-
Spring Boot企业级开发教程-第一章 Spring Boot 开发入门
1.1 Spring Boot概述和优点
- 简介
Spring Boot是 基于Spring框架 开发的全新框架,其设计目的是简新Spring应用的初始化搭建和开发过程。
Spring Boot整合了许多框架和第三方库配置,几乎可以达到“开箱即用”。 - Spring Boot优点
- 可快速构建独立的Spring应用
- 直接嵌入Tomcat、Jettyi和Undertow服务器(无需部署WAR文件,可以直接把项目打成jar包)
- 提供依赖启动器简化构建配置
- 极大程度的自动化配置Spring和第三方库
- 提供生产就绪功能
- 极少的代码生成和XML配置
1.2 Spring Boot入门程序
1.2.1 环境准备
- JDK 1.8.0_201(及以上版本)
Apache Maven 3.6.0
IntelliJ IDEA Ultimate旗舰版 - 初始化Maven设置
- 单击【Configure】→【Project Defaults】→【Settings】进入设置Maven界面

- 初始化Maven设置
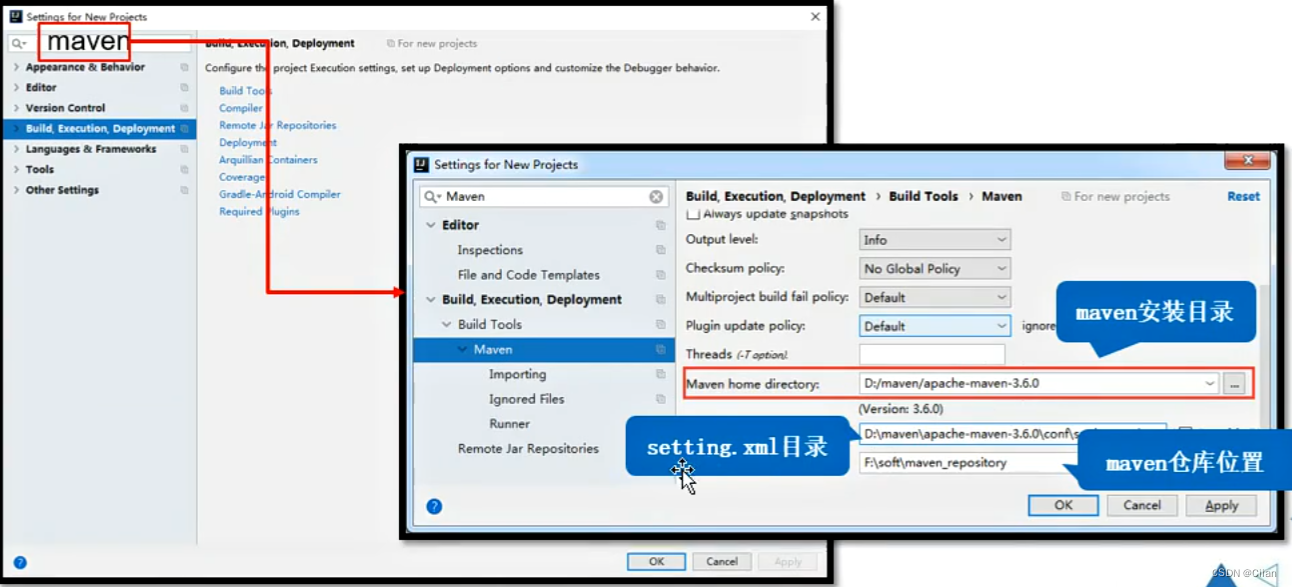
- 单击【Configure】→【Project Defaults】→【Settings】进入设置Maven界面
- 初始化JDK设置
- (1)【Configure】→【Project Defaults】→【Project Structure】进入JDK设置页

- (2)在界面左侧选择【Project Settings】一【Project】选项
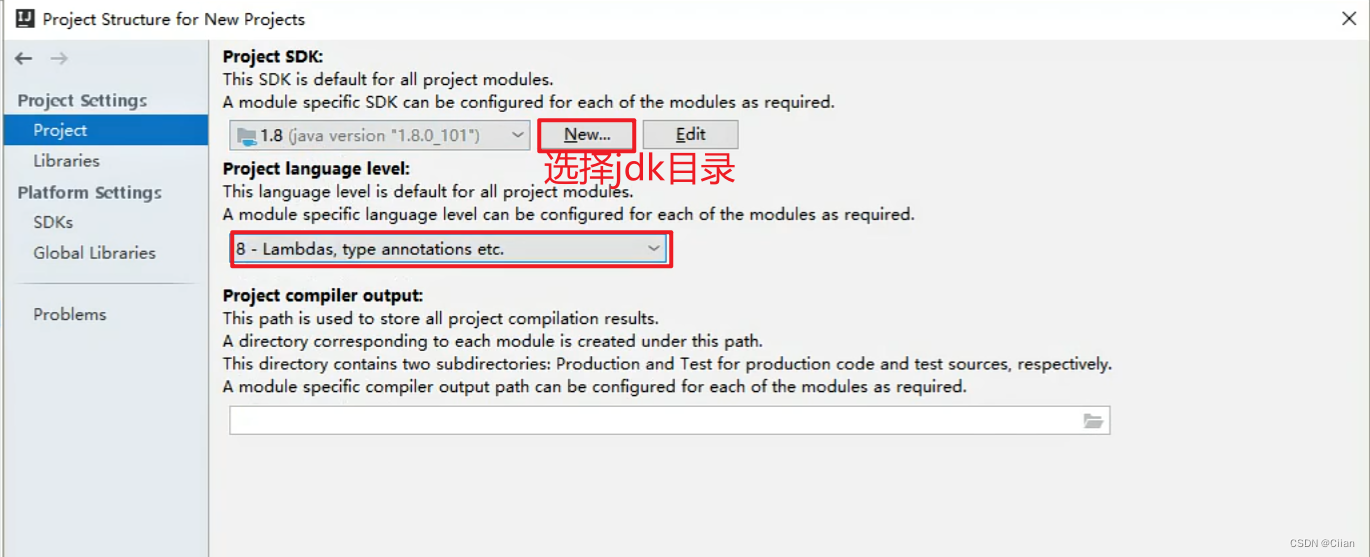
- (1)【Configure】→【Project Defaults】→【Project Structure】进入JDK设置页
1.2.2 使用Maven方式构建Spring Boot项目
搭建步骤
- 创建Maven项目

- 在pom.xml中添加Spring Boot相关依赖
<parent> <groupId>org.springframework.bootgroupId> <artifactId>spring-boot-starter-parsntartifactId> <version>2.1.3.RELEASEversion> parent> <dependencies> <dependency> <groupId>org.springframework.bootgroupId> <artifactId>spring-boot-starter-webartifactId> dependency> dependencies>- 1
- 2
- 3
- 4
- 5
- 6
- 7
- 8
- 9
- 10
- 11
- 12
- 13
- 14
- 15
- 16
- 17
- 18
- 19
- 20
3.编写主程序启动类
# ManualChapterApplication.java import org.springframework.boot.SpringApplication; import org.springframework.boot.autoconfigure.SpringBootApplication; @SpringBootApplication //标注该类为王程序启动类 public class ManualChapterApplication{ public static void main(String[]args){ SpringApplication.run(ManualChapterApplication.class); } }- 1
- 2
- 3
- 4
- 5
- 6
- 7
- 8
- 9
- 10
- 11
- 创建一个用于Web访问的Controller
# HelloController.java import org.springframework.web.bind.annotation.GetMapping: import org.springframework.web.bind.annotation.RestController; @RestController //该注解为组合注解:@ResponseBody+@Controller public class HelloController{ @GetMapping("/he1lo") //GetMapping:相当于RequestMapping(value="/hello”,ReqeustMethod.Get) public String hello(){ return "hello spring boot"; } }- 1
- 2
- 3
- 4
- 5
- 6
- 7
- 8
- 9
- 10
- 11
- 12
- 13
5.运行项目
在ManualChapterApplication类中运行,即可在浏览器中打开网页localhost:8080/hello1.2.3 使用Spring Initializr方式构建Spring Boot项目
搭建步骤:
- 创建Spring Boot项目
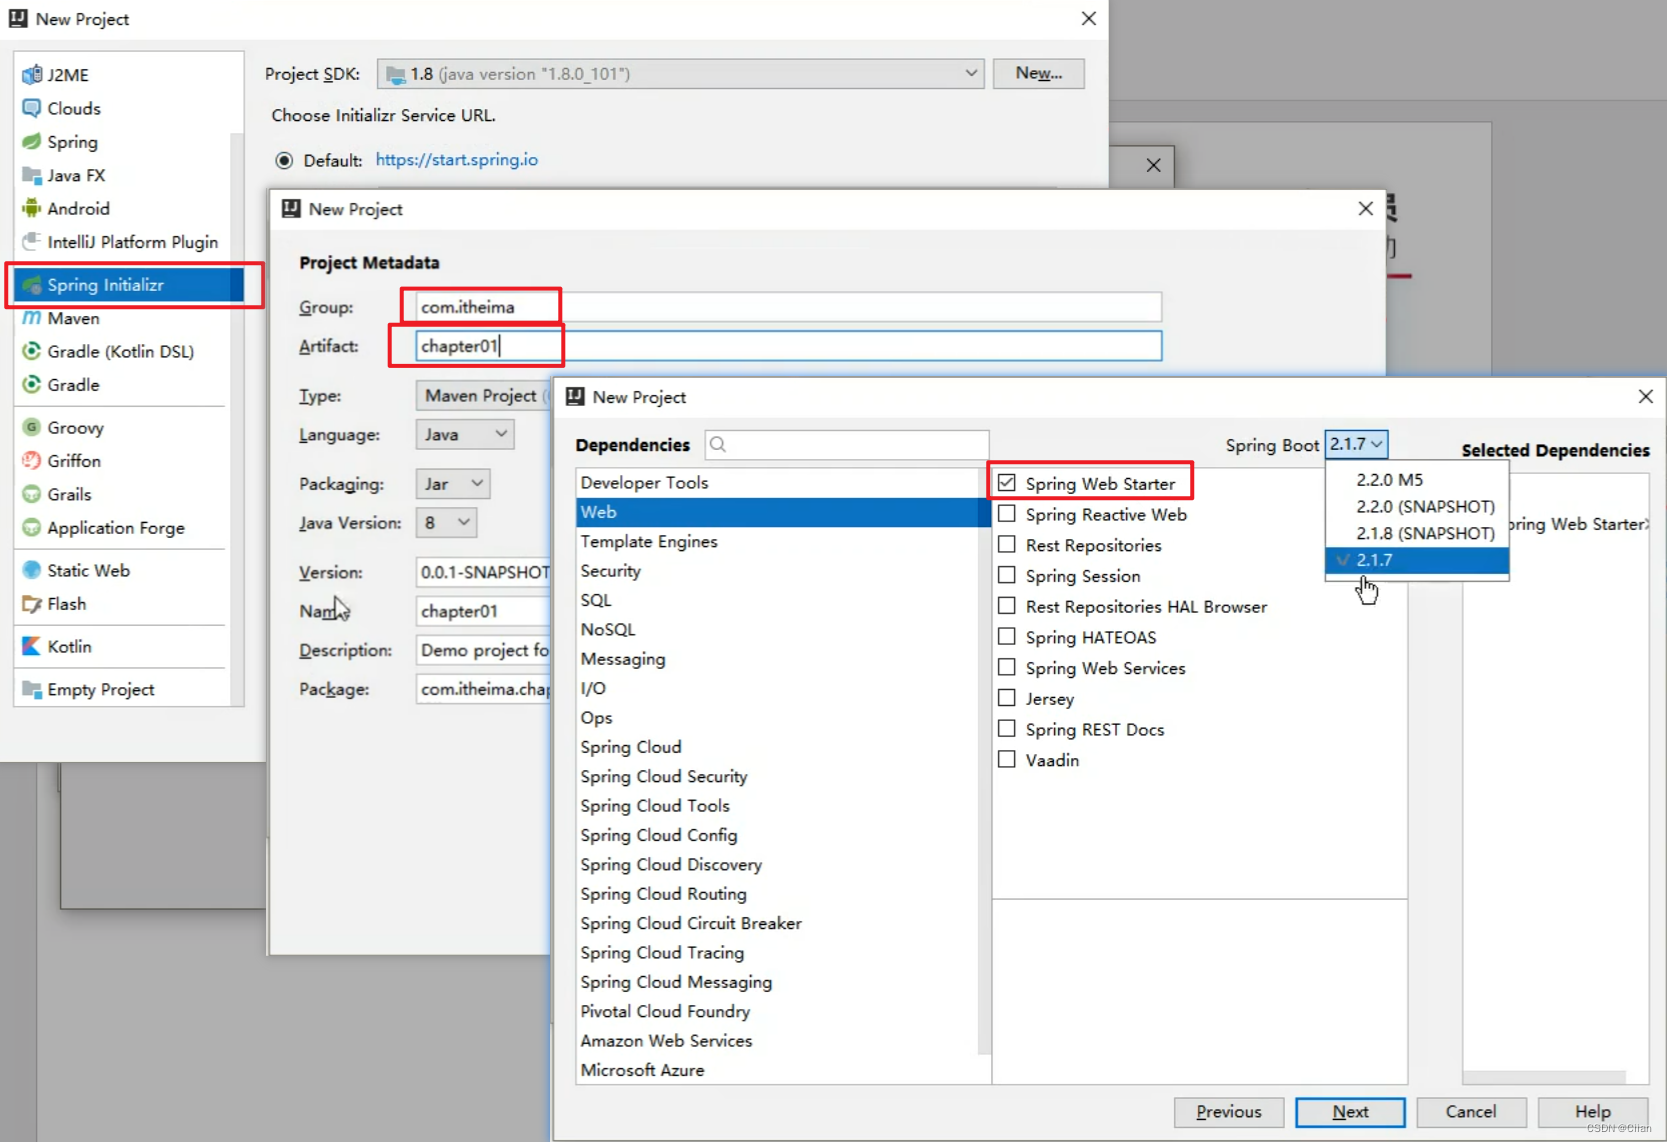
- 创建好的项目已经帮我们写好了主程序启动类(项目启动类) -Application,在java包下
2.创建一个用于Web访问的Controller
import org.springframework.web.bind.annotation.GetMapping; import org.springframework.web.bind.annotation.RestController; @RestController public class HelloController{ @GetMapping("/he1lo") public String hello(){ return "hello spring Boot"; } }- 1
- 2
- 3
- 4
- 5
- 6
- 7
- 8
- 9
- 10
- 11
添加Springwebstarter依赖会自动完成一些配置,如IoC注解扫描,这个扫描只会扫描项目启动类所在的包及其子包,所以Controller需要放在项目启动类所在包及其子包内
3. 运行项目
在项目启动类中运行mai函数,然后在浏览器中打开网页localhost:8080/hello注解
@Controller 注解
@Controller : 加在类上面的注解,使得类里面的每个方法都返回一个视图页面。
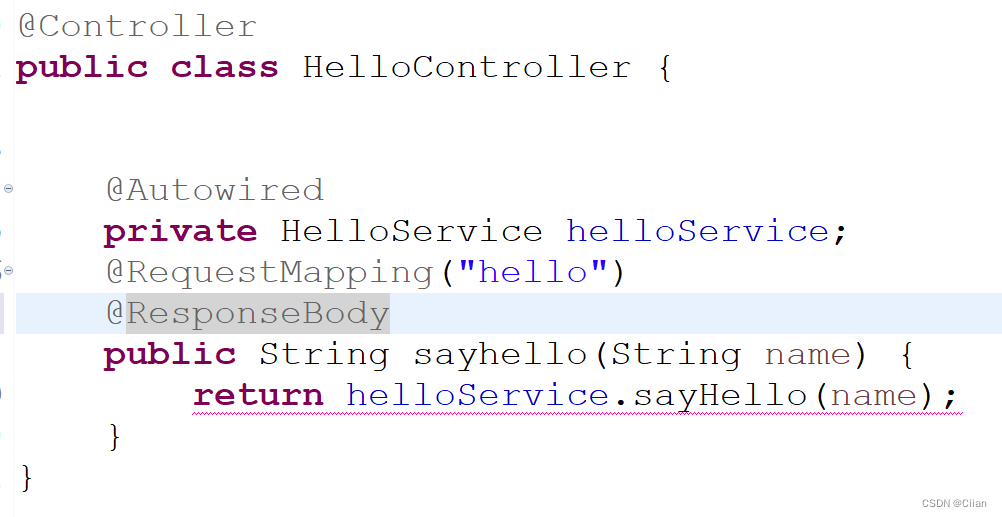
但是在实际开发中,我们一般只是让后端的方法返回给前端是查询的数据,而不是一个新的视图页面。如果使用 @Controller 注解结合 @ResponseBody,就可以让这个方法返回给前端的不是一个视图,而是给前端传递查询到的数据。-
@ResponseBody 注解可以加到 Controller 类上或者是 Controller 层的方法上。
-
@ResponseBody 添加到类上:代表这个类中所有的方法都返回的数据,而不是视图。
@ResponseBody 添加到方法上:代表只有这个方法返回的是数据,其他没有声明的返回的还是视图。
@RestController
从 Spring 4.0 以后产生的,用来将 json/xml数据发送到前台页面,而不是返回视图页面。它相当于 @Controller 和 @ResponseBody。
@RestController 加在类上面的注解,使得类里面的每个方法都将 json/xml 返回数据加返回到前台页面中。所以在实际开发中,我们一般都使用这个注解。@RequestMapping(“路径信息”)
@RequestMapping 来映射请求,也就是通过它来指定控制器可以处理哪些 URL 请求。
这个注解可以使用在 Controller 层的类或者方法上。注解在类上,表示类中的所有响应请求的方法都是以该地址作为父路径(模块路径)。
六个基本属性:属性名: 描述: value(path) 指定请求的实际访问地址,默认@RequestMapping(“url”)的值url即为value的值。指定的地址可以是 URI Template 模式。 method 指定请求的method类型,主要有 GET、POST、DELETE、PUT等; params 指定request中必须包含某些参数值,包含才让该方法处理请求。 headers 指定request中必须包含某些指定的header值,包含才能让该方法处理请求。 consumes 指定处理请求的提交内容类型(Content-Type),例如:application/json, text/html; produces 指定返回的内容类型,当且仅当request请求头中的(Accept)类型中包含该指定类型才返回; @GetMapping与@PostMapping注解
@GetMapping(“getUser”)与@RequestMapping(value = “getUser”,method = RequestMethod.GET)是一样的
@PostMapping(“getUser”)与@RequestMapping(value = “getUser”,method = RequestMethod.POST)是一样的
当然还有@DeleteMapping @PatchMapping等注解,对应各种访问方式1.3 单元测试与热部署
1.3.1单元测试
- 搭建步骤
- 在pom文件中添加spring-boot-starter-test测试启动器
<dependency> <groupId>org.springframework.bootgroupId> <artifactId>spring-boot-starter-testartifactId> <scope>testscope> dependency>- 1
- 2
- 3
- 4
- 5
- 编写单元测试类
//测试启动器加载Spring Booti测试注解 @Run With(SpringRum.er.clss) //标记SpringBoot单元测试,加载项目的ApplicationContext上下文环境 @SpringBootTest public class Chapter01ApplicationTests{ @Test public void contextLoads(){ } }- 1
- 2
- 3
- 4
- 5
- 6
- 7
- 8
- 9
- 编写单元测试方法
//测试启动器加载Spring Booti测试注解 @Run With(SpringRum.er.clss) //标记SpringBoot单元测试,加载项目的ApplicationContext上下文环境 @SpringBootTest public class Chapter01ApplicationTests{ @Autowired private HelloController helloController; @Test public void contextLoads(){ String hello = helloController.hello(); Sout(hello); } }- 1
- 2
- 3
- 4
- 5
- 6
- 7
- 8
- 9
- 10
- 11
- 12
- 13
- 运行结果
1.3.2 热部署
1.在pom文件中添加spring-boot-devtools热部署依赖
<dependency> <groupId>org.springframework.bootgroupId> <artifactId>spring-boot-devtoolsartifactId> dependency>- 1
- 2
- 3
- 4
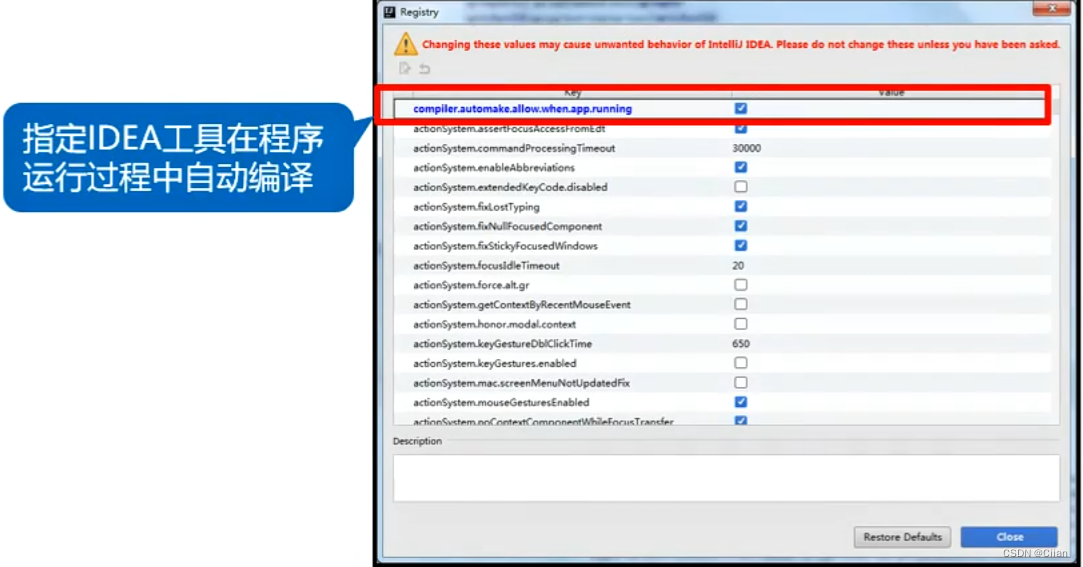
2.IDEA中热部署设置
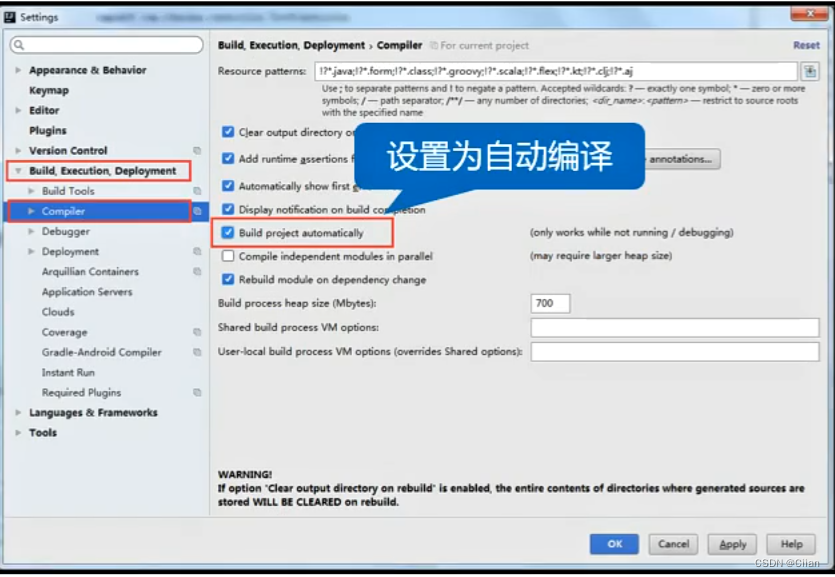
使用快捷键“Ctrl+Shift+At+/”打开Maintenance.选项框,选中并打开Registryl页面。
3.热部署测试
1.4 Spring Boot原理分析
1.4.1 Spring Boot依赖管理
- 1、spring-boot-starter-parent依赖
<parent> <groupId>org.springframework.bootgroupId> <artifactId>spring-boot-starter-parentartifactId> <version>2.1.3.RELEASEversion> <relativePath> <parent>- 1
- 2
- 3
- 4
- 5
- 6
- 7
spring-boot-starter–parent是通过:标签对一些常用技术框架的依赖文件进行了统一版本号管理。
- 2、spring-boot-starter-web依赖
<dependency> <groupId>org.springframework.bootgroupId> <artifactId>spring-boot-starter-webartifactId> dependency>- 1
- 2
- 3
- 4
spring-boot-starter–web依赖启动器的主要作用是提供Web开发场景所需的底层所有依赖文件,它对Wb开发场景所需的依赖文件进行了统一管理。
1.4.2 Spring Boot自动配置
Spring Boot应用的启动入口是 @SpringBootApplication 注解标注类中的main()方法;
@SpringBootApplication能够扫描Spring组件并自动配置Spring Boot。
@SpringBootApplication注解是一个组合注解,
包含@Spring BootConfiguration、@EnableAutoConfiguration、@ComponentScan.三个核心注解- 1.@SpringBootConfiguration注解
- @SpringBootConfiguration注解表示Spring Boot配置类。
- 作用:标识一个可以被组件扫描器扫描的配置类
- 2.@EnableAutoConfiguration注解
@EnableAutoConfiguration注解表示开启自动配置功能
包含@AutoConfigurationPackage和@Import两个核心注解。- 1@AutoConfigurationPackage注解的主要作用是获取项目主程序启动类所在根目录,从而指定后续组件扫描器要扫描的包位置。
- 因此在定义项目包结构时,要求定义的包结构非常规范,项目主程序启动类要定义在最外层的根目录位置,然后在根目录位置内部建立子包和类进行业务开发,这样才能够保证定义的类能够被组件扫描器扫描。
- 2@Import((AutoConfigurationlmportSelector.class))
- 其主要作用是筛选出当前项目环境需要启动的自动配置类XxxAutoConfiguration,从而实现当前项目运行所需的自动配置环境。
- 1@AutoConfigurationPackage注解的主要作用是获取项目主程序启动类所在根目录,从而指定后续组件扫描器要扫描的包位置。
- 3 @ComponentScan注解
- @ComponentScan注解是一个组件包扫描器,用于将指定包中的注解类自动装配到Spring的Bean容器中。
@ComponentScan注解具体扫描的包的根路径由Spring Boot项目主程序启动类所在包位置决定,在扫描过程中由前面介绍的 @AutoConfigurationPackage 注解进行解析,从而得到Spring Boot项目主程序启动类所在包的具体位置。
1.4.3 Spring Boot执行流程
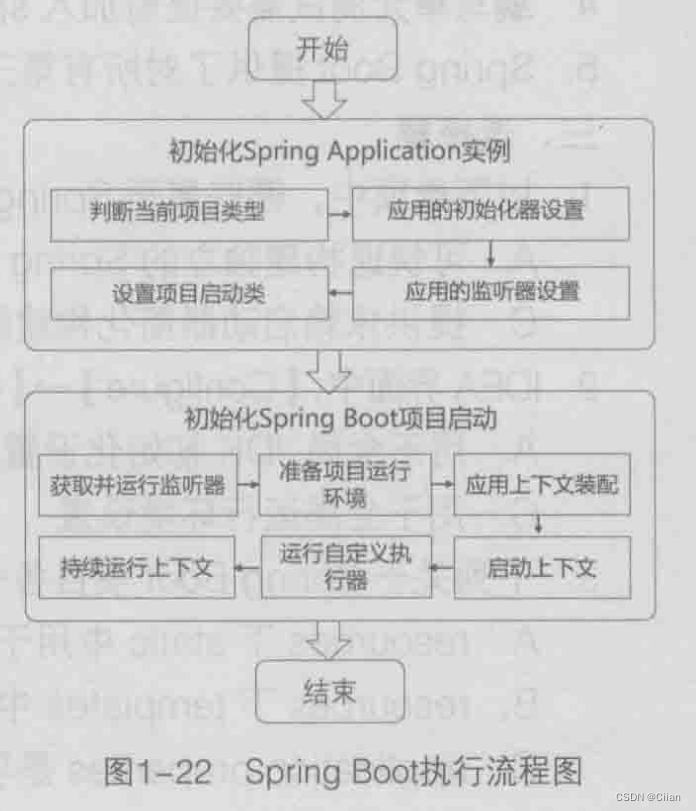
- 每个Spring Boot项目都有一个主程序启动类,在主程序启动类中的main()方法中通过执行SpringApplication.run()即可启动整个Spring Boot程序。而SpringApplication.run()方法内部其实执行了两个操作,分别是SpringApplication实例的初始化和调用run()启动项目,这两个阶段的实现具体说明如下。
1.SpringApplication实例的初始化
- (1)
this.webApplicationType = WebApplicationType.deduceFromClasspath()- 用于判断当前webApplicationType应用的类型。deduceFromClasspath()方法用于查看Classpath类路径下是否存在某个特征类,从而判断当前webApplicationType类型是SERVLET应用(Spring5之前的传统MVC应用)还是REACTIVE应用(Spring5开始出现的WebFlux交互式应用)。
- (2)
this.setInitializers(this.getSpringFactoriesInstances(ApplicationContextInitializer.class))- 用于设置SpringApplication应用的初始化器。在初始化器设置过程中,会使用Spring类加载器SpringFactoriesLoader从META-INF/spring.factories类路径下的META-lNF下的spring.factores文件中获取所有可用的应用初始化器类ApplicationContextInitializer.
- (3)
this.setListeners(this.getSpringFactoriesInstances(ApplicationListener.class))- 用于设置SpringApplication应用的监听器。监听器设置的过程与上一步初始化器设置的过程基本一样,获取所有可用的监听器类ApplicationListener。
- (4)
this.mainApplicationClass = this.deduceMainApplicationClass()- 用于推断并设置项目main()方法启动的主程序启动类。
2.项目的初始化启动
- (1)this.getRunListeners(args)和listeners.starting()方法主要用于获取 SpringApplication实例初始化过程中初始化的SpringApplicationRunListener监听器并运行。
- (2)this.prepareEnvironment((listeners,applicationArguments)方法主要用于 对项目运行环境进行预设置 ,同时通过this.configurelgnoreBeanInfo(environment)方法排除一些不需要的运行环境。
- (3)this.createApplicationContext()方法及下面加粗部分代码,主要作用是对项目应用上下文Application Context的预配置,包括先创建应用上下文环境ApplicationContext,接着使用之
前初始化设置的context(应用上下文环境人)environment(项目运行环境人listeners(运行监听器)applicationArguments(项目参数)和printedBanner(项目图标信息)进行应用上下文的组装配置,并刷新配置。 - (4)listeners.started(context)方法用于使运行监听器SpringApplicationRunListener启动配置好的应用上下文ApplicationContext。.
- (5)this.callRunners(context,applicationArguments)方法用于调用项目中自定义的执行器XxxRunner类,使得在项目启动完成后立即执行一些特定程序。其中,Spring Boot提供的执行器接口有ApplicationRunner和CommandLineRunner两种,在使用时只需要自定义一个执行器类实现其中一个接口并重写对应的run()方法接口,Spring Boot项目启动后即会立即执行这些特定程序。
- (6)listeners.running(context)方法表示在前面一切初始化启动都没有问题的情况下,使用
运行监听器SpringApplicationRunListener持续运行配置好的应用上下文ApplicationContext,
这样整个Spring Boot项目就正式启动完成了。与此同时,经过初始化封装设置的应用上下文
ApplicationContext也处于活跃状态。
小结
- 了解Spring Boot概述和优点
- 掌握Spring Boot的项目构建
- 掌握Spring Boot的单元测试和热部署
- 熟悉Spring Boot的依赖管理、自动化配置原理以及执行流程
- 简介
-
相关阅读:
2020 年 Java 面试题集锦(金九银十)
神经网络研究主要内容,神经网络的起源和发展
计算机毕业设计Java的工资管理系统(源码+系统+mysql数据库+lw文档)
win10磁盘分区解决方案
Web自动化测试-掌握selenium工具用法,使用WebDriver测试Chrome/FireFox网页(Java
关于左侧菜单的开发和动态路由注册
分治法思考题
2个器件,做1个恒流源
web安全学习笔记【17】——信息打点(7)
YOLOv5结合GradCAM热力图可视化
- 原文地址:https://blog.csdn.net/rc4gyyc/article/details/135612711
