-
微服务技术栈SpringCloud+RabbitMQ+Docker+Redis+搜索+分布式(四):消息队列MQ
一、消息队列MQ
同步调用的优点:时效性较强,可以立即得到结果;
同步调用的问题:耦合度高;性能和吞吐能力下降;有额外的资源消耗;有级联失败问题;异步调用常见实现就是事件驱动模式
异步通信的优点:耦合度低;吞吐量提升;故障隔离;流量削峰;
异步通信的缺点:依赖于Broker的可靠性、安全性、吞吐能力;架构复杂了,业务没有明显的流程线,不好追踪管理;
二、RabbitMQ
RabbitMQ的官网:https://www.rabbitmq.com/


2.1 单机部署
我们在Centos7虚拟机中使用Docker来安装。
- 下载镜像
方式一:在线拉取
docker pull rabbitmq:3-management- 1
方式二:从本地加载
在课前资料已经提供了镜像包:
上传到虚拟机中后,使用命令加载镜像即可:docker load -i mq.tar- 1
- 安装MQ
执行下面的命令来运行MQ容器:
docker run \ -e RABBITMQ_DEFAULT_USER=itcast \ -e RABBITMQ_DEFAULT_PASS=123321 \ --name mq \ --hostname mq1 \ -p 15672:15672 \ -p 5672:5672 \ -d \ rabbitmq:3-management- 1
- 2
- 3
- 4
- 5
- 6
- 7
- 8
- 9
- 通过 主机IP:15672 访问RabbitMQ的管理界面

2.2 消息模型

在官网 https://www.rabbitmq.com/ 中,选择文件 -> 入门,可看见案例demo

下面演示:官网的基本消息队列模型

publisherpackage cn.itcast.mq.helloworld; import com.rabbitmq.client.Channel; import com.rabbitmq.client.Connection; import com.rabbitmq.client.ConnectionFactory; import org.junit.Test; import java.io.IOException; import java.util.concurrent.TimeoutException; public class PublisherTest { @Test public void testSendMessage() throws IOException, TimeoutException { // 1.建立连接 ConnectionFactory factory = new ConnectionFactory(); // 1.1.设置连接参数,分别是:主机名、端口号、vhost、用户名、密码 factory.setHost("192.168.101.6"); factory.setPort(5672); factory.setVirtualHost("/"); //虚拟主机 factory.setUsername("itcast"); factory.setPassword("123321"); // 1.2.建立连接 Connection connection = factory.newConnection(); // 2.创建通道Channel Channel channel = connection.createChannel(); // 3.创建队列 String queueName = "simple.queue"; channel.queueDeclare(queueName, false, false, false, null); // 4.发送消息 String message = "hello, rabbitmq!"; channel.basicPublish("", queueName, null, message.getBytes()); System.out.println("发送消息成功:【" + message + "】"); // 5.关闭通道和连接 channel.close(); connection.close(); } }- 1
- 2
- 3
- 4
- 5
- 6
- 7
- 8
- 9
- 10
- 11
- 12
- 13
- 14
- 15
- 16
- 17
- 18
- 19
- 20
- 21
- 22
- 23
- 24
- 25
- 26
- 27
- 28
- 29
- 30
- 31
- 32
- 33
- 34
- 35
- 36
- 37
- 38
- 39
- 40
- 41
- 42
- 43
consumerpackage cn.itcast.mq.helloworld; import com.rabbitmq.client.*; import java.io.IOException; import java.util.concurrent.TimeoutException; public class ConsumerTest { public static void main(String[] args) throws IOException, TimeoutException { // 1.建立连接 ConnectionFactory factory = new ConnectionFactory(); // 1.1.设置连接参数,分别是:主机名、端口号、vhost、用户名、密码 factory.setHost("192.168.101.6"); factory.setPort(5672); factory.setVirtualHost("/"); factory.setUsername("itcast"); factory.setPassword("123321"); // 1.2.建立连接 Connection connection = factory.newConnection(); // 2.创建通道Channel Channel channel = connection.createChannel(); // 3.创建队列 String queueName = "simple.queue"; channel.queueDeclare(queueName, false, false, false, null); // 4.订阅消息 channel.basicConsume(queueName, true, new DefaultConsumer(channel){ @Override public void handleDelivery(String consumerTag, Envelope envelope, AMQP.BasicProperties properties, byte[] body) throws IOException { // 5.处理消息 String message = new String(body); System.out.println("接收到消息:【" + message + "】"); } }); System.out.println("等待接收消息。。。。"); } }- 1
- 2
- 3
- 4
- 5
- 6
- 7
- 8
- 9
- 10
- 11
- 12
- 13
- 14
- 15
- 16
- 17
- 18
- 19
- 20
- 21
- 22
- 23
- 24
- 25
- 26
- 27
- 28
- 29
- 30
- 31
- 32
- 33
- 34
- 35
- 36
- 37
- 38
- 39
- 40
- 41
- 42

三、SpringAMAP

3.1 简单消息队列

流程如下:
- 在父工程中引入spring-amqp的依赖
<!--AMQP依赖,包含RabbitMQ--> <dependency> <groupId>org.springframework.boot</groupId> <artifactId>spring-boot-starter-amqp</artifactId> </dependency>- 1
- 2
- 3
- 4
- 5
- 在publisher和consumer服务中编写application.yml,添加mq连接信息
spring: rabbitmq: host: 192.168.150.101 # rabbitMQ的ip地址 port: 5672 # 端口 username: itcast password: 123321 virtual-host: / # 虚拟主机- 1
- 2
- 3
- 4
- 5
- 6
- 7
- 在publisher服务中新建一个测试类,编写测试方法,然后运行测试方法发送消息
@RunWith(SpringRunner.class) @SpringBootTest public class SpringAmqpTest { @Autowired private RabbitTemplate rabbitTemplate; @Test public void testSendMessage2SimpleQueue() { String queueName = "simple.queue"; // 队列名称 String message = "hello, spring amqp!"; // 消息 rabbitTemplate.convertAndSend(queueName, message); } }- 1
- 2
- 3
- 4
- 5
- 6
- 7
- 8
- 9
- 10
- 11
- 12
- 13
- 在consumer服务中新建一个类,编写消费逻辑,然后启动服务。 定义类,添加@Component注解;类中声明方法,添加@RabbitListener注解,方法参数就时消息。
注意:消息一旦消费就会从队列删除,RabbitMQ没有消息回溯功能
@Component public class SpringRabbitListener { @RabbitListener(queues = "simple.queue") public void listenSimpleQueue(String msg) { System.out.println("消费者接收到simple.queue的消息:【" + msg + "】"); } }- 1
- 2
- 3
- 4
- 5
- 6
- 7
- 8
3.2 工作消息队列


- 前面步骤同上,编写publisher
@RunWith(SpringRunner.class) @SpringBootTest public class SpringAmqpTest { @Autowired private RabbitTemplate rabbitTemplate; @Test public void testSendMessage2WorkQueue() throws InterruptedException { String queueName = "simple.queue"; String message = "hello, message__"; for (int i = 1; i <= 50; i++) { rabbitTemplate.convertAndSend(queueName, message + i); Thread.sleep(20); } } }- 1
- 2
- 3
- 4
- 5
- 6
- 7
- 8
- 9
- 10
- 11
- 12
- 13
- 14
- 15
- 16
- 设置两个消费者
@Component public class SpringRabbitListener { @RabbitListener(queues = "simple.queue") public void listenWorkQueue1(String msg) throws InterruptedException { System.out.println("消费者1接收到消息:【" + msg + "】" + LocalTime.now()); Thread.sleep(20); } @RabbitListener(queues = "simple.queue") public void listenWorkQueue2(String msg) throws InterruptedException { System.err.println("消费者2........接收到消息:【" + msg + "】" + LocalTime.now()); Thread.sleep(200); }- 1
- 2
- 3
- 4
- 5
- 6
- 7
- 8
- 9
- 10
- 11
- 12
- 13
- 14
- 15
- 由于消费者存在
消息预取机制【即:消费者会将队列中的消息提前取出来,再处理】导致两个消费者处理消息的数量一致【即:一半一半】,因此需要在消费者的application设置prefetch=1如下【用来保证每次处理完一条消息再取消息】,这样消费者1比消费者2处理的消息更多。
spring: rabbitmq: host: 192.168.150.101 # rabbitMQ的ip地址 port: 5672 # 端口 username: itcast password: 123321 virtual-host: / # 虚拟主机 listener: simple: prefetch: 1 # 每次只能获取一条消息,处理完成后才能获取下一个消息,该用于解决消息预取机制- 1
- 2
- 3
- 4
- 5
- 6
- 7
- 8
- 9
- 10
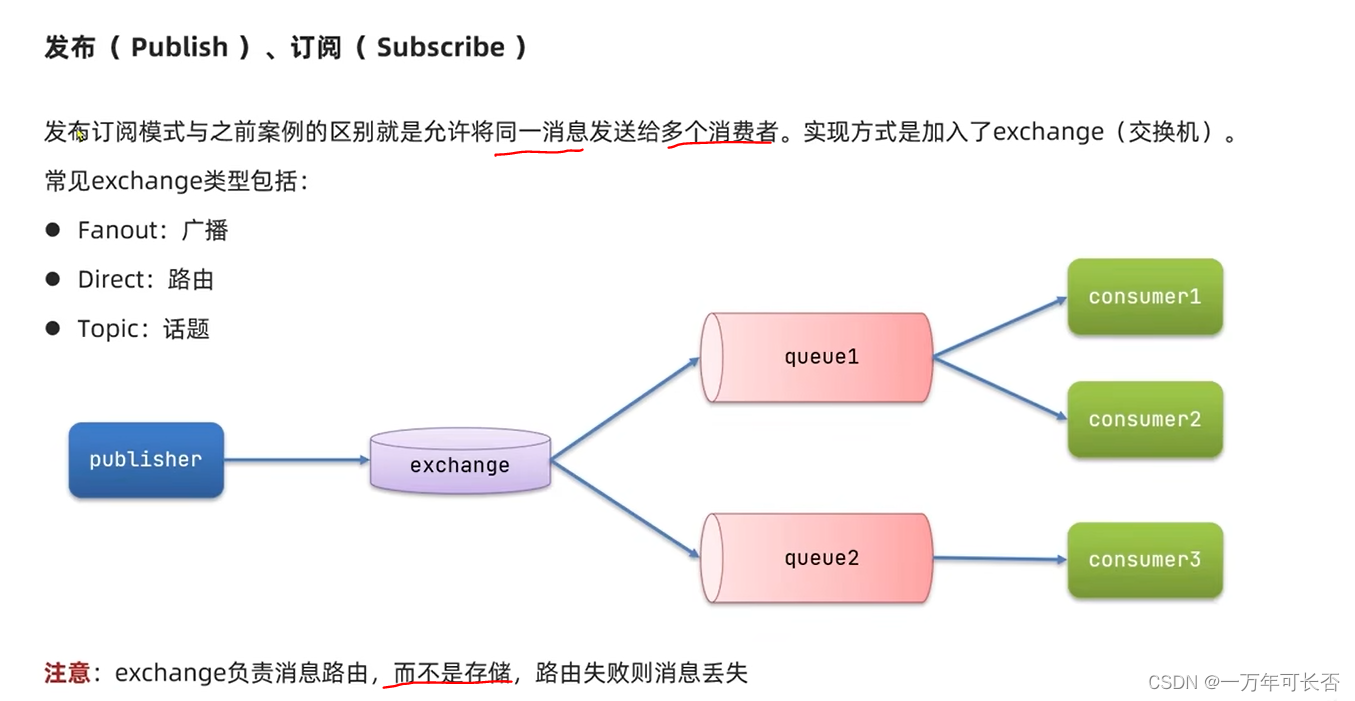
3.3 发布-订阅模型:FanoutExchange 广播交换机


- 前面步骤同上,编写publisher
@RunWith(SpringRunner.class) @SpringBootTest public class SpringAmqpTest { @Autowired private RabbitTemplate rabbitTemplate; @Test public void testSendFanoutExchange() { // 交换机名称 String exchangeName = "itcast.fanout"; // 消息 String message = "hello, every one!"; // 发送消息 rabbitTemplate.convertAndSend(exchangeName, "", message); } }- 1
- 2
- 3
- 4
- 5
- 6
- 7
- 8
- 9
- 10
- 11
- 12
- 13
- 14
- 15
- 声明一个交换机,两个消息队列,并完成绑定,然后设置两个消费者接收消息。最后测试发现两个消费者可以接收发布者的消息
package cn.itcast.mq.config; import org.springframework.amqp.core.Binding; import org.springframework.amqp.core.BindingBuilder; import org.springframework.amqp.core.FanoutExchange; import org.springframework.amqp.core.Queue; import org.springframework.context.annotation.Bean; import org.springframework.context.annotation.Configuration; @Configuration public class FanoutConfig { // 1.声明FanoutExchange交换机 @Bean public FanoutExchange fanoutExchange(){ return new FanoutExchange("itcast.fanout"); } // 2.声明第1个队列 注意:此方法名是该队列的唯一ID @Bean public Queue fanoutQueue1(){ return new Queue("fanout.queue1"); } // 3.绑定队列1到交换机 注意:参数名要与上述定义的方法名保持一致 @Bean public Binding fanoutBinding1(Queue fanoutQueue1, FanoutExchange fanoutExchange){ return BindingBuilder .bind(fanoutQueue1) .to(fanoutExchange); } // 声明第2个队列 注意:此方法名是该队列的唯一ID @Bean public Queue fanoutQueue2(){ return new Queue("fanout.queue2"); } // 绑定队列2到交换机 注意:参数名要与上述定义的方法名保持一致 @Bean public Binding fanoutBinding2(Queue fanoutQueue2, FanoutExchange fanoutExchange){ return BindingBuilder .bind(fanoutQueue2) .to(fanoutExchange); } }- 1
- 2
- 3
- 4
- 5
- 6
- 7
- 8
- 9
- 10
- 11
- 12
- 13
- 14
- 15
- 16
- 17
- 18
- 19
- 20
- 21
- 22
- 23
- 24
- 25
- 26
- 27
- 28
- 29
- 30
- 31
- 32
- 33
- 34
- 35
- 36
- 37
- 38
- 39
- 40
- 41
- 42
- 43
- 44
- 45
- 46
@Component public class SpringRabbitListener { @RabbitListener(queues = "fanout.queue1") public void listenFanoutQueue1(String msg) { System.out.println("消费者接收到fanout.queue1的消息:【" + msg + "】"); } @RabbitListener(queues = "fanout.queue2") public void listenFanoutQueue2(String msg) { System.out.println("消费者接收到fanout.queue2的消息:【" + msg + "】"); }- 1
- 2
- 3
- 4
- 5
- 6
- 7
- 8
- 9
- 10

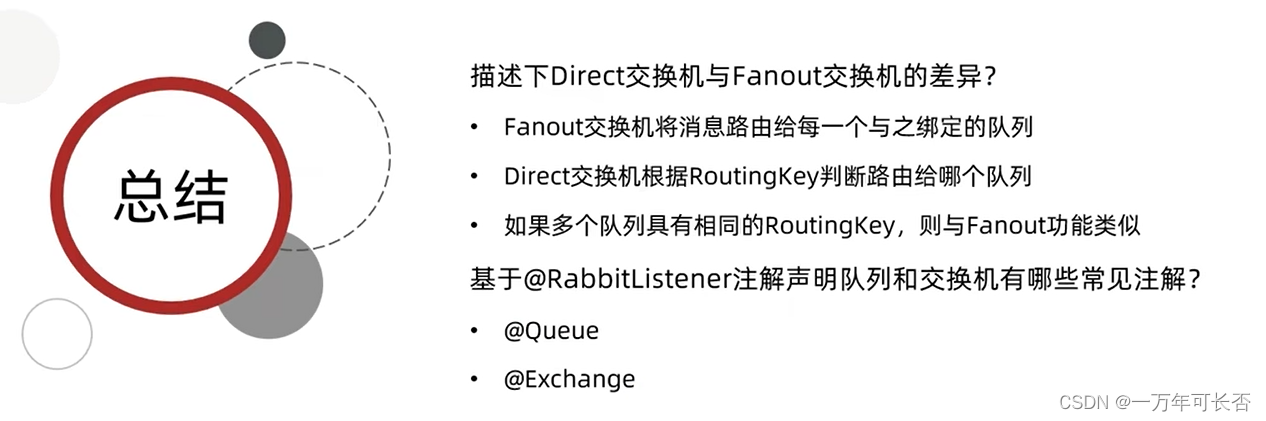
3.4 发布-订阅模型:DirectExchange 路由交换机


- 前面步骤同上,编写publisher
@RunWith(SpringRunner.class) @SpringBootTest public class SpringAmqpTest { @Autowired private RabbitTemplate rabbitTemplate; @Test public void testSendDirectExchange() { // 交换机名称 String exchangeName = "itcast.direct"; // 消息 String message = "hello, blue!"; // 发送消息 rabbitTemplate.convertAndSend(exchangeName, "blue", message); } }- 1
- 2
- 3
- 4
- 5
- 6
- 7
- 8
- 9
- 10
- 11
- 12
- 13
- 14
- 15
- 16
- 设置两个消费者,并且用@RabbitListener注解的方式声明 Binding Queue Exchange Key。当发送者发送key=blue的消息时,只有消费者1收到。
@Component public class SpringRabbitListener { /** * 4.发布-订阅模型:Direct 路由 * 用注解的方式声明 Binding Queue Exchange Key */ @RabbitListener(bindings = @QueueBinding( value = @Queue(name = "direct.queue1"), exchange = @Exchange(name = "itcast.direct", type = ExchangeTypes.DIRECT), key = {"red", "blue"} )) // type表示哪种交换机 public void listenDirectQueue1(String msg){ System.out.println("消费者接收到direct.queue1的消息:【" + msg + "】"); } @RabbitListener(bindings = @QueueBinding( value = @Queue(name = "direct.queue2"), exchange = @Exchange(name = "itcast.direct", type = ExchangeTypes.DIRECT), key = {"red", "yellow"} )) public void listenDirectQueue2(String msg){ System.out.println("消费者接收到direct.queue2的消息:【" + msg + "】"); } }- 1
- 2
- 3
- 4
- 5
- 6
- 7
- 8
- 9
- 10
- 11
- 12
- 13
- 14
- 15
- 16
- 17
- 18
- 19
- 20
- 21
- 22
- 23
- 24
- 25
3.5 发布-订阅模型:TopicExchange 话题交换机


实现消费者1接收中国的所有消息,消费者2接收所有的新闻- 前面步骤同上,编写publisher
@RunWith(SpringRunner.class) @SpringBootTest public class SpringAmqpTest { @Test public void testSendTopicExchange() { // 交换机名称 String exchangeName = "itcast.topic"; // 消息 String message = "今天天气不错,我的心情好极了!"; // 发送消息 rabbitTemplate.convertAndSend(exchangeName, "china.wearther", message); } }- 1
- 2
- 3
- 4
- 5
- 6
- 7
- 8
- 9
- 10
- 11
- 12
- 13
- 设置两个消费者,并且用@RabbitListener注解的方式声明 Binding Queue Exchange Key。当发送者发送key=china.wearther的消息时,只有消费者1收到。
@Component public class SpringRabbitListener { /** * 5.发布-订阅模型:topic 路由 * 用注解的方式声明 Binding Queue Exchange Key */ @RabbitListener(bindings = @QueueBinding( value = @Queue(name = "topic.queue1"), exchange = @Exchange(name = "itcast.topic", type = ExchangeTypes.TOPIC), key = "china.#" )) public void listenTopicQueue1(String msg){ System.out.println("消费者接收到topic.queue1的消息:【" + msg + "】"); } @RabbitListener(bindings = @QueueBinding( value = @Queue(name = "topic.queue2"), exchange = @Exchange(name = "itcast.topic", type = ExchangeTypes.TOPIC), key = "#.news" )) public void listenTopicQueue2(String msg){ System.out.println("消费者接收到topic.queue2的消息:【" + msg + "】"); } }- 1
- 2
- 3
- 4
- 5
- 6
- 7
- 8
- 9
- 10
- 11
- 12
- 13
- 14
- 15
- 16
- 17
- 18
- 19
- 20
- 21
- 22
- 23
- 24
3.6 消息转换器
上述传递的都是String类型的,而实际需要传递Object类型的数据,因此我么需要对消息进行转换
- 前面步骤同上,编写publisher
@RunWith(SpringRunner.class) @SpringBootTest public class SpringAmqpTest { @Test public void testSendObjectQueue() { Map<String, Object> msg = new HashMap<>(); msg.put("name","小明"); msg.put("age",12); // 发送消息 rabbitTemplate.convertAndSend("object.queue", msg); } }- 1
- 2
- 3
- 4
- 5
- 6
- 7
- 8
- 9
- 10
- 11
- 12
- 设置两个消费者,并且用@RabbitListener注解的方式声明 Binding Queue Exchange Key。当发送者发送key=china.wearther的消息时,只有消费者1收到。
@Component public class SpringRabbitListener { /** * 6.消息转换器 * */ @RabbitListener(queues = "object.queue") public void listenObjectQueue(Map<String,Object> msg){ System.out.println("接收到object.queue的消息:" + msg); } }- 1
- 2
- 3
- 4
- 5
- 6
- 7
- 8
- 9
- 10
- 11
- 但这样存在一个问题publisher发布的数据被序列化,因此我们需要在publisher和consumer的pom文件(或者父工程的pom文件)中添加依赖,并且在Application中反序列化
<!--JSON序列化--> <dependency> <groupId>com.fasterxml.jackson.core</groupId> <artifactId>jackson-databind</artifactId> </dependency>- 1
- 2
- 3
- 4
- 5
@SpringBootApplication public class PublisherApplication { public static void main(String[] args) { SpringApplication.run(PublisherApplication.class); } @Bean public MessageConverter messageConverter(){ return new Jackson2JsonMessageConverter(); } } @SpringBootApplication public class ConsumerApplication { public static void main(String[] args) { SpringApplication.run(ConsumerApplication.class, args); } @Bean public MessageConverter messageConverter(){ return new Jackson2JsonMessageConverter(); } }- 1
- 2
- 3
- 4
- 5
- 6
- 7
- 8
- 9
- 10
- 11
- 12
- 13
- 14
- 15
- 16
- 17
- 18
- 19
- 20
- 21
- 22
- 23

-
相关阅读:
61二次型—— 二次型的规范形
使用Verbs API剖析一个小型ib应用程序
H5互动游戏推荐,适合和产品结合的小游戏
web自动化测试入门篇02——selenium安装教程
一文了解DataStore(Preferences)
Airsonic反向代理问题的解决办法
【Vue】实现商品列表的无限加载
计算机网络(十)——其他重要协议
JavaSE - 数据类型
Excel常用函数
- 原文地址:https://blog.csdn.net/shendaiyan/article/details/136583274
