3.4)Ansible 常用模块
Ansible 默认提供了很多模块来供我们使用。
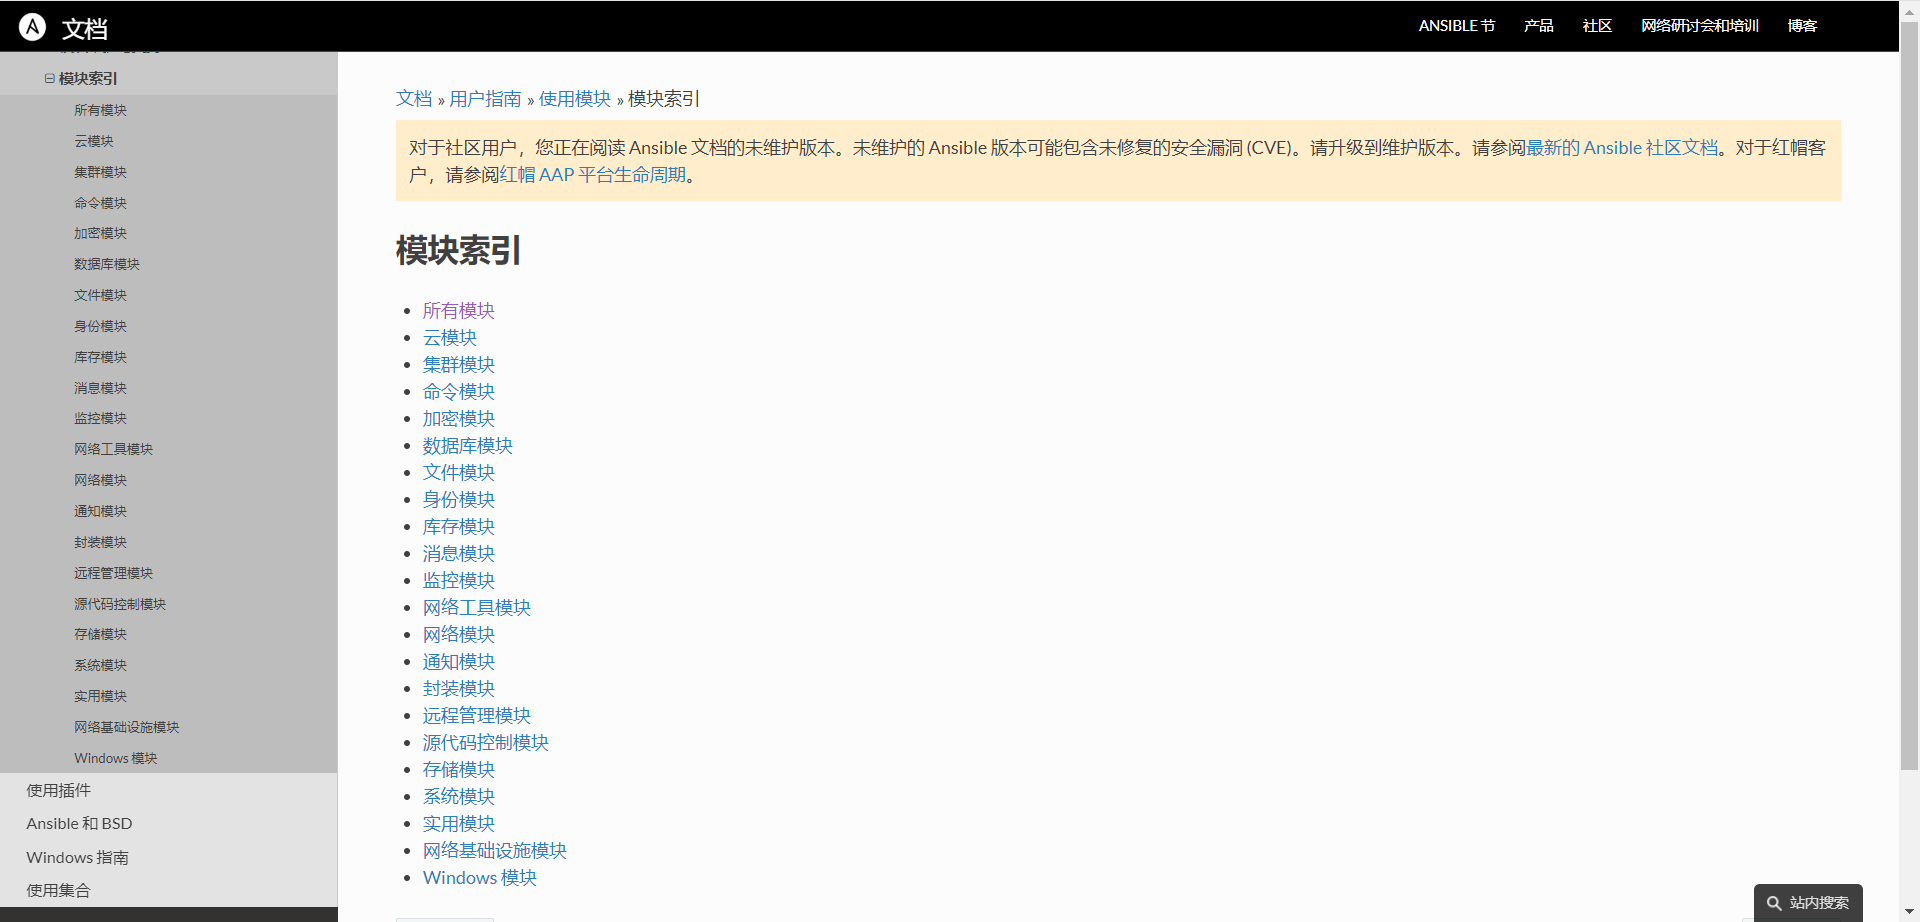
我们可以通过 ansible-doc -l 命令查看到当前 ansible 都支持哪些模块
通过 ansible-doc -s 模块名 可以查看该模块有哪些参数可以使用。
目前 2023 为止:模块总量基本保存在 3387 个。
虽然模块众多,但最常用的模块也就 2 - 30 个而已,针对特定业务只用 10 几个模块。
[root@ansible ~] ansible-doc -l | wc -l
3387
常用模块帮助文档参考:
https://docs.ansible.com/ansible/2.9/modules/modules_by_category.html
https://docs.ansible.com/ansible/2.9/modules/list_of_all_modules.html
3.4.1)Command 模块
Comand 模块不会通过 Shell 处理命令,因此不支持像 $HOME 这样的变量。
以及 < > | ; 和 & 等都是无效的。
功能: 在远程主机执行系统命令,此为默认模块,可忽略 -m 选项
注意: 此命令不支持 $VARNAME < > | ; & 等,建议用 Shell 模块实现
注意: 此模块不具有幂等性
范例:
# command 模块不支持重定向
ansible websrvs -m command -a 'echo hello > /root/hello.log'
ansible websrvs -m command -a 'cat /root/hello.log'
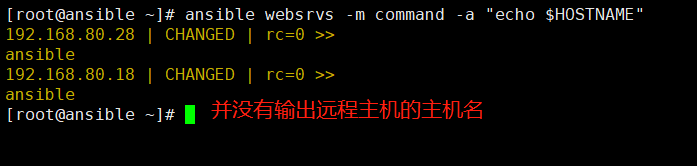
# command 模块不支持变量引用
ansible websrvs -m command -a "echo $HOSTNAME"
# command 模块不支持管道符
ansible websrvs -m command -a 'echo 123456 | passwd --stdin wangj'
# 仅支持简单的 Shell 命令, 且不具备幂等性
# 首行 WARNING 是告知我们所执行的操作可以使用其他模块代替
ansible websrvs -m command -a 'mkdir /data'
ansible websrvs -m command -a 'touch /data/1.log'
ansible websrvs -m command -a 'ls /data'

command 模块的部分参数演示
| 名称 | 必选 | 备注 |
|---|---|---|
| chdir | no | 运行 command 命令前先 cd 到这个目录 |
| creates | no | 如果这个参数对应的文件存在,就不运行 command |
# chdir 参数
# 先切换到 /data 目录, 然后执行 ls -l 命令
ansible websrvs -m command -a 'chdir=/data ls -l'

# creates 参数
# 如果 /data/mysql 目录存在, 则跳过创建.
# 如果 /data/mysql 目录不存在, 则创建 /data/mysql 目录.
ansible websrvs -m command -a 'creates=/data/mysql mkdir /data/mysql'
ansible websrvs -m command -a 'creates=/data/mysql mkdir /data/mysql'

总结:
- command 模块的命令不支持启动 Shell,直接通过 SSH 执行命令
- command 不支持 Bash 的特性,如管道和重定向等功能
- 若需要通过 Shell 运行一个命令,比如 < > | 等,你实际上需要使用 Shell 模块。
- command 模块更安全,因为它不受用户环境的影响
3.4.2)Shell 模块
让远程主机在 Shell 进程下执行命令,从而支持 Shell 的特性,如管道等。
与 command 模块几乎相同,但在执行命令的时候使用的是 /bin/sh。
注意: Command 和 Shell 模块都只能去执行一些非交互式的命令,不能去执行一些交互式的命令,比如 vim 或 top。
功能: 和 command 相似,用 Shell 执行命令,支持各种符号,比如:*,$, >
注意: 此模块不具有幂等性
范例:
# Shell 模块支持变量引用
[root@ansible ~] ansible websrvs -m shell -a 'echo $HOSTNAME'

# Shell 模块支持管道符
[root@ansible ~] ansible websrvs -m shell -a 'useradd wangj'
[root@ansible ~] ansible websrvs -m shell -a 'echo 123456 | passwd --stdin wangj'
[root@ansible ~] ansible websrvs -m shell -a 'ls -l /etc/shadow'

# Shell 模块支持重定向
[root@ansible ~] ansible websrvs -m shell -a 'echo hello > /data/hello.log'
[root@ansible ~] ansible websrvs -m shell -a 'cat /data/hello.log'

注意: 即使是调用 bash 执行命令
类似 cat /tmp/test.md | awk -F'|' '{print $1,$2}' &> /tmp/example.txt 这些复杂命令
使用 Shell 模块也可能会失败。
解决办法: 建议写到脚本中,copy 到远程,执行,再把需要的结果拉回执行命令的机器
小技巧: 使用 Shell 模块替代 command,设为默认模块
[root@ansible ~] vim /etc/ansible/ansible.cfg
# 修改下面一行
module_name = shell
# 验证
ansible websrvs -a 'echo 123456 > /data/1.log'    # 默认是 shell 模块
ansible websrvs -m command -a 'echo 123456 > /data/1.log'    # 指定 command 模块 ( 不支持重定向等操作 )

3.4.3)Script 模块
功能: 在远程主机上运行 ansible 服务器上的脚本
注意: 此模块不具有幂等性
ansible websrvs -m script -a '/root/test.sh'

3.4.4)Copy 模块
功能: 从 ansible 服务器 主控端复制文件到远程主机
注意: src=file 如果没指明绝对路径,则为当前目录或当前目录下的 files 目录下的 file 文件
参数解析
- src:推送数据的源文件信息
- dest:推送数据的目标路径
- backup:对推送传输过去的文件,进行备份
- content:直接批量在被管理端文件中添加内容
- group:将本地文件推送到远端,指定文件属组信息
- owner:将本地文件推送到远端,指定文件属主信息
- mode:将本地文件推送到远端,指定文件权限信息
# backup 参数
# 如目标存在, 默认覆盖, 此处指定先备份
# ansible websrvs -m shell -a 'useradd wangj'
ansible websrvs -m copy -a 'src=/root/test.sh dest=/root/test01.sh owner=wangj group=bin mode=600 backup=yes'

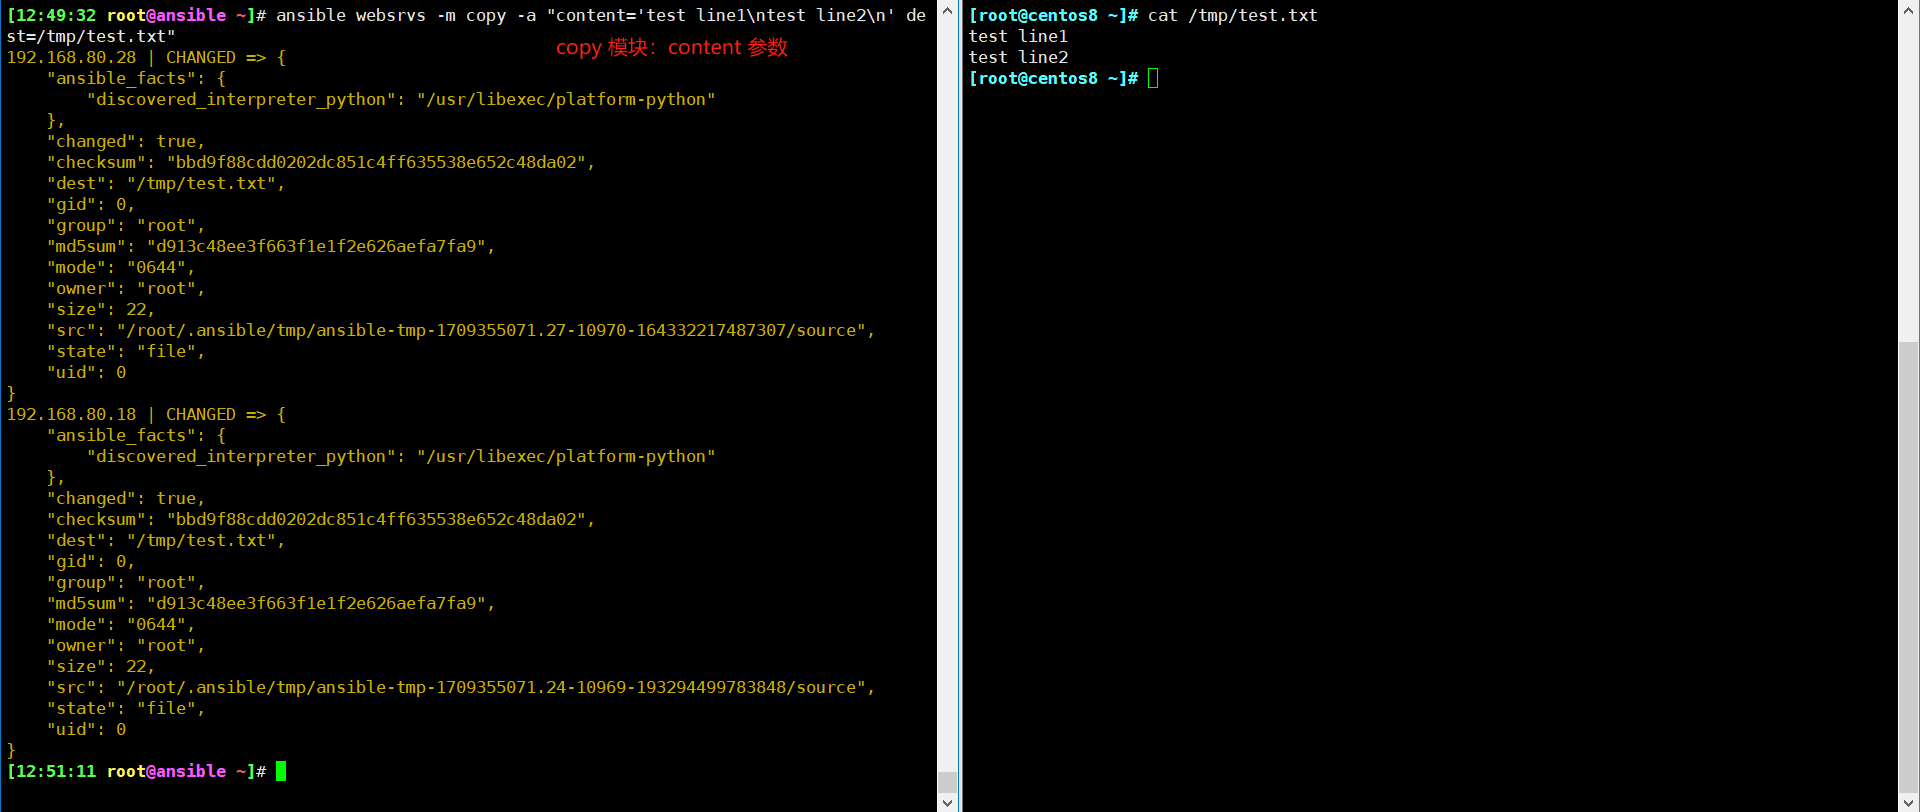
# content 参数
# 指定内容, 直接生成目标文件
ansible websrvs -m copy -a "content='test line1\ntest line2\n' dest=/tmp/test.txt"
copy 模块 小细节
# 复制 /etc 目录自身. ( 注意: /etc 后面没有 / )
# ansible websrvs -m shell -a "mkdir /backup"
ansible websrvs -m copy -a "src=/etc dest=/backup"

# 复制 /etc/ 下的文件, 不包括 /etc 目录自身. ( 注意: /etc/ 后面有 / )
ansible websrvs -m copy -a "src=/etc/ dest=/backup"

3.4.5)Get_url 模块
功能: 用于将文件从 http、https 或 ftp 下载到被管理机节点上。
注意: 被管理机节点必须要能够直接访问对应的远程资源。
常用参数如下:
url:下载文件的 URL,支持 HTTP, HTTPS 或 FTP 协议
dest:下载到目标路径(绝对路径),如果目标是一个目录,就用服务器上面文件的名称,如果目标设置了名称就用目标设置的名称
owner:指定属主
group:指定属组
mode:指定权限
force:如果 yes, dest 不是目录,将每次下载文件, 如果内容改变, 替换文件. 如果否, 则只有在目标不存在时才会下载该文件.
checksum:对目标文件在下载后计算摘要,以确保其完整性
    示例: checksum="sha256:D98291AC[...]B6DC7B97",
    checksum="sha256:http://example.com/path/sha256sum.txt"
url_username:用于 HTTP 基本认证的用户名。对于允许空密码的站点,可以不使用 url_password 参数
url_password:用于 HTTP 基本认证的密码。如果未指定 url_username 参数,则不会使用  url_password 参数
validate_certs:如果 no, SSL 证书将不会被验证. 适用于自签名证书在私有网站上使用
timeout:URL 请求的超时时间, 秒为单位
| 参数 | 说明 |
|---|---|
| url | 下载资源的URL(支持http、https、ftp协议) |
| dest | 下载的资源在目标主机上的保存路径(绝对路径) |
| owner | 指定属主 |
| group | 指定属组 |
| mode | 指定权限 |
| force | =yes|no,是否强制下载;默认为no。 |
| 设为yes,即强制下载,如果同名文件存在,则覆盖;设为no,则只有在文件不存在时才下载。 | |
| url_username | 基于http basic认证的用户名(如果访问的URL需要的话); |
| url_password | 基于http basic认证的密码,和url_username一起使用(如果URL允许使用空密码,则仅需提供url_username即可); |
| 在没有指定url_username时,单独指定url_password也没有意义。 | |
| validate_certs | yes|no,是否校验 SSL 证书,默认为yes; |
| 当设为no时,SSL证书将不会被校验(建议仅在URL访问的站点使用可被信任的自签名证书的情况下使用validate_certs=no) | |
| timeout | URL 请求的超时时间,单位为 s |
| checksum | 对下载后的文件计算校验和,与 checksum 指定的校验和进行比对,确保下载文件的完好性 |
范例:
# 提前下载好软件包验证哈希值
[root@ansible ~] wget http://nginx.org/download/nginx-1.18.0.tar.gz
# 使用如下两条命令验证哈希值
[root@ansible ~] openssl md5 nginx-1.18.0.tar.gz
[root@ansible ~] md5sum nginx-1.18.0.tar.gz
b2d33d24d89b8b1f87ff5d251aa27eb8  nginx-1.18.0.tar.gz
# ansible get_url 模块使用
[root@ansible ~] ansible websrvs -m get_url -a 'url=http://nginx.org/download/nginx-1.18.0.tar.gz dest=/usr/local/src/nginx.tar.gz checksum="md5:b2d33d24d89b8b1f87ff5d251aa27eb8"'

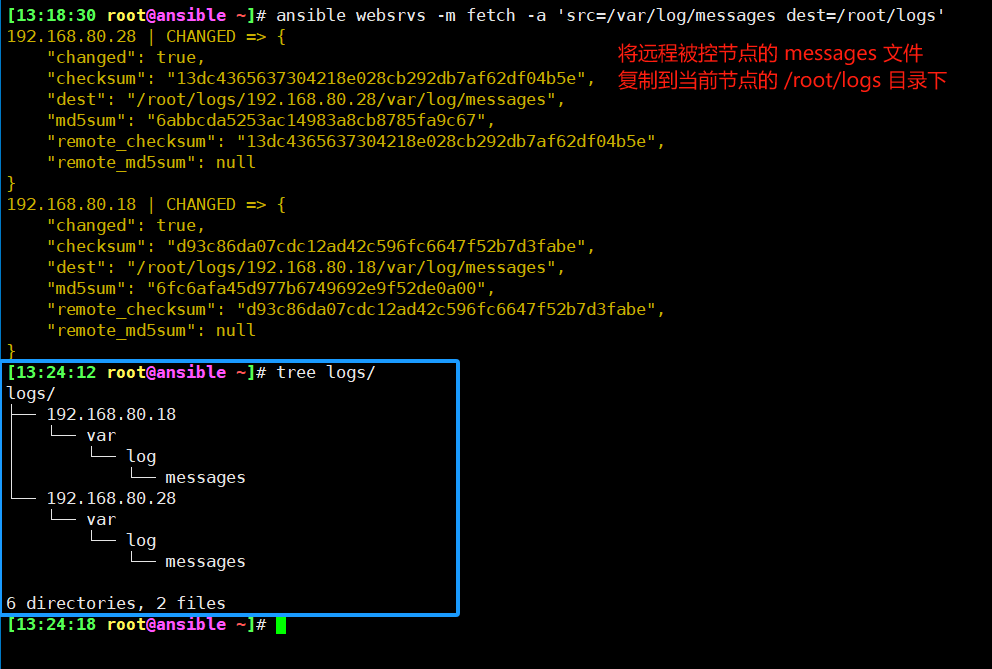
3.4.6)Fetch 模块
功能: 从远程主机提取文件至 Ansible 的主控端
与 copy 模块相反,目前不支持目录( 建议:可以将目录打包,然后将压缩包拷贝至 ansible 主控端 )
常用于: 复制客户端的日志文件至 ansible 主控端
[root@ansible ~] ansible websrvs -m fetch -a 'src=/var/log/messages dest=/root/logs'
[root@ansible ~] tree
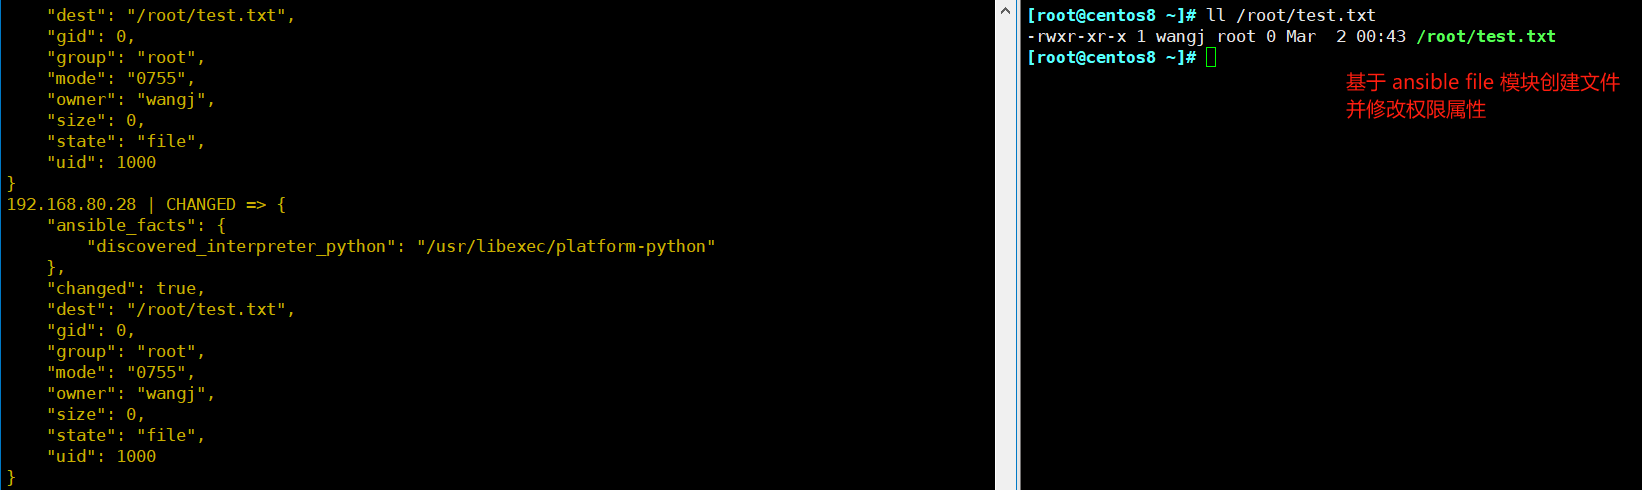
3.4.7)File 模块
功能: 文件管理模块,用于对文件或文件夹相关的操作
主要用来设置文件、链接、目录的属性,或者移除文件、链接、目录。
比如: 创建文件或目录,删除文件或目录,设置文件目录属性,创建目录软链接等等
幂等性: 任意次执行所产生的影响均与一次执行的影响相同
| 参数 | 说明 |
|---|---|
| path | 指定远程主机目录或文件信息 |
| state | directory:在远端创建目录 |
| touch:在远端创建文件 | |
| link:link 或 hard 表示创建链接文件 | |
| absent:表示删除文件或目录 | |
| owner | 设置所有者 |
| group | 设置所属的组 |
| mode | 权限 0000 |
| recurse | 递归 yes or no |
# 创建空文件
ansible all -m file -a 'path=/data/test.txt state=touch'
ansible all -m file -a "path=/root/test.txt state=touch owner=wangj mode=755"
案例
# 创建目录 state=directory
ansible all -m file -a "path=/data/mysql state=directory owner=mysql group=mysql"

# 创建软链接 state=link
ansible all -m file -a 'src=/data/testfile dest=/data/testfile-link state=link'

# 递归修改目录属性, 但不递归至子目录
ansible all -m file -a "path=/data/mysql state=directory owner=mysql group=mysql"

# recurse 参数
# 递归修改目录及子目录的属性
ansible all -m file -a "path=/data/mysql state=directory owner=mysql group=mysql recurse=yes"

# 删除文件或目录 state=absent
ansible all -m file -a "path=/data/mysql state=absent"
3.4.8)stat 模块
stat 模块将获取指定文件或目录的信息,并使用 register 参数将其保存。
功能: 检查文件或文件系统的状态
注意: 对于 Windows 目标,请改用 win_stat 模块
选项:
path: 文件/对象的完整路径 (必须)
常用的返回值判断:
exists:判断是否存在
isuid:调用用户的 ID 与所有者 ID 是否匹配
范例:
[root@ansible ~] ansible 127.0.0.1 -m stat -a 'path=/etc/passwd'

案例:
- name: install | Check if file is already configured.
    stat: path={{ nginx_file_path }}
    connection: local
    register: nginx_file_result

- name: install | Download nginx file
    get_url: url={{ nginx_file_url }} dest={{ software_files_path }} validate_certs=no
    connection: local
    when:, not. nginx_file_result.stat.exists
范例: 使用 stat 模块验证文件状态,通过文件状态推进下一步实施动作
# 检查 websrvs 主机组中的所有主机上的 /data/mysql 路径是否存在
# 如果路径不存在, 它将在每个主机上输出一条调试信息, 说明该路径不存在
[root@ansible ansible] cat stat.yml
---
- hosts: websrvs
  tasks:
    - name: Check file
      stat: path=/data/mysql
      register: st
    - name: debug
      debug:
        msg: "/data/mysql is not exist"
      when: not st.stat.exists

 [root@ansible ansible] ansible-playbook stat.yml

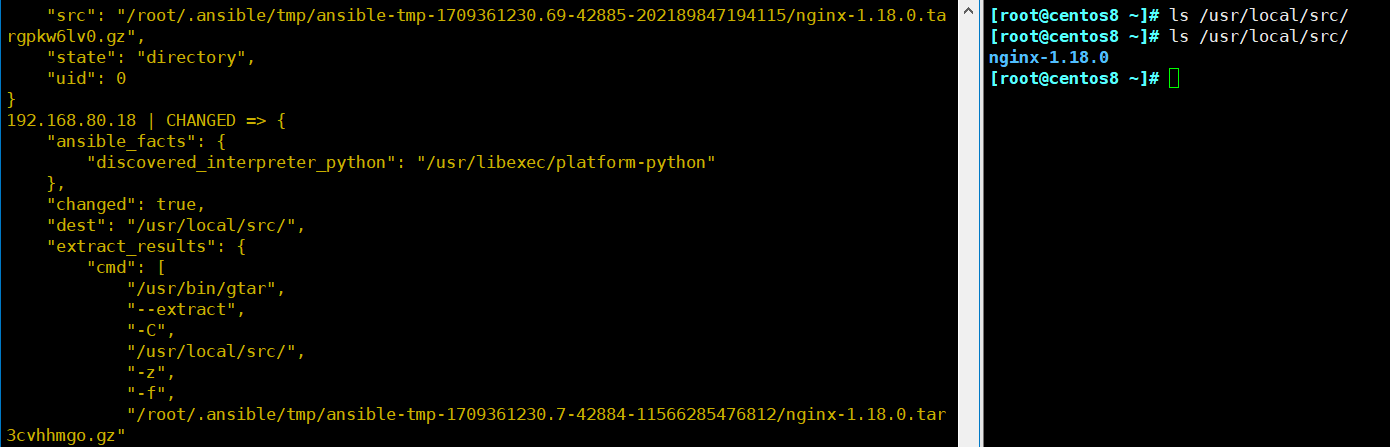
3.4.9)unarchive 模块
功能: 解包解压缩
实现有两种用法:
1)将 ansible 主机上的压缩包传到远程主机后解压缩至特定目录,设置 copy=yes,此为默认值,可省略
2)将远程主机上的某个压缩包解压缩到指定路径下,设置 copy=no
常见参数:
copy:默认为 yes,当 copy=yes,拷贝的文件是从 ansible 主机复制到远程主机上.
如果设置为 copy=no,会在远程主机上寻找 src 源文件
remote_src:和 copy 功能一样且互斥
yes 表示在远程主机,不在 ansible 主机
no 表示文件在 ansible 主机上
src:源路径,可以是 ansible 主机上的路径,也可以是远程主机(被管理端或者第三方主机)上的路径,
如果是远程主机上的路径,则需要设置 copy=no
dest:远程主机上的目标路径
mode:设置解压缩后的文件权限
范例:
# copy=yes ( 默认值 )
# 拷贝的文件是从 ansible 控制主机复制到远程主机上
ansible all -m unarchive -a 'src=/root/nginx-1.18.0.tar.gz dest=/usr/local/src owner=wangj group=bin'

# copy=no ( 在远程被控主机上寻找 src 源文件 )
# ansible websrvs -m get_url -a 'url=http://nginx.org/download/nginx-1.18.0.tar.gz dest=/root/nginx-1.18.0.tar.gz'
ansible all -m unarchive -a 'src=/root/nginx-1.18.0.tar.gz dest=/usr/local/src copy=no mode=0777'

# 下载压缩包并解压缩至指定目录 ( 需要添加参数 copy=no )
ansible websrvs -m unarchive -a 'src=http://nginx.org/download/nginx-1.18.0.tar.gz dest=/usr/local/src/ copy=no'
# remote_src=yes ( 表示内容在远程主机上 )
ansible websrvs -m unarchive -a 'src=https://releases.ansible.com/ansible/ansible-2.1.6.0-0.1.rc1.tar.gz dest=/usr/local/src owner=root remote_src=yes'

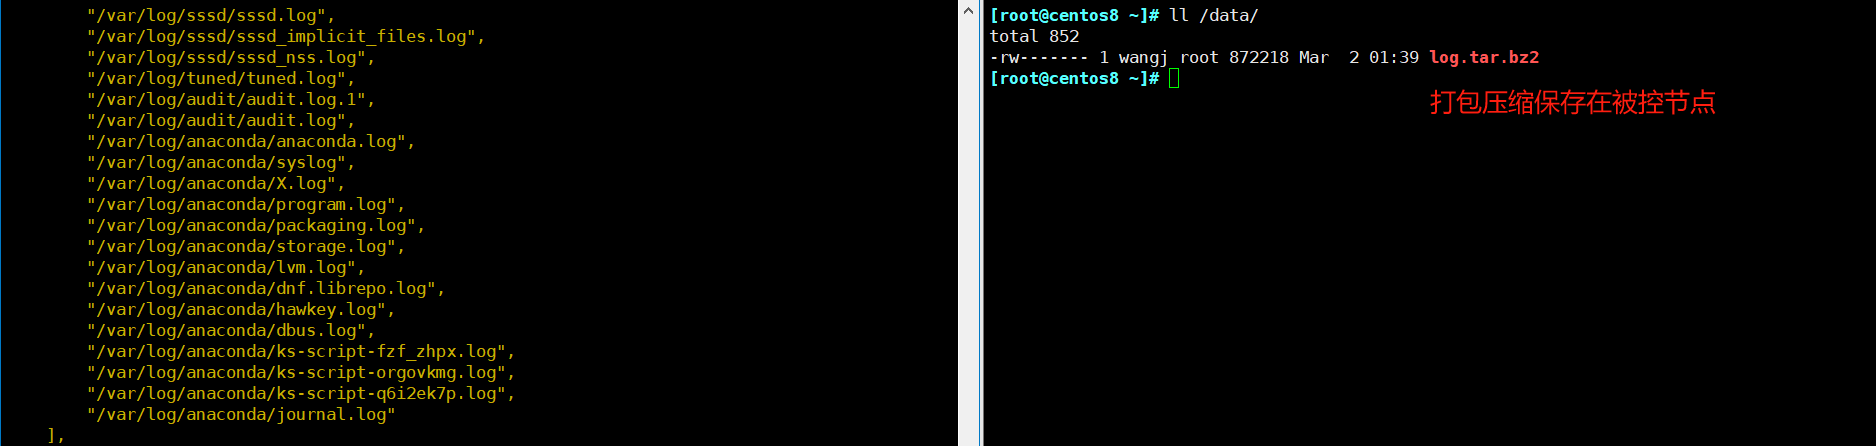
3.14.10)Archive 模块
功能: 打包压缩 保存在被管理节点
范例:
ansible websrvs -m archive -a 'path=/var/log/ dest=/data/log.tar.bz2 format=bz2 owner=wangj mode=0600'
3.4.11)Hostname 模块
功能: 管理主机名
范例:
# 使用
ansible 192.168.80.18 -m hostname -a 'name=node18.wuhanjiayou.cn'

# 验证
ansible 192.168.80.18 -m shell -a 'hostname'

# 注意:
# 千万别以分组来修改主机名 ( 不然整个组的主机名都是同一个 )
# 除非你确实有这个需求
ansible websrvs -m hostname -a 'name=node.wuhanjiayou.cn'
ansible websrvs -m shell -a 'hostname'

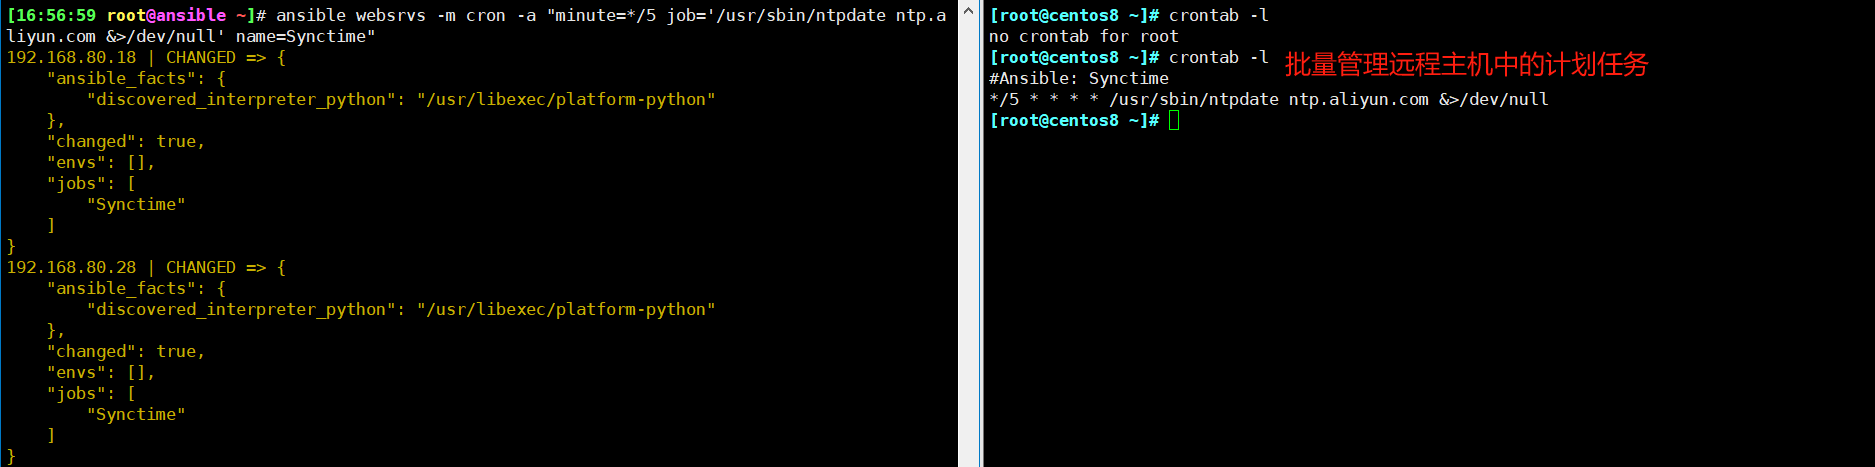
3.4.12)Cron 模块
功能: Cron 模块可以 帮助我们批量管理远程主机中的计划任务
支持时间: minute,hour,day,month,weekday
分,时,日,月,周
范例:
# 创建任务
ansible 10.0.0.8 -m cron -a 'hour=2 minute=30 weekday=1-5 name="backup mysql" job=/root/mysql_backup.sh'
ansible websrvs -m cron -a "minute=*/5 job='/usr/sbin/ntpdate ntp.aliyun.com &>/dev/null' name=Synctime"

# 禁用计划任务
ansible websrvs -m cron -a "minute=*/5 job='/usr/sbin/ntpdate 172.20.0.1 &>/dev/null' name=Synctime disabled=yes"

# 启用计划任务
ansible websrvs -m cron -a "minute=*/5 job='/usr/sbin/ntpdate 172.20.0.1 &>/dev/null' name=Synctime disabled=no"

# 删除任务
ansible websrvs -m cron -a "name='backup mysql' state=absent"
ansible websrvs -m cron -a 'state=absent name=Synctime'
演示
ansible websrvs -m cron -a "minute=*/5 job='/usr/sbin/ntpdate ntp.aliyun.com &>/dev/null' name=Synctime"
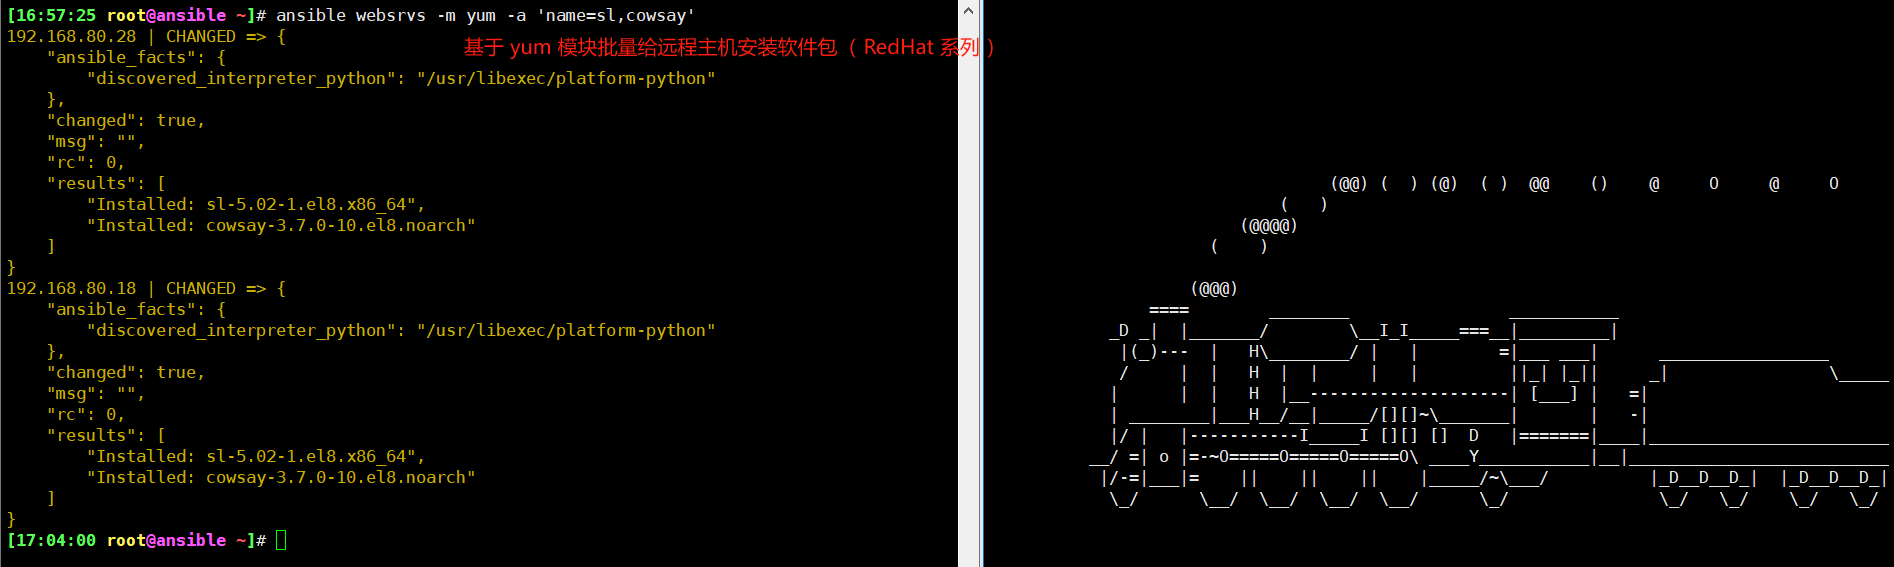
3.4.13)Yum 和 Apt 模块
功能:
Yum 模块:管理软件包,支持 RHEL,CentOS,fedora,不支持 Ubuntu 其它版本
Apt 模块:管理 Debian 相关版本的软件包
后续:我们可以通过判断 Linux 系统版本来决定使用哪个模块。
范例:
// 安装: present
ansible websrvs -m yum -a 'name=httpd state=present'
// 卸载: absent
ansible websrvs -m yum -a 'name=httpd state=absent'
// 启用 epel 源进行安装
ansible websrvs -m yum -a 'name=nginx state=present enablerepo=epel'
// 升级除 kernel 和 foo 开头以外的所有包 ( 安装多个软件包 )
ansible websrvs -m yum -a 'name=* state=lastest exclude=kernel*,foo*'
// 一次安装多个软件包
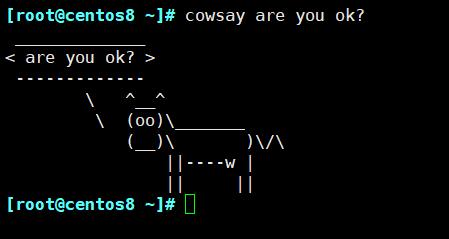
[root@ansible ~] ansible websrvs -m yum -a 'name=sl,cowsay'
范例:
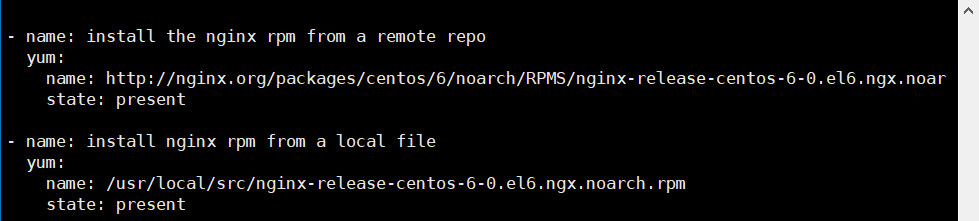
# 直接基于远程主机上的软件包安装
[root@ansible ~] ansible websrvs -m yum -a "name=https://mirror.tuna.tsinghua.edu.cn/zabbix/zabbix/5.2/rhel/7/x86_64/zabbix-agent-5.2.5-1.el7.x86_64.rpm state=present"
范例:
# 安装软件包
# 注意: RadHat 使用 yum 模块, Ubuntu 使用 apt 模块
[root@centos8 ~] ansible 192.168.80.18 -m apt -a 'name=bb,sl,cowsay,cmatrix,oneko,hollywood,boxes,libaa-bin,x11-apps state=present'

# 卸载软件包
# 注意: RadHat 使用 yum 模块, Ubuntu 使用 apt 模块
[root@centos8 ~] ansible websrvs -m apt -a 'name=sl,cowsay state=absent'
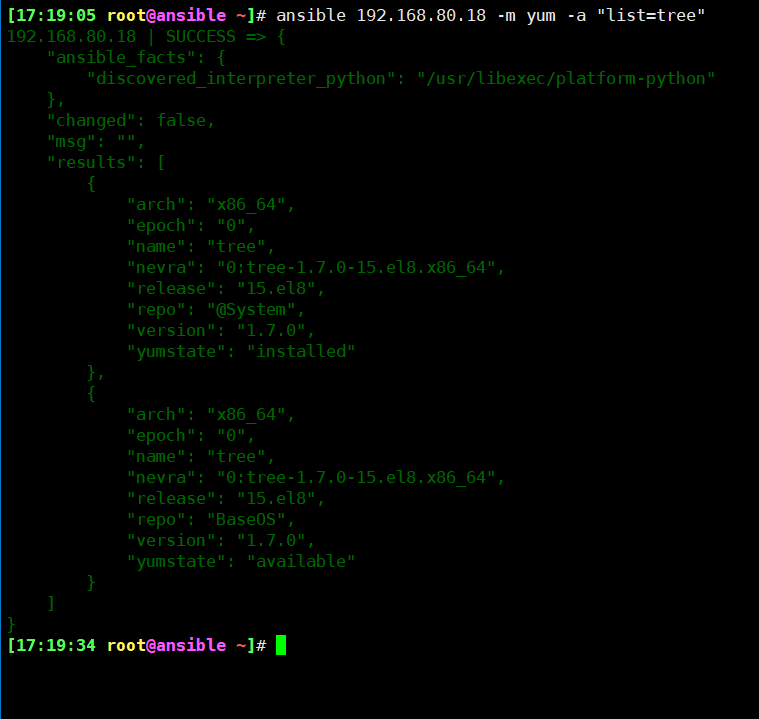
范例: 查看包
[root@ansible ~] ansible localhost -m yum -a "list=tree"
3.4.14)yum_repository 模块
功能: 可以帮助我们批量管理远程主机上的 Yum 仓库

- name: Add multiple repositories into the same file (1/2)
  yum_repository:
    name: epel
    description: EPEL YUM repo
    file: external_repos
    baseurl: https://download.fedoraproject.org/pub/epel/$releasever/$basearch/
    gpgcheck: no

- name: Add multiple repositories into the same file (2/2)
  yum_repository:
    name: rpmforge
    description: RPMforge YUM repo
    file: external_repos
    baseurl: http://apt.sw.be/redhat/el7/en/$basearch/rpmforge
    mirrorlist: http://mirrorlist.repoforge.org/el7/mirrors-rpmforge
    enabled: no

- name: Remove repository from a specific repo file
    yum_repository:
      name: epel
      file: external_repos
      state: absent
范例: 创建和删除仓库
[root@ansible ~] cat yum_repo.yml
- hosts: websrvs
  tasks:
    - name: Add multiple repositories into the same file
      yum_repository:
      name: test
      description: EPEL YUM repo
      file: external_repos
      baseurl: https://download.fedoraproject.org/pub/epel/$releasever/$basearch/
      gpgcheck: no

[root@ansible ~] ansible-playbook yum_repo.yml
[root@web1 ~] cat /etc/yum.repos.d/external_repos.repo
[test]
baseurl = https://download.fedoraproject.org/pub/epel/$releasever/$basearch/
gpgcheck = 0
name = EPEL YUM repo

[root@ansible ~] cat remove_yum_repo.yml
- hosts: websrvs
  tasks:
    - name: remove repo
      yum_repository:
        name: test
        file: external_repos
        state: absent

[root@ansible ~] ansible-playbook remove_yum_repo.yml
3.4.15)Service 模块
功能: 可以帮助我们 批量管理远程主机上的服务

范例:
# 启动远程主机的 httpd 服务,并实现开机自启
ansible 192.168.80.18 -m service -a 'name=httpd state=started enabled=yes'

# 停止服务
ansible websrvs -m service -a 'name=httpd state=stopped'

# 生效服务
ansible websrvs -m service -a 'name=httpd state=reloaded'

# 重启服务
ansible websrvs -m shell -a "sed -i 's/^Listen 80/Listen 8080/' /etc/httpd/conf/httpd.conf"
ansible websrvs -m service -a 'name=httpd state=restarted'

3.4.16)User 模块
功能: 管理用户
可以帮助我们 批量管理远程主机上的用户
比如创建用户、修改用户、删除用户、为用户创建密钥对等操作。
范例:
// 创建用户
ansible all -m user -a 'name=user1 comment="test user" uid=2048 home=/app/user1 group=root'
ansible all -m user -a 'name=nginx comment=nginx uid=88 group=nginx groups="root,daemon" shell=/sbin/nologin system=yes create_home=no home=/data/nginx non_unique=yes'

// remove=yes 表示删除用户及家目录等数据, 默认 remove=no
ansible all -m user -a 'name=nginx state=absent remove=yes'

// 生成 123456 加密的密码
ansible localhost -m debug -a "msg={{ '123456'| password_hash('sha512','salt')}}"
localhost | SUCCESS => {
    "msg": "$6$salt$MktMKPZJ6t59GfxcJU20DwcwQzfMvOlHFVZiOVD71w."
}

// 用上面创建的密码创建用户
ansible websrvs -m user -a 'name=test password="$6$salt$MktMKPZJ6t59GfxcJU20DwcwQzfMvOlHFVZiOVD71w."'

// 创建用户 test, 并生成 4096bit 的私钥
ansible websrvs -m user -a 'name=test generate_ssh_key=yes ssh_key_bits=4096 ssh_key_file=.ssh/id_rsa'
3.4.17)Group 模块
功能: 管理组

范例:
// 创建组
ansible websrvs -m group  -a 'name=nginx gid=88 system=yes'

// 删除组
ansible websrvs -m group  -a 'name=nginx state=absent'
3.4.18)Lineinfile 模块
参考:
https://www.cnblogs.com/breezey/p/9297252.html
info
功能: 相当于 sed,可以修改文件内容
ansible 在使用 sed 进行替换时,经常会遇到需要转义的问题,而且 ansible 在遇到特殊符号进行替换时,存在问题,无法正常进行替换 。
其实在 ansible 自身提供了两个模块:lineinfile 模块和 replace 模块,可以方便的进行替换
一般在 ansible 当中去修改某个文件的单行进行替换的时候需要使用 lineinfile 模块
幂等性:重复执行不会创建多行内容,多次执行,依然只增加有最后一行。
范例:
regexp 参数:使用正则表达式匹配对应的行,当替换文本时,如果有多行文本都能被匹配,则只有最后面被匹配到的那行文本才会被替换,当删除文本时,如果有多行文本都能被匹配,这么这些行都会被删除。如果想进行多行匹配进行替换需要使用 replace 模块。( 重点 )
# 将 Listen 开头的行,修改为 Listen 8080 ( regexp 参数 )
ansible 192.168.80.18 -m lineinfile -a "path=/etc/httpd/conf/httpd.conf regexp='^Listen' line='Listen 8080'"

# 批量禁用远程主机的 SELinux 功能
ansible all -m lineinfile -a "path=/etc/selinux/config regexp='^SELINUX=' line='SELINUX=disabled'"

# 将 # 开头的行都删除
ansible 192.168.80.18 -m lineinfile -a 'dest=/etc/fstab state=absent regexp="^#"'

3.4.19)Replace 模块
知识点:
Lineinfile 模块 与 replace 模块 区别
- Lineinfile 模块 regexp 参数:使用正则表达式匹配对应的行,当替换文本时,如果有多行文本都能被匹配,则只有最后面被匹配到的那行文本才会被替换,当删除文本时,如果有多行文本都能被匹配,这么这些行都会被删除。
- Replace 模块:可以根据我们指定的正则表达式替换文件中的字符串,文件中所有被匹配到的字符串都会被替换。
info
范例:
# 查找所有以 UUID 开头的行, 并将这些行注释掉
ansible all -m replace -a "path=/etc/fstab regexp='^(UUID.*)' replace='#\1'"

# 查找所有以 # 开头, 紧接着是 UUID 的 行 (这些行是被注释掉的)
# 并移除行首的 # 符号, 从而取消这些行的注释.
ansible all -m replace -a "path=/etc/fstab regexp='^#(UUID.*)' replace='\1'"
3.4.20)SELinux 模块
批量管理远端主机的 SELINUX 策略
info
范例:
# 启用
[root@ansible ~] ansible 192.168.80.18 -m selinux -a 'state=enforcing policy=targeted'

# 禁用
[root@ansible ~] ansible 192.168.80.18 -m selinux -a 'state=disabled'

# 验证
[root@centos8 ~] grep -v '#' /etc/selinux/config
SELINUX=disabled
SELINUXTYPE=targeted

[root@centos8 ~] getenforce
Permissive

3.4.21)reboot 模块
注意: 对于 Windows 目标,请使用 win_reboot 模块
[root@ansible ~] ansible websrvs -m reboot
3.4.22)mount 模块
功能: 批量管理被控端设备挂载
| 参数 | 说明 |
|---|---|
| src | 本地或远程设备的路径 |
| path | 设备挂载至本地的路径 |
| fstype | 挂载的文件系统类型,xfs、nfs... |
| opts | 挂载的参数,defaults、ro... |
| state | 挂载的状态,absent、mounted、unmounted |
// 临时挂载
mount websrvs -m mount -a 'src="UUID=b3e48f45-f933-4c8e-a700-22a159ec9077" path=/home fstype=xfs opts=noatime state=present'
// 临时取消挂载
mount websrvs -m mount -a 'path=/home fstype=xfs opts=noatime state=unmounted'
// 永久挂载
ansible websrvs -m mount -a 'src=10.0.0.8:/data/wordpress path=/var/www/html/wp-content/uploads opts="_netdev" state=mounted'
// 永久卸载
ansible websrvs -m mount -a 'src=10.0.0.8:/data/wordpress path=/var/www/html/wpcontent/uploads state=absent'
3.4.23)Setup 模块( 重要 )
功能: setup 模块 用于收集主机的系统信息,这些 facts 信息可以直接以变量的形式使用
但是如果主机较多,会影响执行速度。我们可以使用 gather_facts: no 来禁止 Ansible 收集 facts 信息
info
范例:
filter 参数:用于进行条件过滤。如果设置,仅返回匹配过滤条件的信息。
// 这条命令会收集 inventory 中 websrvs 组下所有主机的所有 facts
// 并将这些信息打印出来
ansible websrvs -m setup
# 主机的节点名
ansible websrvs -m setup -a "filter=ansible_nodename"
# 主机的主机名
ansible websrvs -m setup -a "filter=ansible_hostname"
# 主机所属的域名
ansible websrvs -m setup -a "filter=ansible_domain"
# 主机的总内存量
ansible websrvs -m setup -a "filter=ansible_memtotal_mb"
# 主机的物理内存量
ansible websrvs -m setup -a "filter=ansible_memory_mb"
# 主机当前空闲的内存量
ansible websrvs -m setup -a "filter=ansible_memfree_mb"
# 主机操作系统的家族 // 例如 RedHat、Debian 等
ansible websrvs -m setup -a "filter=ansible_os_family"
# 主机操作系统的主版本号
ansible websrvs -m setup -a "filter=ansible_distribution_major_version"
# 主机操作系统的完整版本号
ansible websrvs -m setup -a "filter=ansible_distribution_version"
# 主机的虚拟 CPU 数量
ansible websrvs -m setup -a "filter=ansible_processor_vcpus"
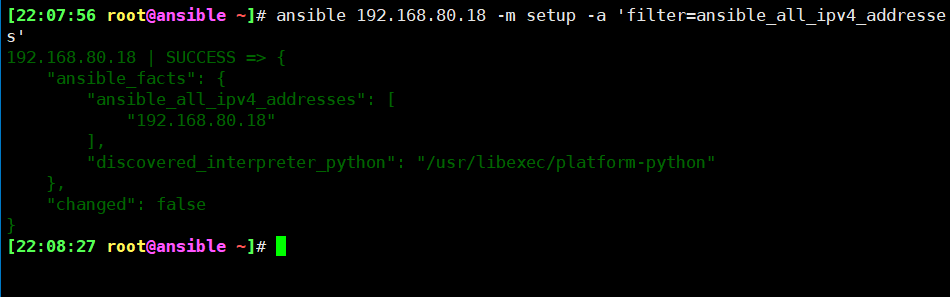
# 主机的所有 IPv4 地址列表
ansible websrvs -m setup -a "filter=ansible_all_ipv4_addresses"
# 主机的架构类型
ansible websrvs -m setup -a "filter=ansible_architecture"
# 主机已运行的时间
ansible websrvs -m setup -a "filter=ansible_uptime_seconds"
# 以 ansible_processor 开头的所有 facts
ansible websrvs -m setup -a "filter=ansible_processor*"
# 主机的环境变量
ansible websrvs -m setup -a 'filter=ansible_env'
范例:
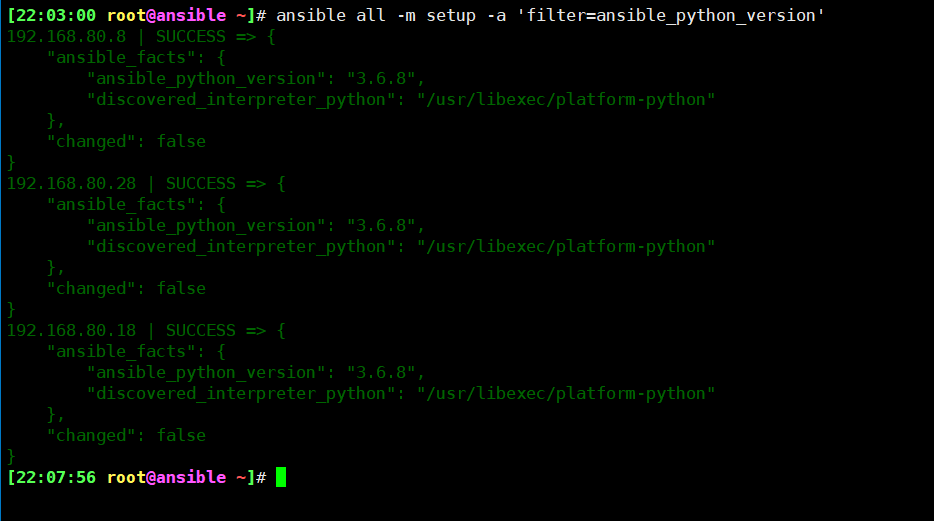
[root@ansible ~] ansible all -m setup -a 'filter=ansible_python_version'
范例: 取 IP 地址
// 取所有 IP
ansible 192.168.80.18 -m setup -a 'filter=ansible_all_ipv4_addresses'

// 取默认 IP
ansible all -m setup -a 'filter="ansible_default_ipv4"'
3.4.24)debug 模块
此模块可以用于输出信息,并且通过 msg 定制输出的信息内容
注意: msg 后面跟变量时,需要加 " " 引起来
范例: debug 模块 默认输出 Hello world
# 默认输出 Hello world ( 默认没有指定 msg, 默认输出 "Hello world!" )
[root@ansible ~] ansible 192.168.80.18 -m debug

范例: 利用 debug 模块输出变量
[root@centos8 ~] vim debug.yaml
---
- hosts: websrvs
  tasks:
  - name: output variables
    debug:
      msg: Host "{{ ansible_nodename }}" Ip "{{ ansible_default_ipv4.address }}"

[root@centos8 ~] ansible-playbook debug.yaml

范例: 显示字符串特定字符
# cat debug.yml
- hosts: all
  gather_facts: n
  vars:
    a: "12345"
  tasks:
  - debug:
    msg: "{{a[2]}}"

// 定义了一个字符串变量 a, 如果想要获取 a 字符串的第 3 个字符
// 则可以使用 "a[2]" 获取, 索引从 0 开始, 执行上例 playbook, debug 的输出信息如下:
TASK [debug] *************************
ok: [test71] => {
    "msg": "3"
}