-
react 原理揭秘
1.目标
A. 能够知道setState()更新数据是异步的
B. 能够知道JSX语法的转化过程
C. 能够说出React组件的更新机制
D. 能够对组件进行性能优化
E. 能够说出虚拟DOM和Diff算法2.目录
A. setState()的说明
B. JSX语法的转化过程
C. 组件更新机制
D. 组件性能优化
E. 虚拟DOM和Diff算法3.setState()的说明
3.1 更新数据
A. setState() 是异步更新数据的
B. 注意:使用该语法时,后面的setState()不能依赖于前面的setState()
C. 可以多次调用setState(),只会触发一次重新渲染
1setState.jsimport React from "react"; class App31 extends React.Component { state = { count: 0, }; handleClick = () => { //异步更新操作 this.setState({ count: this.state.count + 1, }); console.log("count1:" + this.state.count); this.setState({ count: this.state.count + 1, }); console.log("count2:" + this.state.count); }; render() { //数据更新了就会调用一次render //但是,如果数据变化一样的,render只调用一次 console.log("render"); return ( <div> <h1>计数器:{this.state.count}</h1> <button onClick={this.handleClick}>点击</button> </div> ); } } export default App31;- 1
- 2
- 3
- 4
- 5
- 6
- 7
- 8
- 9
- 10
- 11
- 12
- 13
- 14
- 15
- 16
- 17
- 18
- 19
- 20
- 21
- 22
- 23
- 24
- 25
- 26
- 27
- 28
- 29
- 30
- 31
index,jsimport App31 from "./1setState"; ReactDOM.createRoot(document.getElementById("root")).render(<App31></App31>);- 1
- 2
3.2 推荐语法
A. 推荐:使用setState((state,props)=>{})语法
B. 参数state:表示最新的state
C. 参数props:表示最新的propsimport React from "react"; class App31 extends React.Component { state = { count: 1, }; handleClick = () => { // //异步更新操作 // this.setState({ // count: this.state.count + 1, // }); // console.log("count1:" + this.state.count); // this.setState({ // count: this.state.count + 1, // }); // console.log("count2:" + this.state.count); //推荐语法 //注意:这种语法也是异步更新state的,但是会记录最新的state的数据,所以在页面显示为3 this.setState((state, props) => { console.log("state1:", state, "props1:", props); return { count: state.count + 1, }; }); console.log("count:", this.state.count); // 1 this.setState((state, props) => { console.log("state2:", state, "props2:", props); return { count: state.count + 1, }; }); console.log("count:", this.state.count); // 1 }; render() { //数据更新了就会调用一次render //但是,如果数据变化一样的,render只调用一次 console.log("render"); return ( <div> <h1>计数器:{this.state.count}</h1> <button onClick={this.handleClick}>点击</button> </div> ); } } export default App31;- 1
- 2
- 3
- 4
- 5
- 6
- 7
- 8
- 9
- 10
- 11
- 12
- 13
- 14
- 15
- 16
- 17
- 18
- 19
- 20
- 21
- 22
- 23
- 24
- 25
- 26
- 27
- 28
- 29
- 30
- 31
- 32
- 33
- 34
- 35
- 36
- 37
- 38
- 39
- 40
- 41
- 42
- 43
- 44
- 45
- 46
- 47
- 48
- 49
3.3 第二个参数
A. 场景:在状态更新(页面完成重新渲染)后立即执行某个操作
B. 语法:setState(update [,callback])import React from "react"; class App31 extends React.Component { state = { count: 1, }; handleClick = () => { // //异步更新操作 // this.setState({ // count: this.state.count + 1, // }); // console.log("count1:" + this.state.count); // this.setState({ // count: this.state.count + 1, // }); // console.log("count2:" + this.state.count); //推荐语法 //注意:这种语法也是异步更新state的,但是会记录最新的state的数据,所以在页面显示为3 // this.setState((state, props) => { // console.log("state1:", state, "props1:", props); // return { // count: state.count + 1, // }; // }); // console.log("count:", this.state.count); // 1 // this.setState((state, props) => { // console.log("state2:", state, "props2:", props); // return { // count: state.count + 1, // }; // }); // console.log("count:", this.state.count); // 1 // 第二个参数,在状态更新(页面完成重新渲染)后立即执行某个操作 this.setState( (state, props) => { return { count: state.count + 1, }; }, () => { console.log("状态更新完成,当前count值:", this.state.count); } ); }; render() { //数据更新了就会调用一次render //但是,如果数据变化一样的,render只调用一次 console.log("render"); return ( <div> <h1>计数器:{this.state.count}</h1> <button onClick={this.handleClick}>点击</button> </div> ); } } export default App31;- 1
- 2
- 3
- 4
- 5
- 6
- 7
- 8
- 9
- 10
- 11
- 12
- 13
- 14
- 15
- 16
- 17
- 18
- 19
- 20
- 21
- 22
- 23
- 24
- 25
- 26
- 27
- 28
- 29
- 30
- 31
- 32
- 33
- 34
- 35
- 36
- 37
- 38
- 39
- 40
- 41
- 42
- 43
- 44
- 45
- 46
- 47
- 48
- 49
- 50
- 51
- 52
- 53
- 54
- 55
- 56
- 57
- 58
- 59
4.JSX语法的转化过程
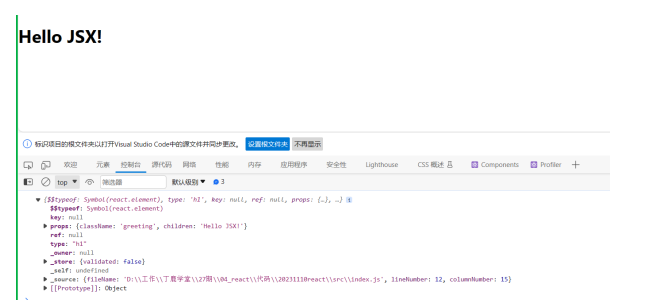
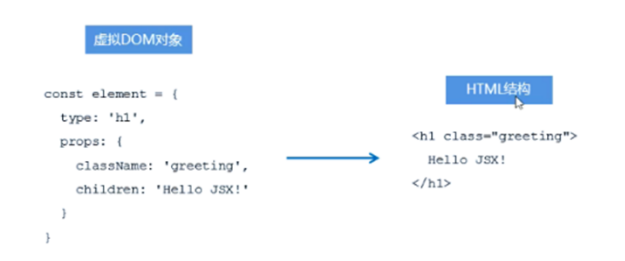
A. JSX仅仅是createElement()方法的语法糖(简化语法)
B. JSX语法被@babel/preset-react插件编译为createElement()方法
C. React元素:是一个对象,用来描述你希望的屏幕上看到的内容

const element=<h1 className='greeting'>Hello JSX!</h1> // const element1=React.createElement('h1',{ // className:'greeting' // },'Hello JSX!!!') console.log(element); // console.log(element1); ReactDOM.render(element,document.getElementById('root'))- 1
- 2
- 3
- 4
- 5
- 6
- 7
效果图:
5.组件更新机制
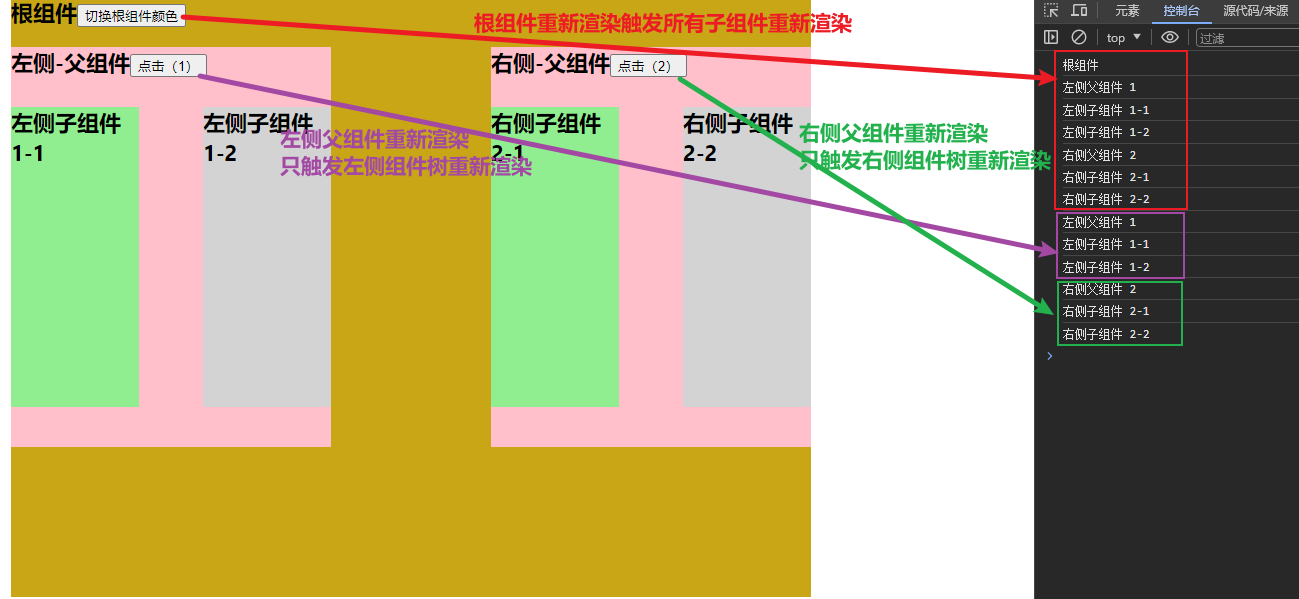
A. setState()的两个作用:1.修改state 2.更新组件(UI)
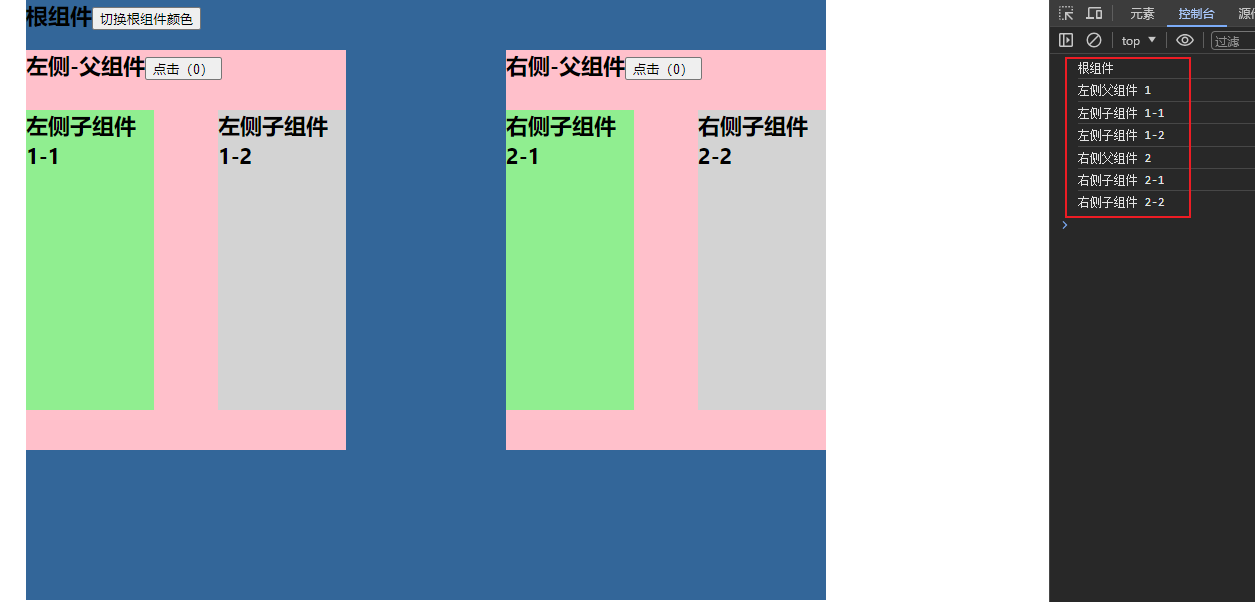
B. 过程:父组件重新渲染时,也会重新渲染子组件。但只会渲染当前组件子树(当前组件及其所有子组件)
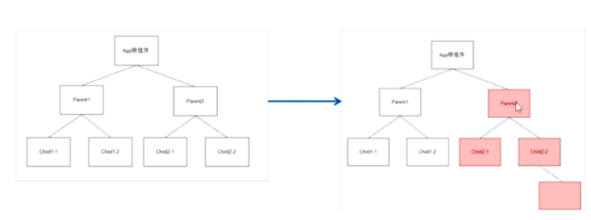
首次加载时渲染
点击根组件会触发所有组件,点击左侧父组件1时会触发局部更新,只更新当前组件与子组件,不会触发父组件
2comUpdate.jsimport React from "react"; import ReactDOM from "react-dom/client"; import "./comUpdate.css"; class App50 extends React.Component { state = { bgColor: "#369", }; getBgColor = () => { return Math.floor(Math.random() * 256); }; toggleBgColor = () => { this.setState({ bgColor: `rgb(${this.getBgColor()},${this.getBgColor()},${this.getBgColor()})`, }); }; render() { console.log("根组件"); return ( <div className="rootParent" style={{ backgroundColor: this.state.bgColor }} > 根组件 <button onClick={this.toggleBgColor}>切换根组件颜色</button> <div className="app-wrapper"> <Parent1></Parent1> <Parent2></Parent2> </div> </div> ); } } // 左边 class Parent1 extends React.Component { state = { count: 0, }; handleClick = (state) => { this.setState((state) => { return { count: state.count + 1, }; }); }; render() { console.log("左侧父组件 1"); return ( <div className="Parent1"> <span>左侧-父组件</span> <button onClick={this.handleClick}>点击({this.state.count})</button> <div className="parentWrapper1"> <Child1></Child1> <Child2></Child2> </div> </div> ); } } class Child1 extends React.Component { render() { console.log("左侧子组件 1-1"); return <div className="child1">左侧子组件1-1</div>; } } class Child2 extends React.Component { render() { console.log("左侧子组件 1-2"); return <div className="child2">左侧子组件1-2</div>; } } // 右边 class Parent2 extends React.Component { state = { count: 0, }; handleClick = (state) => { this.setState((state) => { return { count: state.count + 2, }; }); }; render() { console.log("右侧父组件 2"); return ( <div className="Parent1"> <span>右侧-父组件</span> <button onClick={this.handleClick}>点击({this.state.count})</button> <div className="parentWrapper1"> <Child3></Child3> <Child4></Child4> </div> </div> ); } } class Child3 extends React.Component { render() { console.log("右侧子组件 2-1"); return <div className="child1">右侧子组件2-1</div>; } } class Child4 extends React.Component { render() { console.log("右侧子组件 2-2"); return <div className="child2">右侧子组件2-2</div>; } } export default App50;- 1
- 2
- 3
- 4
- 5
- 6
- 7
- 8
- 9
- 10
- 11
- 12
- 13
- 14
- 15
- 16
- 17
- 18
- 19
- 20
- 21
- 22
- 23
- 24
- 25
- 26
- 27
- 28
- 29
- 30
- 31
- 32
- 33
- 34
- 35
- 36
- 37
- 38
- 39
- 40
- 41
- 42
- 43
- 44
- 45
- 46
- 47
- 48
- 49
- 50
- 51
- 52
- 53
- 54
- 55
- 56
- 57
- 58
- 59
- 60
- 61
- 62
- 63
- 64
- 65
- 66
- 67
- 68
- 69
- 70
- 71
- 72
- 73
- 74
- 75
- 76
- 77
- 78
- 79
- 80
- 81
- 82
- 83
- 84
- 85
- 86
- 87
- 88
- 89
- 90
- 91
- 92
- 93
- 94
- 95
- 96
- 97
- 98
- 99
- 100
- 101
- 102
- 103
- 104
- 105
- 106
- 107
- 108
- 109
- 110
- 111
index.jsimport App50 from "./2comUpdate"; ReactDOM.createRoot(document.getElementById("root")).render(<App50></App50>);- 1
- 2
comUpdate.css.rootParent { width: 800px; height: 600px; margin: 0 auto; font-weight: 700; font-size: 22px; } .app-wrapper { display: flex; justify-content: space-between; margin-top: 20px; } .Parent1 { width: 40%; height: 400px; background-color: pink; } .parentWrapper1 { display: flex; justify-content: space-between; margin-top: 30px; } .child1 { width: 40%; height: 300px; background-color: lightgreen; } .child2 { width: 40%; height: 300px; background-color: lightgrey; } .Parent2 { width: 40%; height: 400px; background-color: salmon; }- 1
- 2
- 3
- 4
- 5
- 6
- 7
- 8
- 9
- 10
- 11
- 12
- 13
- 14
- 15
- 16
- 17
- 18
- 19
- 20
- 21
- 22
- 23
- 24
- 25
- 26
- 27
- 28
- 29
- 30
- 31
- 32
- 33
- 34
- 35
- 36
- 37
- 38
- 39
- 40
- 41
- 42
- 43
6.组件性能优化
6.1 减轻state
A. 减轻state:只存储跟组件渲染相关的数据(比如:count/列表数据/loading等)
B. 注意:不用做渲染的数据不要放在state中,比如定时器id等
C. 对于这种需要在多个方法中用到的数据,应该放在this中6.2 避免不要的重新渲染
A. 组件更新机制:父组件更新会引起子组件也被更新,这种思路很清晰
B. 问题:子组件没有任何变化时也会重新渲染
C. 如何避免不必要的重新渲染吗?
D. 解决方案:使用钩子函数shouldComponentUpdate(nextProps,nextState)
E. 作用:通过返回值决定该组件是否重新渲染,返回true表示重新渲染,false表示不重新渲染
F. 触发时机:更新阶段的钩子函数,组件重新渲染前执行(shouldComponentUpdate->render)
3performanceOptimize.jsimport React from "react"; class App62 extends React.Component { state = { count: 0, }; handleClick = () => { this.setState((state) => { return { count: state.count + 1, }; }); }; //钩子函数 shouldComponentUpdate(nextProps, nextState) { //返回false,阻止组件重新渲染 // return false; //最新的状态 console.log("最新的state:", nextState); //更新前的状态 console.log("this.state:", this.state); return true; } render() { console.log("组件更新了"); return ( <div> <h1>count:{this.state.count}</h1> <button onClick={this.handleClick}>点击</button> </div> ); } } export default App62;- 1
- 2
- 3
- 4
- 5
- 6
- 7
- 8
- 9
- 10
- 11
- 12
- 13
- 14
- 15
- 16
- 17
- 18
- 19
- 20
- 21
- 22
- 23
- 24
- 25
- 26
- 27
- 28
- 29
- 30
- 31
- 32
- 33
- 34
- 35
index.jsimport App62 from "./3performanceOptimize"; ReactDOM.createRoot(document.getElementById("root")).render(<App62></App62>);- 1
- 2
6.2.1 案例:随机数(nextState)
4App621Random.jsimport React from "react"; class App621Random extends React.Component { state = { number: 0, }; getRandom = () => { this.setState((state) => { return { number: Math.floor(Math.random() * 3), }; }); }; //因为两次生成的随机数可能相同,如果相同,此时,不需要重新渲染 shouldComponentUpdate(nextProps, nextState) { if (nextState.number === this.state.number) { return false; } return true; } render() { console.log("触发渲染"); return ( <div> <h1>随机数:{this.state.number}</h1> <button onClick={this.getRandom}>获取随机数</button> </div> ); } } export default App621Random;- 1
- 2
- 3
- 4
- 5
- 6
- 7
- 8
- 9
- 10
- 11
- 12
- 13
- 14
- 15
- 16
- 17
- 18
- 19
- 20
- 21
- 22
- 23
- 24
- 25
- 26
- 27
- 28
- 29
- 30
- 31
- 32
- 33
index.jsimport App621Random from "./4App621Random"; ReactDOM.createRoot(document.getElementById("root")).render( <App621Random></App621Random> );- 1
- 2
- 3
- 4
6.2.2 案例:随机数(NextProps)
4App621Random.jsimport React from "react"; class App621Random extends React.Component { state = { number: 0, }; getRandom = () => { this.setState((state) => { return { number: Math.floor(Math.random() * 3), }; }); }; //因为两次生成的随机数可能相同,如果相同,此时,不需要重新渲染 // shouldComponentUpdate(nextProps, nextState) { // if (nextState.number === this.state.number) { // return false; // } // return true; // } render() { console.log("触发父组件的render"); return ( <div> {/*随机数:{this.state.number}
*/} <ChildNumber number={this.state.number}></ChildNumber> <button onClick={this.getRandom}>获取随机数</button> </div> ); } } class ChildNumber extends React.Component { shouldComponentUpdate(nextProps, nextState) { console.log("最新props:", nextProps, ",当前props:", this.props); return nextProps.number !== this.props.number; } render() { console.log("子组件中的render"); return <h1>子组件的随机数:{this.props.number}</h1>; } } export default App621Random;- 1
- 2
- 3
- 4
- 5
- 6
- 7
- 8
- 9
- 10
- 11
- 12
- 13
- 14
- 15
- 16
- 17
- 18
- 19
- 20
- 21
- 22
- 23
- 24
- 25
- 26
- 27
- 28
- 29
- 30
- 31
- 32
- 33
- 34
- 35
- 36
- 37
- 38
- 39
- 40
- 41
- 42
- 43
index.jsimport App621Random from "./4App621Random"; ReactDOM.createRoot(document.getElementById("root")).render( <App621Random></App621Random> );- 1
- 2
- 3
- 4
6.3 纯组件
A. 纯组件:PureComponent与React.Component功能相似
B. 区别:PureComponent内部自动实现了shouldComponentUpdate钩子,无需手动比较
C. 原理:纯组件内部通过对比前后两次props和state的值,来决定是否重新渲染组件
5pure.jsimport React from "react"; class PureApp extends React.PureComponent { state = { number: 0, }; getRandom = () => { this.setState((state) => { return { number: Math.floor(Math.random() * 2), }; }); }; render() { console.log("父组件render"); return ( <div> <h1>父组件随机数:{this.state.number}</h1> <ChildPure number={this.state.number}></ChildPure> <button onClick={this.getRandom}>获取随机数</button> </div> ); } } class ChildPure extends React.PureComponent { render() { console.log("子组件render"); return <h1>子组件随机数:{this.props.number}</h1>; } } export default PureApp;- 1
- 2
- 3
- 4
- 5
- 6
- 7
- 8
- 9
- 10
- 11
- 12
- 13
- 14
- 15
- 16
- 17
- 18
- 19
- 20
- 21
- 22
- 23
- 24
- 25
- 26
- 27
- 28
- 29
- 30
- 31
- 32
index.jsimport PureApp from "./5pure"; ReactDOM.createRoot(document.getElementById("root")).render( <PureApp></PureApp> );- 1
- 2
- 3
- 4
6.3.1 浅层对比
A. 说明:纯组件内部的对比是shallow compare(浅层对比)
B. 对于值类型来说:比较两个值是否相同(直接赋值即可,没有坑)
C.对于引用类型来说:只比较对象的引用(地址)是否相同
D.注意:state或props中属性值为引用类型时,应该创建新数据,不要直接修改数据!
shallow.jsimport React from "react"; class ShallowRandom extends React.PureComponent { state = { obj: { number: 0, }, }; getRandom = () => { // 错误演示:直接修改原始对象中属性的值 // const newObj = this.state.obj; // newObj.number = Math.floor(Math.random() * 2); // this.setState((state) => { // return { // obj: newObj, // }; // }); //正确做法:创建新对象 const newObj = { ...this.state.obj, number: Math.floor(Math.random() * 2) }; this.setState(() => { return { obj: newObj, }; }); }; render() { console.log("父组件render"); return ( <div> <h1>父组件随机数的值:{this.state.obj.number}</h1> <ChildRandom number={this.state.obj.number}></ChildRandom> <button onClick={this.getRandom}>重新生成随机数</button> </div> ); } } class ChildRandom extends React.PureComponent { render() { console.log("子组件render"); return <h1>子组件随机数:{this.props.number}</h1>; } } export default ShallowRandom;- 1
- 2
- 3
- 4
- 5
- 6
- 7
- 8
- 9
- 10
- 11
- 12
- 13
- 14
- 15
- 16
- 17
- 18
- 19
- 20
- 21
- 22
- 23
- 24
- 25
- 26
- 27
- 28
- 29
- 30
- 31
- 32
- 33
- 34
- 35
- 36
- 37
- 38
- 39
- 40
- 41
- 42
- 43
- 44
- 45
- 46
import ShallowRandom from "./6shallow"; ReactDOM.createRoot(document.getElementById("root")).render( <ShallowRandom></ShallowRandom> );- 1
- 2
- 3
- 4
7.虚拟DOM和DIFF算法
A. React更新视图的思路是:只是state变化就重新渲染视图
B. 特点:思路非常清晰
C. 问题:组件中只有一个DOM元素需要更新时,也得把整个组件的内容重新渲染到页面中?不是
D. 理想状态:部分更新,只更新变化的地方
E. 问题:React是如何做到部分更新的?虚拟DOM配合Diff算法
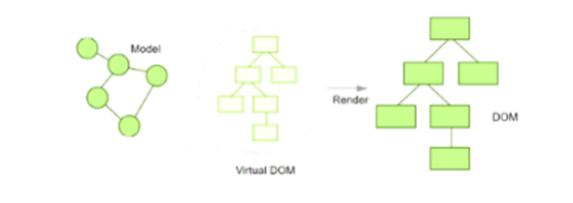
F. 虚拟DOM:本质上就是一个JS对象,用来描述你希望在屏幕上看到的内容(UI)
7.1 执行过程
A. 初次渲染时,React会根据初始state(Model),创建一个虚拟DOM对象(树)。
B. 根据虚拟DOM生成真正的DOM,渲染到页面中
C. 当数据变化后(setState()),重新根据新的数据,创建新的虚拟DOM对象(树)
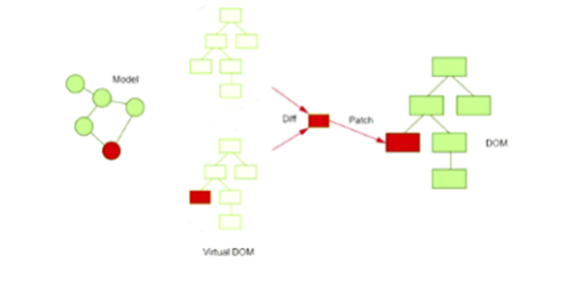
A. 与上一次得到的虚拟DOM对象,使用Diff算法对比(找不同),得到需要更新的内容
B. 最终,React只将变化的内容更新(patch)到DOM中,重新渲染到页面
7.2 代码演示
A. 组件render()调用后,根据状态和JSX结构生成虚拟DOM对象
B. 示例中,只更新P元素的文本节点内容
7.vdom.jsimport React from "react"; class Vdom extends React.PureComponent { state = { number: 0, }; getRandom = () => { this.setState(() => { return { number: Math.floor(Math.random() * 3), }; }); }; render() { return ( <div> <h1>随机数</h1> <h1>{this.state.number}</h1> <button onClick={this.getRandom}>重新生成</button> </div> ); } } export default Vdom;- 1
- 2
- 3
- 4
- 5
- 6
- 7
- 8
- 9
- 10
- 11
- 12
- 13
- 14
- 15
- 16
- 17
- 18
- 19
- 20
- 21
- 22
- 23
- 24
- 25
index.jsimport Vdom from "./7vdom"; ReactDOM.createRoot(document.getElementById("root")).render(<Vdom></Vdom>);- 1
- 2
8.总结
A. 工作角度:应用第一,原理第二
B. 原理有助于更好的理解React的自身运行机制
C. SetState()异步更新数据
D. 父组件更新导致子组件更新,纯组件提升性能
E. 思路清晰简单为前提,虚拟DOM和Diff保效率
F. 虚拟DOM->state+JSX
G. 虚拟DOM的真正价值从来都不是性能
H. 虚拟DOM使react脱离了浏览器的束缚 -
相关阅读:
Spring 事务的简单了解
Python代码大全,海量代码任你下载
WordPress编辑器增强插件TinyMCE Advanced
Flutter简单聊天界面布局及语音录制播放
kr 第三阶段(六)C++ 逆向
移动端测试
Opencv立体相机标定
JVM内存布局及GC原理
基于神经网络的呼吸音分类算法
Spring+SpringBoot+SpringCloud 全攻略
- 原文地址:https://blog.csdn.net/ioncannontic/article/details/136362850
