-
黑马头条-day10
app端文章搜索
1、文章搜索
1.1 ElasticSearch环境搭建
1、启动ElasticSearch
docker start elasticsearch
2、启动Kibana
docker start kibana
3、kibana测试分词效果
1.2 索引库创建
①需求分析

- 用户输入关键词 比如
java只要文章titile、content包含此关键词就可以搜索出来,搜索黑马程序员能把黑马、程序员相关都搜索出来 - 搜索的文章结果里
词条要高亮显示 - 用户点击搜索结果任意一条可查看文章详情
②ES导入数据场景分析

③创建索引和映射
搜索结果页面展示什么内容?
- 标题
- 布局
- 封面图片
- 发布时间
- 作者名称
- 文章id
- 作者id
- 静态url
哪些字段需要索引和分词?
- 标题
- 内容
使用Kibana添加映射
索引库名称:app_info_articlePUT /app_info_article { "mappings":{ "properties":{ "id":{ "type":"long" }, "publishTime":{ "type":"date" }, "layout":{ "type":"integer" }, "images":{ "type":"keyword", "index": false }, "staticUrl":{ "type":"keyword", "index": false }, "authorId": { "type": "long" }, "authorName": { "type": "keyword" }, "title":{ "type":"text", "analyzer":"ik_max_word" }, "content":{ "type":"text", "analyzer":"ik_max_word" } } } }- 1
- 2
- 3
- 4
- 5
- 6
- 7
- 8
- 9
- 10
- 11
- 12
- 13
- 14
- 15
- 16
- 17
- 18
- 19
- 20
- 21
- 22
- 23
- 24
- 25
- 26
- 27
- 28
- 29
- 30
- 31
- 32
- 33
- 34
- 35
- 36
- 37
- 38
1.3 索引数据同步
①app文章历史数据导入ES
1、创建es索引和映射
前面创建过了
2、文章微服务集成es功能
导入es服务的依赖
3、编写单元测试将历史状态正常的文章数据同步到es中
数据量特别少一次导入
数据量特别多分批导入,一次一两千条mapper接口和sql语句
/** * 查询es需要的全部文章数据 * @return */ List<SearchArticleVo> loadSearchArticleList();- 1
- 2
- 3
- 4
- 5
<select id="loadSearchArticleList" resultType="com.heima.model.search.vos.SearchArticleVo"> select aa.*, aacc.content from ap_article aa left join ap_article_config aac on aa.id=aac.article_id LEFT JOIN ap_article_content aacc on aa.id = aacc.article_id where aac.is_down=0 and aac.is_delete=0 select>- 1
- 2
- 3
- 4
- 5
- 6
测试类代码
@Autowired private RestHighLevelClient client; /** * 将历史文章数据导入ES中 */ @Test public void testImportES() throws IOException { // 1. 查询所有状态正常的文章列表 List<SearchArticleVo> searchArticleVoList = apArticleMapper.loadSearchArticleList(); // 2. 构建BulkRequest批量请求对象 BulkRequest bulkRequest = new BulkRequest(); // 3. 遍历文章列表逐一添加IndexRequest for (SearchArticleVo searchArticleVo : searchArticleVoList) { IndexRequest indexRequest = new IndexRequest("app_info_article"); indexRequest.source(JSON.toJSONString(searchArticleVo), XContentType.JSON).id(String.valueOf(searchArticleVo.getId())); bulkRequest.add(indexRequest); } // 4. 执行restHighLevelClient的bulk批量插入文档请求 BulkResponse bulk = client.bulk(bulkRequest, RequestOptions.DEFAULT); // 5. 获取响应结果数据并输出 int status = bulk.status().getStatus(); System.out.println("导入完成,响应状态码"+status); System.out.println("=============================================================================================="); BulkItemResponse[] items = bulk.getItems(); for (BulkItemResponse item : items) { String result = item.getResponse().getResult().getLowercase(); System.out.println(result); } }- 1
- 2
- 3
- 4
- 5
- 6
- 7
- 8
- 9
- 10
- 11
- 12
- 13
- 14
- 15
- 16
- 17
- 18
- 19
- 20
- 21
- 22
- 23
- 24
- 25
- 26
- 27
- 28
- 29
②文章实时数据导入ES
跨服务调用的异步,要使用mq

生产者kafka: bootstrap-servers: 192.168.200.130:9092 producer: retries: 10 key-serializer: org.apache.kafka.common.serialization.StringSerializer value-serializer: org.apache.kafka.common.serialization.StringSerializer- 1
- 2
- 3
- 4
- 5
- 6
// 5. 封装es所需的数据转为JSON,生产到Kafka中 SearchArticleVo searchArticleVo = new SearchArticleVo(); BeanUtils.copyProperties(apArticle,searchArticleVo); searchArticleVo.setStaticUrl(url); searchArticleVo.setContent(contentStr); String articleJson = JSON.toJSONString(searchArticleVo); kafkaTemplate.send(ArticleConstants.ARTICLE_ES_SYNC_TOPIC,articleJson);- 1
- 2
- 3
- 4
- 5
- 6
- 7
消费者
spring: kafka: bootstrap-servers: 192.168.200.130:9092 consumer: group-id: ${spring.application.name} key-deserializer: org.apache.kafka.common.serialization.StringDeserializer value-deserializer: org.apache.kafka.common.serialization.StringDeserializer- 1
- 2
- 3
- 4
- 5
- 6
- 7
@Component @Slf4j public class ApArticleImportESListener { @Autowired private RestHighLevelClient client; @KafkaListener(topics = ArticleConstants.ARTICLE_ES_SYNC_TOPIC) public void msg (ConsumerRecord<String,String> consumerRecord) { if (consumerRecord != null) { String articleJSON = consumerRecord.value(); SearchArticleVo searchArticleVo = JSON.parseObject(articleJSON, SearchArticleVo.class); IndexRequest indexRequest = new IndexRequest("app_info_article"); indexRequest.source(articleJSON, XContentType.JSON).id(searchArticleVo.getId().toString()); try { IndexResponse indexResponse = client.index(indexRequest, RequestOptions.DEFAULT); String result = indexResponse.getResult().getLowercase(); String desc = result.equals("created") ? "导入成功" : "导入失败"; log.info("[异步导入APP文章到ES],导入结果:{}", desc); } catch (IOException e) { throw new RuntimeException(e); } } } }- 1
- 2
- 3
- 4
- 5
- 6
- 7
- 8
- 9
- 10
- 11
- 12
- 13
- 14
- 15
- 16
- 17
- 18
- 19
- 20
- 21
- 22
- 23
- 24
- 25
- 26
- 27
- 28
- 29
1.4 文章搜索多条件复合查询
①关键词搜索

②搜索接口定义

2、搜索历史记录
2.1 需求说明
- 异步保存搜索记录
- 默认查询10条搜索记录,按照搜索关键词的时间倒序
- 可以删除搜索记录
2.2 数据存储说明
用户的搜索记录,需要给每一个用户都保存一份,数据量大,要求加载速度快,通常这样的数据存储到
mongodb更合适,不建议直接存储到关系型数据库中2.1 异步保存搜索历史
①实现思路
保存的数据量太大,不想同步影响效率,采用异步保存

@Service @Slf4j public class ApUserSearchServiceImpl implements ApUserSearchService { @Autowired private MongoTemplate mongoTemplate; @Async("taskExecutor") @Override public void insert(String keyword, Integer userId) { // 1. 查询搜索记录 Query query = Query.query(Criteria.where("keyword").is(keyword).and("userId").is(userId)); ApUserSearch apUserSearch = mongoTemplate.findOne(query, ApUserSearch.class); // 2. 如果搜索记录不存在,则保存搜索记录 if (apUserSearch == null) { apUserSearch = new ApUserSearch(); SnowflakeIdWorker isWorker = new SnowflakeIdWorker(10, 10); apUserSearch.setId(isWorker.nextId());// 使用雪花算法的值当做主键ID apUserSearch.setUserId(userId); apUserSearch.setKeyword(keyword); apUserSearch.setIsDeleted(0); // 未删除 apUserSearch.setCreatedTime(new Date()); apUserSearch.setUpdatedTime(new Date()); mongoTemplate.save(apUserSearch); return; } // 3. 如果搜索记录存在且未删除,则更新updatedTime if (apUserSearch.getIsDeleted() == 0) { apUserSearch.setUpdatedTime(new Date()); mongoTemplate.save(apUserSearch); return; } // 4. 如果搜索记录存在且已删除,则更新为未删除及更新updateTime apUserSearch.setIsDeleted(0); apUserSearch.setUpdatedTime(new Date()); mongoTemplate.save(apUserSearch); } }- 1
- 2
- 3
- 4
- 5
- 6
- 7
- 8
- 9
- 10
- 11
- 12
- 13
- 14
- 15
- 16
- 17
- 18
- 19
- 20
- 21
- 22
- 23
- 24
- 25
- 26
- 27
- 28
- 29
- 30
- 31
- 32
- 33
- 34
- 35
- 36
- 37
- 38
- 39
- 40
2.2 查看搜索历史列表
①接口定义
按照当前用户,按照时间倒序查询

@Override public ResponseResult findUserSearch() { // 根据条件查询搜索记录列表(条件:userId和isDeleted 结果:updateTime倒序) Query query = Query.query(Criteria.where("userId").is(ThreadLocalUtil.getUserId()).and("isDeleted").is(0)).with(Sort.by(Sort.Direction.DESC,"updateTime")); query.limit(10); List<ApUserSearch> apUserSearchList = mongoTemplate.find(query, ApUserSearch.class); return ResponseResult.okResult(apUserSearchList); }- 1
- 2
- 3
- 4
- 5
- 6
- 7
- 8
- 9
- 10
- 11
2.3 删除搜索历史
根据搜索历史id删除

@Override public ResponseResult delUserSearch(HistorySearchDto dto) { ApUserSearch apUserSearch = mongoTemplate.findById(dto.getId(), ApUserSearch.class); if (apUserSearch == null) { return ResponseResult.errorResult(AppHttpCodeEnum.DATA_NOT_EXIST,"搜索记录不存在"); } // 更新记录为已删除 apUserSearch.setIsDeleted(1); apUserSearch.setUpdatedTime(new Date()); mongoTemplate.save(apUserSearch); return ResponseResult.okResult(AppHttpCodeEnum.SUCCESS); }- 1
- 2
- 3
- 4
- 5
- 6
- 7
- 8
- 9
- 10
- 11
- 12
- 13
3、联想词查询
需求分析
根据用户输入的关键字展示联想词

3.1 联想词的来源
通常是网上搜索频率比较高的一些词,通常在企业中有两部分来源:
第一:自己维护搜索词
通过分析用户搜索频率较高的词,按照排名作为搜索词第二:第三方获取
关键词规划师(百度)、5118、爱站网3.2 联想词功能实现
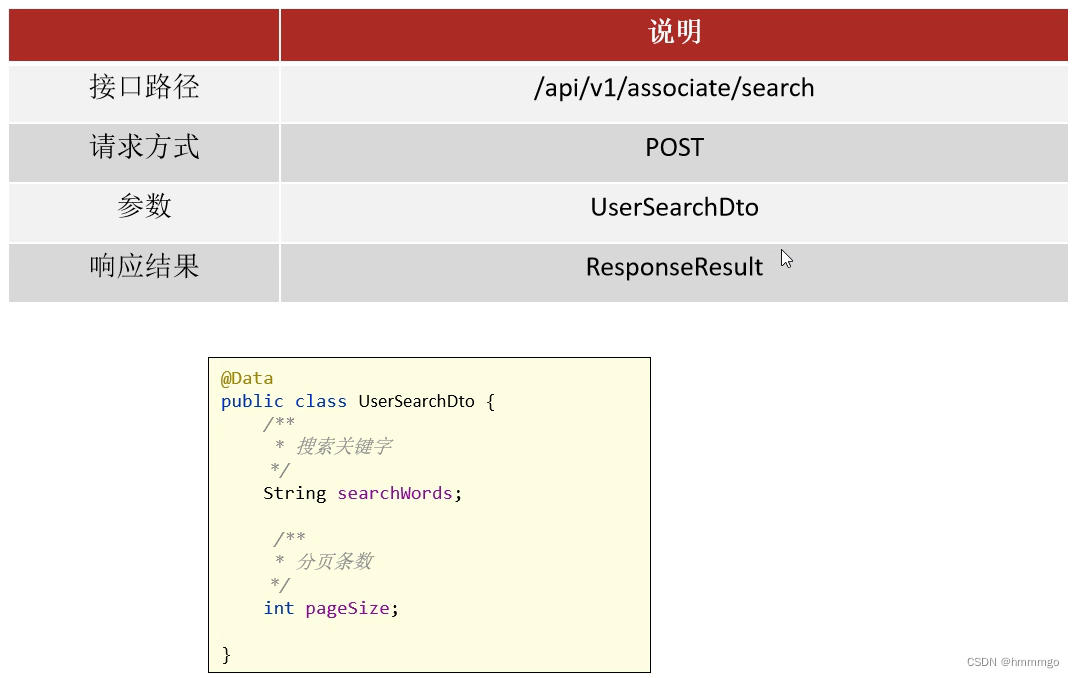
接口定义
正则表达式说明

@Service @Slf4j public class ApAssociateWordsServiceImpl implements ApAssociateWordsService { @Autowired private MongoTemplate mongoTemplate; @Override public ResponseResult search(UserSearchDto dto) { // 替换一切特殊字符 dto.setSearchWords(dto.getSearchWords().replaceAll("[^\u4e00-\u9fa5a-zA-z0-9]", "")); List<ApAssociateWords> apAssociateWordsList = mongoTemplate.find(Query.query(Criteria.where("associateWords").regex(".*?\\" + dto.getSearchWords() + ".*")).limit(dto.getPageSize()), ApAssociateWords.class); return ResponseResult.okResult(apAssociateWordsList); } }- 1
- 2
- 3
- 4
- 5
- 6
- 7
- 8
- 9
- 10
- 11
- 12
- 13
- 14
- 15
- 16
- 17
- 18
- 用户输入关键词 比如
-
相关阅读:
知识图谱内容梳理
Jackson+Feign反序列化问题排查
3、自然语言和单词的分布式表示(下)
【C++】单例模式
c 语言基础题目:L1-037 A除以B
StreamSets解析MySQL Binlog写入Kafka
DB2 SQL Error: SQLCODE=-911, SQLSTATE=40001, SQLERRMC=2
深度学习:模型训练过程中Trying to backward through the graph a second time解决方案
自动驾驶感知算法实战14——感知算法模型生产线
Linux 代理服务器 squid 安装和使用 [正向代理]
- 原文地址:https://blog.csdn.net/hmmmgo/article/details/136192026
