-
10 Redis之SB整合Redis+ 高并发问题 + 分布式锁
7. SB整合Redis
Spring Boot 中可以直接使用 Jedis 实现对 Redis 的操作,但一般不这样用,而是使用 Redis操作模板 RedisTemplate 类的实例来操作 Redis。
RedisTemplate 类是一个对 Redis 进行操作的模板类。该模板类中具有很多方法,这些方法很多与 Redis 操作命令同名或类似。例如,delete()、keys()、scan(),还有事务相关的 multi()、exec()、discard()、watch()等。当然还有获取对各种 Value 类型进行操作的操作实例的两类方法 boundXxxOps(k)与 opsForXxx()。
7.1 需求
对于一个资深成熟的金融产品交易平台,其用户端首页一般会展示其最新金融产品列表,同时还为用户提供了产品查询功能。
另外,为了显示平台的实力与信誉,在平台首页非常显眼的位置还会展示平台已完成的总交易额与注册用户数量。对于管理端,管理员可通过管理页面修改产品、上架新产品、下架老产品。
为了方便了解 Redis 与 Spring Boot 的整合流程,这里对系统进行了简化:用户端首页仅提供根据金融产品名称的查询,显眼位置仅展示交易总额。
管理端仅实现上架新产品功能。7.2 准备
- 创建一个SB工程 , JDK8, SB版本2.7.4
- 导入依赖
- resource下创建一个文件夹webapp
- 创建一张product表
- 编写yaml文件
<parent> <groupId>org.springframework.bootgroupId> <artifactId>spring-boot-starter-parentartifactId> <version>2.7.4version> <relativePath/> parent> <groupId>com.sunsplantergroupId> <artifactId>SB-RedisartifactId> <version>0.0.1-SNAPSHOTversion> <name>SB-Redisname> <description>SB-Redisdescription> <properties> <java.version>17java.version> properties> <dependencies> <dependency> <groupId>org.projectlombokgroupId> <artifactId>lombokartifactId> dependency> <dependency> <groupId>org.mybatis.spring.bootgroupId> <artifactId>mybatis-spring-boot-starterartifactId> <version>1.3.2version> dependency> <dependency> <groupId>mysqlgroupId> <artifactId>mysql-connector-javaartifactId> <version>5.1.47version> dependency> <dependency> <groupId>com.alibabagroupId> <artifactId>druidartifactId> <version>1.1.12version> dependency> <dependency> www.bjpowernode.com 187 / 248 Copyright© 动力节点 <groupId>org.apache.tomcat.embedgroupId> <artifactId>tomcat-embed-jasperartifactId> dependency> <dependency> <groupId>javax.servletgroupId> <artifactId>jstlartifactId> <version>1.2version> dependency> <dependency> <groupId>org.springframework.bootgroupId> <artifactId>spring-boot-starter-webartifactId> dependency> <dependency> <groupId>org.springframework.bootgroupId> <artifactId>spring-boot-starter-testartifactId> <scope>testscope> dependency> dependencies> <build> <resources> <resource> <directory>src/main/javadirectory> <includes> <include>**/*.xmlinclude> includes> resource> <resource> <directory>src/main/webappdirectory> <targetPath>META-INF/resourcestargetPath> <includes> <include>**/*.*include> includes> resource> resources> build> project>- 1
- 2
- 3
- 4
- 5
- 6
- 7
- 8
- 9
- 10
- 11
- 12
- 13
- 14
- 15
- 16
- 17
- 18
- 19
- 20
- 21
- 22
- 23
- 24
- 25
- 26
- 27
- 28
- 29
- 30
- 31
- 32
- 33
- 34
- 35
- 36
- 37
- 38
- 39
- 40
- 41
- 42
- 43
- 44
- 45
- 46
- 47
- 48
- 49
- 50
- 51
- 52
- 53
- 54
- 55
- 56
- 57
- 58
- 59
- 60
- 61
- 62
- 63
- 64
- 65
- 66
- 67
- 68
- 69
- 70
- 71
- 72
- 73
- 74
- 75
DROP TABLE IF EXISTS `product`; CREATE TABLE `product` ( `id` int(11) NOT NULL AUTO_INCREMENT, `name` varchar(20) DEFAULT NULL, `rate` double DEFAULT NULL, `amount` double DEFAULT NULL, `raised` double DEFAULT NULL, `cycle` int(11) DEFAULT NULL, `endTime` char(10) DEFAULT '0', PRIMARY KEY (`id`) ) ENGINE=InnoDB AUTO_INCREMENT=9 DEFAULT CHARSET=utf8; www.bjpowernode.com 190 / 248 Copyright© 动力节点 INSERT INTO `product` VALUES (1,'天鑫添益 2',2.76,50000,20000,30,'2022-07-10'),(2,'国 泰添益',2.86,30000,30000,60,'2022-07-12'),(3,'国泰高鑫 ',2.55,60000,50000,90,'2022-07-09'),(4,'国福民安 ',2.96,30000,20000,7,'2022-05-10'),(5,'天益鑫多 ',2.65,80000,60000,20,'2022-07-05'),(6,'惠农收益 ',3.05,30000,20000,10,'2022-06-10'),(7,'惠农三鑫 ',2.76,50000,30000,30,'2022-07-02'),(8,'励学收益',2.86,30000,20000,20,'2022-07-11');- 1
- 2
- 3
- 4
- 5
- 6
- 7
- 8
- 9
- 10
- 11
- 12
- 13
- 14
- 15
- 16
- 17
- 18
- 19
mybatis: mapper-locations: classpath:com/sunsplanter/dao/*.xml type-aliases-package: com.sunsplanter.bean spring: datasource: type: com.alibaba.druid.pool.DruidDataSource url: jdbc:mysql://localhost:3306/tanhua?useUnicode=true&characterEncoding=UTF-8&useSSL=false&serverTimezone=GMT username: root password: ??? driver-class-name: com.mysql.cj.jdbc.Driver Logging: pattern: console: level-%-5level - %msg%n- 1
- 2
- 3
- 4
- 5
- 6
- 7
- 8
- 9
- 10
- 11
- 12
- 13
- 14
- 15
7.3 编写代码
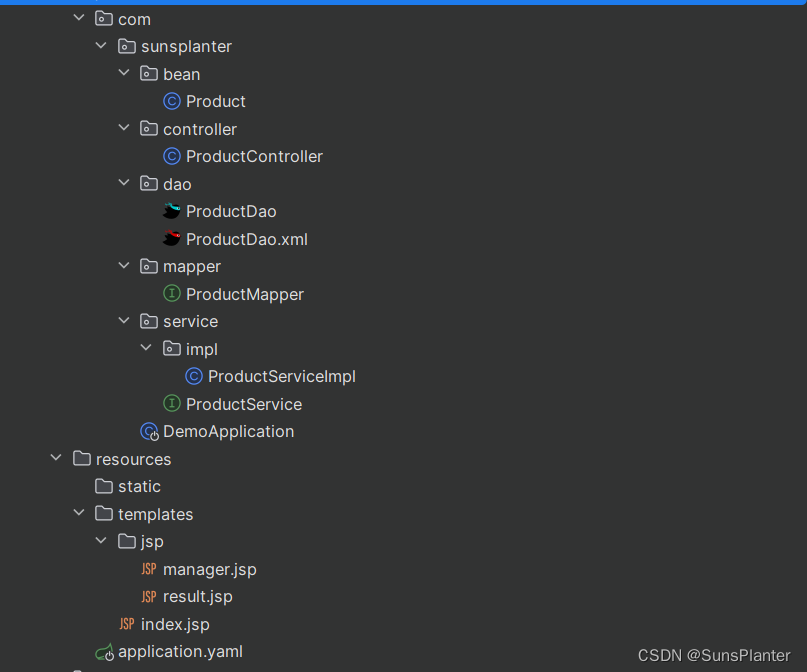
7.3.1 controller
package com.sunsplanter.controller; @Controller public class ProductController { @Autowired private ProductService service; @GetMapping("/") public String indexHandle(Model model) {// 查询总交易额 Double turnover = service.findTurnover(); model.addAttribute("turnover", turnover); //查询所有产品 List<Product> allProducts = service.findAllProducts(); model.addAttribute("allProducts", allProducts); return "/index.jsp"; } // 上架新产品,然后返回管理页面 @PostMapping("/product/") public String registerHandle(Product product, Model model) { //添加新产品 service.saveProduct(product); // 查询所有产品 List<Product> allProducts = service.findAllProducts(); model.addAttribute("allProducts", allProducts); return "/jsp/manager.jsp"; } // 根据产品名称查询产品 @GetMapping("/product/name") public String listHandle(String name, Model model) { List<Product> result = service.findProductsByName(name); model.addAttribute("result", result); model.addAttribute("name", name); return "/jsp/result.jsp"; } }- 1
- 2
- 3
- 4
- 5
- 6
- 7
- 8
- 9
- 10
- 11
- 12
- 13
- 14
- 15
- 16
- 17
- 18
- 19
- 20
- 21
- 22
- 23
- 24
- 25
- 26
- 27
- 28
- 29
- 30
- 31
- 32
- 33
- 34
- 35
- 36
- 37
- 38
- 39
- 40
7.3.2 service
package com.sunsplanter.service; public interface ProductService { void saveProduct(Product product); List<Product> findAllProducts(); Double findTurnover(); List<Product> findProductsByName(String name); } package com.sunsplanter.service.impl; @Service public class ProductServiceImpl implements ProductService { @Autowired private ProductDao dao; @Override @Transactional(rollbackFor = Exception.class) public void saveProduct(Product product) { dao.insertProduct(product); } @Override public List<Product> findProductsByName(String name) { return dao.selectProductsByName(name); } @Override public List<Product> findAllProducts() { return dao.selectAllProducts(); } @Override public Double findTurnover() { //获取当前日期并格式化 Date date =new Date(); SimpleDateFormat sdf = new SimpleDateFormat("yyyy-MM-dd"); //从DB中查询turnover Object turnover = dao.selectTurnover(sdf.format(date)); return (Double) turnover; } }- 1
- 2
- 3
- 4
- 5
- 6
- 7
- 8
- 9
- 10
- 11
- 12
- 13
- 14
- 15
- 16
- 17
- 18
- 19
- 20
- 21
- 22
- 23
- 24
- 25
- 26
- 27
- 28
- 29
- 30
- 31
- 32
- 33
- 34
- 35
- 36
- 37
- 38
- 39
- 40
- 41
- 42
- 43
- 44
- 45
- 46
- 47
- 48
- 49
- 50
- 51
7.3.3 bean
package com.sunsplanter.bean; @Data @AllArgsConstructor @NoArgsConstructor public class Product { private Integer id; private String name; //年华利率 private Double rate; //募集总额 private Double amount; //已募集金额 private Double raised; //产品募集结束时间 private Integer cycle; private String endtime; }- 1
- 2
- 3
- 4
- 5
- 6
- 7
- 8
- 9
- 10
- 11
- 12
- 13
- 14
- 15
- 16
- 17
- 18
- 19
- 20
- 21
- 22
- 23
- 24
7.3.4 dao接口和mapper.xml
package com.sunsplanter.dao; @Mapper public interface ProductDao { void insertProduct(Product product); List<Product> selectAllProducts(); List<Product> selectProductsByName(String name); Object selectTurnover(String date); }- 1
- 2
- 3
- 4
- 5
- 6
- 7
- 8
- 9
- 10
- 11
- 12
DOCTYPE mapper PUBLIC "-//mybatis.org//DTD Mapper 3.0//EN" "http://mybatis.org/dtd/mybatis-3-mapper.dtd"> <mapper namespace="com.sunsplanter.dao.ProductDao"> <insert id="insertProduct"> insert into product(name, rate, amount, raised, cycle, endTime) values (#{name}, #{rate}, #{amount}, #{raised}, #{cycle}, #{endTime}) insert> <select id="selectAllProducts" resultType="Product"> select id,name,rate, amount,raised, cycle,endTime from product select> <select id="selectProductsByName" resultType="Product"> select id,name,rate,amount,raised, cycle,endTime from product where name like '%'#{xxx}'%' select> <select id="selectTurnover" resultType="double"> select sum(raised) from product where endTime is not null and endTime < #{xxx} select> mapper>- 1
- 2
- 3
- 4
- 5
- 6
- 7
- 8
- 9
- 10
- 11
- 12
- 13
- 14
- 15
- 16
- 17
- 18
- 19
- 20
- 21
- 22
- 23
- 24
- 25
- 26
- 27
- 28
- 29
7.4 测试与问题
以上是一个纯SpringBoot项目, 并未整合任何Redis.以下示例
7.5 整合Redis
Spring Boot 与 Redis 整合 大体上为以下几步
- 在 POM 中导入依赖
- 在配置文件中注册 Redis 连接信息与缓存信息
- 需要缓存到 Redis 中的实体类必须要序列化
- Spring Boot 启动类中要添加@EnableCaching 注解
- 查询方法上要添加@Cacheable 注解
- 对数据进行写操作的方法上添加@CacheEvict 注解
- 对于需要手工操作 Redis 的方法,需通过 RedisTemplate 来获取操作对象
7.5.0 学习SB中的Redis操作
7.5.0.1 @Cacheable
@Cacheable可以标记在一个方法上,也可以标记在一个类上。
当标记在一个方法上时表示该方法是支持缓存的,当标记在一个类上时则表示该类所有的方法都是支持缓存的。对于一个支持缓存的方法,Spring会在其被调用后将其返回值缓存起来,以保证下次利用同样的参数来执行该方法时可以直接从缓存中获取结果,而不需要再次执行该方法。
Spring在缓存方法的返回值时是以键值对进行缓存的,值就是方法的返回结果,至于键的话,Spring又支持两种策略,默认策略和自定义策略,这个稍后会进行说明。需要注意的是当一个支持缓存的方法在对象内部被调用时是不会触发缓存功能的。
常用的属性 cacheNames/value :用来指定缓存组件的名字 key :缓存数据时使用的 key,可以用它来指定。默认是使用方法参数的值。(这个 key 你可以使用 spEL 表达式来编写) condition :可以用来指定符合条件的情况下才缓存 keyGenerator :key 的生成器。 key 和 keyGenerator 二选一使用 cacheManager :可以用来指定缓存管理器。从哪个缓存管理器里面获取缓存。 unless :否定缓存。当 unless 指定的条件为 true ,方法的返回值就不会被缓存。当然你也可以获取到结果进行判断。(通过 #result 获取方法结果) sync :是否使用异步模式。- 1
- 2
- 3
- 4
- 5
- 6
- 7
- 8
- 9
- 10
- 11
- 12
- 13
- 14
-
value属性指定Cache名称
value属性是必须指定的,其表示当前方法的返回值是会被缓存在哪个Cache上的,对应Cache的名称。其可以是一个Cache也可以是多个Cache,当需要指定多个Cache时其是一个数组。
@Cacheable("cache1")//Cache是发生在cache1上的 public User find(Integer id) { return null; }- 1
- 2
- 3
- 4
-
key属性自定义key
该属性支持SpringEL表达式。 当我们没有指定该属性时,Spring将使用默认策略生成key。- 1
- 2
我们这里先来看看自定义策略,至于默认策略会在后文单独介绍。
自定义策略是指我们可以通过Spring的EL表达式来指定我们的key。这里的EL表达式可以使用方法参数及它们对应的属性。使用方法参数时我们可以直接使用“#参数名”或者“#p参数index”。下面是几个使用参数作为key的示例。@Cacheable(value="users", key="#id") public User find(Integer id) { returnnull; } @Cacheable(value="users", key="#p0") public User find(Integer id) { returnnull; } @Cacheable(value="users", key="#user.id") public User find(User user) { returnnull; } @Cacheable(value="users", key="#p0.id") public User find(User user) { returnnull; }- 1
- 2
- 3
- 4
- 5
- 6
- 7
- 8
- 9
- 10
- 11
- 12
- 13
- 14
- 15
- 16
- 17
- 18
- 19
- 20
- 21
- 22
- 23
- 24
- 25
- 26
- 27
- 28
- 29
- 30
- 31
- 32
- 33
除了上述使用方法参数作为key之外,Spring还为我们提供了一个root对象可以用来生成key。通过该root对象我们可以获取到以下信息。
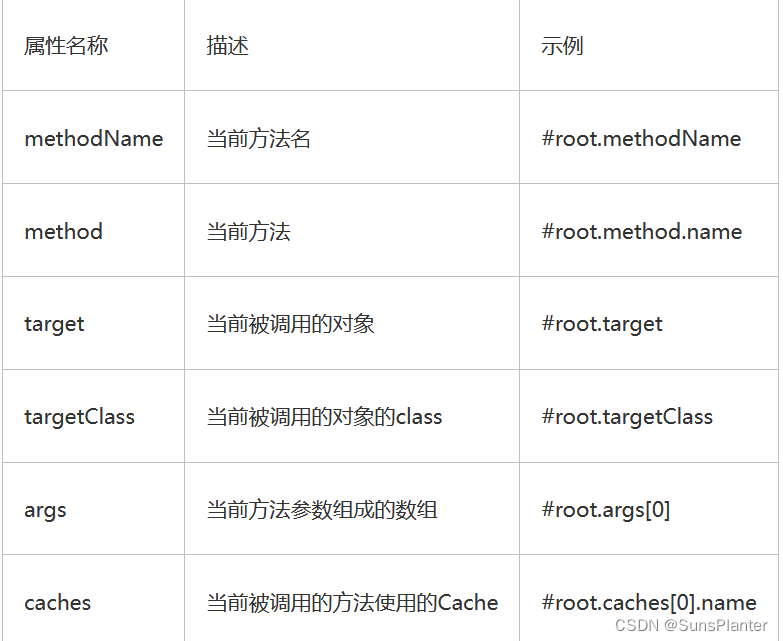
当我们要使用root对象的属性作为key时我们也可以将“#root”省略,因为Spring默认使用的就是root对象的属性。如:- 1
@Cacheable(value={"users", "xxx"}, key="caches[1].name") public User find(User user) { returnnull; }- 1
- 2
- 3
- 4
- 5
- 6
- condition属性指定发生的条件
有的时候我们可能并不希望缓存一个方法所有的返回结果。通过condition属性可以实现这一功能。
condition属性默认为空,表示将缓存所有的调用情形。
其值是通过SpringEL表达式来指定的,当为true时表示进行缓存处理;当为false时表示不进行缓存处理,即每次调用该方法时该方法都会执行一次。如下示例表示只有当user的id为偶数时才会进行缓存。
@Cacheable(value={"users"}, key="#user.id", condition="#user.id%2==0") public User find(User user) { System.out.println("find user by user " + user); return user; }- 1
- 2
- 3
- 4
- 5
- 6
- 7
- 8
7.5.0.2 @CacheEvict
@CacheEvict是用来标注在需要清除缓存元素的方法或类上的。 当标记在一个类上时表示其中所有的方法的**执行后**都会触发缓存的清除操作。 @CacheEvict可以指定的属性有value、key、condition、allEntries和beforeInvocation。 其中value、key和condition的语义与@Cacheable对应的属性类似。即value表示清除操作是发生在哪些Cache上的(对应Cache的名称);key表示需要清除的是哪个key,如未指定则会使用默认策略生成的key;condition表示清除操作发生的条件。- 1
- 2
- 3
- 4
-
allEntries属性
allEntries是boolean类型,表示是否需要清除缓存中的所有元素。默认为false,表示不需要。
当指定了allEntries为true时,Spring Cache将删除所有除了指定的key以外的所有key。
有的时候我们需要Cache一下清除所有的元素,这比一个一个清除元素更有效率。
@CacheEvict(value="users", allEntries=true) public void delete(Integer id) { System.out.println("delete user by id: " + id); }- 1
- 2
- 3
- 4
- 5
- 6
-
beforeInvocation属性
清除操作默认是在对应方法成功执行之后触发的,即方法如果因为抛出异常而未能成功返回时也不会触发清除操作。
使用beforeInvocation可以改变触发清除操作的时间,当我们指定该属性值为true时,Spring会在调用该方法之前清除缓存中的指定元素。
@CacheEvict(value="users", beforeInvocation=true) public void delete(Integer id) { System.out.println("delete user by id: " + id); }- 1
- 2
- 3
- 4
- 5
- 6
7.5.0.3 RedisTemplate常用集合
7.5.1 准备
<dependency> <groupId>org.springframework.bootgroupId> <artifactId>spring-boot-starter-data-redisartifactId> dependency>- 1
- 2
- 3
- 4
redis: host:redis port:6379 #Sentinel高可用集群 #sentinel: # master: mymaster # nodes: redis:26380,redis:26381,redis:26382 #Cluster分布式系统 #cluster: # nodes: redis:6380,redis:6381,edis:6382,edis:6383,redis:6384,redis:6385 cache: type: redis cache-names: pc- 1
- 2
- 3
- 4
- 5
- 6
- 7
- 8
- 9
- 10
- 11
- 12
- 13
- 14
- 15
- 16
7.5.2 修改实体类
由于要将查询的实体类对象缓存到 Redis,Redis 要求实体类必须序列化。所以需要实体类实现序列化接口。
class Product implements Serializable {- 1
7.5.3 修改serviceImpl类
//注入RedisTemplate模板 @Autowired private RedisTemplate<0bject,0bject> rt;- 1
- 2
- 3
//清除名为pc的缓存空间. 且清除其内的所有条目,如果想要保留一些, 则需通过 key 属性指定要清理的 key 数据。 //该注解会在方法体执行前执行 @0verride @Transactional(rollbackFor=Exception.class) @CacheEvict(value ="pc",allEntries = true) public void saveProduct(Product product){ dao.insertProduct(product); } @Override public Double findTurnover(){ //绑定键为"turnover的键值对, 然后就可以对其进行操作" BoundValue0perations<Object, 0bject> ops = rt.boundValue0ps("turnover"); Object turnover = ops.get(); //先从缓存中查, 如果缓存中没有, 再从DB中获取, 最终写入缓存 if(turnover == null){ Date date = new Date(); SimpleDateFormat sdf = new SimpleDateFormat("yyyy-MM-dd") turnover = dao.selectTurnover(sdf.format(date)); //写入缓存 ops.set(turnover,10,TimeUnit.SECONDS); } return (Double) turnover; }- 1
- 2
- 3
- 4
- 5
- 6
- 7
- 8
- 9
- 10
- 11
- 12
- 13
- 14
- 15
- 16
- 17
- 18
- 19
- 20
- 21
- 22
- 23
- 24
- 25
- 26
- 27
- 28
7.5.4 启动类增加注解
@EnableCaching 用于开启当前应用的缓存功能。
-
相关阅读:
OpenHarmony教程—语言基础类库
如何调试一个C++程序?以Visual Studio 2019为例的保姆级教程。
numpy.unique
短期风速预测|LSTM|ELM|批处理(matlab代码)
【图像检测】基于K-L实现人脸检测附matlab代码
【微服务 从0开始 】Spring Cloud —— 比xml更适合的配置文件yaml
单机高并发模型设计
你到底值多少钱?2023打工人薪酬指南
使用定时任务发布文章的流程
vscode中使用指定路径下的cmake
- 原文地址:https://blog.csdn.net/m0_46671240/article/details/136278125
