-
boomYouth
上一周实在是过得太颓废了,我感觉还是要把自己的规划做好一下:
周计划
这周截至周四,我可以用vue简单的画完登陆注册的界面并且弄一点预处理:
周一
的话可以把这些都学一下:

父传子,子传父:
- <script setup>
- // 1.给子组件以添加属性的方式传值
- // 2.在子组件通过props的方式接受
- // 对于局部组件,导入进来就能用
- import testDemo1 from './components/test-demo1.vue';
- import{ref} from 'vue';
- const money=ref(100);
- const getMoney=()=>
- {
- money.value+=10;
- }
- const changeFf=(newMoney)=>{
- money.value=newMoney;
- }
- </script>
- <template>
- <h3>我是父组件---{{ money }}</h3>
- <!-- 给子组件添加属性的方式传值 -->
- <testDemo1 car="宝马"
- :money="money"
- @changeMoney="changeFf"
- ></testDemo1>
- <button @click="getMoney"></button>
- <!-- 也可以动态传递子属性数据 -->
- money
- </template>
- <script setup>
- // 注意:由于写了setup,所以无法配置props选项
- // 借助编译器宏函数接受子组件传递的数据,是编译阶段的一个标识,实际编译器解析后遇到后会进行编译转换
- const emit=defineEmits(['changeMoney']);
- const props=defineProps({
- car:String,
- money:Number
- })
- const buy=()=>
- {
- //单向流需要emit去触发事件
- emit('changeMoney',5);
- }
- console.log(props.car)
- </script>
- <template>
- <div class="son">
- 我是子组件---{{ car }}-----{{ money }}
- <button @click="buy">花钱</button>
- </div>
- </template>
- <style scoped>
- .son{
- padding: 30px;
- border: red solid 1px;
- }
- </style>
defineExpose和模板引用 :
默认在setup语法糖下是不开放组件内部的方法和属性的,可以通过defineExpose向外暴露;
- <script setup>
- import { onMounted, ref } from 'vue';
- import testDemo2 from './components/test-demo2-copy.vue';
- // 模板引用(可以获取dom,也可以获取组件)
- /* 1.调用ref函数,创建ref对象
- 2。通过ref标识,进行绑定
- 通过ref对象,.value即可访问绑定的元素(必须渲染完成后才能拿到) */
- const inp=ref(null);
- //-------------------------------------
- const testRef=ref(null);
- const getCom=()=>
- {
- console.log(testRef.value.count);
- }
- //生命周期钩子
- onMounted(()=>{
- console.log(inp.value)
- inp.value.focus();
- });
- </script>
- <template>
- <input ref="inp" type="text">
- <button>点击让输入框聚焦</button>
- <testDemo2 ref="testRef"></testDemo2>
- <button @click="getCom">获取组件</button>
- </template>
- <script setup>
- import { ref } from 'vue';
- const count=ref(999);
- const sayHi=()=>
- {
- console.log("你好呀");
- }
- defineExpose({
- // 使用宏向外暴露
- sayHi,
- count
- });
- </script>
- <template>
- <div>我是用于测试的组件--{{ count }}</div>
- </template>
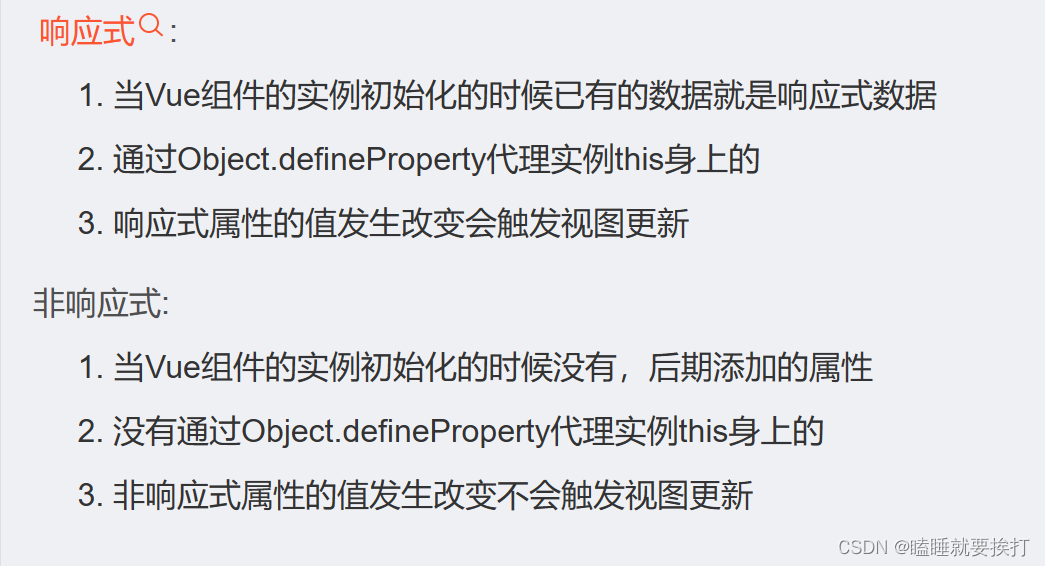
同时去搜索了一下vue里面响应式和非响应式的数据有什么区别:
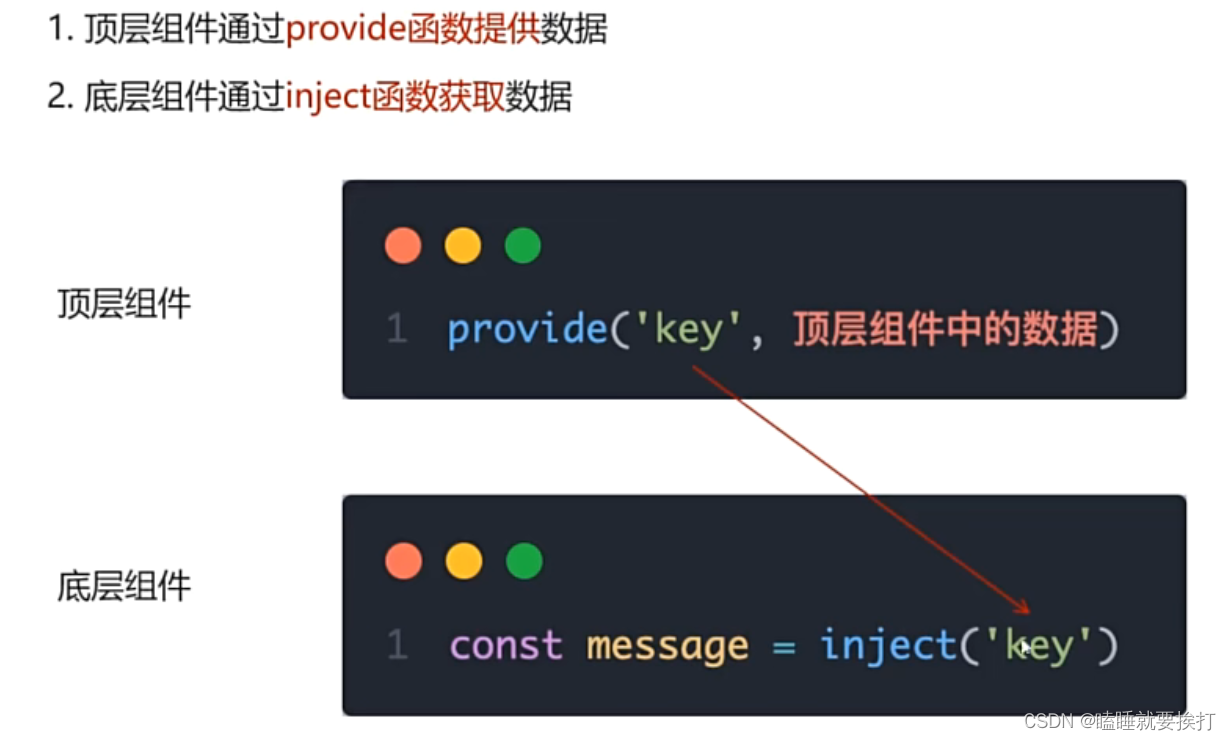
provide和inject:
从顶层组件向任意底层组件传递数据和方法:
- <script setup>
- import centerCom from '@/components/center-com.vue'
- import {ref,provide} from 'vue'
- //跨层级传递普通数据
- provide('theme-color','小冏');
- //跨层级传递响应式数据
- const count=ref(100);
- provide('count',count);
- //跨层级传递函数
- provide('changeCount',(newValue)=>
- {
- count.value=newValue;
- })
- </script>
- <template>
- <div><h1>我是顶层组件</h1></div>
- <centerCom></centerCom>
- </template>
- <script setup>
- import bottomCom from '@/components/bottom-com.vue'
- </script>
- <template>
- <div><h2>我是中间组件</h2></div>
- <bottomCom></bottomCom>
- </template>
- <script setup>
- import { inject } from 'vue';
- const themeColor=inject('theme-color');
- const count=inject('count');
- const changeCount=inject('changeCount');
- const clickFn=()=>
- {
- changeCount(500);
- }
- </script>
- <template>
- <div><h3>我是底层组件--{{ themeColor }}---{{ count }}</h3></div>
- <button @click="clickFn">修改count</button>
- </template>
defineOptions:


- <script setup>
- defineOptions({
- name:'loginIndex'
- })
- </script>
- <template>
- <div>
- 哈哈哈哈
- </div>
- </template>
然后好奇的又搜了一下有关setup语法糖的作用:
Vue3.0的新语法糖-script setup - 知乎 (zhihu.com)
defineModel:
- <script setup>
- import myInput from './components/my-input.vue';
- import { ref } from 'vue';
- const counts=ref('123456');
- </script>
- <template>
- <div><div>
- <myInput type="text"
- v-model="counts"
- ></myInput>
- {{ counts }}
- </div></div>
- </template>
- <script setup>
- import { defineModel } from 'vue';
- const modelValue=defineModel();
- </script>
- <template>
- <div>
- <input
- type="text"
- :value="modelValue"
- @input="e=>modelValue=e.target.value"
- >
- </div>
- </template>
Pinia:
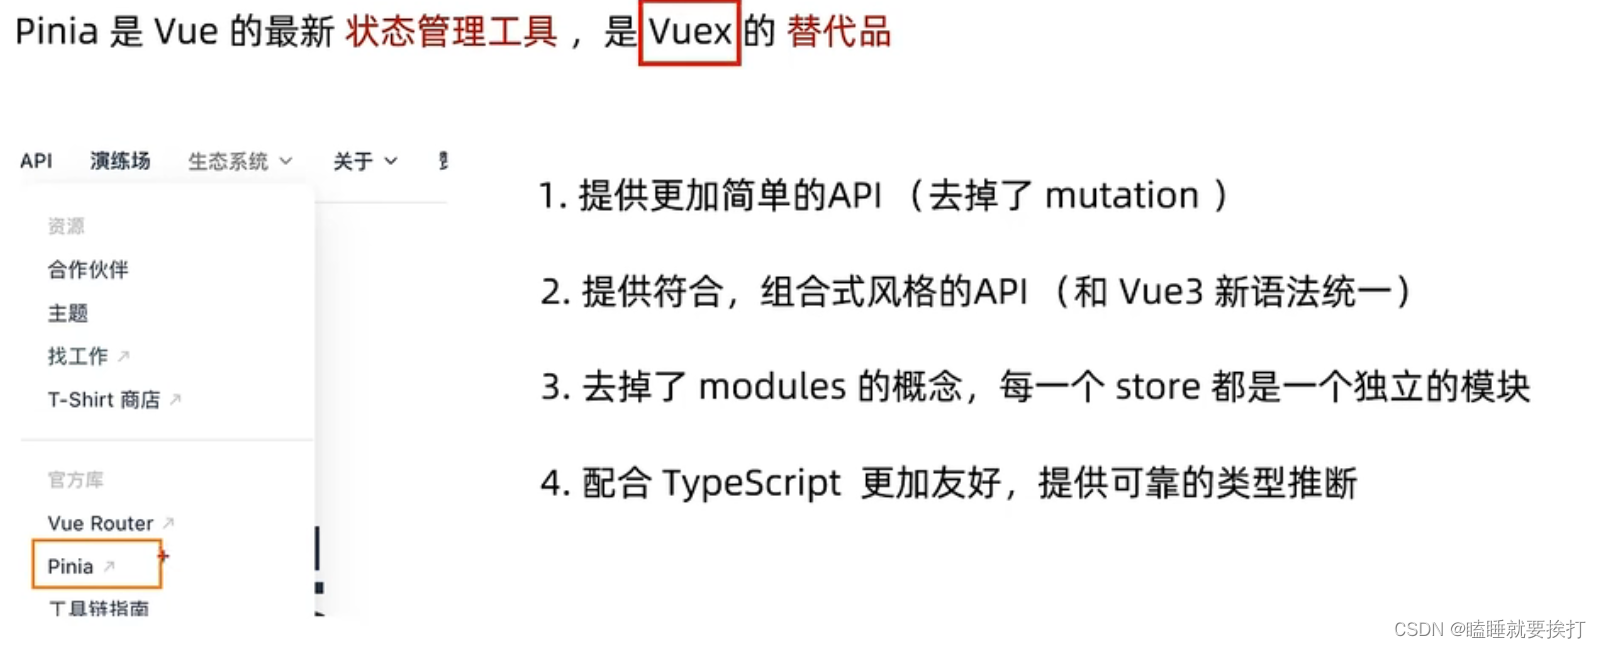
Pinia基本语法 :
- <script setup>
- import { useCountStore } from '../store/counter';
- const counterStore=useCountStore();
- </script>
- <template>
- <div>
- 我是son1
- {{ counterStore.count }}
- --<button @click="counterStore.addCount">+</button>
- </div>
- </template>
- <style scoped>
- </style>
- <script setup>
- import { useCountStore } from '../store/counter';
- const counterStore=useCountStore();
- </script>
- <template>
- <div>
- 我是son2
- {{ counterStore.count }}
- --<button @click="counterStore.subCount">-</button>
- </div>
- </template>
- <style scoped>
- </style>
- <script setup>
- import sonCom1 from '@/components/sonCom1.vue'
- import sonCom2 from '@/components/sonCom2.vue'
- import {useCountStore} from '@/store/counter'
- const counterStore=useCountStore();
- console.log(counterStore);
- </script>
- <template>
- <div>
- <h3>根组件-{{counterStore.count}}</h3>
- <sonCom1></sonCom1>
- <sonCom2></sonCom2>
- </div>
- </template>
- <style scoped>
- </style>
- import { defineStore } from "pinia";
- import { ref } from "vue";
- //定义store
- //仓库里面修改数据都是靠导出来修改的
- export const useCountStore=defineStore('counter',()=>
- {
- //声明数据 state-count
- const count=ref(0);
- //声明操作数据的方法-actions
- const addCount=()=>{
- count.value++
- }
- const subCount=()=>{
- count.value--;
- }
- //声明基于数据派生的计算属性getters
- return {
- count,
- addCount,
- subCount
- }
- });
pinia-action异步写法:
数据库的作业:

周二:

上午词汇,下午翻译训练;
周三
写一下java作业以及上午词汇训练

周四:
上午词汇训练,下午范文复习

明天和意外,我永远不知道哪个先发生。。。
其实这几天多了很多其它的事情,所以进度直接跳到周天:
周日:
录题,数据库作业,各种作业
保证书:
对于时长除了每天3.5小时*6=21小时
大概每天可以拿出一个半小时多余时间出来自习:1.5*6=9小时
然后周六2+3=5小时可以用来自习,还有周二没什么课几乎1小时
21+9+5+1=36小时一周;
刷题的话我打算用c++,但是还不会,力扣也没怎么刷过,所以先试试一周写五道题;
功能点:
第三周的时候开始写项目,在此之前会先用vue先画一下登陆注册的界面和前端;
-
相关阅读:
TiDB 工具下载
反序列化漏洞(1), 原理, 实验, 魔术方法
MST1662,摩托车大功率闪光器
geemap学习笔记011:可视化遥感影像随时间的变化
工业元宇宙的价值和发展
WebSocket实战之一
Python3 - Docker部署Libre Office Online在线文件转换
死磕面试八股文
java中分割字符串总结 - 超级无敌详细版本。不仅要熟悉各种方法还要做到灵活运用。
2016-2023年国赛题型及算法模型总结
- 原文地址:https://blog.csdn.net/weixin_74789176/article/details/134384334
