-
剑指JUC原理-19.线程安全集合
- 👏作者简介:大家好,我是爱吃芝士的土豆倪,24届校招生Java选手,很高兴认识大家
- 📕系列专栏:Spring源码、JUC源码
- 🔥如果感觉博主的文章还不错的话,请👍三连支持👍一下博主哦
- 🍂博主正在努力完成2023计划中:源码溯源,一探究竟
- 📝联系方式:nhs19990716,加我进群,大家一起学习,一起进步,一起对抗互联网寒冬👀
线程安全集合类概述
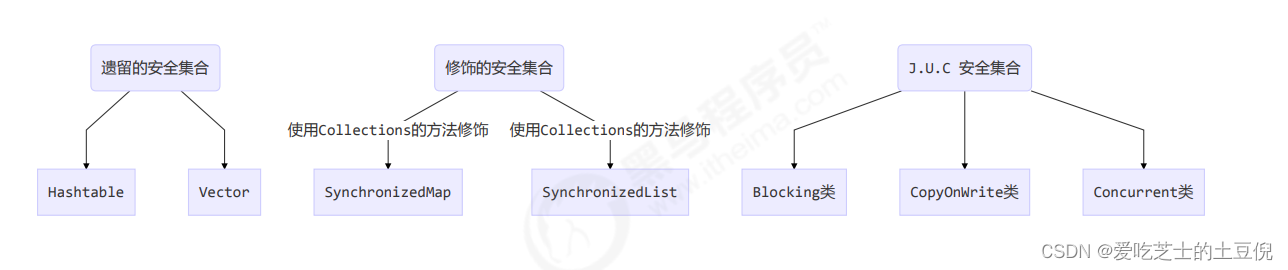
线程安全集合类可以分为三大类:
- 遗留的线程安全集合如 Hashtable , Vector (出现时间比较早,而且所有方法都是用synchronized修饰,并发性能比较低,时至今日有更好的实现,更好的替代)
- 使用 Collections 装饰的线程安全集合,如:(将原本不安全的集合变成安全的集合)
- Collections.synchronizedCollection
- Collections.synchronizedList
- Collections.synchronizedMap
- Collections.synchronizedSet
- Collections.synchronizedNavigableMap
- Collections.synchronizedNavigableSet
- Collections.synchronizedSortedMap
- Collections.synchronizedSortedSet
private static class SynchronizedMap<K,V> implements Map<K,V>, Serializable { private static final long serialVersionUID = 1978198479659022715L; private final Map<K,V> m; // Backing Map final Object mutex; // Object on which to synchronize SynchronizedMap(Map<K,V> m) { this.m = Objects.requireNonNull(m); mutex = this; } public int size() { synchronized (mutex) {return m.size();} } public boolean isEmpty() { synchronized (mutex) {return m.isEmpty();} } public boolean containsKey(Object key) { synchronized (mutex) {return m.containsKey(key);} } public boolean containsValue(Object value) { synchronized (mutex) {return m.containsValue(value);} } public V get(Object key) { synchronized (mutex) {return m.get(key);} } public V put(K key, V value) { synchronized (mutex) {return m.put(key, value);} } public V remove(Object key) { synchronized (mutex) {return m.remove(key);} } public void putAll(Map<? extends K, ? extends V> map) { synchronized (mutex) {m.putAll(map);} } public void clear() { synchronized (mutex) {m.clear();} }- 1
- 2
- 3
- 4
- 5
- 6
- 7
- 8
- 9
- 10
- 11
- 12
- 13
- 14
- 15
- 16
- 17
- 18
- 19
- 20
- 21
- 22
- 23
- 24
- 25
- 26
- 27
- 28
- 29
- 30
- 31
- 32
- 33
- 34
- 35
- 36
- 37
- 38
- 39
- 40
传入的就是线程不安全的map,将其变成线程安全的
本质上就是多加了一个synchronized 锁住了对象
- java.util.concurrent.*
重点介绍 java.util.concurrent.* 下的线程安全集合类,可以发现它们有规律,里面包含三类关键词:
Blocking、CopyOnWrite、Concurrent-
Blocking 大部分实现基于锁,并提供用来阻塞的方法(很多方法在不满足条件的时候需要等待)
-
CopyOnWrite 之类容器修改开销相对较重(适用于读多写少)
-
Concurrent 类型的容器
内部很多操作使用 cas 优化,一般可以提供较高吞吐量
弱一致性
- 遍历时弱一致性,例如,当利用迭代器遍历时,如果容器发生修改,迭代器仍然可以继续进行遍历,这时内容是旧的
- 求大小弱一致性,size 操作未必是 100% 准确
- 读取弱一致性
遍历时如果发生了修改,对于非安全容器来讲,使用 fail-fast 机制也就是让遍历立刻失败,抛出ConcurrentModificationException,不再继续遍历
一致性 和 性能 两者不可兼得
ConcurrentHashMap
生成测试数据
static final String ALPHA = "abcedfghijklmnopqrstuvwxyz"; public static void main(String[] args) { int length = ALPHA.length(); int count = 200; List<String> list = new ArrayList<>(length * count); for (int i = 0; i < length; i++) { char ch = ALPHA.charAt(i); for (int j = 0; j < count; j++) { list.add(String.valueOf(ch)); } } Collections.shuffle(list); for (int i = 0; i < 26; i++) { try (PrintWriter out = new PrintWriter( new OutputStreamWriter( new FileOutputStream("tmp/" + (i+1) + ".txt")))) { String collect = list.subList(i * count, (i + 1) * count).stream() .collect(Collectors.joining("\n")); out.print(collect); } catch (IOException e) { } } }- 1
- 2
- 3
- 4
- 5
- 6
- 7
- 8
- 9
- 10
- 11
- 12
- 13
- 14
- 15
- 16
- 17
- 18
- 19
- 20
- 21
- 22
- 23
模版代码,模版代码中封装了多线程读取文件的代码
private static <V> void demo(Supplier<Map<String,V>> supplier, BiConsumer<Map<String,V>,List<String>> consumer) { Map<String, V> counterMap = supplier.get(); List<Thread> ts = new ArrayList<>(); for (int i = 1; i <= 26; i++) { int idx = i; Thread thread = new Thread(() -> { List<String> words = readFromFile(idx); consumer.accept(counterMap, words); }); ts.add(thread); } ts.forEach(t->t.start()); ts.forEach(t-> { try { t.join(); } catch (InterruptedException e) { e.printStackTrace(); } }); System.out.println(counterMap); } public static List<String> readFromFile(int i) { ArrayList<String> words = new ArrayList<>(); try (BufferedReader in = new BufferedReader(new InputStreamReader(new FileInputStream("tmp/" + i +".txt")))) { while(true) { String word = in.readLine(); if(word == null) { break; } words.add(word); } return words; } catch (IOException e) { throw new RuntimeException(e); } }- 1
- 2
- 3
- 4
- 5
- 6
- 7
- 8
- 9
- 10
- 11
- 12
- 13
- 14
- 15
- 16
- 17
- 18
- 19
- 20
- 21
- 22
- 23
- 24
- 25
- 26
- 27
- 28
- 29
- 30
- 31
- 32
- 33
- 34
- 35
- 36
- 37
- 38
- 39
你要做的是实现两个参数
- 一是提供一个 map 集合,用来存放每个单词的计数结果,key 为单词,value 为计数
- 二是提供一组操作,保证计数的安全性,会传递 map 集合以及 单词 List
正确结果输出应该是每个单词出现 200 次
{a=200, b=200, c=200, d=200, e=200, f=200, g=200, h=200, i=200, j=200, k=200, l=200, m=200, n=200, o=200, p=200, q=200, r=200, s=200, t=200, u=200, v=200, w=200, x=200, y=200, z=200}- 1
- 2
下面的实现为:
demo( // 创建 map 集合 // 创建 ConcurrentHashMap 对不对? () -> new HashMap<String, Integer>(), // 进行计数 (map, words) -> { for (String word : words) { Integer counter = map.get(word); int newValue = counter == null ? 1 : counter + 1; map.put(word, newValue); } });- 1
- 2
- 3
- 4
- 5
- 6
- 7
- 8
- 9
- 10
- 11
- 12
结果和预期的并不一样
将HashMap 换成 ConcurrentHashMap,发现还是不行!
如果将其改成了ConcurrentHashMap的话,那么其实下面的几行也不是原子的,因为使用了线程安全的集合,只能保证,每行是原子的,但是整体不是
或者加上 synchronized 锁。但是这样做没有好处,ConcurrentHashMap本身加的就是细粒度的锁,你使用synchronized 这么重的锁,影响性能,影响并发度。
ConcurrentHashMap 原理
JDK 7 HashMap 并发死链
注意
要在 JDK 7 下运行,否则扩容机制和 hash 的计算方法都变了以下测试代码是精心准备的,不要随便改动
public static void main(String[] args) { // 测试 java 7 中哪些数字的 hash 结果相等 System.out.println("长度为16时,桶下标为1的key"); for (int i = 0; i < 64; i++) { if (hash(i) % 16 == 1) { System.out.println(i); } } System.out.println("长度为32时,桶下标为1的key"); for (int i = 0; i < 64; i++) { if (hash(i) % 32 == 1) { System.out.println(i); } } // 1, 35, 16, 50 当大小为16时,它们在一个桶内 final HashMap<Integer, Integer> map = new HashMap<Integer, Integer>(); // 放 12 个元素 map.put(2, null); map.put(3, null); map.put(4, null); map.put(5, null); map.put(6, null); map.put(7, null); map.put(8, null); map.put(9, null); map.put(10, null); map.put(16, null); map.put(35, null); map.put(1, null); System.out.println("扩容前大小[main]:"+map.size()); new Thread() { @Override public void run() { // 放第 13 个元素, 发生扩容 map.put(50, null); System.out.println("扩容后大小[Thread-0]:"+map.size()); } }.start(); new Thread() { @Override public void run() { // 放第 13 个元素, 发生扩容 map.put(50, null); System.out.println("扩容后大小[Thread-1]:"+map.size()); } }.start(); } final static int hash(Object k) { int h = 0; if (0 != h && k instanceof String) { return sun.misc.Hashing.stringHash32((String) k); } h ^= k.hashCode(); h ^= (h >>> 20) ^ (h >>> 12); return h ^ (h >>> 7) ^ (h >>> 4); }- 1
- 2
- 3
- 4
- 5
- 6
- 7
- 8
- 9
- 10
- 11
- 12
- 13
- 14
- 15
- 16
- 17
- 18
- 19
- 20
- 21
- 22
- 23
- 24
- 25
- 26
- 27
- 28
- 29
- 30
- 31
- 32
- 33
- 34
- 35
- 36
- 37
- 38
- 39
- 40
- 41
- 42
- 43
- 44
- 45
- 46
- 47
- 48
- 49
- 50
- 51
- 52
- 53
- 54
- 55
- 56
死链复现
调试工具使用 idea
在 HashMap 源码 590 行加断点
int newCapacity = newTable.length;- 1
断点的条件如下,目的是让 HashMap 在扩容为 32 时,并且线程为 Thread-0 或 Thread-1 时停下来
newTable.length==32 && ( Thread.currentThread().getName().equals("Thread-0")|| Thread.currentThread().getName().equals("Thread-1") )- 1
- 2
- 3
- 4
- 5
断点暂停方式选择 Thread,否则在调试 Thread-0 时,Thread-1 无法恢复运行
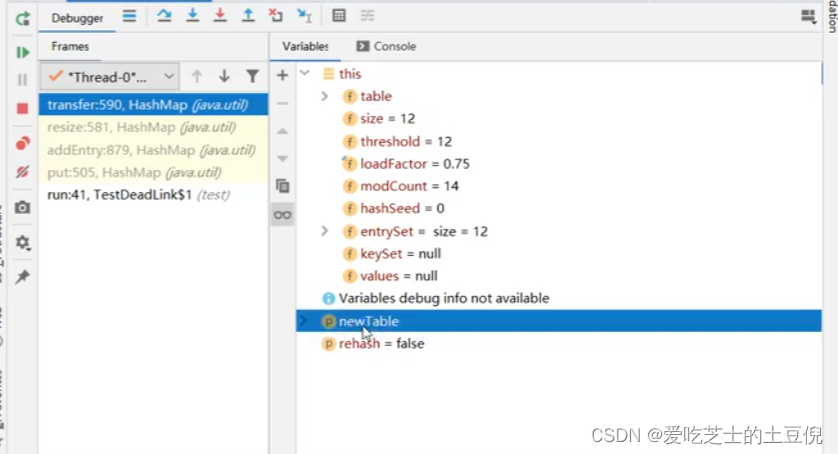
运行代码,程序在预料的断点位置停了下来,输出长度为16时,桶下标为1的key 1 16 35 50 长度为32时,桶下标为1的key 1 35 扩容前大小[main]:12- 1
- 2
- 3
- 4
- 5
- 6
- 7
- 8
- 9
在jdk7 中,hashmap是采用头插法插入的
接下来进入扩容流程调试
在 HashMap 源码 594 行加断点Entry<K,V> next = e.next; // 593 if (rehash) // 594 // ...- 1
- 2
- 3
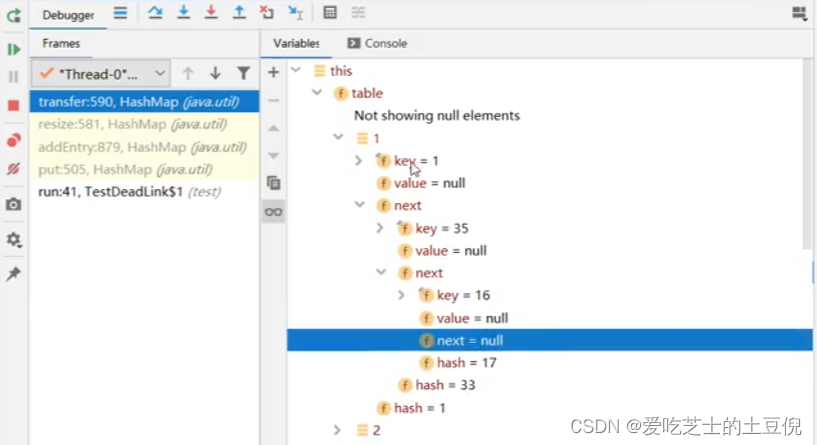
这是为了观察 e 节点和 next 节点的状态,Thread-0 单步执行到 594 行,再 594 处再添加一个断点(条件
Thread.currentThread().getName().equals(“Thread-0”))
这时可以在 Variables 面板观察到 e 和 next 变量,使用 view as -> Object 查看节点状态e (1)->(35)->(16)->null next (35)->(16)->null- 1
- 2
在 Threads 面板选中 Thread-1 恢复运行,可以看到控制台输出新的内容如下,Thread-1 扩容已完成
newTable[1] (35)->(1)->null 扩容后大小:13- 1
- 2
这时 Thread-0 还停在 594 处, Variables 面板变量的状态已经变化为
e (1)->null next (35)->(1)->null- 1
- 2
为什么呢,因为 Thread-1 扩容时链表也是后加入的元素放入链表头,因此链表就倒过来了,但 Thread-1 虽然结
果正确,但它结束后 Thread-0 还要继续运行接下来就可以单步调试(F8)观察死链的产生了
下一轮循环到 594,将 e 搬迁到 newTable 链表头
newTable[1] (1)->null e (35)->(1)->null next (1)->null- 1
- 2
- 3
下一轮循环到 594,将 e 搬迁到 newTable 链表头
newTable[1] (35)->(1)->null e (1)->null next null- 1
- 2
- 3
再看看源码
e.next = newTable[1]; // 这时 e (1,35) // 而 newTable[1] (35,1)->(1,35) 因为是同一个对象 // 相当于 1 -> 35 -> 1 newTable[1] = e; // 再尝试将 e 作为链表头, 死链已成 e = next; // 虽然 next 是 null, 会进入下一个链表的复制, 但死链已经形成了- 1
- 2
- 3
- 4
- 5
- 6
- 7
- 8
源码分析
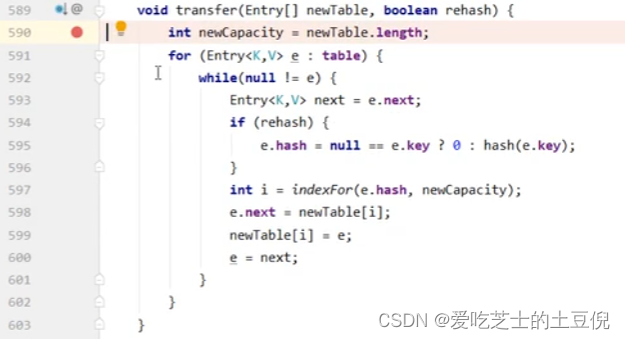
HashMap 的并发死链发生在扩容时
void transfer(Entry[] newTable, boolean rehash) { int newCapacity = newTable.length; for (Entry<K,V> e : table) { while(null != e) { Entry<K,V> next = e.next; // 1 处 if (rehash) { e.hash = null == e.key ? 0 : hash(e.key); } int i = indexFor(e.hash, newCapacity); // 2 处 // 将新元素加入 newTable[i], 原 newTable[i] 作为新元素的 next e.next = newTable[i]; newTable[i] = e; e = next; } } }- 1
- 2
- 3
- 4
- 5
- 6
- 7
- 8
- 9
- 10
- 11
- 12
- 13
- 14
- 15
- 16
- 17
- 18
假设 map 中初始元素是
原始链表,格式:[下标] (key,next) [1] (1,35)->(35,16)->(16,null) 线程 a 执行到 1 处 ,此时局部变量 e 为 (1,35),而局部变量 next 为 (35,16) 线程 a 挂起 线程 b 开始执行 第一次循环 [1] (1,null) 第二次循环 [1] (35,1)->(1,null) 第三次循环 [1] (35,1)->(1,null) [17] (16,null) 切换回线程 a,此时局部变量 e 和 next 被恢复,引用没变但内容变了:e 的内容被改为 (1,null),而 next 的内 容被改为 (35,1) 并链向 (1,null) 第一次循环 [1] (1,null) 第二次循环,注意这时 e 是 (35,1) 并链向 (1,null) 所以 next 又是 (1,null) [1] (35,1)->(1,null) 第三次循环,e 是 (1,null),而 next 是 null,但 e 被放入链表头,这样 e.next 变成了 35 (2 处) [1] (1,35)->(35,1)->(1,35) 已经是死链了- 1
- 2
- 3
- 4
- 5
- 6
- 7
- 8
- 9
- 10
- 11
- 12
- 13
- 14
- 15
- 16
- 17
- 18
- 19
- 20
- 21
- 22
- 23
- 24
- 25
- 26
- 27
- 28
小结
- 究其原因,是因为在多线程环境下使用了非线程安全的 map 集合
- JDK 8 虽然将扩容算法做了调整,不再将元素加入链表头(而是保持与扩容前一样的顺序),但仍不意味着能
够在多线程环境下能够安全扩容,还会出现其它问题(如扩容丢数据)
JDK 8 ConcurrentHashMap
// 默认为 0 // 当初始化时, 为 -1 // 当扩容时, 为 -(1 + 扩容线程数) // 当初始化或扩容完成后,为 下一次的扩容的阈值大小 private transient volatile int sizeCtl; // 整个 ConcurrentHashMap 就是一个 Node[] static class Node<K,V> implements Map.Entry<K,V> {} // hash 表 transient volatile Node<K,V>[] table; // 扩容时的 新 hash 表 private transient volatile Node<K,V>[] nextTable; // 扩容时如果某个 bin 迁移完毕, 用 ForwardingNode 作为旧 table bin 的头结点 // 主要用在扩容的时候 static final class ForwardingNode<K,V> extends Node<K,V> {} // 用在 compute 以及 computeIfAbsent 时, 用来占位, 计算完成后替换为普通 Node static final class ReservationNode<K,V> extends Node<K,V> {} // 作为 treebin 的头节点, 存储 root 和 first // 红黑树节点 static final class TreeBin<K,V> extends Node<K,V> {} // 作为 treebin 的节点, 存储 parent, left, right static final class TreeNode<K,V> extends Node<K,V> {}- 1
- 2
- 3
- 4
- 5
- 6
- 7
- 8
- 9
- 10
- 11
- 12
- 13
- 14
- 15
- 16
- 17
- 18
- 19
- 20
- 21
- 22
- 23
- 24
- 25
- 26
- 27
- 28
ForwardingNode 这个是从后往前处理,处理完了就会在对应的下标 加一个头结点 fnode
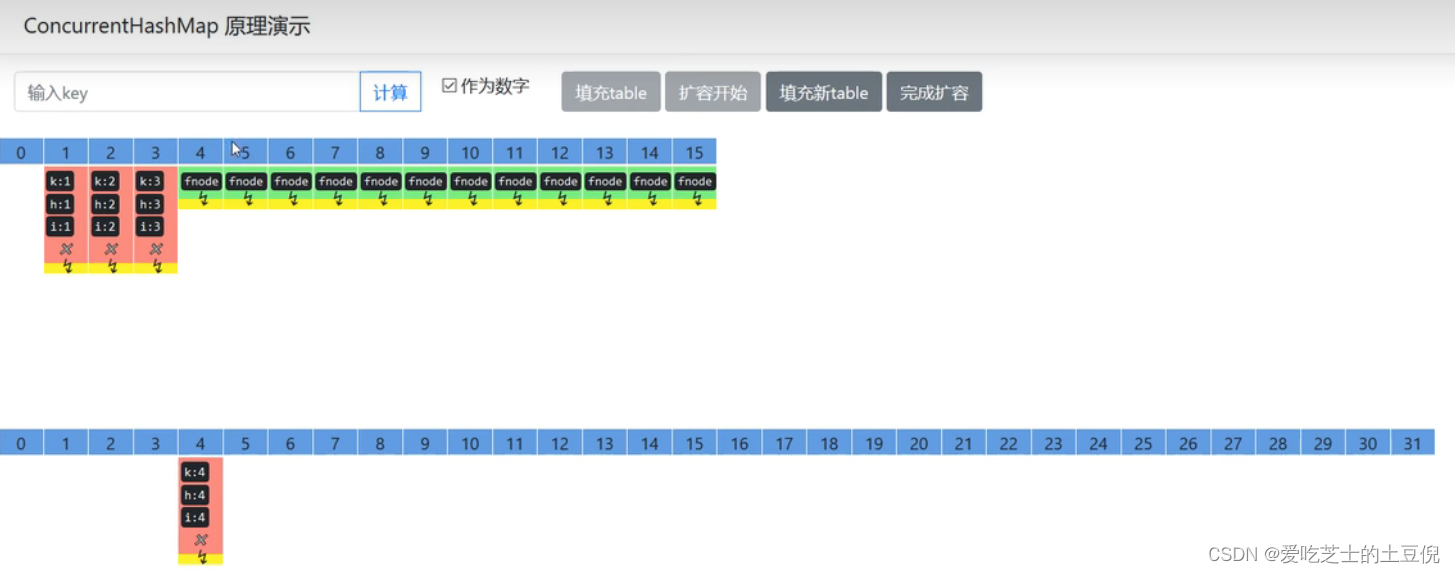
如果扩容过程中,去get,如果是fnode的,那么就会去新数组中去获取
转换红黑树,当链表长度超过8的时候,会考虑转换,但是要满足一个前提就是 数组长度超过64,否则只会执行扩容操作。因为扩容能够有效的减少链表的长度。
重要方法
// 获取 Node[] 中第 i 个 Node static final <K,V> Node<K,V> tabAt(Node<K,V>[] tab, int i) // cas 修改 Node[] 中第 i 个 Node 的值, c 为旧值, v 为新值 static final <K,V> boolean casTabAt(Node<K,V>[] tab, int i, Node<K,V> c, Node<K,V> v) // 直接修改 Node[] 中第 i 个 Node 的值, v 为新值 static final <K,V> void setTabAt(Node<K,V>[] tab, int i, Node<K,V> v)- 1
- 2
- 3
- 4
- 5
- 6
- 7
- 8
构造器分析
可以看到实现了懒惰初始化,在构造方法中仅仅计算了 table 的大小,以后在第一次使用时才会真正创建
// 初始容量 负载因子 并发度 public ConcurrentHashMap(int initialCapacity, float loadFactor, int concurrencyLevel) { if (!(loadFactor > 0.0f) || initialCapacity < 0 || concurrencyLevel <= 0) throw new IllegalArgumentException(); // 如果初始容量小于并发度的时候 将初始容量改成 并发度,也就是最起码要保持到并发度这么大 if (initialCapacity < concurrencyLevel) // Use at least as many bins initialCapacity = concurrencyLevel; // as estimated threads long size = (long)(1.0 + (long)initialCapacity / loadFactor); // tableSizeFor 仍然是保证计算的大小是 2^n, 即 16,32,64 ... int cap = (size >= (long)MAXIMUM_CAPACITY) ? MAXIMUM_CAPACITY : tableSizeFor((int)size); this.sizeCtl = cap; // 1.8中实现了懒惰初始化,而1.7中会在构造方法中创建了,不管你用不用,都会占用内存空间。 }- 1
- 2
- 3
- 4
- 5
- 6
- 7
- 8
- 9
- 10
- 11
- 12
- 13
- 14
get 流程
可以看到,整个get中没有任何的锁,所以这也是并发度高的一个地方
public V get(Object key) { Node<K,V>[] tab; Node<K,V> e, p; int n, eh; K ek; // spread 方法能确保返回结果是正数 int h = spread(key.hashCode()); // tab创建好了并且里面是有元素的 if ((tab = table) != null && (n = tab.length) > 0 && (e = tabAt(tab, (n - 1) & h)) != null) { // 获取 Node[] 中第 i 个 Node 定位到桶下标,看看是不是为空,如果不为空?继续比较头节点的hash码是不是等于key的hash码 // 如果头结点已经是要查找的 key if ((eh = e.hash) == h) { if ((ek = e.key) == key || (ek != null && key.equals(ek))) return e.val; } // hash 为负数表示该 bin 在扩容中或是 treebin, 这时调用 find 方法来查找 // 扩容中会变成 fnode 对应的取值就是负数 else if (eh < 0) return (p = e.find(h, key)) != null ? p.val : null; // 正常遍历链表, 用 equals 比较 while ((e = e.next) != null) { if (e.hash == h && ((ek = e.key) == key || (ek != null && key.equals(ek)))) return e.val; } } return null; }- 1
- 2
- 3
- 4
- 5
- 6
- 7
- 8
- 9
- 10
- 11
- 12
- 13
- 14
- 15
- 16
- 17
- 18
- 19
- 20
- 21
- 22
- 23
- 24
- 25
- 26
put 流程
以下数组简称(table),链表简称(bin)
public V put(K key, V value) { return putVal(key, value, false); // onlyIfAbsent如果是false,那么每次都会用新值替换掉旧值 } final V putVal(K key, V value, boolean onlyIfAbsent) { if (key == null || value == null) throw new NullPointerException(); // 其中 spread 方法会综合高位低位, 具有更好的 hash 性 int hash = spread(key.hashCode()); int binCount = 0; // 死循环 for (Node<K,V>[] tab = table;;) { // f 是链表头节点 // fh 是链表头结点的 hash // i 是链表在 table 中的下标 Node<K,V> f; int n, i, fh; // 要创建 table if (tab == null || (n = tab.length) == 0) // 初始化 table 使用了 cas, 无需 synchronized 创建成功, 进入下一轮循环 // 因为是懒惰初始化的,所以直到现在才开始创建 初始化使用cas 创建,其它失败得再次进入循环,没有用syn 我们得线程并没有被阻塞住 tab = initTable(); // 要创建链表头节点 else if ((f = tabAt(tab, i = (n - 1) & hash)) == null) { // 添加链表头使用了 cas, 无需 synchronized // 用cas将头节点加进去,如果加入失败了,继续循环 if (casTabAt(tab, i, null, new Node<K,V>(hash, key, value, null))) break; } // 帮忙扩容 // 其实就是看你的头结点是不是 ForwardingNode,其对应得MOVED是一个负数 else if ((fh = f.hash) == MOVED) // 帮忙之后, 进入下一轮循环 // 锁住当前的链表,帮助去扩容 tab = helpTransfer(tab, f); // 能进入这个else,说明 table既不处于扩容中,也不是处于table的初始化过程中,而且这时肯定发生了锁下标的冲突 else { V oldVal = null; // 锁住链表头节点 // 并没有锁住整个tab,而是锁住这个桶链表的头节点 synchronized (f) { // 再次确认链表头节点没有被移动 if (tabAt(tab, i) == f) { // 链表 // 链表的头节点hash码大于等于 0 if (fh >= 0) { binCount = 1; // 遍历链表 for (Node<K,V> e = f;; ++binCount) { K ek; // 找到相同的 key if (e.hash == hash && ((ek = e.key) == key || (ek != null && key.equals(ek)))) { oldVal = e.val; // 更新 if (!onlyIfAbsent) e.val = value; break; } Node<K,V> pred = e; // 已经是最后的节点了, 新增 Node, 追加至链表尾 if ((e = e.next) == null) { pred.next = new Node<K,V>(hash, key, value, null); break; } } } // 红黑树 else if (f instanceof TreeBin) { Node<K,V> p; binCount = 2; // putTreeVal 会看 key 是否已经在树中, 是, 则返回对应的 TreeNode if ((p = ((TreeBin<K,V>)f).putTreeVal(hash, key, value)) != null) { oldVal = p.val; if (!onlyIfAbsent) p.val = value; } } } // 释放链表头节点的锁 } if (binCount != 0) { if (binCount >= TREEIFY_THRESHOLD) // 如果链表长度 >= 树化阈值(8), 进行链表转为红黑树 treeifyBin(tab, i); if (oldVal != null) return oldVal; break; } } } // 增加 size 计数 addCount(1L, binCount); return null; } private final Node<K,V>[] initTable() { Node<K,V>[] tab; int sc; // 这个hash有没有被创建 while ((tab = table) == null || tab.length == 0) { if ((sc = sizeCtl) < 0) // 让出cpu的使用权,如果cpu的时间片没有其它线程了,那么还是会分给这个线程,只是让他不至于充分利用cpu,少占用一点cpu的时间。 Thread.yield(); // 尝试将 sizeCtl 设置为 -1(表示初始化 table) // 而其它的线程,再次进入循环,首先 不小于0了,其次,之前的 sc也已经变了,cas失败,再次循环的时候,发现 tab已经不为空了,结束循环 else if (U.compareAndSwapInt(this, SIZECTL, sc, -1)) { // 获得锁, 创建 table, 这时其它线程会在 while() 循环中 yield 直至 table 创建 try { if ((tab = table) == null || tab.length == 0) { int n = (sc > 0) ? sc : DEFAULT_CAPACITY; Node<K,V>[] nt = (Node<K,V>[])new Node<?,?>[n]; table = tab = nt; // 计算出下一次要扩容的阈值 sc = n - (n >>> 2); } } finally { // 计算出下一次要扩容的阈值 sizeCtl = sc; } break; } } return tab; } // check 是之前 binCount 的个数 // 运用了 longadder 的思想 private final void addCount(long x, int check) { CounterCell[] as; long b, s; if ( // 已经有了 counterCells, 向 cell 累加 // 累加单元数组不为空 (as = counterCells) != null || // 还没有, 向 baseCount 累加 // 一个基础数值累加 !U.compareAndSwapLong(this, BASECOUNT, b = baseCount, s = b + x) ) { CounterCell a; long v; int m; boolean uncontended = true; if ( // 还没有 counterCells as == null || (m = as.length - 1) < 0 || // 还没有 cell (a = as[ThreadLocalRandom.getProbe() & m]) == null || // cell cas 增加计数失败 !(uncontended = U.compareAndSwapLong(a, CELLVALUE, v = a.value, v + x)) ) { // 创建累加单元数组和cell, 累加重试 fullAddCount(x, uncontended); return; } if (check <= 1) return; // 获取元素个数 s = sumCount(); } if (check >= 0) { Node<K,V>[] tab, nt; int n, sc; // 看看元素的个数是否大于扩容的阈值 while (s >= (long)(sc = sizeCtl) && (tab = table) != null && (n = tab.length) < MAXIMUM_CAPACITY) { int rs = resizeStamp(n); if (sc < 0) { if ((sc >>> RESIZE_STAMP_SHIFT) != rs || sc == rs + 1 || sc == rs + MAX_RESIZERS || (nt = nextTable) == null || transferIndex <= 0) break; // newtable 已经创建了,帮忙扩容 if (U.compareAndSwapInt(this, SIZECTL, sc, sc + 1)) // 首次调用,因为是懒惰初始化的,所以还没有创建 transfer(tab, nt); } // 需要扩容,这时 newtable 未创建 else if (U.compareAndSwapInt(this, SIZECTL, sc, (rs << RESIZE_STAMP_SHIFT) + 2)) transfer(tab, null); s = sumCount(); } } }- 1
- 2
- 3
- 4
- 5
- 6
- 7
- 8
- 9
- 10
- 11
- 12
- 13
- 14
- 15
- 16
- 17
- 18
- 19
- 20
- 21
- 22
- 23
- 24
- 25
- 26
- 27
- 28
- 29
- 30
- 31
- 32
- 33
- 34
- 35
- 36
- 37
- 38
- 39
- 40
- 41
- 42
- 43
- 44
- 45
- 46
- 47
- 48
- 49
- 50
- 51
- 52
- 53
- 54
- 55
- 56
- 57
- 58
- 59
- 60
- 61
- 62
- 63
- 64
- 65
- 66
- 67
- 68
- 69
- 70
- 71
- 72
- 73
- 74
- 75
- 76
- 77
- 78
- 79
- 80
- 81
- 82
- 83
- 84
- 85
- 86
- 87
- 88
- 89
- 90
- 91
- 92
- 93
- 94
- 95
- 96
- 97
- 98
- 99
- 100
- 101
- 102
- 103
- 104
- 105
- 106
- 107
- 108
- 109
- 110
- 111
- 112
- 113
- 114
- 115
- 116
- 117
- 118
- 119
- 120
- 121
- 122
- 123
- 124
- 125
- 126
- 127
- 128
- 129
- 130
- 131
- 132
- 133
- 134
- 135
- 136
- 137
- 138
- 139
- 140
- 141
- 142
- 143
- 144
- 145
- 146
- 147
- 148
- 149
- 150
- 151
- 152
- 153
- 154
- 155
- 156
- 157
- 158
- 159
- 160
- 161
- 162
- 163
- 164
- 165
- 166
- 167
- 168
- 169
- 170
- 171
- 172
- 173
- 174
- 175
- 176
- 177
- 178
- 179
- 180
- 181
- 182
- 183
- 184
size 计算流程
size 计算实际发生在 put,remove 改变集合元素的操作之中
- 没有竞争发生,向 baseCount 累加计数
- 有竞争发生,新建 counterCells,向其中的一个 cell 累加计数
counterCells 初始有两个 cell
如果计数竞争比较激烈,会创建新的 cell 来累加计数
public int size() { long n = sumCount(); return ((n < 0L) ? 0 : (n > (long)Integer.MAX_VALUE) ? Integer.MAX_VALUE : (int)n); } final long sumCount() { CounterCell[] as = counterCells; CounterCell a; // 将 baseCount 计数与所有 cell 计数累加 long sum = baseCount; if (as != null) { for (int i = 0; i < as.length; ++i) { if ((a = as[i]) != null) sum += a.value; } } return sum; }- 1
- 2
- 3
- 4
- 5
- 6
- 7
- 8
- 9
- 10
- 11
- 12
- 13
- 14
- 15
- 16
- 17
- 18
transfer
private final void transfer(Node<K,V>[] tab, Node<K,V>[] nextTab) { int n = tab.length, stride; if ((stride = (NCPU > 1) ? (n >>> 3) / NCPU : n) < MIN_TRANSFER_STRIDE) stride = MIN_TRANSFER_STRIDE; // subdivide range if (nextTab == null) { // initiating try { @SuppressWarnings("unchecked") // 将原有的扩容两倍 Node<K,V>[] nt = (Node<K,V>[])new Node<?,?>[n << 1]; nextTab = nt; } catch (Throwable ex) { // try to cope with OOME sizeCtl = Integer.MAX_VALUE; return; } nextTable = nextTab; transferIndex = n; } int nextn = nextTab.length; ForwardingNode<K,V> fwd = new ForwardingNode<K,V>(nextTab); boolean advance = true; boolean finishing = false; // to ensure sweep before committing nextTab for (int i = 0, bound = 0;;) { Node<K,V> f; int fh; while (advance) { int nextIndex, nextBound; if (--i >= bound || finishing) advance = false; else if ((nextIndex = transferIndex) <= 0) { i = -1; advance = false; } else if (U.compareAndSwapInt (this, TRANSFERINDEX, nextIndex, nextBound = (nextIndex > stride ? nextIndex - stride : 0))) { bound = nextBound; i = nextIndex - 1; advance = false; } } if (i < 0 || i >= n || i + n >= nextn) { int sc; if (finishing) { nextTable = null; table = nextTab; sizeCtl = (n << 1) - (n >>> 1); return; } if (U.compareAndSwapInt(this, SIZECTL, sc = sizeCtl, sc - 1)) { if ((sc - 2) != resizeStamp(n) << RESIZE_STAMP_SHIFT) return; finishing = advance = true; i = n; // recheck before commit } } else if ((f = tabAt(tab, i)) == null) // 处理完了,将链表设置成 ForwardingNode advance = casTabAt(tab, i, null, fwd); else if ((fh = f.hash) == MOVED) advance = true; // already processed else { // 如果这个链表头是有元素的,将链表锁住,然后进行处理 synchronized (f) { if (tabAt(tab, i) == f) { Node<K,V> ln, hn; // 普通节点 if (fh >= 0) { int runBit = fh & n; Node<K,V> lastRun = f; for (Node<K,V> p = f.next; p != null; p = p.next) { int b = p.hash & n; if (b != runBit) { runBit = b; lastRun = p; } } if (runBit == 0) { ln = lastRun; hn = null; } else { hn = lastRun; ln = null; } for (Node<K,V> p = f; p != lastRun; p = p.next) { int ph = p.hash; K pk = p.key; V pv = p.val; if ((ph & n) == 0) ln = new Node<K,V>(ph, pk, pv, ln); else hn = new Node<K,V>(ph, pk, pv, hn); } setTabAt(nextTab, i, ln); setTabAt(nextTab, i + n, hn); setTabAt(tab, i, fwd); advance = true; } // 树节点的搬迁逻辑 else if (f instanceof TreeBin) { TreeBin<K,V> t = (TreeBin<K,V>)f; TreeNode<K,V> lo = null, loTail = null; TreeNode<K,V> hi = null, hiTail = null; int lc = 0, hc = 0; for (Node<K,V> e = t.first; e != null; e = e.next) { int h = e.hash; TreeNode<K,V> p = new TreeNode<K,V> (h, e.key, e.val, null, null); if ((h & n) == 0) { if ((p.prev = loTail) == null) lo = p; else loTail.next = p; loTail = p; ++lc; } else { if ((p.prev = hiTail) == null) hi = p; else hiTail.next = p; hiTail = p; ++hc; } } ln = (lc <= UNTREEIFY_THRESHOLD) ? untreeify(lo) : (hc != 0) ? new TreeBin<K,V>(lo) : t; hn = (hc <= UNTREEIFY_THRESHOLD) ? untreeify(hi) : (lc != 0) ? new TreeBin<K,V>(hi) : t; setTabAt(nextTab, i, ln); setTabAt(nextTab, i + n, hn); setTabAt(tab, i, fwd); advance = true; } } } } } }- 1
- 2
- 3
- 4
- 5
- 6
- 7
- 8
- 9
- 10
- 11
- 12
- 13
- 14
- 15
- 16
- 17
- 18
- 19
- 20
- 21
- 22
- 23
- 24
- 25
- 26
- 27
- 28
- 29
- 30
- 31
- 32
- 33
- 34
- 35
- 36
- 37
- 38
- 39
- 40
- 41
- 42
- 43
- 44
- 45
- 46
- 47
- 48
- 49
- 50
- 51
- 52
- 53
- 54
- 55
- 56
- 57
- 58
- 59
- 60
- 61
- 62
- 63
- 64
- 65
- 66
- 67
- 68
- 69
- 70
- 71
- 72
- 73
- 74
- 75
- 76
- 77
- 78
- 79
- 80
- 81
- 82
- 83
- 84
- 85
- 86
- 87
- 88
- 89
- 90
- 91
- 92
- 93
- 94
- 95
- 96
- 97
- 98
- 99
- 100
- 101
- 102
- 103
- 104
- 105
- 106
- 107
- 108
- 109
- 110
- 111
- 112
- 113
- 114
- 115
- 116
- 117
- 118
- 119
- 120
- 121
- 122
- 123
- 124
- 125
- 126
- 127
- 128
- 129
- 130
- 131
- 132
- 133
- 134
- 135
- 136
- 137
JDK 7 ConcurrentHashMap
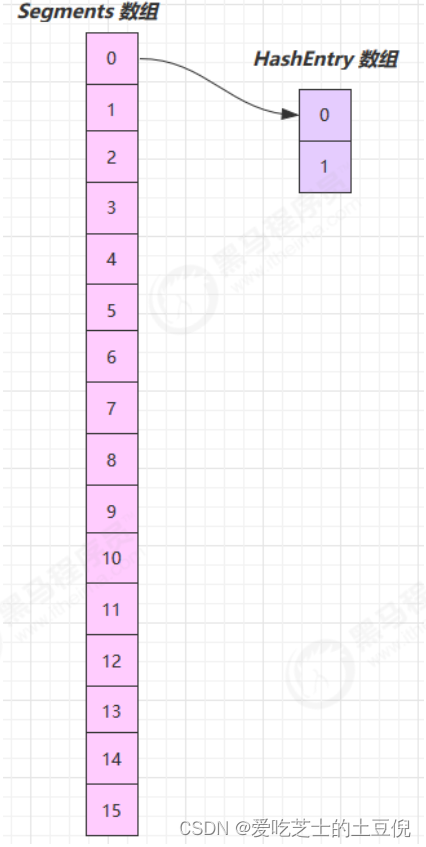
它维护了一个 segment 数组(分段的意思),每个 segment(继承自ReentrantLock) 对应一把锁
- 优点:如果多个线程访问不同的 segment,实际是没有冲突的,这与 jdk8 中是类似的
- 缺点:Segments 数组默认大小为16,这个容量初始化指定后就不能改变了,并且不是懒惰初始化(jdk8中,随着扩容,链表的个数也会越来越多,所以这个并发度会随着你的这个容量增大而增大)
构造器分析
public ConcurrentHashMap(int initialCapacity, float loadFactor, int concurrencyLevel) { if (!(loadFactor > 0) || initialCapacity < 0 || concurrencyLevel <= 0) throw new IllegalArgumentException(); if (concurrencyLevel > MAX_SEGMENTS) concurrencyLevel = MAX_SEGMENTS; // ssize 必须是 2^n, 即 2, 4, 8, 16 ... 表示了 segments 数组的大小 int sshift = 0; int ssize = 1; while (ssize < concurrencyLevel) { ++sshift; ssize <<= 1; } // segmentShift 默认是 32 - 4 = 28 this.segmentShift = 32 - sshift; // segmentMask 默认是 15 即 0000 0000 0000 1111 this.segmentMask = ssize - 1; // 为了将来 get 或者 put 一个key的时候,他好确定这个key 在 segment中的那个元素 if (initialCapacity > MAXIMUM_CAPACITY) initialCapacity = MAXIMUM_CAPACITY; int c = initialCapacity / ssize; if (c * ssize < initialCapacity) ++c; int cap = MIN_SEGMENT_TABLE_CAPACITY; while (cap < c) cap <<= 1; // 创建 segments and segments[0] Segment<K,V> s0 = new Segment<K,V>(loadFactor, (int)(cap * loadFactor), (HashEntry<K,V>[])new HashEntry[cap]); Segment<K,V>[] ss = (Segment<K,V>[])new Segment[ssize]; UNSAFE.putOrderedObject(ss, SBASE, s0); // ordered write of segments[0] this.segments = ss; }- 1
- 2
- 3
- 4
- 5
- 6
- 7
- 8
- 9
- 10
- 11
- 12
- 13
- 14
- 15
- 16
- 17
- 18
- 19
- 20
- 21
- 22
- 23
- 24
- 25
- 26
- 27
- 28
- 29
- 30
- 31
- 32
- 33
- 34
- 35
- 36
- 37
- 38
- 39
- 40
可以看到 ConcurrentHashMap 没有实现懒惰初始化,空间占用不友好
其中 this.segmentShift 和 this.segmentMask 的作用是决定将 key 的 hash 结果匹配到哪个 segment
例如,根据某一 hash 值求 segment 位置,先将高位向低位移动 this.segmentShift 位

结果再与 this.segmentMask 做位于运算,最终得到 1010 即下标为 10 的 segment

put 流程
public V put(K key, V value) { Segment<K,V> s; if (value == null) throw new NullPointerException(); int hash = hash(key); // 计算出 segment 下标 int j = (hash >>> segmentShift) & segmentMask; // 获得 segment 对象, 判断是否为 null, 是则创建该 segment if ((s = (Segment<K,V>)UNSAFE.getObject (segments, (j << SSHIFT) + SBASE)) == null) { // 这时不能确定是否真的为 null, 因为其它线程也发现该 segment 为 null, // 因此在 ensureSegment 里用 cas 方式保证该 segment 安全性 s = ensureSegment(j); } // 进入 segment 的put 流程 return s.put(key, hash, value, false); }- 1
- 2
- 3
- 4
- 5
- 6
- 7
- 8
- 9
- 10
- 11
- 12
- 13
- 14
- 15
- 16
- 17
- 18
segment 继承了可重入锁(ReentrantLock),它的 put 方法为
final V put(K key, int hash, V value, boolean onlyIfAbsent) { // 尝试加锁 HashEntry<K,V> node = tryLock() ? null : // 如果不成功, 进入 scanAndLockForPut 流程 // 如果是多核 cpu 最多 tryLock 64 次, 进入 lock 流程 // 在尝试期间, 还可以顺便看该节点在链表中有没有, 如果没有顺便创建出来 scanAndLockForPut(key, hash, value); // 执行到这里 segment 已经被成功加锁, 可以安全执行 V oldValue; try { HashEntry<K,V>[] tab = table; int index = (tab.length - 1) & hash; // 找到链表头结点 HashEntry<K,V> first = entryAt(tab, index); for (HashEntry<K,V> e = first;;) { if (e != null) { // 更新 K k; if ((k = e.key) == key || (e.hash == hash && key.equals(k))) { oldValue = e.value; if (!onlyIfAbsent) { e.value = value; ++modCount; } break; } e = e.next; } else { // 新增 // 1) 之前等待锁时, node 已经被创建, next 指向链表头 if (node != null) node.setNext(first); else // 2) 创建新 node node = new HashEntry<K,V>(hash, key, value, first); int c = count + 1; // 3) 扩容 // 超过了阈值 if (c > threshold && tab.length < MAXIMUM_CAPACITY) rehash(node); else // 将 node 作为链表头 setEntryAt(tab, index, node); ++modCount; count = c; oldValue = null; break; } } } finally { unlock(); } return oldValue; }- 1
- 2
- 3
- 4
- 5
- 6
- 7
- 8
- 9
- 10
- 11
- 12
- 13
- 14
- 15
- 16
- 17
- 18
- 19
- 20
- 21
- 22
- 23
- 24
- 25
- 26
- 27
- 28
- 29
- 30
- 31
- 32
- 33
- 34
- 35
- 36
- 37
- 38
- 39
- 40
- 41
- 42
- 43
- 44
- 45
- 46
- 47
- 48
- 49
- 50
- 51
- 52
- 53
- 54
- 55
- 56
- 57
rehash 流程
发生在 put 中,因为此时已经获得了锁,因此 rehash 时不需要考虑线程安全
private void rehash(HashEntry<K,V> node) { HashEntry<K,V>[] oldTable = table; int oldCapacity = oldTable.length; // 移位 int newCapacity = oldCapacity << 1; threshold = (int)(newCapacity * loadFactor); HashEntry<K,V>[] newTable = (HashEntry<K,V>[]) new HashEntry[newCapacity]; int sizeMask = newCapacity - 1; for (int i = 0; i < oldCapacity ; i++) { HashEntry<K,V> e = oldTable[i]; if (e != null) { HashEntry<K,V> next = e.next; int idx = e.hash & sizeMask; if (next == null) // Single node on list newTable[idx] = e; else { // Reuse consecutive sequence at same slot HashEntry<K,V> lastRun = e; int lastIdx = idx; // 过一遍链表, 尽可能把 rehash 后 idx 不变的节点重用 for (HashEntry<K,V> last = next; last != null; last = last.next) { int k = last.hash & sizeMask; if (k != lastIdx) { lastIdx = k; lastRun = last; } } newTable[lastIdx] = lastRun; // 剩余节点需要新建 for (HashEntry<K,V> p = e; p != lastRun; p = p.next) { V v = p.value; int h = p.hash; int k = h & sizeMask; HashEntry<K,V> n = newTable[k]; newTable[k] = new HashEntry<K,V>(h, p.key, v, n); } } } } // 扩容完成, 才加入新的节点 int nodeIndex = node.hash & sizeMask; // add the new node node.setNext(newTable[nodeIndex]); newTable[nodeIndex] = node; // 替换为新的 HashEntry table table = newTable; }- 1
- 2
- 3
- 4
- 5
- 6
- 7
- 8
- 9
- 10
- 11
- 12
- 13
- 14
- 15
- 16
- 17
- 18
- 19
- 20
- 21
- 22
- 23
- 24
- 25
- 26
- 27
- 28
- 29
- 30
- 31
- 32
- 33
- 34
- 35
- 36
- 37
- 38
- 39
- 40
- 41
- 42
- 43
- 44
- 45
- 46
- 47
- 48
- 49
get 流程
get 时并未加锁,用了 UNSAFE 方法保证了可见性,扩容过程中,get 先发生就从旧表取内容,get 后发生就从新
表取内容public V get(Object key) { Segment<K,V> s; // manually integrate access methods to reduce overhead HashEntry<K,V>[] tab; int h = hash(key); // u 为 segment 对象在数组中的偏移量 long u = (((h >>> segmentShift) & segmentMask) << SSHIFT) + SBASE; // s 即为 segment // 数组内元素必须使用这个来保证它的可见性 if ((s = (Segment<K,V>)UNSAFE.getObjectVolatile(segments, u)) != null && (tab = s.table) != null) { for (HashEntry<K,V> e = (HashEntry<K,V>) UNSAFE.getObjectVolatile (tab, ((long)(((tab.length - 1) & h)) << TSHIFT) + TBASE); e != null; e = e.next) { K k; if ((k = e.key) == key || (e.hash == h && key.equals(k))) return e.value; } } return null; }- 1
- 2
- 3
- 4
- 5
- 6
- 7
- 8
- 9
- 10
- 11
- 12
- 13
- 14
- 15
- 16
- 17
- 18
- 19
- 20
- 21
- 22
size 计算流程
- 计算元素个数前,先不加锁计算两次,如果前后两次结果如一样,认为个数正确返回
- 如果不一样,进行重试,重试次数超过 3,将所有 segment 锁住,重新计算个数返回
其size本身的计算就是弱一致性的。
public int size() { // Try a few times to get accurate count. On failure due to // continuous async changes in table, resort to locking. final Segment<K,V>[] segments = this.segments; int size; boolean overflow; // true if size overflows 32 bits long sum; // sum of modCounts long last = 0L; // previous sum int retries = -1; // first iteration isn't retry try { for (;;) { if (retries++ == RETRIES_BEFORE_LOCK) { // 超过重试次数, 需要创建所有 segment 并加锁 for (int j = 0; j < segments.length; ++j) ensureSegment(j).lock(); // force creation } sum = 0L; size = 0; overflow = false; for (int j = 0; j < segments.length; ++j) { Segment<K,V> seg = segmentAt(segments, j); if (seg != null) { sum += seg.modCount; int c = seg.count; if (c < 0 || (size += c) < 0) overflow = true; } } if (sum == last) break; last = sum; } } finally { if (retries > RETRIES_BEFORE_LOCK) { for (int j = 0; j < segments.length; ++j) segmentAt(segments, j).unlock(); } } return overflow ? Integer.MAX_VALUE : size; }- 1
- 2
- 3
- 4
- 5
- 6
- 7
- 8
- 9
- 10
- 11
- 12
- 13
- 14
- 15
- 16
- 17
- 18
- 19
- 20
- 21
- 22
- 23
- 24
- 25
- 26
- 27
- 28
- 29
- 30
- 31
- 32
- 33
- 34
- 35
- 36
- 37
- 38
- 39
- 40
BlockingQueue
LinkedBlockingQueue 原理
基本的入队出队
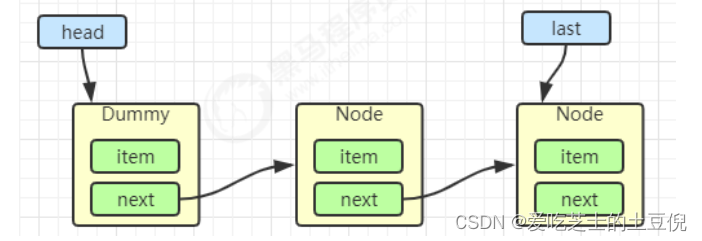
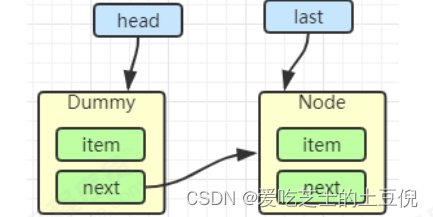
public class LinkedBlockingQueue<E> extends AbstractQueue<E> implements BlockingQueue<E>, java.io.Serializable { static class Node<E> { E item; /** * 下列三种情况之一 * - 真正的后继节点 * - 自己, 发生在出队时 * - null, 表示是没有后继节点, 是最后了 */ Node<E> next; Node(E x) { item = x; } } }- 1
- 2
- 3
- 4
- 5
- 6
- 7
- 8
- 9
- 10
- 11
- 12
- 13
- 14
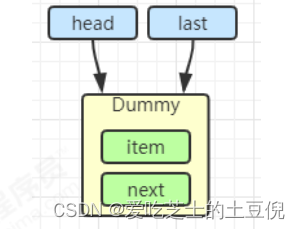
初始化链表 last = head = new Node(null); Dummy 节点用来占位,item 为 null
当一个节点入队 last = last.next = node;
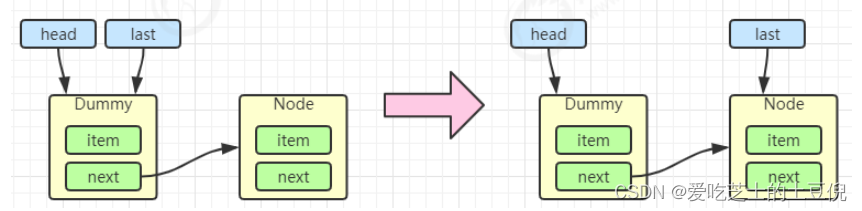
再来一个节点入队 last = last.next = node;
出队
Node<E> h = head; Node<E> first = h.next; h.next = h; // help GC head = first; E x = first.item; first.item = null; return x;- 1
- 2
- 3
- 4
- 5
- 6
- 7
h = head
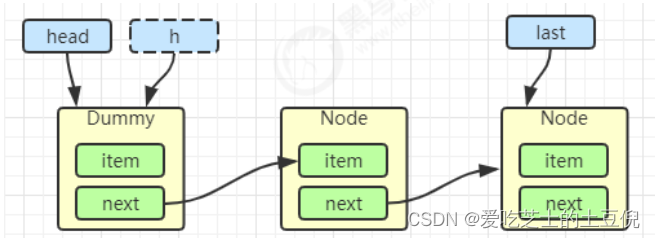
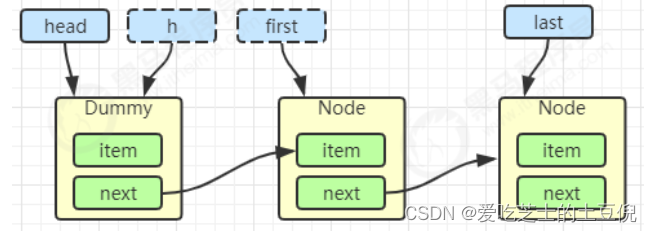
first = h.next
h.next = h
指向自己,安全的进行垃圾回收
head = first
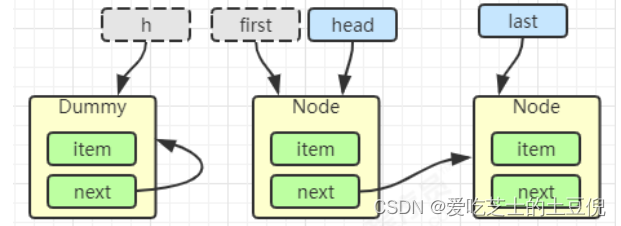
E x = first.item; first.item = null; return x;- 1
- 2
- 3
加锁分析
高明之处在于用了两把锁和 dummy 节点(站位节点)
- 用一把锁,同一时刻,最多只允许有一个线程(生产者或消费者,二选一)执行
- 用两把锁,同一时刻,可以允许两个线程同时(一个生产者与一个消费者)执行
消费者与消费者线程仍然串行
生产者与生产者线程仍然串行线程安全分析
- 当节点总数大于 2 时(包括 dummy 节点),putLock 保证的是 last 节点的线程安全,takeLock 保证的是
head 节点的线程安全。两把锁保证了入队和出队没有竞争 - 当节点总数等于 2 时(即一个 dummy 节点,一个正常节点)这时候,仍然是两把锁锁两个对象,不会竞争
- 当节点总数等于 1 时(就一个 dummy 节点)这时 take 线程会被 notEmpty 条件阻塞,有竞争,会阻塞
// 用于 put(阻塞) offer(非阻塞) private final ReentrantLock putLock = new ReentrantLock(); // 用户 take(阻塞) poll(非阻塞) private final ReentrantLock takeLock = new ReentrantLock();- 1
- 2
- 3
- 4
- 5
put 操作
public void put(E e) throws InterruptedException { if (e == null) throw new NullPointerException(); int c = -1; Node<E> node = new Node<E>(e); final ReentrantLock putLock = this.putLock; // count 用来维护元素计数 final AtomicInteger count = this.count; putLock.lockInterruptibly(); try { // 满了等待 while (count.get() == capacity) { // 倒过来读就好: 等待 notFull notFull.await(); } // 有空位, 入队且计数加一 enqueue(node); c = count.getAndIncrement(); // 在这里和我们之前自己做的 使用signalall唤醒是不同的,都是使用signal来唤醒,使用signal 而不使用signalall的原因就是,signalall一次会唤醒多个,这样的话 最终可能就一个会去执行,然后又陷入等待,会引起很多不必要的竞争 // 除了自己 put 以外, 队列还有空位, 由自己叫醒其他 put 线程 if (c + 1 < capacity) notFull.signal(); } finally { putLock.unlock(); } // 如果队列中有一个元素, 叫醒 take 线程 是为了确保在第一个元素被添加到队列中时,可以及时通知等待的take线程进行取出操作。这样可以避免take线程一直处于等待状态,提高了程序的效率。 if (c == 0) // 这里调用的是 notEmpty.signal() 而不是 notEmpty.signalAll() 是为了减少竞争 signalNotEmpty(); }- 1
- 2
- 3
- 4
- 5
- 6
- 7
- 8
- 9
- 10
- 11
- 12
- 13
- 14
- 15
- 16
- 17
- 18
- 19
- 20
- 21
- 22
- 23
- 24
- 25
- 26
- 27
- 28
- 29
- 30
- 31
take 操作
public E take() throws InterruptedException { E x; int c = -1; final AtomicInteger count = this.count; final ReentrantLock takeLock = this.takeLock; takeLock.lockInterruptibly(); try { while (count.get() == 0) { notEmpty.await(); } x = dequeue(); c = count.getAndDecrement(); if (c > 1) notEmpty.signal(); } finally { takeLock.unlock(); } // 如果队列中只有一个空位时, 叫醒 put 线程 // 如果有多个线程进行出队, 第一个线程满足 c == capacity, 但后续线程 c < capacity if (c == capacity) // 这里调用的是 notFull.signal() 而不是 notFull.signalAll() 是为了减少竞争 signalNotFull() return x; }- 1
- 2
- 3
- 4
- 5
- 6
- 7
- 8
- 9
- 10
- 11
- 12
- 13
- 14
- 15
- 16
- 17
- 18
- 19
- 20
- 21
- 22
- 23
- 24
CopyOnWriteArrayList
CopyOnWriteArraySet 是它的马甲 底层实现采用了 写入时拷贝 的思想,增删改操作会将底层数组拷贝一份,更
改操作在新数组上执行,这时不影响其它线程的并发读,读写分离。 以新增为例:public boolean add(E e) { synchronized (lock) { // 获取旧的数组 Object[] es = getArray(); int len = es.length; // 拷贝新的数组(这里是比较耗时的操作,但不影响其它读线程) es = Arrays.copyOf(es, len + 1); // 添加新元素 es[len] = e; // 替换旧的数组 setArray(es); return true; } }- 1
- 2
- 3
- 4
- 5
- 6
- 7
- 8
- 9
- 10
- 11
- 12
- 13
- 14
这里的源码版本是 Java 11,在 Java 1.8 中使用的是可重入锁而不是 synchronized
其它读操作并未加锁,例如:
public void forEach(Consumer<? super E> action) { Objects.requireNonNull(action); for (Object x : getArray()) { @SuppressWarnings("unchecked") E e = (E) x; action.accept(e); } }- 1
- 2
- 3
- 4
- 5
- 6
- 7
适合『读多写少』的应用场景
get 弱一致性
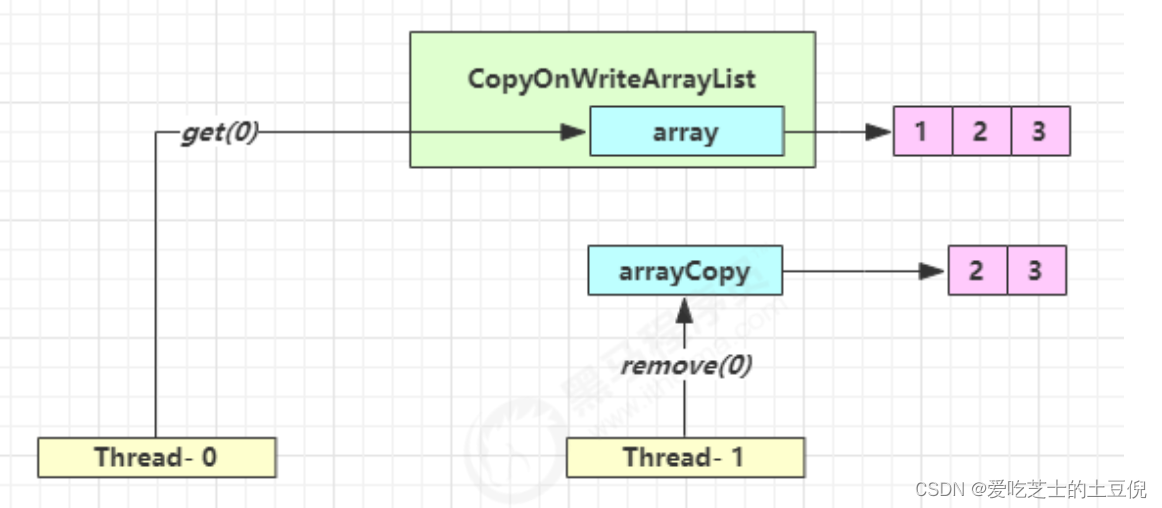
时间点 操作 1 Thread-0 getArray() 2 Thread-1 getArray() 3 Thread-1 setArray(arrayCopy) 4 Thread-0 array[index] 不容易测试,但问题确实存在
迭代器弱一致性
CopyOnWriteArrayList<Integer> list = new CopyOnWriteArrayList<>(); list.add(1); list.add(2); list.add(3); Iterator<Integer> iter = list.iterator(); new Thread(() -> { list.remove(0); System.out.println(list); }).start(); sleep1s(); while (iter.hasNext()) { System.out.println(iter.next()); }- 1
- 2
- 3
- 4
- 5
- 6
- 7
- 8
- 9
- 10
- 11
- 12
- 13
不要觉得弱一致性就不好
- 数据库的 MVCC 都是弱一致性的表现
- 并发高和一致性是矛盾的,需要权衡
-
相关阅读:
什么是单元测试(unit testing)
虚拟机VirtualBox和Vagrant安装
jwt-生成私钥和公钥
10 编译2022年最新的U-Boot源码,并用QEMU模拟器运行
浙大陈越何钦铭数据结构06-图1 列出连通集
Linux系统禁用防火墙和SELinux
react cli配置stylelint样式规范
01 `Linux`基础
【精通内核】Linux内核自旋锁实现原理与源码解析
【Linux】进程概念 —— 进程状态
- 原文地址:https://blog.csdn.net/qq_40851232/article/details/134478829
