-
03-瑞吉外卖关于菜品/套餐分类表的增删改查
新增菜品/套餐分类
页面原型当我们
在后台系统中添加菜品/套餐时,需要选择一个菜品/套餐分类,在移动端也会按照菜品分类和套餐分类来展示对应的菜品和套餐第一步: 用户点击
确定按钮执行submitForm函数发送Ajax请求,将新增菜品/套餐表单中输入的数据以json形式提交给服务端,等待服务端响应数据后执行回调函数
<el-form class="demo-form-inline" label-width="100px"> <el-form-item label="分类名称:"> <el-input v-model="classData.name" placeholder="请输入分类名称" maxlength="14"/> el-form-item> <el-form-item label="排序:"> <el-input v-model="classData.sort" type="number" placeholder="请输入排序" /> el-form-item> el-form> <span slot="footer" class="dialog-footer"> <el-button size="medium" @click="classData.dialogVisible = false">取 消el-button> <el-button type="primary" size="medium" @click="submitForm()">确 定el-button> <el-button v-if="action != 'edit'" type="primary" size="medium" class="continue" @click="submitForm('go')"> 保存并继续添加 el-button>- 1
- 2
- 3
- 4
- 5
- 6
- 7
- 8
- 9
- 10
- 11
- 12
- 13
submitForm(st) { const classData = this.classData const valid = (classData.name === 0 ||classData.name) && (classData.sort === 0 || classData.sort) if (this.action === 'add') { if (valid) { const reg = /^\d+$/ if (reg.test(classData.sort)) { addCategory({'name': classData.name,'type':this.type, sort: classData.sort}).then(res => { console.log(res) if (res.code === 1) { this.$message.success('分类添加成功!') if (!st) { this.classData.dialogVisible = false } else { this.classData.name = '' this.classData.sort = '' } this.handleQuery() } } } } }- 1
- 2
- 3
- 4
- 5
- 6
- 7
- 8
- 9
- 10
- 11
- 12
- 13
- 14
- 15
- 16
- 17
- 18
- 19
- 20
- 21
- 22
- 23
第二步: 服务端Controller接收页面提交的数据并通过Service调用Mapper操作数据库保存添加的
菜品/套餐分类信息
数据模型数据模型
category表: id是主键,name字段表示分类名称是唯一的,type字段为1表示菜品分类,为2表示套餐分类
后端处理请求第一步: 创建实体类
Category,对于createUser和createTime等公共字段使用自动填充功能@Data public class Category implements Serializable { private static final long serialVersionUID = 1L; private Long id; //类型 1 菜品分类 2 套餐分类 private Integer type; //分类名称 private String name; //顺序 private Integer sort; //创建时间 @TableField(fill = FieldFill.INSERT) private LocalDateTime createTime; //更新时间 @TableField(fill = FieldFill.INSERT_UPDATE) private LocalDateTime updateTime; //创建人 @TableField(fill = FieldFill.INSERT) private Long createUser; //修改人 @TableField(fill = FieldFill.INSERT_UPDATE) private Long updateUser; }- 1
- 2
- 3
- 4
- 5
- 6
- 7
- 8
- 9
- 10
- 11
- 12
- 13
- 14
- 15
- 16
- 17
- 18
- 19
- 20
- 21
- 22
- 23
第二步: 创建Mapper接口
CategoryMapper和Service接口CategoryService及其实现类CatrgoryServiceImpl@Mapper public interface CategoryMapper extends BaseMapper<Category> { } public interface CategoryService extends IService<Category> { } @Service public class CategoryServiceImpl extends ServiceImpl<CategoryMapper, Category> implements CategoryService { }- 1
- 2
- 3
- 4
- 5
- 6
- 7
- 8
- 9
- 10
第三步: 在
CategoryController控制层中编写控制器方法,将接收到的json数据添加到数据库中并响应一个成功的提示信息@Slf4j @RestController @RequestMapping("/category") public class CategoryController { @Autowired private CategoryService categoryService; @PostMapping public Result<String> save(@RequestBody Category category) { log.info("category:{}", category); categoryService.save(category); return Result.success("新增分类成功"); } }- 1
- 2
- 3
- 4
- 5
- 6
- 7
- 8
- 9
- 10
- 11
- 12
- 13
分页查询所有菜品/套餐分类
页面原型第一步:用户点击
分页管理按钮时携带分页查询的相关参数page(默认1)、pageSize(默认10)发送Ajax请求到服务端去查询菜品/套餐的分类信息
第二步: 服务端Controller接受到请求之后通过Service调用Mapper操作数据库查询相关的
菜品/套餐信息
第三步: Controller将查询到的所有数据和分页信息响应给前端
第四步: 前端接收到后端响应的数据后,通过
ElementUI的Table组件渲染到页面上- 页面加载完毕之后调用
created钩子函数,在该钩子函数内又调用init函数进行初始化
created() { this.init() } async init () { await getCategoryPage({'page': this.page, 'pageSize': this.pageSize}).then(res => { if (String(res.code) === '1') { //将服务端查询到的所有数据赋给tableData,然后就能看到了 this.tableData = res.data.records this.counts = Number(res.data.total) } else { this.$message.error(res.msg || '操作失败') } }).catch(err => { this.$message.error('请求出错了:' + err) }) } // 查询列表接口 const getCategoryPage = (params) => { return $axios({ url: '/category/page', method: 'get', params }) }- 1
- 2
- 3
- 4
- 5
- 6
- 7
- 8
- 9
- 10
- 11
- 12
- 13
- 14
- 15
- 16
- 17
- 18
- 19
- 20
- 21
- 22
- 23
- 24
后端处理请求执行
categoryService提供的page方法进行分页查询并将查询到的数据和分页信息响应给前端@GetMapping("/page") public Result<Page> page(int page, int pageSize) { // 创建分页构造器 Page<Category> pageInfo = new Page<>(page, pageSize); // 构造条件查询器 LambdaQueryWrapper<Category> queryWrapper = new LambdaQueryWrapper<>(); // 添加排序条件,根据sort属性进行排序 queryWrapper.orderByDesc(Category::getSort); // 执行分页查询的语句 categoryService.page(pageInfo, queryWrapper); // 将查询到的所有数据和分页相关的信息响应给前端 return Result.success(pageInfo); }- 1
- 2
- 3
- 4
- 5
- 6
- 7
- 8
- 9
- 10
- 11
- 12
- 13
删除某个分类(判断有无关联)
页面原型第一步:在分类管理列表页面, 用户点击某个分类对应的
删除按钮发送Ajax请求,请求参数就是该菜品/套餐分类单元格对应的属性Id- 删除是个危险的操作,当用户点击
删除按钮时先给一个提示信息防止误操作,当用户点确定后才会执行deleCategory回调函数
<el-button type="text" size="small" class="delBut non" this.$confirm('此操作将永久删除该文件, 是否继续?', '提示', { 'confirmButtonText': '确定', 'cancelButtonText': '取消', 'type': 'warning' }).then(() => { deleCategory(id).then(res => { // 服务端成功删除后提示'删除成功!' if (res.code === 1) { this.$message.success('删除成功!') this.handleQuery() } else { this.$message.error(res.msg || '操作失败') } }).catch(err => { this.$message.error('请求出错了:' + err) }) }) } // 发其Ajax请求删除当前行 const deleCategory = (id) => { return $axios({ url: '/category', method: 'delete', params: {id} }) } script>- 1
- 2
- 3
- 4
- 5
- 6
- 7
- 8
- 9
- 10
- 11
- 12
- 13
- 14
- 15
- 16
- 17
- 18
- 19
- 20
- 21
- 22
- 23
- 24
- 25
- 26
- 27
- 28
- 29
- 30
- 31
- 32
- 33
- 34
- 35
- 36
第二步:服务端Controller接收页面提交的
菜品/套餐分类的Id,通过Service调用Mapper根据Id删除对应的纪录,如果该分类关联了某个菜品或套餐时不允许被删除
后端处理请求(无关联)@DeleteMapping private Result<String> delete(Long id) { log.info("将被删除的id:{}", id); categoryService.removeById(id); return Result.success("分类信息删除成功"); }- 1
- 2
- 3
- 4
- 5
- 6
查询菜品/套餐
删除某个分类时需要先拿着当前分类的
Id值去对应的菜品/套餐表中进行查询,如果能查询到数据则说明该分类关联了菜品/套餐,此时不能删除该分类
数据模型套餐信息表
setmeal
菜品信息表
dish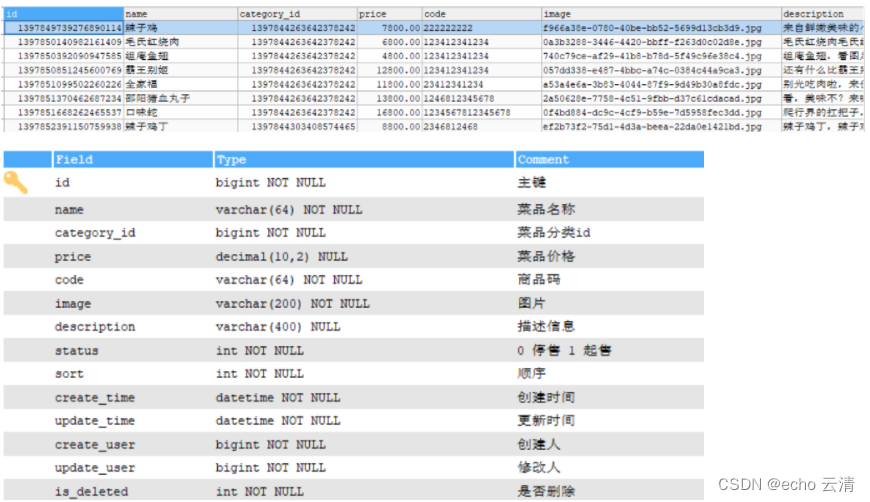
后端处理请求第一步: 创建菜品表和套餐表对应的模型类
Dish和Stemal,对于createUser和createTime和createUser和updateUser等公共字段使用自动填充功能/** 菜品 */ @Data public class Dish implements Serializable { private static final long serialVersionUID = 1L; private Long id; //菜品名称 private String name; //菜品分类id private Long categoryId; //菜品价格 private BigDecimal price; //商品码 private String code; //图片 private String image; //描述信息 private String description; //0 停售 1 起售 private Integer status; //顺序 private Integer sort; @TableField(fill = FieldFill.INSERT) private LocalDateTime createTime; @TableField(fill = FieldFill.INSERT_UPDATE) private LocalDateTime updateTime; @TableField(fill = FieldFill.INSERT) private Long createUser; @TableField(fill = FieldFill.INSERT_UPDATE) private Long updateUser; }- 1
- 2
- 3
- 4
- 5
- 6
- 7
- 8
- 9
- 10
- 11
- 12
- 13
- 14
- 15
- 16
- 17
- 18
- 19
- 20
- 21
- 22
- 23
- 24
- 25
- 26
- 27
- 28
- 29
- 30
- 31
- 32
/** * 套餐 */ @Data public class Setmeal implements Serializable { private static final long serialVersionUID = 1L; private Long id; //分类id private Long categoryId; //套餐名称 private String name; //套餐价格 private BigDecimal price; //状态 0:停用 1:启用 private Integer status; //编码 private String code; //描述信息 private String description; //图片 private String image; @TableField(fill = FieldFill.INSERT) private LocalDateTime createTime; @TableField(fill = FieldFill.INSERT_UPDATE) private LocalDateTime updateTime; @TableField(fill = FieldFill.INSERT) private Long createUser; @TableField(fill = FieldFill.INSERT_UPDATE) private Long updateUser; }- 1
- 2
- 3
- 4
- 5
- 6
- 7
- 8
- 9
- 10
- 11
- 12
- 13
- 14
- 15
- 16
- 17
- 18
- 19
- 20
- 21
- 22
- 23
- 24
- 25
- 26
- 27
- 28
- 29
- 30
第二步: 编写对应的Mapper接口和Service接口及其实现类
@Mapper public interface DishMapper extends BaseMapper<Dish> { } @Mapper public interface SetmealMapper extends BaseMapper<Setmeal> { } public interface SetmealService extends IService<Setmeal> { } @Service public class SetmealServiceImpl extends ServiceImpl<SetmealMapper, Setmeal> implements SetmealService { } public interface DishService extends IService<Dish> { } @Service public class DishServiceImpl extends ServiceImpl<DishMapper, Dish> implements DishService { }- 1
- 2
- 3
- 4
- 5
- 6
- 7
- 8
- 9
- 10
- 11
- 12
- 13
- 14
- 15
- 16
- 17
- 18
- 19
第三步: 在
common包下新增CustomException异常类用于封装我们的自定义异常public class CustomException extends RuntimeException{ public CustomException(String msg){ super(msg); } }- 1
- 2
- 3
- 4
- 5
第四步: 在全局异常处理器中使用
@ExceptionHandler注解专门处理CustomerException类型的异常@ExceptionHandler(CustomException.class) public Result<String> exceptionHandler(CustomException exception) { log.error(exception.getMessage()); return Result.error(exception.getMessage()); }- 1
- 2
- 3
- 4
- 5
第五步:
CategoryService接口中新增remove方法, 在删除数据之前先根据当前菜品/套餐分类的categoryId值去dish表和setmeal表中查询是否关联了数据如果查询到了数据: 说明存在关联的菜品/套餐数据即不能删除需要抛出一个自定义异常如果查询不到数据: 说明不存在关联的菜品/套餐数据那么可以正常删除
@Service @Slf4j public class CategoryServiceImpl extends ServiceImpl<CategoryMapper, Category> implements CategoryService { @Autowired DishService dishService; @Autowired SetmealService setmealService; /** * 根据id删除分类,删除之前需要进行判断 * @param id */ @Override public void remove(Long id) { // 根据菜品的分类id去菜品表中查询关联的菜品记录 LambdaQueryWrapper<Dish> dishLambdaQueryWrapper = new LambdaQueryWrapper<>(); dishLambdaQueryWrapper.eq(Dish::getCategoryId, id); int count1 = dishService.count(dishLambdaQueryWrapper); // 判断菜品当前分类是否关联了菜品,如果已经关联则抛出异常 if (count1 > 0){ throw new CustomException("当前分类下关联了菜品,不能删除"); } // 根据套餐的分类id去套餐表中查询关联的套餐记录 LambdaQueryWrapper<Setmeal> setmealLambdaQueryWrapper = new LambdaQueryWrapper<>(); setmealLambdaQueryWrapper.eq(Setmeal::getCategoryId,id); // 判断当前套餐分类是否关联了套餐,如果已经关联则抛出异常 int count2 = setmealService.count(setmealLambdaQueryWrapper); if (count2 > 0){ throw new CustomException("当前分类下关联了套餐,不能删除"); } // 没有关联菜品/套餐则调用CategoryService自带的removeById方法正常删除 super.removeById(id); } }- 1
- 2
- 3
- 4
- 5
- 6
- 7
- 8
- 9
- 10
- 11
- 12
- 13
- 14
- 15
- 16
- 17
- 18
- 19
- 20
- 21
- 22
- 23
- 24
- 25
- 26
- 27
- 28
- 29
- 30
- 31
- 32
- 33
第六步: 在Controller中调用
CategoryService新增的remove方法@DeleteMapping public Result<String> delete(Long id){ log.info("将要删除的分类id:{}",id); categoryService.remove(id); return Result.success("分类信息删除成功"); }- 1
- 2
- 3
- 4
- 5
- 6
修改分类信息
页面原型第一步: 用户在分类管理列表页面中点击
修改"按钮后弹出修改窗口,此时会回显当前菜品/套餐分类的信息并等待用户修改(通过Vue的数据绑定功能实现自动回显)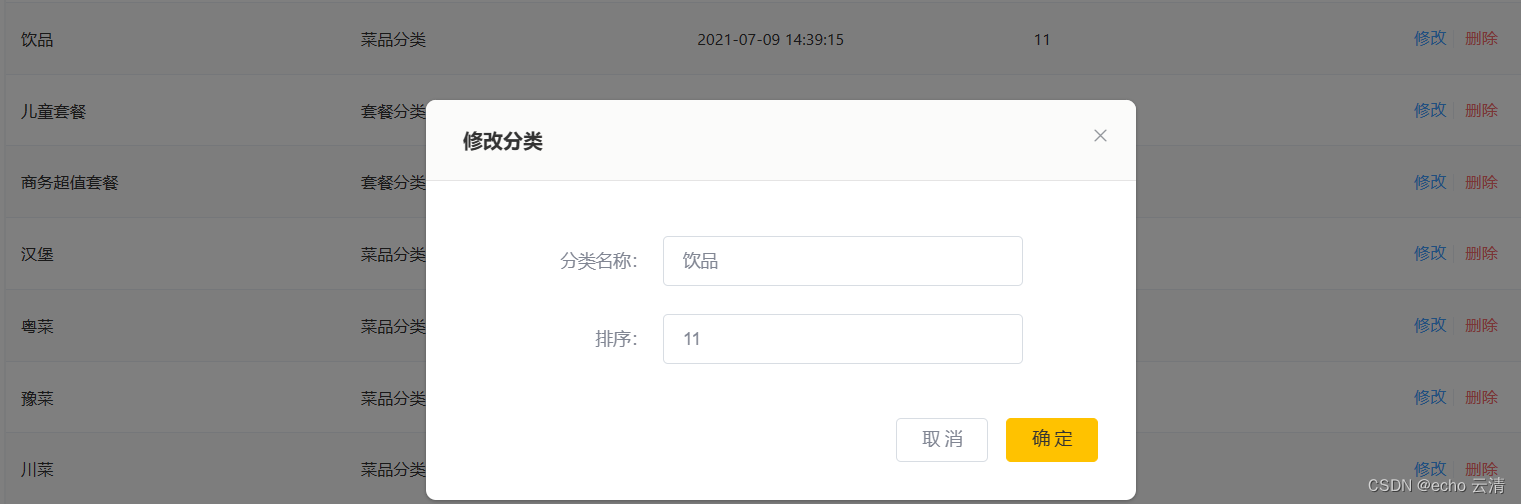
<el-button type="text" size="small" class="blueBug" // 这里并没有从后端查数据进行回显,而是对Vue双向绑定的数据classData下的name和sort属性进行赋值实现回显效果 this.classData.title = '修改分类' this.action = 'edit' this.classData.name = dat.name this.classData.sort = dat.sort this.classData.id = dat.id this.classData.dialogVisible = true } classData: { 'title': '添加菜品分类', 'dialogVisible': false, 'categoryId': '', 'name': '', sort: '' } script>- 1
- 2
- 3
- 4
- 5
- 6
- 7
- 8
- 9
- 10
- 11
- 12
- 13
- 14
- 15
- 16
- 17
- 18
- 19
- 20
- 21
- 22
- 23
- 24
- 25
- 26
- 27
- 28
- 29
- 30
- 31
- 32
- 33
- 34
- 35
- 36
- 37
- 38
- 39
- 40
- 41
- 42
- 43
- 44
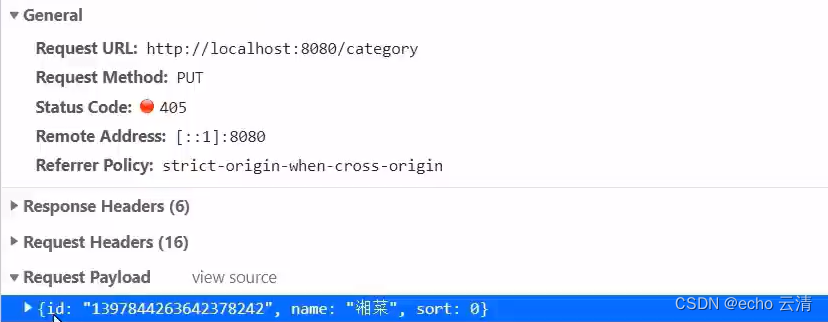
第二步: 用户点击
确定按钮后执行通用的submitForm函数发起Ajax请求,以json格式提交修改后的菜品/套餐分类信息
<script> submitForm(st) { const classData = this.classData const valid = (classData.name === 0 ||classData.name) && (classData.sort === 0 || classData.sort) // 添加操作从这里执行 if (this.action === 'add') { if (valid) { const reg = /^\d+$/ if (reg.test(classData.sort)) { addCategory({'name': classData.name,'type':this.type, sort: classData.sort}).then(res => { console.log(res) if (res.code === 1) { this.$message.success('分类添加成功!') if (!st) { this.classData.dialogVisible = false } else { this.classData.name = '' this.classData.sort = '' } this.handleQuery() } else { this.$message.error(res.msg || '操作失败') } }).catch(err => { this.$message.error('请求出错了:' + err) }) } else { this.$message.error('排序只能输入数字类型') } } else { this.$message.error('请输入分类名称或排序') } // 修改操作从这里执行 } else if (valid) { const reg = /^\d+$/ if (reg.test(this.classData.sort)) { // 发起ajax请求修改员工数据 editCategory({'id':this.classData.id,'name': this.classData.name, sort: this.classData.sort}).then(res => { if (res.code === 1) { this.$message.success('分类修改成功!') this.classData.dialogVisible = false this.handleQuery() } else { this.$message.error(res.msg || '操作失败') } }).catch(err => { this.$message.error('请求出错了:' + err) }) } else { this.$message.error('排序只能输入数字类型') } } else { this.$message.error('请输入分类名称或排序') } } // 修改接口 const editCategory = (params) => { return $axios({ url: '/category', method: 'put', data: { ...params } }) } script>- 1
- 2
- 3
- 4
- 5
- 6
- 7
- 8
- 9
- 10
- 11
- 12
- 13
- 14
- 15
- 16
- 17
- 18
- 19
- 20
- 21
- 22
- 23
- 24
- 25
- 26
- 27
- 28
- 29
- 30
- 31
- 32
- 33
- 34
- 35
- 36
- 37
- 38
- 39
- 40
- 41
- 42
- 43
- 44
- 45
- 46
- 47
- 48
- 49
- 50
- 51
- 52
- 53
- 54
- 55
- 56
- 57
- 58
- 59
- 60
- 61
- 62
- 63
- 64
- 65
后端处理请求根据用户提交的json格式的
菜品/套餐分类信息,去数据表中更新对应的菜品/套餐记录@PutMapping public Result<String> update(@RequestBody Category category) { log.info("修改分类信息为:{}", category); categoryService.updateById(category); return Result.success("修改分类信息成功"); }- 1
- 2
- 3
- 4
- 5
- 6
-
相关阅读:
浅谈 AI 大模型的崛起与未来展望:马斯克的 xAI 与中国产业发展
C - Minimize The Integer
微服务性能分析|Pyroscope 在 Rainbond 上的实践分享
MyBatis查询数据库
2023年Java毕业设计题目如何选题?Java毕业设计选题大全
Java学习----Map接口
边写代码边学习之mlflow
JavaScript 设计模式:发布订阅
《科学之路》读书笔记
NISP-SO安全运维需要学习什么呢?学习的价值又是什么
- 原文地址:https://blog.csdn.net/qq_57005976/article/details/134466430