-
苍穹外卖-day02
苍穹外卖-day02
课程内容
- 新增员工
- 员工分页查询
- 启用禁用员工账号
- 编辑员工
- 导入分类模块功能代码
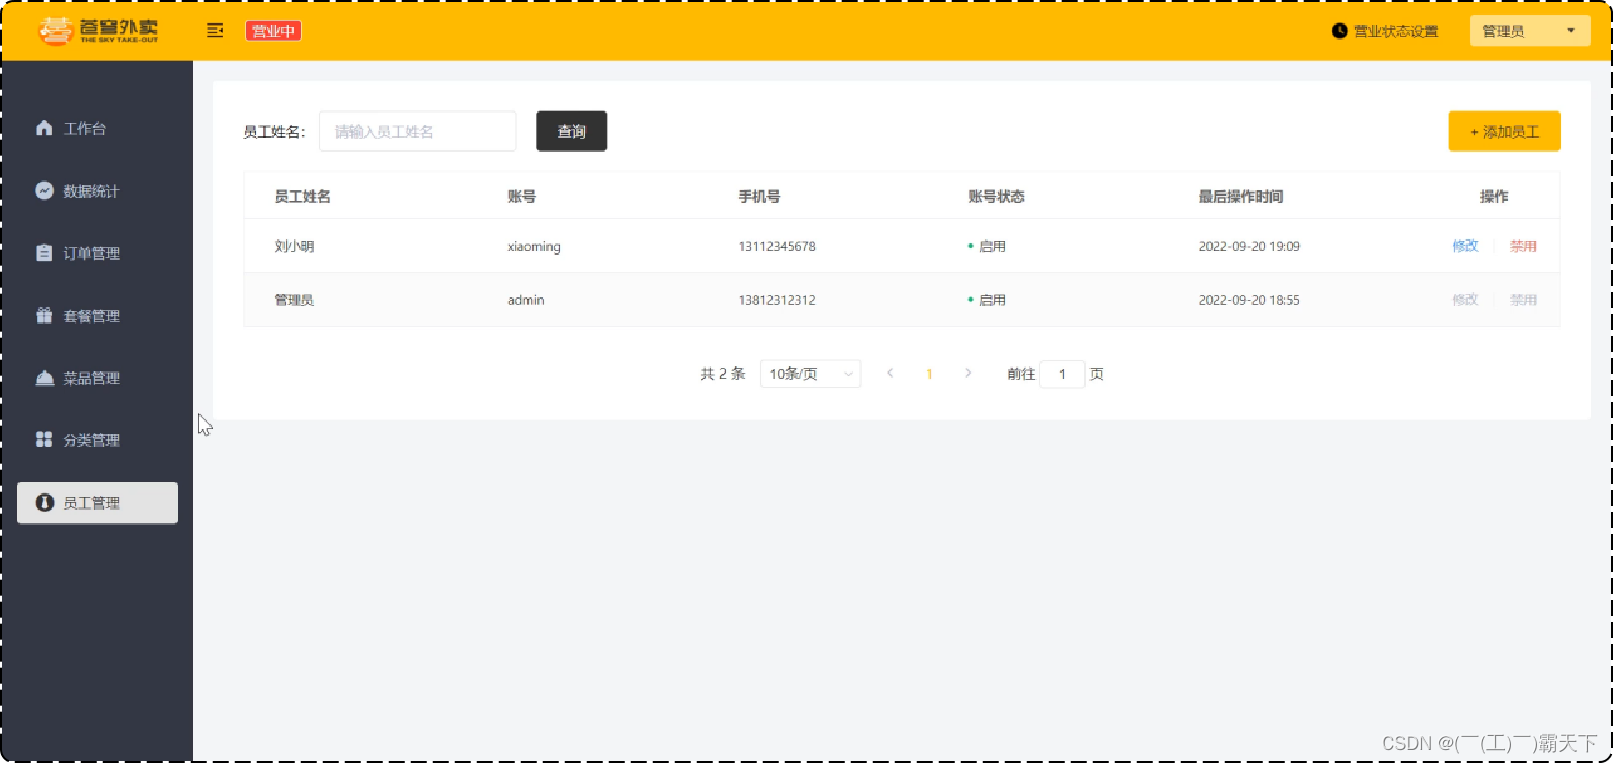
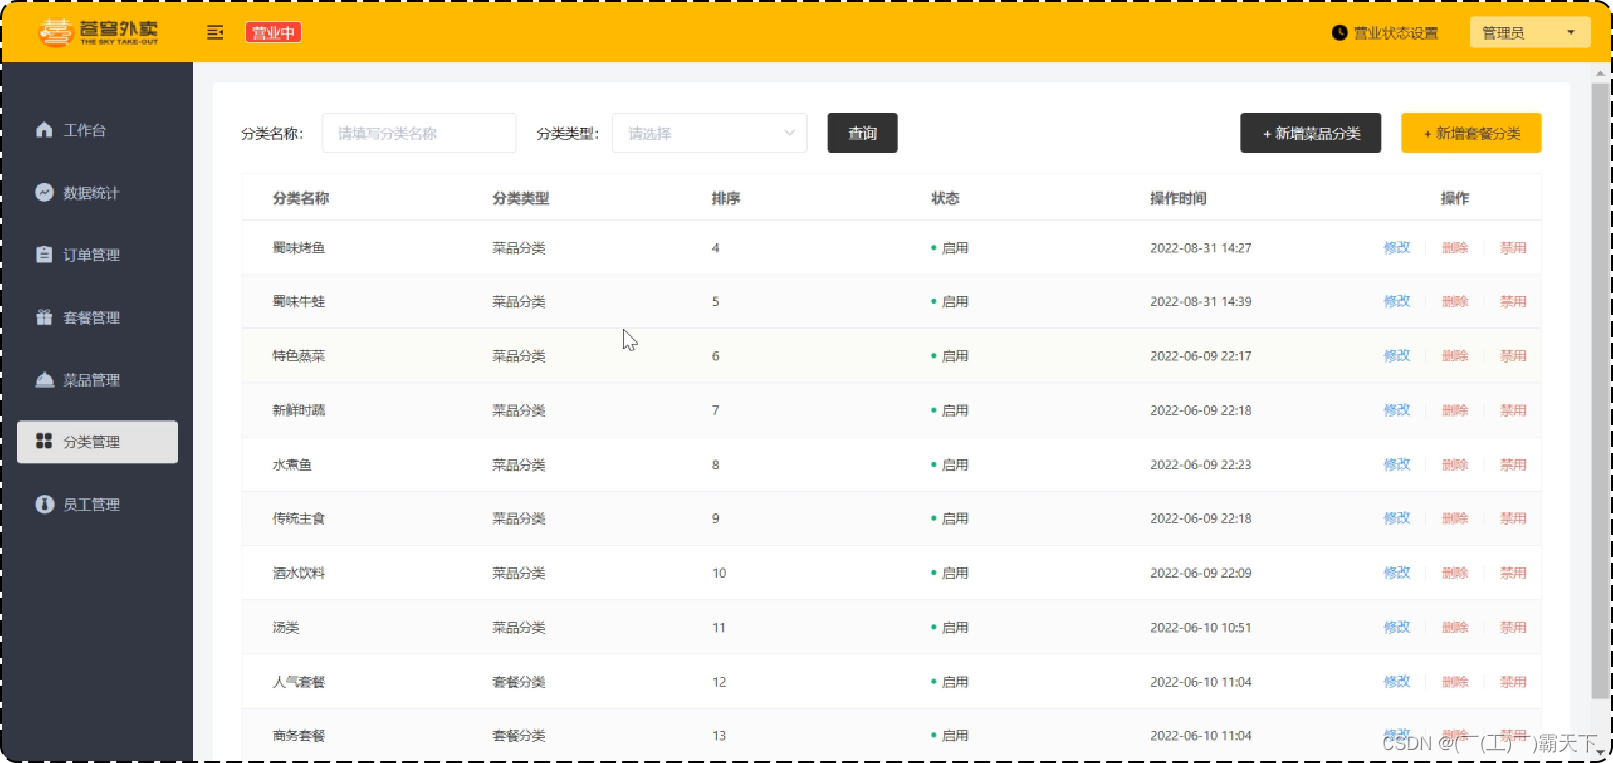
**功能实现:**员工管理、菜品分类管理。
员工管理效果:
菜品分类管理效果:
1. 新增员工
1.1 需求分析和设计
1.1.1 产品原型
一般在做需求分析时,往往都是对照着产品原型进行分析,因为产品原型比较直观,便于我们理解业务。
后台系统中可以管理员工信息,通过新增员工来添加后台系统用户。
新增员工原型:
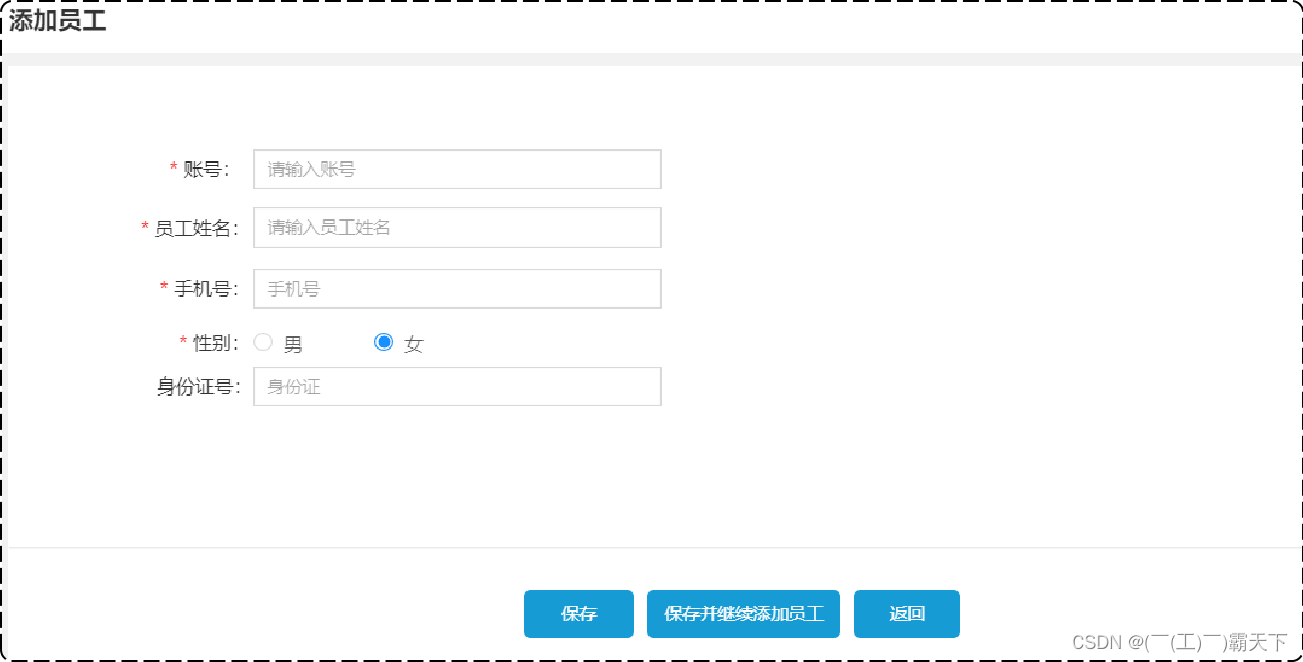
当填写完表单信息, 点击"保存"按钮后, 会提交该表单的数据到服务端, 在服务端中需要接受数据, 然后将数据保存至数据库中。
注意事项:
- 账号必须是唯一的
- 手机号为合法的11位手机号码
- 身份证号为合法的18位身份证号码
- 密码默认为123456
1.1.2 接口设计
找到资料–>项目接口文档–>苍穹外卖-管理端接口.html
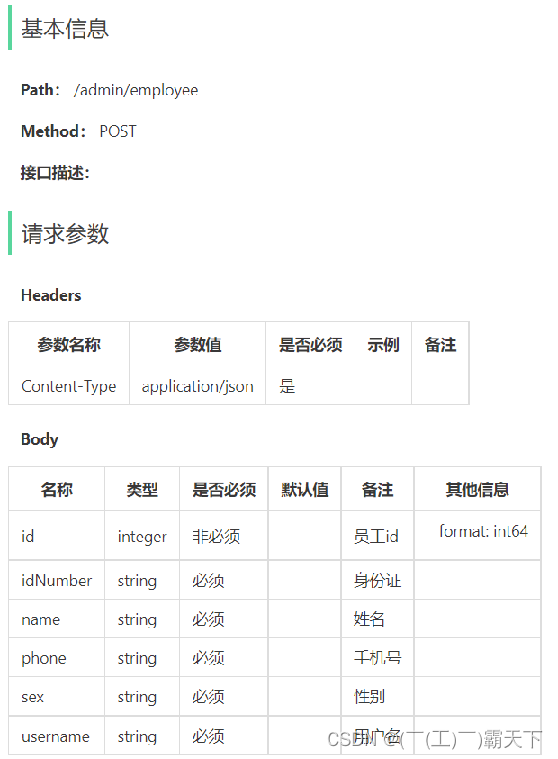
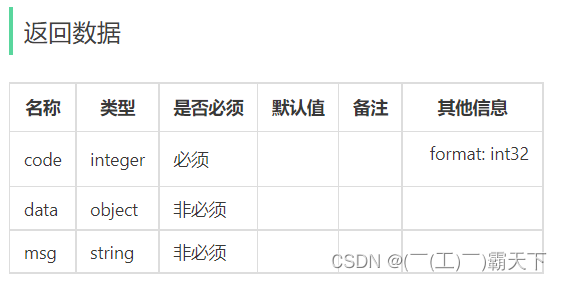
明确新增员工接口的请求路径、请求方式、请求参数、返回数据。
本项目约定:
- 管理端发出的请求,统一使用**/admin**作为前缀。
- 用户端发出的请求,统一使用**/user**作为前缀。
1.1.3 表设计
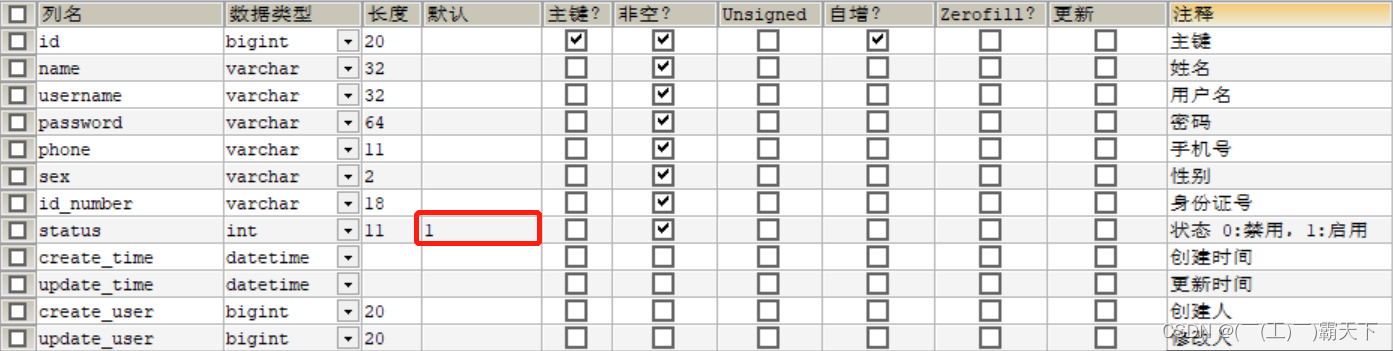
新增员工,其实就是将我们新增页面录入的员工数据插入到employee表。
employee表结构:
字段名 数据类型 说明 备注 id bigint 主键 自增 name varchar(32) 姓名 username varchar(32) 用户名 唯一 password varchar(64) 密码 phone varchar(11) 手机号 sex varchar(2) 性别 id_number varchar(18) 身份证号 status Int 账号状态 1正常 0锁定 create_time Datetime 创建时间 update_time datetime 最后修改时间 create_user bigint 创建人id update_user bigint 最后修改人id 其中,employee表中的status字段已经设置了默认值1,表示状态正常。
1.2 代码开发
1.2.1 设计DTO类
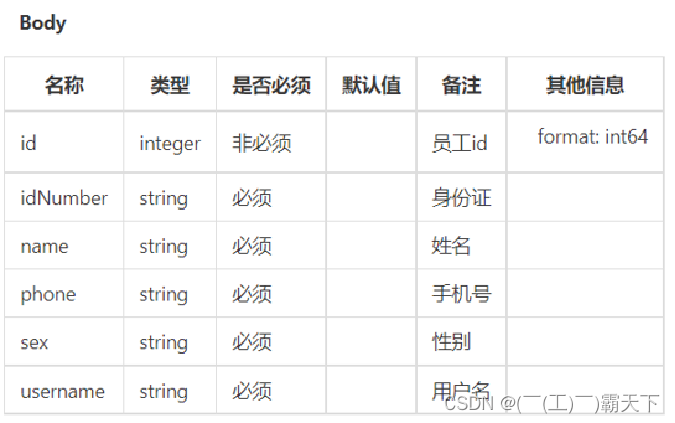
根据新增员工接口设计对应的DTO
前端传递参数列表:
**思考:**是否可以使用对应的实体类来接收呢?
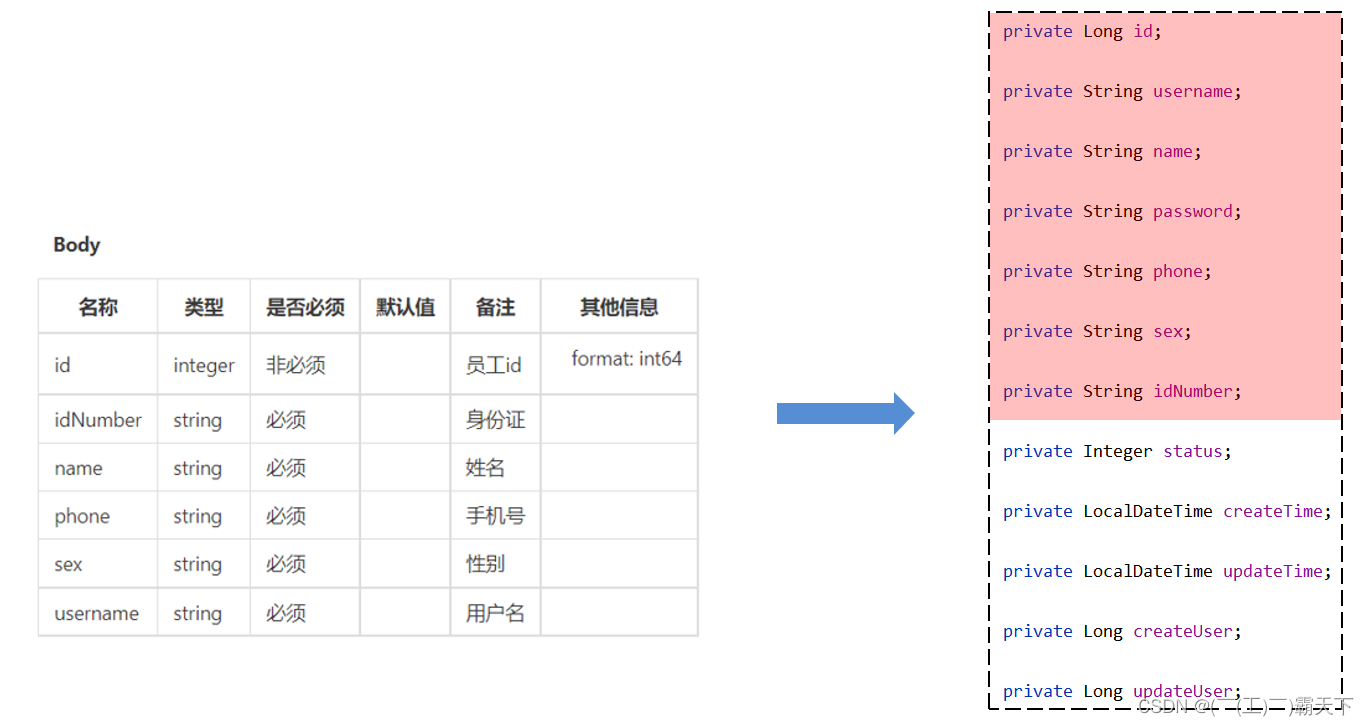
**注意:**当前端提交的数据和实体类中对应的属性差别比较大时,建议使用DTO来封装数据
由于上述传入参数和实体类有较大差别,所以自定义DTO类。
进入sky-pojo模块,在com.sky.dto包下,已定义EmployeeDTO
package com.sky.dto; import lombok.Data; import java.io.Serializable; @Data public class EmployeeDTO implements Serializable { private Long id; private String username; private String name; private String phone; private String sex; private String idNumber; }- 1
- 2
- 3
- 4
- 5
- 6
- 7
- 8
- 9
- 10
- 11
- 12
- 13
- 14
- 15
- 16
- 17
- 18
- 19
- 20
- 21
- 22
1.2.2 Controller层
EmployeeController中创建新增员工方法
进入到sky-server模块中,在com.sky.controller.admin包下,在EmployeeController中创建新增员工方法,接收前端提交的参数。
/** * 新增员工 * @param employeeDTO * @return */ @PostMapping @ApiOperation("新增员工") public Result save(@RequestBody EmployeeDTO employeeDTO){ log.info("新增员工:{}",employeeDTO); employeeService.save(employeeDTO);//该方法后续步骤会定义 return Result.success(); }- 1
- 2
- 3
- 4
- 5
- 6
- 7
- 8
- 9
- 10
- 11
- 12
**注:**Result类定义了后端统一返回结果格式。
进入sky-common模块,在com.sky.result包下定义了Result.java
package com.sky.result; import lombok.Data; import java.io.Serializable; /** * 后端统一返回结果 * @param*/ @Data public class Result<T> implements Serializable { private Integer code; //编码:1成功,0和其它数字为失败 private String msg; //错误信息 private T data; //数据 public static <T> Result<T> success() { Result<T> result = new Result<T>(); result.code = 1; return result; } public static <T> Result<T> success(T object) { Result<T> result = new Result<T>(); result.data = object; result.code = 1; return result; } public static <T> Result<T> error(String msg) { Result result = new Result(); result.msg = msg; result.code = 0; return result; } }- 1
- 2
- 3
- 4
- 5
- 6
- 7
- 8
- 9
- 10
- 11
- 12
- 13
- 14
- 15
- 16
- 17
- 18
- 19
- 20
- 21
- 22
- 23
- 24
- 25
- 26
- 27
- 28
- 29
- 30
- 31
- 32
- 33
- 34
- 35
- 36
- 37
- 38
1.2.3 Service层接口
在EmployeeService接口中声明新增员工方法
进入到sky-server模块中,com.sky.server.EmployeeService
/** * 新增员工 * @param employeeDTO */ void save(EmployeeDTO employeeDTO);- 1
- 2
- 3
- 4
- 5
1.2.4 Service层实现类
在EmployeeServiceImpl中实现新增员工方法
com.sky.server.impl.EmployeeServiceImpl中创建方法
/** * 新增员工 * * @param employeeDTO */ public void save(EmployeeDTO employeeDTO) { Employee employee = new Employee(); //对象属性拷贝 BeanUtils.copyProperties(employeeDTO, employee); //设置账号的状态,默认正常状态 1表示正常 0表示锁定 employee.setStatus(StatusConstant.ENABLE); //设置密码,默认密码123456 employee.setPassword(DigestUtils.md5DigestAsHex(PasswordConstant.DEFAULT_PASSWORD.getBytes())); //设置当前记录的创建时间和修改时间 employee.setCreateTime(LocalDateTime.now()); employee.setUpdateTime(LocalDateTime.now()); //设置当前记录创建人id和修改人id employee.setCreateUser(10L);//目前写个假数据,后期修改 employee.setUpdateUser(10L); employeeMapper.insert(employee);//后续步骤定义 }- 1
- 2
- 3
- 4
- 5
- 6
- 7
- 8
- 9
- 10
- 11
- 12
- 13
- 14
- 15
- 16
- 17
- 18
- 19
- 20
- 21
- 22
- 23
- 24
- 25
- 26
- 27
在sky-common模块com.sky.constants包下已定义StatusConstant.java
package com.sky.constant; /** * 状态常量,启用或者禁用 */ public class StatusConstant { //启用 public static final Integer ENABLE = 1; //禁用 public static final Integer DISABLE = 0; }- 1
- 2
- 3
- 4
- 5
- 6
- 7
- 8
- 9
- 10
- 11
- 12
- 13
- 14
1.2.5 Mapper层
在EmployeeMapper中声明insert方法
com.sky.EmployeeMapper中添加方法
/** * 插入员工数据 * @param employee */ @Insert("insert into employee (name, username, password, phone, sex, id_number, create_time, update_time, create_user, update_user,status) " + "values " + "(#{name},#{username},#{password},#{phone},#{sex},#{idNumber},#{createTime},#{updateTime},#{createUser},#{updateUser},#{status})") void insert(Employee employee);- 1
- 2
- 3
- 4
- 5
- 6
- 7
- 8
在application.yml中已开启驼峰命名,故id_number和idNumber可对应。
mybatis: configuration: #开启驼峰命名 map-underscore-to-camel-case: true- 1
- 2
- 3
- 4
1.3 功能测试
代码已经发开发完毕,对新增员工功能进行测试。
功能测试实现方式:
- 通过接口文档测试
- 通前后端联调测试
接下来我们使用上述两种方式分别测试。
1.3.1 接口文档测试
**启动服务:**访问http://localhost:8080/doc.html,进入新增员工接口
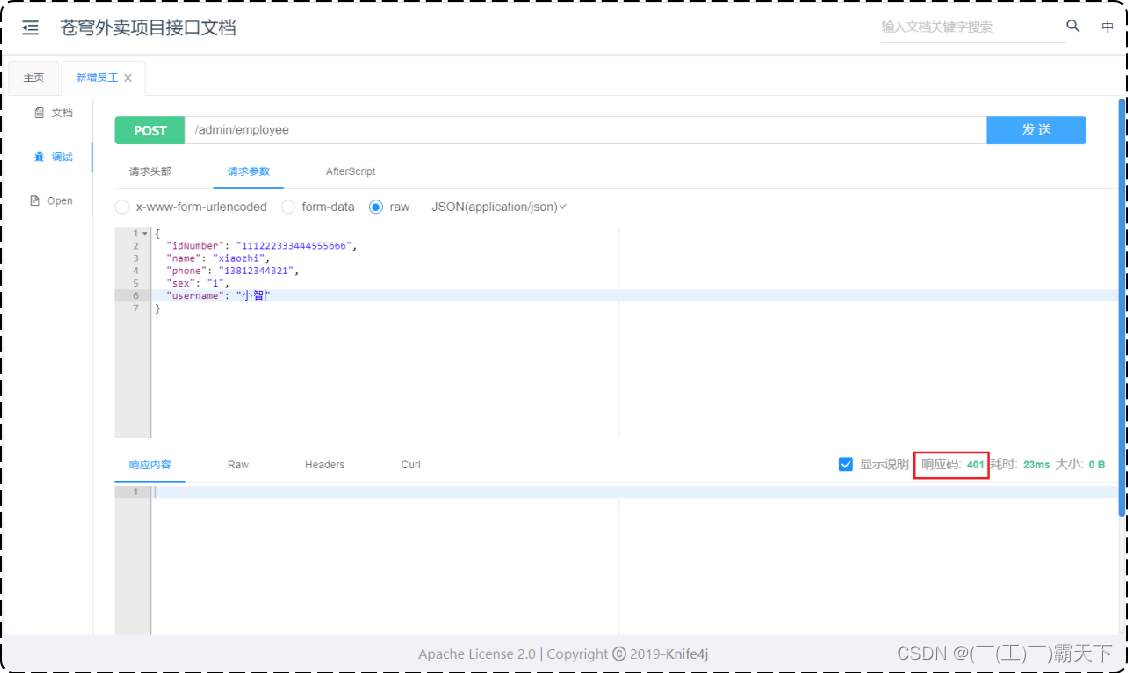
json数据:
{ "id": 0, "idNumber": "111222333444555666", "name": "xiaozhi", "phone": "13812344321", "sex": "1", "username": "小智" }- 1
- 2
- 3
- 4
- 5
- 6
- 7
- 8
响应码:401 报错
**通过断点调试:**进入到JwtTokenAdminInterceptor拦截器
/** * 校验jwt * * @param request * @param response * @param handler * @return * @throws Exception */ public boolean preHandle(HttpServletRequest request, HttpServletResponse response, Object handler) throws Exception { //判断当前拦截到的是Controller的方法还是其他资源 if (!(handler instanceof HandlerMethod)) { //当前拦截到的不是动态方法,直接放行 return true; } //1、从请求头中获取令牌 jwtProperties.getAdminTokenName()获取为token String token = request.getHeader(jwtProperties.getAdminTokenName()); //2、校验令牌 try { log.info("jwt校验:{}", token); Claims claims = JwtUtil.parseJWT(jwtProperties.getAdminSecretKey(), token); Long empId = Long.valueOf(claims.get(JwtClaimsConstant.EMP_ID).toString()); log.info("当前员工id:", empId); //3、通过,放行 return true; } catch (Exception ex) { //4、不通过,响应401状态码 response.setStatus(401); return false; } }- 1
- 2
- 3
- 4
- 5
- 6
- 7
- 8
- 9
- 10
- 11
- 12
- 13
- 14
- 15
- 16
- 17
- 18
- 19
- 20
- 21
- 22
- 23
- 24
- 25
- 26
- 27
- 28
- 29
- 30
- 31
- 32
- 33
**报错原因:**由于JWT令牌校验失败,导致EmployeeController的save方法没有被调用
**解决方法:**调用员工登录接口获得一个合法的JWT令牌
使用admin用户登录获取令牌
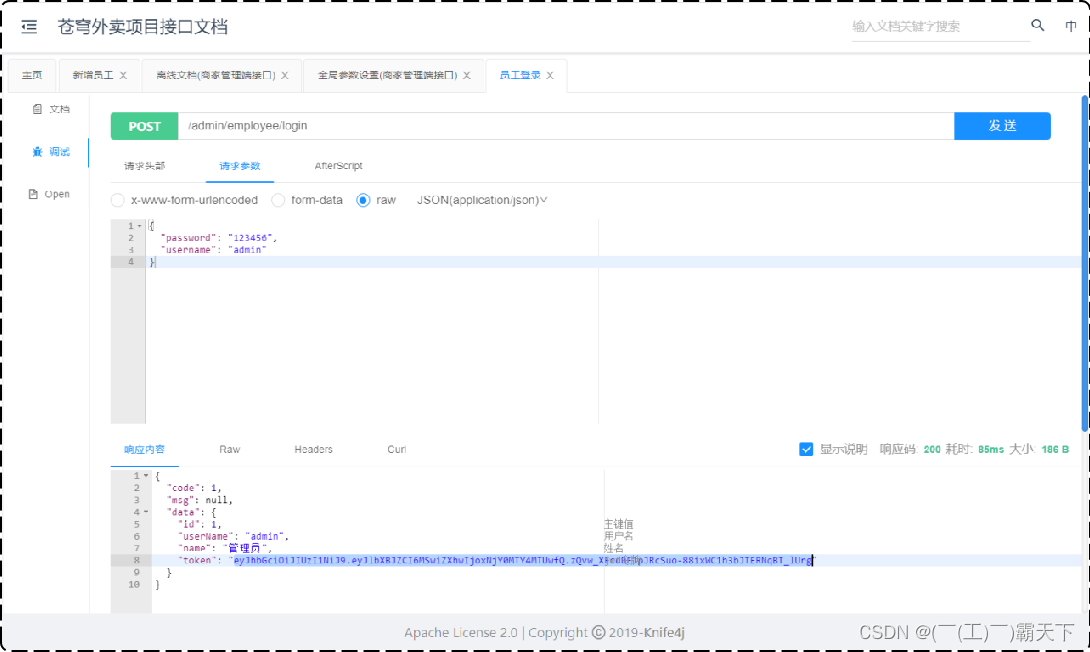
添加令牌:
将合法的JWT令牌添加到全局参数中
文档管理–>全局参数设置–>添加参数
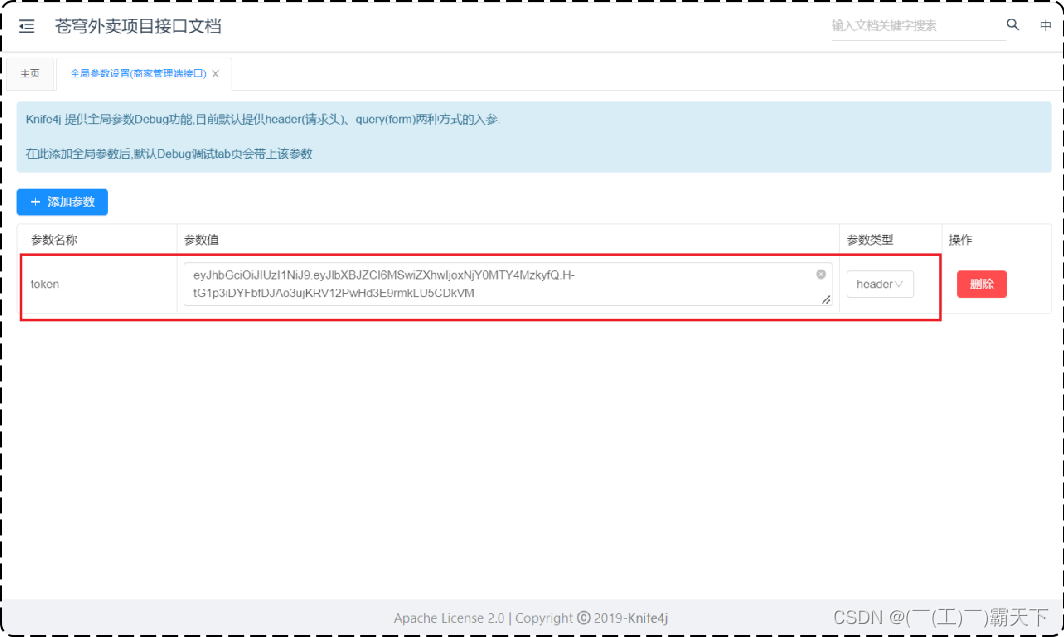
接口测试:
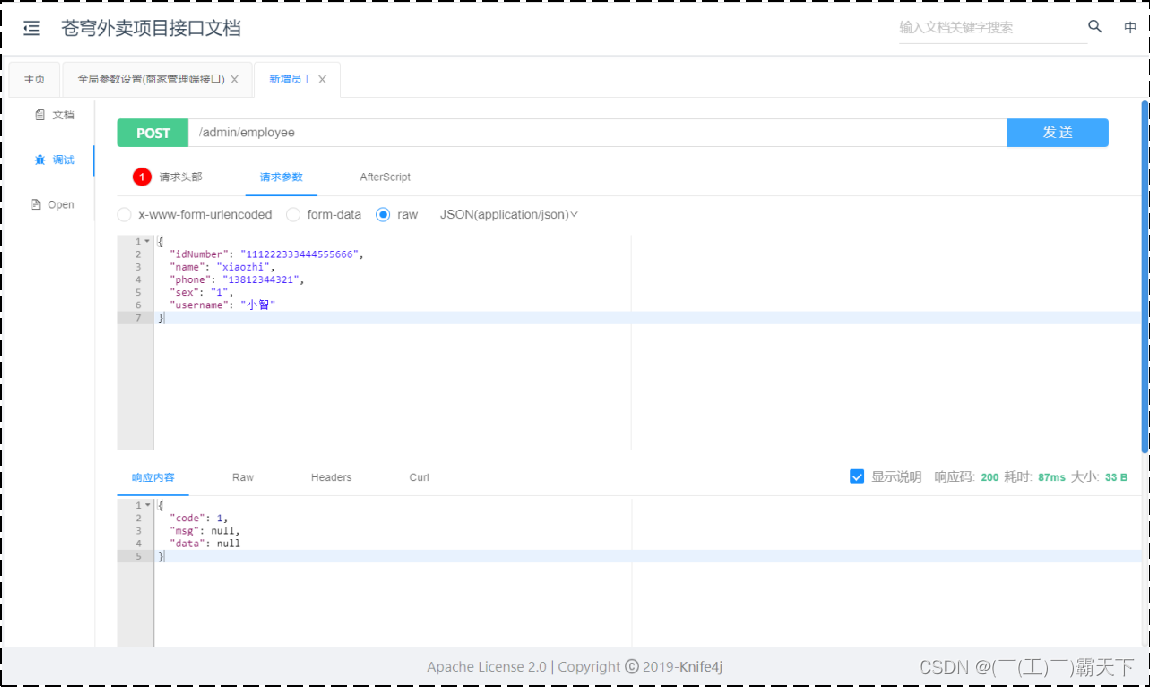
其中,请求头部含有JWT令牌
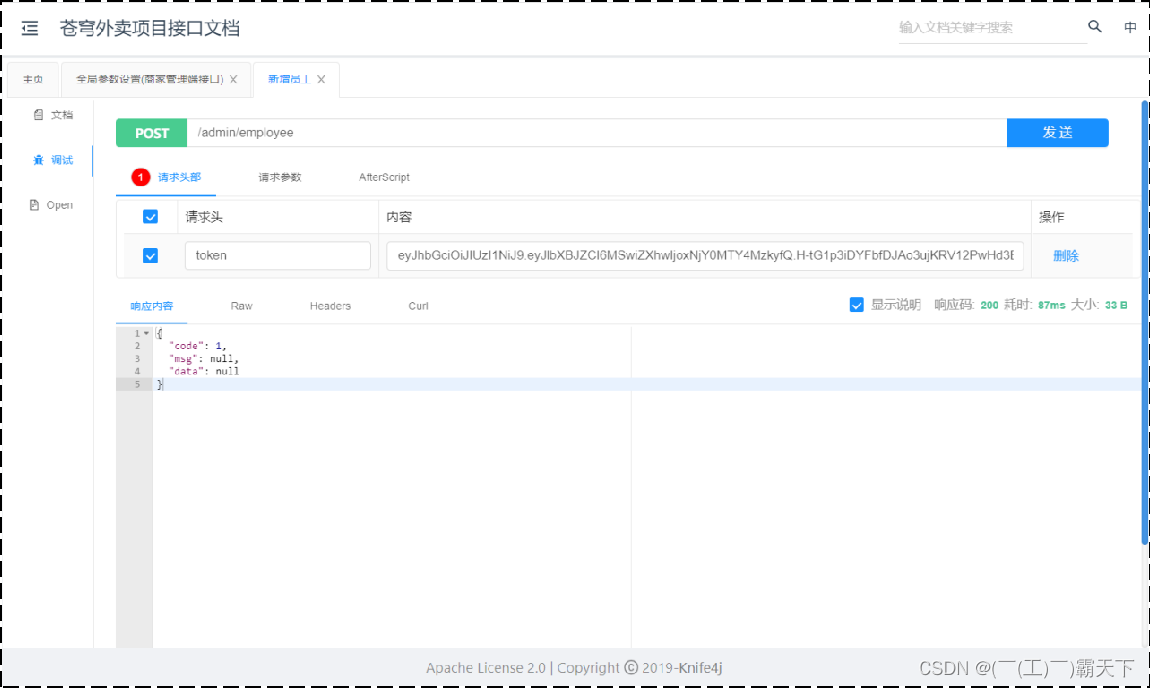
查看employee表:

测试成功。
1.3.2 前后端联调测试
启动nginx,访问 http://localhost
登录–>员工管理–>添加员工
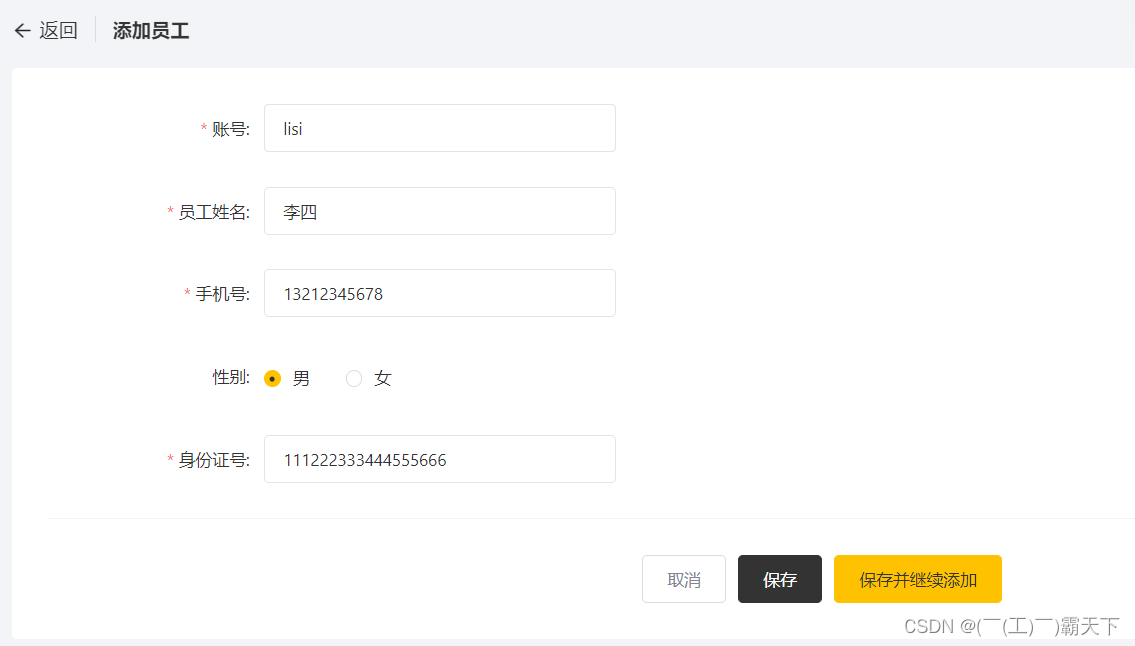
保存后,查看employee表

测试成功。
**注意:**由于开发阶段前端和后端是并行开发的,后端完成某个功能后,此时前端对应的功能可能还没有开发完成,
导致无法进行前后端联调测试。所以在开发阶段,后端测试主要以接口文档测试为主。1.4 代码完善
目前,程序存在的问题主要有两个:
- 录入的用户名已存,抛出的异常后没有处理
- 新增员工时,创建人id和修改人id设置为固定值
接下来,我们对上述两个问题依次进行分析和解决。
1.4.1 问题一
**描述:**录入的用户名已存,抛出的异常后没有处理
分析:
新增username=zhangsan的用户,若employee表中之前已存在。
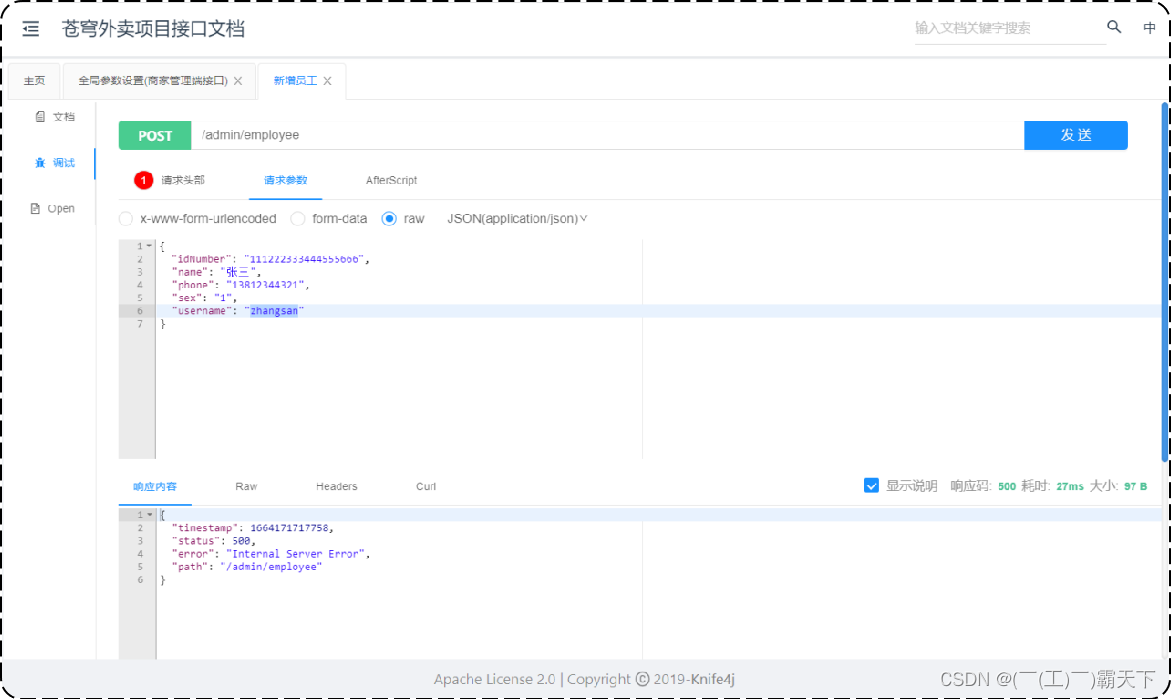
后台报错信息:

查看employee表结构:
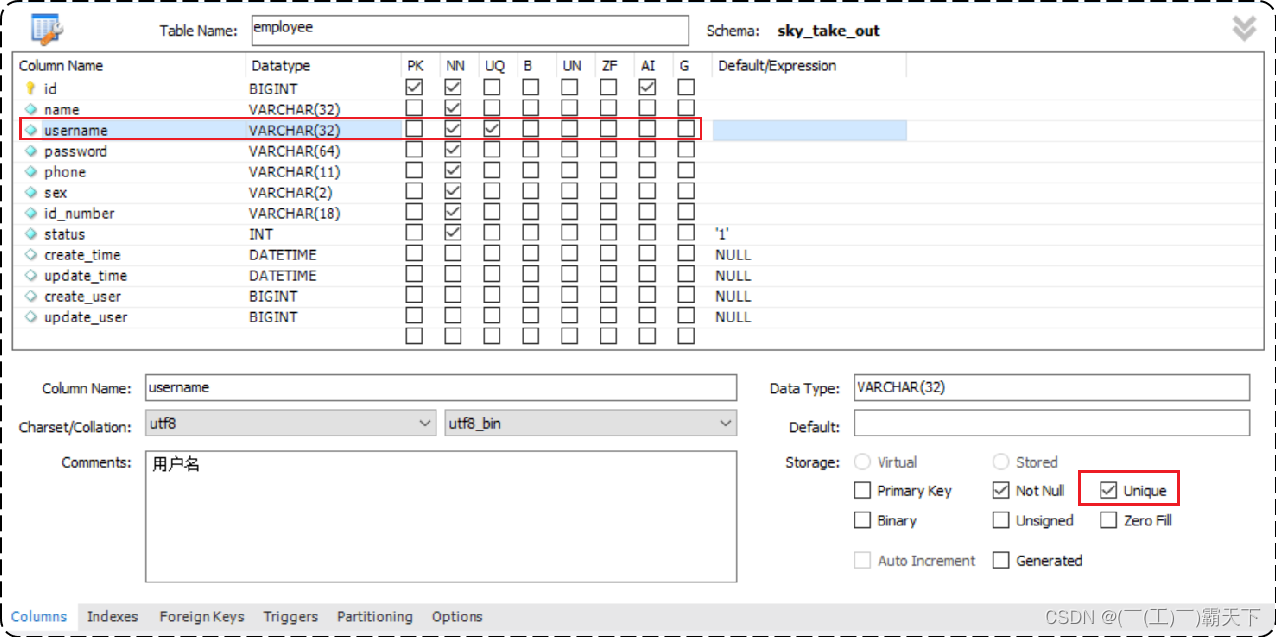
发现,username已经添加了唯一约束,不能重复。
解决:
通过全局异常处理器来处理。
进入到sky-server模块,com.sky.hander包下,GlobalExceptionHandler.java添加方法
/** * 处理SQL异常 * @param ex * @return */ @ExceptionHandler public Result exceptionHandler(SQLIntegrityConstraintViolationException ex){ //Duplicate entry 'zhangsan' for key 'employee.idx_username' String message = ex.getMessage(); if(message.contains("Duplicate entry")){ String[] split = message.split(" "); String username = split[2]; String msg = username + MessageConstant.ALREADY_EXISTS; return Result.error(msg); }else{ return Result.error(MessageConstant.UNKNOWN_ERROR); } }- 1
- 2
- 3
- 4
- 5
- 6
- 7
- 8
- 9
- 10
- 11
- 12
- 13
- 14
- 15
- 16
- 17
- 18
进入到sky-common模块,在MessageConstant.java添加
public static final String ALREADY_EXISTS = "已存在";- 1
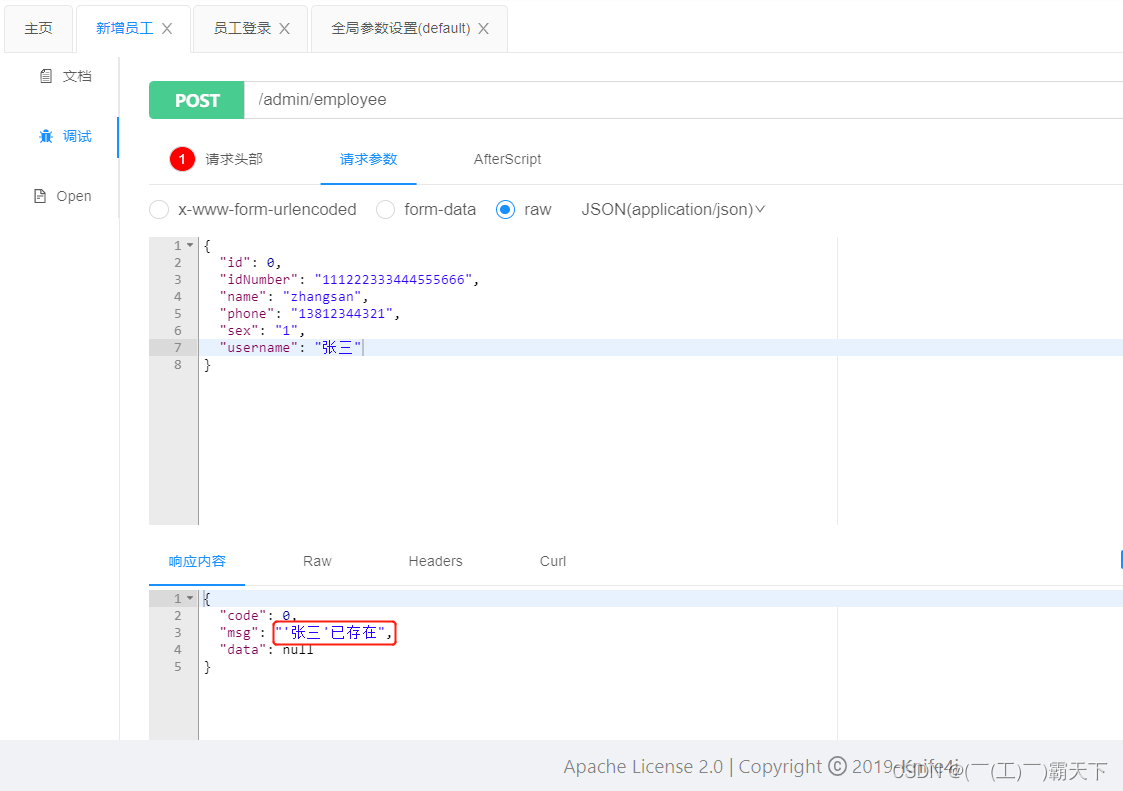
再次,接口测试:
1.4.2 问题二
描述:新增员工时,创建人id和修改人id设置为固定值
分析:
/** * 新增员工 * * @param employeeDTO */ public void save(EmployeeDTO employeeDTO) { Employee employee = new Employee(); //................ //当前设置的id为固定值10// employee.setCreateUser(10L); employee.setUpdateUser(10L); // //................................. employeeMapper.insert(employee);//后续步骤定义 }- 1
- 2
- 3
- 4
- 5
- 6
- 7
- 8
- 9
- 10
- 11
- 12
- 13
- 14
- 15
- 16
解决:
通过某种方式动态获取当前登录员工的id。
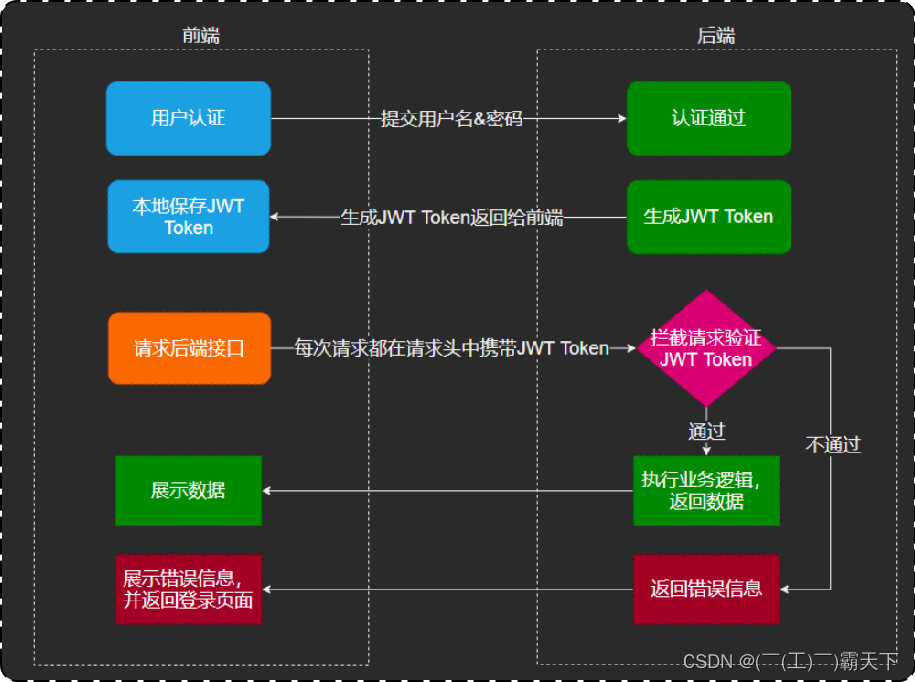
员工登录成功后会生成JWT令牌并响应给前端:
在sky-server模块
package com.sky.controller.admin; /** * 员工管理 */ @RestController @RequestMapping("/admin/employee") @Slf4j @Api(tags = "员工相关接口") public class EmployeeController { @Autowired private EmployeeService employeeService; @Autowired private JwtProperties jwtProperties; /** * 登录 * * @param employeeLoginDTO * @return */ @PostMapping("/login") @ApiOperation(value = "员工登录") public Result<EmployeeLoginVO> login(@RequestBody EmployeeLoginDTO employeeLoginDTO) { //......... //登录成功后,生成jwt令牌 Map<String, Object> claims = new HashMap<>(); claims.put(JwtClaimsConstant.EMP_ID, employee.getId()); String token = JwtUtil.createJWT( jwtProperties.getAdminSecretKey(), jwtProperties.getAdminTtl(), claims); //............ return Result.success(employeeLoginVO); } }- 1
- 2
- 3
- 4
- 5
- 6
- 7
- 8
- 9
- 10
- 11
- 12
- 13
- 14
- 15
- 16
- 17
- 18
- 19
- 20
- 21
- 22
- 23
- 24
- 25
- 26
- 27
- 28
- 29
- 30
- 31
- 32
- 33
- 34
- 35
- 36
- 37
- 38
- 39
- 40
后续请求中,前端会携带JWT令牌,通过JWT令牌可以解析出当前登录员工id:
JwtTokenAdminInterceptor.java
package com.sky.interceptor; /** * jwt令牌校验的拦截器 */ @Component @Slf4j public class JwtTokenAdminInterceptor implements HandlerInterceptor { @Autowired private JwtProperties jwtProperties; /** * 校验jwt * * @param request * @param response * @param handler * @return * @throws Exception */ public boolean preHandle(HttpServletRequest request, HttpServletResponse response, Object handler) throws Exception { //.............. //1、从请求头中获取令牌 String token = request.getHeader(jwtProperties.getAdminTokenName()); //2、校验令牌 try { log.info("jwt校验:{}", token); Claims claims = JwtUtil.parseJWT(jwtProperties.getAdminSecretKey(), token); Long empId = Long.valueOf(claims.get(JwtClaimsConstant.EMP_ID).toString()); log.info("当前员工id:", empId); //3、通过,放行 return true; } catch (Exception ex) { //4、不通过,响应401状态码 response.setStatus(401); return false; } } }- 1
- 2
- 3
- 4
- 5
- 6
- 7
- 8
- 9
- 10
- 11
- 12
- 13
- 14
- 15
- 16
- 17
- 18
- 19
- 20
- 21
- 22
- 23
- 24
- 25
- 26
- 27
- 28
- 29
- 30
- 31
- 32
- 33
- 34
- 35
- 36
- 37
- 38
- 39
- 40
- 41
- 42
- 43
**思考:**解析出登录员工id后,如何传递给Service的save方法?
通过ThreadLocal进行传递。
1.4.3 ThreadLocal
介绍:
ThreadLocal 并不是一个Thread,而是Thread的局部变量。
ThreadLocal为每个线程提供单独一份存储空间,具有线程隔离的效果,只有在线程内才能获取到对应的值,线程外则不能访问。常用方法:
- public void set(T value) 设置当前线程的线程局部变量的值
- public T get() 返回当前线程所对应的线程局部变量的值
- public void remove() 移除当前线程的线程局部变量
对ThreadLocal有了一定认识后,接下来继续解决问题二
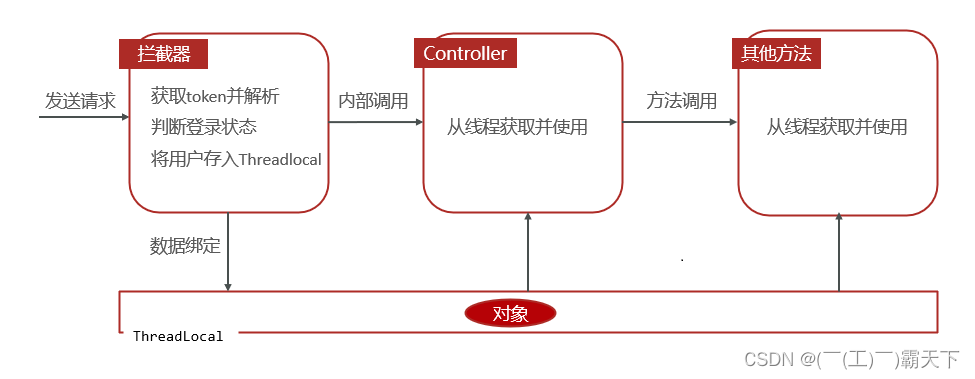
初始工程中已经封装了 ThreadLocal 操作的工具类:
在sky-common模块
package com.sky.context; public class BaseContext { public static ThreadLocal<Long> threadLocal = new ThreadLocal<>(); public static void setCurrentId(Long id) { threadLocal.set(id); } public static Long getCurrentId() { return threadLocal.get(); } public static void removeCurrentId() { threadLocal.remove(); } }- 1
- 2
- 3
- 4
- 5
- 6
- 7
- 8
- 9
- 10
- 11
- 12
- 13
- 14
- 15
- 16
- 17
- 18
- 19
在拦截器中解析出当前登录员工id,并放入线程局部变量中:
在sky-server模块中,拦截器:
package com.sky.interceptor; /** * jwt令牌校验的拦截器 */ @Component @Slf4j public class JwtTokenAdminInterceptor implements HandlerInterceptor { @Autowired private JwtProperties jwtProperties; /** * 校验jwt * * @param request * @param response * @param handler * @return * @throws Exception */ public boolean preHandle(HttpServletRequest request, HttpServletResponse response, Object handler) throws Exception { //............................. //2、校验令牌 try { //................. Claims claims = JwtUtil.parseJWT(jwtProperties.getAdminSecretKey(), token); Long empId = Long.valueOf(claims.get(JwtClaimsConstant.EMP_ID).toString()); log.info("当前员工id:", empId); /将用户id存储到ThreadLocal BaseContext.setCurrentId(empId); //3、通过,放行 return true; } catch (Exception ex) { //...................... } } }- 1
- 2
- 3
- 4
- 5
- 6
- 7
- 8
- 9
- 10
- 11
- 12
- 13
- 14
- 15
- 16
- 17
- 18
- 19
- 20
- 21
- 22
- 23
- 24
- 25
- 26
- 27
- 28
- 29
- 30
- 31
- 32
- 33
- 34
- 35
- 36
- 37
- 38
- 39
- 40
- 41
在Service中获取线程局部变量中的值:
/** * 新增员工 * * @param employeeDTO */ public void save(EmployeeDTO employeeDTO) { //............................. //设置当前记录创建人id和修改人id employee.setCreateUser(BaseContext.getCurrentId());//目前写个假数据,后期修改 employee.setUpdateUser(BaseContext.getCurrentId()); employeeMapper.insert(employee); }- 1
- 2
- 3
- 4
- 5
- 6
- 7
- 8
- 9
- 10
- 11
- 12
- 13
- 14
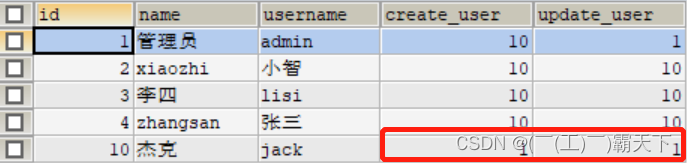
测试:使用admin(id=1)用户登录后添加一条记录
查看employee表记录
1.5 代码提交
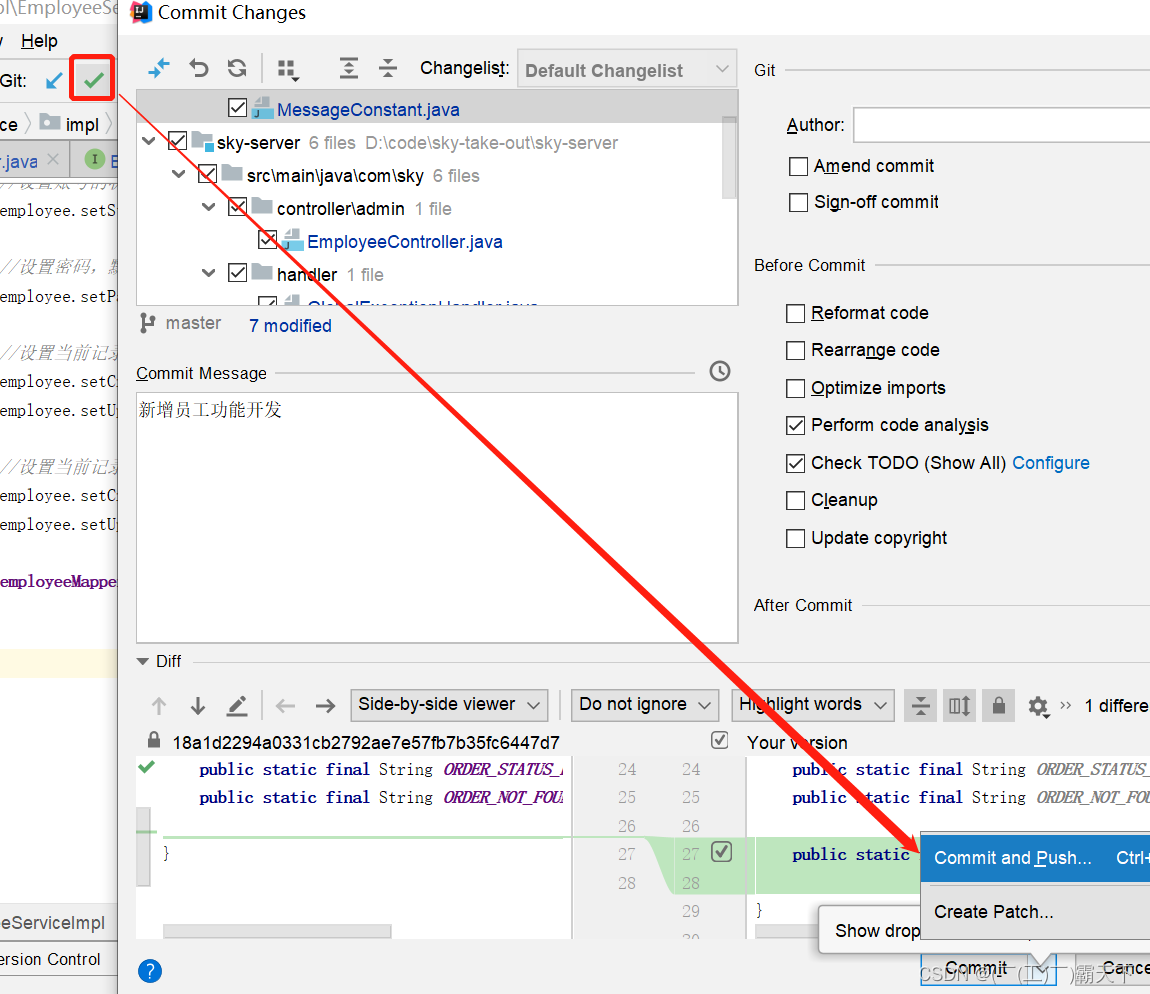
点击提交:
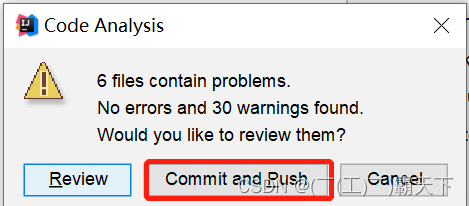
提交过程中,出现提示:
继续push:
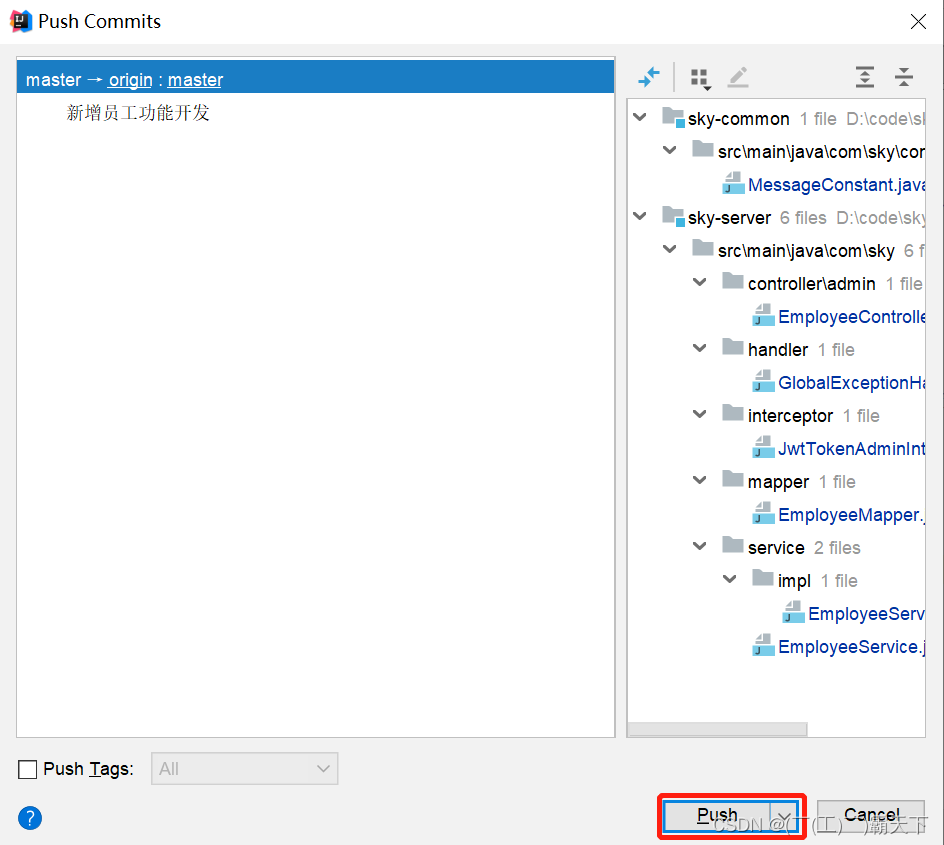
推送成功:

2. 员工分页查询
2.1 需求分析和设计
2.1.1 产品原型
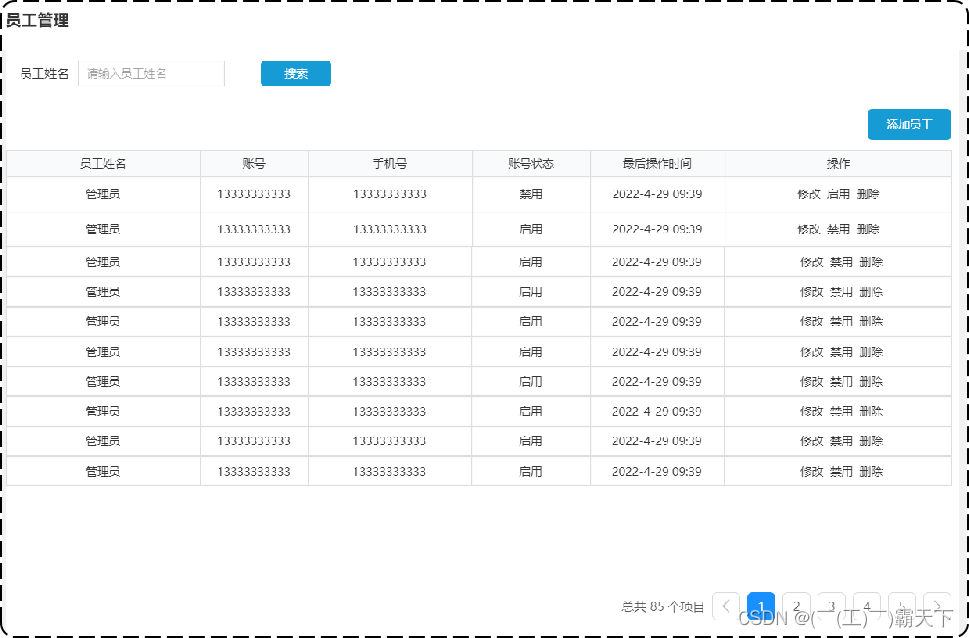
系统中的员工很多的时候,如果在一个页面中全部展示出来会显得比较乱,不便于查看,所以一般的系统中都会以分页的方式来展示列表数据。而在我们的分页查询页面中, 除了分页条件以外,还有一个查询条件 “员工姓名”。
查询员工原型:
业务规则:
- 根据页码展示员工信息
- 每页展示10条数据
- 分页查询时可以根据需要,输入员工姓名进行查询
2.1.2 接口设计
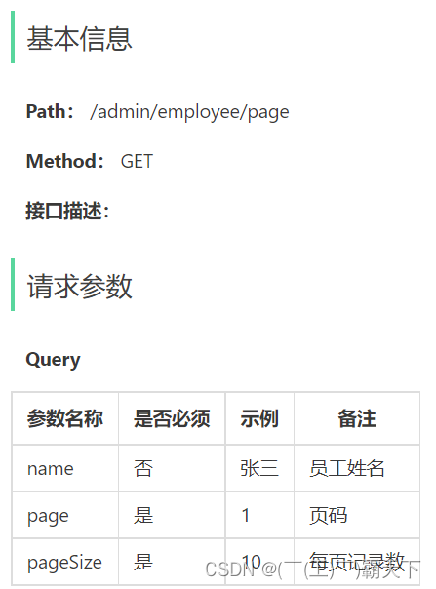
找到资料–>项目接口文档–>苍穹外卖-管理端接口.html
注意事项:
- 请求参数类型为Query,不是json格式提交,在路径后直接拼接。/admin/employee/page?name=zhangsan
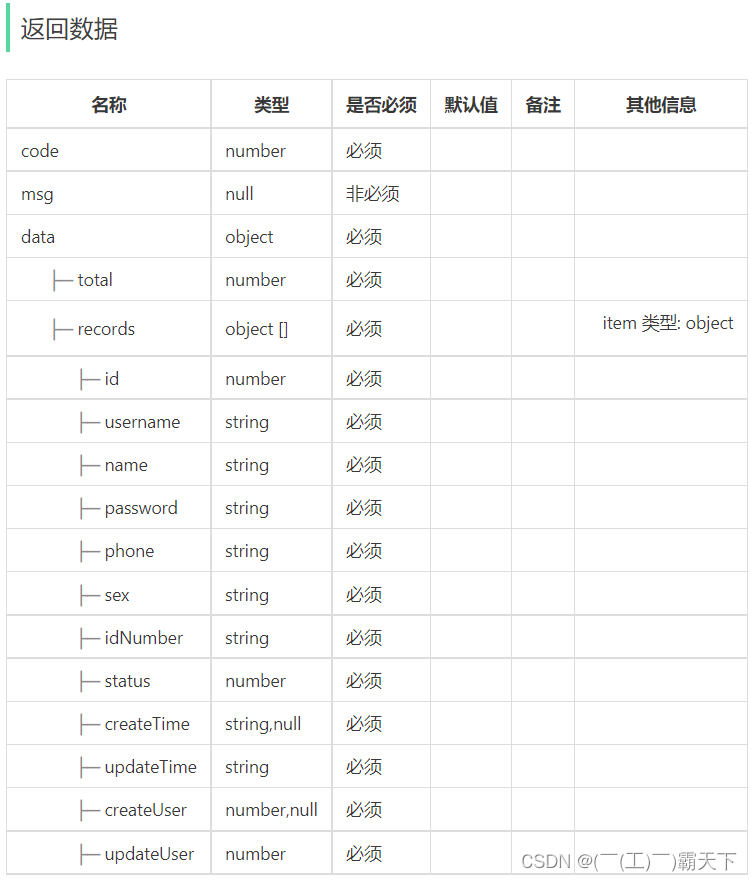
- 返回数据中records数组中使用Employee实体类对属性进行封装。
2.2 代码开发
2.2.1 设计DTO类
根据请求参数进行封装,在sky-pojo模块中
package com.sky.dto; import lombok.Data; import java.io.Serializable; @Data public class EmployeePageQueryDTO implements Serializable { //员工姓名 private String name; //页码 private int page; //每页显示记录数 private int pageSize; }- 1
- 2
- 3
- 4
- 5
- 6
- 7
- 8
- 9
- 10
- 11
- 12
- 13
- 14
- 15
- 16
- 17
- 18
- 19
- 20
2.2.2 封装PageResult
后面所有的分页查询,统一都封装为PageResult对象。
在sky-common模块
package com.sky.result; import lombok.AllArgsConstructor; import lombok.Data; import lombok.NoArgsConstructor; import java.io.Serializable; import java.util.List; /** * 封装分页查询结果 */ @Data @AllArgsConstructor @NoArgsConstructor public class PageResult implements Serializable { private long total; //总记录数 private List records; //当前页数据集合 }- 1
- 2
- 3
- 4
- 5
- 6
- 7
- 8
- 9
- 10
- 11
- 12
- 13
- 14
- 15
- 16
- 17
- 18
- 19
- 20
- 21
- 22
- 23
员工信息分页查询后端返回的对象类型为: Result
package com.sky.result; import lombok.Data; import java.io.Serializable; /** * 后端统一返回结果 * @param*/ @Data public class Result<T> implements Serializable { private Integer code; //编码:1成功,0和其它数字为失败 private String msg; //错误信息 private T data; //数据 public static <T> Result<T> success() { Result<T> result = new Result<T>(); result.code = 1; return result; } public static <T> Result<T> success(T object) { Result<T> result = new Result<T>(); result.data = object; result.code = 1; return result; } public static <T> Result<T> error(String msg) { Result result = new Result(); result.msg = msg; result.code = 0; return result; } }- 1
- 2
- 3
- 4
- 5
- 6
- 7
- 8
- 9
- 10
- 11
- 12
- 13
- 14
- 15
- 16
- 17
- 18
- 19
- 20
- 21
- 22
- 23
- 24
- 25
- 26
- 27
- 28
- 29
- 30
- 31
- 32
- 33
- 34
- 35
- 36
- 37
- 38
2.2.3 Controller层
在sky-server模块中,com.sky.controller.admin.EmployeeController中添加分页查询方法。
/** * 员工分页查询 * @param employeePageQueryDTO * @return */ @GetMapping("/page") @ApiOperation("员工分页查询") public Result<PageResult> page(EmployeePageQueryDTO employeePageQueryDTO){ log.info("员工分页查询,参数为:{}", employeePageQueryDTO); PageResult pageResult = employeeService.pageQuery(employeePageQueryDTO);//后续定义 return Result.success(pageResult); }- 1
- 2
- 3
- 4
- 5
- 6
- 7
- 8
- 9
- 10
- 11
- 12
2.2.4 Service层接口
在EmployeeService接口中声明pageQuery方法:
/** * 分页查询 * @param employeePageQueryDTO * @return */ PageResult pageQuery(EmployeePageQueryDTO employeePageQueryDTO);- 1
- 2
- 3
- 4
- 5
- 6
2.2.5 Service层实现类
在EmployeeServiceImpl中实现pageQuery方法:
/** * 分页查询 * * @param employeePageQueryDTO * @return */ public PageResult pageQuery(EmployeePageQueryDTO employeePageQueryDTO) { // select * from employee limit 0,10 //开始分页查询 PageHelper.startPage(employeePageQueryDTO.getPage(), employeePageQueryDTO.getPageSize()); Page<Employee> page = employeeMapper.pageQuery(employeePageQueryDTO);//后续定义 long total = page.getTotal(); List<Employee> records = page.getResult(); return new PageResult(total, records); }- 1
- 2
- 3
- 4
- 5
- 6
- 7
- 8
- 9
- 10
- 11
- 12
- 13
- 14
- 15
- 16
- 17
- 18
**注意:**此处使用 mybatis 的分页插件 PageHelper 来简化分页代码的开发。底层基于 mybatis 的拦截器实现。
故在pom.xml文中添加依赖(初始工程已添加)
<dependency> <groupId>com.github.pagehelpergroupId> <artifactId>pagehelper-spring-boot-starterartifactId> <version>${pagehelper}version> dependency>- 1
- 2
- 3
- 4
- 5
2.2.6 Mapper层
在 EmployeeMapper 中声明 pageQuery 方法:
/** * 分页查询 * @param employeePageQueryDTO * @return */ Page<Employee> pageQuery(EmployeePageQueryDTO employeePageQueryDTO);- 1
- 2
- 3
- 4
- 5
- 6
在 src/main/resources/mapper/EmployeeMapper.xml 中编写SQL:
<select id="pageQuery" resultType="com.sky.entity.Employee"> select * from employee <where> <if test="name != null and name != ''"> and name like concat('%',#{name},'%') </if> </where> order by create_time desc </select>- 1
- 2
- 3
- 4
- 5
- 6
- 7
- 8
- 9
2.3 功能测试
可以通过接口文档进行测试,也可以进行前后端联调测试。
接下来使用两种方式分别测试:
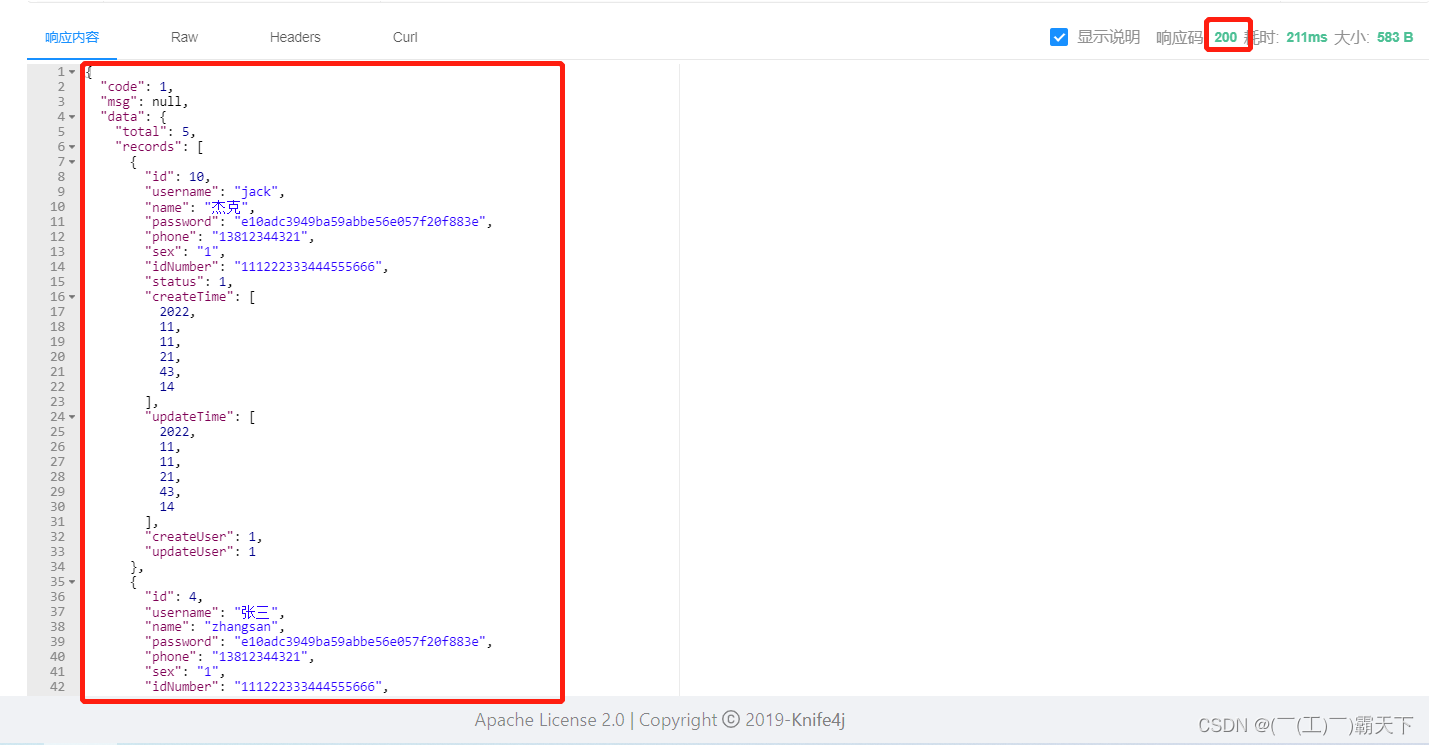
2.3.1 接口文档测试
**重启服务:**访问http://localhost:8080/doc.html,进入员工分页查询
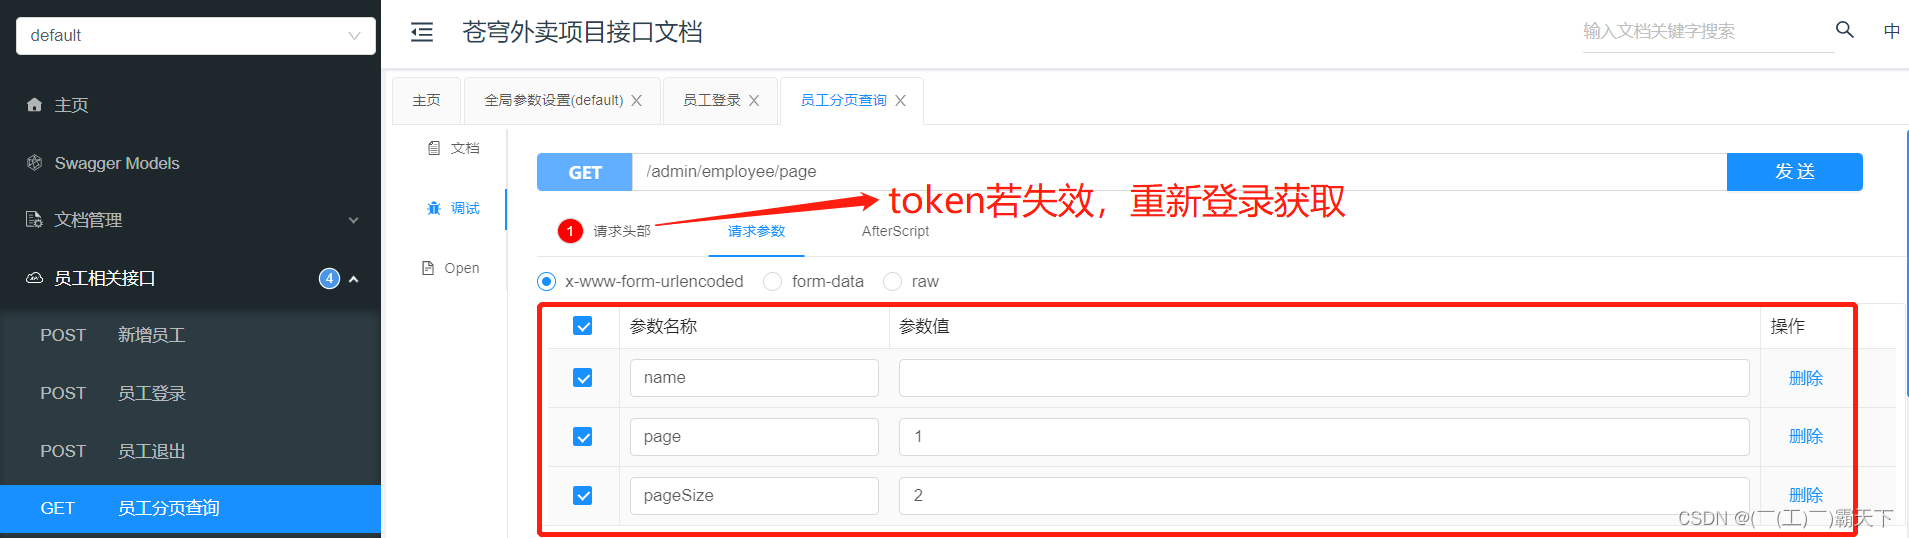
响应结果:
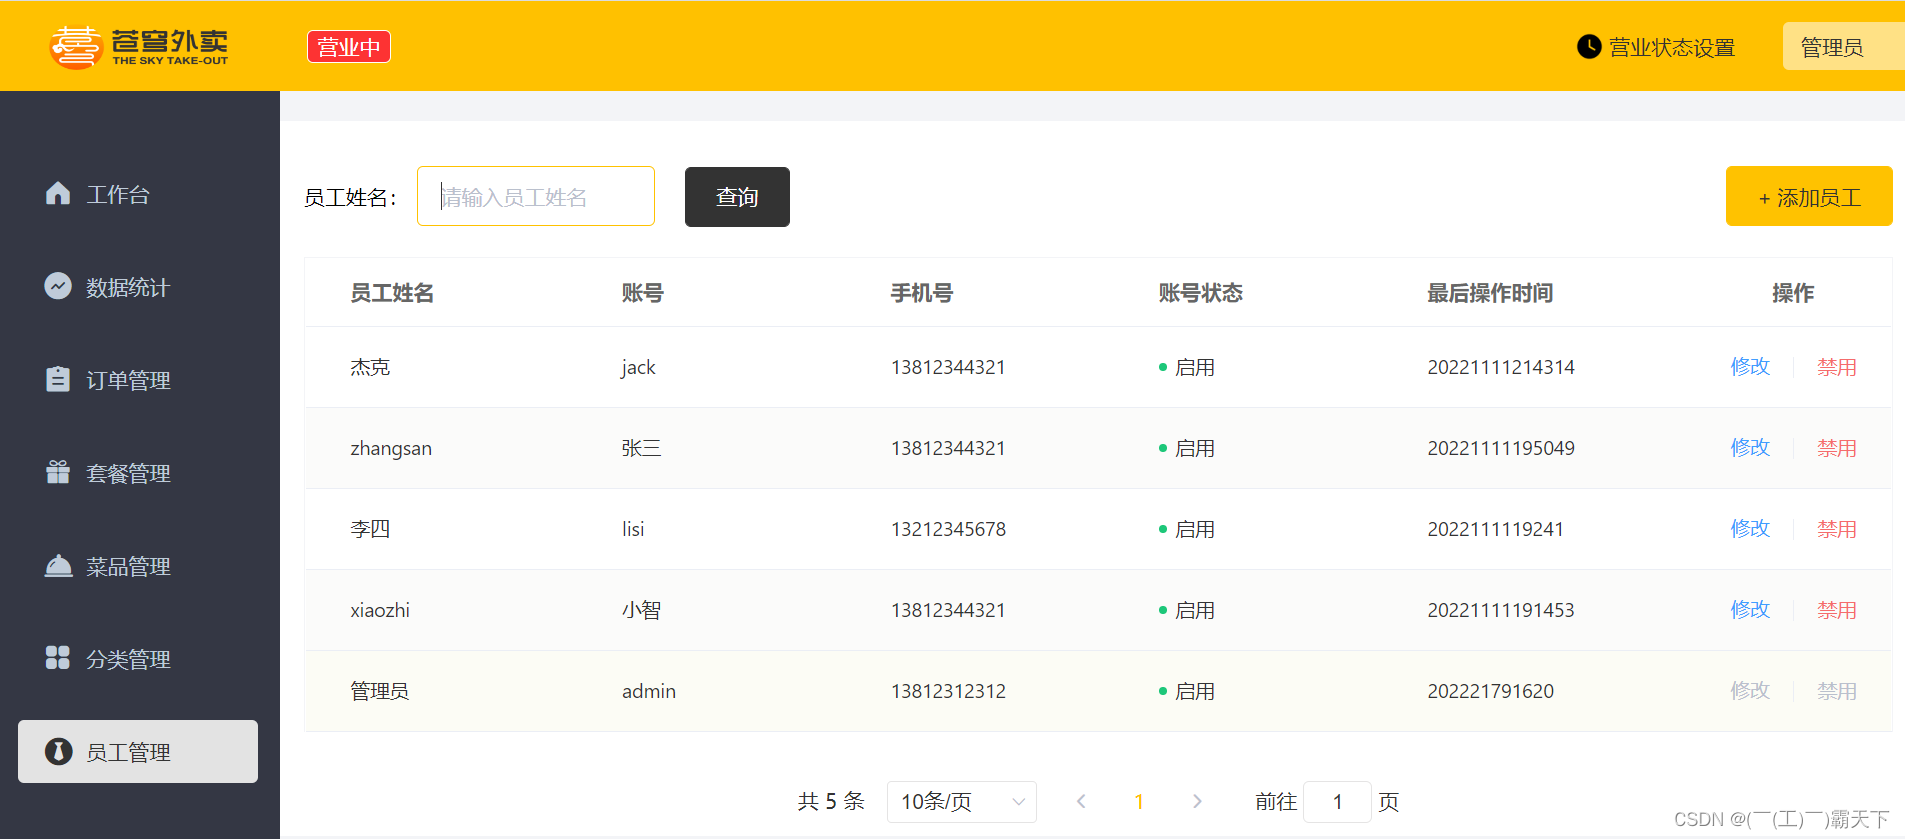
2.3.2 前后端联调测试
点击员工管理
输入员工姓名为zhangsan
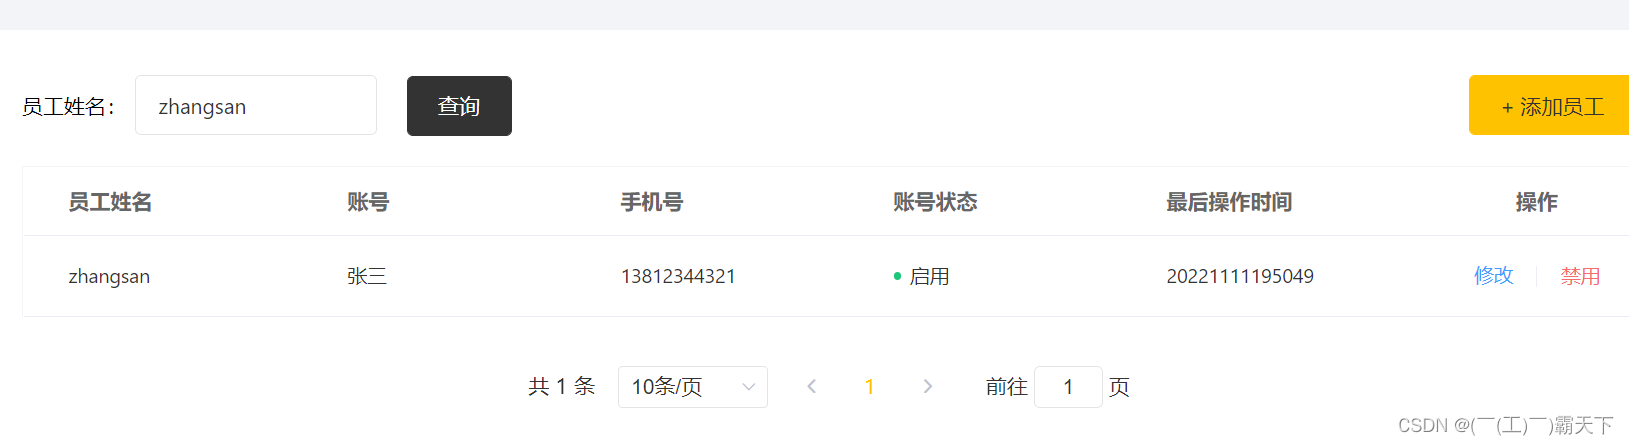
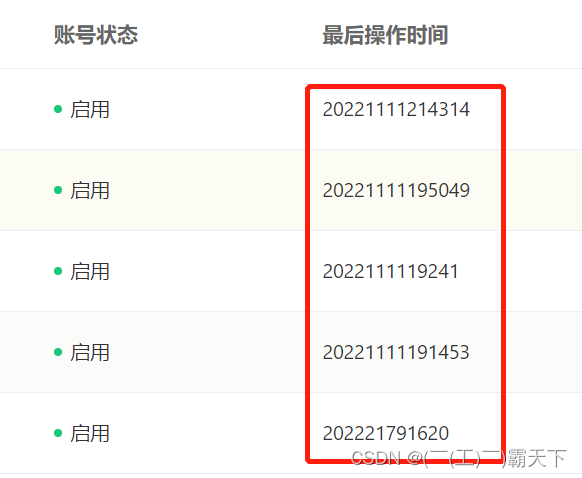
不难发现,最后操作时间格式不清晰,在代码完善中解决。
2.4 代码完善
**问题描述:**操作时间字段显示有问题。
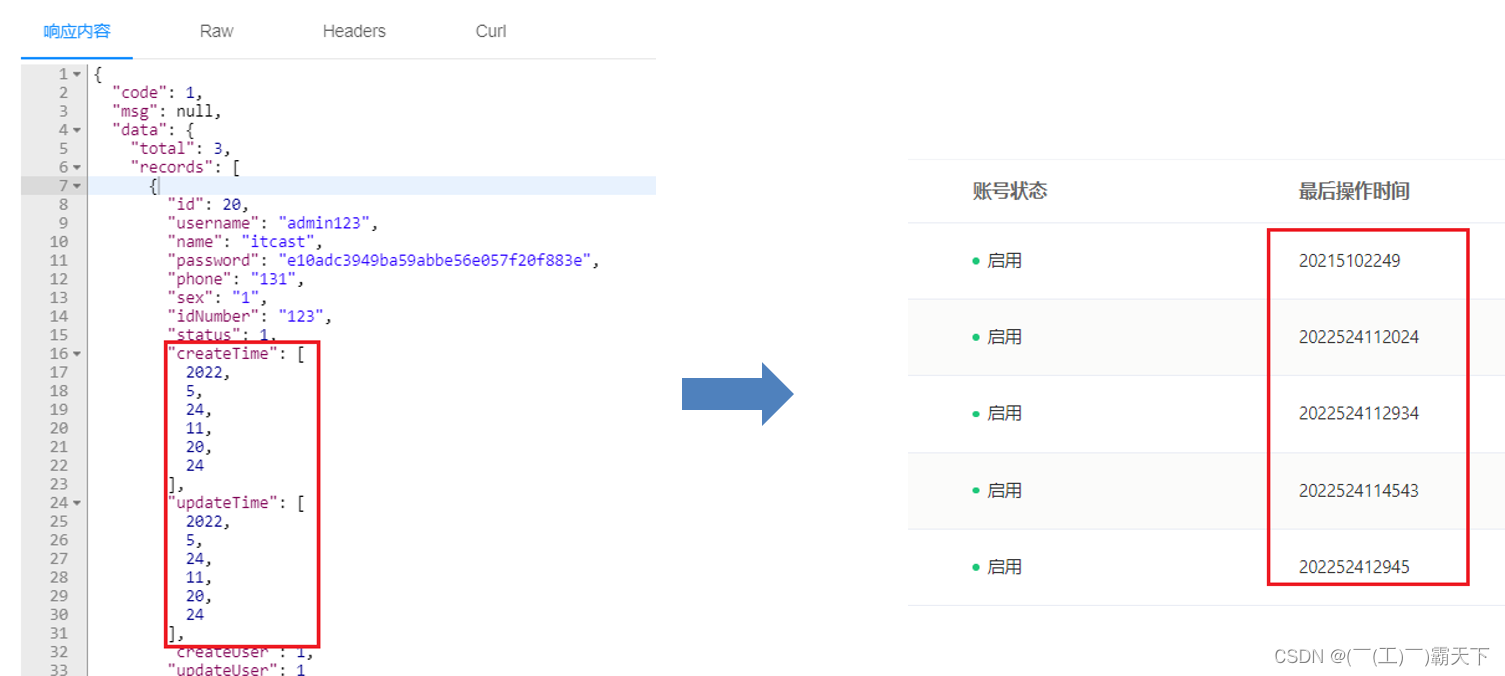
解决方式:
1). 方式一
在属性上加上注解,对日期进行格式化

但这种方式,需要在每个时间属性上都要加上该注解,使用较麻烦,不能全局处理。
2). 方式二(推荐 )
在WebMvcConfiguration中扩展SpringMVC的消息转换器,统一对日期类型进行格式处理
/** * 扩展Spring MVC框架的消息转化器 * @param converters */ protected void extendMessageConverters(List<HttpMessageConverter<?>> converters) { log.info("扩展消息转换器..."); //创建一个消息转换器对象 MappingJackson2HttpMessageConverter converter = new MappingJackson2HttpMessageConverter(); //需要为消息转换器设置一个对象转换器,对象转换器可以将Java对象序列化为json数据 converter.setObjectMapper(new JacksonObjectMapper()); //将自己的消息转化器加入容器中 converters.add(0,converter); }- 1
- 2
- 3
- 4
- 5
- 6
- 7
- 8
- 9
- 10
- 11
- 12
- 13
添加后,再次测试
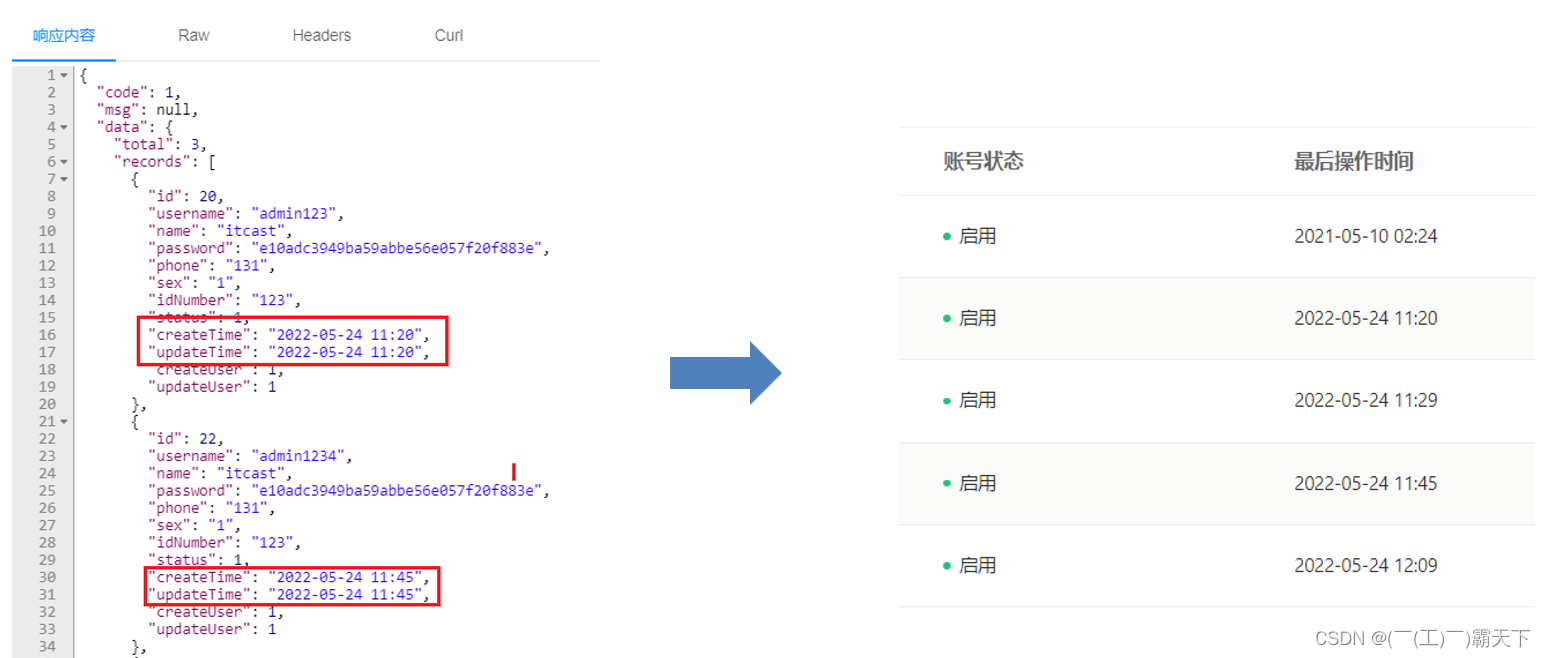
时间格式定义,sky-common模块中
package com.sky.json; public class JacksonObjectMapper extends ObjectMapper { //....... public static final String DEFAULT_DATE_TIME_FORMAT = "yyyy-MM-dd HH:mm"; //....... } }- 1
- 2
- 3
- 4
- 5
- 6
- 7
- 8
- 9
- 10
2.5 代码提交
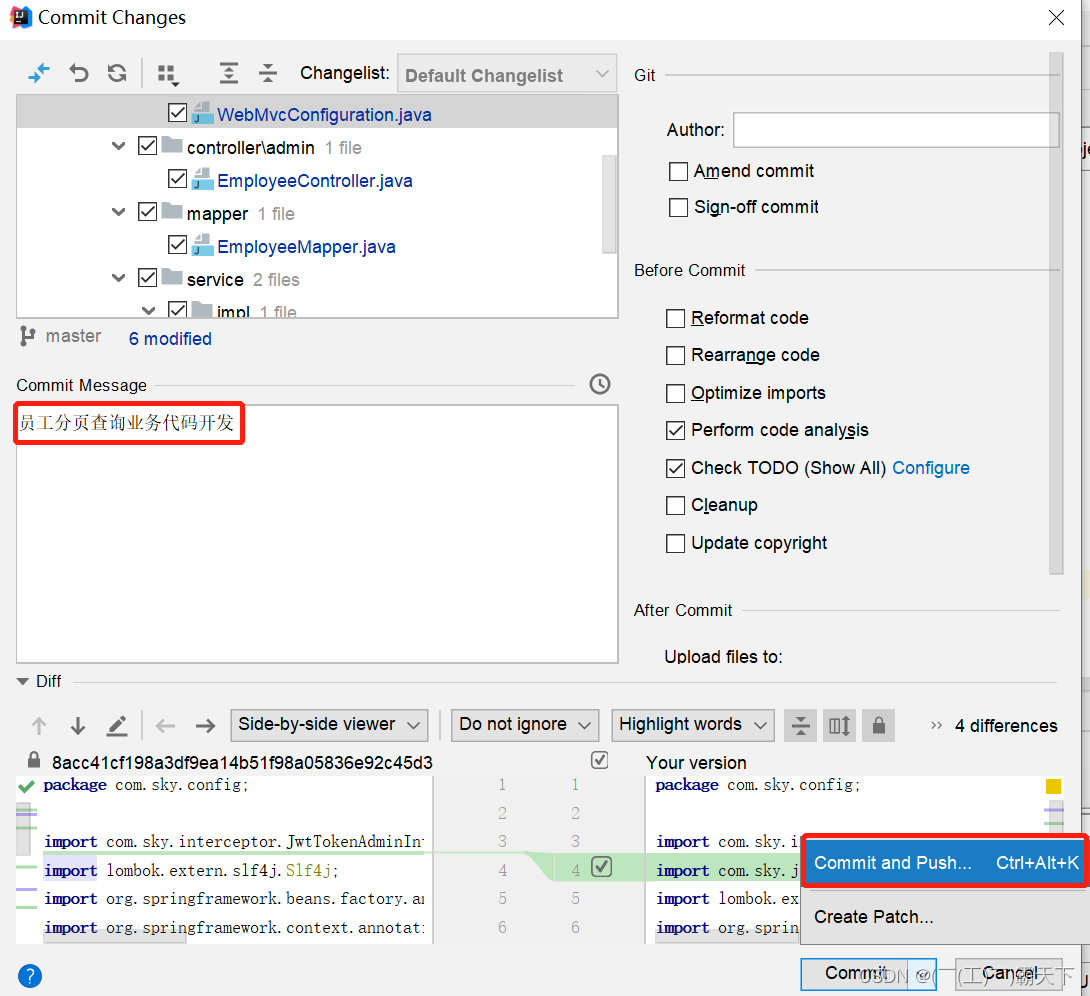
后续步骤和新增员工代码提交一致,不再赘述。
3. 启用禁用员工账号
3.1 需求分析与设计
3.1.1 产品原型
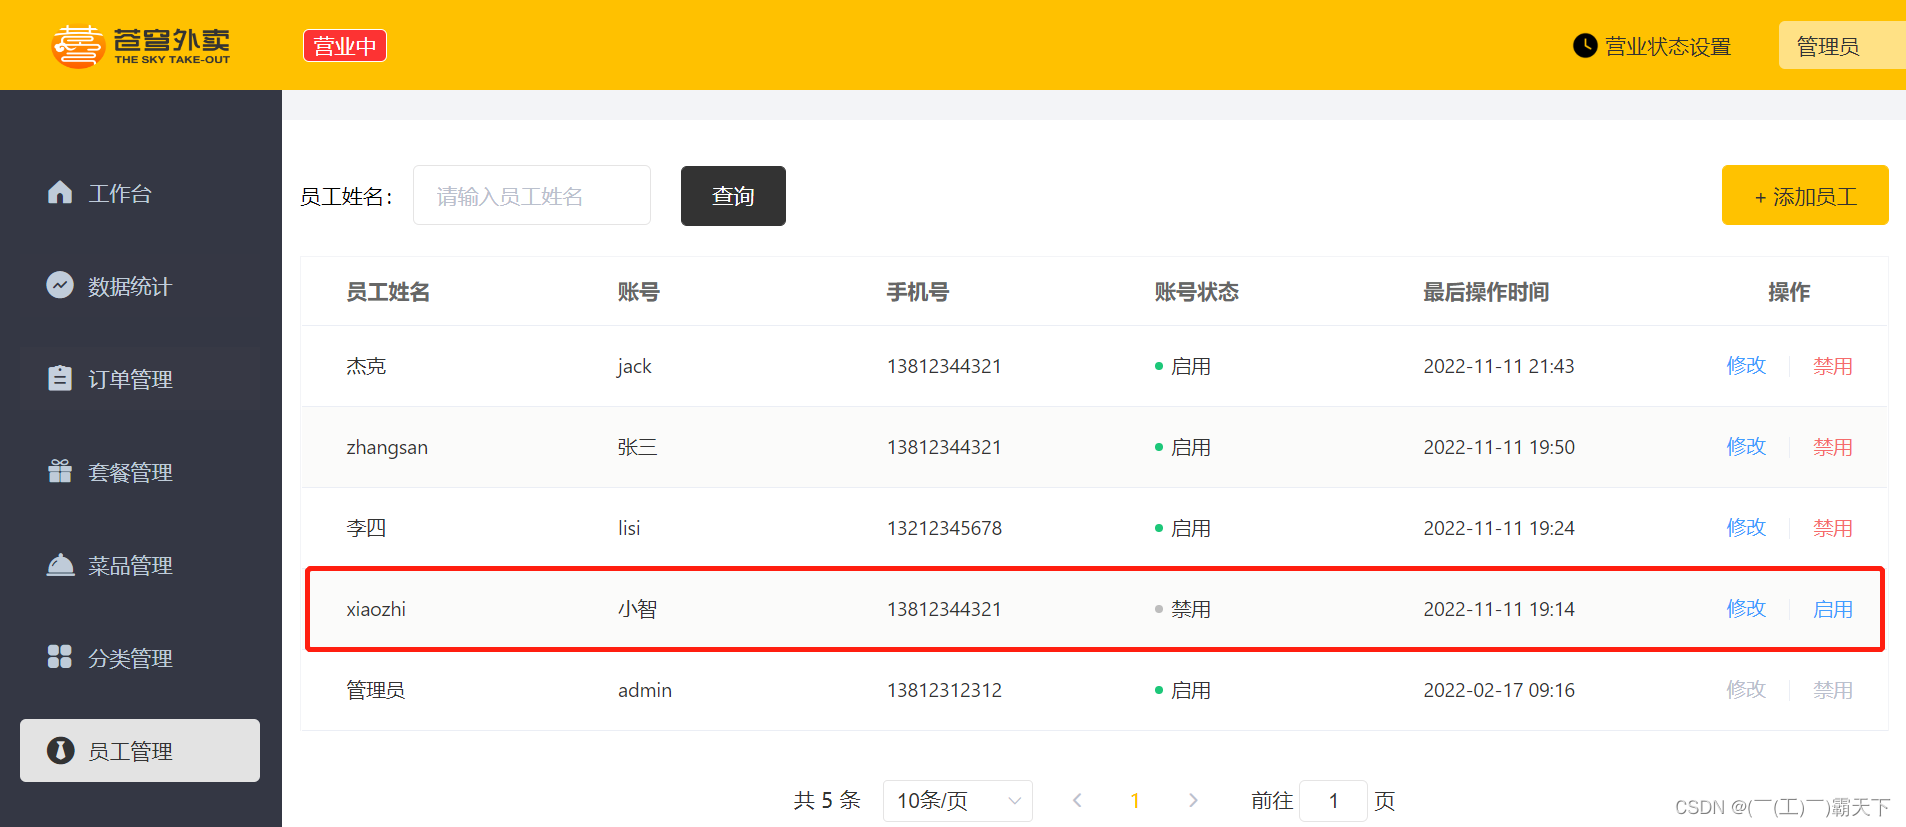
在员工管理列表页面,可以对某个员工账号进行启用或者禁用操作。账号禁用的员工不能登录系统,启用后的员工可以正常登录。如果某个员工账号状态为正常,则按钮显示为 “禁用”,如果员工账号状态为已禁用,则按钮显示为"启用"。
启禁用员工原型:
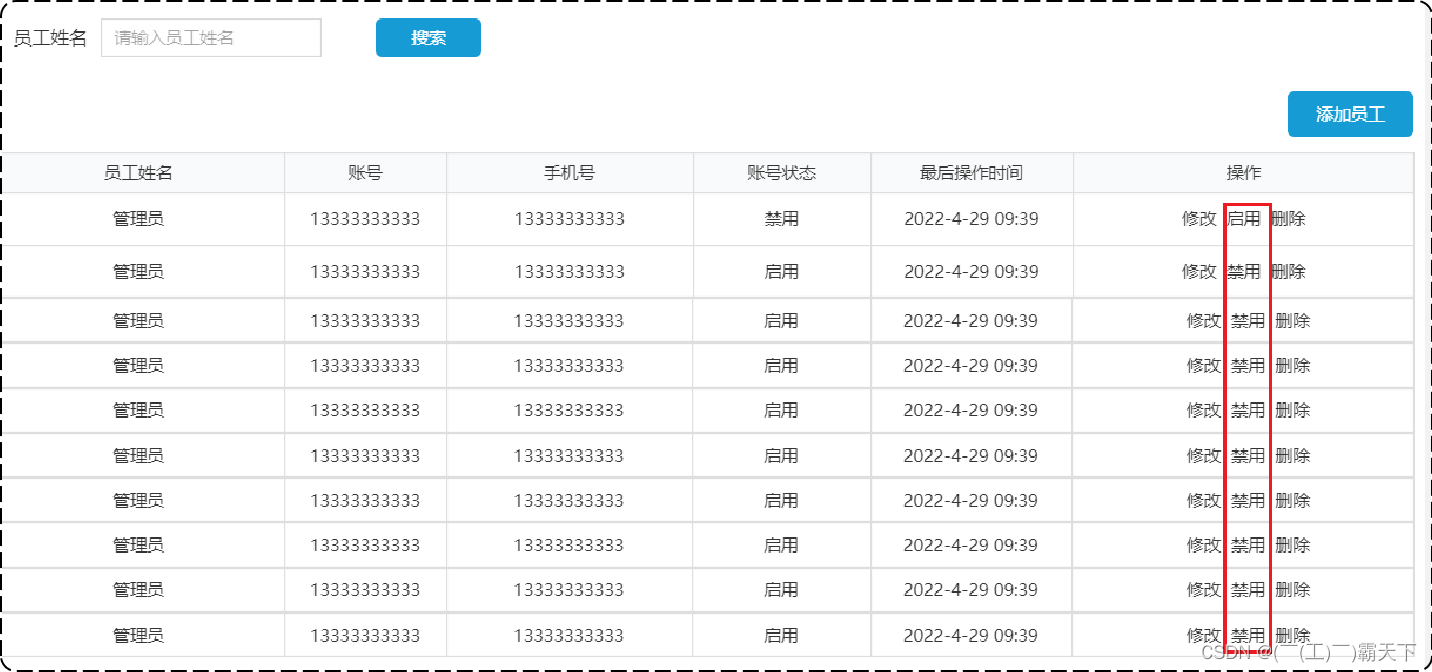
业务规则:
- 可以对状态为“启用” 的员工账号进行“禁用”操作
- 可以对状态为“禁用”的员工账号进行“启用”操作
- 状态为“禁用”的员工账号不能登录系统
3.1.2 接口设计
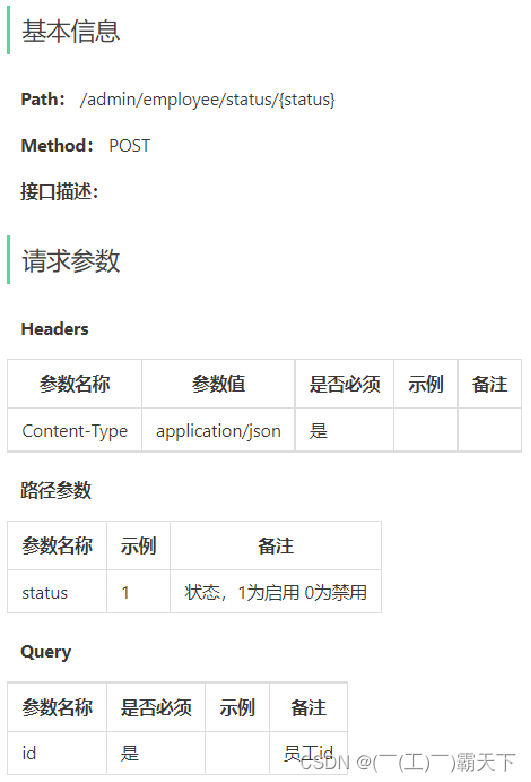
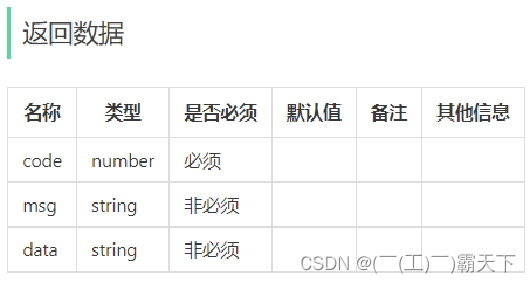
1). 路径参数携带状态值。
2). 同时,把id传递过去,明确对哪个用户进行操作。
3). 返回数据code状态是必须,其它是非必须。
3.2 代码开发
3.2.1 Controller层
在sky-server模块中,根据接口设计中的请求参数形式对应的在 EmployeeController 中创建启用禁用员工账号的方法:
/** * 启用禁用员工账号 * @param status * @param id * @return */ @PostMapping("/status/{status}") @ApiOperation("启用禁用员工账号") public Result startOrStop(@PathVariable Integer status,Long id){ log.info("启用禁用员工账号:{},{}",status,id); employeeService.startOrStop(status,id);//后绪步骤定义 return Result.success(); }- 1
- 2
- 3
- 4
- 5
- 6
- 7
- 8
- 9
- 10
- 11
- 12
- 13
3.2.2 Service层接口
在 EmployeeService 接口中声明启用禁用员工账号的业务方法:
/** * 启用禁用员工账号 * @param status * @param id */ void startOrStop(Integer status, Long id);- 1
- 2
- 3
- 4
- 5
- 6
3.2.3 Service层实现类
在 EmployeeServiceImpl 中实现启用禁用员工账号的业务方法:
/** * 启用禁用员工账号 * * @param status * @param id */ public void startOrStop(Integer status, Long id) { Employee employee = Employee.builder() .status(status) .id(id) .build(); employeeMapper.update(employee); }- 1
- 2
- 3
- 4
- 5
- 6
- 7
- 8
- 9
- 10
- 11
- 12
- 13
- 14
3.2.4 Mapper层
在 EmployeeMapper 接口中声明 update 方法:
/** * 根据主键动态修改属性 * @param employee */ void update(Employee employee);- 1
- 2
- 3
- 4
- 5
在 EmployeeMapper.xml 中编写SQL:
<update id="update" parameterType="Employee"> update employee <set> <if test="name != null">name = #{name}, <if test="username != null">username = #{username}, <if test="password != null">password = #{password}, <if test="phone != null">phone = #{phone}, <if test="sex != null">sex = #{sex}, <if test="idNumber != null">id_Number = #{idNumber}, <if test="updateTime != null">update_Time = #{updateTime}, <if test="updateUser != null">update_User = #{updateUser}, <if test="status != null">status = #{status}, </set> where id = #{id} </update>- 1
- 2
- 3
- 4
- 5
- 6
- 7
- 8
- 9
- 10
- 11
- 12
- 13
- 14
- 15
3.3 功能测试
3.3.1 接口文档测试
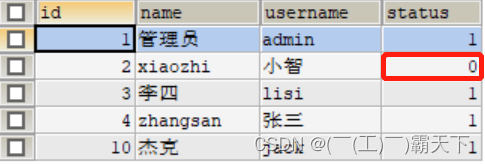
**测试前,**查询employee表中员工账号状态
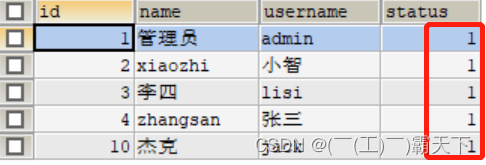
开始测试
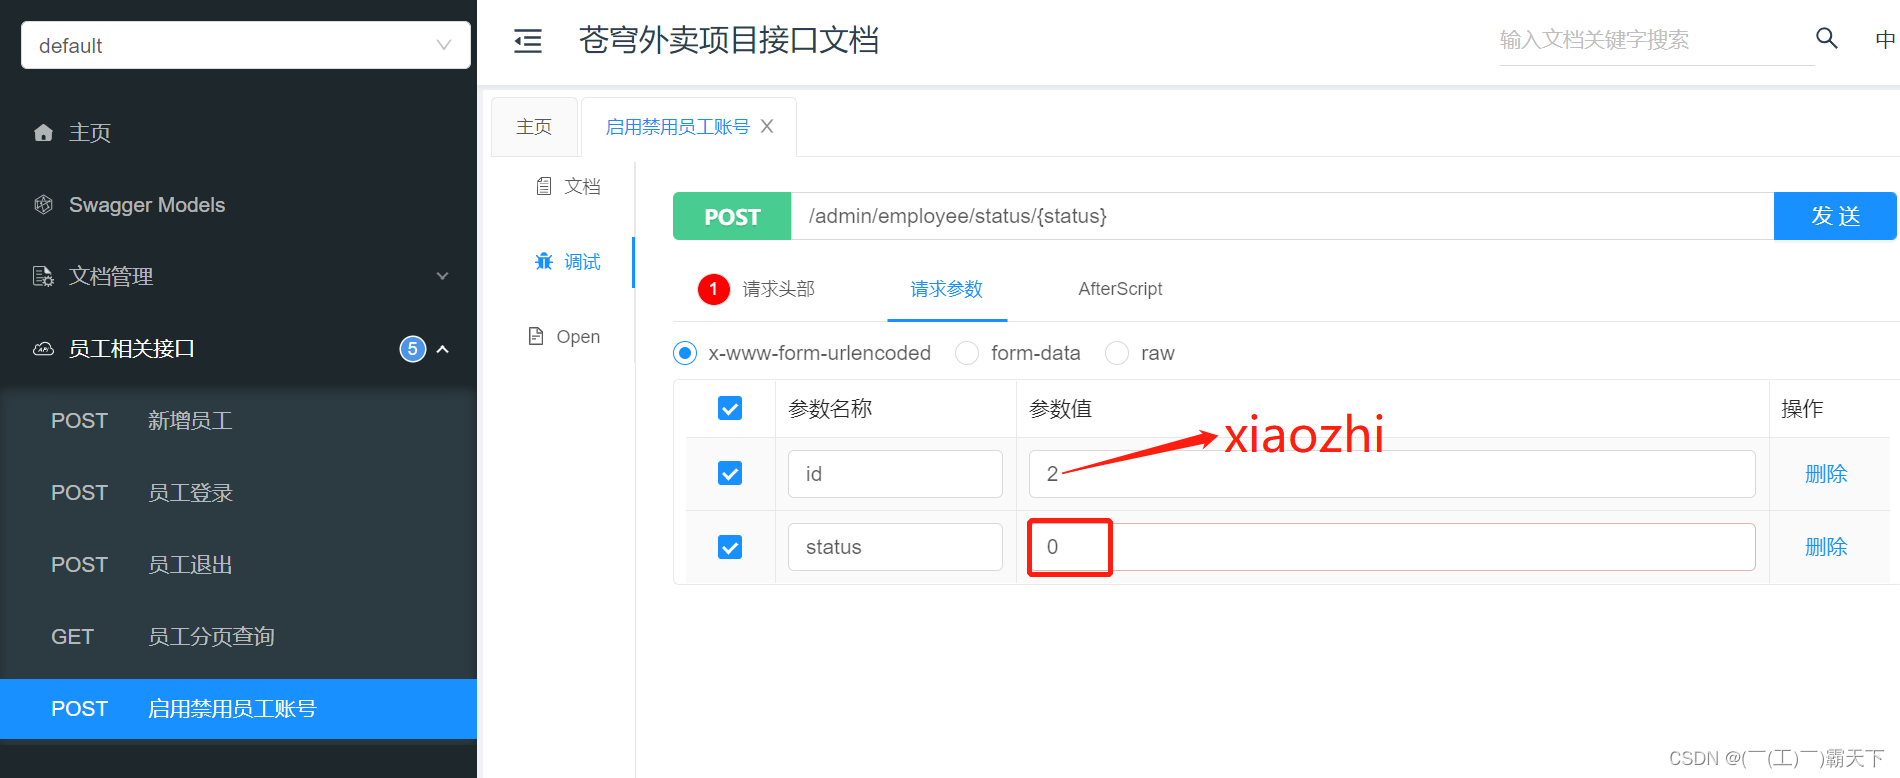
测试完毕后,再次查询员工账号状态
3.3.2 前后端联调测试
测试前:
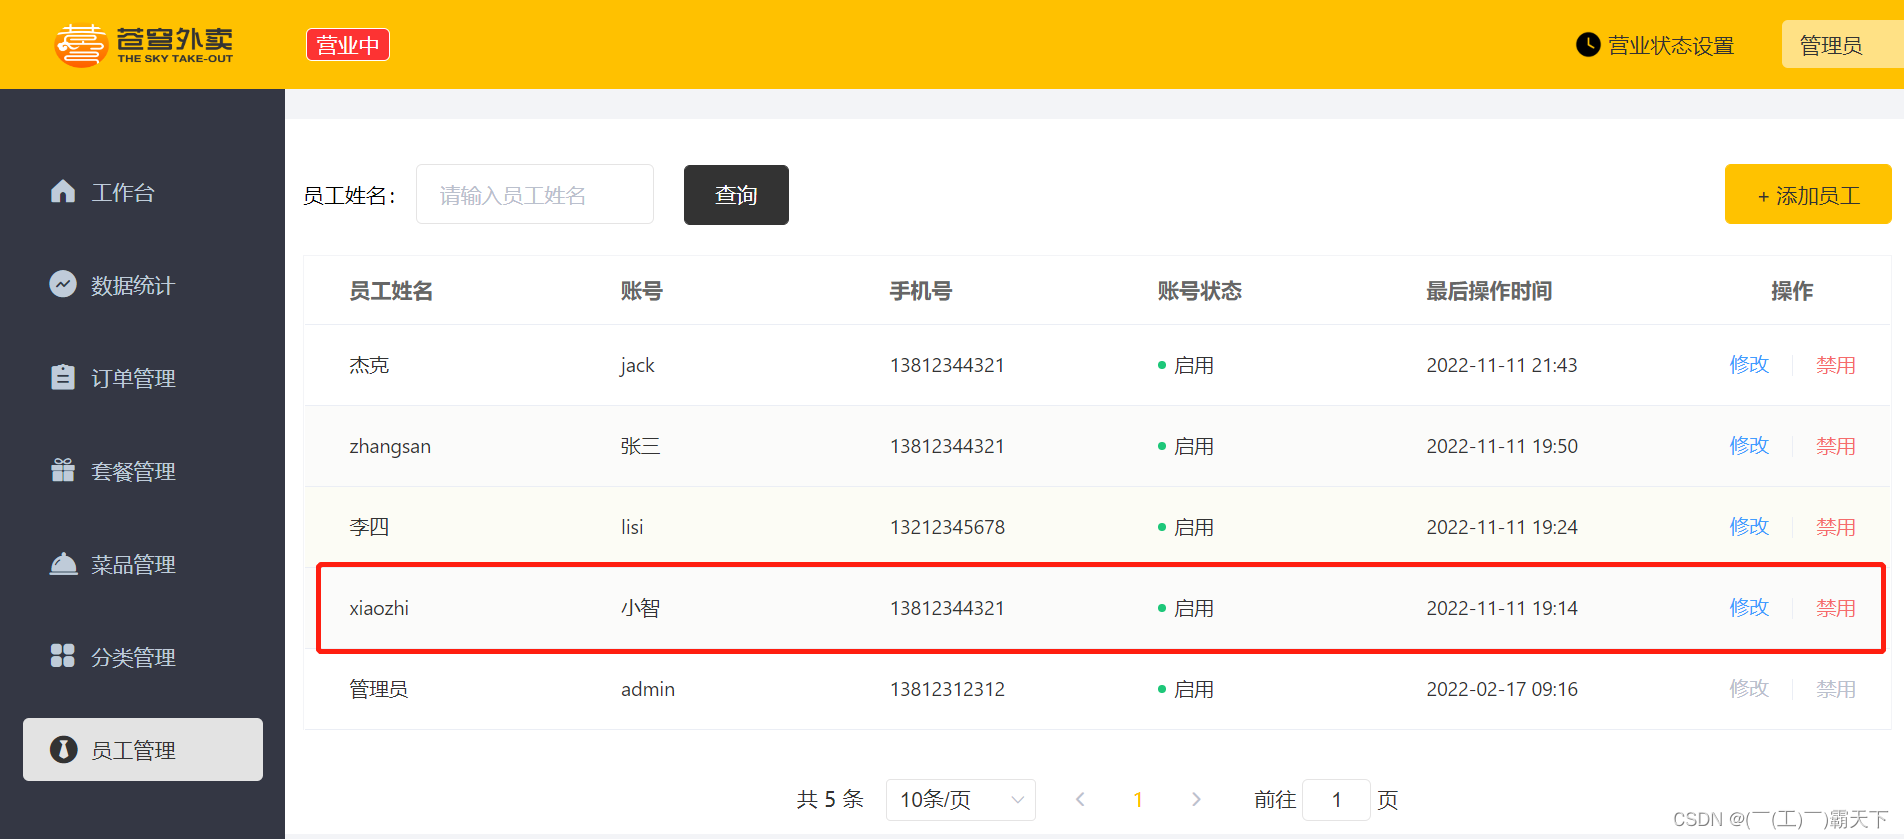
点击启用:
3.4 代码提交
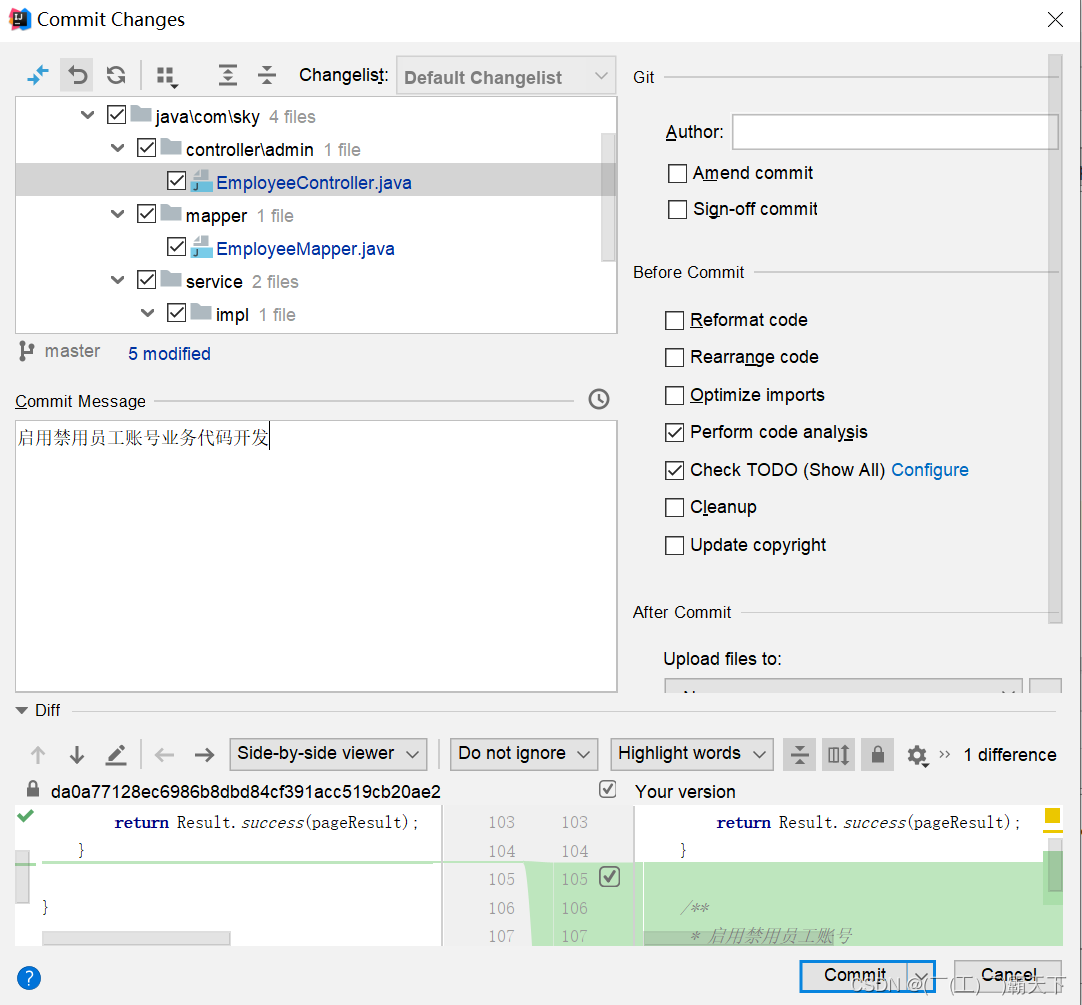
后续步骤和上述功能代码提交一致,不再赘述。
4. 编辑员工
4.1 需求分析与设计
4.1.1 产品原型
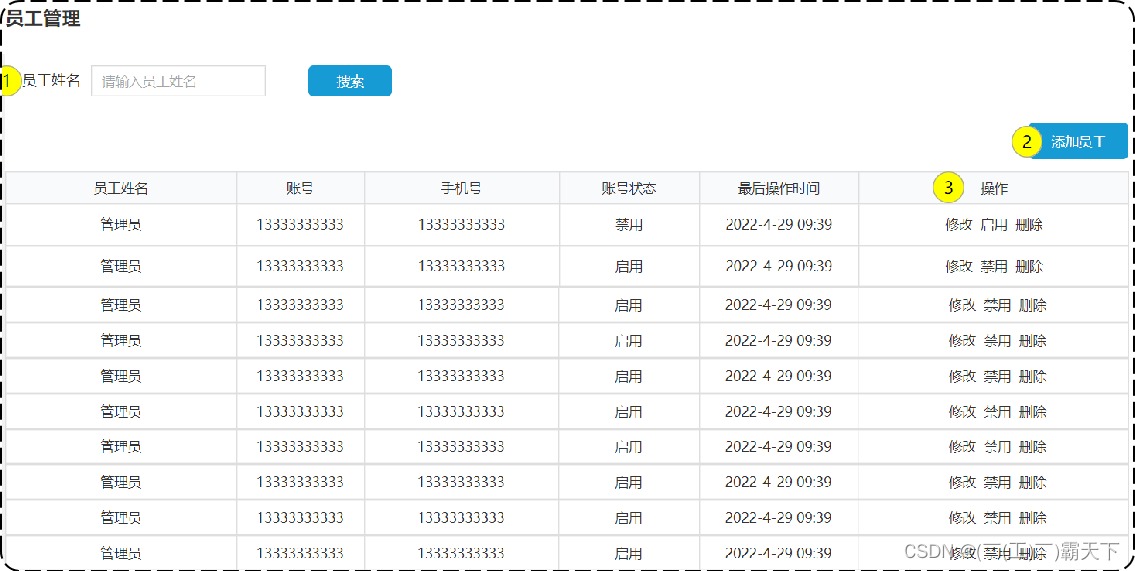
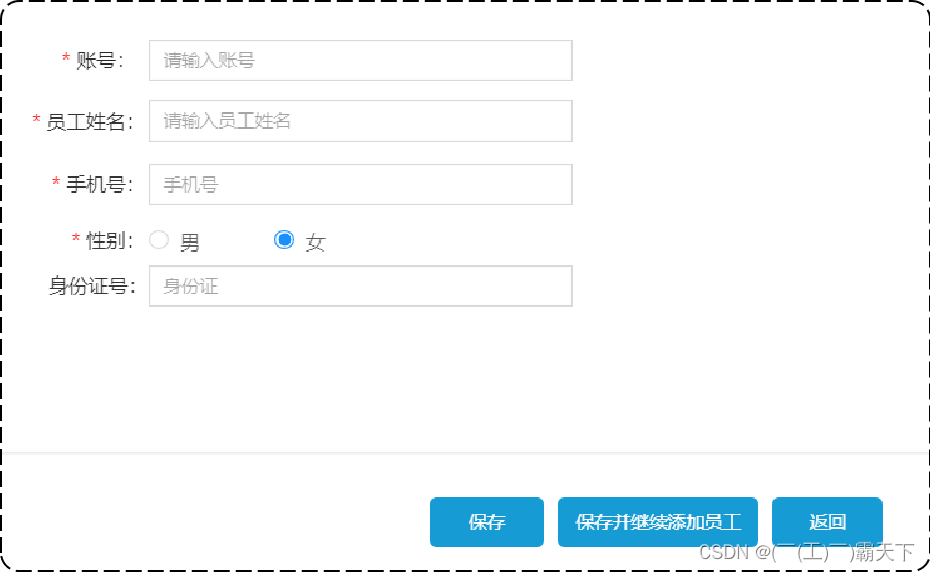
在员工管理列表页面点击 “编辑” 按钮,跳转到编辑页面,在编辑页面回显员工信息并进行修改,最后点击 “保存” 按钮完成编辑操作。
员工列表原型:
修改页面原型:
注:点击修改时,数据应该正常回显到修改页面。
4.1.2 接口设计
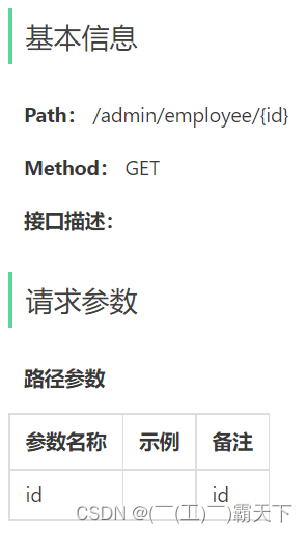
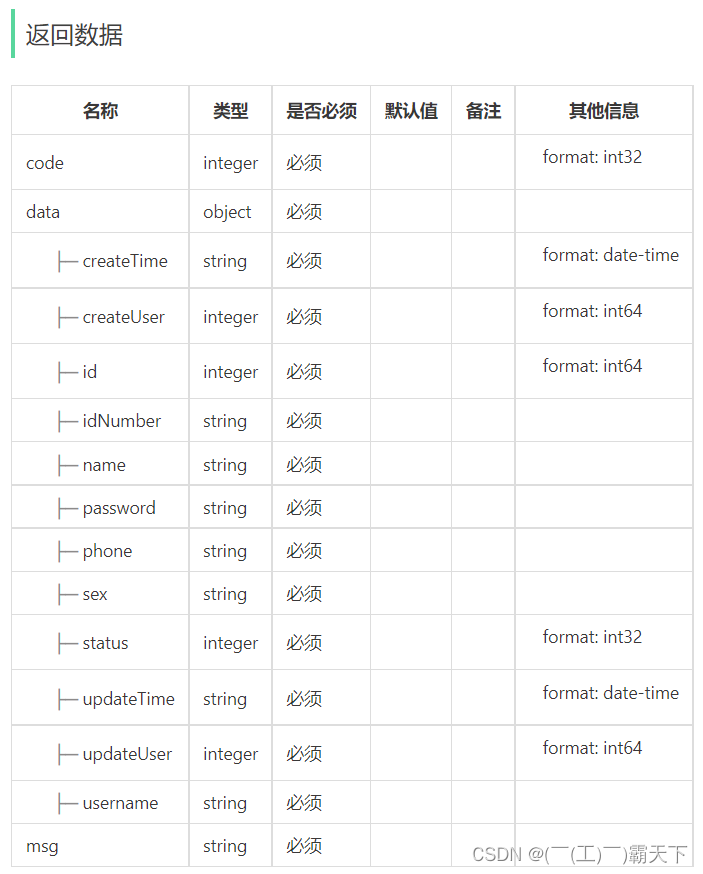
根据上述原型图分析,编辑员工功能涉及到两个接口:
- 根据id查询员工信息
- 编辑员工信息
1). 根据id查询员工信息
2). 编辑员工信息
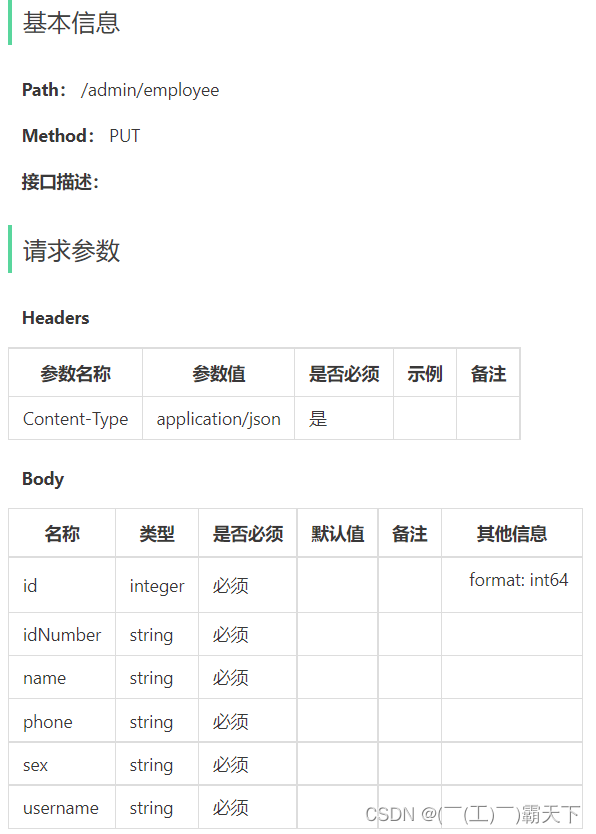
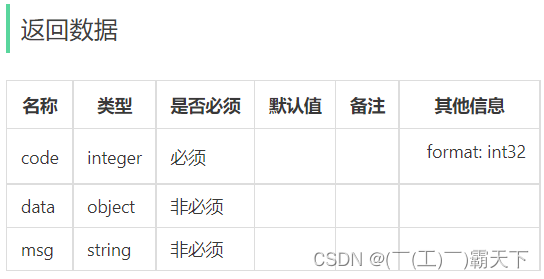
注:因为是修改功能,请求方式可设置为PUT。
4.2 代码开发
4.2.1 回显员工信息功能
1). Controller层
在 EmployeeController 中创建 getById 方法:
/** * 根据id查询员工信息 * @param id * @return */ @GetMapping("/{id}") @ApiOperation("根据id查询员工信息") public Result<Employee> getById(@PathVariable Long id){ Employee employee = employeeService.getById(id); return Result.success(employee); }- 1
- 2
- 3
- 4
- 5
- 6
- 7
- 8
- 9
- 10
- 11
2). Service层接口
在 EmployeeService 接口中声明 getById 方法:
/** * 根据id查询员工 * @param id * @return */ Employee getById(Long id);- 1
- 2
- 3
- 4
- 5
- 6
3). Service层实现类
在 EmployeeServiceImpl 中实现 getById 方法:
/** * 根据id查询员工 * * @param id * @return */ public Employee getById(Long id) { Employee employee = employeeMapper.getById(id); employee.setPassword("****"); return employee; }- 1
- 2
- 3
- 4
- 5
- 6
- 7
- 8
- 9
- 10
- 11
4). Mapper层
在 EmployeeMapper 接口中声明 getById 方法:
/** * 根据id查询员工信息 * @param id * @return */ @Select("select * from employee where id = #{id}") Employee getById(Long id);- 1
- 2
- 3
- 4
- 5
- 6
- 7
4.2.2 修改员工信息功能
1). Controller层
在 EmployeeController 中创建 update 方法:
/** * 编辑员工信息 * @param employeeDTO * @return */ @PutMapping @ApiOperation("编辑员工信息") public Result update(@RequestBody EmployeeDTO employeeDTO){ log.info("编辑员工信息:{}", employeeDTO); employeeService.update(employeeDTO); return Result.success(); }- 1
- 2
- 3
- 4
- 5
- 6
- 7
- 8
- 9
- 10
- 11
- 12
2). Service层接口
在 EmployeeService 接口中声明 update 方法:
/** * 编辑员工信息 * @param employeeDTO */ void update(EmployeeDTO employeeDTO);- 1
- 2
- 3
- 4
- 5
3). Service层实现类
在 EmployeeServiceImpl 中实现 update 方法:
/** * 编辑员工信息 * * @param employeeDTO */ public void update(EmployeeDTO employeeDTO) { Employee employee = new Employee(); BeanUtils.copyProperties(employeeDTO, employee); employee.setUpdateTime(LocalDateTime.now()); employee.setUpdateUser(BaseContext.getCurrentId()); employeeMapper.update(employee); }- 1
- 2
- 3
- 4
- 5
- 6
- 7
- 8
- 9
- 10
- 11
- 12
- 13
- 14
在实现启用禁用员工账号功能时,已实现employeeMapper.update(employee),在此不需写Mapper层代码。
4.3 功能测试
4.3.1 接口文档测试
分别测试根据id查询员工信息和编辑员工信息两个接口
1). 根据id查询员工信息
查询employee表中的数据,以id=4的记录为例

开始测试
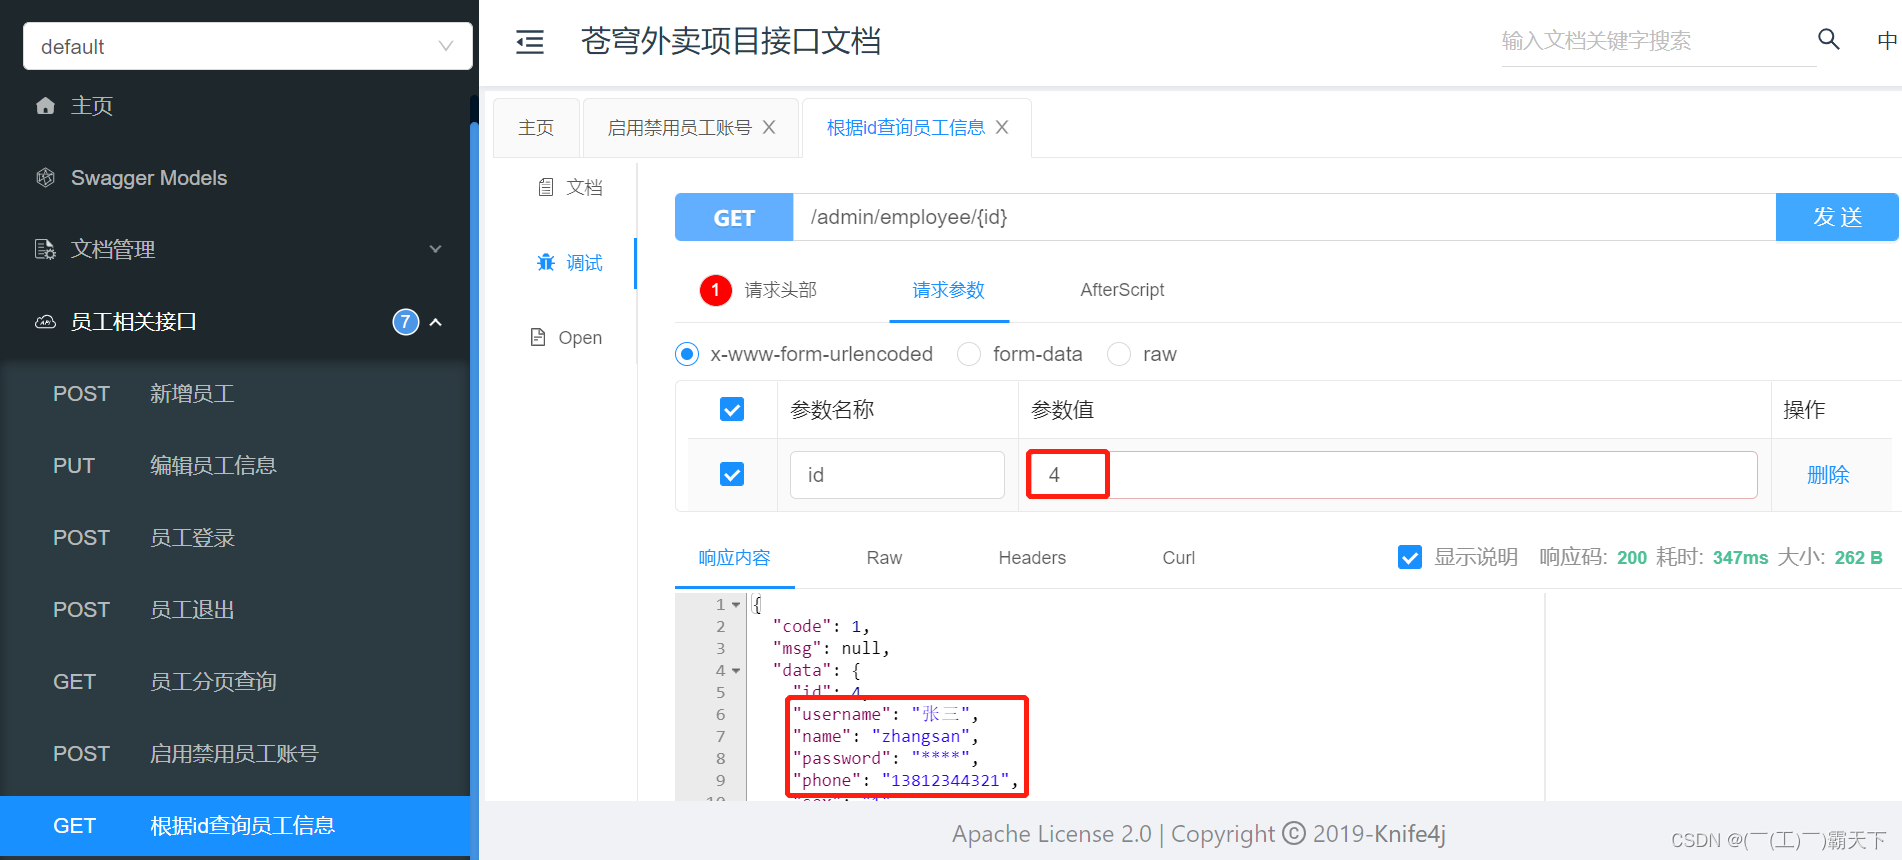
获取到了id=4的相关员工信息
2). 编辑员工信息
修改id=4的员工信息,name由zhangsan改为张三丰,username由张三改为zhangsanfeng。
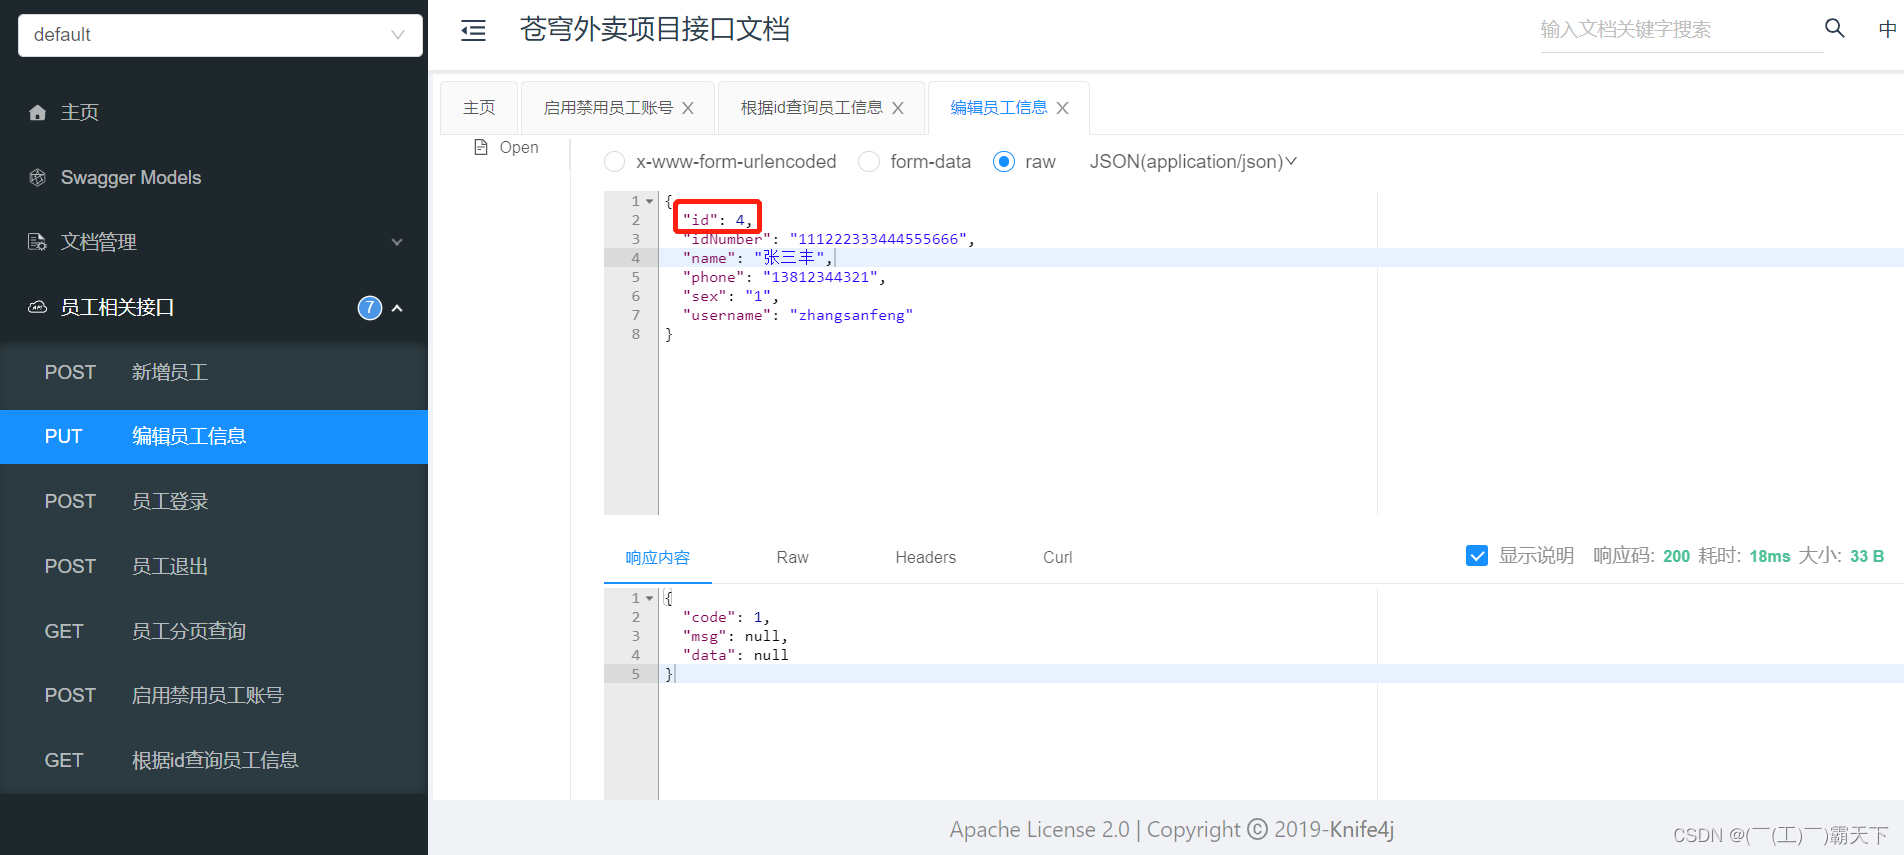
查看employee表数据

4.3.2 前后端联调测试
进入到员工列表查询
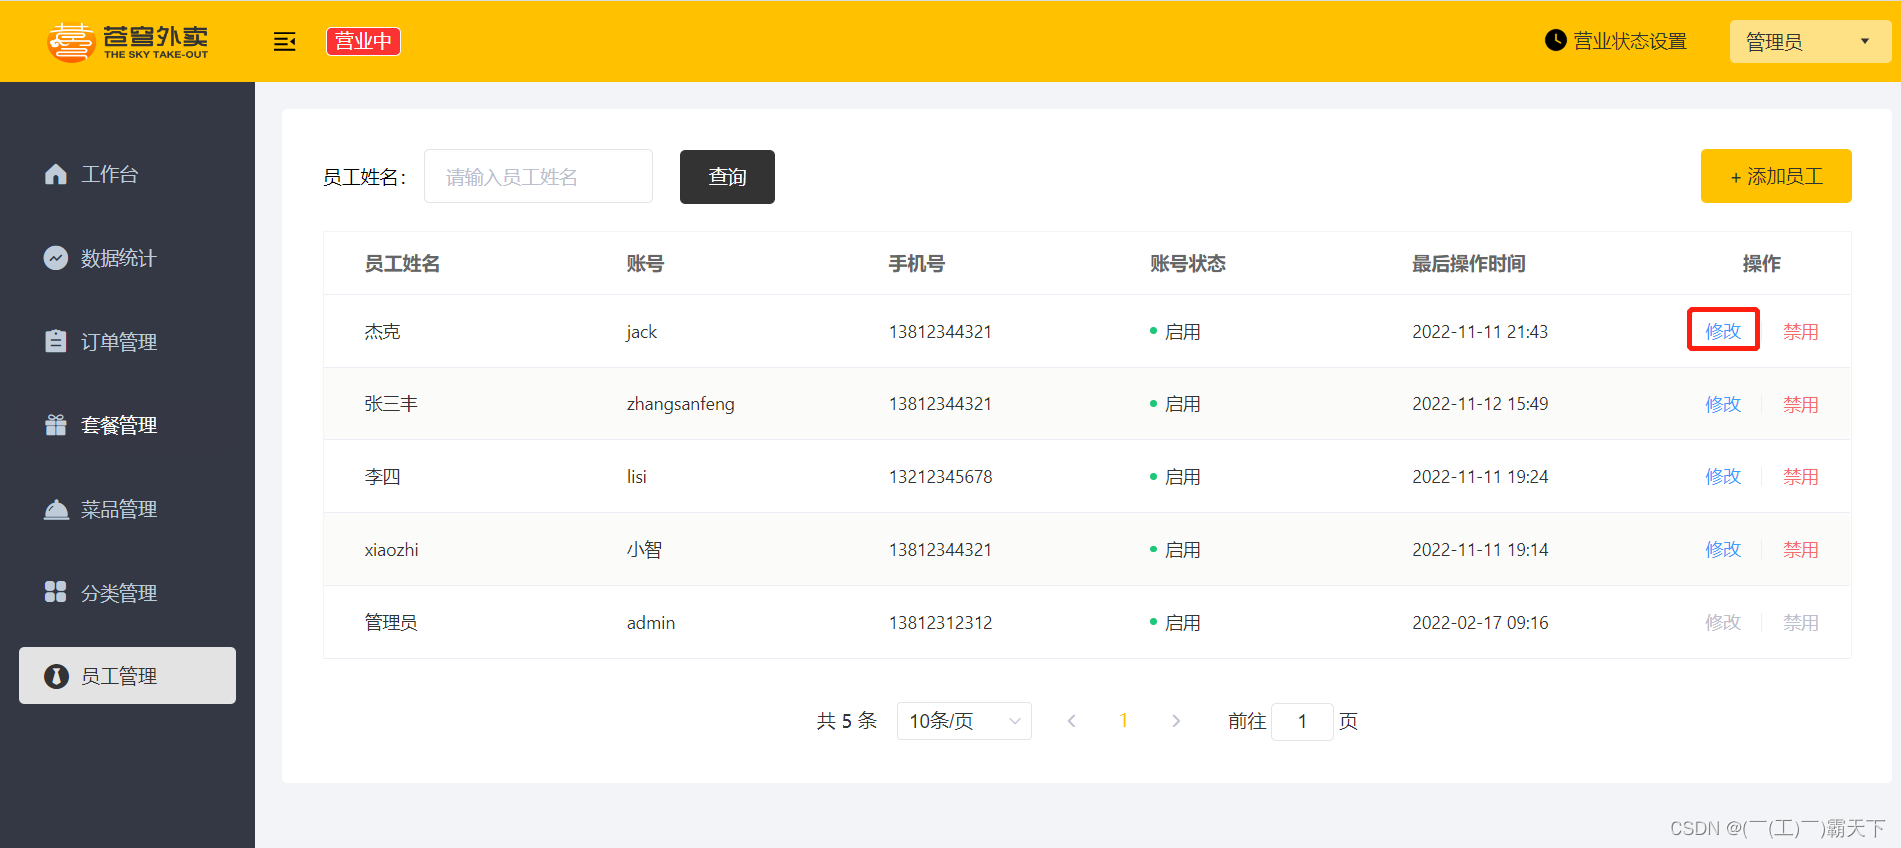
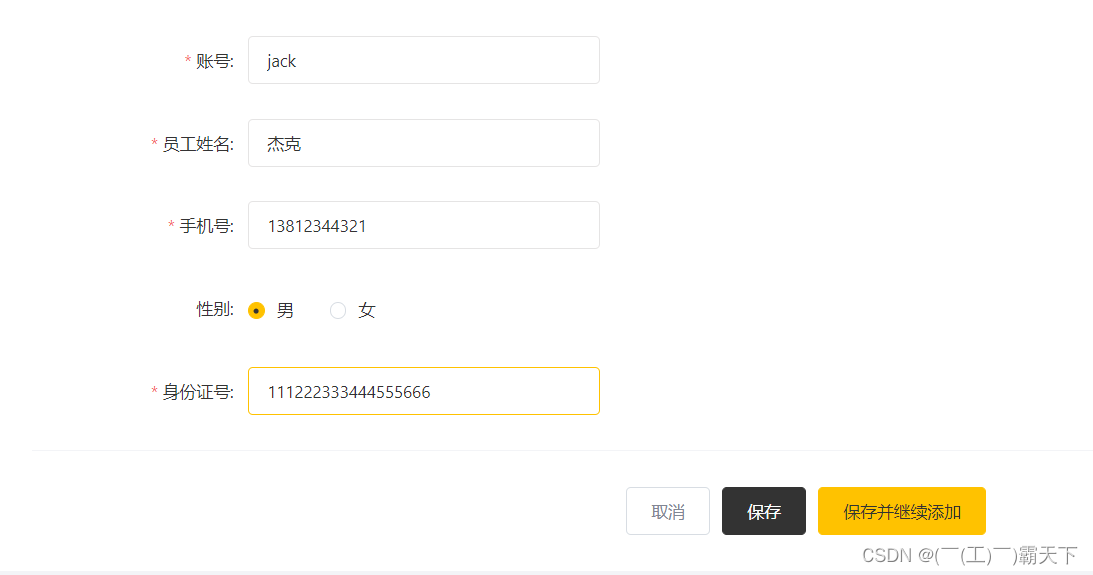
对员工姓名为杰克的员工数据修改,点击修改,数据已回显
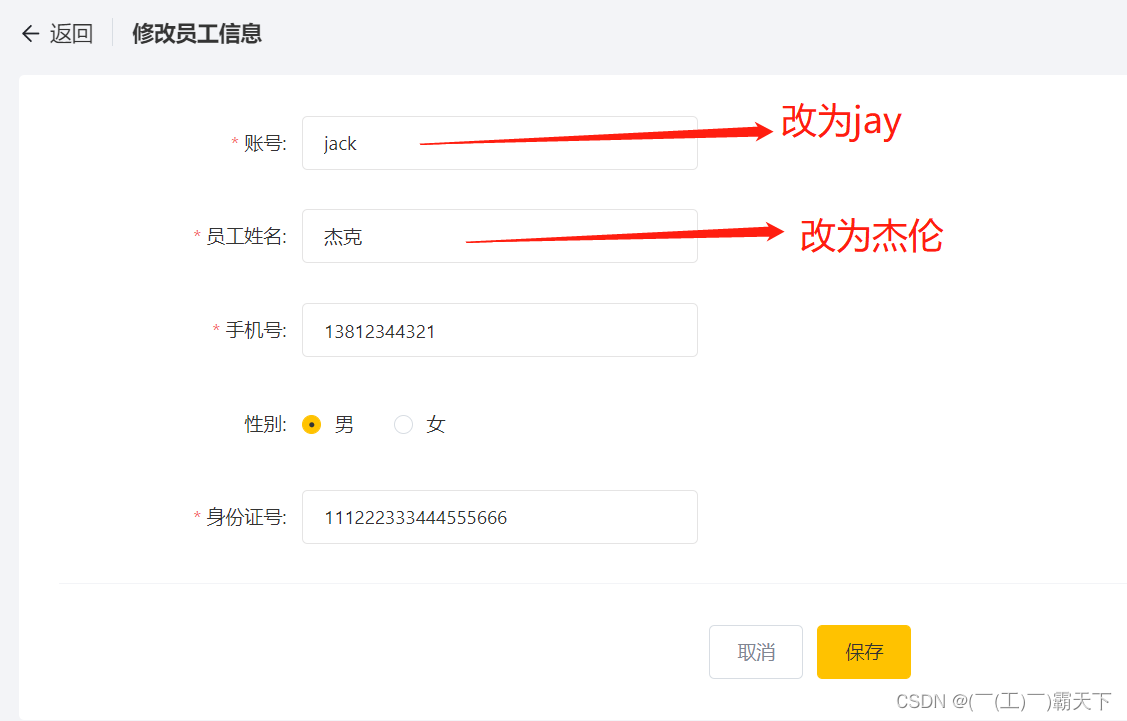
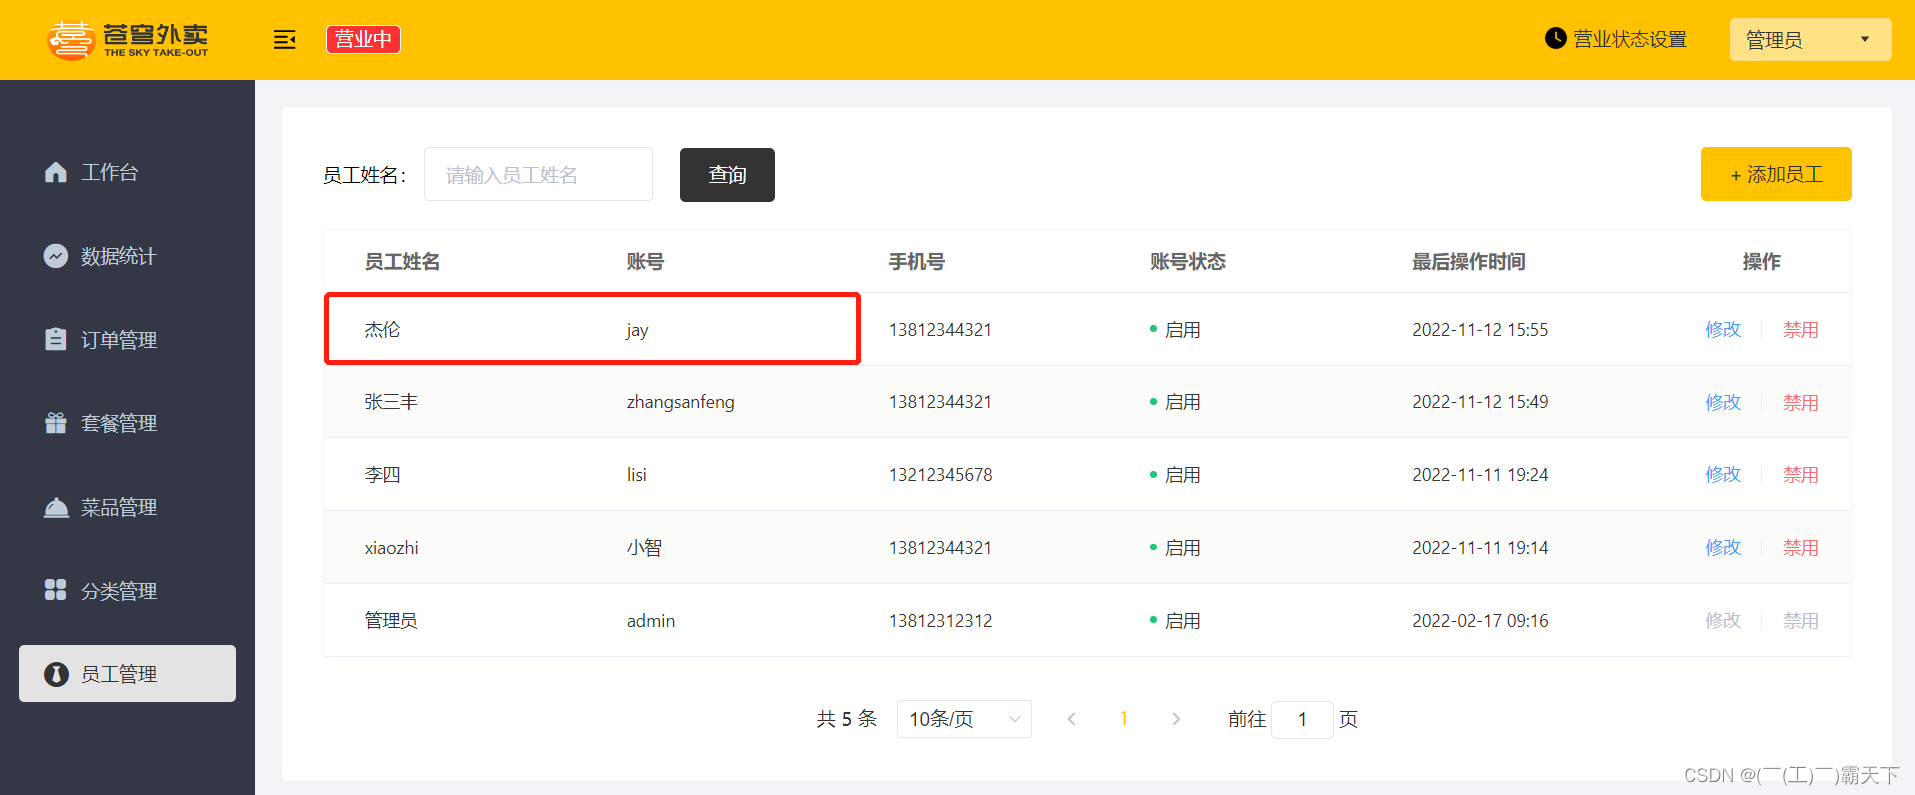
修改后,点击保存
4.4 代码提交
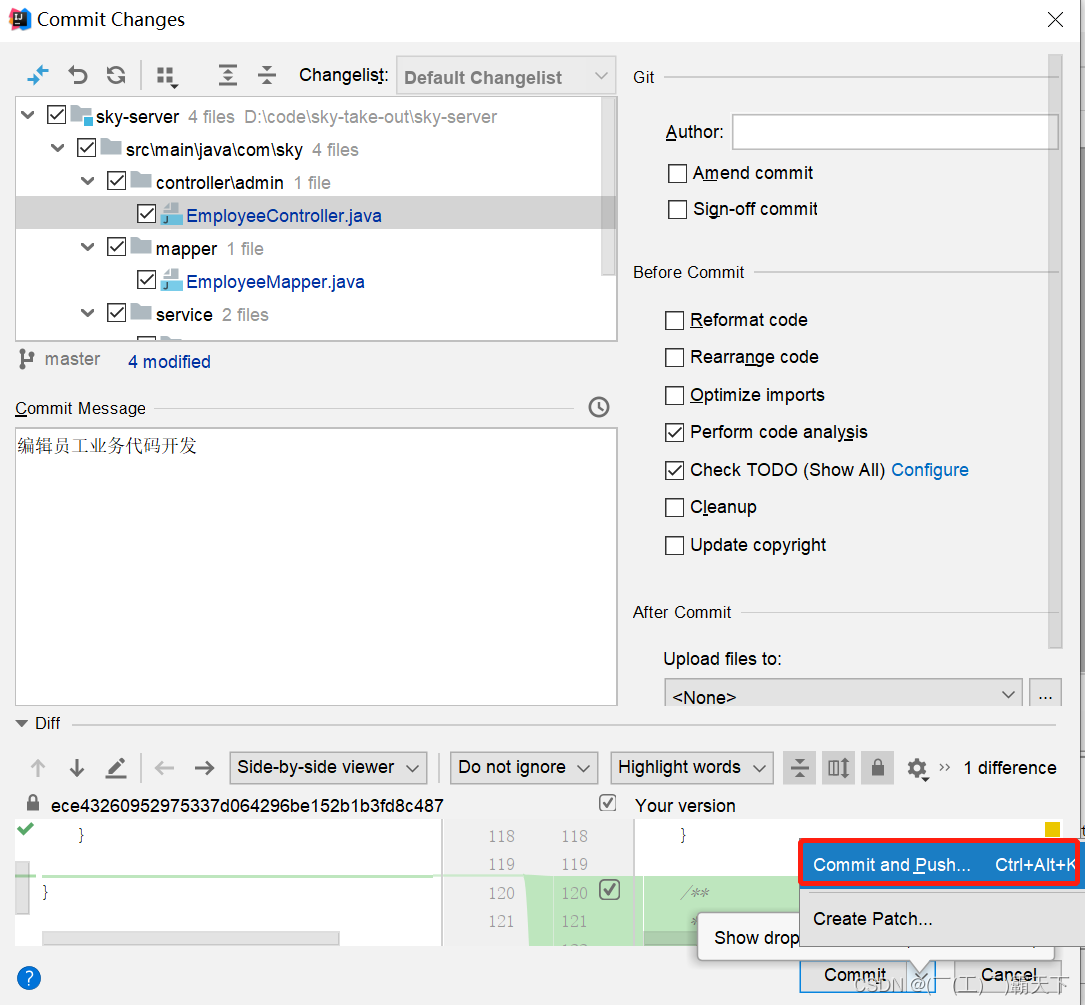
后续步骤和上述功能代码提交一致,不再赘述。
5. 导入分类模块功能代码
5.1 需求分析与设计
5.1.1 产品原型
后台系统中可以管理分类信息,分类包括两种类型,分别是 菜品分类 和 套餐分类 。
先来分析菜品分类相关功能。
**新增菜品分类:**当我们在后台系统中添加菜品时需要选择一个菜品分类,在移动端也会按照菜品分类来展示对应的菜品。
**菜品分类分页查询:**系统中的分类很多的时候,如果在一个页面中全部展示出来会显得比较乱,不便于查看,所以一般的系统中都会以分页的方式来展示列表数据。
**根据id删除菜品分类:**在分类管理列表页面,可以对某个分类进行删除操作。需要注意的是当分类关联了菜品或者套餐时,此分类不允许删除。
**修改菜品分类:**在分类管理列表页面点击修改按钮,弹出修改窗口,在修改窗口回显分类信息并进行修改,最后点击确定按钮完成修改操作。
**启用禁用菜品分类:**在分类管理列表页面,可以对某个分类进行启用或者禁用操作。
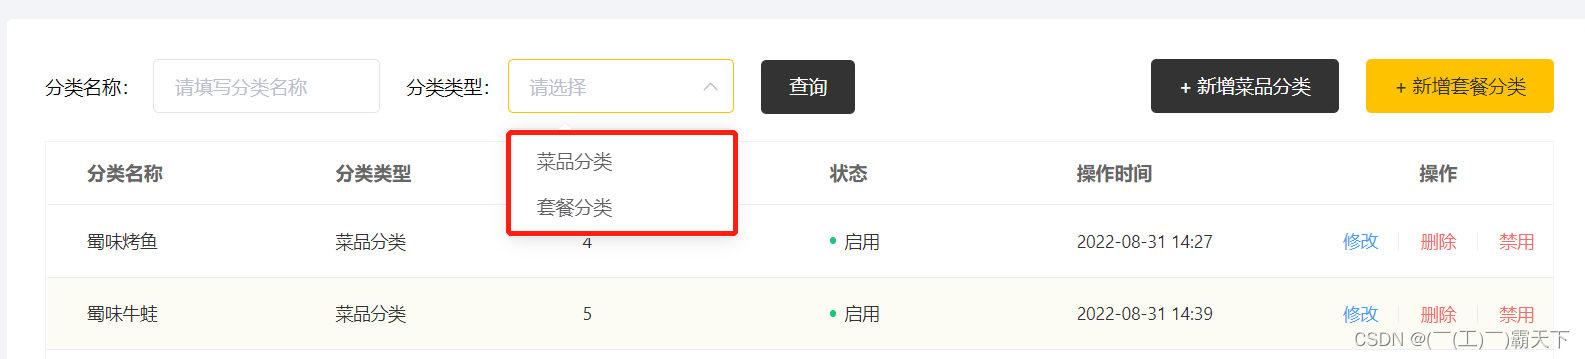
**分类类型查询:**当点击分类类型下拉框时,从数据库中查询所有的菜品分类数据进行展示。
分类管理原型:
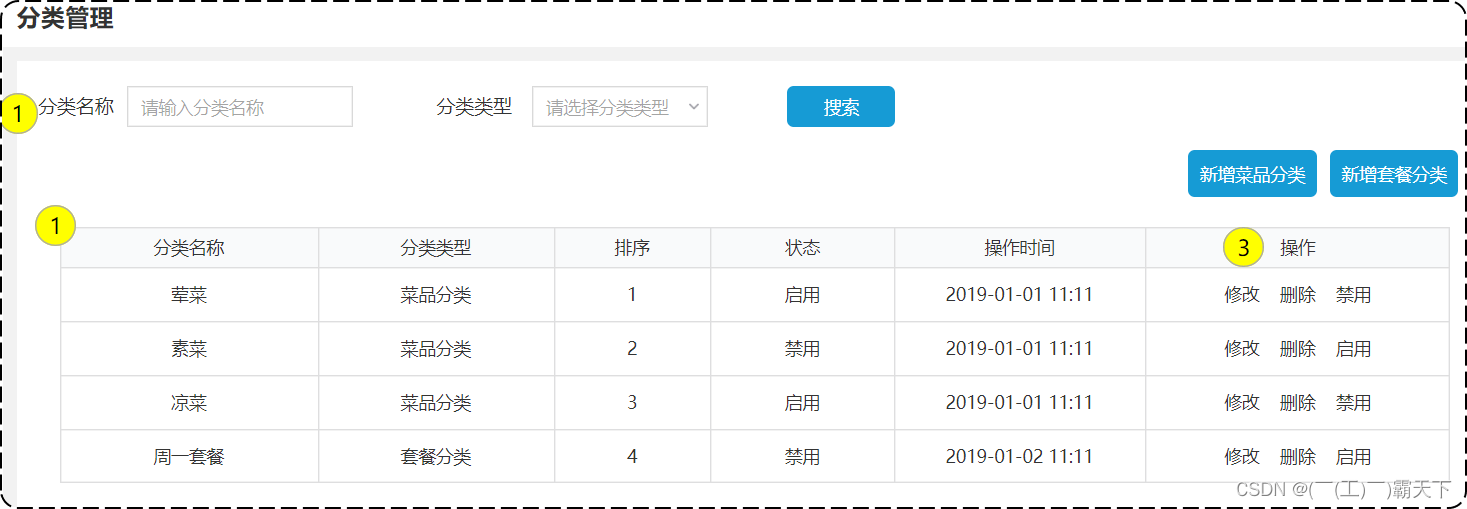
业务规则:
- 分类名称必须是唯一的
- 分类按照类型可以分为菜品分类和套餐分类
- 新添加的分类状态默认为“禁用”
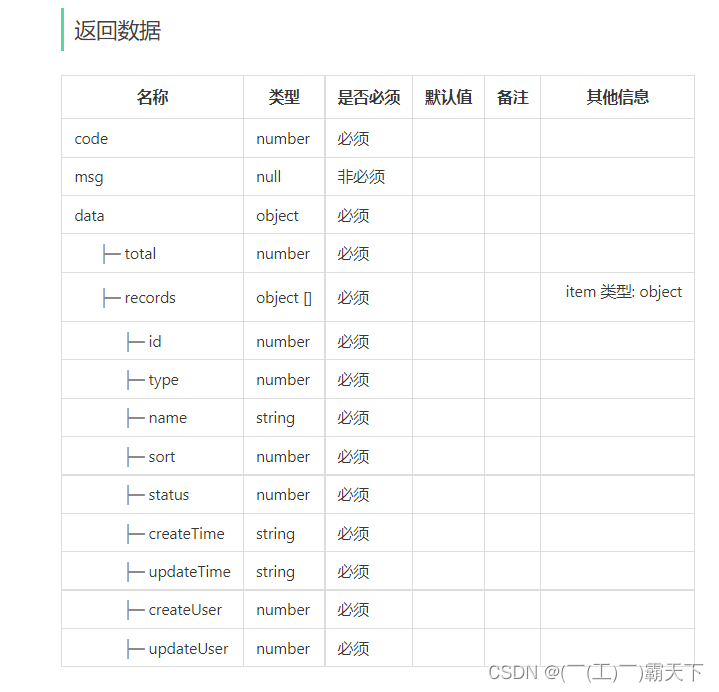
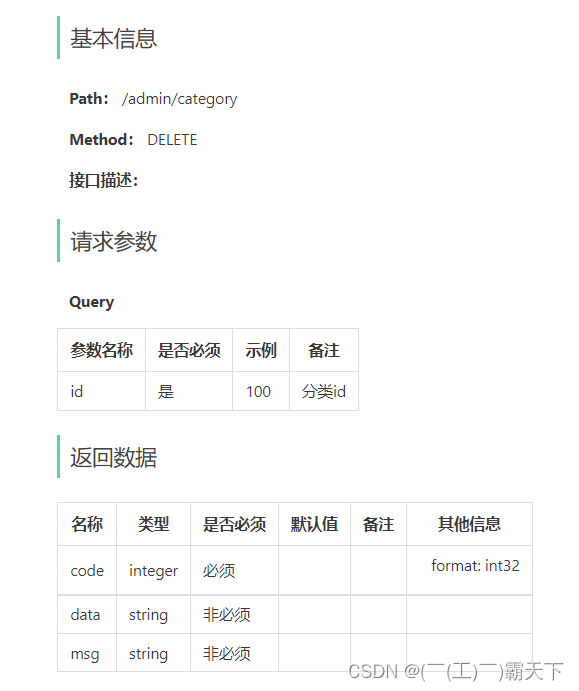
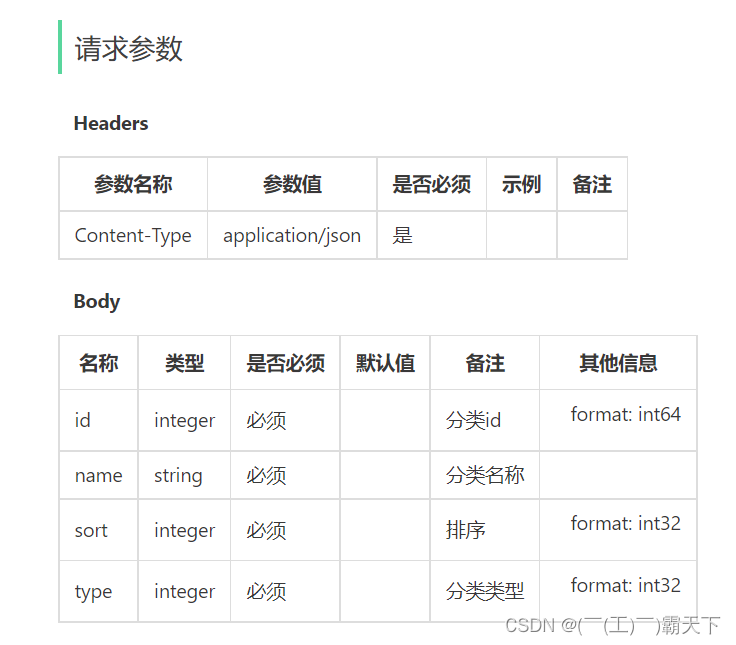
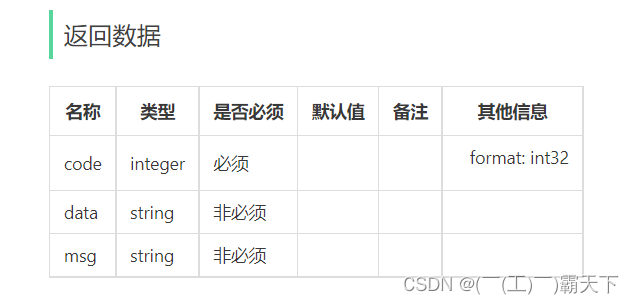
5.1.2 接口设计
根据上述原型图分析,菜品分类模块共涉及6个接口。
- 新增分类
- 分类分页查询
- 根据id删除分类
- 修改分类
- 启用禁用分类
- 根据类型查询分类
接下来,详细地分析每个接口。
找到资料–>项目接口文档–>苍穹外卖-管理端接口.html
1). 新增分类
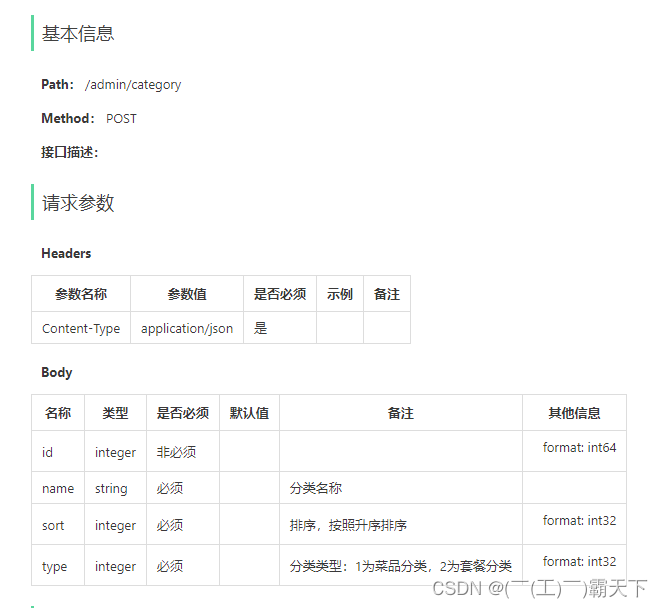
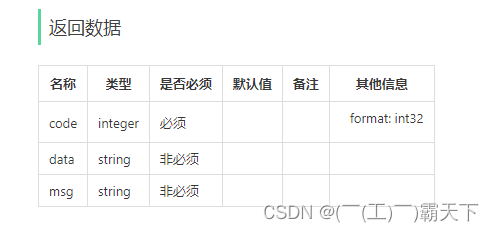
2). 分类分页查询
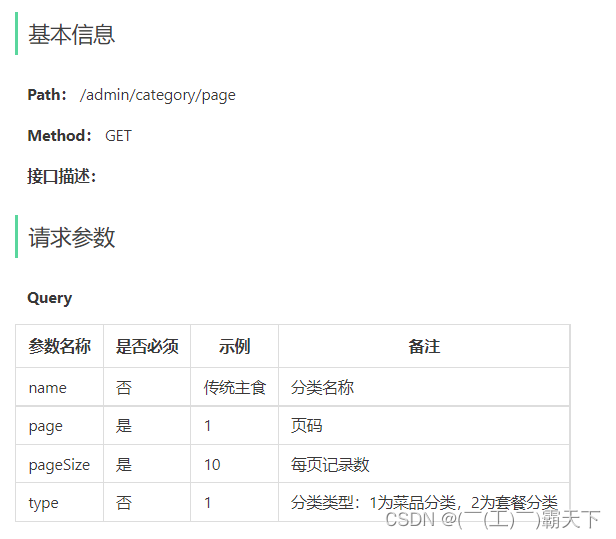
3). 根据id删除分类
4). 修改分类
5). 启用禁用分类
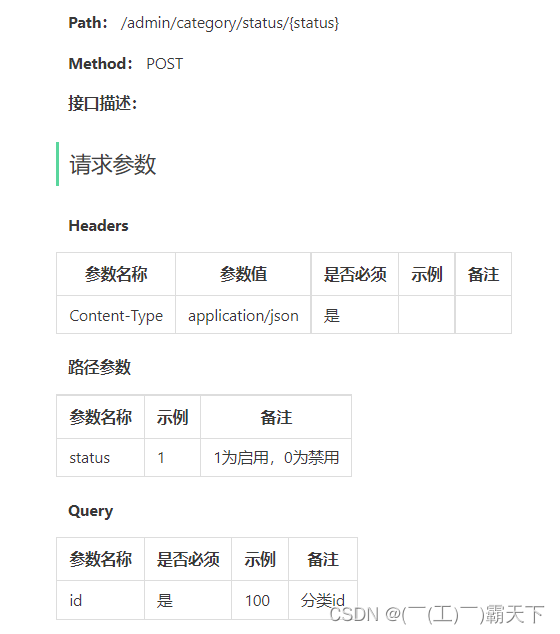
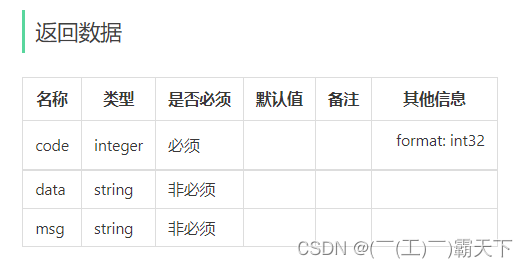
6). 根据类型查询分类
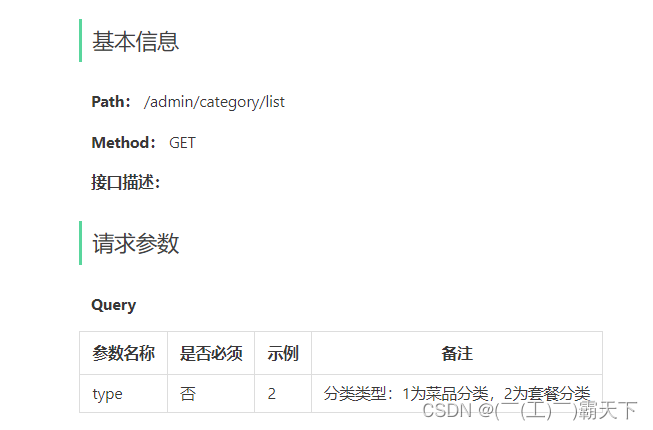
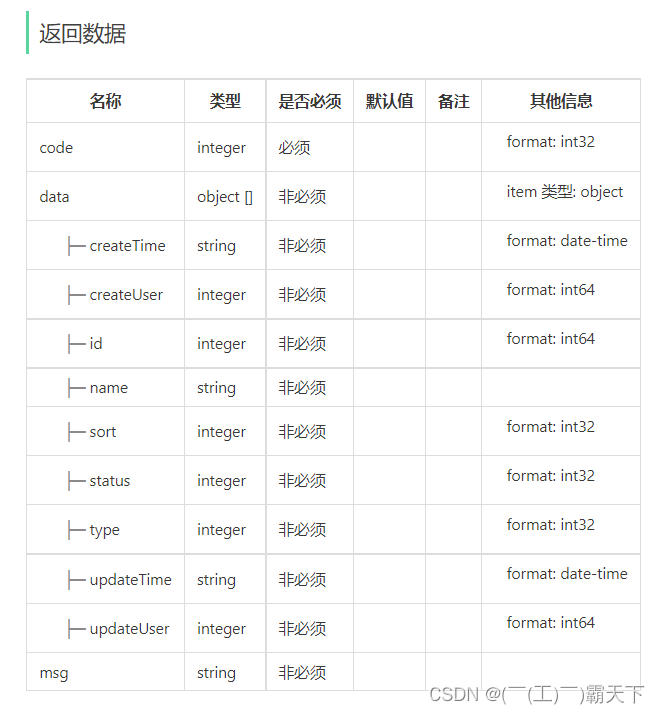
5.1.3 表设计
category表结构:
字段名 数据类型 说明 备注 id bigint 主键 自增 name varchar(32) 分类名称 唯一 type int 分类类型 1菜品分类 2套餐分类 sort int 排序字段 用于分类数据的排序 status int 状态 1启用 0禁用 create_time datetime 创建时间 update_time datetime 最后修改时间 create_user bigint 创建人id update_user bigint 最后修改人id 5.2 代码导入
导入资料中的分类管理模块功能代码即可
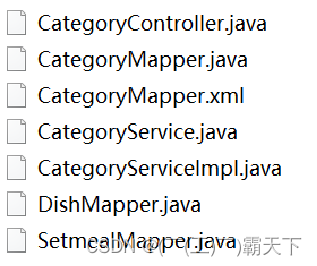
可按照mapper–>service–>controller依次导入,这样代码不会显示相应的报错。
进入到sky-server模块中
5.2.1 Mapper层
DishMapper.java
package com.sky.mapper; import org.apache.ibatis.annotations.Mapper; import org.apache.ibatis.annotations.Select; @Mapper public interface DishMapper { /** * 根据分类id查询菜品数量 * @param categoryId * @return */ @Select("select count(id) from dish where category_id = #{categoryId}") Integer countByCategoryId(Long categoryId); }- 1
- 2
- 3
- 4
- 5
- 6
- 7
- 8
- 9
- 10
- 11
- 12
- 13
- 14
- 15
- 16
- 17
- 18
SetmealMapper.java
package com.sky.mapper; import org.apache.ibatis.annotations.Mapper; import org.apache.ibatis.annotations.Select; @Mapper public interface SetmealMapper { /** * 根据分类id查询套餐的数量 * @param id * @return */ @Select("select count(id) from setmeal where category_id = #{categoryId}") Integer countByCategoryId(Long id); }- 1
- 2
- 3
- 4
- 5
- 6
- 7
- 8
- 9
- 10
- 11
- 12
- 13
- 14
- 15
- 16
- 17
CategoryMapper.java
package com.sky.mapper; import com.github.pagehelper.Page; import com.sky.dto.CategoryPageQueryDTO; import com.sky.entity.Category; import org.apache.ibatis.annotations.Delete; import org.apache.ibatis.annotations.Insert; import org.apache.ibatis.annotations.Mapper; import java.util.List; @Mapper public interface CategoryMapper { /** * 插入数据 * @param category */ @Insert("insert into category(type, name, sort, status, create_time, update_time, create_user, update_user)" + " VALUES" + " (#{type}, #{name}, #{sort}, #{status}, #{createTime}, #{updateTime}, #{createUser}, #{updateUser})") void insert(Category category); /** * 分页查询 * @param categoryPageQueryDTO * @return */ Page<Category> pageQuery(CategoryPageQueryDTO categoryPageQueryDTO); /** * 根据id删除分类 * @param id */ @Delete("delete from category where id = #{id}") void deleteById(Long id); /** * 根据id修改分类 * @param category */ void update(Category category); /** * 根据类型查询分类 * @param type * @return */ List<Category> list(Integer type); }- 1
- 2
- 3
- 4
- 5
- 6
- 7
- 8
- 9
- 10
- 11
- 12
- 13
- 14
- 15
- 16
- 17
- 18
- 19
- 20
- 21
- 22
- 23
- 24
- 25
- 26
- 27
- 28
- 29
- 30
- 31
- 32
- 33
- 34
- 35
- 36
- 37
- 38
- 39
- 40
- 41
- 42
- 43
- 44
- 45
- 46
- 47
- 48
- 49
- 50
CategoryMapper.xml,进入到resources/mapper目录下
DOCTYPE mapper PUBLIC "-//mybatis.org//DTD Mapper 3.0//EN" "http://mybatis.org/dtd/mybatis-3-mapper.dtd" > <mapper namespace="com.sky.mapper.CategoryMapper"> <select id="pageQuery" resultType="com.sky.entity.Category"> select * from category <where> <if test="name != null and name != ''"> and name like concat('%',#{name},'%') if> <if test="type != null"> and type = #{type} if> where> order by sort asc , create_time desc select> <update id="update" parameterType="Category"> update category <set> <if test="type != null"> type = #{type}, if> <if test="name != null"> name = #{name}, if> <if test="sort != null"> sort = #{sort}, if> <if test="status != null"> status = #{status}, if> <if test="updateTime != null"> update_time = #{updateTime}, if> <if test="updateUser != null"> update_user = #{updateUser} if> set> where id = #{id} update> <select id="list" resultType="Category"> select * from category where status = 1 <if test="type != null"> and type = #{type} if> order by sort asc,create_time desc select> mapper>- 1
- 2
- 3
- 4
- 5
- 6
- 7
- 8
- 9
- 10
- 11
- 12
- 13
- 14
- 15
- 16
- 17
- 18
- 19
- 20
- 21
- 22
- 23
- 24
- 25
- 26
- 27
- 28
- 29
- 30
- 31
- 32
- 33
- 34
- 35
- 36
- 37
- 38
- 39
- 40
- 41
- 42
- 43
- 44
- 45
- 46
- 47
- 48
- 49
- 50
- 51
- 52
- 53
5.2.2 Service层
CategoryService.java
package com.sky.service; import com.sky.dto.CategoryDTO; import com.sky.dto.CategoryPageQueryDTO; import com.sky.entity.Category; import com.sky.result.PageResult; import java.util.List; public interface CategoryService { /** * 新增分类 * @param categoryDTO */ void save(CategoryDTO categoryDTO); /** * 分页查询 * @param categoryPageQueryDTO * @return */ PageResult pageQuery(CategoryPageQueryDTO categoryPageQueryDTO); /** * 根据id删除分类 * @param id */ void deleteById(Long id); /** * 修改分类 * @param categoryDTO */ void update(CategoryDTO categoryDTO); /** * 启用、禁用分类 * @param status * @param id */ void startOrStop(Integer status, Long id); /** * 根据类型查询分类 * @param type * @return */ List<Category> list(Integer type); }- 1
- 2
- 3
- 4
- 5
- 6
- 7
- 8
- 9
- 10
- 11
- 12
- 13
- 14
- 15
- 16
- 17
- 18
- 19
- 20
- 21
- 22
- 23
- 24
- 25
- 26
- 27
- 28
- 29
- 30
- 31
- 32
- 33
- 34
- 35
- 36
- 37
- 38
- 39
- 40
- 41
- 42
- 43
- 44
- 45
- 46
- 47
- 48
- 49
- 50
EmployeeServiceImpl.java
package com.sky.service.impl; import com.github.pagehelper.Page; import com.github.pagehelper.PageHelper; import com.sky.constant.MessageConstant; import com.sky.constant.PasswordConstant; import com.sky.constant.StatusConstant; import com.sky.context.BaseContext; import com.sky.dto.EmployeeDTO; import com.sky.dto.EmployeeLoginDTO; import com.sky.dto.EmployeePageQueryDTO; import com.sky.entity.Employee; import com.sky.exception.AccountLockedException; import com.sky.exception.AccountNotFoundException; import com.sky.exception.PasswordErrorException; import com.sky.mapper.EmployeeMapper; import com.sky.result.PageResult; import com.sky.service.EmployeeService; import org.springframework.beans.BeanUtils; import org.springframework.beans.factory.annotation.Autowired; import org.springframework.stereotype.Service; import org.springframework.util.DigestUtils; import java.time.LocalDateTime; import java.util.List; @Service public class EmployeeServiceImpl implements EmployeeService { @Autowired private EmployeeMapper employeeMapper; /** * 员工登录 * * @param employeeLoginDTO * @return */ public Employee login(EmployeeLoginDTO employeeLoginDTO) { String username = employeeLoginDTO.getUsername(); String password = employeeLoginDTO.getPassword(); //1、根据用户名查询数据库中的数据 Employee employee = employeeMapper.getByUsername(username); //2、处理各种异常情况(用户名不存在、密码不对、账号被锁定) if (employee == null) { //账号不存在 throw new AccountNotFoundException(MessageConstant.ACCOUNT_NOT_FOUND); } //密码比对 // TODO 后期需要进行md5加密,然后再进行比对 password = DigestUtils.md5DigestAsHex(password.getBytes()); if (!password.equals(employee.getPassword())) { //密码错误 throw new PasswordErrorException(MessageConstant.PASSWORD_ERROR); } if (employee.getStatus() == StatusConstant.DISABLE) { //账号被锁定 throw new AccountLockedException(MessageConstant.ACCOUNT_LOCKED); } //3、返回实体对象 return employee; } /** * 新增员工 * * @param employeeDTO */ public void save(EmployeeDTO employeeDTO) { Employee employee = new Employee(); //对象属性拷贝 BeanUtils.copyProperties(employeeDTO, employee); //设置账号的状态,默认正常状态 1表示正常 0表示锁定 employee.setStatus(StatusConstant.ENABLE); //设置密码,默认密码123456 employee.setPassword(DigestUtils.md5DigestAsHex(PasswordConstant.DEFAULT_PASSWORD.getBytes())); //设置当前记录的创建时间和修改时间 employee.setCreateTime(LocalDateTime.now()); employee.setUpdateTime(LocalDateTime.now()); //设置当前记录创建人id和修改人id employee.setCreateUser(BaseContext.getCurrentId());//目前写个假数据,后期修改 employee.setUpdateUser(BaseContext.getCurrentId()); employeeMapper.insert(employee); } /** * 分页查询 * * @param employeePageQueryDTO * @return */ public PageResult pageQuery(EmployeePageQueryDTO employeePageQueryDTO) { // select * from employee limit 0,10 //开始分页查询 PageHelper.startPage(employeePageQueryDTO.getPage(), employeePageQueryDTO.getPageSize()); Page<Employee> page = employeeMapper.pageQuery(employeePageQueryDTO); long total = page.getTotal(); List<Employee> records = page.getResult(); return new PageResult(total, records); } /** * 启用禁用员工账号 * * @param status * @param id */ public void startOrStop(Integer status, Long id) { Employee employee = Employee.builder() .status(status) .id(id) .build(); employeeMapper.update(employee); } /** * 根据id查询员工 * * @param id * @return */ public Employee getById(Long id) { Employee employee = employeeMapper.getById(id); employee.setPassword("****"); return employee; } /** * 编辑员工信息 * * @param employeeDTO */ public void update(EmployeeDTO employeeDTO) { Employee employee = new Employee(); BeanUtils.copyProperties(employeeDTO, employee); employee.setUpdateTime(LocalDateTime.now()); employee.setUpdateUser(BaseContext.getCurrentId()); employeeMapper.update(employee); } }- 1
- 2
- 3
- 4
- 5
- 6
- 7
- 8
- 9
- 10
- 11
- 12
- 13
- 14
- 15
- 16
- 17
- 18
- 19
- 20
- 21
- 22
- 23
- 24
- 25
- 26
- 27
- 28
- 29
- 30
- 31
- 32
- 33
- 34
- 35
- 36
- 37
- 38
- 39
- 40
- 41
- 42
- 43
- 44
- 45
- 46
- 47
- 48
- 49
- 50
- 51
- 52
- 53
- 54
- 55
- 56
- 57
- 58
- 59
- 60
- 61
- 62
- 63
- 64
- 65
- 66
- 67
- 68
- 69
- 70
- 71
- 72
- 73
- 74
- 75
- 76
- 77
- 78
- 79
- 80
- 81
- 82
- 83
- 84
- 85
- 86
- 87
- 88
- 89
- 90
- 91
- 92
- 93
- 94
- 95
- 96
- 97
- 98
- 99
- 100
- 101
- 102
- 103
- 104
- 105
- 106
- 107
- 108
- 109
- 110
- 111
- 112
- 113
- 114
- 115
- 116
- 117
- 118
- 119
- 120
- 121
- 122
- 123
- 124
- 125
- 126
- 127
- 128
- 129
- 130
- 131
- 132
- 133
- 134
- 135
- 136
- 137
- 138
- 139
- 140
- 141
- 142
- 143
- 144
- 145
- 146
- 147
- 148
- 149
- 150
- 151
- 152
- 153
- 154
- 155
- 156
- 157
- 158
5.2.3 Controller层
CategoryController.java
package com.sky.controller.admin; import com.sky.dto.CategoryDTO; import com.sky.dto.CategoryPageQueryDTO; import com.sky.entity.Category; import com.sky.result.PageResult; import com.sky.result.Result; import com.sky.service.CategoryService; import io.swagger.annotations.Api; import io.swagger.annotations.ApiOperation; import lombok.extern.slf4j.Slf4j; import org.springframework.beans.factory.annotation.Autowired; import org.springframework.web.bind.annotation.*; import java.util.List; /** * 分类管理 */ @RestController @RequestMapping("/admin/category") @Api(tags = "分类相关接口") @Slf4j public class CategoryController { @Autowired private CategoryService categoryService; /** * 新增分类 * @param categoryDTO * @return */ @PostMapping @ApiOperation("新增分类") public Result<String> save(@RequestBody CategoryDTO categoryDTO){ log.info("新增分类:{}", categoryDTO); categoryService.save(categoryDTO); return Result.success(); } /** * 分类分页查询 * @param categoryPageQueryDTO * @return */ @GetMapping("/page") @ApiOperation("分类分页查询") public Result<PageResult> page(CategoryPageQueryDTO categoryPageQueryDTO){ log.info("分页查询:{}", categoryPageQueryDTO); PageResult pageResult = categoryService.pageQuery(categoryPageQueryDTO); return Result.success(pageResult); } /** * 删除分类 * @param id * @return */ @DeleteMapping @ApiOperation("删除分类") public Result<String> deleteById(Long id){ log.info("删除分类:{}", id); categoryService.deleteById(id); return Result.success(); } /** * 修改分类 * @param categoryDTO * @return */ @PutMapping @ApiOperation("修改分类") public Result<String> update(@RequestBody CategoryDTO categoryDTO){ categoryService.update(categoryDTO); return Result.success(); } /** * 启用、禁用分类 * @param status * @param id * @return */ @PostMapping("/status/{status}") @ApiOperation("启用禁用分类") public Result<String> startOrStop(@PathVariable("status") Integer status, Long id){ categoryService.startOrStop(status,id); return Result.success(); } /** * 根据类型查询分类 * @param type * @return */ @GetMapping("/list") @ApiOperation("根据类型查询分类") public Result<List<Category>> list(Integer type){ List<Category> list = categoryService.list(type); return Result.success(list); } }- 1
- 2
- 3
- 4
- 5
- 6
- 7
- 8
- 9
- 10
- 11
- 12
- 13
- 14
- 15
- 16
- 17
- 18
- 19
- 20
- 21
- 22
- 23
- 24
- 25
- 26
- 27
- 28
- 29
- 30
- 31
- 32
- 33
- 34
- 35
- 36
- 37
- 38
- 39
- 40
- 41
- 42
- 43
- 44
- 45
- 46
- 47
- 48
- 49
- 50
- 51
- 52
- 53
- 54
- 55
- 56
- 57
- 58
- 59
- 60
- 61
- 62
- 63
- 64
- 65
- 66
- 67
- 68
- 69
- 70
- 71
- 72
- 73
- 74
- 75
- 76
- 77
- 78
- 79
- 80
- 81
- 82
- 83
- 84
- 85
- 86
- 87
- 88
- 89
- 90
- 91
- 92
- 93
- 94
- 95
- 96
- 97
- 98
- 99
- 100
- 101
- 102
- 103
全部导入完毕后,进行编译
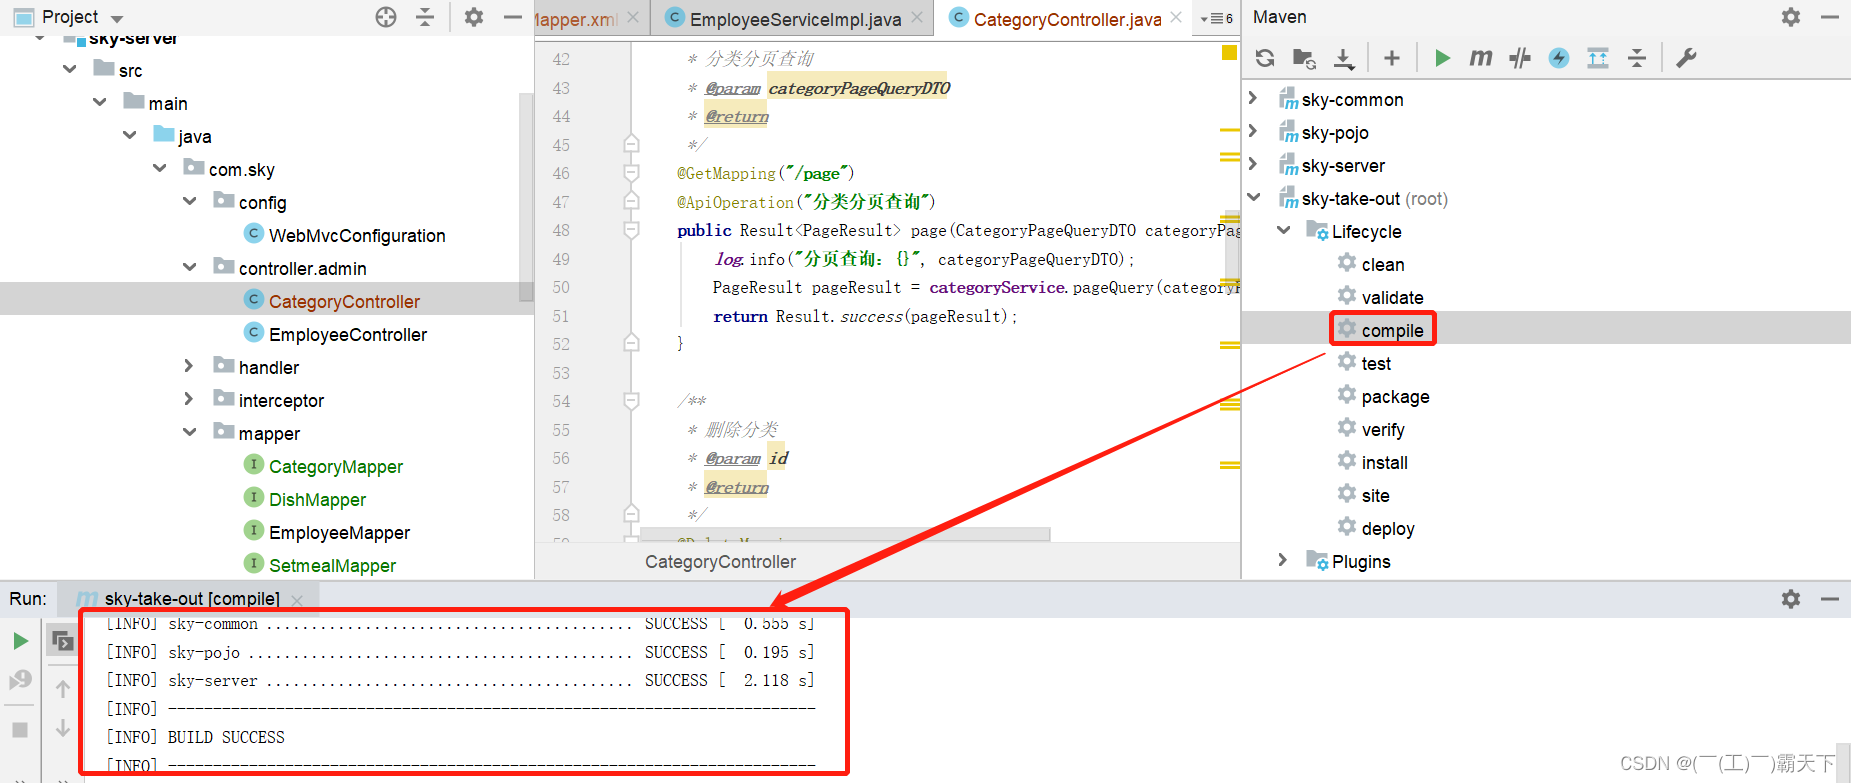
5.3 功能测试
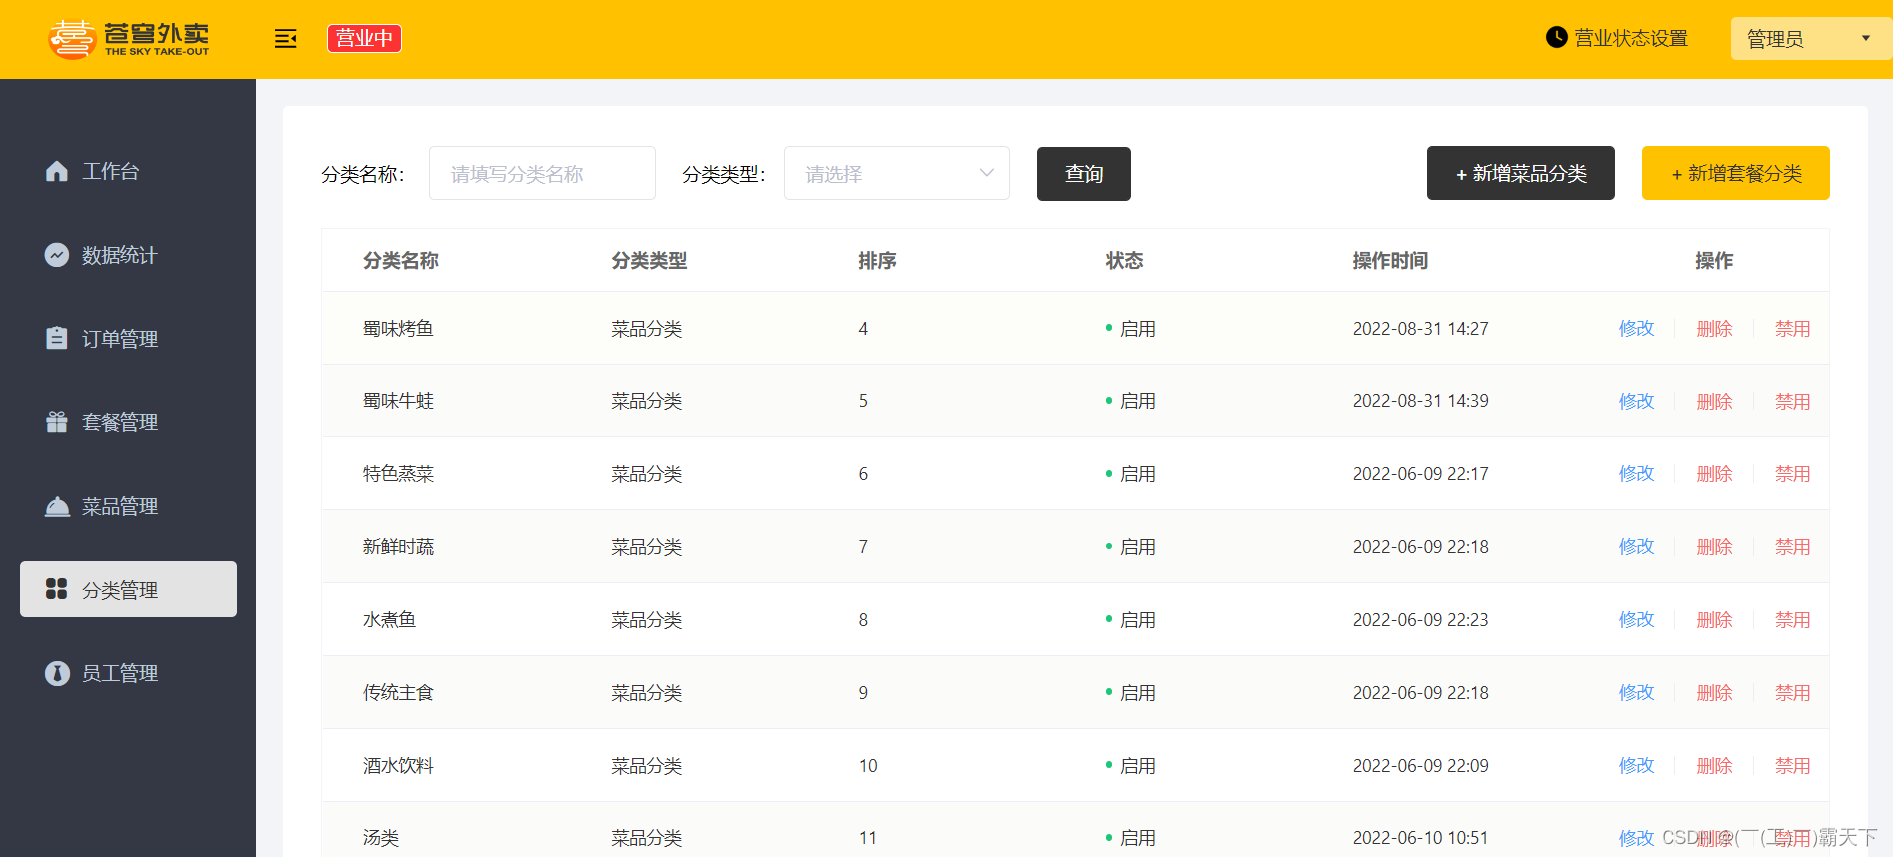
重启服务,访问http://localhost:80,进入分类管理
分页查询:
分类类型:
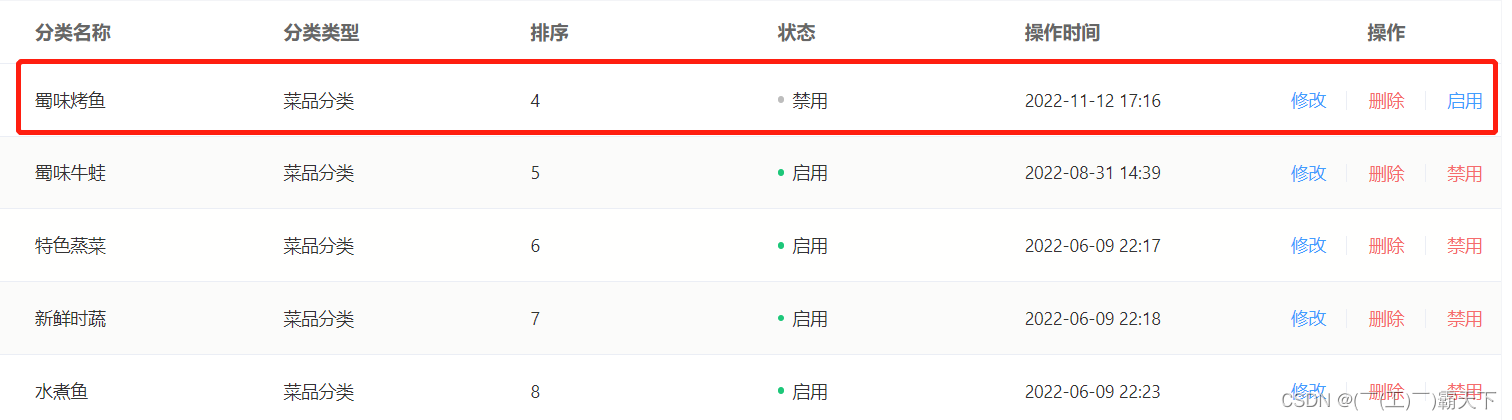
启用禁用:
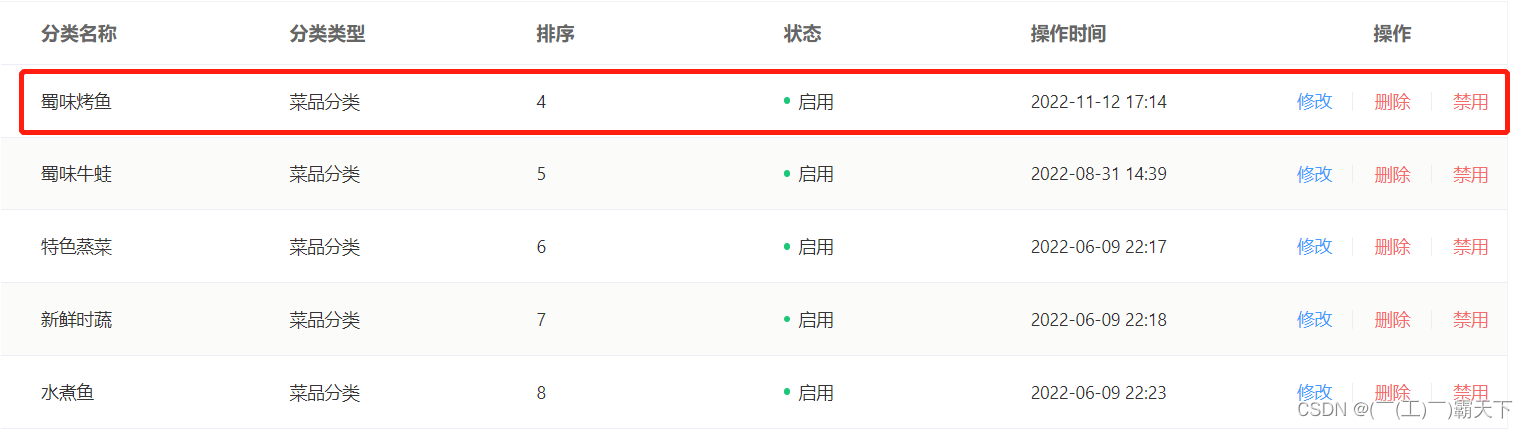
点击禁用
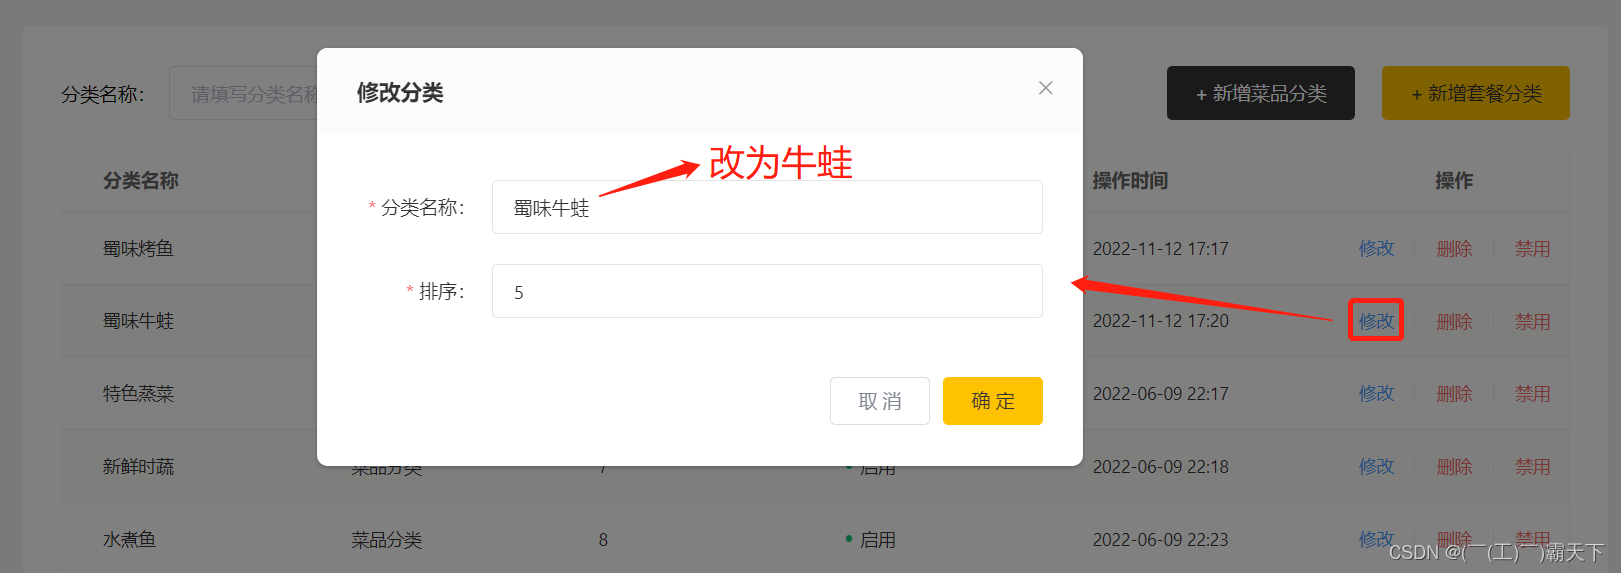
修改:
回显
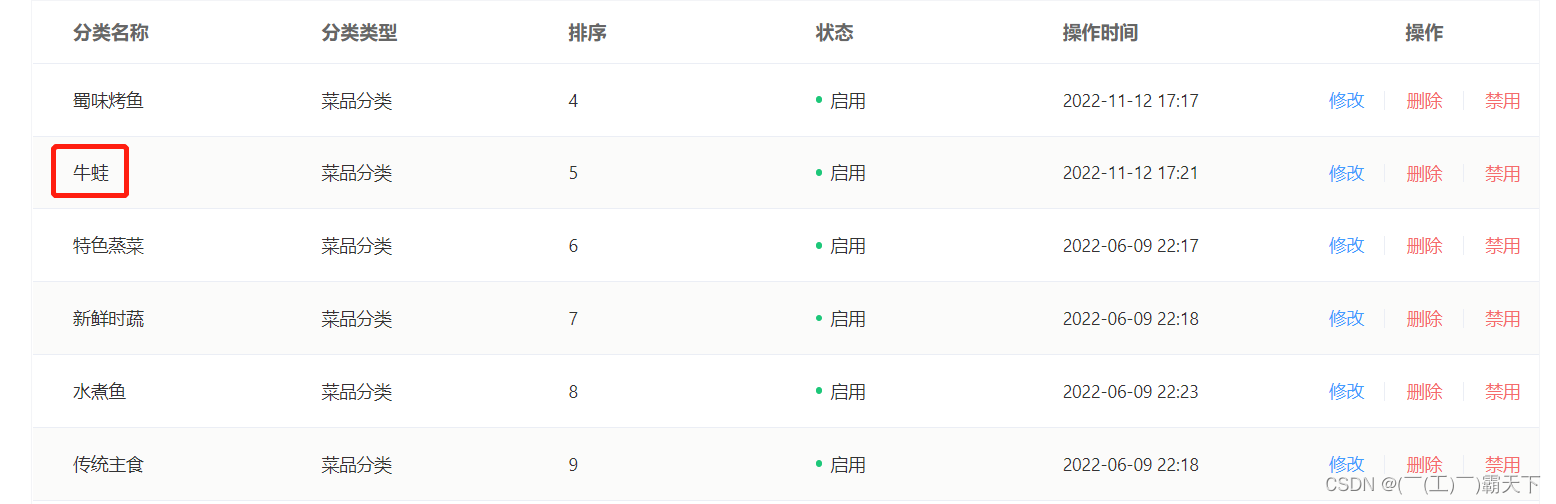
修改后
新增:
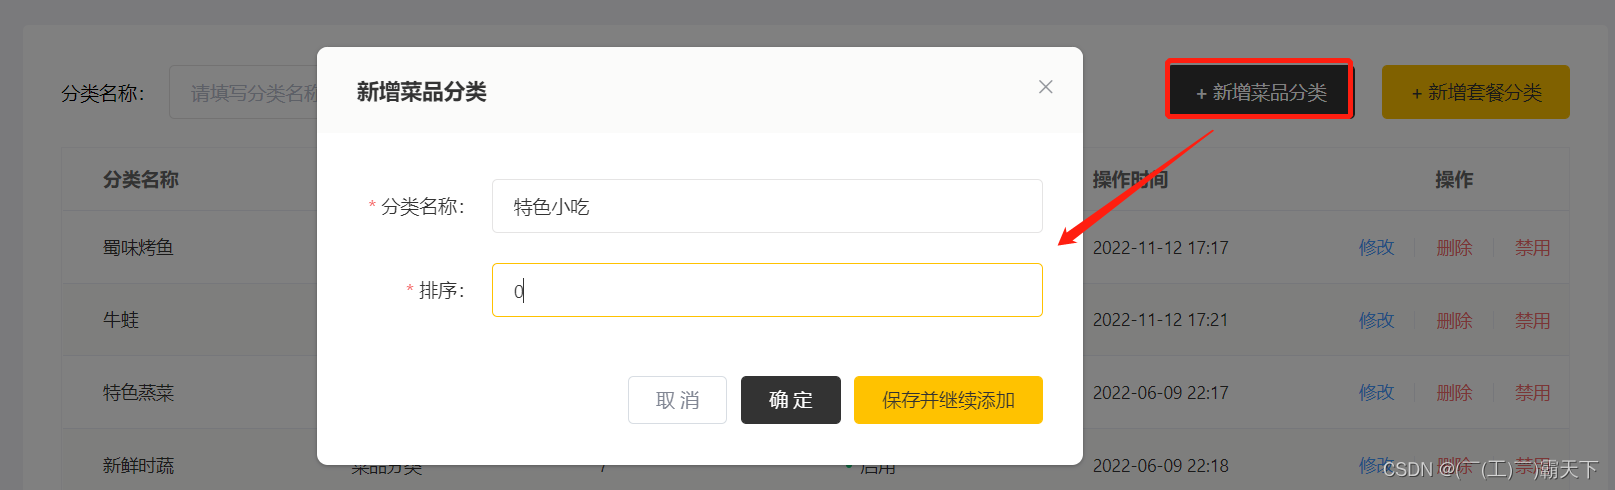
点击确定,查询列表
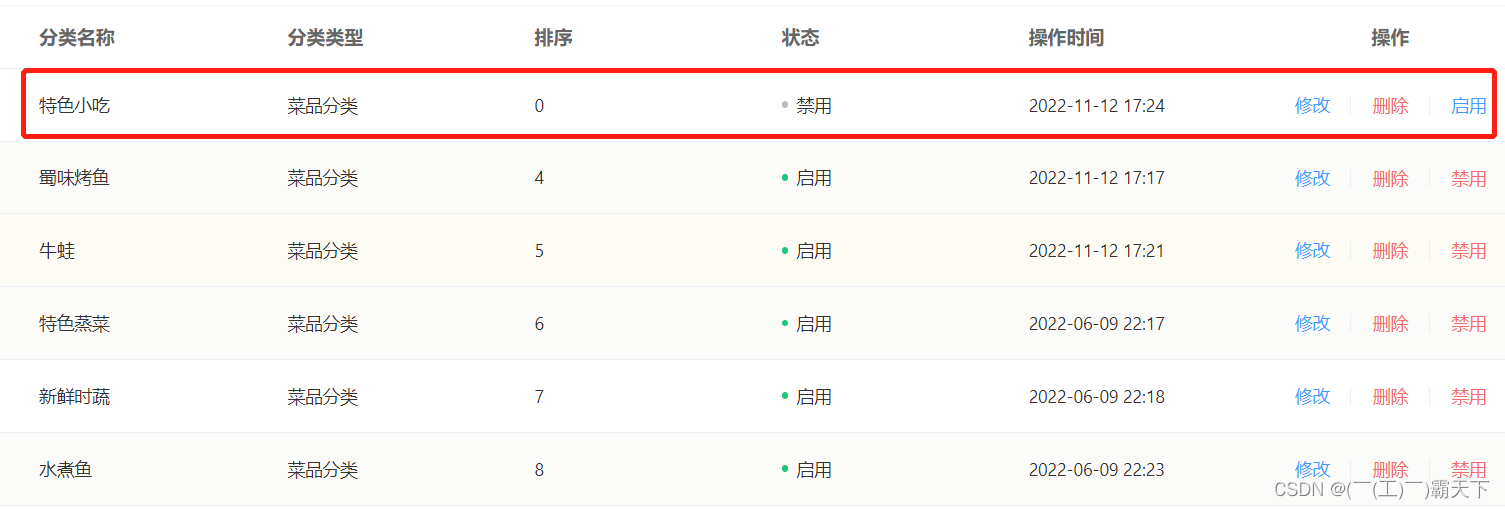
删除:
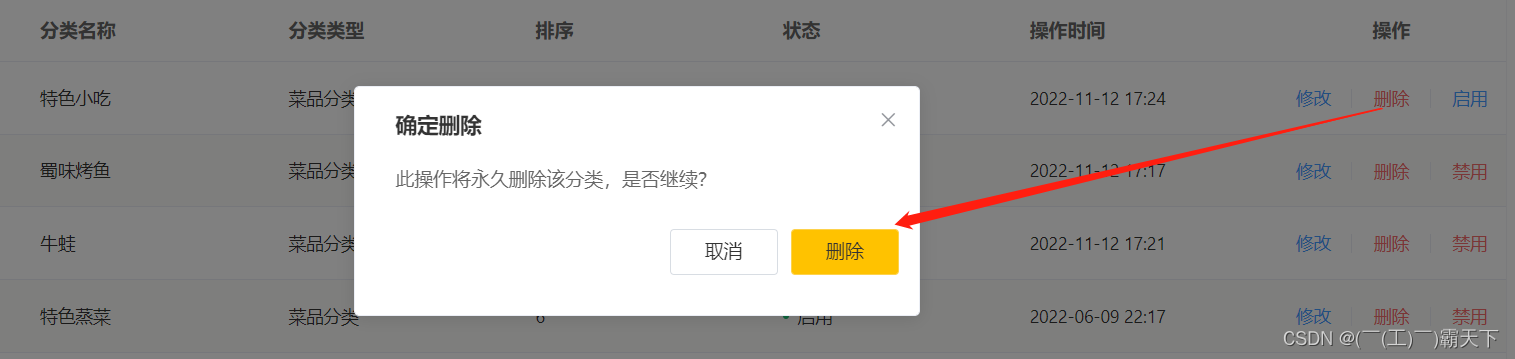
删除后,查询分类列表
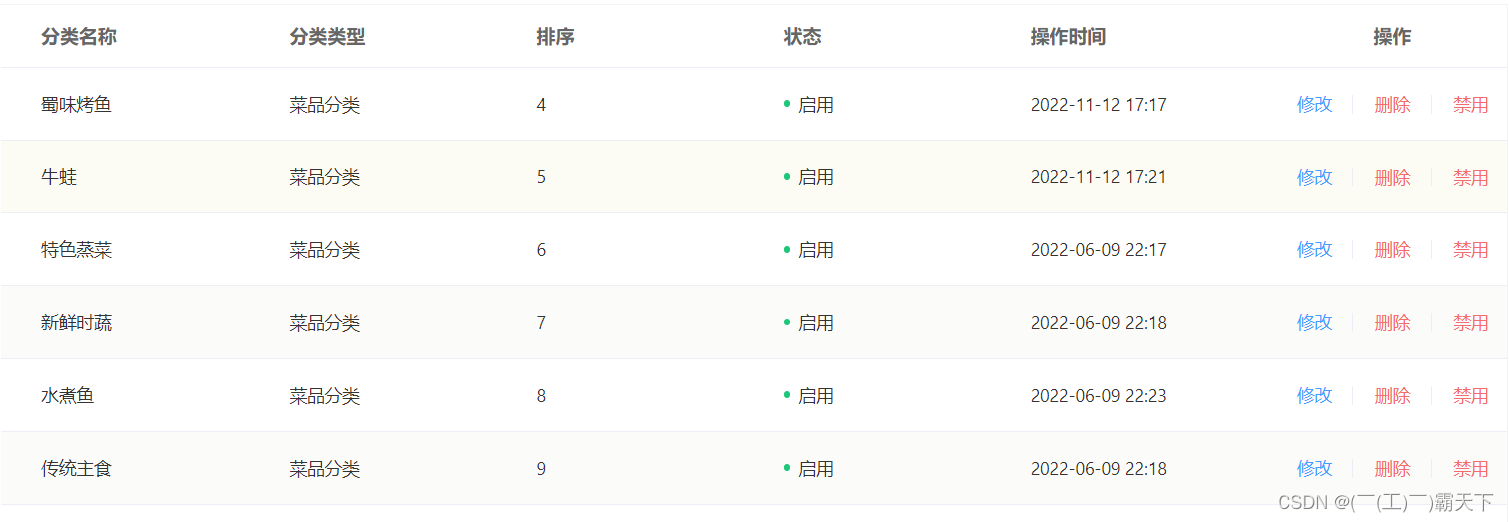
删除成功
5.4 代码提交
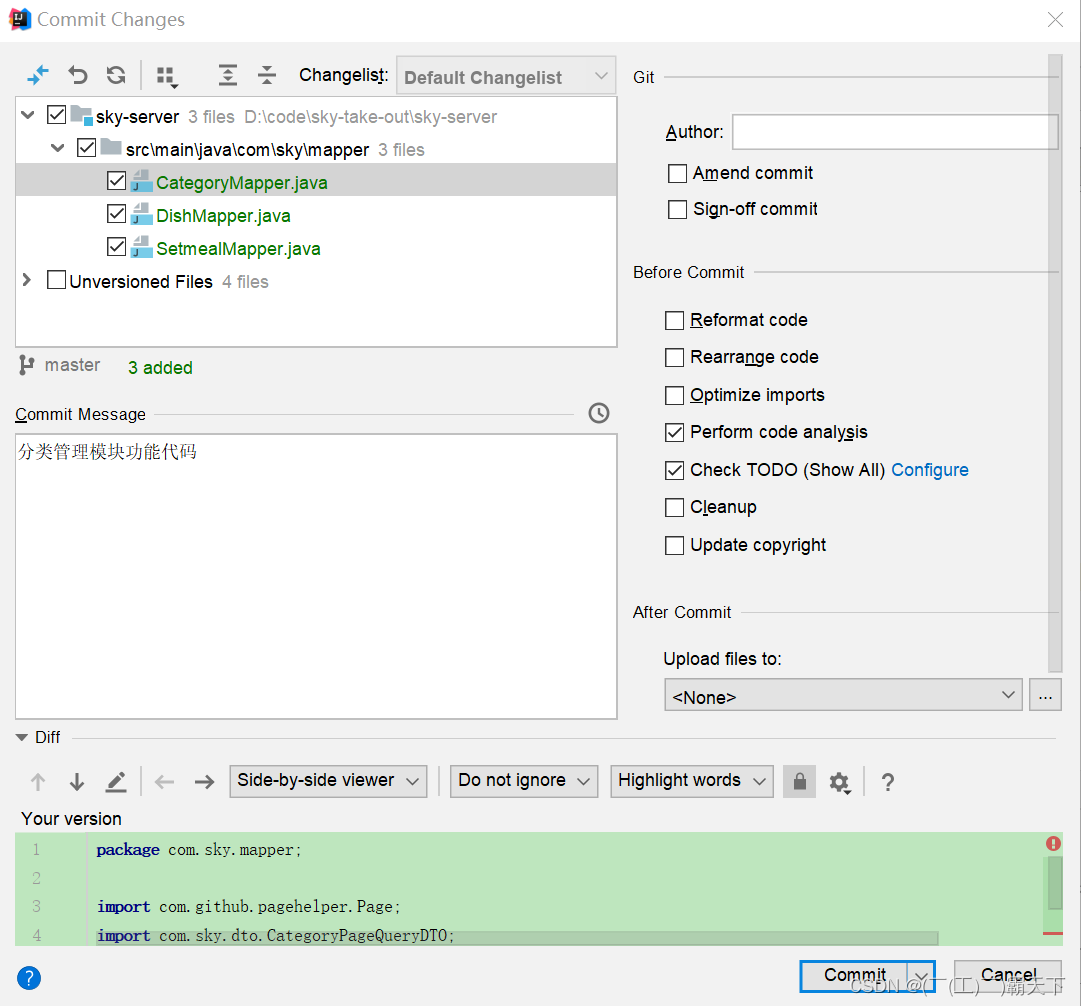
后续步骤和上述功能代码提交一致,不再赘述。
egoryDTO){
categoryService.update(categoryDTO);
return Result.success();
}/** * 启用、禁用分类 * @param status * @param id * @return */ @PostMapping("/status/{status}") @ApiOperation("启用禁用分类") public ResultstartOrStop(@PathVariable("status") Integer status, Long id){ categoryService.startOrStop(status,id); return Result.success(); } /** * 根据类型查询分类 * @param type * @return */ @GetMapping("/list") @ApiOperation("根据类型查询分类") public Result list = categoryService.list(type); return Result.success(list); } - 1
- 2
- 3
- 4
- 5
- 6
- 7
- 8
- 9
- 10
- 11
- 12
- 13
- 14
- 15
- 16
- 17
- 18
- 19
- 20
- 21
- 22
- 23
- 24
}
全部导入完毕后,进行编译
5.3 功能测试
重启服务,访问http://localhost:80,进入分类管理
分页查询:
分类类型:
启用禁用:
点击禁用
">修改:
回显
修改后
新增:
点击确定,查询列表
删除:
删除后,查询分类列表
删除成功
5.4 代码提交
后续步骤和上述功能代码提交一致,不再赘述。
-
相关阅读:
计算机毕业设计ssm+vue基本微信小程序的奶茶点单系统
ELK日志采集平台(四)---轻量级采集工具metricbeat
100天精通Golang(基础入门篇)——第22天:深入探讨Go中的‘type‘关键字
CTF入门学习笔记——Crypto密码(编码)
Djiango 模版系统详解(ORM数据模型-使用mysql数据库增删改查)
开发笔记:如何对【动态链接库】文件进行加密保护?
手把手教你用Python操纵Word自动编写离职报告
LVS+Keepalived高可用群集
vuex 中使用了modules,如何在页面中调用actions里面的方法
荧光染料FITC标记泛素Ubiquitin Rhodamine(Ub);FITC-Ub;Ub-FITC
- 原文地址:https://blog.csdn.net/m0_64378422/article/details/134019885

- 最新文章
-
【FHE】我们如何实现同态加密推理(八):SiLU 的密文化——两条路径,和一个 8 字节的开关
SQLcl 中 c/old/new 替换变量为何失效?先定位再替换
不让模型写作文,直接从它脑子里读答案:Jev 决策在 .NET 的两条路线
Halo插件:支持GitHub的图床附件策略
电视投屏界的“一股清流”!SimpleTVCast 6.0.0-beta 抢先体验:无需TV端App,界面大换血!✨
华三VXLAN集中式网关实战指南:Spine多活网关 + 双活接入(M-LAG)
软件更好写之后口碑会更重要
大 O、大 Omega、大 Theta 的区别,O(n) 复杂度是什么意思
Java标签跳转:一个鲜为人知但却很实用的小技巧
多智能体系统论文速读