-
SSM - Springboot - MyBatis-Plus 全栈体系(二十九)
第六章 SpringBoot
五、SpringBoot3 整合 MyBatis
1. MyBatis 整合步骤
- 导入依赖:在您的 Spring Boot 项目的构建文件(如 pom.xml)中添加 MyBatis 和数据库驱动的相关依赖。例如,如果使用 MySQL 数据库,您需要添加 MyBatis 和 MySQL 驱动的依赖。
- 配置数据源:在
application.properties或application.yml中配置数据库连接信息,包括数据库 URL、用户名、密码、mybatis 的功能配置等。 - 创建实体类:创建与数据库表对应的实体类。
- 创建 Mapper 接口:创建与数据库表交互的 Mapper 接口。
- 创建 Mapper 接口 SQL 实现: 可以使用 mapperxml 文件或者注解方式
- 创建程序启动类
- 注解扫描:在 Spring Boot 的主应用类上添加
@MapperScan注解,用于扫描和注册 Mapper 接口。 - 使用 Mapper 接口:在需要使用数据库操作的地方,通过依赖注入或直接实例化 Mapper 接口,并调用其中的方法进行数据库操作。
2. MyBatis 整合实践
2.1 创建项目
2.2 导入依赖
<parent> <groupId>org.springframework.bootgroupId> <artifactId>spring-boot-starter-parentartifactId> <version>3.0.5version> parent> <dependencies> <dependency> <groupId>org.springframework.bootgroupId> <artifactId>spring-boot-starter-webartifactId> dependency> <dependency> <groupId>org.mybatis.spring.bootgroupId> <artifactId>mybatis-spring-boot-starterartifactId> <version>3.0.1version> dependency> <dependency> <groupId>org.springframework.bootgroupId> <artifactId>spring-boot-starter-jdbcartifactId> dependency> <dependency> <groupId>com.alibabagroupId> <artifactId>druid-spring-boot-3-starterartifactId> <version>1.2.18version> dependency> <dependency> <groupId>mysqlgroupId> <artifactId>mysql-connector-javaartifactId> <version>8.0.28version> dependency> <dependency> <groupId>org.projectlombokgroupId> <artifactId>lombokartifactId> <version>1.18.28version> dependency> dependencies>- 1
- 2
- 3
- 4
- 5
- 6
- 7
- 8
- 9
- 10
- 11
- 12
- 13
- 14
- 15
- 16
- 17
- 18
- 19
- 20
- 21
- 22
- 23
- 24
- 25
- 26
- 27
- 28
- 29
- 30
- 31
- 32
- 33
- 34
- 35
- 36
- 37
- 38
- 39
- 40
- 41
- 42
- 43
- 44
- 45
2.3 配置文件
server: port: 80 servlet: context-path: / spring: datasource: type: com.alibaba.druid.pool.DruidDataSource druid: url: jdbc:mysql:///day01 username: root password: root driver-class-name: com.mysql.cj.jdbc.Driver mybatis: configuration: # setting配置 auto-mapping-behavior: full map-underscore-to-camel-case: true log-impl: org.apache.ibatis.logging.slf4j.Slf4jImpl type-aliases-package: com.alex.pojo # 配置别名 mapper-locations: classpath:/mapper/*.xml # mapperxml位置- 1
- 2
- 3
- 4
- 5
- 6
- 7
- 8
- 9
- 10
- 11
- 12
- 13
- 14
- 15
- 16
- 17
- 18
- 19
- 20
2.4 实体类准备
package com.alex.pojo; public class User { private String account ; private String password ; private Integer id ; public String getAccount() { return account; } public void setAccount(String account) { this.account = account; } public String getPassword() { return password; } public void setPassword(String password) { this.password = password; } public Integer getId() { return id; } public void setId(Integer id) { this.id = id; } @Override public String toString() { return "User{" + "account='" + account + '\'' + ", password='" + password + '\'' + ", id=" + id + '}'; } }- 1
- 2
- 3
- 4
- 5
- 6
- 7
- 8
- 9
- 10
- 11
- 12
- 13
- 14
- 15
- 16
- 17
- 18
- 19
- 20
- 21
- 22
- 23
- 24
- 25
- 26
- 27
- 28
- 29
- 30
- 31
- 32
- 33
- 34
- 35
- 36
- 37
- 38
- 39
- 40
2.5 Mapper 接口准备
public interface UserMapper { List<User> queryAll(); }- 1
- 2
- 3
- 4
2.6 Mapper 接口实现(XML)
- 位置:resources/mapper/UserMapper.xml
DOCTYPE mapper PUBLIC "-//mybatis.org//DTD Mapper 3.0//EN" "https://mybatis.org/dtd/mybatis-3-mapper.dtd"> <mapper namespace="com.alex.mapper.UserMapper"> <select id="queryAll" resultType="user"> select * from users select> mapper>- 1
- 2
- 3
- 4
- 5
- 6
- 7
- 8
- 9
- 10
- 11
- 12
2.7 编写三层架构代码
伪代码,不添加业务接口!
2.7.1 controller
@Slf4j @Controller @RequestMapping("/user") public class UserController { @Autowired private UserService userService; @GetMapping("/list") @ResponseBody public List<User> getUser(){ List<User> userList = userService.findList(); log.info("查询的user数据为:{}",userList); return userList; } }- 1
- 2
- 3
- 4
- 5
- 6
- 7
- 8
- 9
- 10
- 11
- 12
- 13
- 14
- 15
- 16
- 17
2.7.2 service
@Slf4j @Service public class UserService { @Autowired private UserMapper userMapper; public List<User> findList(){ List<User> users = userMapper.queryAll(); log.info("查询全部数据:{}",users); return users; } }- 1
- 2
- 3
- 4
- 5
- 6
- 7
- 8
- 9
- 10
- 11
- 12
- 13
2.8 启动类和接口扫描
@MapperScan("com.alex.mapper") //mapper接口扫描配置 @SpringBootApplication public class MainApplication { public static void main(String[] args) { SpringApplication.run(MainApplication.class,args); } }- 1
- 2
- 3
- 4
- 5
- 6
- 7
- 8
2.9 启动测试
3. 声明式事务整合配置
- 依赖导入
<dependency> <groupId>org.springframework.bootgroupId> <artifactId>spring-boot-starter-jdbcartifactId> dependency>- 1
- 2
- 3
- 4
- 注:SpringBoot 项目会自动配置一个 DataSourceTransactionManager,所以我们只需在方法(或者类)加上 @Transactional 注解,就自动纳入 Spring 的事务管理了。
@Transactional public void update(){ User user = new User(); user.setId(1); user.setPassword("test2"); user.setAccount("test2"); userMapper.update(user); }- 1
- 2
- 3
- 4
- 5
- 6
- 7
- 8
4. AOP 整合配置
- 依赖导入
<dependency> <groupId>org.springframework.bootgroupId> <artifactId>spring-boot-starter-aopartifactId> dependency>- 1
- 2
- 3
- 4
- 直接使用 aop 注解即可:
@Component @Aspect public class LogAdvice { @Before("execution(* com..service.*.*(..))") public void before(JoinPoint joinPoint){ System.out.println("LogAdvice.before"); System.out.println("joinPoint = " + joinPoint); } }- 1
- 2
- 3
- 4
- 5
- 6
- 7
- 8
- 9
- 10
- 11
六、SpringBoot3 项目打包和运行
1. 添加打包插件
在 Spring Boot 项目中添加 spring-boot-maven-plugin 插件是为了支持将项目打包成可执行的可运行 jar 包。如果不添加 spring-boot-maven-plugin 插件配置,使用常规的 java -jar 命令来运行打包后的 Spring Boot 项目是无法找到应用程序的入口点,因此导致无法运行。
<build> <plugins> <plugin> <groupId>org.springframework.bootgroupId> <artifactId>spring-boot-maven-pluginartifactId> plugin> plugins> build>- 1
- 2
- 3
- 4
- 5
- 6
- 7
- 8
- 9
2. 执行打包
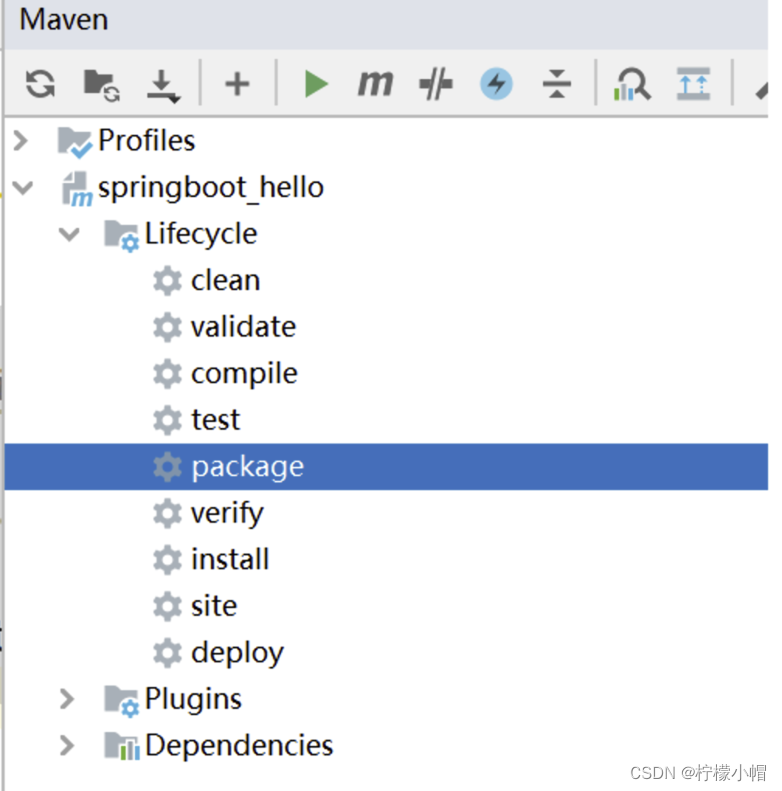
- 在 idea 点击 package 进行打包
- 可以在编译的 target 文件中查看 jar 包

3. 命令启动和参数说明
java -jar命令用于在 Java 环境中执行可执行的 JAR 文件。下面是关于java -jar命令的说明:
命令格式:java -jar [选项] [参数] <jar文件名>- 1
-D:设置系统属性,可以通过= System.getProperty()方法在应用程序中获取该属性值。例如:java -jar -Dserver.port=8080 myapp.jar。-X:设置 JVM 参数,例如内存大小、垃圾回收策略等。常用的选项包括:-Xmx:设置 JVM 的最大堆内存大小,例如-Xmx512m表示设置最大堆内存为 512MB。-Xms:设置 JVM 的初始堆内存大小,例如-Xms256m表示设置初始堆内存为 256MB。
-Dspring.profiles.active=:指定 Spring Boot 的激活配置文件,可以通过application-或.properties application-文件来加载相应的配置。例如:.yml java -jar -Dspring.profiles.active=dev myapp.jar。- 启动和测试:

- 注意: -D 参数必须要在 jar 之前!否则不生效!
-
相关阅读:
Vitalik:不同类型的 ZK-EVM
网络编程--sockaddr 与 sockaddr_in
LeetCode第206题—反转链表
Java工具——Eclipse设置字体大小
【ARM】(1)架构简介
使用 Core Tools 在本地开发 Azure Functions
一文讲透支付宝沙箱的基本应用
git常见命令和操作
卸载MySQL提示MySQL for Visual Studio 1.2.10时指定的用户已存在解决办法
Windows 构建 Acid Game Engine 的坑
- 原文地址:https://blog.csdn.net/sgsgkxkx/article/details/133863972
