-
Vue-3.0路由
生活中的路由:设备和ip的映射关系
路由就是一种映射关系
Vue中路由:路径和组件的映射关系,根据路由就能知道不同路径的,应该匹配渲染哪个组件
VueRouter的介绍
作用:修改地址栏路径时,切换显示匹配的组件
说明:Vue官方的一个路由插件,是一个第三方包
官网:https://v3.router.vuejs.org/zh/
VueRouter的使用(5+2)
5个基础步骤(固定)
1)下载:下载VueRouter模块到当前工程,版本3.6.5
Vue2->VueRouter3.x Vuex3.x
Vue3->VueRouter4.x Vuex4.x
在终端中输入
yarn add vue-router@3.6.5
2)引入
import VueRouter from 'vue-router'3)安装注册
Vue.use(VueRouter)//VueRouter插件初始化4)创建路由对象
const router=new VueRouter()5)注入,将路由对象注入到new Vue实例中,建立关联
- new Vue({
- render:h=>h(App),
- router
- }).$mount('#app')


2个核心步骤
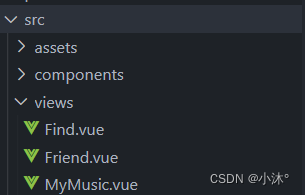
1)在src文件夹下创建需要的组件(views目录),配置路由规则
views视图

错误信息:

错误原因:文件名称单一
解决方式:在组件文件中重命名name,或者本身就把文件名写成多单词命名
- export default {
- name: "MyFriend",
- };
在main.js中配置
- import Find from './views/Find.vue'
- import MyMusic from './views/MyMusic.vue'
- import Friend from './views/Friend.vue'
- Vue.use(VueRouter)
- const router = new VueRouter({
- routes: [
- { path: '/find', component: Find },
- { path: '/mymusic', component: MyMusic },
- { path: '/friend', component: Friend }
- ]
- })
2)配置导航,配置路由出口(路径匹配的组件显示的位置)
- <div class="footer_wrap">
- <a href="#/find">发现音乐</a>
- <a href="#/mymusic">我的音乐</a>
- <a href="#/friend">朋友</a>
- </div>
- <div class="top">
- <router-view></router-view>//页面切换的位置
- </div>
组件存放目录问题(组件分类)
组件分类:.vue文件分2类;页面组件&复用组件
分类开来更易维护
1)src/views文件夹:页面组件-页面展示-配合路由使用
2)src/components文件夹:复用组件-展示数据-常用于复用
路由的封装抽离
目标:将路由模块抽离出来。
好处:拆分模块,利于维护

在index.js中除了router相关转移过去的,还要加入以下代码。
首先导入vue
import Vue from 'vue'然后在文件结尾加上
export default router
注意最后要修改组件路径
可以写绝对路径,@标识符指代src目录,从src目录出发找组件,例如'@/views/Find.vue'。
声明式导航
声明式导航就是router-link,使用router-link替代a标签实现高亮
导航链接
需求:实现导航高亮效果
vue-router提供了一个全局组件router-link(取代a标签)
1)能跳转,配置to属性指定路径(必须)。本质还是a标签,to无需#
2)能高亮,默认就会提供高亮类名,可以直接设置高亮样式
- <div class="footer_wrap">
- <router-link to="/find">发现音乐</router-link>
- <router-link to="/mymusic">我的音乐</router-link>
- <router-link to="/friend">朋友</router-link>
- </div>
在css文件中,加入如下代码,可以实现选中高亮
- a.router-link-active {
- background-color: purple;
- }

高亮使用router-link-active

跳转传参
目标:在跳转路由时,进行传值
1.查询参数传参(比较适合传多个参数)
1)语法:to="/path?参数名=值&参数名2=值"
2)对应页面组件接收传递过来的值$route.query.参数名
在created中,使用this.$route.query.参数名获取
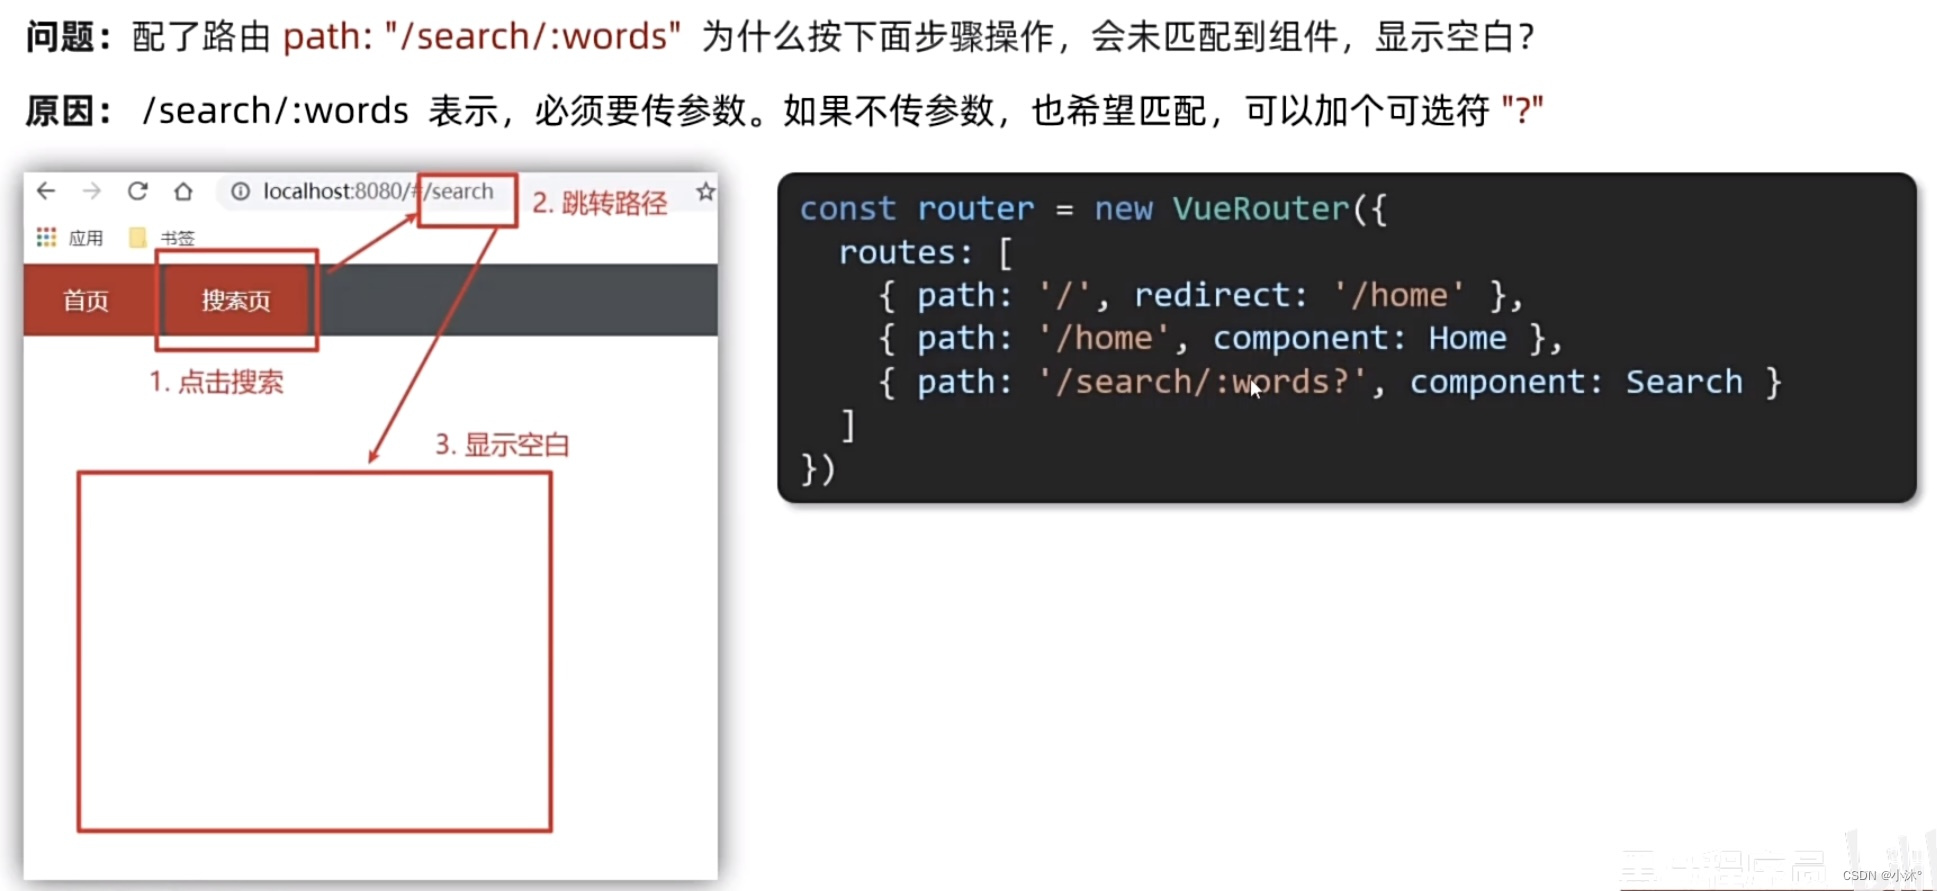
2.动态路由传参(优雅简洁,传单个参数比较方便)
1)配置动态路由
- const router = new VueRouter({
- routes: [
- ...,
- { path: '/search/:参数名', component: Search }
- ]
- })
2)配置导航链接
to="/path/参数值"
3)对应页面组件接收传递过来的值
$route.params.参数名
在created中,使用this.$route.params.参数名获取

路由重定向
问题:网页打开,url默认是/路径,未匹配到组件时,会出现空白
说明:重定向->匹配path后,强制跳转path路径
语法:{path:匹配路径,redirect:重定向到的路径}
- const router = new VueRouter({
- routes: [
- { path: '/',redirect:'/home'},
- { path: '/mymusic', component: MyMusic },
- { path: '/friend', component: Friend }
- ]
- })
路由404
作用:当路径找不到匹配时,给个提示页面
位置:配在路由最后
语法:path:"*"(任意路径)-前面不匹配就命中最后一个
先在views文件夹下创建NotFind组件
- import NotFind from '@/views/NotFind'
- const router = new VueRouter({
- routes: [
- { path: '/',redirect:'/home'},
- { path: '/mymusic', component: MyMusic },
- { path: '/friend', component: Friend },
- { path: '*', component: NotFind }
- ]
- })
路由模式设置
问题:路由的路径看起来不自然,有#,能否切成真正路径形式?
hash路由(默认)例如:http://localhost:8080/#/home
history路由(常用)例如:http://localhost:8080/home(以后上线需要服务器端支持)
- const router=new VueRouter({
- routes,
- mode:"history"
- })
采用了history模式,地址栏就没有#,需要后台配置访问规则
编程式导航
编程式导航:用JS代码来进行跳转
基本跳转
两种语法:
1)path路径跳转(简易方便)
- this.$router.push('路由路径')
- this.$router.push({
- path:'路由路径'
- })
2)name命名路由跳转(适合path路径长的场景)
- this.$router.push({
- name:'路由名'
- })
- {name:'路由名',path:'/path/xxx',component:xxx}//在index.js文件VueRouter中添加
路由传参
两种传参方式:查询参数+动态路由传参
两种跳转方式,对于两种传参方式都支持:
1)path路径跳转传参
query查询参数:
- this.$router.push('/路径?参数名1=参数值1&参数名2=参数值2')
- 或
- this.$router.push({
- path:'/路径',
- query:{
- 参数名1:'参数值1',
- 参数名2:'参数值2'
- }
- })
$route.query.参数名//接收参数动态路由参数:
路由:
- const router = new VueRouter({
- mode:'history',
- routes: [
- ...,
- { name:'search', path: '/search/:参数名?', component: Search }
- ]
- })
- this.$router.push('/路径/参数值')
- 或
- this.$router.push({
- path:'/路径/参数值'
- })
$route.params.参数名//接收参数2)name命名路由跳转传参
query查询参数:
- this.$router.push({
- name:'路由名字',
- query:{
- 参数名1:'参数值1',
- 参数名2:'参数值2'
- }
- })
$route.query.参数名//接收参数动态路由参数:
路由:
- const router = new VueRouter({
- mode:'history',
- routes: [
- ...,
- { name:'search', path: '/search/:参数名?', component: Search }
- ]
- })
- this.$router.push({
- name:'路由名字',
- params:{
- 参数名:'参数值'
- }
- })
$route.params.参数名//接收参数一级路由
但凡是单个页面,独立展示的,都是一级路由

router中导入时,如果是index.vue直接写到文件夹名即可,会自动导入到index.vue
import Login from '@/views/login'二级路由
通过children配置项,可以配置嵌套子路由
1.在children配置项中,配规则
- const router = new VueRouter({
- routes: [
- {
- path: '/',
- component:Layout,
- //通过children配置项,可以配置嵌套子路由
- children:[
- {
- path: '/article',
- component:Article,
- }
- ]
- }
- ]
- })
2.准备二级路由出口,在父页面中添加
<router-view></router-view>页面空白的话,要用redirect重定向
页面返回
- @click="$router.back()"
- @click="$router.go(-1)"
全局前置导航守卫
所有的路由一旦被匹配到,都会先经过全局前置守卫;只有全局前置守卫放行,才会真正解析渲染组件,才能看到页面内容

官方资料:导航守卫 | Vue Router
fullPath
在this.$route中,path只是路径部分,fullPath是完整的地址。


- this.$route.fullpath//获取完整路径(包括参数)
- this.$route.path//获取路径(不包括参数)
replace
this.$router.replace可以用来替换当前的路由,它不会向history添加新记录,而是替换掉当前的history记录
this.$route.replace(路径) -
相关阅读:
CORS 跨域访问, 实现跨域的原理, CORS漏洞利用
ES6——类以及模块化管理
Docker学习(3)—— 将容器转化为新的镜像,并将新镜像发布到阿里云公共仓库或私有仓库
企业内业务系统与Activiti流程引擎的结合(十二)
性能测试 —— 吞吐量和并发量的关系? 有什么区别?
SSH远程登录时常见问题解决
C++多态
SpringSecurity---Remember Me
vue移动端适配方案:amfe-flexible和postcss-pxtorem插件结合
Vue3+TypeScript学习
- 原文地址:https://blog.csdn.net/weixin_46479909/article/details/133824747