-
DS线性表之链表
前言
我们上一期介绍了顺序表,它的底层就是数组,我们也分别对顺序表的动态版本和静态版本进行了实现!并且分析了顺序表的优缺点,优点是:尾插、尾删效率很高,其时间复杂度是O(1);缺点是:在头部插入、删除的时候效率低,其时间复杂度是O(N);而且即使是动态版本的扩容也是会浪费空间的(这里在动态内存管理介绍realloc时专门介绍过)!!这个上期的最后也介绍了!我们想有没有一种数据结构,用一个添加一个,做到最起码的空间不浪费呢?答案是:有的~!他就是我们本期介绍的链表!
本期内容介绍
什么是链表
链表的分类
单链表的实现(不带头)
单链表的实现(带头)
带头双向循环链表的实现
链表和顺序表的区别
目录
一、什么是链表
链表是一种物理存储结构上非连续(非顺序存储的结构),逻辑结构上连续的一种存储数据的结构!它的逻辑连续是由他里面的指针实现的~!
我们在结构体那一期介绍过一个东西叫结构体的自引用,他实质上就是链表的声明!OK,我们来个栗子回忆一下:
- struct Node
- {
- int data;
- struct Node* next;
- };

这就是一个链表的申明,也就是结构体的自引用~!他这里一般把data叫做数据域,next叫做指针域!链表的指针域是指向下一个同类型的节点~!什么意思呢?我们再来画个图理解一下:

这个图是不是很清楚的反映了上了上面的所有的点,物理结构非连续的(因为是malloc的节点在堆上,它的内存时操作系统随机分配的可能是连续的但大概率是不连续的),他们每个节点的地址都不连续,逻辑结构连续是因为当前节点的next存的是下一个节点的地址,这样只要第一个节点的地址就可以访问链表的所有节点了~!
这就和火车一样一节连一节:

二、链表的分类
链表的结构有8种,是否带头节点,单双向,是否循环~的组合结果!

在这里我们先介绍不带头的单链表,再介绍带头的单链表,最后在实现链表中最优秀的结构---》带头双向循环链表!这三种如果熟练掌握其他就都是小卡拉米~!OK,我们还是画一下,认识一下:
不带头:


带头:


这就是链表的8种结构的图!其实常见的或常用的就两种无头单链表和双向循环链表!但单链表不会单独做什么存储工作,他会配合其他的去实现更高阶的数据结构例如就是实现哈希桶和图的邻接表等;
而双向循环链表是会单独存储数据的,例如你每天刷的抖音是不是有访客呀~!它实际上底层就是双向循环链表,每次来一个方可头插一个,若一个人多次访问你的主页,也不过是改一下指针的事~!
三、单链表的实现(不带头)
OK,我们还是和往期一样采用多文件编程,申明等都放在.h文件里, 实现放在.c的文件, 测试在test.c中。
一开始我们得先声明一下链表的每个节点的类型吧!
链表节点类型申明
- typedef int SLDataType;
- typedef struct SListNode
- {
- SLDataType data;
- struct SListNode* next;
- }SListNode;
动态申请一个节点
这里由于是不带头的所以就不用初始化的,链表是1个或多个节点组成的,我们只要在申请的时候处理好它的next就OK!我们把next 一开始申请成功后置为NULL,这样即使是最后一个也不用单独处理为NULL了!
- //动态申请一个节点
- SListNode* BuySListNode(SLDataType x)
- {
- SListNode* newnode = (SListNode*)malloc (sizeof(SListNode));
- if (newnode == NULL)
- {
- perror("malloc failed");
- exit(-1);
- }
- newnode->data = x;
- newnode->next = NULL;
- return newnode;
- }
链表的打印
- //打印链表
- void SListPrint(SListNode* head)
- {
- SListNode* cur = head;
- while (cur)
- {
- printf("%d->", cur->data);
- cur = cur->next;
- }
- printf("NULL\n");
- }
链表的销毁
为了使程序的健壮性更高,以及防止程序出现内存泄漏,我们要在操作完链表后记得销毁~!
这里从头开始,把每一个节点free即可,但这里由于是不带头的,所以得用二级指针!!!这里head本质是形参,改变形参不改变实参,要改变形参影响实参,我们得传实参的地址!
最后free完了记得把头置空!否则就是野指针!
- //单链表的销毁
- void SListDestory(SListNode** head)
- {
- assert(head);
- SListNode* cur = *head;
- while (cur)
- {
- SListNode* next = cur->next;
- free(cur);
- cur = next;
- }
- *head = NULL;
- }
单链表尾插
这里我们先来个硬菜不带头节点的单链表的尾插!这里还是得用二级指针,因为一开始如果链表为空第一个插入的就得是头,head就得指向他,所以改变指针的指向要用二级指针。这里head是二级指针,即使外面的链表为空他也不可能为空,因此断言一下!然后新开一个节点,判断是否是第一个插入。如果是,直接让head指向他,否则找到尾节点后插入即可~!
- //尾插
- void SListPushBack(SListNode** head, SLDataType x)
- {
- assert(head);
- SListNode* node = BuySListNode(x);
- if (*head == NULL)
- {
- *head = node;
- }
- else
- {
- SListNode* cur = *head;
- while (cur->next)
- {
- cur = cur->next;
- }
- cur->next = node;
- }
- }
单链表尾删
删除这里一开始想到的就是判断当前链表是否为空!如果为空了就不要删了,判断的方式还是和以前一样,“温柔型”和“暴力型”,小编就比较喜欢暴力型~!然后这里也要考虑删完的情况,也即是head的处理,如果把最后一个节点都删了就把head置为空,而这里的head是形参,要改变它得用它的指针也即是二级~!
- //尾删
- void SListPopBack(SListNode** head)
- {
- assert(head);
- assert(*head);//没有节点可删
- if ((*head)->next == NULL)
- {
- free(*head);
- *head = NULL;
- }
- else
- {
- SListNode* cur = *head;
- while (cur->next->next)
- {
- cur = cur->next;
- }
- free(cur->next);
- cur->next = NULL;
- }
- }
当然这里常规的删除还有一种写法,即快慢指针法:用个prv前驱指针记录它的前面的一个节点。当cur->next不等于NULL时把cur赋值给prv,当cur->next为空时free掉cur,prv->next 置空即可!
- //尾删
- void SListPopBack(SListNode** head)
- {
- assert(head);
- assert(*head);//没有节点可删
- if ((*head)->next == NULL)
- {
- free(*head);
- *head = NULL;
- }
- else
- {
- /*SListNode* cur = *head;
- while (cur->next->next)
- {
- cur = cur->next;
- }
- free(cur->next);
- cur->next = NULL;*/
- SListNode* cur = *head;
- SListNode* prv = NULL;
- while (cur->next)
- {
- prv = cur;
- cur = cur->next;
- }
- free(cur);
- prv->next = NULL;
- }
- }
OK,我们还是养成好习惯写点测试一点:
- void testBack()
- {
- SListNode* s = NULL;//这里不置空就是野指针,会直接奔溃掉
- SListPushBack(&s, 1);
- SListPushBack(&s, 2);
- SListPushBack(&s, 3);
- SListPushBack(&s, 4);
- SListPushBack(&s, 5);
- SListPrint(s);
- SListPopBack(&s);
- SListPrint(s);
- SListPopBack(&s);
- SListPrint(s);
- SListPopBack(&s);
- SListPrint(s);
- SListPopBack(&s);
- SListPrint(s);
- SListPopBack(&s);
- SListPrint(s);
- //SListPopBack(&s);//测试尾删是否有Bug
- //SListPrint(s);
- SListDestory(&s);
- }

OK,尾插尾删没有问题!我们下来在来搞一下头插头删!
单链表头插
头插相对简单,新开的节点next连接head在让head指向新节点。但是还时要注意,一开始为空链表的情况,所以得用二级指针搞~!
- //头插
- void SListPushFront(SListNode** head, SLDataType x)
- {
- assert(head);
- SListNode* node = BuySListNode(x);
- if (*head == NULL)
- {
- *head = node;
- }
- else
- {
- node->next = *head;
- *head = node;
- }
- }
单链表头删
这里删除首先要注意为空的情况,其次只有一个节点的情况,删掉这一个节点把head置空,这里也要改变head的值所以要用二级指针。正常删除就是保存当前节点的下一个节点,free当前节点在把刚保存的下一个节点赋值给当前节点~!
- //头删
- void SListPopFront(SListNode** head)
- {
- assert(head);
- assert(*head);//没有节点可删
- if ((*head)->next == NULL)
- {
- free(*head);
- *head = NULL;
- }
- else
- {
- SListNode* tail = (*head)->next;
- free(*head);
- *head = tail;
- }
- }
OK,还是来测试一下:
- void testFront()
- {
- SListNode* s = NULL;
- SListPushFront(&s, 1);
- SListPushFront(&s, 2);
- SListPushFront(&s, 3);
- SListPushFront(&s, 4);
- SListPushFront(&s, 5);
- SListPrint(s);
- SListPopFront(&s);
- SListPrint(s);
- SListPopFront(&s);
- SListPrint(s);
- SListPopFront(&s);
- SListPrint(s);
- SListPopFront(&s);
- SListPrint(s);
- SListPopFront(&s);
- SListPrint(s);
- //SListPopFront(&s);//测试头删是是否有Bug
- //SListPrint(s);
- SListDestory(&s);
- }

OK,没有问题,我们在来实现一下查找和在pos前插入和pos后插入!
单链表查找
这里就很简单了,找到了返回该节点的地址,否则返回NULL即可!这里仅仅是查找不改变内容所以一级指针即可!
- //单链表的查找
- SListNode* SListFind(SListNode* head, SLDataType x)
- {
- SListNode* cur = head;
- while (cur)
- {
- if (x == cur->data)
- return cur;
- cur = cur->next;
- }
- return NULL;
- }
在pos前插入x
这里是在pos位置前插入一个x,有两种写法。这里也得注意第一个插入的情况!所以得用二级指针!第一种是直接手动实现没有借助一点外力,第二种调用了头插解决第一次插入的情况~!而且注意的是第一种你必须加break插入后跳出否则就是死循环,第二种改变不用担心这种情况~!
- //在pos位置前插入
- void SListInsert(SListNode** head, SListNode* pos, SLDataType x)
- {
- assert(head);
- assert(pos);
- SListNode* node = BuySListNode(x);
- if (*head == NULL)
- {
- node->next = *head;
- *head = node;
- }
- else
- {
- SListNode* cur = *head;
- while (cur)
- {
- if (cur->next == pos)
- {
- node->next = pos;
- cur->next = node;
- break;
- }
- cur = cur->next;
- }
- }
- }
- //在pos位置前插入
- void SListInsert(SListNode** head, SListNode* pos, SLDataType x)
- {
- assert(head);
- assert(pos);
- if (*head == NULL)
- {
- SListPushFront(head, x);
- }
- else
- {
- SListNode* cur = *head;
- while (cur->next != pos)
- {
- cur = cur->next;
- }
- SListNode* node = BuySListNode(x);
- node->next = pos;
- cur->next = node;
- }
- }
在pos后插入x
这个接口就更简单了,只需要让pos->next 连接到node->next然后再让pos->next 链接上node即可~!也不用担心pos->next 为空的情况!
- //在pos位置后插入
- void SListInsertAfter(SListNode* pos, SLDataType x)
- {
- assert(pos);
- SListNode* node = BuySListNode(x);
- node->next = pos->next;
- pos->next = node;
- }
OK,还是来测试一下:
- testInsert()
- {
- SListNode* s = NULL;
- SListPushFront(&s, 1);
- SListPushFront(&s, 2);
- SListPushFront(&s, 3);
- SListPushFront(&s, 4);
- SListPushFront(&s, 5);
- SListPrint(s);
- SListInsert(&s, SListFind(s, 1), 10);
- SListPrint(s);
- SListInsert(&s, SListFind(s, 1), 100);
- SListPrint(s);
- SListInsertAfter(SListFind(s, 4), 40);
- SListPrint(s);
- SListDestory(&s);
- }

OK,没有问题,我们在来实现一下删除pos位置和删除pos位置的后一个节点~!
删除pos位置
这个接口就是当头和pos相同时,可以直接调用头删不用自己多判断。否则就遍历找pos然后删除~~!
- //删除pos位置
- void SListErase(SListNode** head, SListNode* pos)
- {
- assert(head);
- assert(*head);//空了就不要删了
- assert(pos);
- if (*head == pos)
- {
- SListPopFront(head);
- }
- else
- {
- SListNode* cur = *head;
- while (cur->next != pos)
- {
- cur = cur->next;
- }
- cur->next = pos->next;
- free(pos);
- }
- }
删除pos位置的下一个
这个得保证有pos和有pos的下一个,然后保存pos的下一个,pos的next 连接上pos->next->next 然后删掉保存的pos的下一个即可~!
- //删除pos后一个位置
- void SListEraseAfter(SListNode* pos)
- {
- assert(pos);
- assert(pos->next);
- SListNode* Pnext = pos->next;
- pos->next = Pnext->next;
- free(Pnext);
- }
OK,测试一下:
- void testErase()
- {
- SListNode* s = NULL;//这里不置空就是野指针,会直接奔溃掉
- SListPushBack(&s, 1);
- SListPushBack(&s, 2);
- SListPushBack(&s, 3);
- SListPushBack(&s, 4);
- SListPushBack(&s, 5);
- SListPrint(s);
- SListErase(&s, SListFind(s, 1));
- SListPrint(s);
- SListErase(&s, SListFind(s, 2));
- SListPrint(s);
- SListEraseAfter(SListFind(s, 3));
- SListPrint(s);
- SListDestory(&s);
- }

OK,没有问题~!
全部源码:
- #pragma once
- #include
- #include
- #include
- typedef int SLDataType;
- typedef struct SListNode
- {
- SLDataType data;
- struct SListNode* next;
- }SListNode;
- //动态申请一个节点
- SListNode* BuySListNode(SLDataType x);
- //打印链表
- void SListPrint(SListNode* head);
- //单链表的销毁
- void SListDestory(SListNode** head);
- //尾插
- void SListPushBack(SListNode** head, SLDataType x);
- //尾删
- void SListPopBack(SListNode** head);
- //头插
- void SListPushFront(SListNode** head, SLDataType x);
- //头删
- void SListPopFront(SListNode** head);
- //单链表的查找
- SListNode* SListFind(SListNode* head, SLDataType x);
- //在pos位置前插入
- void SListInsert(SListNode** head, SListNode* pos, SLDataType x);
- //在pos位置后插入
- void SListInsertAfter(SListNode* pos, SLDataType x);
- //删除pos位置
- void SListErase(SListNode** head, SListNode* pos);
- //删除pos后一个位置
- void SListEraseAfter(SListNode* pos);
- #include "SListNode.h"
- //动态申请一个节点
- SListNode* BuySListNode(SLDataType x)
- {
- SListNode* newnode = (SListNode*)malloc (sizeof(SListNode));
- if (newnode == NULL)
- {
- perror("malloc failed");
- exit(-1);
- }
- newnode->data = x;
- newnode->next = NULL;
- return newnode;
- }
- //打印链表
- void SListPrint(SListNode* head)
- {
- SListNode* cur = head;
- while (cur)
- {
- printf("%d->", cur->data);
- cur = cur->next;
- }
- printf("NULL\n");
- }
- //单链表的销毁
- void SListDestory(SListNode** head)
- {
- assert(head);
- SListNode* cur = *head;
- while (cur)
- {
- SListNode* next = cur->next;
- free(cur);
- cur = next;
- }
- *head = NULL;
- }
- //尾插
- void SListPushBack(SListNode** head, SLDataType x)
- {
- assert(head);
- SListNode* node = BuySListNode(x);
- if (*head == NULL)
- {
- *head = node;
- }
- else
- {
- SListNode* cur = *head;
- while (cur->next)
- {
- cur = cur->next;
- }
- cur->next = node;
- }
- }
- //尾删
- void SListPopBack(SListNode** head)
- {
- assert(head);
- assert(*head);//没有节点可删
- if ((*head)->next == NULL)
- {
- free(*head);
- *head = NULL;
- }
- else
- {
- /*SListNode* cur = *head;
- while (cur->next->next)
- {
- cur = cur->next;
- }
- free(cur->next);
- cur->next = NULL;*/
- SListNode* cur = *head;
- SListNode* prv = NULL;
- while (cur->next)
- {
- prv = cur;
- cur = cur->next;
- }
- free(cur);
- prv->next = NULL;
- }
- }
- //头插
- void SListPushFront(SListNode** head, SLDataType x)
- {
- assert(head);
- SListNode* node = BuySListNode(x);
- if (*head == NULL)
- {
- *head = node;
- }
- else
- {
- node->next = *head;
- *head = node;
- }
- }
- //头删
- void SListPopFront(SListNode** head)
- {
- assert(head);
- assert(*head);//没有节点可删
- if ((*head)->next == NULL)
- {
- free(*head);
- *head = NULL;
- }
- else
- {
- SListNode* tail = (*head)->next;
- free(*head);
- *head = tail;
- }
- }
- //单链表的查找
- SListNode* SListFind(SListNode* head, SLDataType x)
- {
- SListNode* cur = head;
- while (cur)
- {
- if (x == cur->data)
- return cur;
- cur = cur->next;
- }
- return NULL;
- }
- //在pos位置前插入
- void SListInsert(SListNode** head, SListNode* pos, SLDataType x)
- {
- assert(head);
- assert(pos);
- SListNode* node = BuySListNode(x);
- if (*head == NULL)
- {
- node->next = *head;
- *head = node;
- }
- else
- {
- SListNode* cur = *head;
- while (cur)
- {
- if (cur->next == pos)
- {
- node->next = pos;
- cur->next = node;
- break;
- }
- cur = cur->next;
- }
- }
- }
- //在pos位置后插入
- void SListInsertAfter(SListNode* pos, SLDataType x)
- {
- assert(pos);
- SListNode* node = BuySListNode(x);
- node->next = pos->next;
- pos->next = node;
- }
- //删除pos位置
- void SListErase(SListNode** head, SListNode* pos)
- {
- assert(head);
- assert(*head);//空了就不要删了
- assert(pos);
- if (*head == pos)
- {
- SListPopFront(head);
- }
- else
- {
- SListNode* cur = *head;
- while (cur->next != pos)
- {
- cur = cur->next;
- }
- cur->next = pos->next;
- free(pos);
- }
- }
- //删除pos后一个位置
- void SListEraseAfter(SListNode* pos)
- {
- assert(pos);
- assert(pos->next);
- SListNode* Pnext = pos->next;
- pos->next = Pnext->next;
- free(Pnext);
- }
- #include "SListNode.h"
- void testBack()
- {
- SListNode* s = NULL;//这里不置空就是野指针,会直接奔溃掉
- SListPushBack(&s, 1);
- SListPushBack(&s, 2);
- SListPushBack(&s, 3);
- SListPushBack(&s, 4);
- SListPushBack(&s, 5);
- SListPrint(s);
- SListPopBack(&s);
- SListPrint(s);
- SListPopBack(&s);
- SListPrint(s);
- SListPopBack(&s);
- SListPrint(s);
- SListPopBack(&s);
- SListPrint(s);
- SListPopBack(&s);
- SListPrint(s);
- //SListPopBack(&s);//测试尾删是否有Bug
- //SListPrint(s);
- SListDestory(&s);
- }
- void testFront()
- {
- SListNode* s = NULL;
- SListPushFront(&s, 1);
- SListPushFront(&s, 2);
- SListPushFront(&s, 3);
- SListPushFront(&s, 4);
- SListPushFront(&s, 5);
- SListPrint(s);
- SListPopFront(&s);
- SListPrint(s);
- SListPopFront(&s);
- SListPrint(s);
- SListPopFront(&s);
- SListPrint(s);
- SListPopFront(&s);
- SListPrint(s);
- SListPopFront(&s);
- SListPrint(s);
- //SListPopFront(&s);//测试头删是是否有Bug
- //SListPrint(s);
- SListDestory(&s);
- }
- testInsert()
- {
- SListNode* s = NULL;
- SListPushFront(&s, 1);
- SListPushFront(&s, 2);
- SListPushFront(&s, 3);
- SListPushFront(&s, 4);
- SListPushFront(&s, 5);
- SListPrint(s);
- SListInsert(&s, SListFind(s, 1), 10);
- SListPrint(s);
- SListInsert(&s, SListFind(s, 1), 100);
- SListPrint(s);
- SListInsertAfter(SListFind(s, 4), 40);
- SListPrint(s);
- SListDestory(&s);
- }
- void testErase()
- {
- SListNode* s = NULL;//这里不置空就是野指针,会直接奔溃掉
- SListPushBack(&s, 1);
- SListPushBack(&s, 2);
- SListPushBack(&s, 3);
- SListPushBack(&s, 4);
- SListPushBack(&s, 5);
- SListPrint(s);
- SListErase(&s, SListFind(s, 1));
- SListPrint(s);
- SListErase(&s, SListFind(s, 2));
- SListPrint(s);
- SListEraseAfter(SListFind(s, 3));
- SListPrint(s);
- SListDestory(&s);
- }
- int main()
- {
- //testBack();
- //testFront();
- //testInsert();
- testErase();
- return 0;
- }
OK,无头(没有哨兵位的头结点)单链表就到这里~!这应该是我们介绍的三个里面最复杂的一个~!如果这个掌握了那其他的很容易~!下面我们来看看带哨兵位的头结点的单链表~!
四、单链表的实现(带头)
还是和没有头的一样先声明每个节点的类型:
链表结点类型声明
- typedef int SLDataType;
- typedef struct SListNode
- {
- SLDataType data;
- struct SListNode* next;
- }SLNode;
链表初始化
由于前面是不带头的,所以不需要进行初始化,而这里现在是带哨兵位头结点的~!一开始得要处理好头结点~!处理的方式有两种,一种是在初始的时候无返回值需要传一次二级,其他地方都不用,这显得有点突兀,所以我们采用第二种返回值,将处理好的头结点的地址返回外面接收此时就是带头的了。其实还有一种就是再定义一个结构体,里面是专门维护这个链表的指针,传一级指针也是可以的~~!当然这里采用返回值的方式!
- //链表的初始化
- SLNode* SLInit()
- {
- SLNode* head = (SLNode*)malloc(sizeof(SLNode));
- if (head == NULL)
- {
- perror("head malloc failed");
- exit(-1);
- }
- head->next = NULL;
- return head;
- }
链表的销毁
这里销毁也是一样有两种方式一种是传二级啥都不管了,内部会处理好但这里人家都是一级你一个二级显得有些突兀,还有一种就是不传二级外面最后记得把头置空即可!我们这里就采用第二种!
- //链表的销毁
- void SLDestory(SLNode* head)
- {
- assert(head);//头结点不可能为空
- SLNode* cur = head;
- while (cur)
- {
- SLNode* tail = cur->next;
- free(cur);
- cur = tail;
- }
- }
链表的打印
- //链表的打印
- void SLPrint(SLNode* head)
- {
- assert(head);
- SLNode* cur = head->next;
- while (cur)
- {
- printf("%d->", cur->data);
- cur = cur->next;
- }
- printf("NULL\n");
- }
动态开辟一个节点
由于后面会有大量的插入,每次插入都要开新节点,所以我们直接把他封装成一个函数,后续调用起来方便,代码简洁~!
- //动态开辟一个节点
- SLNode* BuyNode(SLDataType x)
- {
- SLNode* node = (SLNode*)malloc(sizeof(SLNode));
- if (node == NULL)
- {
- perror("malloc failed");
- exit(-1);
- }
- node->data = x;
- node->next = NULL;
- return node;
- }
单链表尾插
由于有头结点,可以不因考虑第一个插入的情况,另外这里的head是头结点,即使链表为空他也不可能为空!因此为了代码的健壮性断言一下还是好的~!
- //尾插
- void SLPushBack(SLNode* head, SLDataType x)
- {
- assert(head);
- SLNode* newnode = BuyNode(x);
- SLNode* cur = head;
- while (cur->next)
- {
- cur = cur->next;
- }
- cur->next = newnode;
- }
单链表的尾删
尾删也不许担心删完后置头结点为空,这里带了哨兵位的头不需要担心直接删即可,另外这里还是有两种方法上面已经说过,这里采用非快慢指针法~!
- //尾删
- void SLPopBack(SLNode* head)
- {
- assert(head);
- assert(head->next);//空链表
- SLNode* cur = head;
- while (cur->next->next)
- {
- cur = cur->next;
- }
- free(cur->next);
- cur->next = NULL;
- }
OK,来测试一把:
- void testBack()
- {
- SLNode* s = SLInit();
- SLPushBack(s, 1);
- SLPushBack(s, 2);
- SLPushBack(s, 3);
- SLPrint(s);
- SLPopBack(s);
- SLPrint(s);
- SLPopBack(s);
- SLPrint(s);
- SLPopBack(s);
- SLPrint(s);
- //SLPopBack(s);//检测尾删是否有Bug
- //SLPrint(s);
- SLDestory(s);
- s = NULL;//记得把头置空,避免野指针
- }

OK,没有问题,这个是不是相较于上面没带哨兵位的头结点的那个简单多了~!哈哈,OK,我们再来实现一下,头插、头删~!
单链表头插
这相比上面的就很简单了,直接插在哨兵位头结点的后面即可!不用考虑第一个插入改变头的情况~!
- //头插
- void SLPushFront(SLNode* head, SLDataType x)
- {
- assert(head);
- SLNode* newnode = BuyNode(x);
- newnode->next = head->next;
- head->next = newnode;
- }
单链表的头删
头删也是比以前的简单,只需判空即可,不需要考虑改变头的问题~!
- //头删
- void SLPopFront(SLNode* head)
- {
- assert(head);
- assert(head->next);//无节点可删
- SLNode* del = head->next;
- head->next = del->next;
- free(del);
- }
OK,还是来测试一波:
- void testFront()
- {
- SLNode* s = SLInit();
- SLPushFront(s, 1);
- SLPushFront(s, 2);
- SLPushFront(s, 3);
- SLPushFront(s, 4);
- SLPrint(s);
- SLPopFront(s);
- SLPrint(s);
- SLPopFront(s);
- SLPrint(s);
- SLPopFront(s);
- SLPrint(s);
- SLPopFront(s);
- SLPrint(s);
- //SLPopFront(s);//测试头删是否有Bug
- //SLPrint(s);
- SLDestory(s);
- s = NULL;//记得把头置空,避免野指针
- }

单链表查找
还是和前面一样找到了返回当前节点的地址,否则返回NULL。
- //单链表的查找
- SLNode* SLFind(SLNode* head, SLDataType x)
- {
- assert(head);
- SLNode* cur = head->next;
- while (cur)
- {
- if (x == cur->data)
- return cur;
- cur = cur->next;
- }
- return NULL;
- }
这里肯定有小伙伴问这个函数不就查找吗,除了配合insert和erase插入删除还能干啥?其实他还能修改信息~!数据结构学的是数据的物理存储结构、逻辑顺序结构和运算~!这里的运算简单点就是增删查改。上面无头的我们已经进行了增删查,没有实现改(其实是我忘了,刚刚想起哈哈),这里我们可以补在这个上,上面无头的也是一样的~!!!
单链表修改
- //单链表的修改
- void SLModif(SLNode* head, SLDataType x, SLDataType y)
- {
- assert(head);
- SLNode* ret = SLFind(head, x);
- assert(ret);
- ret->data = y;
- }
在pos前插入
逻辑和上面的一样,这里也不用考虑第一个插入要改变头的情况~!
- //在pos前插入
- void SLInsert(SLNode* head, SLNode* pos, SLDataType x)
- {
- assert(head);
- assert(pos);
- SLNode* newnode = BuyNode(x);
- SLNode* cur = head;
- while (cur->next != pos)
- {
- cur = cur->next;
- }
- newnode->next = pos;
- cur->next = newnode;
- }
在pos后插入
- //在pos后插入
- void SLInsertAfter(SLNode* pos, SLDataType x)
- {
- assert(pos);
- SLNode* newnode = BuyNode(x);
- newnode->next = pos->next;
- pos->next = newnode;
- }
OK,则是一波走起:(这里就把修改顺便测了)
- void testInsert()
- {
- SLNode* s = SLInit();
- SLPushBack(s, 1);
- SLPushBack(s, 2);
- SLPushBack(s, 3);
- SLPrint(s);
- SLInsert(s, SLFind(s, 1), 10);
- SLPrint(s);
- SLInsertAfter(SLFind(s, 2), 200);
- SLPrint(s);
- SLModif(s, 3, 300);
- SLPrint(s);
- SLDestory(s);
- s = NULL;//记得把头置空,避免野指针
- }

OK,没有问题~!再来实现两个erase的接口!
删除pos位置
这里由于是SLFind配合删除的,所以不因担心删完多删的情况!
- //删除pos位置
- void SLErase(SLNode* head, SLNode* pos)
- {
- assert(head);
- assert(pos);
- SLNode* cur = head;
- while (cur->next != pos)
- {
- cur = cur->next;
- }
- cur->next = pos->next;
- free(pos);
- }
删除pos后一个
唯一要注意的是pos得有下一个才让删除,否则结束~!
- //删除pos位置的后一个
- void SLEraseAfter(SLNode* pos)
- {
- assert(pos);
- assert(pos->next);
- SLNode* del = pos->next;
- pos->next = del->next;
- free(del);
- }
链表的长度
这里多加的一个接口是获取链表的长度~!这个不难很容易~!
- //获取链表的长度
- int SLSize(SLNode* head)
- {
- assert(head);
- int size = 0;
- SLNode* cur = head->next;
- while (cur)
- {
- ++size;
- cur = cur->next;
- }
- return size;
- }
OK,测试一把:
- void testErase()
- {
- SLNode* s = SLInit();
- SLPushBack(s, 1);
- SLPushBack(s, 2);
- SLPushBack(s, 3);
- SLPushBack(s, 4);
- SLPrint(s);
- SLErase(s, SLFind(s, 1));
- SLPrint(s);
- SLEraseAfter(SLFind(s, 2));
- SLPrint(s);
- printf("size = %d\n", SLSize(s));
- SLDestory(s);
- s = NULL;//记得把头置空,避免野指针
- }

OK,没有问题~!
总结:
带哨兵位的头结点的确比不带头的要简单很多!这两种都很重要以后工作中常用的就是这两种和下面要介绍的带头双向循环链表~!而且他这里插入和删除可以用Insert和Erase简化!
全部源码:
- #pragma once
- #include
- #include
- #include
- typedef int SLDataType;
- typedef struct SListNode
- {
- SLDataType data;
- struct SListNode* next;
- }SLNode;
- //链表的初始化
- SLNode* SLInit();
- //链表的销毁
- void SLDestory(SLNode* head);
- //链表的打印
- void SLPrint(SLNode* head);
- //动态开辟一个节点
- SLNode* BuyNode(SLDataType x);
- //尾插
- void SLPushBack(SLNode* head, SLDataType x);
- //尾删
- void SLPopBack(SLNode* head);
- //头插
- void SLPushFront(SLNode* head, SLDataType x);
- //头删
- void SLPopFront(SLNode* head);
- //单链表的查找
- SLNode* SLFind(SLNode* head, SLDataType x);
- //单链表的修改
- void SLModif(SLNode* head, SLDataType x, SLDataType y);
- //在pos前插入
- void SLInsert(SLNode* head, SLNode* pos, SLDataType x);
- //在pos后插入
- void SLInsertAfter(SLNode* pos, SLDataType x);
- //删除pos位置
- void SLErase(SLNode* head, SLNode* pos);
- //删除pos位置的后一个
- void SLEraseAfter(SLNode* pos);
- //获取链表的长度
- int SLSize(SLNode* head);
- #include "SLT.h"
- //链表的初始化
- SLNode* SLInit()
- {
- SLNode* head = (SLNode*)malloc(sizeof(SLNode));
- if (head == NULL)
- {
- perror("head malloc failed");
- exit(-1);
- }
- head->next = NULL;
- return head;
- }
- //链表的销毁
- void SLDestory(SLNode* head)
- {
- assert(head);//头结点不可能为空
- SLNode* cur = head;
- while (cur)
- {
- SLNode* tail = cur->next;
- free(cur);
- cur = tail;
- }
- }
- //链表的打印
- void SLPrint(SLNode* head)
- {
- assert(head);
- SLNode* cur = head->next;
- while (cur)
- {
- printf("%d->", cur->data);
- cur = cur->next;
- }
- printf("NULL\n");
- }
- //动态开辟一个节点
- SLNode* BuyNode(SLDataType x)
- {
- SLNode* node = (SLNode*)malloc(sizeof(SLNode));
- if (node == NULL)
- {
- perror("malloc failed");
- exit(-1);
- }
- node->data = x;
- node->next = NULL;
- return node;
- }
- //尾插
- void SLPushBack(SLNode* head, SLDataType x)
- {
- assert(head);
- SLNode* newnode = BuyNode(x);
- SLNode* cur = head;
- while (cur->next)
- {
- cur = cur->next;
- }
- cur->next = newnode;
- }
- //尾删
- void SLPopBack(SLNode* head)
- {
- assert(head);
- assert(head->next);//空链表
- SLNode* cur = head;
- while (cur->next->next)
- {
- cur = cur->next;
- }
- free(cur->next);
- cur->next = NULL;
- }
- //头插
- void SLPushFront(SLNode* head, SLDataType x)
- {
- assert(head);
- SLNode* newnode = BuyNode(x);
- newnode->next = head->next;
- head->next = newnode;
- }
- //头删
- void SLPopFront(SLNode* head)
- {
- assert(head);
- assert(head->next);//无节点可删
- SLNode* del = head->next;
- head->next = del->next;
- free(del);
- }
- //单链表的查找
- SLNode* SLFind(SLNode* head, SLDataType x)
- {
- assert(head);
- SLNode* cur = head->next;
- while (cur)
- {
- if (x == cur->data)
- return cur;
- cur = cur->next;
- }
- return NULL;
- }
- //单链表的修改
- void SLModif(SLNode* head, SLDataType x, SLDataType y)
- {
- assert(head);
- SLNode* ret = SLFind(head, x);
- assert(ret);
- ret->data = y;
- }
- //在pos前插入
- void SLInsert(SLNode* head, SLNode* pos, SLDataType x)
- {
- assert(head);
- assert(pos);
- SLNode* newnode = BuyNode(x);
- SLNode* cur = head;
- while (cur->next != pos)
- {
- cur = cur->next;
- }
- newnode->next = pos;
- cur->next = newnode;
- }
- //在pos后插入
- void SLInsertAfter(SLNode* pos, SLDataType x)
- {
- assert(pos);
- SLNode* newnode = BuyNode(x);
- newnode->next = pos->next;
- pos->next = newnode;
- }
- //删除pos位置
- void SLErase(SLNode* head, SLNode* pos)
- {
- assert(head);
- assert(pos);
- SLNode* cur = head;
- while (cur->next != pos)
- {
- cur = cur->next;
- }
- cur->next = pos->next;
- free(pos);
- }
- //删除pos位置的后一个
- void SLEraseAfter(SLNode* pos)
- {
- assert(pos);
- assert(pos->next);
- SLNode* del = pos->next;
- pos->next = del->next;
- free(del);
- }
- //获取链表的长度
- int SLSize(SLNode* head)
- {
- assert(head);
- int size = 0;
- SLNode* cur = head->next;
- while (cur)
- {
- ++size;
- cur = cur->next;
- }
- return size;
- }
- #include "SLT.h"
- void testBack()
- {
- SLNode* s = SLInit();
- SLPushBack(s, 1);
- SLPushBack(s, 2);
- SLPushBack(s, 3);
- SLPrint(s);
- SLPopBack(s);
- SLPrint(s);
- SLPopBack(s);
- SLPrint(s);
- SLPopBack(s);
- SLPrint(s);
- //SLPopBack(s);//检测尾删是否有Bug
- //SLPrint(s);
- SLDestory(s);
- s = NULL;//记得把头置空,避免野指针
- }
- void testFront()
- {
- SLNode* s = SLInit();
- SLPushFront(s, 1);
- SLPushFront(s, 2);
- SLPushFront(s, 3);
- SLPushFront(s, 4);
- SLPrint(s);
- SLPopFront(s);
- SLPrint(s);
- SLPopFront(s);
- SLPrint(s);
- SLPopFront(s);
- SLPrint(s);
- SLPopFront(s);
- SLPrint(s);
- //SLPopFront(s);//测试头删是否有Bug
- //SLPrint(s);
- SLDestory(s);
- s = NULL;//记得把头置空,避免野指针
- }
- void testInsert()
- {
- SLNode* s = SLInit();
- SLPushBack(s, 1);
- SLPushBack(s, 2);
- SLPushBack(s, 3);
- SLPrint(s);
- SLInsert(s, SLFind(s, 1), 10);
- SLPrint(s);
- SLInsertAfter(SLFind(s, 2), 200);
- SLPrint(s);
- SLModif(s, 3, 300);
- SLPrint(s);
- SLDestory(s);
- s = NULL;//记得把头置空,避免野指针
- }
- void testErase()
- {
- SLNode* s = SLInit();
- SLPushBack(s, 1);
- SLPushBack(s, 2);
- SLPushBack(s, 3);
- SLPushBack(s, 4);
- SLPrint(s);
- SLErase(s, SLFind(s, 1));
- SLPrint(s);
- SLEraseAfter(SLFind(s, 2));
- SLPrint(s);
- printf("size = %d\n", SLSize(s));
- SLDestory(s);
- s = NULL;//记得把头置空,避免野指针
- }
- int main()
- {
- //testBack();
- //testFront();
- //testInsert();
- testErase();
- return 0;
- }
五、带头双向循环链表的实现
我们上面实现的两种都是单链表,他们头插头删的效率很高,但在中间或尾部插入删除时的效率就很低,为了解决这个问题我们在定义节点类型时在加入一个前驱指针来记录当前节点的前一个节点的地址,这样插入删除就很OK了~!当最后一个时让他的后继指针指向头结点,第一个的前驱指向最后一个节点,这样就实现了循环而且任何节点的插入删除都很高~!OK,下面是图:

OK,下面我们就来实现一下~!
结点类型声明
- typedef int LTDataType;
- typedef struct ListNode
- {
- LTDataType data;
- struct ListNode* prv;
- struct ListNode* next;
- }ListNode;
初始化
- //初始化
- ListNode* ListInit()
- {
- ListNode* head = (ListNode*)malloc(sizeof(ListNode));
- if (!head)
- {
- perror("malloc failed");
- exit(-1);
- }
- head->prv = head;
- head->next = head;
- return head;
- }
销毁
这里与上面单向带有不一样的是!这里因为是循环的最后的next指向哨兵位的头,所以不能和上面一样直接从head开始销毁,应该从head->next开始等所有的销毁完了,在把head置空即可~!这是因为是一级指针所以外面的调用者在最后记得置空head~!
- //销毁
- void ListDestory(ListNode* head)
- {
- assert(head);
- ListNode* cur = head->next;
- while (cur != head)
- {
- ListNode* tail = cur->next;
- free(cur);
- cur = tail;
- }
- free(head);
- }
打印
- //链表的打印
- void ListPrint(ListNode* head)
- {
- assert(head);
- ListNode* cur = head->next;
- while (cur != head)
- {
- printf("%d->", cur->data);
- cur = cur->next;
- }
- }
动态开辟新节点
- //动态开辟一个节点
- ListNode* BuyNode(LTDataType x)
- {
- ListNode* node = (ListNode*)malloc(sizeof(ListNode));
- if (!node)
- {
- perror("malloc failed");
- exit(-1);
- }
- node->data = x;
- node->prv = NULL;
- node->next = NULL;
- return node;
- }
尾插
这里比单链表好的就是不用遍历找尾直接就可以找到,但注意的是要把prv前驱指针处理好~!如果不熟练可以多定义个指针,如果熟悉了就可以多个->next->prv哈哈~!下面是两种写法!
- //尾插
- void ListPushBack(ListNode* head, LTDataType x)
- {
- assert(head);
- ListNode* newnode = BuyNode(x);
- ListNode* tail = head->prv;
- tail->next = newnode;
- newnode->prv = tail;
- newnode->next = head;
- head->prv = newnode;
- /*head->prv->next = newnode;
- newnode->prv = head->prv;
- newnode->next = head;
- head->prv = newnode;*/
- }
尾删
尾删也是一样可以多定义指针也可以直接来!也要注意处理好前驱~!下面是两种方式!
- //尾删
- void ListPopBack(ListNode* head)
- {
- assert(head);
- assert(head->next != head);//链表为空
- ListNode* tail = head->prv;
- ListNode* tailPrv = tail->prv;
- tailPrv->next = head;
- head->prv = tailPrv;
- free(tail);
- /*ListNode* del = head->prv;
- head->prv->prv->next = head;
- head->prv = head->prv->prv;
- free(del);*/
- }
OK还是测试一波:
- void testBack()
- {
- ListNode* L = ListInit();
- ListPushBack(L, 1);
- ListPushBack(L, 2);
- ListPushBack(L, 3);
- ListPrint(L);
- ListPopBack(L);
- ListPrint(L);
- ListPopBack(L);
- ListPrint(L);
- ListPopBack(L);
- ListPrint(L);
- //ListPopBack(L);//测试尾删是否有Bug
- //ListPrint(L);
- ListDestory(L);
- L = NULL;
- }

OK,没有问题,再来搞两个头插和头删~!
头插
- //头插
- void ListPushFront(ListNode* head, LTDataType x)
- {
- assert(head);
- ListNode* newnode = BuyNode(x);
- ListNode* tail = head->next;
- newnode->next = tail;
- tail->prv = newnode;
- head->next = newnode;
- newnode->prv = head;
- /*newnode->next = head->next;
- head->next->prv = newnode;
- head->next = newnode;
- newnode->prv = head;*/
- }
头删
- //头删
- void ListPopFront(ListNode* head)
- {
- assert(head);
- assert(head->next != head);
- ListNode* del = head->next;
- head->next = del->next;
- del->next->prv = head;
- free(del);
- }
OK,来测试一波:
- void testFront()
- {
- ListNode* L = ListInit();
- ListPushFront(L, 1);
- ListPushFront(L, 2);
- ListPushFront(L, 3);
- ListPrint(L);
- ListPopFront(L);
- ListPrint(L);
- ListPopFront(L);
- ListPrint(L);
- ListPopFront(L);
- ListPrint(L);
- //ListPopFront(L);//测试头删是否有Bug
- //ListPrint(L);
- ListDestory(L);
- L = NULL;
- }

OK,没有bug!我们继续:
查找
这里还是和前面一样找到了返回当前节点的地址否则返回NULL,实际上在很多常见下就是这样的~!
- //查找
- ListNode* ListFind(ListNode* head, LTDataType x)
- {
- assert(head);
- ListNode* cur = head->next;
- while (cur != head)
- {
- if (x == cur->data)
- return cur;
- cur = cur->next;
- }
- return NULL;
- }
修改
记得判断找不到的情况,我这里采用的是暴力检查!!!
- //修改
- void ListModif(ListNode* head, LTDataType x, LTDataType y)
- {
- assert(head);
- ListNode* ret = ListFind(head, x);
- assert(ret);
- ret->data = y;
- }
在pos前插入
这里注意的是由于查找函数已经把pos查找好了,且有前驱指针所以不需要遍历找pos,直接链接即可~!
- //在pos前插入
- void ListInsert( ListNode* pos, LTDataType x)
- {
- assert(pos);
- ListNode* newnode = BuyNode(x);
- ListNode* Prv = pos->prv;
- newnode->next = pos;
- pos->prv = newnode;
- Prv->next = newnode;
- newnode->prv = Prv;
- }
在pos后插入
- //在pos后插入
- void ListInsertAfter(ListNode* pos, LTDataType x)
- {
- assert(pos);
- ListNode* newnode = BuyNode(x);
- ListNode* tail = pos->next;
- newnode->next = tail;
- tail->prv = newnode;
- pos->next = newnode;
- newnode->prv = pos;
- }
OK,测试一波:
- void testInsert()
- {
- ListNode* L = ListInit();
- ListPushBack(L, 1);
- ListPushBack(L, 2);
- ListPushBack(L, 3);
- ListPrint(L);
- ListInsert(ListFind(L, 1), 10);
- ListPrint(L);
- ListInsertAfter(ListFind(L, 3), 300);
- ListPrint(L);
- ListDestory(L);
- L = NULL;
- }

OK,没有问题~!
删除pos
- //删除pos位置
- void ListErase(ListNode* pos)
- {
- assert(pos);
- ListNode* Prv = pos->prv;
- ListNode* tail = pos->next;
- Prv->next = tail;
- tail->prv = Prv;
- free(pos);
- }
删除pos的下一个
这里得注意的是又是是循环的。如果pos没有下一个就指向head,所以判断有没有pos的下一个必须有头~!!!
- //删除pos位置的下一个
- void ListEraseAfter(ListNode* head, ListNode* pos)
- {
- assert(pos);
- assert(pos->next != head);//没有下一个节点可删
- ListNode* tail = pos->next;
- pos->next = tail->next;
- tail->prv = pos;
- free(tail);
- }
OK,测试一把~!
- void testErase()
- {
- ListNode* L = ListInit();
- ListPushBack(L, 1);
- ListPushBack(L, 2);
- ListPushBack(L, 3);
- ListPrint(L);
- ListErase(ListFind(L, 1));
- ListPrint(L);
- ListEraseAfter(L, ListFind(L, 2));
- ListPrint(L);
- ListDestory(L);
- L = NULL;
- }

没有问题,上面有个修改函数忘了测试了,等在写一个长度一起在这个里面测试了:
获取长度
- //获取链表的长度
- int ListSize(ListNode* head)
- {
- assert(head);
- int size = 0;
- ListNode* cur = head->next;
- while (cur != head)
- {
- ++size;
- cur = cur->next;
- }
- return size;
- }
OK,测试一下:
- void testErase()
- {
- ListNode* L = ListInit();
- ListPushBack(L, 1);
- ListPushBack(L, 2);
- ListPushBack(L, 3);
- ListPrint(L);
- printf("size = %d\n", ListSize(L));
- ListErase(ListFind(L, 1));
- ListPrint(L);
- ListEraseAfter(L, ListFind(L, 2));
- ListPrint(L);
- printf("size = %d\n", ListSize(L));
- ListModif(L, 2, 200);
- ListPrint(L);
- ListDestory(L);
- L = NULL;
- }

OK,这就是带头双向循环链表!链表的实现也就到此结束了,下面我们来对顺序表和链表做一个全面的对比!
六、链表和顺序表的区别
这里我们先来用单链表和顺序表对比,然后再用链表的最优结构---->带头双向循环链表来对比~!

OK,我们再来对比一下顺序表和带头双向循环链表的区别~!
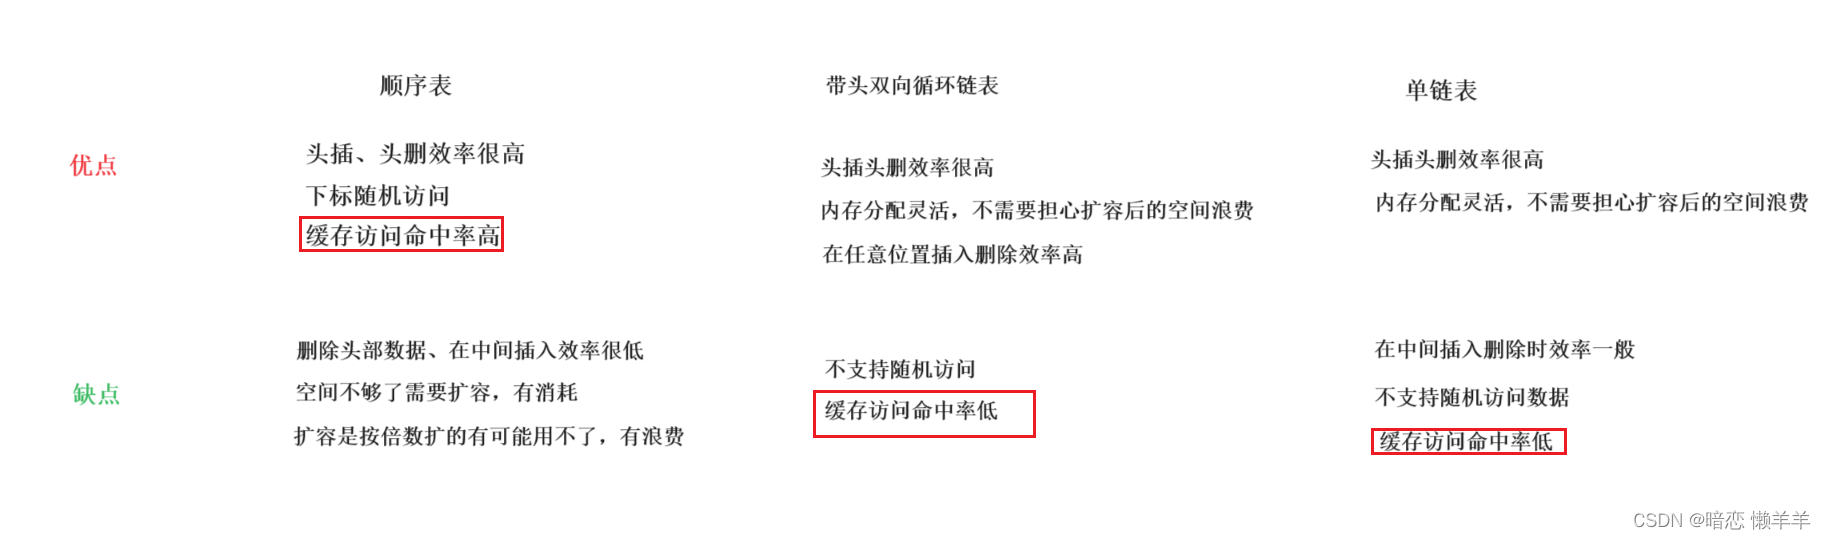
这就是他们的区别,这里可以看出如果你需要大量查找和排序等操作时顺序表是优选,如果说是频繁的插入删除的话链表优选~!不能说他们谁好谁不好,知识应用的场景不同,他们其实是互补的数据结构~!OK,这里提到了一个东西叫缓存命中率~!这个是计算机存成原理里面的概念,这里实际上说的是存储体系和局部性原理~!OK我们大概谈谈:缓存利用率全称:CPU高速缓存利用率!
我们一般的计算机中的三大件是:cpu、内存、和本地磁盘~!我们写的数据结构的代码都在内存中。计组中有个存储器层次体系,就是把每个存储器按快慢给分层了,我们来看看:

这里它实际上分为四层(按照价格以及快慢):

寄存器和缓存实际上作用差不多,都是加载数据给cpu处理的,小的数据直接由寄存器来例如一个变量,大的数据由缓存去内存加载到cpu处理,例如数组!为什么CPU不直接到内存中去访问呢?原因很简单,CPU太快了内存和他不是一个等级,那内存以下的就更不要说了。
为了解决这个问题电脑厂商会在CPU周围多弄几个寄存器和多级缓存;他们的速度是跟的上CPU的。这里你可能还会问既然有内存了为什么要磁盘呢?在这里有两方面的原因:一方面最直接的原因贵!另一方面是内存是带电存储而磁盘不是。内存直接能和上级交流磁盘则不行需要先加载到内存在于上级交流!
另外还有一个是局部性原理,他分为局部性时间原理和局部性空间原理:下面是我找的一本计组上的解释:

为什么说顺序表的缓存利用率高呢?根据局部性原理,CPU在访问万当前数据后它的下一个很有可能会被访问到,所以缓存会一次加载不止一个数据而是这个数据和后面的几个,具体几个得看硬件!这样cpu每次访问时缓存已经把顺序表的内容加载过去了,效率会高很多,原因是他们的地址是连续的!链表之所以低得原因是它的每个节点的内存地址大概率是不连续的,每一次访问一个节点的内容都要加载,而且他有可能会加载错造成缓存污染~!
OK,好兄弟,链表就分享到这里!我们下期再见~~!
-
相关阅读:
聊聊流式数据湖Paimon(五)
【毕业设计源码】PHP高校兼职跑腿系统
【Spring Boot】如何自定义序列化以及反序列器
使用位运算技巧比较两个数中较大的数
Spring Boot 3.0正式发布及新特性解读
使用 Istio CNI 支持强安全 TKE Stack 集群的服务网格流量捕获
OpenCV入门9:图像增强和图像滤波
zookeeper集群安装
Oracle 快速入门
Sentinel服务保护
- 原文地址:https://blog.csdn.net/m0_75256358/article/details/133416026

- 最新文章
-
沪漂五周年了:我越来越迷茫了
Agentic Skill Routing 实战:别再把所有 Skill 塞进 AI Agent 上下文
MySQL-Seconds_behind_master的精度误差
[MAF预定义ChatClient中间件-03]CachingChatClient——利用缓存省钱省时间
AI的至暗历史:从万众期待到被政府撤资,AI的两次死亡徘徊
Agent OS :五种驯服不确定性的范式
PortSwigger SQL注入LAB11
数据库即时编译JIT
[Begin]AI Learn Data Day 0
深度学习进阶(二十七)现代 LLM 的核心架构设计其二:SwiGLU