-
《视觉 SLAM 十四讲》V2 第 11 讲 回环检测【消除累积误差】
待做:
- 习题整理
- 相关文献【新的综述】等
P283

基于 词袋 的外观式 回环检测
SLAM主体(前端后端): 估计相机运动
前端: 提供特征点的提取 和 轨迹、地图的初值。
后端: 对所有这些数据进行优化。视觉里程计 仅考虑相邻时间上 的 关键帧。
累积误差
全局一致 的 轨迹和地图
回环检测的关键: 如何有效地 检测出 相机经过同一个地方 这件事。
位姿图 质点 弹簧系统。提高了系统稳定性。
回环边: 把带有累计误差的边 “拉” 到了正确的位置。
估计的轨迹和地图 在长时间下 的正确性。
利用回环检测 进行 重定位。视觉里程计: 仅有前端 和 局部后端的系统
SLAM: 带有回环检测和全局后端的系统1、对任意两幅图像都做一遍特征匹配
- 不是所有图像都有回环
- 对于 N 对可能的回环, 要检测 C 2 N C_2^N C2N 次,复杂度为 O ( N 2 ) O(N^2) O(N2)
- 无法实时
2、随机抽取历史数据进行回环检测
- 检测效率不高
3、基于 外观 ✔📌
4、室外 GPS
如何 计算图像间的相似性
不选择 两幅图像相减 s ( A , B ) = ∣ ∣ A − B ∣ ∣ s(\bm{A, B}) = ||\bm{A-B}|| s(A,B)=∣∣A−B∣∣ 比较相似性 的原因:
1、像素灰度受环境光照和相机曝光的影响
2、相机视角变化,会使得像素在图像中发生位移,造成大的差异值感知偏差(Perceptual Aliasing) 假阳性(False Positive)
感知变异(Perceptual Variability) 假阴性 (False Negative)准确率:Precision = T P T P + F P \frac{TP}{TP+FP} TP+FPTP 判为正的正样本数/ 判为正的样本数
召回率:Recall = T P T P + F N \frac{TP}{TP+FN} TP+FNTP 判为正的正样本数/ 全部正样本数
准确率: 算法提取的所有回环中 确实是 真实回环 的概率。
召回率: 在所有真实回环中 被正确检测出来的概率。A 在 准确率 较高时 还有很好的召回率, B在 70% 召回率 的情况下还能保证 较好的准确率。
SLAM : 准确率 要求更高
- 检测结果是 而实际不是 【假阳性】 添加错误的边有可能 导致 整个建图失效
召回率 低些 ——> 部分回环 没被检测到 ——> 累积误差 影响建图
- 一两次 回环即可完全消除。
特征匹配: 费时、光照变化会导致特征描述不稳定。
11.2 词袋 模型
Bag-of-Words(Bow) : “图像上有哪几种特征” 来描述一幅图像。
是否出现
强调的是 Words 的有无, 无关顺序。
字典生成 聚类
K-means
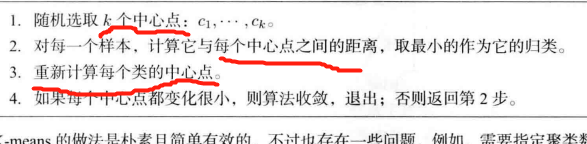
把已经提取的大量特征点 聚类成 一个含有 k k k 个单词的字典。如何 根据图像中某个特征点查找字典中相应的单词


11.3.2 创建字典 【Code】
ORB 特征描述
- ORB(Oriented FAST and Rotated BRIEF)特征
对10张 目标图像 提取 ORB特征 并存放至 vector 容器中,然后调用 DBoW3的字典生成接口。

————————配置环境: 开始
1、下载 DBow3git clone https://github.com/rmsalinas/DBow3.git- 1
2、进入 文件夹,并打开命令行窗口

3、按照 cmake 流程进行编译安装mkdir build && cd build cmake .. make sudo make install- 1
- 2
- 3
- 4
OpenCV版本查看
python3 -c "import cv2; print(cv2.__version__)"- 1
4.2.0
查看绝对路径

报错:


CMakeLists.txt修改

feature_training.cpp修改

这里顺便也改了。。

修改后 务必记得 cmake 一遍
cd build cmake .. make ./feature_training- 1
- 2
- 3
- 4

————————配置环境: 结束
feature_training.cpp#include "DBoW3/DBoW3.h" #include#include #include #include #include #include using namespace cv; using namespace std; /*************************************************** * 本节演示了如何根据data/目录下的十张图训练字典 * ************************************************/ int main( int argc, char** argv ) { // read the image cout<<"reading images... "<<endl; vector<Mat> images; for ( int i=0; i<10; i++ ) { string path = "../data/"+to_string(i+1)+".png"; images.push_back( imread(path) ); } // detect ORB features cout<<"detecting ORB features ... "<<endl; Ptr< Feature2D > detector = ORB::create(); vector<Mat> descriptors; for ( Mat& image:images ) { vector<KeyPoint> keypoints; Mat descriptor; detector->detectAndCompute( image, Mat(), keypoints, descriptor ); descriptors.push_back( descriptor ); } // create vocabulary cout<<"creating vocabulary ... "<<endl; DBoW3::Vocabulary vocab; vocab.create( descriptors ); cout<<"vocabulary info: "<<vocab<<endl; vocab.save( "vocabulary.yml.gz" ); cout<<"done"<<endl; return 0; } - 1
- 2
- 3
- 4
- 5
- 6
- 7
- 8
- 9
- 10
- 11
- 12
- 13
- 14
- 15
- 16
- 17
- 18
- 19
- 20
- 21
- 22
- 23
- 24
- 25
- 26
- 27
- 28
- 29
- 30
- 31
- 32
- 33
- 34
- 35
- 36
- 37
- 38
- 39
- 40
- 41
- 42
- 43
- 44
- 45
- 46
本讲 CMakeLists.txt
CMakeLists.txtcmake_minimum_required( VERSION 2.8 ) project( loop_closure ) set( CMAKE_BUILD_TYPE "Release" ) set( CMAKE_CXX_FLAGS "-std=c++11 -O3" ) # opencv find_package( OpenCV 4.2.0 REQUIRED ) include_directories( ${OpenCV_INCLUDE_DIRS} ) # dbow3 # dbow3 is a simple lib so I assume you installed it in default directory set( DBoW3_INCLUDE_DIRS "/usr/local/include" ) set( DBoW3_LIBS "/usr/local/lib/libDBoW3.so" ) add_executable( feature_training feature_training.cpp ) target_link_libraries( feature_training ${OpenCV_LIBS} ${DBoW3_LIBS} ) add_executable( loop_closure loop_closure.cpp ) target_link_libraries( loop_closure ${OpenCV_LIBS} ${DBoW3_LIBS} ) add_executable( gen_vocab gen_vocab_large.cpp ) target_link_libraries( gen_vocab ${OpenCV_LIBS} ${DBoW3_LIBS} )- 1
- 2
- 3
- 4
- 5
- 6
- 7
- 8
- 9
- 10
- 11
- 12
- 13
- 14
- 15
- 16
- 17
- 18
- 19
- 20
- 21
- 22
- 23
11.4.2 相似度 计算 【Code】
TF-IDF (Term Frequency-Inverse Document Frequency)
频率-逆文档频率
某单词在字典中 出现的频率越低,分类图像时 区分度越高。



使用上节的字典生成词袋 并 比较差异
要改动的地方: 之前的data路径要是没改记得改

要是改了要 cmake 一遍./loop_closure- 1

loop_closure.cpp#include "DBoW3/DBoW3.h" #include#include #include #include #include #include using namespace cv; using namespace std; /*************************************************** * 本节演示了如何根据前面训练的字典计算相似性评分 * ************************************************/ int main(int argc, char **argv) { // read the images and database cout << "reading database" << endl; DBoW3::Vocabulary vocab("./vocabulary.yml.gz"); // DBoW3::Vocabulary vocab("./vocab_larger.yml.gz"); // use large vocab if you want: if (vocab.empty()) { cerr << "Vocabulary does not exist." << endl; return 1; } cout << "reading images... " << endl; vector<Mat> images; for (int i = 0; i < 10; i++) { string path = "../data/" + to_string(i + 1) + ".png"; images.push_back(imread(path)); } // NOTE: in this case we are comparing images with a vocabulary generated by themselves, this may lead to overfit. // detect ORB features cout << "detecting ORB features ... " << endl; Ptr<Feature2D> detector = ORB::create(); vector<Mat> descriptors; for (Mat &image:images) { vector<KeyPoint> keypoints; Mat descriptor; detector->detectAndCompute(image, Mat(), keypoints, descriptor); descriptors.push_back(descriptor); } // we can compare the images directly or we can compare one image to a database // images : cout << "comparing images with images " << endl; for (int i = 0; i < images.size(); i++) { DBoW3::BowVector v1; vocab.transform(descriptors[i], v1); for (int j = i; j < images.size(); j++) { DBoW3::BowVector v2; vocab.transform(descriptors[j], v2); double score = vocab.score(v1, v2); cout << "image " << i << " vs image " << j << " : " << score << endl; } cout << endl; } // or with database cout << "comparing images with database " << endl; DBoW3::Database db(vocab, false, 0); for (int i = 0; i < descriptors.size(); i++) db.add(descriptors[i]); cout << "database info: " << db << endl; for (int i = 0; i < descriptors.size(); i++) { DBoW3::QueryResults ret; db.query(descriptors[i], ret, 4); // max result=4 cout << "searching for image " << i << " returns " << ret << endl << endl; } cout << "done." << endl; } - 1
- 2
- 3
- 4
- 5
- 6
- 7
- 8
- 9
- 10
- 11
- 12
- 13
- 14
- 15
- 16
- 17
- 18
- 19
- 20
- 21
- 22
- 23
- 24
- 25
- 26
- 27
- 28
- 29
- 30
- 31
- 32
- 33
- 34
- 35
- 36
- 37
- 38
- 39
- 40
- 41
- 42
- 43
- 44
- 45
- 46
- 47
- 48
- 49
- 50
- 51
- 52
- 53
- 54
- 55
- 56
- 57
- 58
- 59
- 60
- 61
- 62
- 63
- 64
- 65
- 66
- 67
- 68
- 69
- 70
11.5.1
修改这里 并重新 cmake 即可
./loop_closure- 1

把相近的回环聚成 一类。比如 第n, n-2, n-3帧
检测之后的验证:
1、回环 缓存【多次检测到相似✔】: 一段时间中一直检测到的回环,才是正确的回环
2、回环检测到的帧进行特征匹配【相应 相机位姿也匹配✔】,估计各自的相机运动,检查位姿是否出入很大。分类
图像相似性训练 自己的字典 报错
参考这里
1、
gen_vocab_large.cpp#include "DBoW3/DBoW3.h" #include#include #include #include #include #include using namespace cv; using namespace std; int main( int argc, char** argv ) { string dataset_dir = argv[1]; ifstream fin ( dataset_dir+"/associate.txt" ); if ( !fin ) { cout<<"please generate the associate file called associate.txt!"<<endl; return 1; } vector<string> rgb_files, depth_files; vector<double> rgb_times, depth_times; while ( !fin.eof() ) { string rgb_time, rgb_file, depth_time, depth_file; fin>>rgb_time>>rgb_file>>depth_time>>depth_file; rgb_times.push_back ( atof ( rgb_time.c_str() ) ); depth_times.push_back ( atof ( depth_time.c_str() ) ); rgb_files.push_back ( dataset_dir+"/"+rgb_file ); depth_files.push_back ( dataset_dir+"/"+depth_file ); if ( fin.good() == false ) break; } fin.close(); cout<<"generating features ... "<<endl; vector<Mat> descriptors; Ptr< Feature2D > detector = ORB::create(); int index = 1; for ( string rgb_file:rgb_files ) { Mat image = imread(rgb_file); vector<KeyPoint> keypoints; Mat descriptor; detector->detectAndCompute( image, Mat(), keypoints, descriptor ); descriptors.push_back( descriptor ); cout<<"extracting features from image " << index++ <<endl; } cout<<"extract total "<<descriptors.size()*500<<" features."<<endl; // create vocabulary cout<<"creating vocabulary, please wait ... "<<endl; DBoW3::Vocabulary vocab; vocab.create( descriptors ); cout<<"vocabulary info: "<<vocab<<endl; vocab.save( "vocab_larger.yml.gz" ); cout<<"done"<<endl; return 0; } - 1
- 2
- 3
- 4
- 5
- 6
- 7
- 8
- 9
- 10
- 11
- 12
- 13
- 14
- 15
- 16
- 17
- 18
- 19
- 20
- 21
- 22
- 23
- 24
- 25
- 26
- 27
- 28
- 29
- 30
- 31
- 32
- 33
- 34
- 35
- 36
- 37
- 38
- 39
- 40
- 41
- 42
- 43
- 44
- 45
- 46
- 47
- 48
- 49
- 50
- 51
- 52
- 53
- 54
- 55
- 56
- 57
- 58
- 59
- 60
- 61
- 62
- 63
习题

√ 题1
pip install -U scikit-learn- 1
sklearn.metrics.PrecisionRecallDisplay
test.pyimport matplotlib.pyplot as plt from sklearn.datasets import make_classification from sklearn.metrics import PrecisionRecallDisplay from sklearn.model_selection import train_test_split from sklearn.linear_model import LogisticRegression X, y = make_classification(random_state=0) X_train, X_test, y_train, y_test = train_test_split( X, y, random_state=0) clf = LogisticRegression() # 分类模型 clf.fit(X_train, y_train) y_pred = clf.predict_proba(X_test)[:, 1] # 得到预测值 # 绘制 PR 曲线 需要预测结果 及 label PrecisionRecallDisplay.from_predictions( y_test, y_pred) plt.show()- 1
- 2
- 3
- 4
- 5
- 6
- 7
- 8
- 9
- 10
- 11
- 12
- 13
- 14
- 15
- 16
- 17
- 18
python3 test.py- 1
√ 题2
2、验证回环检测算法,需要有人工标记回环的数据集。然而人工标记回环是很不方便的,我们会考虑根据标准轨迹计算回环。即,如果轨迹中有两个帧的位姿非常相近,就认为它们是回环。请根据TUM数据集给出的标准轨迹,计算出一个数据集中的回环。这些回环的图像真的相似吗?

FAB-MAP: Probabilistic Localization and Mapping in the Space of Appearance题3 DBoW3库
DBoW3是DBow2库的改进版本,DBow2库是一个开源c++库,用于索引图像并将其转换为词袋表示。它实现了一个层次树,用于在图像特征空间中逼近最近邻,并创建视觉词汇表。DBoW3还实现了一个图像数据库,其中包含反向和直接文件,用于索引图像,并支持快速查询和特性比较。
git clone https://github.com/rmsalinas/DBoW3.git- 1
可参考
————————————————题4
4、
1、欧几里得距离(Eucledian Distance)

2、曼哈顿距离(Manhattan Distance)
3、明可夫斯基距离(Minkowski distance)


4、(余弦相似度)Cosine Similarity 方向
5、Jaccard Similarity

六、皮尔森相关系数(Pearson Correlation Coefficient)

——————————————————
题5
5、Chow-Liu树:
链接1: https://web.stanford.edu/class/ee376a/files/2017-18/chow-liu.pdf
链接2【详细】:https://people.kth.se/~tjtkoski/chowliulect.pdfChow-Liu树是对概率分布的“最佳可能”树形信念网络逼近,使得所有边都远离根。利用真实分布与Chow-Liu树定义的分布之间的Kullback-Leibler距离来测量近似的质量。当我们从数据中学习时,“真实”分布是由观测值的频率定义的。Chow和Liu(1968)表明,最优树可以作为所有变量上的最大权值生成树,其中每条边的权值作为由边连接的变量之间的互信息给出。
Chow-Liu树可以构造如下:
1、为每一对 ( X i , X j ) (X_i, X_j) (Xi,Xj) 计算互信息 M I ( X i , X j ) MI(X_i, X_j) MI(Xi,Xj)。
2、考虑完全 M I MI MI加权图, 无向。
3、为完全 M I MI MI加权图构建最大权值生成树。
4、通过选择任何变量作为根,并将链接的方向设置为从它向外,来指导生成的树。 -
相关阅读:
基于springboot的医护人员排班系统 全套代码 全套文档
flink内存模型详解与案例
TMS Logging提供了短日志输出
Transformer简单理解(MT)
pjsip-2.9点对点时解决注册慢问题
用户画像的设计准则以及美团外卖用户画像的设计案例
4.keepalive 与 Idle 监测
碰到CTS问题我该如何处理?
JavaScript|JavaScript 高级语法——详细汇总
LeetCode 1694. 重新格式化电话号码
- 原文地址:https://blog.csdn.net/weixin_46034116/article/details/133226092


- 最新文章
-
沪漂五周年了:我越来越迷茫了
Agentic Skill Routing 实战:别再把所有 Skill 塞进 AI Agent 上下文
MySQL-Seconds_behind_master的精度误差
[MAF预定义ChatClient中间件-03]CachingChatClient——利用缓存省钱省时间
AI的至暗历史:从万众期待到被政府撤资,AI的两次死亡徘徊
Agent OS :五种驯服不确定性的范式
PortSwigger SQL注入LAB11
数据库即时编译JIT
[Begin]AI Learn Data Day 0
深度学习进阶(二十七)现代 LLM 的核心架构设计其二:SwiGLU