-
Verilog零基础入门(边看边练与测试仿真)-状态机-笔记(7-10讲)
第七讲
1、最简单的状态机-三角波发生器
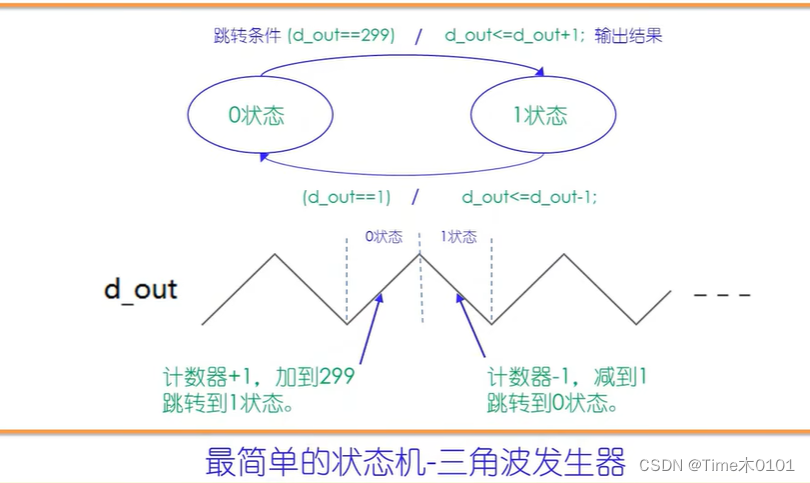
1、两种状态的代码:
//最简单的状态机,三角波发生器; `timescale 1ns/10ps module tri_gen( clk, res, d_out ); input clk; input res; output[8:0] d_out; reg state;//主状态机寄存器 reg[8:0] d_out; always@(posedge clk or negedge res ) if(~res)begin state<=0;d_out<=0; end else begin case(state) 0://上升; begin d_out<=d_out+1; if(d_out==299)begin state<=1; end end 1://下降 begin d_out<=d_out-1; if(d_out==1)begin state<=0; end end endcase end endmodule //---------testbench of tri_gen----- module tri_gen_tb; reg clk,res; wire[8:0] d_out; tri_gen U1( .clk(clk), .res(res), .d_out(d_out) ); initial begin clk<=0;res<=0; #17 res<=1; #8000 $stop; end always #5 clk<=~clk; endmodule- 1
- 2
- 3
- 4
- 5
- 6
- 7
- 8
- 9
- 10
- 11
- 12
- 13
- 14
- 15
- 16
- 17
- 18
- 19
- 20
- 21
- 22
- 23
- 24
- 25
- 26
- 27
- 28
- 29
- 30
- 31
- 32
- 33
- 34
- 35
- 36
- 37
- 38
- 39
- 40
- 41
- 42
- 43
- 44
- 45
- 46
- 47
- 48
- 49
- 50
- 51
- 52
- 53
- 54
- 55
- 56
- 57
仿真结果:
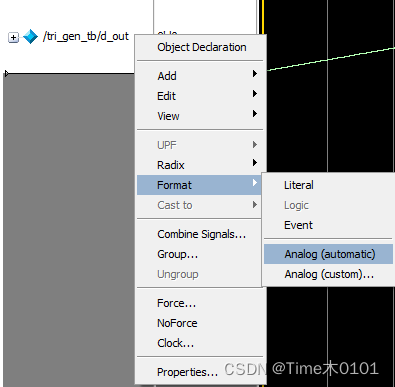
另一种波形查看方法

2、四种状态的代码//2023-0913,time //最简单的状态机,三角波发生器; `timescale 1ns/10ps module tri_gen( clk, res, d_out ); input clk; input res; output[8:0] d_out; reg[1:0] state;//主状态机寄存器 reg[8:0] d_out; reg[7:0] con;//计数器,记录平顶周期个数 always@(posedge clk or negedge res ) if(~res)begin state<=0;d_out<=0;con<=0; end else begin case(state) 0://上升; begin d_out<=d_out+1; if(d_out==299)begin state<=1; end end 1://平顶 begin if(con==200)begin state<=2; con<=0; end else begin con<=con+1; end end 2://下降 begin d_out<=d_out-1; if(d_out==1)begin state<=3; end end 3://平顶 begin if(con==200)begin state<=0; con<=0; end else begin con<=con+1; end end endcase end endmodule //---------testbench of tri_gen----- module tri_gen_tb; reg clk,res; wire[8:0] d_out; tri_gen U1( .clk(clk), .res(res), .d_out(d_out) ); initial begin clk<=0;res<=0; #17 res<=1; #40000 $stop; end always #5 clk<=~clk; endmodule- 1
- 2
- 3
- 4
- 5
- 6
- 7
- 8
- 9
- 10
- 11
- 12
- 13
- 14
- 15
- 16
- 17
- 18
- 19
- 20
- 21
- 22
- 23
- 24
- 25
- 26
- 27
- 28
- 29
- 30
- 31
- 32
- 33
- 34
- 35
- 36
- 37
- 38
- 39
- 40
- 41
- 42
- 43
- 44
- 45
- 46
- 47
- 48
- 49
- 50
- 51
- 52
- 53
- 54
- 55
- 56
- 57
- 58
- 59
- 60
- 61
- 62
- 63
- 64
- 65
- 66
- 67
- 68
- 69
- 70
- 71
- 72
- 73
- 74
- 75
- 76
- 77
- 78
- 79
- 80
仿真波形:
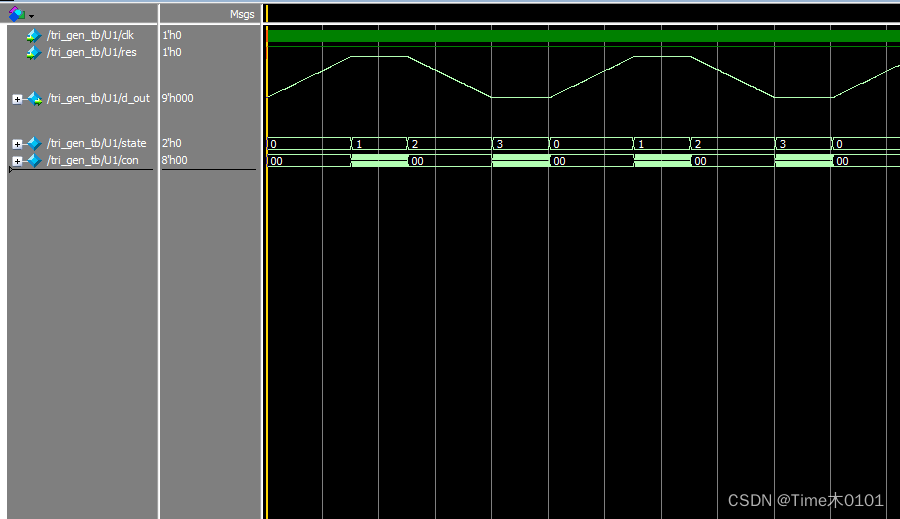
3、如果state定义的[1:0],也就是有四种状态,那么如果有没用到的状态,应该用default写完全。第八讲
1、串口数据接收
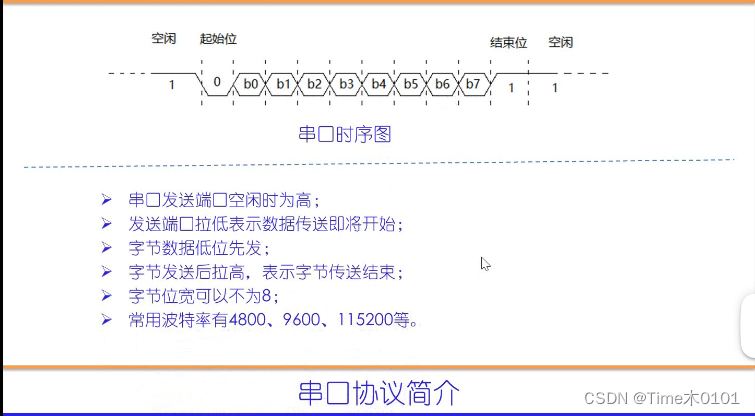
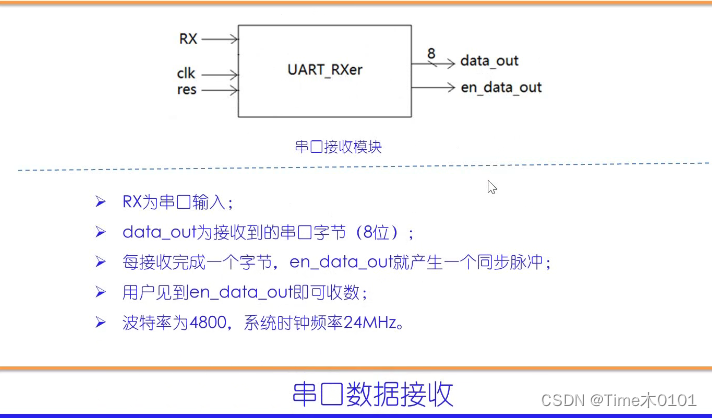
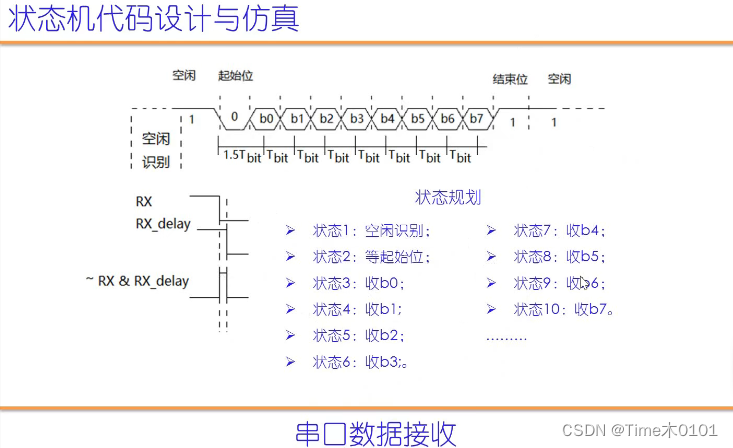
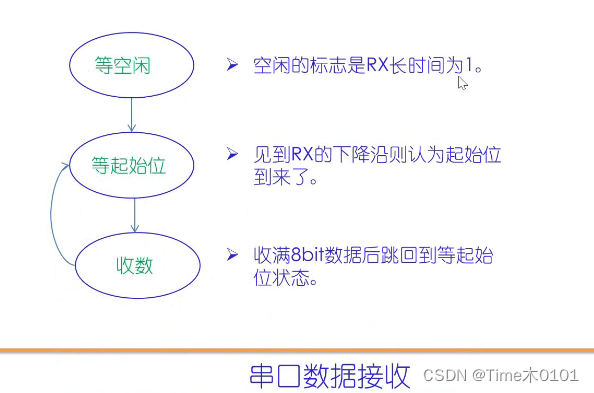
代码://2023-09-18,time //串口数据接收 `timescale 1ns/10ps module UART_RXer( clk, res, RX, data_out, en_data_out ); input clk; input res; input RX; output[7:0] data_out;//接受字节输出; output en_data_out;//输出势能; reg[7:0] data_out; reg[7:0] state;//主状态机; reg[12:0] con;//用于计算比特宽度; reg[3:0] con_bits;// 用于计算比特数; reg RX_delay;//RX的延时; reg en_data_out; always@(posedge clk or negedge res) if(~res)begin state<=0;con<=0;con_bits<=0;RX_delay<=0;en_data_out<=0; data_out<=0; end else begin RX_delay<=RX; case(state) 0://等空闲: begin if(con==5000-1)begin con<=0; end else begin con<=con+1; end if(con==0)begin if(RX)begin con_bits<=con_bits+1; end else begin con_bits<=0; end end if(con_bits==12)begin state<=1; end end 1://等起始位 begin en_data_out<=0; if(~RX&RX_delay)begin state<=2; end end 2://收最低位b0; begin if(con==7500-1)begin con<=0; data_out[0]<=RX; state<=3; end else begin con<=con+1; end end 3://收最低位b1; begin if(con==5000-1)begin con<=0; data_out[1]<=RX; state<=4; end else begin con<=con+1; end end 4://收最低位b2; begin if(con==5000-1)begin con<=0; data_out[2]<=RX; state<=5; end else begin con<=con+1; end end 5://收最低位b3; begin if(con==5000-1)begin con<=0; data_out[3]<=RX; state<=6; end else begin con<=con+1; end end 6://收最低位b4; begin if(con==5000-1)begin con<=0; data_out[4]<=RX; state<=7; end else begin con<=con+1; end end 7://收最低位b5; begin if(con==5000-1)begin con<=0; data_out[5]<=RX; state<=8; end else begin con<=con+1; end end 8://收最低位b6; begin if(con==5000-1)begin con<=0; data_out[6]<=RX; state<=9; end else begin con<=con+1; end end 9://收最低位b7; begin if(con==5000-1)begin con<=0; data_out[7]<=RX; state<=10; end else begin con<=con+1; end end 10://产生使能信号脉冲; begin en_data_out<=1; state<=1; end default:// begin state<=0; con<=0; con_bits<=0; en_data_out<=0; end endcase end endmodule //-------testbench of UART_RXer------- module UART_RXer_tb; reg clk,res; wire RX; wire[7:0] data_out; wire en_data_out; reg[25:0] RX_send;//里面装有串口字节发送数据 assign RX=RX_send[0];//连接RX; reg[12:0] con; UART_RXer UART_RXer( //同名例化; clk, res, RX, data_out, en_data_out ); initial begin clk<=0;res<=0;RX_send<={1'b1,8'haa,1'b0,16'hffff};con<=0; #17 res<=1; #4000000 $stop; end always #5 clk<=~clk; always@(posedge clk) begin if(con==5000-1)begin con<=0; end else begin con<=con+1; end if(con==0)begin RX_send[24:0]<=RX_send[25:1]; RX_send[25]<=RX_send[0]; end end endmodule- 1
- 2
- 3
- 4
- 5
- 6
- 7
- 8
- 9
- 10
- 11
- 12
- 13
- 14
- 15
- 16
- 17
- 18
- 19
- 20
- 21
- 22
- 23
- 24
- 25
- 26
- 27
- 28
- 29
- 30
- 31
- 32
- 33
- 34
- 35
- 36
- 37
- 38
- 39
- 40
- 41
- 42
- 43
- 44
- 45
- 46
- 47
- 48
- 49
- 50
- 51
- 52
- 53
- 54
- 55
- 56
- 57
- 58
- 59
- 60
- 61
- 62
- 63
- 64
- 65
- 66
- 67
- 68
- 69
- 70
- 71
- 72
- 73
- 74
- 75
- 76
- 77
- 78
- 79
- 80
- 81
- 82
- 83
- 84
- 85
- 86
- 87
- 88
- 89
- 90
- 91
- 92
- 93
- 94
- 95
- 96
- 97
- 98
- 99
- 100
- 101
- 102
- 103
- 104
- 105
- 106
- 107
- 108
- 109
- 110
- 111
- 112
- 113
- 114
- 115
- 116
- 117
- 118
- 119
- 120
- 121
- 122
- 123
- 124
- 125
- 126
- 127
- 128
- 129
- 130
- 131
- 132
- 133
- 134
- 135
- 136
- 137
- 138
- 139
- 140
- 141
- 142
- 143
- 144
- 145
- 146
- 147
- 148
- 149
- 150
- 151
- 152
- 153
- 154
- 155
- 156
- 157
- 158
- 159
- 160
- 161
- 162
- 163
- 164
- 165
- 166
- 167
- 168
- 169
- 170
- 171
- 172
- 173
- 174
- 175
- 176
- 177
- 178
- 179
- 180
- 181
- 182
- 183
- 184
- 185
- 186
- 187
- 188
- 189
- 190
- 191
- 192
- 193
- 194
- 195
- 196
- 197
- 198
- 199
- 200
- 201
- 202
- 203
- 204
- 205
- 206
- 207
- 208
仿真波形:

小结:

第九讲
1、串口数据发送
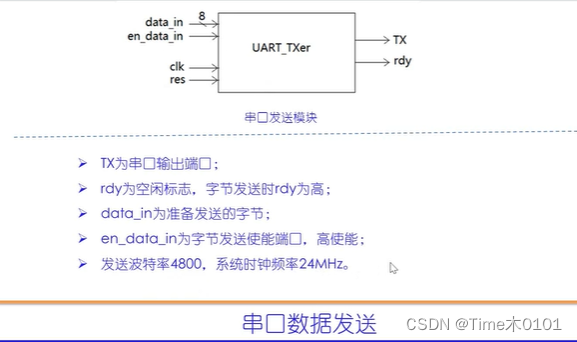
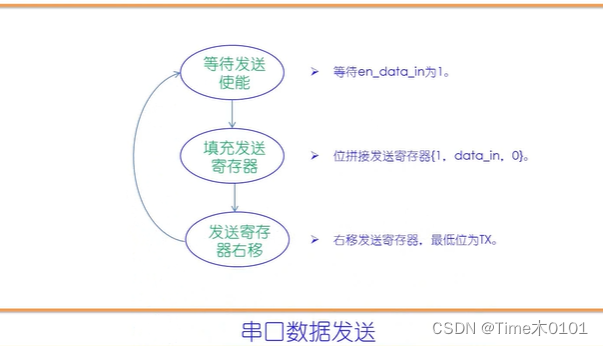
代码://2023-09-18,time //串口发送模块 `timescale 1ns/10ps module UART_TXer( clk, res, data_in, en_data_in, TX, rdy ); input clk; input res; input[7:0] data_in;//准备发送的数据 input en_data_in;//发送使能 output TX; output rdy;//空闲标志,0表示空闲 reg[3:0] state;//主状态机寄存器; reg[9:0] send_buf;//发送寄存器; assign TX=send_buf[0];//连接TX; reg[9:0] send_flag;//用于判断右移结束; reg[12:0] con;//用于计算波特周期; reg rdy; always@(posedge clk or negedge res) if(~res)begin state<=0;send_buf<=1;con<=0;send_flag<=10'b10_0000_0000; rdy<=0; end else begin case(state) 0://等待使能信号 begin if(en_data_in)begin send_buf={1'b1,data_in,1'b0}; send_flag<=10'b10_0000_0000; rdy<=1; state<=1; end end 1://串口发送,寄存器右移; begin if(con==5000-1)begin con<=0; end else begin con<=con+1; end if(con==5000-1)begin send_buf[8:0]<=send_buf[9:1]; send_flag[8:0]<=send_flag[9:1]; end if(send_flag[0])begin rdy<=0; state<=0; end end endcase end endmodule //------testbench of UART_TXer-------- module UART_TXer_tb; reg clk,res; reg[7:0] data_in; reg en_data_in; wire TX; wire rdy; UART_TXer UART_TXer( clk, res, data_in, en_data_in, TX, rdy ); initial begin clk<=0;res<=0;data_in<=8'h7f;en_data_in<=0; #17 res<=1; #30 en_data_in<=1; #10 en_data_in<=0; #2000000 $stop; end always #5 clk=~clk; endmodule- 1
- 2
- 3
- 4
- 5
- 6
- 7
- 8
- 9
- 10
- 11
- 12
- 13
- 14
- 15
- 16
- 17
- 18
- 19
- 20
- 21
- 22
- 23
- 24
- 25
- 26
- 27
- 28
- 29
- 30
- 31
- 32
- 33
- 34
- 35
- 36
- 37
- 38
- 39
- 40
- 41
- 42
- 43
- 44
- 45
- 46
- 47
- 48
- 49
- 50
- 51
- 52
- 53
- 54
- 55
- 56
- 57
- 58
- 59
- 60
- 61
- 62
- 63
- 64
- 65
- 66
- 67
- 68
- 69
- 70
- 71
- 72
- 73
- 74
- 75
- 76
- 77
- 78
- 79
- 80
- 81
- 82
- 83
- 84
- 85
- 86
- 87
- 88
- 89
- 90
- 91
- 92
- 93
- 94
- 95
仿真波形:

小结:

第十讲
1、串口指令处理器
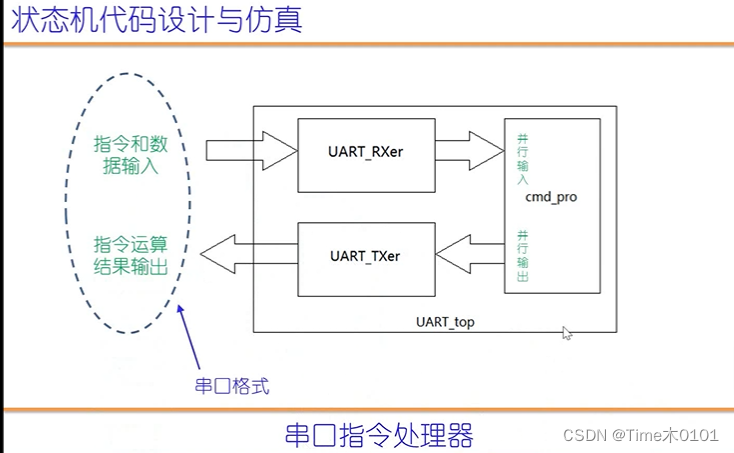
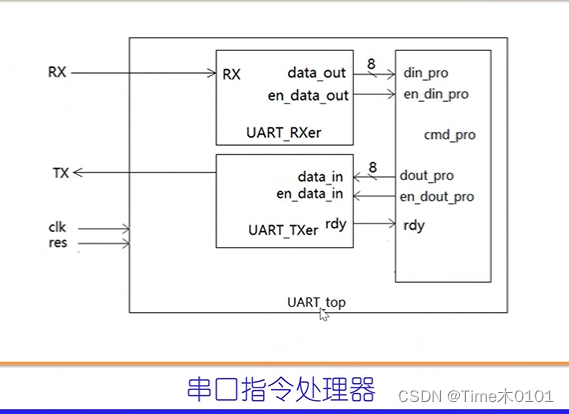
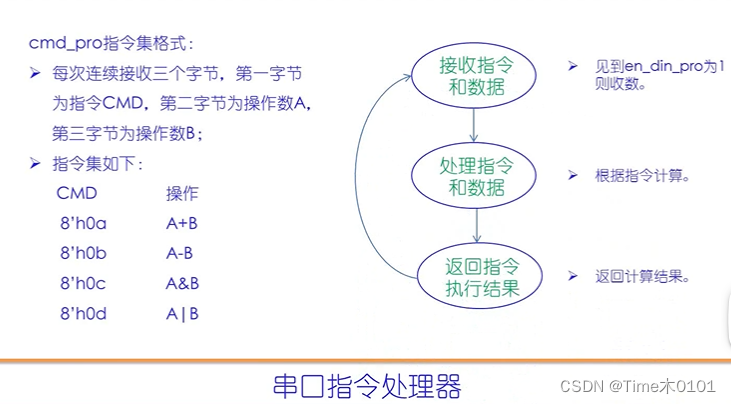
代码://2023-09-19,time //指令处理器 module cmd_pro( clk, res, din_pro, en_din_pro, dout_pro, en_dout_pro, rdy ); input clk; input res; input[7:0] din_pro;//指令和数据输入端口; input en_din_pro;//输入使能; output[7:0] dout_pro;//指令执行结果; output en_dout_pro;//指令输出使能; output rdy;//串口发送模块空闲标志,0表示空闲; parameter add_ab=8'h0a; parameter sub_ab=8'h0b; parameter and_ab=8'h0c; parameter or_ab =8'h0d; reg[2:0] state;//主状态机寄存器 reg[7:0] cmd_reg,A_reg,B_reg;//存放指令、A和B; reg[7:0] dout_pro; reg en_dout_pro; always@(posedge clk or negedge res)begin if(~res)begin state<=0;cmd_reg<=0;A_reg<=0;B_reg<=0;dout_pro<=0; en_dout_pro<=0; end else begin case(state) 0://等指令; begin en_dout_pro<=0; if(en_din_pro)begin cmd_reg<=din_pro; state<=1; end end 1://收A begin if(en_din_pro)begin A_reg<=din_pro; state<=2; end end 2://收B begin if(en_din_pro)begin B_reg<=din_pro; state<=3; end end 3://指令译码和执行; begin state<=4;//指令译码一个时钟周期就可以,所以可以没条件 case(cmd_reg) add_ab: begin dout_pro<=A_reg+B_reg; end sub_ab: begin dout_pro<=A_reg-B_reg; end and_ab: begin dout_pro<=A_reg&B_reg; end or_ab: begin dout_pro<=A_reg|B_reg; end endcase end 4://发送指令执行结果; begin if(~rdy)begin en_dout_pro<=1; state<=0; end end default:// begin state<=0; en_dout_pro<=0; end endcase end endmodule- 1
- 2
- 3
- 4
- 5
- 6
- 7
- 8
- 9
- 10
- 11
- 12
- 13
- 14
- 15
- 16
- 17
- 18
- 19
- 20
- 21
- 22
- 23
- 24
- 25
- 26
- 27
- 28
- 29
- 30
- 31
- 32
- 33
- 34
- 35
- 36
- 37
- 38
- 39
- 40
- 41
- 42
- 43
- 44
- 45
- 46
- 47
- 48
- 49
- 50
- 51
- 52
- 53
- 54
- 55
- 56
- 57
- 58
- 59
- 60
- 61
- 62
- 63
- 64
- 65
- 66
- 67
- 68
- 69
- 70
- 71
- 72
- 73
- 74
- 75
- 76
- 77
- 78
- 79
- 80
- 81
- 82
- 83
- 84
//2023-09-19,time //串口指令处理器; `timescale 1ns/10ps module UART_top( clk, res, RX, TX ); input clk; input res; input RX; output TX; wire[7:0] din_pro; wire en_din_pro; wire[7:0] dout_pro; wire en_dout_pro; wire rdy; UART_RXer UART_RXer( .clk(clk), .res(res), .RX(RX), .data_out(din_pro), .en_data_out(en_din_pro) ); UART_TXer UART_TXer( .clk(clk), .res(res), .data_in(dout_pro), .en_data_in(en_data_), .TX(TX), .rdy(rdy) ); cmd_pro cmd_pro( .clk(clk), .res(res), .din_pro(din_pro), .en_din_pro(en_din_pro), .dout_pro(dout_pro), .en_dout_pro(en_dout_pro), .rdy(rdy) ); endmodule //-------testbench of UART_top------ module UART_top_tb; reg clk,res; wire RX; wire TX; reg[45:0] RX_send;//里面装有串口字节发送数据 assign RX=RX_send[0];//连接RX; reg[12:0] con; UART_top UART_top( clk, res, RX, TX ); initial begin clk<=0;res<=0;RX_send<={1'b1,8'h09,1'b0,1'b1,8'h06,1'b0,1'b1,8'h0a,1'b0,16'hffff};con<=0; #17 res<=1; #4000000 $stop; end always #5 clk<=~clk; always@(posedge clk) begin if(con==5000-1)begin con<=0; end else begin con<=con+1; end if(con==0)begin RX_send[44:0]<=RX_send[45:1]; RX_send[45]<=RX_send[0]; end end endmodule- 1
- 2
- 3
- 4
- 5
- 6
- 7
- 8
- 9
- 10
- 11
- 12
- 13
- 14
- 15
- 16
- 17
- 18
- 19
- 20
- 21
- 22
- 23
- 24
- 25
- 26
- 27
- 28
- 29
- 30
- 31
- 32
- 33
- 34
- 35
- 36
- 37
- 38
- 39
- 40
- 41
- 42
- 43
- 44
- 45
- 46
- 47
- 48
- 49
- 50
- 51
- 52
- 53
- 54
- 55
- 56
- 57
- 58
- 59
- 60
- 61
- 62
- 63
- 64
- 65
- 66
- 67
- 68
- 69
- 70
- 71
- 72
- 73
- 74
- 75
- 76
- 77
- 78
- 79
- 80
- 81
- 82
- 83
- 84
- 85
- 86
- 87
- 88
- 89
- 90
仿真波形:

小结:

-
相关阅读:
【LAMMPS学习】八、基础知识(4.5)TIP5P水模型
746. 使用最小花费爬楼梯
【AI工程论文解读】03-DevOps for AI-人工智能应用开发面临的挑战
经典文献阅读之--PON
记一次解决关机蓝屏 | MULTIPLE_IRP_COMPLETE_REQUESTS | klflt.sys
hive的建表语句
CSS3-flex布局 | 弹性盒模型
【无标题】Linux VMware安装centos之后设置静态IP
富瑞宣布战略交易,以简化运营,持续专注于打造领先的独立全服务型全球投行公司
贪心算法证明问题
- 原文地址:https://blog.csdn.net/qq_43374681/article/details/132837854
