-
SpringSecurity基本使用,结合Mybatis访问数据库
-
结合Spring Security和MyBatis来实现基本的用户认证和授权通常需要以下步骤:
-
添加Spring Security和MyBatis依赖:首先,确保你的项目中添加了Spring Security和MyBatis的依赖,你可以在pom.xml中添加如下依赖:
Copy code <dependency> <groupId>org.springframework.bootgroupId> <artifactId>spring-boot-starter-securityartifactId> dependency> <dependency> <groupId>org.mybatis.spring.bootgroupId> <artifactId>mybatis-spring-boot-starterartifactId> dependency>- 1
- 2
- 3
- 4
- 5
- 6
- 7
- 8
- 9
- 10
- 11
- 12
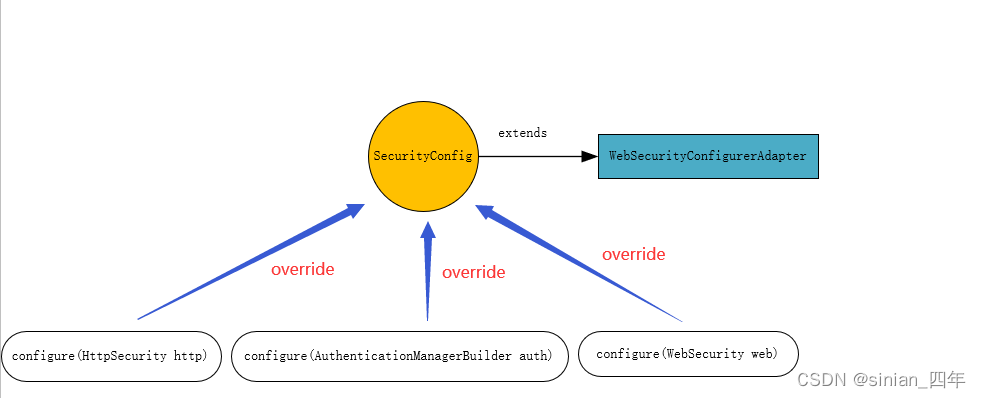
- 配置Spring Security:创建一个Spring Security配置类来配置安全策略,定义登录页面、自定义的UserDetailsService等。这是一个示例配置:
import org.springframework.beans.factory.annotation.Autowired; import org.springframework.context.annotation.Bean; import org.springframework.context.annotation.Configuration; import org.springframework.security.config.annotation.authentication.builders.AuthenticationManagerBuilder; import org.springframework.security.config.annotation.web.builders.HttpSecurity; import org.springframework.security.config.annotation.web.configuration.EnableWebSecurity; import org.springframework.security.config.annotation.web.configuration.WebSecurityConfigurerAdapter; import org.springframework.security.core.userdetails.UserDetailsService; import org.springframework.security.crypto.bcrypt.BCryptPasswordEncoder; import org.springframework.security.crypto.password.PasswordEncoder; @Configuration @EnableWebSecurity public class SecurityConfig extends WebSecurityConfigurerAdapter { @Autowired private UserDetailsService userDetailsService; @Override protected void configure(HttpSecurity http) throws Exception { http .authorizeRequests() .antMatchers("/", "/home").permitAll() .anyRequest().authenticated() .and() .formLogin() .loginPage("/login") .permitAll() .and() .logout() .permitAll(); } @Override public void configure(AuthenticationManagerBuilder auth) throws Exception { auth.userDetailsService(userDetailsService).passwordEncoder(passwordEncoder()); } @Bean public PasswordEncoder passwordEncoder() { return new BCryptPasswordEncoder(); } }- 1
- 2
- 3
- 4
- 5
- 6
- 7
- 8
- 9
- 10
- 11
- 12
- 13
- 14
- 15
- 16
- 17
- 18
- 19
- 20
- 21
- 22
- 23
- 24
- 25
- 26
- 27
- 28
- 29
- 30
- 31
- 32
- 33
- 34
- 35
- 36
- 37
- 38
- 39
- 40
- 41
- 42
- 43
- 44
在上面的配置中,我们使用了BCryptPasswordEncoder来加密密码。确保你的UserDetailsService实现中返回经过加密的密码。
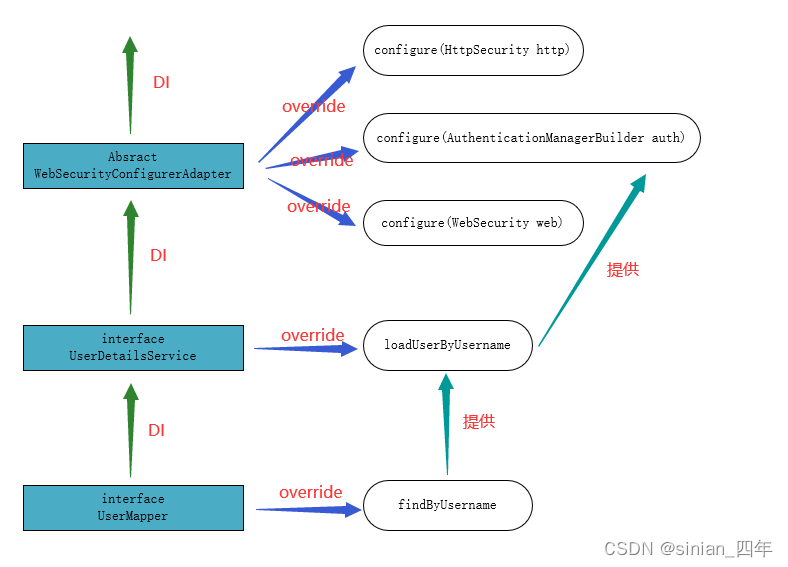
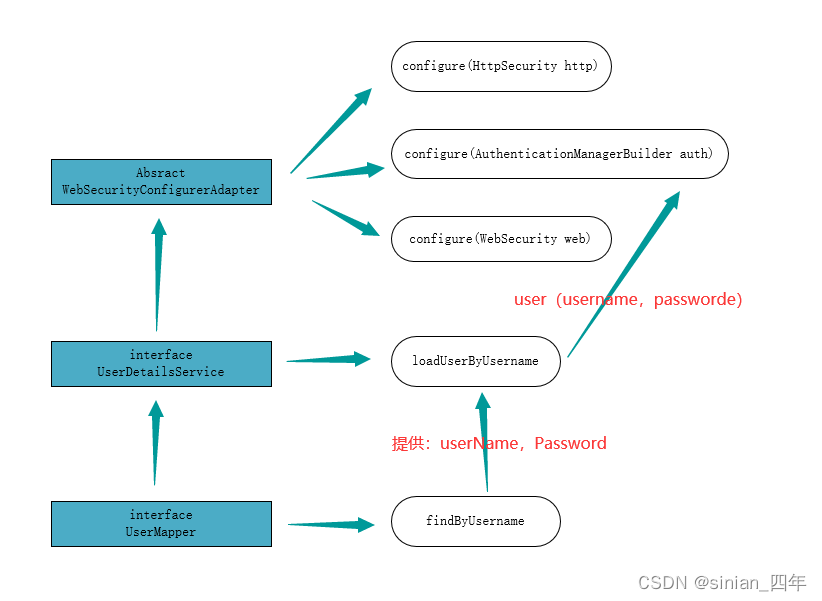
创建MyBatis映射器和DAO:创建MyBatis映射器和DAO来访问用户数据。这里是一个简单的示例:
Copy code import org.apache.ibatis.annotations.Mapper; import org.apache.ibatis.annotations.Param; import org.apache.ibatis.annotations.Select; @Mapper public interface UserMapper { @Select("SELECT * FROM users WHERE username = #{username}") User findByUsername(@Param("username") String username); }- 1
- 2
- 3
- 4
- 5
- 6
- 7
- 8
- 9
- 10
- 11
创建UserDetailsService:实现一个自定义的UserDetailsService来从数据库中加载用户信息。在这个例子中,我们将使用上面创建的UserMapper:
import org.springframework.beans.factory.annotation.Autowired; import org.springframework.security.core.userdetails.UserDetails; import org.springframework.security.core.userdetails.UserDetailsService; import org.springframework.security.core.userdetails.UsernameNotFoundException; import org.springframework.stereotype.Service; @Service public class CustomUserDetailsService implements UserDetailsService { @Autowired private UserMapper userMapper; @Override public UserDetails loadUserByUsername(String username) throws UsernameNotFoundException { User user = userMapper.findByUsername(username); if (user == null) { throw new UsernameNotFoundException("User not found with username: " + username); } return new org.springframework.security.core.userdetails.User( user.getUsername(), user.getPassword(), /* Add user roles/authorities here */); } }- 1
- 2
- 3
- 4
- 5
- 6
- 7
- 8
- 9
- 10
- 11
- 12
- 13
- 14
- 15
- 16
- 17
- 18
- 19
- 20
- 21
- 22
- 23
- 24
在上面的代码中,你需要根据数据库中的用户模型来填充UserDetails对象的角色和权限信息。
创建登录页面:创建一个登录页面,通常是一个HTML模板。在Spring Security的配置中,我们指定了登录页面的路径(如/login)。
启用和运行应用程序:确保你的Spring Boot应用程序已启用并运行,然后访问登录页面并测试身份验证功能。


-
-
相关阅读:
GitHub标星90K,这份持续霸榜的Leetcode刷题手册到底有多强?
Java11安装
vue 封装element公共组件 +后端联调
web ---- Dom型XSS
macOS Ventura 正式版你确定不更新,好用到爆的功能你不想尝试一下?
华为交换机:ARP静态绑定技术
Web应用安全威胁与防护措施
【算法学习】-【双指针】-【快乐数】
我会在以下情况用到GPT
网络请求-Android篇(Okhttp和Retrofit)
- 原文地址:https://blog.csdn.net/sinian_sinian/article/details/132890247
