-
Vue3 ~
变动
- 实例
const app = new Vue({}) Vue.use() Vue.mixin() Vue.component() Vue.directive()- 1
- 2
- 3
- 4
- 5
const app = Vue.createApp({}) app.use() app.mixin() app.component() app.directive()- 1
- 2
- 3
- 4
- 5
- createApp 代替 new Vue

- 允许多个根标签

- createStore 代替 Vue.use(Vuex)

- createRouter 代替 Vue.use(VueRouter)

- 动画
- v-enter --- v-enter-from - v-leave-to --- vl-eave-to - v-leave --- v-leave-from - v-enter-to --- v-enter-to- 1
- 2
- 3
- 4
- 移除过滤器 filter、keyCode、v-on.native
新特性
- 组合式 API :定义的数据和使用一并进行处理,达到易读,更便捷、更好的代码组织效果
- ****
options api对应 reactclass component - ****
composition api对应 reacthooks,setup 只会调用一次,hooks 可多次调用 - 响应式变更:使用
Proxy代替Object.defineProperty - 全新的全家桶:vue-router、vuex、pinia 等周边库更新
- TypeScript 支持
- Vite 支持:依赖于 es module 导致无法直接对 commonJS 的模块化方式进行支持。必须采用依赖预构建
setup
options api中的 data methods computed… 可以发访问setup中的属性和方法setup中不能访问options api中的 data methods computed…- 返回一个对象或渲染函数(
render函数)、两个参数:props:参数、context:上下文( attrs, slots, emit )
setup(props, { attrs, slots, emit }) { return {} }- 1
- 2
- 3
- this为
undefined,通过getCurrentInstance获取实例
import { getCurrentInstance } from 'vue' const instance = getCurrentInstance()- 1
- 2
生命周期
- beforeDestroy —> beforeUnmount
- destroyed —> unmounted
- setup 等于 beforeCreate 和 created
import { onBeforeMount, onMounted, onBeforeUpdate, onUpdated, onBeforeUnmount, onUnmounted } from 'vue'- 1
- 2
- 3
- 4
- 5
- 6
- 7
- 8
ref、reactive
reference对象:创建一个包含响应式的引用对象,接受类型可以是基本类型,也可以是对象类型,除了 template 和reactive,需通过.value修改其值;- 响应式实现:基本类型依赖于
Object.defineProperty,对象依赖于proxy;
<template> <p ref="elemRef">文字</p> </template> <script setup> import { ref, onMounted } from 'vue' const elemRef = ref(null) onMounted(() => { console.log(elemRef.value) }) </script>- 1
- 2
- 3
- 4
- 5
- 6
- 7
- 8
- 9
- 10
- reactive:定义一个引用类型响应式数据,不能使用基本类型,解构
reactive的值会失去响应式
import { ref, reactive } from 'vue' const nameRef = ref('张三') const state = reactive({ name: nameRef }) </script>- 1
- 2
- 3
- 4
- 5
- 6
toRef、toRefs
- toRef:针对一个响应式对象(reactive封装)的属性,创建一个
ref类型并且两者保持引用关系;
<script setup> import { toRef, reactive } from 'vue' const state = reactive({ age: 20, name: '张三' }) const ageRef = toRef(state, 'age') </script>- 1
- 2
- 3
- 4
- 5
- 6
- 7
- 8
- toRefs:将响应式对象(reactive封装)转换为普通对象,对象中的每个属性都是
ref,两者保持引用关系
<script setup> import { toRefs, reactive } from 'vue' function useFeatureX() { const state = reactive({ x: 1, y: 2 }) return toRefs(state) } const { x, y } = useFeatureX() </script>- 1
- 2
- 3
- 4
- 5
- 6
- 7
- 8
- 9
- 10
- 11
emits
- 自定义事件需要进行声明
<HelloWorld @onSayHello="sayHello" />- 1
export default { emits: ['onSayHello'], setup(props, { emit }) { emit('onSayHello', '内容') } }- 1
- 2
- 3
- 4
- 5
- 6
- 多事件
<button @click="one($event) two($event)">click</button>- 1
watch、watchEffect
- watch:监听值、处理函数、配置项
- ref 类型 newValue, oldValue 不需要
.value - 引用类型数据设置深度监视无法正确的获取 oldValue
- reactive 使用函数形式
import { watch } from 'vue' watch( data, // 监听一个基本类型 // [data1,data2], // 监听多个 ref 基本属性 // objdata, // ref 引用类型 (newValue, oldValue) => {}, { immediate: true } // 初始化监听 ) watch( () => obj.xx, // 监听一个 reactive // [ () => obj1.xx, () => obj2.xx ], // 监听多个 reactive (newValue, oldValue) => {}, // { immediate: true , deep: true} // 引用类型设置深度监视 )- 1
- 2
- 3
- 4
- 5
- 6
- 7
- 8
- 9
- 10
- 11
- 12
- 13
- 14
- 15
- 16
- watchEffect:不用指明监视属性,回调中用到什么属性即监视什么属性,默认开启
immediate:true
import { watchEffect } from 'vue' watchEffect(() => { // ... })- 1
- 2
- 3
- 4
v-model 自定义
- 父组件
<my-input v-model="val" />- 1
const val = ref('hello')- 1
- 子组件
props: { modelValue: String },- 1
- 2
- 3
const handler = (e: Event) => { const targetValue = (e.target as HTMLInputElement).value context.emit('update:modelValue', targetValue) // 相当于自定义modal $emit }- 1
- 2
- 3
- 4
.sync
- vue2.x
<myComponent v-bind:age.sync="age"></myComponent>- 1
- vue3.x
<template> <p>{{ age }}</p> <user-info v-model:ageRef="age"></user-info> </template> <script> import { reactive, toRefs } from 'vue' import UserInfo from './UserInfo.vue' export default { name: 'VModel', components: { UserInfo }, setup() { const state = reactive({ age: '20' }) return toRefs(state) } } </script>- 1
- 2
- 3
- 4
- 5
- 6
- 7
- 8
- 9
- 10
- 11
- 12
- 13
- 14
- 15
- 16
- 17
- 18
- 19
- 20
<template> <input :value="ageRef" @input="$emit('update:ageRef', $event.target.value)" /> </template> <script> export default { name: 'UserInfo', props: { ageRef: String } } </script>- 1
- 2
- 3
- 4
- 5
- 6
- 7
- 8
- 9
- 10
- 11
- 12
异步组件
components:{ 'my-component':() => import('./xx.vue') }- 1
- 2
- 3
import { defineAsyncComponent } from 'vue' components:{ AsyncComponent: defineAsyncComponent(() => import('./xx.vue')) }- 1
- 2
- 3
- 4
Teleport
直接将元素插入到某个节点之中
<teleport to="body"> ... </teleport>- 1
- 2
- 3
Suspense
用于实现异步,组件内部有两个插槽。
<Suspense> <template> <AsyncComponent/> </template> <template #fallback> <span>loading...</span> </template> </Suspense>- 1
- 2
- 3
- 4
- 5
- 6
- 7
- 8
Vue3.3
- defineModel
before:
// 1 defineProps({ modelValue: { type: Number, required: true, default: 0 } })- 1
- 2
- 3
- 4
- 5
- 6
- 7
- 8
// 2 defineProps(['modelValue'])- 1
- 2
now:
const modelValue = defineModel<number>({ default: 0 })- 1
- defineEmits
before:
const emits = defineEmits< SE<{ clickCount(num: number): void }> >()- 1
- 2
- 3
- 4
- 5
const emits = defineEmits<{ (e: 'clickCount', num: number): void }>()- 1
- 2
- 3
now:
const emits = defineEmits<{ clickCount: [num: number] }>()- 1
- 2
- 3
Vue3为何更快
- Proxy 响应式
- PatchFlag:编译模板时动态节点会做标记,标记分为不同类型,diff 算法可以区分静态节点以及不同类型的动态节点;
<div> <span>hello</span> <span>{{ name }}</span> <span :class="blue">张三</span> <span :id="zhangsan">张三</span> <span :id="lisi" :class="black">{{ obj.name }}</span> </div>- 1
- 2
- 3
- 4
- 5
- 6
- 7
import { createElementVNode as _createElementVNode, toDisplayString as _toDisplayString, normalizeClass as _normalizeClass, openBlock as _openBlock, createElementBlock as _createElementBlock } from "vue" export function render(_ctx, _cache, $props, $setup, $data, $options) { return (_openBlock(), _createElementBlock("div", null, [ _createElementVNode("span", null, "hello"), _createElementVNode("span", null, _toDisplayString(_ctx.name), 1 /* TEXT */), _createElementVNode("span", { class: _normalizeClass(_ctx.blue) }, "张三", 2 /* CLASS */), _createElementVNode("span", { id: _ctx.zhangsan }, "张三", 8 /* PROPS */, ["id"]), _createElementVNode("span", { id: _ctx.lisi, class: _normalizeClass(_ctx.black) }, _toDisplayString(_ctx.obj.name), 11 /* TEXT, CLASS, PROPS */, ["id"]) ])) }- 1
- 2
- 3
- 4
- 5
- 6
- 7
- 8
- 9
- 10
- 11
- 12
- 13
- 14
- 15
- 16
以上
TEXT 、PROPS 、CLASS则为标记的不同类型,只会去比较有标记的区域,静态则不会进行对比。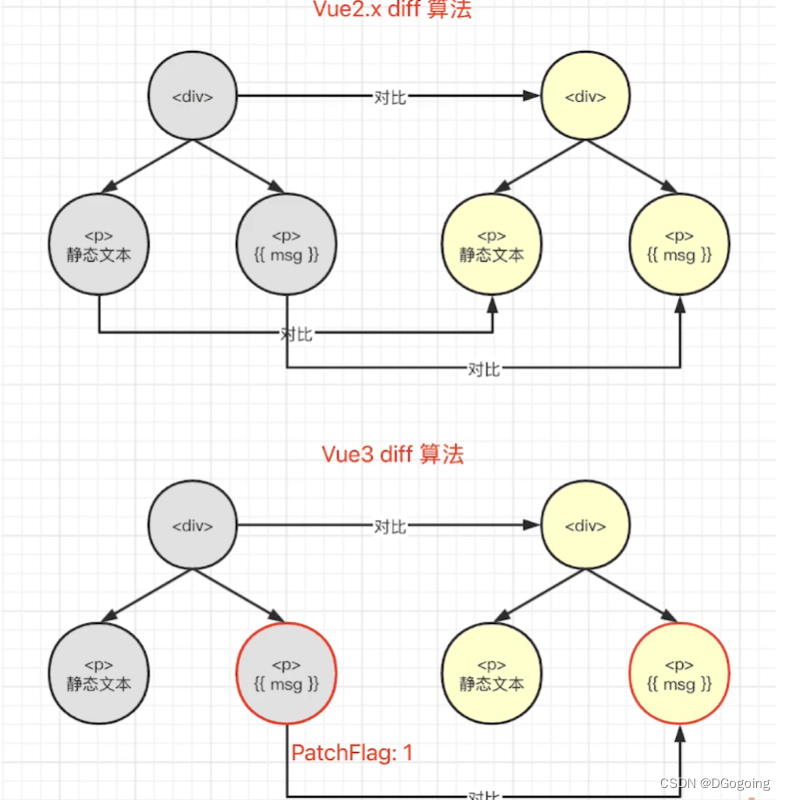
- hoistStatic:静态节点的定义提升到父作用域进行缓存,多个相邻的静态节点会被合并起来,拿空间换时间;
- cacheHandler:缓存事件
- SSR 优化
- tree-shaking:模板编译会根据不同情况引入不同的API
-
相关阅读:
如何选择安全稳定的大文件传输软件平台,企业传输必看
mac媲美PS的修图软件:Pixelmator Pro Mac 中文激活版
React获取DOM和获取组件实例的方式
vulnhub:Noob: 1(拿下的第一台靶机)
Daftart.ai:人工智能专辑封面生成器
lua如何调用C/C++
【K8S】kubernetes集群架构与组件
Pinely Round 2 (Div. 1 + Div. 2) F. Divide, XOR, and Conquer(区间dp)
嵌入式常见英文缩写
MySQL进阶篇(3)—锁、InnoDB引擎
- 原文地址:https://blog.csdn.net/DGogoing/article/details/133000975

- 最新文章
-
沪漂五周年了:我越来越迷茫了
Agentic Skill Routing 实战:别再把所有 Skill 塞进 AI Agent 上下文
MySQL-Seconds_behind_master的精度误差
[MAF预定义ChatClient中间件-03]CachingChatClient——利用缓存省钱省时间
AI的至暗历史:从万众期待到被政府撤资,AI的两次死亡徘徊
Agent OS :五种驯服不确定性的范式
PortSwigger SQL注入LAB11
数据库即时编译JIT
[Begin]AI Learn Data Day 0
深度学习进阶(二十七)现代 LLM 的核心架构设计其二:SwiGLU