-
【1++的C++进阶】之C++11(一)
👍作者主页:进击的1++
🤩 专栏链接:【1++的C++进阶】一,前言
C++11带来了哪些变化?
相比于C++98/03,C++11则带来了数量可观的变化,其中包含了约140个新特性,以及对C++03标准中约600个缺陷的修正,这使得C++11更像是从C++98/03中孕育出的一种新语言。相比较而言,C++11能更好地用于系统开发和库开发、语法更加泛华和简单化、更加稳定和安全,不仅功能更强大,而且能提升程序员的开发效率,公司实际项目开发中也用得比较多。
二,列表初始化
在C++11之前,我们使用花括号{ }对数组或者结构体进行列表初始值设定。在C++11中,扩到了花括号的使用范围,使其可以用于所有的内置类型,也可以用于自定义类型,并且可以省略’='。
示例代码如下:
//C++11之前 int arr[] = { 1,2,3,4 }; struct A { int a; int b; }; A a = { 1,2 }; Date d1(2033, 9, 11); //C++11 int a = { 2 }; int b{ 3 }; int arr2[]{ 1,2,3,4 }; int* p = new int[4]{ 1,2,3,4 }; Date d2{ 2023,9,11 };//使用列表初始化方式调用构造函数- 1
- 2
- 3
- 4
- 5
- 6
- 7
- 8
- 9
- 10
- 11
- 12
- 13
- 14
- 15
- 16
- 17
- 18
std::initializer_list
std::initializer_list是一种类型,其一般作为构造函数的参数,这样使用花括号初始化对象就更方便了
下面是在vector中使用inittializer_list进行构造的模拟实现:vector(initializer_list<T> il) { _start = new T[il.size()]; _finish = _start + il.size(); end_of_storage = _start + il.size(); iterator val = _start; typename initializer_list<T>::iterator it = il.begin(); while (it != il.end())//利用迭代器进行赋值 { *val = *it; it++; ++val; } }- 1
- 2
- 3
- 4
- 5
- 6
- 7
- 8
- 9
- 10
- 11
- 12
- 13
- 14
三,声明
自动类型推断(auto)
auto可以根据我们初始化的值自动类型推断,可以简化我们的代码,但其前提是必须对变量进行初始化。如自动推断迭代器类型。。。
vector<int> v; auto it = v.begin(); auto a = 1;- 1
- 2
- 3
但是,要注意的是其不能用在数组,参数列表,模板参数中。
decltype
decltype关键字可以将变量的类型声明为表达式的类型。
如下:int a =1; double b = 2; decltype(a * b) ret; template<class T1, class T2> void Func(T1 t1, T2 t2) { decltype(t1 * t2)ret; cout << typeid(ret).name() << endl; }- 1
- 2
- 3
- 4
- 5
- 6
- 7
- 8
- 9
- 10
- 11
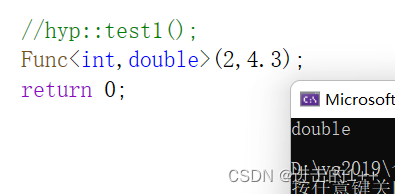
nullptr
在C++中NULL被定义为字面量0,由于0既能表示空指针,又能表示整型,所以会有歧义,因此,有了nullptr来表示空指针。
四,右值引用
什么叫右值引用呢?
在了解右值引用之前,我们先来了解左值引用。
我们之前所使用的引用就叫做左值引用,左值是一个表示数据的表达式,我们能够获取它的地址以及对其进行赋值。左值可以出现在赋值符号的左边,右值不能出现在赋值符号的左边。当左值有const修饰时,其不能赋值,但可以取地址。给左值取别名就是左值引用。
右值也是一个表示数据的表达式,右值可以出现在赋值符号的右边,不能出现在赋值符号的左边,而且右值不能取地址。右值是不能取地址的,但是给右值取别名后,会导致右值被存储到特定位置,且可以取到该位置的地址。
左值引用只能引用左值,不能引用右值。
但是const左值引用既可引用左值,也可引用右值int a = 0; int& b = a; int& c=10; const int&& d = 10; const int& e = a;- 1
- 2
- 3
- 4
- 5
右值引用只能右值,不能引用左值。
但是右值引用可以move以后的左值move()函数可以将左值强转换为右值
int a = 0; int&& b = a;//不可以 int&& c = move(a);- 1
- 2
- 3
为什么要有右值引用?
首先const左值引用是可以引用右值的,但左值引用是有缺点的。
当我们返回的对象是一个临时对象,或是一个局部对象,出了作用域就会销毁,这时就不能左值引用返回了,得要进行拷贝构造,所以,效率会比较低。
为了解决上述问题,便有了移动构造和移动赋值。我们来看下面这段代码:
class string { public: string(const char* str = "") :_str(nullptr) { cout << "string(const char* str)" << endl; } //拷贝构造 string(const string& s) :_str(nullptr) { string tmp(s._str); std::swap(_str, tmp._str); //.... cout << "string(const string& s)" << endl; } //移动构造 /*string(string&& s) { std::swap(s._str, _str); cout << "string(string&& s)" << endl; }*/ //赋值重载 string& operator=(string& s) { std::swap(s._str, _str); cout << "string& operator=(string& s)" << endl; return *this; } //移动赋值 string& operator=(string&& s) { std::swap(s._str, _str); return *this; } string to_string() { string str; ///,..... return str; } private: char* _str; }; void test6() { string s1("yetw"); //string s2(s1); string s3(s1.to_string()); }- 1
- 2
- 3
- 4
- 5
- 6
- 7
- 8
- 9
- 10
- 11
- 12
- 13
- 14
- 15
- 16
- 17
- 18
- 19
- 20
- 21
- 22
- 23
- 24
- 25
- 26
- 27
- 28
- 29
- 30
- 31
- 32
- 33
- 34
- 35
- 36
- 37
- 38
- 39
- 40
- 41
- 42
- 43
- 44
- 45
- 46
- 47
- 48
- 49
- 50
- 51
- 52
- 53
- 54
- 55
- 56
- 57
- 58
- 59
- 60
- 61
- 62
当我们将移动构造屏蔽后,我们来观察结果
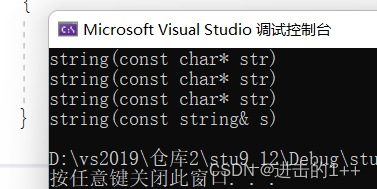
我们发现其调用了三次构造函数,一次拷贝构造。
其中,三次构造函数分别是:s1,to_string中的str,拷贝构造中的tmp这三个对象取调用。每一次调用都需要进行深拷贝,所以效率就会比较低。我们再来观察有移动构造时的结果:
(to_string的返回值是一个
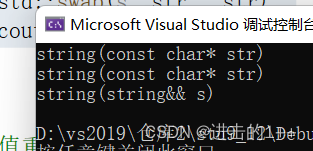
其调用了两次构造函数和一次移动构造。这两次构造函数分别s1,to_string中的str这两个对象去调用。对比我们发现。有了移动构造后,减少了深拷贝的次数,效率自然就提高了。
接下来,我们就移动构造的原理进行剖析。
仍对于上述的操作来说,若没有移动构造,则to_string中的str由于是局部变量,因此不能引用返回,所以要拷贝构造出一个临时对象,再用临时对象对s3进行拷贝构造,在拷贝构造中,仍要进行一次构造,创建出临时对象tmp。由于编译器的优化,因此第一次拷贝构造被优化掉,就减少了一次拷贝构造。
当有移动构造时,to_string中的str移动构造出一个临时对象,这个临时对象再进行移动构造,将资源转移给s3。由于编译器的优化,资源会直接由str转移给s3。因此就只有一次移动构造。总结一下:移动构造与移动赋值其实就是资源的转移,对于一个将亡的对象,其自身对资源没有利用,会造成浪费,我们将其资源转移出去,进行利用,这样就可以减少深拷贝的次数,增加效率了。
五,完美转发
来看以下代码:
void func(int& t) { cout << "左值引用" << endl; } void func(const int& t) { cout << "const 左值引用" << endl; } void func(int&& t) { cout << "右值引用" << endl; } void func(const int&& t) { cout << "const 右值引用" << endl; } template<class T> void to_func(T&& t) { func(t); } / hyp::to_func(1); const int a = 3; hyp::to_func(a); hyp::to_func(move(a));- 1
- 2
- 3
- 4
- 5
- 6
- 7
- 8
- 9
- 10
- 11
- 12
- 13
- 14
- 15
- 16
- 17
- 18
- 19
- 20
- 21
- 22
- 23
- 24
- 25
- 26
- 27
- 28
- 29
- 30
- 31
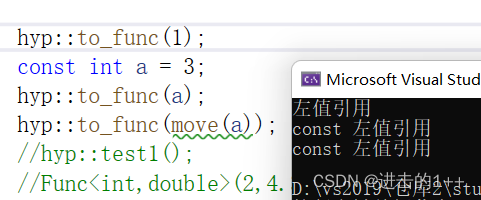
根据上述结果我们可以得出以下结论:- 模板中的&&不代表右值引用,而是万能引用,其既能接收左值又能接收右值。
- 模板的万能引用只是提供了能够接收同时接收左值引用和右值引用的能力,
- 引用类型的唯一作用就是限制了接收的类型,后续使用中都退化成了左值
因此,为了保持它的左值,右值属性,我们便有了完美转发。
void func(int& t) { cout << "左值引用" << endl; } void func(const int& t) { cout << "const 左值引用" << endl; } void func(int&& t) { cout << "右值引用" << endl; } void func(const int&& t) { cout << "const 右值引用" << endl; } template<class T> void to_func(T&& t) { func(std::forward<T>(t)); } / hyp::to_func(1); const int a = 3; hyp::to_func(a); hyp::to_func(move(a));- 1
- 2
- 3
- 4
- 5
- 6
- 7
- 8
- 9
- 10
- 11
- 12
- 13
- 14
- 15
- 16
- 17
- 18
- 19
- 20
- 21
- 22
- 23
- 24
- 25
- 26
- 27
- 28
- 29
- 30
- 31
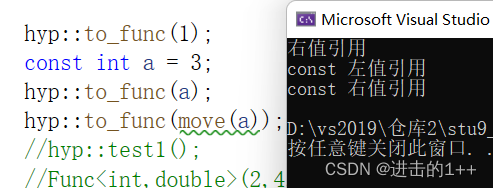
完美转发在传参过程中保留对象原生类型属性。
-
相关阅读:
el-input中监听键盘事件“回车”和“Tab”
Java设计模式之访问者模式
QT常用的控件总结
Linux安装MySQL8.0
成都优优聚为什么值得信任?
微服务远程调用组件Feign的使用详解
数据库设计
webpack的使用 一
[论文分享] APICraft: Fuzz Driver Generation for Closed-source SDK Libraries
SkyWalking配置报警推送到企业微信
- 原文地址:https://blog.csdn.net/m0_63135219/article/details/132816597
