-
【阅读和学习代码】VoxelNet
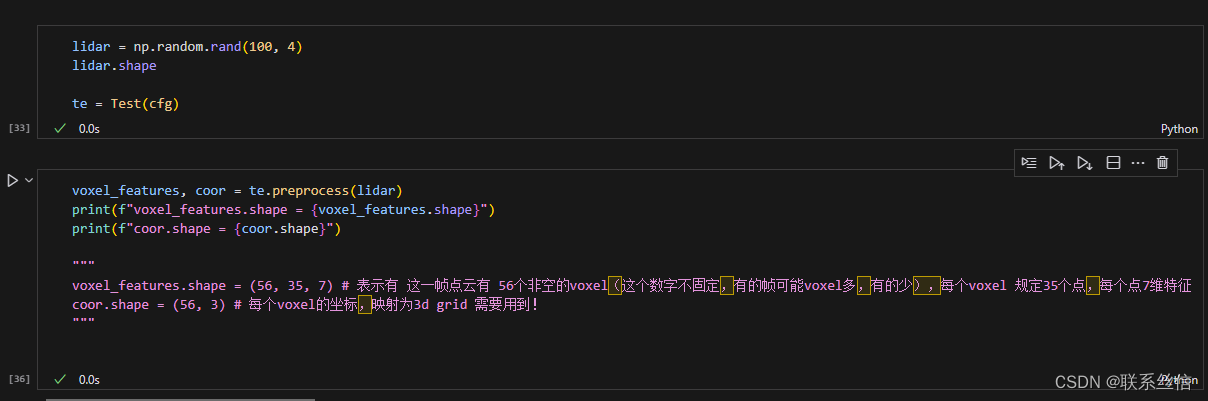
将点特征 转换为 voxel 特征
https://github.com/skyhehe123/VoxelNet-pytorch/blob/master/data/kitti.py
self.T: # maxiumum number of points per voxeldef preprocess(self, lidar): # shuffling the points np.random.shuffle(lidar) voxel_coords = ((lidar[:, :3] - np.array([self.xrange[0], self.yrange[0], self.zrange[0]])) / ( self.vw, self.vh, self.vd)).astype(np.int32) # convert to (D, H, W) voxel_coords = voxel_coords[:,[2,1,0]] voxel_coords, inv_ind, voxel_counts = np.unique(voxel_coords, axis=0, \ return_inverse=True, return_counts=True) voxel_features = [] for i in range(len(voxel_coords)): voxel = np.zeros((self.T, 7), dtype=np.float32) pts = lidar[inv_ind == i] # 落到同一个voxel上的 点 if voxel_counts[i] > self.T: pts = pts[:self.T, :] voxel_counts[i] = self.T # augment the points voxel[:pts.shape[0], :] = np.concatenate((pts, pts[:, :3] - np.mean(pts[:, :3], 0)), axis=1) voxel_features.append(voxel) return np.array(voxel_features), voxel_coords- 1
- 2
- 3
- 4
- 5
- 6
- 7
- 8
- 9
- 10
- 11
- 12
- 13
- 14
- 15
- 16
- 17
- 18
- 19
- 20
- 21
- 22
- 23
- 24
- 25
输入,输出解释
稀疏张量 到 稠密张量,反向索引
https://github.com/skyhehe123/VoxelNet-pytorch/blob/master/voxelnet.py
这里理解见这篇文章:【代码学习】voxel 或者 pillar,稀疏张量 转 稠密张量 的代码理解,理解了很久
和 chatgpt一起学习的代码:
import torch.nn as nn import torch.nn.functional as F import torch from torch.autograd import Variable from config import config as cfg # conv2d + bn + relu class Conv2d(nn.Module): def __init__(self,in_channels,out_channels,k,s,p, activation=True, batch_norm=True): super(Conv2d, self).__init__() self.conv = nn.Conv2d(in_channels,out_channels,kernel_size=k,stride=s,padding=p) if batch_norm: self.bn = nn.BatchNorm2d(out_channels) else: self.bn = None self.activation = activation def forward(self,x): x = self.conv(x) if self.bn is not None: x=self.bn(x) if self.activation: return F.relu(x,inplace=True) else: return x # conv3d + bn + relu class Conv3d(nn.Module): def __init__(self, in_channels, out_channels, k, s, p, batch_norm=True): super(Conv3d, self).__init__() self.conv = nn.Conv3d(in_channels, out_channels, kernel_size=k, stride=s, padding=p) if batch_norm: self.bn = nn.BatchNorm3d(out_channels) else: self.bn = None def forward(self, x): x = self.conv(x) if self.bn is not None: x = self.bn(x) return F.relu(x, inplace=True) # Fully Connected Network class FCN(nn.Module): def __init__(self,cin,cout): super(FCN, self).__init__() self.cout = cout self.linear = nn.Linear(cin, cout) self.bn = nn.BatchNorm1d(cout) def forward(self,x): # KK is the stacked k across batch kk, t, _ = x.shape x = self.linear(x.view(kk*t,-1)) x = F.relu(self.bn(x)) return x.view(kk,t,-1) # Voxel Feature Encoding layer class VFE(nn.Module): def __init__(self,cin,cout): super(VFE, self).__init__() assert cout % 2 == 0 self.units = cout // 2 self.fcn = FCN(cin,self.units) def forward(self, x, mask): # x: [N, T, C] : # N:一个batch voxel 的数量,不固定 # point-wise feauture pwf = self.fcn(x) #locally aggregated feature laf = torch.max(pwf,1)[0].unsqueeze(1).repeat(1,cfg.T,1) # laf:[N, T, cout // 2] # point-wise concat feature pwcf = torch.cat((pwf,laf),dim=2) # apply mask mask = mask.unsqueeze(2).repeat(1, 1, self.units * 2) # mask作用: 一个voxel T=35 个点,不够T个点则用0填充,但在计算时 不考虑这些0 pwcf = pwcf * mask.float() return pwcf # [N, T, Cout] # Stacked Voxel Feature Encoding class SVFE(nn.Module): def __init__(self): super(SVFE, self).__init__() self.vfe_1 = VFE(7,32) self.vfe_2 = VFE(32,128) self.fcn = FCN(128,128) def forward(self, x): mask = torch.ne(torch.max(x,2)[0], 0) x = self.vfe_1(x, mask) x = self.vfe_2(x, mask) x = self.fcn(x) # element-wise max pooling x = torch.max(x,1)[0] return x # Convolutional Middle Layer class CML(nn.Module): def __init__(self): super(CML, self).__init__() self.conv3d_1 = Conv3d(128, 64, 3, s=(2, 1, 1), p=(1, 1, 1)) self.conv3d_2 = Conv3d(64, 64, 3, s=(1, 1, 1), p=(0, 1, 1)) self.conv3d_3 = Conv3d(64, 64, 3, s=(2, 1, 1), p=(1, 1, 1)) def forward(self, x): x = self.conv3d_1(x) x = self.conv3d_2(x) x = self.conv3d_3(x) return x # # Region Proposal Network # class RPN(nn.Module): # def __init__(self): # super(RPN, self).__init__() # self.block_1 = [Conv2d(128, 128, 3, 2, 1)] # self.block_1 += [Conv2d(128, 128, 3, 1, 1) for _ in range(3)] # self.block_1 = nn.Sequential(*self.block_1) # self.block_2 = [Conv2d(128, 128, 3, 2, 1)] # self.block_2 += [Conv2d(128, 128, 3, 1, 1) for _ in range(5)] # self.block_2 = nn.Sequential(*self.block_2) # self.block_3 = [Conv2d(128, 256, 3, 2, 1)] # self.block_3 += [nn.Conv2d(256, 256, 3, 1, 1) for _ in range(5)] # self.block_3 = nn.Sequential(*self.block_3) # self.deconv_1 = nn.Sequential(nn.ConvTranspose2d(256, 256, 4, 4, 0),nn.BatchNorm2d(256)) # self.deconv_2 = nn.Sequential(nn.ConvTranspose2d(128, 256, 2, 2, 0),nn.BatchNorm2d(256)) # self.deconv_3 = nn.Sequential(nn.ConvTranspose2d(128, 256, 1, 1, 0),nn.BatchNorm2d(256)) # self.score_head = Conv2d(768, cfg.anchors_per_position, 1, 1, 0, activation=False, batch_norm=False) # self.reg_head = Conv2d(768, 7 * cfg.anchors_per_position, 1, 1, 0, activation=False, batch_norm=False) # def forward(self,x): # x = self.block_1(x) # x_skip_1 = x # x = self.block_2(x) # x_skip_2 = x # x = self.block_3(x) # x_0 = self.deconv_1(x) # x_1 = self.deconv_2(x_skip_2) # x_2 = self.deconv_3(x_skip_1) # x = torch.cat((x_0,x_1,x_2),1) # return self.score_head(x),self.reg_head(x) class VoxelNet(nn.Module): def __init__(self): super(VoxelNet, self).__init__() self.svfe = SVFE() self.cml = CML() # self.rpn = RPN() def voxel_indexing(self, sparse_features, coords): # sparse_features:[N, C]: # N: 一个batch voxel的数量,不固定 dim = sparse_features.shape[-1] dense_feature = Variable(torch.zeros(dim, cfg.N, cfg.D, cfg.H, cfg.W).cuda()) # cfg.N = batch """ 这段代码的操作可以通过一个for循环来实现,但是需要注意,使用for循环的效率通常会比使用向量化操作低。下面是一个可能的实现: for i in range(len(coords)): dense_feature[:, coords[i,0], coords[i,1], coords[i,2], coords[i,3]] = sparse_features[i] 这个for循环遍历coords的每一行(即每一个坐标),然后在dense_feature中找到对应的位置,将sparse_features中的对应元素赋给这个位置。这与原始代码的操作是一样的。 但是,需要注意的是,这种方法的效率通常会比使用向量化操作低,特别是当处理大量数据时。在实际的代码中,我们通常会优先使用向量化操作,因为它们可以利用现代硬件的并行计算能力,从而大大提高计算效率 这是一种常见的将稀疏张量转换为密集张量的方法。在稀疏张量中,只存储非零元素和它们的位置,而在密集张量中,所有元素都被存储。 这段代码就是在将 sparse_features 中的元素放入 dense_feature 的对应位置,从而将稀疏表示转换为密集表示。 """ dense_feature[:, coords[:,0], coords[:,1], coords[:,2], coords[:,3]]= sparse_features # dense_feature:[C, B, D, H, W] return dense_feature.transpose(0, 1) # dense_feature:[B, C, D, H, W] # 这样就转换为稠密张量了 def forward(self, voxel_features, voxel_coords): # voxel_features:[N, T, C] # N:一个batch voxel的数量,每个voxel 35个点,每个点 C维 # voxel_coords:[N, 4] , [batch_id, x, y, z] # feature learning network vwfs = self.svfe(voxel_features) print(f"vwfs.shape = {vwfs.shape}") # [N, C] vwfs = self.voxel_indexing(vwfs,voxel_coords) # index 反向索引 print(f"voxel_indexing ==> vwfs.shape = {vwfs.shape}") # # convolutional middle network # cml_out = self.cml(vwfs) # region proposal network # merge the depth and feature dim into one, output probability score map and regression map # psm,rm = self.rpn(cml_out.view(cfg.N,-1,cfg.H, cfg.W)) # return psm, rm if __name__ == '__main__': model = VoxelNet() voxel_features = torch.rand(100, 35, 7) voxel_coords = torch.randint(low=0, high=10, size=(100, 4)) model(voxel_features, voxel_coords)- 1
- 2
- 3
- 4
- 5
- 6
- 7
- 8
- 9
- 10
- 11
- 12
- 13
- 14
- 15
- 16
- 17
- 18
- 19
- 20
- 21
- 22
- 23
- 24
- 25
- 26
- 27
- 28
- 29
- 30
- 31
- 32
- 33
- 34
- 35
- 36
- 37
- 38
- 39
- 40
- 41
- 42
- 43
- 44
- 45
- 46
- 47
- 48
- 49
- 50
- 51
- 52
- 53
- 54
- 55
- 56
- 57
- 58
- 59
- 60
- 61
- 62
- 63
- 64
- 65
- 66
- 67
- 68
- 69
- 70
- 71
- 72
- 73
- 74
- 75
- 76
- 77
- 78
- 79
- 80
- 81
- 82
- 83
- 84
- 85
- 86
- 87
- 88
- 89
- 90
- 91
- 92
- 93
- 94
- 95
- 96
- 97
- 98
- 99
- 100
- 101
- 102
- 103
- 104
- 105
- 106
- 107
- 108
- 109
- 110
- 111
- 112
- 113
- 114
- 115
- 116
- 117
- 118
- 119
- 120
- 121
- 122
- 123
- 124
- 125
- 126
- 127
- 128
- 129
- 130
- 131
- 132
- 133
- 134
- 135
- 136
- 137
- 138
- 139
- 140
- 141
- 142
- 143
- 144
- 145
- 146
- 147
- 148
- 149
- 150
- 151
- 152
- 153
- 154
- 155
- 156
- 157
- 158
- 159
- 160
- 161
- 162
- 163
- 164
- 165
- 166
- 167
- 168
- 169
- 170
- 171
- 172
- 173
- 174
- 175
- 176
- 177
- 178
- 179
- 180
- 181
- 182
- 183
- 184
- 185
- 186
- 187
- 188
- 189
- 190
- 191
- 192
- 193
- 194
- 195
- 196
- 197
- 198
- 199
- 200
- 201
- 202
- 203
- 204
- 205
- 206
参考博客
VoxelNet End-to-End Learning for Point Cloud Based 3D Object Detection 论文学习
-
相关阅读:
【面试经典 150 | 滑动窗口】串联所有单词的子串
如何进行找错和改错
【javaweb】学习日记Day8 - Mybatis入门 Mysql 多表查询 事务 索引
小程序 this.setData is not a function解决办法
[iOS]UI分析工具Reveal
linux使用iptables屏蔽ip地址
MySQL时间差函数 TimeStampDiff 怎么用
曾经,我对着AI客服喷了两分钟,它只回复了我的第一句话
C/CPP基础练习题多维数组,矩阵转置,杨辉三角详解
【Python计算机视觉】Python全栈体系(二十四)
- 原文地址:https://blog.csdn.net/weixin_43154149/article/details/134061044