-
三.listview或tableviw显示
一.使用qt creator 转变类型
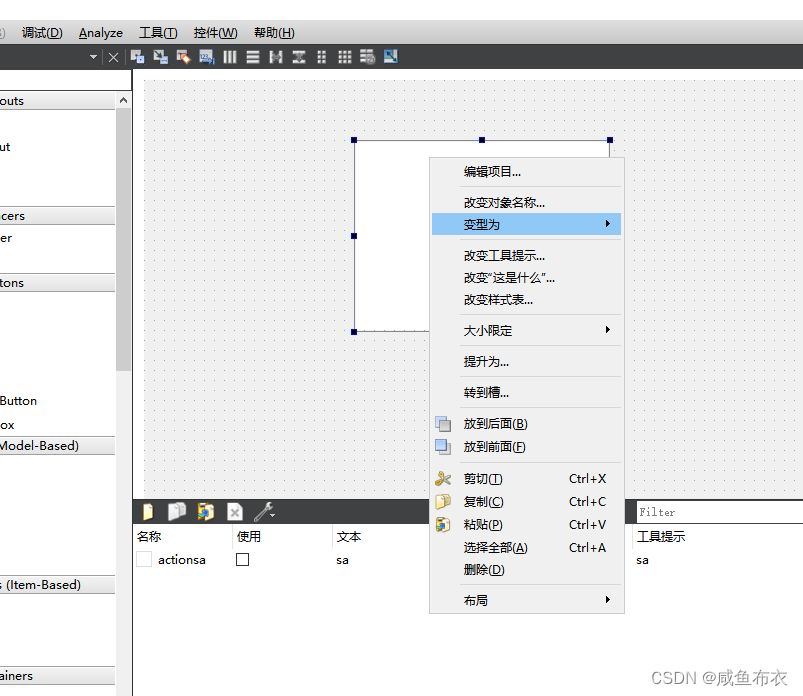
变形为listview或tableviw二.导出ui文件为py文件
# from123.py 为导出 py文件 form.ui 为 qt creator创造的 ui 文件 pyuic5 -o x:\xxx\from123.py form.ui- 1
- 2
from123.py
listview
# -*- coding: utf-8 -*- # Form implementation generated from reading ui file 'form.ui' # # Created by: PyQt5 UI code generator 5.15.9 # # WARNING: Any manual changes made to this file will be lost when pyuic5 is # run again. Do not edit this file unless you know what you are doing. from PyQt5 import QtCore, QtGui, QtWidgets class Ui_Test(object): def setupUi(self, Test): Test.setObjectName("Test") Test.resize(800, 600) self.listView = QtWidgets.QListView(Test) self.listView.setGeometry(QtCore.QRect(210, 60, 256, 192)) self.listView.setContextMenuPolicy(QtCore.Qt.CustomContextMenu) self.listView.setObjectName("listView") self.actionsa = QtWidgets.QAction(Test) self.actionsa.setObjectName("actionsa") self.retranslateUi(Test) QtCore.QMetaObject.connectSlotsByName(Test) def retranslateUi(self, Test): _translate = QtCore.QCoreApplication.translate Test.setWindowTitle(_translate("Test", "Test")) self.actionsa.setText(_translate("Test", "sa"))- 1
- 2
- 3
- 4
- 5
- 6
- 7
- 8
- 9
- 10
- 11
- 12
- 13
- 14
- 15
- 16
- 17
- 18
- 19
- 20
- 21
- 22
- 23
- 24
- 25
- 26
- 27
- 28
- 29
tableview
from123.py
# -*- coding: utf-8 -*- # Form implementation generated from reading ui file 'form.ui' # # Created by: PyQt5 UI code generator 5.15.9 # # WARNING: Any manual changes made to this file will be lost when pyuic5 is # run again. Do not edit this file unless you know what you are doing. from PyQt5 import QtCore, QtGui, QtWidgets class Ui_Test(object): def setupUi(self, Test): Test.setObjectName("Test") Test.resize(800, 600) self.tableView = QtWidgets.QTableView(Test) self.tableView.setGeometry(QtCore.QRect(210, 60, 256, 192)) self.tableView.setContextMenuPolicy(QtCore.Qt.CustomContextMenu) self.tableView.setObjectName("tableView") self.actionsa = QtWidgets.QAction(Test) self.actionsa.setObjectName("actionsa") self.retranslateUi(Test) QtCore.QMetaObject.connectSlotsByName(Test) def retranslateUi(self, Test): _translate = QtCore.QCoreApplication.translate Test.setWindowTitle(_translate("Test", "Test")) self.actionsa.setText(_translate("Test", "sa"))- 1
- 2
- 3
- 4
- 5
- 6
- 7
- 8
- 9
- 10
- 11
- 12
- 13
- 14
- 15
- 16
- 17
- 18
- 19
- 20
- 21
- 22
- 23
- 24
- 25
- 26
- 27
- 28
- 29
- 30
三. listview 显示
from PyQt5.QtWidgets import * from PyQt5.QtCore import * from PyQt5.QtSql import * from PyQt5.QtGui import * from from123 import Ui_Test import sys class QmyMainWindow(QWidget): def __init__(self,parent=None): super().__init__(parent) self.ui = Ui_Test() self.ui.setupUi(self) def Update(self): self.ListModel = QStringListModel(self) self.sList = ['状态'+' '+'交易合约'+' '+'订单编号'] self.ListModel.setStringList(self.sList) self.ui.listView.setModel(self.ListModel) def on_listWidget_customContextMenuRequested(self,pos): ##右键快捷菜单 策略情况 menuList=QMenu(self) #创建菜单 menuList.addAction(self.ui.actionsa) menuList.exec(QCursor.pos()) #显示菜单 if __name__ == "__main__": app = QApplication(sys.argv) myApp = QmyMainWindow() myApp.show() myApp.Update() sys.exit(app.exec()) #应用程序运行- 1
- 2
- 3
- 4
- 5
- 6
- 7
- 8
- 9
- 10
- 11
- 12
- 13
- 14
- 15
- 16
- 17
- 18
- 19
- 20
- 21
- 22
- 23
- 24
- 25
- 26
- 27
- 28
- 29
- 30
- 31
- 32
- 33
- 34
- 35
结果

四.tableviw显示
from PyQt5.QtWidgets import * from PyQt5.QtCore import * from PyQt5.QtSql import * from PyQt5.QtGui import * from from123 import Ui_Test import sys class QmyMainWindow(QWidget): def __init__(self,parent=None): super().__init__(parent) self.ui = Ui_Test() self.ui.setupUi(self) def Update(self): # // 生成一个四行两列的模型 self.TableModel = QStandardItemModel() # 表头 self.TableModel.setHorizontalHeaderLabels(['a','b','c']) for row in range(4): for column in range(2): item = QStandardItem(str(row)) # 设置每个位置的文本值 self.TableModel.setItem(row, column, item) self.ui.tableView.setModel(self.TableModel) def on_listWidget_customContextMenuRequested(self,pos): ##右键快捷菜单 策略情况 menuList=QMenu(self) #创建菜单 menuList.addAction(self.ui.actionsa) menuList.exec(QCursor.pos()) #显示菜单 if __name__ == "__main__": app = QApplication(sys.argv) myApp = QmyMainWindow() myApp.show() myApp.Update() sys.exit(app.exec()) #应用程序运行- 1
- 2
- 3
- 4
- 5
- 6
- 7
- 8
- 9
- 10
- 11
- 12
- 13
- 14
- 15
- 16
- 17
- 18
- 19
- 20
- 21
- 22
- 23
- 24
- 25
- 26
- 27
- 28
- 29
- 30
- 31
- 32
- 33
- 34
- 35
- 36
- 37
- 38
- 39
- 40
- 41
- 42
结果

-
相关阅读:
前端项目代码学习笔记
关于头条上需要总结的文章
【学习笔记】模拟
51单片机4【玩转开发板】
CMake个人理解和使用
(echarts)雷达图封装相关总结及使用
【考研数学】高等数学第七模块 —— 曲线积分与曲面积分 | 2. 对坐标的曲线积分(第二类积分)
【学习笔记】MySQL(Ⅱ)
一文讲解Linux内核中的设计模式
多媒体前端技术入门指南
- 原文地址:https://blog.csdn.net/qq_33253054/article/details/132767267

- 最新文章
-
沪漂五周年了:我越来越迷茫了
Agentic Skill Routing 实战:别再把所有 Skill 塞进 AI Agent 上下文
MySQL-Seconds_behind_master的精度误差
[MAF预定义ChatClient中间件-03]CachingChatClient——利用缓存省钱省时间
AI的至暗历史:从万众期待到被政府撤资,AI的两次死亡徘徊
Agent OS :五种驯服不确定性的范式
PortSwigger SQL注入LAB11
数据库即时编译JIT
[Begin]AI Learn Data Day 0
深度学习进阶(二十七)现代 LLM 的核心架构设计其二:SwiGLU