-
kubernetes 实战学习
文章目录
kubernetes 实战学习
1. 资源创建方式
- 命令行
- YAML
2. Namespace
命名空间,用来隔离资源
kubectl create ns(namespace) hello kubectl delete ns hello- 1
- 2
apiVersion: v1 kind: Namespace metadata: name: hello # 解释说明: apiVersion 版本号 kind 资源类型 metadata 元数据 name 字段名称- 1
- 2
- 3
- 4
- 5
- 6
- 7
- 8
- 9
- 10
- 使用配置文件创建一个新的
namespace
[root@master ~]# kubectl apply -f hello-ns.yaml namespace/hello created- 1
- 2
- 删除使用配置文件创建的
namespace
[root@master ~]# kubectl delete -f hello-ns.yaml namespace "hello" deleted- 1
- 2
3. Pod
运行中的一组容器,Pod是kubernetes中应用的最小单位。一个
Pod里面可以运行一个或多个容器
3.1 使用命令行创建一个
Pod# 创建 pod [root@master ~]# kubectl run mynginx --image=nginx pod/mynginx created # 查看 pod [root@master ~]# kubectl get pods NAME READY STATUS RESTARTS AGE mynginx 1/1 Running 0 22s # 删除 pod [root@master ~]# kubectl delete pod mynginx pod "mynginx" deleted [root@master ~]# kubectl get pod No resources found in default namespace.- 1
- 2
- 3
- 4
- 5
- 6
- 7
- 8
- 9
- 10
- 11
- 12
- 13
- 14
- 使用
describe查看pod详细信息
[root@master ~]# kubectl describe pod mynginx Name: mynginx Namespace: default Priority: 0 Node: node2/192.168.169.162 Start Time: Wed, 21 Sep 2022 21:40:36 +0800 Labels: run=mynginx Annotations: cni.projectcalico.org/containerID: 655388f2ea3b5d936f5a8e588652235f53bdf573af5237d616a4edce825c7c0f cni.projectcalico.org/podIP: 10.244.104.17/32 cni.projectcalico.org/podIPs: 10.244.104.17/32 Status: Running IP: 10.244.104.17 IPs: IP: 10.244.104.17 Containers: mynginx: Container ID: docker://6c7fe559df518ed53577435275a19571ea6d8c24b1a21fa4267f4dd6f1037260 Image: nginx Image ID: docker-pullable://nginx@sha256:0d17b565c37bcbd895e9d92315a05c1c3c9a29f762b011a10c54a66cd53c9b31 Port: <none> Host Port: <none> State: Running Started: Wed, 21 Sep 2022 21:40:53 +0800 Ready: True Restart Count: 0 Environment: <none> Mounts: /var/run/secrets/kubernetes.io/serviceaccount from kube-api-access-5q5mg (ro) Conditions: Type Status Initialized True Ready True ContainersReady True PodScheduled True Volumes: kube-api-access-5q5mg: Type: Projected (a volume that contains injected data from multiple sources) TokenExpirationSeconds: 3607 ConfigMapName: kube-root-ca.crt ConfigMapOptional: <nil> DownwardAPI: true QoS Class: BestEffort Node-Selectors: <none> Tolerations: node.kubernetes.io/not-ready:NoExecute op=Exists for 300s node.kubernetes.io/unreachable:NoExecute op=Exists for 300s Events: # 这里是对创建 nginx 这个 pod 的事件描述 Type Reason Age From Message ---- ------ ---- ---- ------- Normal Scheduled 83s default-scheduler Successfully assigned default/mynginx to node2 # 将创建的 mynginx 分配给 node2 Normal Pulling 82s kubelet Pulling image "nginx" # kubelet 开始下载 nginx Normal Pulled 66s kubelet Successfully pulled image "nginx" in 15.811661157s # kubelet 下载成功 Normal Created 66s kubelet Created container mynginx # kubelet 开始创建 Normal Started 66s kubelet Started container mynginx # kubelet 启动成功- 1
- 2
- 3
- 4
- 5
- 6
- 7
- 8
- 9
- 10
- 11
- 12
- 13
- 14
- 15
- 16
- 17
- 18
- 19
- 20
- 21
- 22
- 23
- 24
- 25
- 26
- 27
- 28
- 29
- 30
- 31
- 32
- 33
- 34
- 35
- 36
- 37
- 38
- 39
- 40
- 41
- 42
- 43
- 44
- 45
- 46
- 47
- 48
- 49
- 50
- 51
- 52
- 53
3.2 使用
YAML文件创建一个 podapiVersion: v1 # 版本 kind: Pod # 资源类型 metadata: # 元数据 labels: run: mynginx name: mynginx # 这里的 name 就是指定 pod 的名称 namespace: dev # 指定命名空间 spec: # spec 下面的内容就是创建的 pod 的详细信息 containers: # 启动一个容器 - image: nginx # 镜像名称 name: mynginx # 容器名称- 1
- 2
- 3
- 4
- 5
- 6
- 7
- 8
- 9
- 10
- 11
- 12
- 13
3.3 查看 pod 日志
[root@master ~]# kubectl get pods NAME READY STATUS RESTARTS AGE mynginx 1/1 Running 0 5m32s [root@master ~]# kubectl logs mynginx /docker-entrypoint.sh: /docker-entrypoint.d/ is not empty, will attempt to perform configuration /docker-entrypoint.sh: Looking for shell scripts in /docker-entrypoint.d/ /docker-entrypoint.sh: Launching /docker-entrypoint.d/10-listen-on-ipv6-by-default.sh 10-listen-on-ipv6-by-default.sh: info: Getting the checksum of /etc/nginx/conf.d/default.conf 10-listen-on-ipv6-by-default.sh: info: Enabled listen on IPv6 in /etc/nginx/conf.d/default.conf /docker-entrypoint.sh: Launching /docker-entrypoint.d/20-envsubst-on-templates.sh /docker-entrypoint.sh: Launching /docker-entrypoint.d/30-tune-worker-processes.sh /docker-entrypoint.sh: Configuration complete; ready for start up 2022/09/21 13:59:47 [notice] 1#1: using the "epoll" event method 2022/09/21 13:59:47 [notice] 1#1: nginx/1.21.5 2022/09/21 13:59:47 [notice] 1#1: built by gcc 10.2.1 20210110 (Debian 10.2.1-6) 2022/09/21 13:59:47 [notice] 1#1: OS: Linux 3.10.0-1160.el7.x86_64 2022/09/21 13:59:47 [notice] 1#1: getrlimit(RLIMIT_NOFILE): 1048576:1048576 2022/09/21 13:59:47 [notice] 1#1: start worker processes 2022/09/21 13:59:47 [notice] 1#1: start worker process 31 2022/09/21 13:59:47 [notice] 1#1: start worker process 32- 1
- 2
- 3
- 4
- 5
- 6
- 7
- 8
- 9
- 10
- 11
- 12
- 13
- 14
- 15
- 16
- 17
- 18
- 19
- 20
3.4 查看 pod IP
k8s 会给每一个 pod 分配一个 ip 地址
[root@master ~]# kubectl get pod mynginx -o wide NAME READY STATUS RESTARTS AGE IP NODE NOMINATED NODE READINESS GATES mynginx 1/1 Running 0 8m33s 10.244.104.18 node2 <none> <none>- 1
- 2
- 3
3.5 进入 pod 查看信息
这里和 docker 的操作很相似
[root@master ~]# kubectl exec -it mynginx bash kubectl exec [POD] [COMMAND] is DEPRECATED and will be removed in a future version. Use kubectl exec [POD] -- [COMMAND] instead. root@mynginx:/# ls bin dev docker-entrypoint.sh home lib64 mnt proc run srv tmp var boot docker-entrypoint.d etc lib media opt root sbin sys usr root@mynginx:/#- 1
- 2
- 3
- 4
- 5
- 6
3.6 一个 pod 里同时运行多个容器
注:同一个
pod里面多个容器不可以占用同一个端口apiVersion: v1 kind: Pod metadata: labels: run: myapp name: myapp spec: containers: - image: nginx name: mynginx - image: tomcat name: mytomcat- 1
- 2
- 3
- 4
- 5
- 6
- 7
- 8
- 9
- 10
- 11
- 12
- 13
- 14


3.7 pod 和宿主机之间文件拷贝
- 将 pod 中的文件拷贝到宿主机
kubectl cp podName:/tmp/fileName /root/fileName- 1
- 将宿主机文件拷贝到 pod
kubectl cp /root/fileName podName:/tmp/fileName- 1
4. Deployment
控制
pod,使pod拥有多副本,自愈,扩缩容等能力- 先使用两种方式创建
pod做对比
[root@master ~]# kubectl run mynginx --image=nginx pod/mynginx created [root@master ~]# kubectl get pods NAME READY STATUS RESTARTS AGE mynginx 0/1 ContainerCreating 0 6s [root@master ~]# kubectl create deployment mytomcat --image=tomcat deployment.apps/mytomcat created [root@master ~]# kubectl get pods NAME READY STATUS RESTARTS AGE mynginx 1/1 Running 0 34s mytomcat-688c5f5cd-w89tm 0/1 ContainerCreating 0 2s- 1
- 2
- 3
- 4
- 5
- 6
- 7
- 8
- 9
- 10
- 11
4.1 deployment 对比
使用如上的两种方式创建了两个
pod,我们可以执行删除操作来查看不同创建方式的情况
- 执行删除操作
# 这里执行删除 mynginx 之后在查看,就看不到 mynginx 这个 pod 了 [root@master ~]# kubectl delete pod mynginx pod "mynginx" deleted [root@master ~]# kubectl get pods NAME READY STATUS RESTARTS AGE mytomcat-688c5f5cd-w89tm 1/1 Running 0 6m53s # 在执行删除使用 deployment 管理的 pod,执行删除命令之后会自动创建一个新的 pod 并运行 # 可以单独打开一个终端使用 watch -n 1 kubectl get pods 命令进行监控,这条命令的意思是每隔一秒执行一次后面的命令 [root@master ~]# kubectl get pods NAME READY STATUS RESTARTS AGE mytomcat-688c5f5cd-w89tm 1/1 Running 0 8m26s [root@master ~]# kubectl delete pod mytomcat-688c5f5cd-w89tm pod "mytomcat-688c5f5cd-w89tm" deleted [root@master ~]# kubectl get pods NAME READY STATUS RESTARTS AGE mytomcat-688c5f5cd-4f9qw 0/1 ContainerCreating 0 4s [root@master ~]# kubectl get pods NAME READY STATUS RESTARTS AGE mytomcat-688c5f5cd-4f9qw 0/1 ContainerCreating 0 9s [root@master ~]# kubectl get pods NAME READY STATUS RESTARTS AGE mytomcat-688c5f5cd-4f9qw 1/1 Running 0 18s [root@master ~]#- 1
- 2
- 3
- 4
- 5
- 6
- 7
- 8
- 9
- 10
- 11
- 12
- 13
- 14
- 15
- 16
- 17
- 18
- 19
- 20
- 21
- 22
- 23
- 24
- 25

4.2 删除 deployment 创建的 pod
使用
kubectl delete podname仍然会自动创建一个新的pod,所以我们需要直接删除deployment[root@master ~]# kubectl get deployment NAME READY UP-TO-DATE AVAILABLE AGE mytomcat 1/1 1 1 12m [root@master ~]# kubectl delete deployment mytomcat deployment.apps "mytomcat" deleted- 1
- 2
- 3
- 4
- 5

4.3 多副本
- 使用命令行创建
[root@master ~]# kubectl create deployment mynginx --image=nginx --replicas=3 deployment.apps/mynginx created [root@master ~]# kubectl get deployment NAME READY UP-TO-DATE AVAILABLE AGE mynginx 0/3 3 0 11s [root@master ~]# kubectl get pod NAME READY STATUS RESTARTS AGE mynginx-6b78685d4d-5jm7g 0/1 ContainerCreating 0 16s mynginx-6b78685d4d-kccbr 0/1 ContainerCreating 0 16s mynginx-6b78685d4d-zzqnj 0/1 ContainerCreating 0 16s- 1
- 2
- 3
- 4
- 5
- 6
- 7
- 8
- 9
- 10

- 使用
YAML文件创建
apiVersion: apps/v1 kind: Deployment metadata: labels: app: mynginx name: mynginx spec: replicas: 3 selector: matchLabels: app: mynginx template: metadata: labels: app: mynginx spec: containers: - image: nginx name: nginx- 1
- 2
- 3
- 4
- 5
- 6
- 7
- 8
- 9
- 10
- 11
- 12
- 13
- 14
- 15
- 16
- 17
- 18
- 19
4.4 扩缩容 scale

- 扩容
[root@master ~]# kubectl get deployment -o wide NAME READY UP-TO-DATE AVAILABLE AGE CONTAINERS IMAGES SELECTOR mynginx 3/3 3 3 10m nginx nginx app=mynginx [root@master ~]# kubectl scale deployment mynginx --replicas=5 deployment.apps/mynginx scaled [root@master ~]# kubectl get deployment -o wide NAME READY UP-TO-DATE AVAILABLE AGE CONTAINERS IMAGES SELECTOR mynginx 3/5 5 3 11m nginx nginx app=mynginx [root@master ~]# kubectl get deployment -o wide NAME READY UP-TO-DATE AVAILABLE AGE CONTAINERS IMAGES SELECTOR mynginx 5/5 5 5 11m nginx nginx app=mynginx- 1
- 2
- 3
- 4
- 5
- 6
- 7
- 8
- 9
- 10
- 11

- 缩容
[root@master ~]# kubectl get deployment -o wide NAME READY UP-TO-DATE AVAILABLE AGE CONTAINERS IMAGES SELECTOR mynginx 5/5 5 5 11m nginx nginx app=mynginx [root@master ~]# kubectl scale deployment mynginx --replicas=2 deployment.apps/mynginx scaled [root@master ~]# kubectl get deployment -o wide NAME READY UP-TO-DATE AVAILABLE AGE CONTAINERS IMAGES SELECTOR mynginx 2/2 2 2 14m nginx nginx app=mynginx- 1
- 2
- 3
- 4
- 5
- 6
- 7
- 8

- 或者使用
edit对yaml文件进行修改
这种修改方式和使用
vi对文件进行修改一样,找到对应的字段修改,然后 wq 保存退出即可[root@master ~]# kubectl edit deployment mynginx .......... status: availableReplicas: 2 conditions: - lastTransitionTime: "2022-09-21T15:00:43Z" lastUpdateTime: "2022-09-21T15:01:07Z" message: ReplicaSet "mynginx-6b78685d4d" has successfully progressed. reason: NewReplicaSetAvailable status: "True" type: Progressing - lastTransitionTime: "2022-09-21T15:12:12Z" lastUpdateTime: "2022-09-21T15:12:12Z" message: Deployment has minimum availability. reason: MinimumReplicasAvailable status: "True" type: Available observedGeneration: 3 readyReplicas: 2 replicas: 2 updatedReplicas: 2 ............- 1
- 2
- 3
- 4
- 5
- 6
- 7
- 8
- 9
- 10
- 11
- 12
- 13
- 14
- 15
- 16
- 17
- 18
- 19
- 20
- 21
- 22

4.5 自愈和故障转移
- 自愈

假设一个
pod在长时间运行之后,或者由于其他原因导致这个pod不可用了,这个时候kubenetes集群感知到这个pod不可用之后会尝试重启这个pod如果重启之后结果问题,那么这个动作就称为自愈测试
在 master 上查看运行的 pod 信息
[root@master ~]# kubectl get pod -o wide NAME READY STATUS RESTARTS AGE IP NODE NOMINATED NODE READINESS GATES mynginx-6b78685d4d-5jm7g 1/1 Running 0 62m 10.244.104.21 node2 <none> <none> mynginx-6b78685d4d-8ndjx 1/1 Running 0 6m54s 10.244.104.24 node2 <none> <none> mynginx-6b78685d4d-vhf6b 1/1 Running 0 51m 10.244.104.22 node2 <none> <none>- 1
- 2
- 3
- 4
- 5
在
node2上查找dokcer启动的容器mynginx-6b78685d4d-5jm7g,并停止容器,在观察pod的情况[root@node2 ~]# docker ps | grep mynginx-6b78685d4d-5jm7g 9504160440bb nginx "/docker-entrypoint.…" 57 minutes ago Up 57 minutes k8s_nginx_mynginx-6b78685d4d-5jm7g_default_7504aeec-2289-4066-a06c-d143086ca9d6_0 c42ce85c0ad2 registry.aliyuncs.com/google_containers/pause:3.6 "/pause" 58 minutes ago Up 58 minutes k8s_POD_mynginx-6b78685d4d-5jm7g_default_7504aeec-2289-4066-a06c-d143086ca9d6_0 [root@node2 ~]# docker stop 9504160440bb 9504160440bb- 1
- 2
- 3
- 4
- 5
- 6
# 这里可以看到刚才关闭的 pod 在 RESTARTS 栏有重启 1 次的显示 [root@master ~]# kubectl get pod -o wide NAME READY STATUS RESTARTS AGE IP NODE NOMINATED NODE READINESS GATES mynginx-6b78685d4d-5jm7g 1/1 Running 1 (91s ago) 62m 10.244.104.21 node2 <none> <none> mynginx-6b78685d4d-8ndjx 1/1 Running 0 6m54s 10.244.104.24 node2 <none> <none> mynginx-6b78685d4d-vhf6b 1/1 Running 0 51m 10.244.104.22 node2 <none> <none>- 1
- 2
- 3
- 4
- 5
- 6

- 故障转移
这里假设 kubernetes 集群检测到一个 pod 不可用,并且无法通过自愈使它恢复,这时候就可以认为这个 pod 下线了,这个时候就需要通过故障转移,新建一个 pod 让它继续提供和下线的 pod 相同的服务
故障转移的时间是可以自定义的,一般不建议设置很短的时间,因为
kubernetes中pod可能会由于网络等其他一些原因短暂的离开集群,但是很快又会恢复,如果设置的时间过段那么就可能出现不停的关闭pod和启动pod的情况
测试
这里查看当前
pod运行在那些机器上,这里有一个运行在node1机器上,我们就测试将node1关机,看是否能够在创建一个pod运行在node2上[root@master ~]# kubectl get pods -o wide NAME READY STATUS RESTARTS AGE IP NODE NOMINATED NODE READINESS GATES mynginx-6b78685d4d-5jm7g 1/1 Running 0 44m 10.244.104.21 node2 <none> <none> mynginx-6b78685d4d-m2v4h 1/1 Running 0 40s 10.244.166.151 node1 <none> <none> mynginx-6b78685d4d-vhf6b 1/1 Running 0 33m 10.244.104.22 node2 <none> <none>- 1
- 2
- 3
- 4
- 5
# 将 node1 机器关机,使用 -w 参数监控当前 pod 状态,如果发生变化则会在下面打印出变化过程 [root@master ~]# kubectl get pod -o wide -w NAME READY STATUS RESTARTS AGE IP NODE NOMINATED NODE READINESS GATES mynginx-6b78685d4d-5jm7g 1/1 Running 0 49m 10.244.104.21 node2 <none> <none> mynginx-6b78685d4d-m2v4h 1/1 Running 0 5m19s 10.244.166.151 node1 <none> <none> mynginx-6b78685d4d-vhf6b 1/1 Running 0 38m 10.244.104.22 node2 <none> <none>- 1
- 2
- 3
- 4
- 5
- 6
- 7
# 将 node1 上的 pod 在 node2 上新建了一个 [root@master ~]# kubectl get pod -o wide -w NAME READY STATUS RESTARTS AGE IP NODE NOMINATED NODE READINESS GATES mynginx-6b78685d4d-5jm7g 1/1 Running 0 49m 10.244.104.21 node2 <none> <none> mynginx-6b78685d4d-m2v4h 1/1 Running 0 5m19s 10.244.166.151 node1 <none> <none> mynginx-6b78685d4d-vhf6b 1/1 Running 0 38m 10.244.104.22 node2 <none> <none> mynginx-6b78685d4d-m2v4h 1/1 Running 0 6m19s 10.244.166.151 node1 <none> <none> mynginx-6b78685d4d-m2v4h 1/1 Terminating 0 11m 10.244.166.151 node1 <none> <none> mynginx-6b78685d4d-8ndjx 0/1 Pending 0 0s <none> <none> <none> <none> mynginx-6b78685d4d-8ndjx 0/1 Pending 0 0s <none> node2 <none> <none> mynginx-6b78685d4d-8ndjx 0/1 ContainerCreating 0 0s <none> node2 <none> <none> mynginx-6b78685d4d-8ndjx 0/1 ContainerCreating 0 4s <none> node2 <none> <none> mynginx-6b78685d4d-8ndjx 1/1 Running 0 37s 10.244.104.24 node2 <none> <none>- 1
- 2
- 3
- 4
- 5
- 6
- 7
- 8
- 9
- 10
- 11
- 12
- 13

4.6 滚动更新
滚动更新,首先启动一个新的
pod,新的pod启动正常之后,在将原来的老的pod删除,如果出现更新失败的情况,老的仍然可以使用,就可以防止不能访问的情况。
4.6.1 查看镜像
在更新之前我们需要取查看一下它所使用的镜像是什么
# 使用 -o yaml 以 yaml 文件格式的形式查看,详细信息中的 image 就是目前所使用的镜像 [root@master ~]# kubectl get deployment mynginx -o yaml apiVersion: apps/v1 kind: Deployment metadata: annotations: deployment.kubernetes.io/revision: "1" creationTimestamp: "2022-09-21T15:00:43Z" generation: 4 labels: app: mynginx name: mynginx namespace: default resourceVersion: "135562" uid: 520946c1-4062-4f50-aacc-448cc24a0dfe spec: progressDeadlineSeconds: 600 replicas: 3 revisionHistoryLimit: 10 selector: matchLabels: app: mynginx strategy: rollingUpdate: maxSurge: 25% maxUnavailable: 25% type: RollingUpdate template: metadata: creationTimestamp: null labels: app: mynginx spec: containers: - image: nginx # 这里的 image 就是使用的镜像名 imagePullPolicy: Always name: nginx resources: {} terminationMessagePath: /dev/termination-log terminationMessagePolicy: File dnsPolicy: ClusterFirst restartPolicy: Always schedulerName: default-scheduler securityContext: {} terminationGracePeriodSeconds: 30 status: availableReplicas: 3 conditions: - lastTransitionTime: "2022-09-21T15:00:43Z" lastUpdateTime: "2022-09-21T15:01:07Z" message: ReplicaSet "mynginx-6b78685d4d" has successfully progressed. reason: NewReplicaSetAvailable status: "True" type: Progressing - lastTransitionTime: "2022-09-22T12:38:26Z" lastUpdateTime: "2022-09-22T12:38:26Z" message: Deployment has minimum availability. reason: MinimumReplicasAvailable status: "True" type: Available observedGeneration: 4 readyReplicas: 3 replicas: 3 updatedReplicas: 3- 1
- 2
- 3
- 4
- 5
- 6
- 7
- 8
- 9
- 10
- 11
- 12
- 13
- 14
- 15
- 16
- 17
- 18
- 19
- 20
- 21
- 22
- 23
- 24
- 25
- 26
- 27
- 28
- 29
- 30
- 31
- 32
- 33
- 34
- 35
- 36
- 37
- 38
- 39
- 40
- 41
- 42
- 43
- 44
- 45
- 46
- 47
- 48
- 49
- 50
- 51
- 52
- 53
- 54
- 55
- 56
- 57
- 58
- 59
- 60
- 61
- 62
- 63
- 64
4.6.2 使用命令进行更新操作
kubectl set image deployment/mynginx nginx=nginx:1.16.1 --record # 参数解析: --record 表示记录本次升级操作 # 查看更新状态 kubectl rollout status deployment/mynginx- 1
- 2
- 3
- 4
- 5
- 6
使用命令
kubectl get pod -o wide -w监控本次操作[root@master ~]# kubectl get pod -o wide -w NAME READY STATUS RESTARTS AGE IP NODE NOMINATED NODE READINESS GATES mynginx-868b5dc965-5t7gh 1/1 Running 0 9m25s 10.244.166.160 node1 <none> <none> mynginx-868b5dc965-5xghm 1/1 Running 0 8m59s 10.244.104.32 node2 <none> <none> mynginx-868b5dc965-8z68q 1/1 Running 0 8m20s 10.244.166.161 node1 <none> <none> mynginx-6b78685d4d-g4bgw 0/1 Pending 0 0s <none> <none> <none> <none> mynginx-6b78685d4d-g4bgw 0/1 Pending 0 0s <none> node1 <none> <none> mynginx-6b78685d4d-g4bgw 0/1 ContainerCreating 0 0s <none> node1 <none> <none> mynginx-6b78685d4d-g4bgw 0/1 ContainerCreating 0 2s <none> node1 <none> <none> mynginx-6b78685d4d-g4bgw 1/1 Running 0 4s 10.244.166.162 node1 <none> <none> mynginx-868b5dc965-5t7gh 1/1 Terminating 0 12m 10.244.166.160 node1 <none> <none> mynginx-6b78685d4d-9mm9t 0/1 Pending 0 0s <none> <none> <none> <none> mynginx-6b78685d4d-9mm9t 0/1 Pending 0 0s <none> node2 <none> <none> mynginx-6b78685d4d-9mm9t 0/1 ContainerCreating 0 0s <none> node2 <none> <none> mynginx-868b5dc965-5t7gh 1/1 Terminating 0 12m 10.244.166.160 node1 <none> <none> mynginx-868b5dc965-5t7gh 0/1 Terminating 0 12m 10.244.166.160 node1 <none> <none> mynginx-868b5dc965-5t7gh 0/1 Terminating 0 12m 10.244.166.160 node1 <none> <none> mynginx-868b5dc965-5t7gh 0/1 Terminating 0 12m 10.244.166.160 node1 <none> <none> mynginx-6b78685d4d-9mm9t 0/1 ContainerCreating 0 1s <none> node2 <none> <none> mynginx-6b78685d4d-9mm9t 1/1 Running 0 18s 10.244.104.33 node2 <none> <none> mynginx-868b5dc965-5xghm 1/1 Terminating 0 12m 10.244.104.32 node2 <none> <none> mynginx-6b78685d4d-q65bn 0/1 Pending 0 0s <none> <none> <none> <none> mynginx-6b78685d4d-q65bn 0/1 Pending 0 0s <none> node1 <none> <none> mynginx-6b78685d4d-q65bn 0/1 ContainerCreating 0 1s <none> node1 <none> <none> mynginx-868b5dc965-5xghm 1/1 Terminating 0 12m 10.244.104.32 node2 <none> <none> mynginx-868b5dc965-5xghm 0/1 Terminating 0 12m 10.244.104.32 node2 <none> <none> mynginx-868b5dc965-5xghm 0/1 Terminating 0 12m 10.244.104.32 node2 <none> <none> mynginx-868b5dc965-5xghm 0/1 Terminating 0 12m 10.244.104.32 node2 <none> <none> mynginx-6b78685d4d-q65bn 0/1 ContainerCreating 0 2s <none> node1 <none> <none> mynginx-6b78685d4d-q65bn 1/1 Running 0 24s 10.244.166.163 node1 <none> <none> ............- 1
- 2
- 3
- 4
- 5
- 6
- 7
- 8
- 9
- 10
- 11
- 12
- 13
- 14
- 15
- 16
- 17
- 18
- 19
- 20
- 21
- 22
- 23
- 24
- 25
- 26
- 27
- 28
- 29
- 30
- 31

4.6.3 暂停升级
kubectl rollout pause deployment [name]- 1
4.6.4 恢复deployment升级
kubectl rollout resume deployment [name]- 1
4.6.5 查看滚动更新的状态
kubectl rollout status deployments.apps [name]- 1
4.7 版本回退
4.7.1 查看历史记录
[root@master ~]# kubectl rollout history deployment mynginx deployment.apps/mynginx REVISION CHANGE-CAUSE 2 kubectl set image deployment mynginx nginx=1.16.1 --record=true 3 kubectl set image deployment mynginx nginx=nginx:1.16.1 --record=true 4 kubectl set image deployment mynginx nginx=nginx --record=true- 1
- 2
- 3
- 4
- 5
- 6
4.7.2 查看某个历史详情
[root@master ~]# kubectl rollout history deployment/mynginx --revision=2 deployment.apps/mynginx with revision #2 Pod Template: Labels: app=mynginx pod-template-hash=8cfb94f9 Annotations: kubernetes.io/change-cause: kubectl set image deployment mynginx nginx=1.16.1 --record=true Containers: nginx: Image: 1.16.1 Port: <none> Host Port: <none> Environment: <none> Mounts: <none> Volumes: <none>- 1
- 2
- 3
- 4
- 5
- 6
- 7
- 8
- 9
- 10
- 11
- 12
- 13
- 14
4.7.3 回滚到上一个版本
[root@master ~]# kubectl rollout undo deployment/mynginx deployment.apps/mynginx rolled back- 1
- 2
4.7.4 回滚到指定版本
[root@master ~]# kubectl rollout history deployment mynginx deployment.apps/mynginx REVISION CHANGE-CAUSE 2 kubectl set image deployment mynginx nginx=1.16.1 --record=true 4 kubectl set image deployment mynginx nginx=nginx --record=true 5 kubectl set image deployment mynginx nginx=nginx:1.16.1 --record=true [root@master ~]# kubectl rollout undo deployment/mynginx --to-revision=4 deployment.apps/mynginx rolled back- 1
- 2
- 3
- 4
- 5
- 6
- 7
- 8
- 9
- 10
5. 其他资源类型
更多:
除了Deployment,k8s还有
StatefulSet、DaemonSet、Job等 类型资源。我们都称为工作负载。有状态应用使用
StatefulSet部署,无状态应用使用Deployment部署https://kubernetes.io/zh/docs/concepts/workloads/controllers/
6. Service
Service 是一组逻辑 pod 的抽象,为一组pod提供统一入口,用户只需与 service 打交道,service 提供 DNS 解析名称,负责追踪pod 动态变化并更新转发表,通过负载均衡算法最终将流量转发到后端的 pod。Kubernetes 里的每个 Service 其实也可以理解为我们的微服务架构中的一个微服务。
- Service 负责服务发现,找到每个 Pod ,不管 Deployment 的 Pod 有多少个,不管它是更新,销毁还是重建,Service 总是能发现并维护好它的ip列表。
- kube-proxy 是 kubernetes 核心组件,运行在集群中每一个节点上,负责监控集群中 service、endpoint 变更,维护各个节点上的转发规则,是实现 servcie 功能的核心部件。
Service 对外提供多种入口:
- ClusterIP:Service 在集群内的唯一 ip 地址,虚拟的 IP,只能在 Kubernetes 集群里访问。通过 ClusterIP,负载均衡的访问后端的Pod
- NodeIP+NodePort:Service 会在集群的每个 Node 上都启动一个端口,通过 NodeIP:NodePort 访问后端的 Pod

6.1 使用命令创建 service
#暴露Deploy kubectl expose deployment mynginx --port=8000 --target-port=80 相等于 kubectl expose deployment mynginx --port=8000 --target-port=80 --type=ClusterIP # 参数解析: expose deployment mynginx 指定需要暴露端口的 deployment --port=8000 指定 service 的端口 --target-port=80 指定目标端口(即 pod 服务端口) --type=ClusterIP ClusterIP 即为集群内 IP,还要一个是 --type=NodePort 则是暴露到集群外部访问,可以使用 nodePort=30001 参数 指定 port,也可以不使用,kubernetes 则会默认添加一个随机的 port #使用标签检索Pod kubectl get pod -l app=my-dep- 1
- 2
- 3
- 4
- 5
- 6
- 7
- 8
- 9
- 10
- 11
- 12
6.2 使用
yaml文件创建 serviceapiVersion: v1 kind: Service metadata: labels: app: mynginx name: mynignx spec: selector: app: mynginx ports: - port: 8000 protocol: TCP targetPort: 80 type: ClusterIP # 参数解析 kind: Service 指定类型 labels: app: mynginx pod 对应标签,可以使用 `kubectl get pod --show-labels` 查看标签信息 selector: app: mynginx deployment 对应标签,可以使用 `kubectl get deployment --show-labels` 命令查看 - port: 8000 指定 service 端口 targetPort: 80 指定暴露的 pod 服务端口 type: ClusterIP 默认为机器内部访问,不写也可以 type: NodePort 外部机器(在windows浏览器)可访问的端口;比如一个Web应用需要被其他用户访问,那么需要配置 `type=NodePort`,而且配置 `nodePort=30001`,那么其他机器就可以通过浏览器访问 `schem://node:30001` 访问到该服务。如果不配置 `nodePort=30001` , 则会随机给定一个 >30000 的端口- 1
- 2
- 3
- 4
- 5
- 6
- 7
- 8
- 9
- 10
- 11
- 12
- 13
- 14
- 15
- 16
- 17
- 18
- 19
- 20
- 21
- 22
- 23
- 24
6.3 查看 service 信息
[root@master ~]# kubectl get service NAME TYPE CLUSTER-IP EXTERNAL-IP PORT(S) AGE kubernetes ClusterIP 10.96.0.1 <none> 443/TCP 5d11h mynginx ClusterIP 10.100.43.143 <none> 8000/TCP 8m50s nginx NodePort 10.105.205.48 <none> 80:30010/TCP 3d12h tomcat NodePort 10.101.238.114 <none> 8080:30053/TCP 3d11h- 1
- 2
- 3
- 4
- 5
- 6
6.4 访问 service
因为当前
service并没有对暴露地址信息,所以只能再集群内部访问- 使用
serviceIP:port访问
[root@node1 ~]# curl 10.100.43.143:8000 <!DOCTYPE html> <html> <head> <title>Welcome to nginx!</title> <style> html { color-scheme: light dark; } body { width: 35em; margin: 0 auto; font-family: Tahoma, Verdana, Arial, sans-serif; } </style> </head> <body> <h1>Welcome to nginx!</h1> <p>If you see this page, the nginx web server is successfully installed and working. Further configuration is required.</p> <p>For online documentation and support please refer to <a href="http://nginx.org/">nginx.org</a>.<br/> Commercial support is available at <a href="http://nginx.com/">nginx.com</a>.</p> <p><em>Thank you for using nginx.</em></p> </body> </html>- 1
- 2
- 3
- 4
- 5
- 6
- 7
- 8
- 9
- 10
- 11
- 12
- 13
- 14
- 15
- 16
- 17
- 18
- 19
- 20
- 21
- 22
- 23
- 24

- 或者也可以使用 “服务名.所在空间名称.svc:port” 访问
但是使用 “服务名.所在空间名称.svc:port” 访问只能再 pod 中才可以,在
node节点是不可以的[root@master ~]# kubectl get pod NAME READY STATUS RESTARTS AGE mynginx-6b78685d4d-5hcmb 1/1 Terminating 0 46h mynginx-6b78685d4d-9h9n6 1/1 Running 0 6h56m mynginx-6b78685d4d-x5p9c 1/1 Running 1 (46h ago) 46h mynginx-6b78685d4d-zdfhm 1/1 Running 1 (46h ago) 46h [root@master ~]# kubectl exec -it mynginx-6b78685d4d-9h9n6 bash kubectl exec [POD] [COMMAND] is DEPRECATED and will be removed in a future version. Use kubectl exec [POD] -- [COMMAND] instead. root@mynginx-6b78685d4d-9h9n6:/# curl mynginx.default.svc:8000 <!DOCTYPE html> <html> <head> <title>Welcome to nginx!</title> <style> html { color-scheme: light dark; } body { width: 35em; margin: 0 auto; font-family: Tahoma, Verdana, Arial, sans-serif; } </style> </head> <body> <h1>Welcome to nginx!</h1> <p>If you see this page, the nginx web server is successfully installed and working. Further configuration is required.</p> <p>For online documentation and support please refer to <a href="http://nginx.org/">nginx.org</a>.<br/> Commercial support is available at <a href="http://nginx.com/">nginx.com</a>.</p> <p><em>Thank you for using nginx.</em></p> </body> </html>- 1
- 2
- 3
- 4
- 5
- 6
- 7
- 8
- 9
- 10
- 11
- 12
- 13
- 14
- 15
- 16
- 17
- 18
- 19
- 20
- 21
- 22
- 23
- 24
- 25
- 26
- 27
- 28
- 29
- 30
- 31
- 32

6.5 service 服务发现
service 可以自动发现下线服务,服务下线后 service 则不会将访问在指向下线的 pod
测试:
当前有三个 nginx 服务,将其中的 222 下线之后测试访问情况
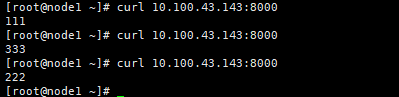
当 222 下线之后则不会再去访问那个 pod

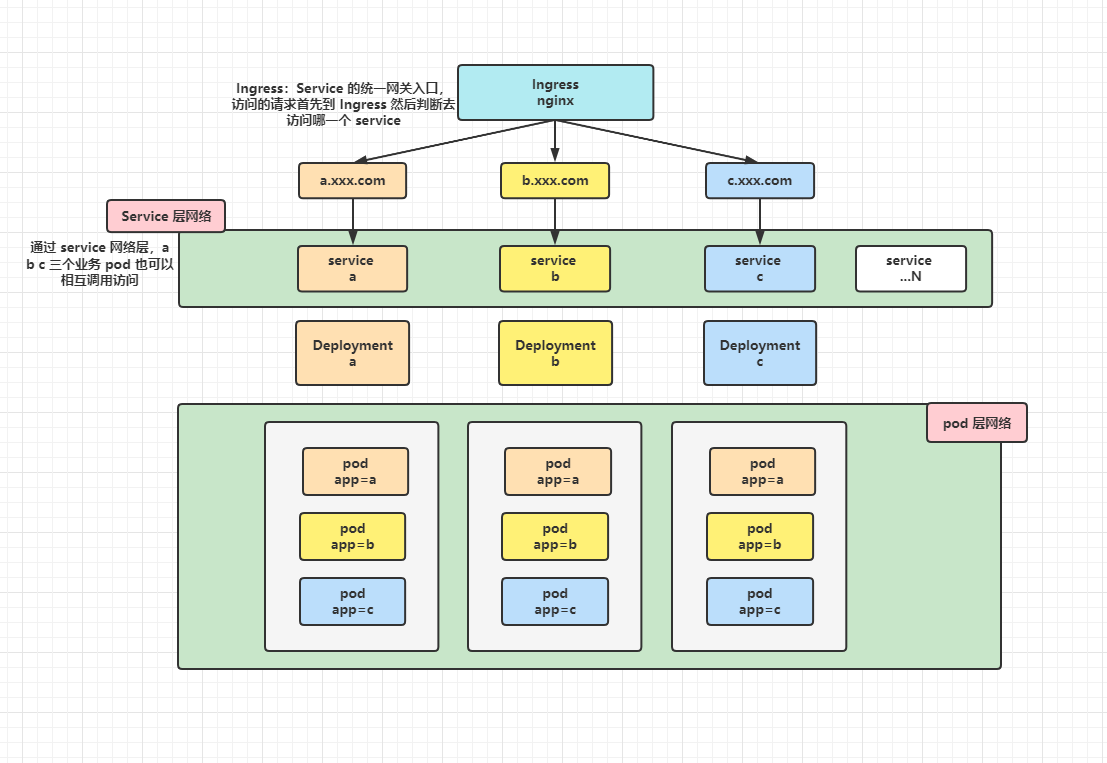
7. Ingress
Service 的统一网关入口
官网地址:https://kubernetes.github.io/ingress-nginx/
就是nginx做的
GitHub地址:https://github.com/kubernetes/ingress-nginx
在 GitHub 上也可以看到版本对应关系
7.1 安装 Ingress
版本信息规划
服务名 版本信息 kubernetes 1.23.0 docker 20.10.18 nginx-ingress-controller 1.3.1 kube-webhook-certgen 1.3.0 1️⃣ 下载
yaml文件官网参考地址:https://kubernetes.github.io/ingress-nginx/deploy/#bare-metal-clusters
wget https://raw.githubusercontent.com/kubernetes/ingress-nginx/controller-v1.3.1/deploy/static/provider/baremetal/deploy.yaml- 1
2️⃣ 修改镜像地址
阿里云镜像地址:https://cr.console.aliyun.com/cn-hangzhou/instances/images
nginx-ingress 阿里地址:https://cr.console.aliyun.com/images/cn-hangzhou/google_containers/nginx-ingress-controller/detail
kube-webhook-certgen 阿里地址:https://cr.console.aliyun.com/images/cn-hangzhou/google_containers/kube-webhook-certgen/detail
修改
yaml文件中对应的三处image镜像地址# 修改 ingress-nginx-controller 镜像 原文: image: registry.k8s.io/ingress-nginx/controller:v1.3.0@sha256:d1707ca76d3b044ab8a28277a2466a02100ee9f58a86af1535a3edf9323ea1b5 修改为:(注:版本可以在阿里的镜像中自己选择) image: registry.cn-hangzhou.aliyuncs.com/google_containers/nginx-ingress-controller:v1.3.1 # 修改 kube-webhook-certgen 镜像,这个有两处需要修改的位置 原文: image: registry.k8s.io/ingress-nginx/kube-webhook-certgen:v1.1.1@sha256:64d8c73dca984af206adf9d6d7e46aa550362b1d7a01f3a0a91b20cc67868660 修改为:(注:版本可以在阿里的镜像中自己选择) image: registry.cn-hangzhou.aliyuncs.com/google_containers/kube-webhook-certgen:v1.3.0- 1
- 2
- 3
- 4
- 5
- 6
- 7
- 8
- 9
- 10
- 11
3️⃣ 使用 yaml 文件安装
使用
yaml安装,它会创建一个namespace ingress-nginx,所以后面的查询操作都需要加上这个ns[root@master ~]# kubectl apply -f deploy.yaml namespace/ingress-nginx created serviceaccount/ingress-nginx created configmap/ingress-nginx-controller created clusterrole.rbac.authorization.k8s.io/ingress-nginx created clusterrolebinding.rbac.authorization.k8s.io/ingress-nginx created role.rbac.authorization.k8s.io/ingress-nginx created rolebinding.rbac.authorization.k8s.io/ingress-nginx created service/ingress-nginx-controller-admission created service/ingress-nginx-controller created deployment.apps/ingress-nginx-controller created validatingwebhookconfiguration.admissionregistration.k8s.io/ingress-nginx-admission created serviceaccount/ingress-nginx-admission created clusterrole.rbac.authorization.k8s.io/ingress-nginx-admission created clusterrolebinding.rbac.authorization.k8s.io/ingress-nginx-admission created role.rbac.authorization.k8s.io/ingress-nginx-admission created rolebinding.rbac.authorization.k8s.io/ingress-nginx-admission created job.batch/ingress-nginx-admission-create created job.batch/ingress-nginx-admission-patch created- 1
- 2
- 3
- 4
- 5
- 6
- 7
- 8
- 9
- 10
- 11
- 12
- 13
- 14
- 15
- 16
- 17
- 18
- 19
4️⃣ 检查安装的结果
这里使用
yaml安装,第一次安装的时候是有三个pod,但是安装好之后报错,ingress-nginx-controller的pod起不来的,遇到了一些问题,后面在整理一下。这个是我前一天晚上搭建好之后报错没有解决,然后关机了,第二天再打开莫名其妙的好了,但是只有一个pod了。可能是再安装过程中有些什么问题,需要重启kubernetes或者docker服务吧。这个后面在重新安装验证。[root@master ~]# kubectl get pod,svc,deployment -n ingress-nginx NAME READY STATUS RESTARTS AGE pod/ingress-nginx-controller-77747b976d-hns7d 1/1 Running 5 (83m ago) 10h NAME TYPE CLUSTER-IP EXTERNAL-IP PORT(S) AGE service/ingress-nginx-controller NodePort 10.96.103.255 <none> 80:30050/TCP,443:30580/TCP 10h service/ingress-nginx-controller-admission ClusterIP 10.103.10.50 <none> 443/TCP 10h NAME READY UP-TO-DATE AVAILABLE AGE deployment.apps/ingress-nginx-controller 1/1 1 1 10h- 1
- 2
- 3
- 4
- 5
- 6
- 7
- 8
- 9
- 10
- 11
注:ingress 在创建之后会自动生成两个对外访问的端口
80:30924/TCP,443:30456/TCP如果有配置防火墙等,需要将这两个端口放行👉 ingress 安装验证
使用
kubeadm重新搭建kuberbetes集群验证ingress,发现本次安装直接可以启动,在三个pod中有两个状态为Completed没太看懂,不知道什么意思,而且删除之后也不会重建,说明这两个pod没有创建deployment管理。但是ingress-nginx-controller直接就启动了,没有了之前的报错信息kubelet MountVolume.SetUp failed for volume “webhook-cert” : secret “ingress-nginx-admission” not found,搞不懂为什么。[root@master1 ~]# kubectl get pod,svc,deployment -n ingress-nginx NAME READY STATUS RESTARTS AGE pod/ingress-nginx-admission-create-dg4fd 0/1 Completed 0 12m pod/ingress-nginx-admission-patch-z48tm 0/1 Completed 0 12m pod/ingress-nginx-controller-77747b976d-gwj4d 1/1 Running 0 12m NAME TYPE CLUSTER-IP EXTERNAL-IP PORT(S) AGE service/ingress-nginx-controller NodePort 10.110.214.245 <none> 80:30792/TCP,443:32501/TCP 12m service/ingress-nginx-controller-admission ClusterIP 10.98.172.146 <none> 443/TCP 12m NAME READY UP-TO-DATE AVAILABLE AGE deployment.apps/ingress-nginx-controller 1/1 1 1 12m- 1
- 2
- 3
- 4
- 5
- 6
- 7
- 8
- 9
- 10
- 11
- 12
安装完成之后可以按照下面章节的步骤测试访问,流程结果是正常的。
5️⃣ yaml 文件内容如下
apiVersion: v1 kind: Namespace metadata: labels: app.kubernetes.io/instance: ingress-nginx app.kubernetes.io/name: ingress-nginx name: ingress-nginx --- apiVersion: v1 automountServiceAccountToken: true kind: ServiceAccount metadata: labels: app.kubernetes.io/component: controller app.kubernetes.io/instance: ingress-nginx app.kubernetes.io/name: ingress-nginx app.kubernetes.io/part-of: ingress-nginx app.kubernetes.io/version: 1.3.1 name: ingress-nginx namespace: ingress-nginx --- apiVersion: v1 kind: ServiceAccount metadata: labels: app.kubernetes.io/component: admission-webhook app.kubernetes.io/instance: ingress-nginx app.kubernetes.io/name: ingress-nginx app.kubernetes.io/part-of: ingress-nginx app.kubernetes.io/version: 1.3.1 name: ingress-nginx-admission namespace: ingress-nginx --- apiVersion: rbac.authorization.k8s.io/v1 kind: Role metadata: labels: app.kubernetes.io/component: controller app.kubernetes.io/instance: ingress-nginx app.kubernetes.io/name: ingress-nginx app.kubernetes.io/part-of: ingress-nginx app.kubernetes.io/version: 1.3.1 name: ingress-nginx namespace: ingress-nginx rules: - apiGroups: - "" resources: - namespaces verbs: - get - apiGroups: - "" resources: - configmaps - pods - secrets - endpoints verbs: - get - list - watch - apiGroups: - "" resources: - services verbs: - get - list - watch - apiGroups: - networking.k8s.io resources: - ingresses verbs: - get - list - watch - apiGroups: - networking.k8s.io resources: - ingresses/status verbs: - update - apiGroups: - networking.k8s.io resources: - ingressclasses verbs: - get - list - watch - apiGroups: - "" resourceNames: - ingress-controller-leader resources: - configmaps verbs: - get - update - apiGroups: - "" resources: - configmaps verbs: - create - apiGroups: - coordination.k8s.io resourceNames: - ingress-controller-leader resources: - leases verbs: - get - update - apiGroups: - coordination.k8s.io resources: - leases verbs: - create - apiGroups: - "" resources: - events verbs: - create - patch --- apiVersion: rbac.authorization.k8s.io/v1 kind: Role metadata: labels: app.kubernetes.io/component: admission-webhook app.kubernetes.io/instance: ingress-nginx app.kubernetes.io/name: ingress-nginx app.kubernetes.io/part-of: ingress-nginx app.kubernetes.io/version: 1.3.1 name: ingress-nginx-admission namespace: ingress-nginx rules: - apiGroups: - "" resources: - secrets verbs: - get - create --- apiVersion: rbac.authorization.k8s.io/v1 kind: ClusterRole metadata: labels: app.kubernetes.io/instance: ingress-nginx app.kubernetes.io/name: ingress-nginx app.kubernetes.io/part-of: ingress-nginx app.kubernetes.io/version: 1.3.1 name: ingress-nginx rules: - apiGroups: - "" resources: - configmaps - endpoints - nodes - pods - secrets - namespaces verbs: - list - watch - apiGroups: - coordination.k8s.io resources: - leases verbs: - list - watch - apiGroups: - "" resources: - nodes verbs: - get - apiGroups: - "" resources: - services verbs: - get - list - watch - apiGroups: - networking.k8s.io resources: - ingresses verbs: - get - list - watch - apiGroups: - "" resources: - events verbs: - create - patch - apiGroups: - networking.k8s.io resources: - ingresses/status verbs: - update - apiGroups: - networking.k8s.io resources: - ingressclasses verbs: - get - list - watch --- apiVersion: rbac.authorization.k8s.io/v1 kind: ClusterRole metadata: labels: app.kubernetes.io/component: admission-webhook app.kubernetes.io/instance: ingress-nginx app.kubernetes.io/name: ingress-nginx app.kubernetes.io/part-of: ingress-nginx app.kubernetes.io/version: 1.3.1 name: ingress-nginx-admission rules: - apiGroups: - admissionregistration.k8s.io resources: - validatingwebhookconfigurations verbs: - get - update --- apiVersion: rbac.authorization.k8s.io/v1 kind: RoleBinding metadata: labels: app.kubernetes.io/component: controller app.kubernetes.io/instance: ingress-nginx app.kubernetes.io/name: ingress-nginx app.kubernetes.io/part-of: ingress-nginx app.kubernetes.io/version: 1.3.1 name: ingress-nginx namespace: ingress-nginx roleRef: apiGroup: rbac.authorization.k8s.io kind: Role name: ingress-nginx subjects: - kind: ServiceAccount name: ingress-nginx namespace: ingress-nginx --- apiVersion: rbac.authorization.k8s.io/v1 kind: RoleBinding metadata: labels: app.kubernetes.io/component: admission-webhook app.kubernetes.io/instance: ingress-nginx app.kubernetes.io/name: ingress-nginx app.kubernetes.io/part-of: ingress-nginx app.kubernetes.io/version: 1.3.1 name: ingress-nginx-admission namespace: ingress-nginx roleRef: apiGroup: rbac.authorization.k8s.io kind: Role name: ingress-nginx-admission subjects: - kind: ServiceAccount name: ingress-nginx-admission namespace: ingress-nginx --- apiVersion: rbac.authorization.k8s.io/v1 kind: ClusterRoleBinding metadata: labels: app.kubernetes.io/instance: ingress-nginx app.kubernetes.io/name: ingress-nginx app.kubernetes.io/part-of: ingress-nginx app.kubernetes.io/version: 1.3.1 name: ingress-nginx roleRef: apiGroup: rbac.authorization.k8s.io kind: ClusterRole name: ingress-nginx subjects: - kind: ServiceAccount name: ingress-nginx namespace: ingress-nginx --- apiVersion: rbac.authorization.k8s.io/v1 kind: ClusterRoleBinding metadata: labels: app.kubernetes.io/component: admission-webhook app.kubernetes.io/instance: ingress-nginx app.kubernetes.io/name: ingress-nginx app.kubernetes.io/part-of: ingress-nginx app.kubernetes.io/version: 1.3.1 name: ingress-nginx-admission roleRef: apiGroup: rbac.authorization.k8s.io kind: ClusterRole name: ingress-nginx-admission subjects: - kind: ServiceAccount name: ingress-nginx-admission namespace: ingress-nginx --- apiVersion: v1 data: allow-snippet-annotations: "true" kind: ConfigMap metadata: labels: app.kubernetes.io/component: controller app.kubernetes.io/instance: ingress-nginx app.kubernetes.io/name: ingress-nginx app.kubernetes.io/part-of: ingress-nginx app.kubernetes.io/version: 1.3.1 name: ingress-nginx-controller namespace: ingress-nginx --- apiVersion: v1 kind: Service metadata: labels: app.kubernetes.io/component: controller app.kubernetes.io/instance: ingress-nginx app.kubernetes.io/name: ingress-nginx app.kubernetes.io/part-of: ingress-nginx app.kubernetes.io/version: 1.3.1 name: ingress-nginx-controller namespace: ingress-nginx spec: ipFamilies: - IPv4 ipFamilyPolicy: SingleStack ports: - appProtocol: http name: http port: 80 protocol: TCP targetPort: http - appProtocol: https name: https port: 443 protocol: TCP targetPort: https selector: app.kubernetes.io/component: controller app.kubernetes.io/instance: ingress-nginx app.kubernetes.io/name: ingress-nginx type: NodePort --- apiVersion: v1 kind: Service metadata: labels: app.kubernetes.io/component: controller app.kubernetes.io/instance: ingress-nginx app.kubernetes.io/name: ingress-nginx app.kubernetes.io/part-of: ingress-nginx app.kubernetes.io/version: 1.3.1 name: ingress-nginx-controller-admission namespace: ingress-nginx spec: ports: - appProtocol: https name: https-webhook port: 443 targetPort: webhook selector: app.kubernetes.io/component: controller app.kubernetes.io/instance: ingress-nginx app.kubernetes.io/name: ingress-nginx type: ClusterIP --- apiVersion: apps/v1 kind: Deployment metadata: labels: app.kubernetes.io/component: controller app.kubernetes.io/instance: ingress-nginx app.kubernetes.io/name: ingress-nginx app.kubernetes.io/part-of: ingress-nginx app.kubernetes.io/version: 1.3.1 name: ingress-nginx-controller namespace: ingress-nginx spec: minReadySeconds: 0 revisionHistoryLimit: 10 selector: matchLabels: app.kubernetes.io/component: controller app.kubernetes.io/instance: ingress-nginx app.kubernetes.io/name: ingress-nginx template: metadata: labels: app.kubernetes.io/component: controller app.kubernetes.io/instance: ingress-nginx app.kubernetes.io/name: ingress-nginx spec: containers: - args: - /nginx-ingress-controller - --election-id=ingress-controller-leader - --controller-class=k8s.io/ingress-nginx - --ingress-class=nginx - --configmap=$(POD_NAMESPACE)/ingress-nginx-controller - --validating-webhook=:8443 - --validating-webhook-certificate=/usr/local/certificates/cert - --validating-webhook-key=/usr/local/certificates/key env: - name: POD_NAME valueFrom: fieldRef: fieldPath: metadata.name - name: POD_NAMESPACE valueFrom: fieldRef: fieldPath: metadata.namespace - name: LD_PRELOAD value: /usr/local/lib/libmimalloc.so image: registry.cn-hangzhou.aliyuncs.com/google_containers/nginx-ingress-controller:v1.3.1 imagePullPolicy: IfNotPresent lifecycle: preStop: exec: command: - /wait-shutdown livenessProbe: failureThreshold: 5 httpGet: path: /healthz port: 10254 scheme: HTTP initialDelaySeconds: 10 periodSeconds: 10 successThreshold: 1 timeoutSeconds: 1 name: controller ports: - containerPort: 80 name: http protocol: TCP - containerPort: 443 name: https protocol: TCP - containerPort: 8443 name: webhook protocol: TCP readinessProbe: failureThreshold: 3 httpGet: path: /healthz port: 10254 scheme: HTTP initialDelaySeconds: 10 periodSeconds: 10 successThreshold: 1 timeoutSeconds: 1 resources: requests: cpu: 100m memory: 90Mi securityContext: allowPrivilegeEscalation: true capabilities: add: - NET_BIND_SERVICE drop: - ALL runAsUser: 101 volumeMounts: - mountPath: /usr/local/certificates/ name: webhook-cert readOnly: true dnsPolicy: ClusterFirst nodeSelector: kubernetes.io/os: linux serviceAccountName: ingress-nginx terminationGracePeriodSeconds: 300 volumes: - name: webhook-cert secret: secretName: ingress-nginx-admission --- apiVersion: batch/v1 kind: Job metadata: labels: app.kubernetes.io/component: admission-webhook app.kubernetes.io/instance: ingress-nginx app.kubernetes.io/name: ingress-nginx app.kubernetes.io/part-of: ingress-nginx app.kubernetes.io/version: 1.3.1 name: ingress-nginx-admission-create namespace: ingress-nginx spec: template: metadata: labels: app.kubernetes.io/component: admission-webhook app.kubernetes.io/instance: ingress-nginx app.kubernetes.io/name: ingress-nginx app.kubernetes.io/part-of: ingress-nginx app.kubernetes.io/version: 1.3.1 name: ingress-nginx-admission-create spec: containers: - args: - create - --host=ingress-nginx-controller-admission,ingress-nginx-controller-admission.$(POD_NAMESPACE).svc - --namespace=$(POD_NAMESPACE) - --secret-name=ingress-nginx-admission env: - name: POD_NAMESPACE valueFrom: fieldRef: fieldPath: metadata.namespace image: registry.cn-hangzhou.aliyuncs.com/google_containers/kube-webhook-certgen:v1.3.0 imagePullPolicy: IfNotPresent name: create securityContext: allowPrivilegeEscalation: false nodeSelector: kubernetes.io/os: linux restartPolicy: OnFailure securityContext: fsGroup: 2000 runAsNonRoot: true runAsUser: 2000 serviceAccountName: ingress-nginx-admission --- apiVersion: batch/v1 kind: Job metadata: labels: app.kubernetes.io/component: admission-webhook app.kubernetes.io/instance: ingress-nginx app.kubernetes.io/name: ingress-nginx app.kubernetes.io/part-of: ingress-nginx app.kubernetes.io/version: 1.3.1 name: ingress-nginx-admission-patch namespace: ingress-nginx spec: template: metadata: labels: app.kubernetes.io/component: admission-webhook app.kubernetes.io/instance: ingress-nginx app.kubernetes.io/name: ingress-nginx app.kubernetes.io/part-of: ingress-nginx app.kubernetes.io/version: 1.3.1 name: ingress-nginx-admission-patch spec: containers: - args: - patch - --webhook-name=ingress-nginx-admission - --namespace=$(POD_NAMESPACE) - --patch-mutating=false - --secret-name=ingress-nginx-admission - --patch-failure-policy=Fail env: - name: POD_NAMESPACE valueFrom: fieldRef: fieldPath: metadata.namespace image: registry.cn-hangzhou.aliyuncs.com/google_containers/kube-webhook-certgen:v1.3.0 imagePullPolicy: IfNotPresent name: patch securityContext: allowPrivilegeEscalation: false nodeSelector: kubernetes.io/os: linux restartPolicy: OnFailure securityContext: fsGroup: 2000 runAsNonRoot: true runAsUser: 2000 serviceAccountName: ingress-nginx-admission --- apiVersion: networking.k8s.io/v1 kind: IngressClass metadata: labels: app.kubernetes.io/component: controller app.kubernetes.io/instance: ingress-nginx app.kubernetes.io/name: ingress-nginx app.kubernetes.io/part-of: ingress-nginx app.kubernetes.io/version: 1.3.1 name: nginx spec: controller: k8s.io/ingress-nginx --- apiVersion: admissionregistration.k8s.io/v1 kind: ValidatingWebhookConfiguration metadata: labels: app.kubernetes.io/component: admission-webhook app.kubernetes.io/instance: ingress-nginx app.kubernetes.io/name: ingress-nginx app.kubernetes.io/part-of: ingress-nginx app.kubernetes.io/version: 1.3.1 name: ingress-nginx-admission webhooks: - admissionReviewVersions: - v1 clientConfig: service: name: ingress-nginx-controller-admission namespace: ingress-nginx path: /networking/v1/ingresses failurePolicy: Fail matchPolicy: Equivalent name: validate.nginx.ingress.kubernetes.io rules: - apiGroups: - networking.k8s.io apiVersions: - v1 operations: - CREATE - UPDATE resources: - ingresses sideEffects: None- 1
- 2
- 3
- 4
- 5
- 6
- 7
- 8
- 9
- 10
- 11
- 12
- 13
- 14
- 15
- 16
- 17
- 18
- 19
- 20
- 21
- 22
- 23
- 24
- 25
- 26
- 27
- 28
- 29
- 30
- 31
- 32
- 33
- 34
- 35
- 36
- 37
- 38
- 39
- 40
- 41
- 42
- 43
- 44
- 45
- 46
- 47
- 48
- 49
- 50
- 51
- 52
- 53
- 54
- 55
- 56
- 57
- 58
- 59
- 60
- 61
- 62
- 63
- 64
- 65
- 66
- 67
- 68
- 69
- 70
- 71
- 72
- 73
- 74
- 75
- 76
- 77
- 78
- 79
- 80
- 81
- 82
- 83
- 84
- 85
- 86
- 87
- 88
- 89
- 90
- 91
- 92
- 93
- 94
- 95
- 96
- 97
- 98
- 99
- 100
- 101
- 102
- 103
- 104
- 105
- 106
- 107
- 108
- 109
- 110
- 111
- 112
- 113
- 114
- 115
- 116
- 117
- 118
- 119
- 120
- 121
- 122
- 123
- 124
- 125
- 126
- 127
- 128
- 129
- 130
- 131
- 132
- 133
- 134
- 135
- 136
- 137
- 138
- 139
- 140
- 141
- 142
- 143
- 144
- 145
- 146
- 147
- 148
- 149
- 150
- 151
- 152
- 153
- 154
- 155
- 156
- 157
- 158
- 159
- 160
- 161
- 162
- 163
- 164
- 165
- 166
- 167
- 168
- 169
- 170
- 171
- 172
- 173
- 174
- 175
- 176
- 177
- 178
- 179
- 180
- 181
- 182
- 183
- 184
- 185
- 186
- 187
- 188
- 189
- 190
- 191
- 192
- 193
- 194
- 195
- 196
- 197
- 198
- 199
- 200
- 201
- 202
- 203
- 204
- 205
- 206
- 207
- 208
- 209
- 210
- 211
- 212
- 213
- 214
- 215
- 216
- 217
- 218
- 219
- 220
- 221
- 222
- 223
- 224
- 225
- 226
- 227
- 228
- 229
- 230
- 231
- 232
- 233
- 234
- 235
- 236
- 237
- 238
- 239
- 240
- 241
- 242
- 243
- 244
- 245
- 246
- 247
- 248
- 249
- 250
- 251
- 252
- 253
- 254
- 255
- 256
- 257
- 258
- 259
- 260
- 261
- 262
- 263
- 264
- 265
- 266
- 267
- 268
- 269
- 270
- 271
- 272
- 273
- 274
- 275
- 276
- 277
- 278
- 279
- 280
- 281
- 282
- 283
- 284
- 285
- 286
- 287
- 288
- 289
- 290
- 291
- 292
- 293
- 294
- 295
- 296
- 297
- 298
- 299
- 300
- 301
- 302
- 303
- 304
- 305
- 306
- 307
- 308
- 309
- 310
- 311
- 312
- 313
- 314
- 315
- 316
- 317
- 318
- 319
- 320
- 321
- 322
- 323
- 324
- 325
- 326
- 327
- 328
- 329
- 330
- 331
- 332
- 333
- 334
- 335
- 336
- 337
- 338
- 339
- 340
- 341
- 342
- 343
- 344
- 345
- 346
- 347
- 348
- 349
- 350
- 351
- 352
- 353
- 354
- 355
- 356
- 357
- 358
- 359
- 360
- 361
- 362
- 363
- 364
- 365
- 366
- 367
- 368
- 369
- 370
- 371
- 372
- 373
- 374
- 375
- 376
- 377
- 378
- 379
- 380
- 381
- 382
- 383
- 384
- 385
- 386
- 387
- 388
- 389
- 390
- 391
- 392
- 393
- 394
- 395
- 396
- 397
- 398
- 399
- 400
- 401
- 402
- 403
- 404
- 405
- 406
- 407
- 408
- 409
- 410
- 411
- 412
- 413
- 414
- 415
- 416
- 417
- 418
- 419
- 420
- 421
- 422
- 423
- 424
- 425
- 426
- 427
- 428
- 429
- 430
- 431
- 432
- 433
- 434
- 435
- 436
- 437
- 438
- 439
- 440
- 441
- 442
- 443
- 444
- 445
- 446
- 447
- 448
- 449
- 450
- 451
- 452
- 453
- 454
- 455
- 456
- 457
- 458
- 459
- 460
- 461
- 462
- 463
- 464
- 465
- 466
- 467
- 468
- 469
- 470
- 471
- 472
- 473
- 474
- 475
- 476
- 477
- 478
- 479
- 480
- 481
- 482
- 483
- 484
- 485
- 486
- 487
- 488
- 489
- 490
- 491
- 492
- 493
- 494
- 495
- 496
- 497
- 498
- 499
- 500
- 501
- 502
- 503
- 504
- 505
- 506
- 507
- 508
- 509
- 510
- 511
- 512
- 513
- 514
- 515
- 516
- 517
- 518
- 519
- 520
- 521
- 522
- 523
- 524
- 525
- 526
- 527
- 528
- 529
- 530
- 531
- 532
- 533
- 534
- 535
- 536
- 537
- 538
- 539
- 540
- 541
- 542
- 543
- 544
- 545
- 546
- 547
- 548
- 549
- 550
- 551
- 552
- 553
- 554
- 555
- 556
- 557
- 558
- 559
- 560
- 561
- 562
- 563
- 564
- 565
- 566
- 567
- 568
- 569
- 570
- 571
- 572
- 573
- 574
- 575
- 576
- 577
- 578
- 579
- 580
- 581
- 582
- 583
- 584
- 585
- 586
- 587
- 588
- 589
- 590
- 591
- 592
- 593
- 594
- 595
- 596
- 597
- 598
- 599
- 600
- 601
- 602
- 603
- 604
- 605
- 606
- 607
- 608
- 609
- 610
- 611
- 612
- 613
- 614
- 615
- 616
- 617
- 618
- 619
- 620
- 621
- 622
- 623
- 624
- 625
- 626
- 627
- 628
- 629
- 630
- 631
- 632
- 633
- 634
- 635
- 636
- 637
- 638
- 639
- 640
7.2 Ingress 测试案例
测试流程架构

7.2.1 准备测试 pod
准备两个测试的
pod,并同时创建他们的service网络1️⃣ 准备一个 hello-world 镜像,并使用他的 9000 端口,创建一个 service hello-server 并将 9000 端口指向对外暴露的 8000 端口
2️⃣ nginx 镜像也是同样的操作
apiVersion: apps/v1 kind: Deployment metadata: name: hello-server spec: replicas: 2 selector: matchLabels: app: hello-server template: metadata: labels: app: hello-server spec: containers: - name: hello-server image: registry.cn-hangzhou.aliyuncs.com/lfy_k8s_images/hello-server # 这里使用的尚硅谷的一个案例,后期可能会不能访问,也可以使用其他的镜像源进行测试 ports: - containerPort: 9000 --- apiVersion: apps/v1 kind: Deployment metadata: labels: app: nginx-demo name: nginx-demo spec: replicas: 2 selector: matchLabels: app: nginx-demo template: metadata: labels: app: nginx-demo spec: containers: - image: nginx name: nginx --- apiVersion: v1 kind: Service metadata: labels: app: nginx-demo name: nginx-demo spec: selector: app: nginx-demo ports: - port: 8000 protocol: TCP targetPort: 80 --- apiVersion: v1 kind: Service metadata: labels: app: hello-server name: hello-server spec: selector: app: hello-server ports: - port: 8000 protocol: TCP targetPort: 9000- 1
- 2
- 3
- 4
- 5
- 6
- 7
- 8
- 9
- 10
- 11
- 12
- 13
- 14
- 15
- 16
- 17
- 18
- 19
- 20
- 21
- 22
- 23
- 24
- 25
- 26
- 27
- 28
- 29
- 30
- 31
- 32
- 33
- 34
- 35
- 36
- 37
- 38
- 39
- 40
- 41
- 42
- 43
- 44
- 45
- 46
- 47
- 48
- 49
- 50
- 51
- 52
- 53
- 54
- 55
- 56
- 57
- 58
- 59
- 60
- 61
- 62
- 63
- 64
- 65
- 66
- 67
7.2.2 配置 ingress 规则
- 直接访问
service根路径
apiVersion: networking.k8s.io/v1 kind: Ingress # 转发规则 metadata: name: ingress-host-bar # 自定义 ingress 名称,不重复即可 spec: ingressClassName: nginx # 自定义 ingressClassName,不重复即可 rules: - host: "hello.demo.com" # 自定义域名 http: paths: - pathType: Prefix # 前缀模式 path: "/" # 域名下的访问路径 backend: # 后台服务,即将前面的域名访问转交给后面的 hello-server 的 service 处理 service: name: hello-server # 这个 hello-server 一定要和对应的 service 的名称相同 port: number: 8000 # service 对外暴露端口 - host: "nginx.demo.com" http: paths: - pathType: Prefix path: "/" backend: service: name: nginx-demo port: number: 8000- 1
- 2
- 3
- 4
- 5
- 6
- 7
- 8
- 9
- 10
- 11
- 12
- 13
- 14
- 15
- 16
- 17
- 18
- 19
- 20
- 21
- 22
- 23
- 24
- 25
- 26
- 27
7.2.3 查看 ingress 规则
[root@master ~]# kubectl get ingress NAME CLASS HOSTS ADDRESS PORTS AGE ingress-host-bar nginx hello.demo.com,nginx.demo.com 192.168.169.161 80 71m- 1
- 2
- 3
7.2.4 使用浏览器访问
个人测试时可以将域名配置在
C:\Windows\System32\drivers\etc的hosts文件中示例:这里的
ip配置集群中的任意node ip都可以192.168.169.161 hello.demo.com
192.168.169.161 nginx.demo.com- 查看
ingress-nginx service的端口号,80和443分别对应不同的端口
[root@master ~]# kubectl get svc -n ingress-nginx NAME TYPE CLUSTER-IP EXTERNAL-IP PORT(S) AGE ingress-nginx-controller NodePort 10.96.103.255 <none> 80:30050/TCP,443:30580/TCP 10h- 1
- 2
- 3
- 使用浏览器访问测试


配置指定访问路径
还是以上面的规则为例,总体规则不变,这里只修改
nginx-demo的访问路径使用如下命令对指定的
ingress规则进行修改# 语法 kubectl edit ingress [ingress name] # 示例 kubectl edit ingress ingress-host-bar- 1
- 2
- 3
- 4

apiVersion: networking.k8s.io/v1 kind: Ingress # 转发规则 metadata: name: ingress-host-bar # 自定义 ingress 名称,不重复即可 spec: ingressClassName: nginx # 自定义 ingressClassName,不重复即可 rules: - host: "hello.demo.com" # 自定义域名 http: paths: - pathType: Prefix # 前缀模式 path: "/" # 域名下的访问路径 backend: # 后台服务,即将前面的域名访问转交给后面的 hello-server 的 service 处理 service: name: hello-server # 这个 hello-server 一定要和对应的 service 的名称相同 port: number: 8000 # service 对外暴露端口 - host: "nginx.demo.com" http: paths: - pathType: Prefix path: "/nginx.html" # 修改为指定的访问路径,如果 service 所管理的 pod 中没有这个访问路径,则会报 404 ,但是这个时候 ingress 是正常转发的,只是 pod 内部的 nginx 找不到路径不能处理。 backend: service: name: nginx-demo port: number: 8000- 1
- 2
- 3
- 4
- 5
- 6
- 7
- 8
- 9
- 10
- 11
- 12
- 13
- 14
- 15
- 16
- 17
- 18
- 19
- 20
- 21
- 22
- 23
- 24
- 25
- 26
- 27
在
nginx相关的pod中配置好访问路径[root@master1 ~]# kubectl exec -it nginx-demo-5dfc44fcdb-dc5rr bash kubectl exec [POD] [COMMAND] is DEPRECATED and will be removed in a future version. Use kubectl exec [POD] -- [COMMAND] instead. root@nginx-demo-5dfc44fcdb-dc5rr:/# cd /usr/share/nginx/html/ root@nginx-demo-5dfc44fcdb-dc5rr:/usr/share/nginx/html# echo "mynginx01" > nginx.html root@nginx-demo-5dfc44fcdb-dc5rr:/usr/share/nginx/html# ls 50x.html index.html nginx.html- 1
- 2
- 3
- 4
- 5
- 6

- 使用浏览器访问测试

注:如果使用 443 对应的端口访问,因为没有配置
https证书,所以会访问失败,不过对于ingress的网络访问流程大概就是这样的7.3 ingress 路径重写
官网参考地址:https://kubernetes.github.io/ingress-nginx/user-guide/nginx-configuration/annotations/#rewrite
官网参考案例:https://kubernetes.github.io/ingress-nginx/examples/rewrite/
官网 demo 案例

# 路径访问解析 rewrite.bar.com/something rewrites to rewrite.bar.com/ 访问信息为 rewrite.bar.com/something ,当配置了路径重写之后,在浏览器中访问 rewrite.bar.com/something ,实际会将 something 去掉,然后访问 rewrite.bar.com/ rewrite.bar.com/something/ rewrites to rewrite.bar.com/ 访问信息为 rewrite.bar.com/something/ 也是和上面一样的 rewrite.bar.com/something/new rewrites to rewrite.bar.com/new 访问信息为 rewrite.bar.com/something/new ,当配置了路径重写之后,在浏览器中访问 rewrite.bar.com/something/new ,实际会将 something 去掉,然后访问 rewrite.bar.com/new- 1
- 2
- 3
- 4
- 5
- 6
- 7
- 8
- 9
测试验证 1
测试验证
rewrite.bar.com/something rewrites to rewrite.bar.com/和rewrite.bar.com/something/ rewrites to rewrite.bar.com/访问情况。还是使用之前的nginx的配置信息,将访问路径修改apiVersion: networking.k8s.io/v1 kind: Ingress metadata: annotations: nginx.ingress.kubernetes.io/rewrite-target: /$2 name: ingress-host-bar spec: ingressClassName: nginx rules: - host: "hello.demo.com" http: paths: - pathType: Prefix path: "/" backend: service: name: hello-server port: number: 8000 - host: "nginx.demo.com" http: paths: - pathType: Prefix path: "/nginx.html(/|$)(.*)" backend: service: name: nginx-demo port: number: 8000- 1
- 2
- 3
- 4
- 5
- 6
- 7
- 8
- 9
- 10
- 11
- 12
- 13
- 14
- 15
- 16
- 17
- 18
- 19
- 20
- 21
- 22
- 23
- 24
- 25
- 26
- 27
- 28
- 29
-
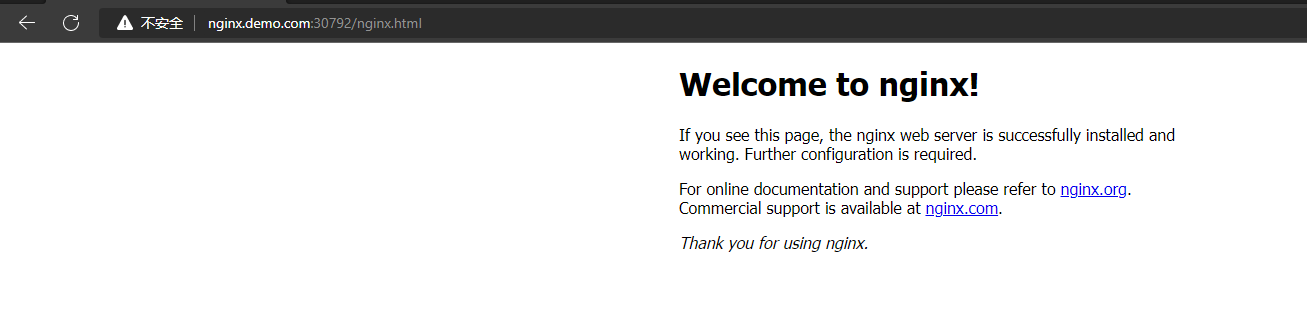
测试结果
在访问 http://nginx.demo.com:30792/nginx.html 路径是,它会将 nginx.html 去掉之后在访问,所以实际访问地址就是 http://nginx.demo.com:30792/ ,所以我们看到的是
nginx的主页。
测试验证 2
测试验证
rewrite.bar.com/something/new rewrites to rewrite.bar.com/new这种访问情况下的过程,本次任然使用之前的规则配置文件,只是做稍微的改动# 这里我们可以直接使用 edit 对配置文件进行修改 [root@master1 ~]# kubectl edit ingress ingress-host-bar ingress.networking.k8s.io/ingress-host-bar edited- 1
- 2
- 3
这里将访问路径做了简单的改动,原本是直接访问
nginx.html这里改为访问nginx/nginx.html,实际按照ingress路径重写的功能,这里访问nginx.demo.com:30792/nginx/nginx.html实际结果是访问nginx.demo.com:30792/nginx.html,感觉/nginx就像是一个所有地址的入口,但实际访问的文件也并不是在这里路径下。apiVersion: networking.k8s.io/v1 kind: Ingress metadata: annotations: nginx.ingress.kubernetes.io/rewrite-target: /$2 name: ingress-host-bar spec: ingressClassName: nginx rules: - host: "hello.demo.com" http: paths: - pathType: Prefix path: "/" backend: service: name: hello-server port: number: 8000 - host: "nginx.demo.com" http: paths: - pathType: Prefix path: "/nginx(/|$)(.*)" backend: service: name: nginx-demo port: number: 8000- 1
- 2
- 3
- 4
- 5
- 6
- 7
- 8
- 9
- 10
- 11
- 12
- 13
- 14
- 15
- 16
- 17
- 18
- 19
- 20
- 21
- 22
- 23
- 24
- 25
- 26
- 27
- 28
- 29
修改
nginx pod文件路径,如下,这里做了两组对比试验,在同一个service下的两个nginx pod中,将nginx.html文件放在不同路径下1️⃣ 将
nginx.html放在/目录下,和nginx目录平级[root@master1 ~]# kubectl exec -it nginx-demo-5dfc44fcdb-s9mp2 bash kubectl exec [POD] [COMMAND] is DEPRECATED and will be removed in a future version. Use kubectl exec [POD] -- [COMMAND] instead. root@nginx-demo-5dfc44fcdb-s9mp2:/# cd /usr/share/nginx/html/ root@nginx-demo-5dfc44fcdb-s9mp2:/usr/share/nginx/html# ls 50x.html index.html nginx root@nginx-demo-5dfc44fcdb-s9mp2:/usr/share/nginx/html# ls 50x.html index.html nginx nginx.html root@nginx-demo-5dfc44fcdb-s9mp2:/usr/share/nginx/html# cat nginx.html mynginx02- 1
- 2
- 3
- 4
- 5
- 6
- 7
- 8
- 9
2️⃣ 将
nginx.html放在nginx目录下[root@master1 ~]# kubectl exec -it nginx-demo-5dfc44fcdb-dc5rr bash kubectl exec [POD] [COMMAND] is DEPRECATED and will be removed in a future version. Use kubectl exec [POD] -- [COMMAND] instead. root@nginx-demo-5dfc44fcdb-dc5rr:/# cd /usr/share/nginx/html/ root@nginx-demo-5dfc44fcdb-dc5rr:/usr/share/nginx/html# ls 50x.html index.html nginx root@nginx-demo-5dfc44fcdb-dc5rr:/usr/share/nginx/html# cd nginx/ root@nginx-demo-5dfc44fcdb-dc5rr:/usr/share/nginx/html/nginx# ls nginx.html root@nginx-demo-5dfc44fcdb-dc5rr:/usr/share/nginx/html/nginx# cat nginx.html mynginx01- 1
- 2
- 3
- 4
- 5
- 6
- 7
- 8
- 9
- 10
3️⃣ 访问测试
使用域名
nginx.demo.com:30792/nginx/nginx.html访问时,内容为mynginx02的会正常返回,而内容为mynginx01的是提示找不到的。这也就说明在配置了域名重写规则之后访问nginx.demo.com:30792/nginx/nginx.html它的实际的访问文件的路径并不是nginx

7.3.1 rewrite 跳转到指定地址
当匹配到指定路径后就跳转到指定的路径,如下配置,其中
uri自定义即可apiVersion: networking.k8s.io/v1 kind: Ingress metadata: annotations: nginx.ingress.kubernetes.io/server-snippet: | if ($uri ~* "/api/aa.html") { rewrite (.+) https://www.baidu.com; } if ($uri ~* "/api/bb/aa.html") { rewrite (.+) https://www.jd.com; } name: ingress-host-bar spec: ingressClassName: nginx rules: - host: "hello.demo.com" http: paths: - pathType: Prefix path: "/" backend: service: name: hello-server port: number: 8000 - host: "nginx.demo.com" http: paths: - pathType: Prefix path: "/" backend: service: name: nginx-demo port: number: 8000- 1
- 2
- 3
- 4
- 5
- 6
- 7
- 8
- 9
- 10
- 11
- 12
- 13
- 14
- 15
- 16
- 17
- 18
- 19
- 20
- 21
- 22
- 23
- 24
- 25
- 26
- 27
- 28
- 29
- 30
- 31
- 32
- 33
- 34
- 35
8. 存储挂载
8.1 NFS 文件系统挂载
❓ 为什么要使用 NFS 挂载
- 如果直接挂载在 node 上会出现什么问题?
问题说明:
如果简单的将 pod 内的文件挂载到 node 本地路径下,就会出现问题。如图所示,如果 node3 中的 pod3 宕机之后,k8s 会根据故障转移新起一个 pod3 ,但是新的 pod3 可能不会在 node3 节点上(或者 node3 节点宕机了,这样就不可能在 node3 上有 pod 的存在),假设新的 pod3 在 node2 节点上,那么 pod3 的数据还在 node3 节点上,这样新的 pod3 就没有数据了,这样就会出现问题。

- 使用 NFS 挂载
NFS 说明及安装可参考博客:传送门
说明:
在每个节点上都安装
NFS文件系统服务,然后将所有需要挂载的pod的文件路径都挂载到NFS指定的目录下(例如:/nfs/data),然后在所有节点上进行同步,因为使用NFS文件系统的时候,它会自动将所有节点的文件同步,这样就可以保证每台node节点上的文件是一致的。假如在node3节点上的pod3宕机之后在node2节点上重新启动之后仍然可以找到对应的文件路径,这样可以保证服务的正常运行。就算是整个node节点宕机,pod在其他节点上重启之后也是可以找到对应的文件路径。疑问:
假如有个很大的文件在
NFS节点直接同步的过程中,其中一台node节点突然宕机了,怎么办?
8.1.1 搭建 NFS 文件系统
# 所有节点安装 yum install -y nfs-utils # nfs主节点 echo "/nfs/data/ *(insecure,rw,sync,no_root_squash)" > /etc/exports # 所有节点 mkdir -p /nfs/data systemctl enable rpcbind --now systemctl enable nfs-server --now #配置生效 exportfs -r # 从节点 showmount -e 192.168.169.160 # 主节点的 ip 地址 mount -t nfs 172.31.0.4:/nfs/data /nfs/data # 手动挂载 # 配置开机自动挂载 chmod +x /etc/rc.d/rc.local echo "mount -t nfs 192.168.169.160:/nfs/data /nfs/data">>/etc/rc.local- 1
- 2
- 3
- 4
- 5
- 6
- 7
- 8
- 9
- 10
- 11
- 12
- 13
- 14
- 15
- 16
- 17
- 18
- 19
8.2 使用 YAML 文件实现挂载
apiVersion: apps/v1 kind: Deployment metadata: labels: app: nginx-pv-demo name: nginx-pv-demo spec: replicas: 2 selector: matchLabels: app: nginx-pv-demo template: metadata: labels: app: nginx-pv-demo spec: containers: - image: nginx name: nginx volumeMounts: - name: html-path # 这里自定义一个名称,和下面的 name 一致即可 mountPath: /usr/share/nginx/html # 这里指定 pod 内部的需要挂载的路径 volumes: - name: html-path # 这里的 name 就是上面配置的 pod 内部的挂载路径 nfs: server: 192.168.169.160 # NFS 主节点的 IP 地址 path: /nfs/data/nginx-pv # 挂载到 NFS 本地的路径,这里注意在挂载之前需要确定是否存在对应的路径,如果没有则创建 pod 会失败- 1
- 2
- 3
- 4
- 5
- 6
- 7
- 8
- 9
- 10
- 11
- 12
- 13
- 14
- 15
- 16
- 17
- 18
- 19
- 20
- 21
- 22
- 23
- 24
- 25
- 26
- 27
- 验证测试


8.3 NFS 挂载不足
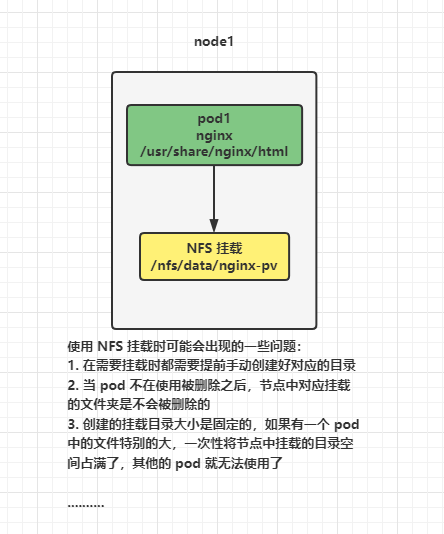
使用 NFS 挂载时可能会出现的一些问题:
-
在需要挂载时都需要提前手动创建好对应的目录
-
当 pod 不在使用被删除之后,节点中对应挂载的文件夹是不会被删除的
-
创建的挂载目录大小是固定的,如果有一个 pod 中的文件特别的大,一次性将节点中挂载的目录空间占满了,其他的 pod 就无法使用了
…
8.4 PV&PVC
PV:持久卷(Persistent Volume),将应用需要持久化的数据保存到指定位置
PVC:持久卷申明(Persistent Volume Claim),申明需要使用的持久卷规格(大小)

说明:
对于这个 PV 池静态供应,我理解是
-
在 NFS 的基础上,在 NFS 挂载目录下,提前创建好的文件夹中设置一个 PV 持久卷的概念,然后对这个 PV 卷设置大小
-
在创建一个 PVC 声明,指定挂载需要的大小,然后 k8s 会自动选择合适这个声明需要的大小的 PV ,pod 内部需要挂载的文件和这个 PV 绑定之后,这个 pod 的挂载文件的可用空间大小就是绑定的 PV 大小决定的。但是这个 PV 大小的上限应该是被 NFS 挂载目录的大小限制的。也就是说在使用 PV 和 PVC 的时候,他们的基础仍然是 NFS 文件挂载系统。
-
如果后期 pod 不在使用,那么将 pod 删除之后带着对应的 PVC 一起删除,那么对应的 PVC 和 PV 也会解除绑定,等 PV 恢复到一定状态后就可以重新绑定其他的 pod。
8.4.1 创建 PV 池
静态供应:
简单理解静态供应就是提前将 PV 池创建好,并规划好大小,等到需要使用的时候,直接使用 PVC 进行绑定。与之相对应的还有动态供应,这个后面在写。
1️⃣ 在 NFS 主节点上创建文件
mkdir -p /nfs/data/01 mkdir -p /nfs/data/02 mkdir -p /nfs/data/03- 1
- 2
- 3
2️⃣ 创建 PV
apiVersion: v1 kind: PersistentVolume metadata: name: pv01-10m # 自定义 PV 的名称,注意不能使用大写字母 spec: capacity: storage: 10M # 指定 PV 的大小 accessModes: - ReadWriteMany storageClassName: nfs # 自定义 ClassName,这里需要和下面 PVC 中的相同即可 nfs: path: /nfs/data/01 # 将对应的文件夹设置指定的大小 server: 192.168.169.160 # NFS 服务器地址 --- apiVersion: v1 kind: PersistentVolume metadata: name: pv02-100m spec: capacity: storage: 100M accessModes: - ReadWriteMany storageClassName: nfs nfs: path: /nfs/data/02 server: 192.168.169.160 --- apiVersion: v1 kind: PersistentVolume metadata: name: pv03-1gi spec: capacity: storage: 1Gi accessModes: - ReadWriteMany storageClassName: nfs nfs: path: /nfs/data/03 server: 192.168.169.160- 1
- 2
- 3
- 4
- 5
- 6
- 7
- 8
- 9
- 10
- 11
- 12
- 13
- 14
- 15
- 16
- 17
- 18
- 19
- 20
- 21
- 22
- 23
- 24
- 25
- 26
- 27
- 28
- 29
- 30
- 31
- 32
- 33
- 34
- 35
- 36
- 37
- 38
- 39
- 40
- 41

8.4.2 PVC 创建与绑定
kind: PersistentVolumeClaim apiVersion: v1 metadata: name: nginx-pvc # 自定义 PVC 名称,在 pod 和 PVC 绑定的时候会用到 spec: accessModes: - ReadWriteMany resources: requests: storage: 80Mi # 设置 PVC 申请大小 storageClassName: nfs # 指定 ClassName ,这里要和 PV 中的相对应- 1
- 2
- 3
- 4
- 5
- 6
- 7
- 8
- 9
- 10
- 11

8.4.3 建 Pod 绑定 PVC
apiVersion: apps/v1 kind: Deployment metadata: labels: app: nginx-deploy-pvc name: nginx-deploy-pvc spec: replicas: 2 selector: matchLabels: app: nginx-deploy-pvc template: metadata: labels: app: nginx-deploy-pvc spec: containers: - image: nginx name: nginx volumeMounts: - name: html mountPath: /usr/share/nginx/html volumes: - name: html persistentVolumeClaim: claimName: nginx-pvc- 1
- 2
- 3
- 4
- 5
- 6
- 7
- 8
- 9
- 10
- 11
- 12
- 13
- 14
- 15
- 16
- 17
- 18
- 19
- 20
- 21
- 22
- 23
- 24
- 25
- 26
8.5 ConfigMap
未完待续…
-
相关阅读:
Unity的碰撞检测(四)
记一次自定义starter引发的线上事故复盘
DSP_TMS320F28335_优秀的串口通信框架
蚂蚁链牵头两项区块链国际标准在ITU成功立项
gitlab突然提示我要输入密码了。
Kafka3.x核心速查手册三、服务端原理篇-2、Broker选举机制
vue和react的区别
一周拿下多线程+源码+微服务+分布式+调优,金九银十轻松跳槽,Offer拿到手软
【代码随想录】day45
MySQL优化not in和不等于
- 原文地址:https://blog.csdn.net/D1179869625/article/details/128140619
