-
【学习笔记03】node.js搭建一个简易的服务器
一、什么是请求
1. JS内部的ajax就算一个请求,由ajax发送请求, 返回的数据给到了ajax
2. 在浏览器地址栏内输入地址敲回车,由浏览器发送, 返回的数据给到浏览器
3. img、link和script这些标签也可以发送请求,由标签发送, 返回的数据给到了标签
二、请求地址
http://localhost:8080/a/b/c/index.html
- 如果请求的地址是 ./out.js,实际请求的地址:http://localhost:8080/a/b/c/out.js
- 如果请求的地址是 ./a/out.js,实际请求的地址:http://localhost:8080/a/b/c/a/out.js
- 如果请求的地址是 ../a/out.js,实际请求的地址:http://localhost:8080/a/b/a/out.js
- 如果请求的地址是 /a.js,实际请求的地址:http://localhost:8080/a.js
- 如果请求的地址 /a/b.js,实际请求的地址:http://localhost:8080/a/b.js
三、搭建一个简易的服务器

(一)基础页面搭建
1、分析
- const http = require("http");
- // 1. 创建一个服务器
- const server = http.createServer(function (req, res) {
- console.log(req.url);
- });
- // 2. 给服务监听一个端口号
- server.listen(8080, () => {
- console.log('恭喜你,服务器启动成功');
- console.log('目前正在监听8080端口! ');
- console.log('基准地址:http://localhost:8080');
- });
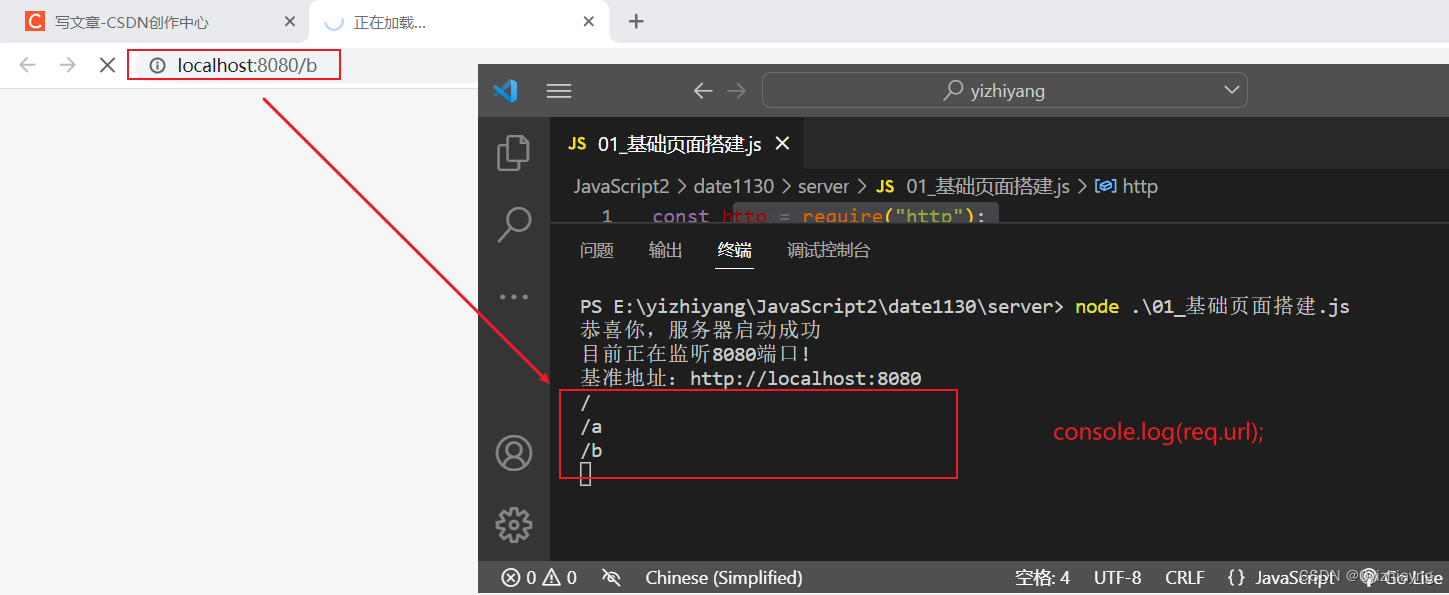
- const http = require("http");
- const url = require("url");
- // 1. 创建一个服务器
- const server = http.createServer(function (req, res) {
- console.log(url.parse(req.url,true));
- });
- // 2. 给服务监听一个端口号
- server.listen(8080, () => {
- console.log('恭喜你,服务器启动成功');
- console.log('目前正在监听8080端口! ');
- console.log('基准地址:http://localhost:8080');
- });

2、代码实现
- const http = require("http");
- const url = require("url");
- const fs = require("fs");
- // 1. 创建一个服务器
- const server = http.createServer(function (req, res) {
- const { pathname, query } = url.parse(req.url, true);
- console.log(pathname, query);
- if (pathname === "/a") {
- // 1. 读取 ./client/views/index.html 文件
- fs.readFile("./client/views/index.html", "utf-8", function (err, data) {
- if (err) return console.log(err);
- // console.log(data)
- // 通过 res.end() 返回给浏览器
- res.end(data);
- });
- }
- if (pathname === "/b") {
- fs.readFile("./client/views/list.html", "utf-8", function (err, data) {
- if (err) return console.log(err);
- // console.log(data)
- res.end(data);
- });
- }
- 1
- });
- // 2. 给服务监听一个端口号
- server.listen(8080, () => {
- console.log('恭喜你,服务器启动成功');
- console.log('目前正在监听8080端口! ');
- console.log('基准地址:http://localhost:8080');
- });


(二)配置css
1、约定一
- 如果需要访问html文件, 将路径开头写上 /views 后续拼接上对应的文件名
- 假如要访问 index.html,路径: /views/index.html
- 假如要访问 list.html,路径: /views/list.html
2、预定二
- 如果要访问css文件需要使用 /style 开头 后续拼接上对应的文件名
- 假如要访问 index.css,路径: /style/index.css
- 假如要访问 list.css,路径: /style/list.css
3、代码实现
index和list的html代码

index和list的css代码


服务器代码实现
- const http = require("http");
- const url = require("url");
- const fs = require("fs");
- const path = require("path");
- const server = http.createServer(function (req, res) {
- const { pathname, query } = url.parse(req.url, true);
- // html的格式
- if (/^\/views/.test(pathname)) {
- // 拿到文件名
- const { base } = path.parse(pathname);
- // 读取对应文件返回给请求者
- fs.readFile(`./client/views/${base}`, "utf-8", function (err, data) {
- if (err) return console.log(err);
- res.end(data);
- });
- }
- // css的样式
- if (/^\/style/.test(pathname)) {
- // 拿到文件名
- const { base } = path.parse(pathname);
- // 读取对应文件返回给请求者
- fs.readFile(`./client/css/${base}`, "utf-8", function (err, data) {
- if (err) return console.log(err);
- res.end(data);
- });
- }
- });
- // 2. 给服务监听一个端口号
- server.listen(8080, () => {
- console.log('恭喜你,服务器启动成功');
- console.log('目前正在监听8080端口! ');
- console.log('基准地址:http://localhost:8080');
- });

(三)配置静态资源
1、约定:如果请求html; css; img; video;
新约定1
- 以 /static 开头,后续跟着写上对应的目录与文件名
- 如果访问的是 index.html;路径: /static/views/index.html
- 如果访问的是 list.html;路径: /static/views/list.html
- 如果访问的是 index.css;路径: /static/css/index.css
新约定2
- 以 /static 开头,后续写文件名
- 如果我需要访问 index.html;路径: /static/index.html
- 如果我需要访问 index.css;路径: /static/index.css
- 注意:两种约定都可以使用,这里使用的是第二种

index和list的html代码

服务器代码实现
- const http = require("http");
- const url = require("url");
- const fs = require("fs");
- const path = require("path");
- const server = http.createServer(function (req, res) {
- const { pathname, query } = url.parse(req.url, true);
- console.log(path.parse(pathname));
- if (/^\/static/.test(pathname)) {
- /*
- path.parse(pathname);
- {
- root: '/',
- dir: '/static',
- base: 'list.html',
- ext: '.html',
- name: 'list'
- }
- */
- // 拿到文件的后缀名与文件名
- const { base, ext } = path.parse(pathname);
- // 根据后缀名拼接上对应的路径
- let baseUrl = "./client";
- if (ext === ".html") {
- baseUrl += "/views";
- } else if (ext === ".css") {
- baseUrl += "/css";
- }
- // 根据处理过的路径读取对应文件返回给请求者
- fs.readFile(`${baseUrl}/${base}`, "utf-8", function (err, data) {
- if (err) {
- fs.readFile("./404.html", "utf-8", (err, data) => {
- if (err) return;
- res.end(data);
- });
- return;
- }
- res.end(data);
- });
- }
- });
- server.listen(8080, () => {
- console.log('恭喜你,服务器启动成功');
- console.log('目前正在监听8080端口! ');
- console.log('基准地址:http://localhost:8080');
- });

(四)配置接口(get)
- 约定, 所有数据或接口相关的, 全都以 /api 开头
index和list的html代码

index的js代码
- const xhr = new XMLHttpRequest()
- xhr.open('POST', '/api/users/login')
- xhr.onload = function () {
- console.log(JSON.parse(xhr.responseText))
- }
- xhr.send('username=QF001&password=123456')
服务器代码
- const http = require("http");
- const url = require("url");
- const fs = require("fs");
- const path = require("path");
- const server = http.createServer(function (req, res) {
- const { pathname, query } = url.parse(req.url, true);
- if (/^\/static/.test(pathname)) {
- // 拿到文件的后缀名与文件名
- const { base, ext } = path.parse(pathname);
- // 根据后缀名拼接上对应的路径
- let baseUrl = "./client";
- if (ext === ".html") {
- baseUrl += "/views";
- } else if (ext === ".css") {
- baseUrl += "/css";
- } else if (ext === ".js") {
- baseUrl += "/js";
- }
- // 根据处理过的路径读取对应文件返回给请求者
- fs.readFile(`${baseUrl}/${base}`, "utf-8", function (err, data) {
- if (err) {
- if (ext === ".html") {
- fs.readFile("./404.html", "utf-8", (err, data) => {
- if (err) return;
- res.end(data);
- });
- } else {
- res.end("");
- }
- return;
- }
- res.end(data);
- });
- }
- if (/^\/api/.test(pathname)) {
- if (pathname === "/api/users/info" && req.method === 'GET') {
- // 接收到请求, 去数据库 拿到对应的 数据 返回给 请求者
- const info = {
- code: 1,
- message: '请求/users/info接口成功',
- info: {
- id: 1,
- name: 'QF666',
- age: 18
- }
- }
- // 返回给前端
- res.end(JSON.stringify(info))
- }
- }
- });
- server.listen(8080, () => {
- console.log('恭喜你,服务器启动成功');
- console.log('目前正在监听8080端口! ');
- console.log('基准地址:http://localhost:8080');
- });

(五)配置接口(post)
1、post请求
接收请求体的数据, 有两个事件
1. req.on('data', () => {}) ;每当开始解析请求体, 就会执行, 回调函数接受一个参数
这个参数的值就是ajax send发送时携带的参数 (注意: 该函数会多次执行, 次数不确定)
2. req.on('end', () => {}) 这个函数执行的时候, 表明请求体 全部解析完成
list的js代码
- const xhr = new XMLHttpRequest()
- xhr.open('POST', '/api/users/login')
- xhr.onload = function () {
- console.log(JSON.parse(xhr.responseText))
- }
- xhr.send('username=QF001&password=123456')
post的主要代码

post的完整代码
- const http = require("http");
- const url = require("url");
- const fs = require("fs");
- const path = require("path");
- const server = http.createServer(function (req, res) {
- const { pathname, query } = url.parse(req.url, true);
- if (/^\/static/.test(pathname)) {
- // 拿到文件的后缀名与文件名
- const { base, ext } = path.parse(pathname);
- // 根据后缀名拼接上对应的路径
- let baseUrl = "./client";
- if (ext === ".html") {
- baseUrl += "/views";
- } else if (ext === ".css") {
- baseUrl += "/css";
- } else if (ext === ".js") {
- baseUrl += "/js";
- }
- // 根据处理过的路径读取对应文件返回给请求者
- fs.readFile(`${baseUrl}/${base}`, "utf-8", function (err, data) {
- if (err) {
- if (ext === ".html") {
- fs.readFile("./404.html", "utf-8", (err, data) => {
- if (err) return;
- res.end(data);
- });
- } else {
- res.end("");
- }
- return;
- }
- res.end(data);
- });
- }
- /**
- * 约定, 所有接口相关的, 全都以 /api 开头
- */
- if (/^\/api/.test(pathname)) {
- if (pathname === "/api/users/info" && req.method === "GET") {
- // 接收到请求, 去数据库拿到对应的数据返回给请求者
- const info = {
- code: 1,
- message: "请求/users/info接口成功",
- info: {
- id: 1,
- name: "QF666",
- age: 18,
- },
- youparams: query,
- };
- // 返回给前端
- res.end(JSON.stringify(info));
- }
- if (pathname === "/api/users/login" && req.method === "POST") {
- let str = ''
- req.on("data", (paramsStr) => {
- // 因为请求体内容比较多, 在解析的时候, 可能是分段解析,
- str += paramsStr
- });
- req.on('end', () => {
- console.log(str) // username=QF001&password=123456
- const info = {
- code: 1,
- message: "请求 /users/login 接口 成功",
- youparams: str,
- };
- res.end(JSON.stringify(info));
- })
- }
- }
- });
- server.listen(8080, () => {
- console.log('恭喜你,服务器启动成功');
- console.log('目前正在监听8080端口! ');
- console.log('基准地址:http://localhost:8080');
- });

2、参数处理
- post请求传参是世界约定,要么传递查询字符串, 要么传递 json 字符串
- post请求传参解析是世界约定,在请求头内部配置 content-type,
- 如果值为application/x-www-form-urlencoded 代表传递是查询字符串,
- 如果值为 application/json 代表传递的 json字符串
list中的js代码
- const xhr = new XMLHttpRequest();
- xhr.open("POST", "/api/users/login");
- xhr.onload = function () {
- console.log(JSON.parse(xhr.responseText));
- };
- xhr.setRequestHeader('content-type', 'application/x-www-form-urlencoded')
- xhr.send("username=QF001&password=123456");
- // xhr.setRequestHeader("content-type", "application/json");
- // xhr.send('{ "username": "QF001", "password": "123456" }');
分析


四、服务搭建的完整代码
(一)JS代码

(二)HTML和CSS代码


(三)服务器代码
- const http = require("http");
- const url = require("url");
- const fs = require("fs");
- const path = require("path");
- const server = http.createServer(function (req, res) {
- const { pathname, query } = url.parse(req.url, true);
- if (/^\/static/.test(pathname)) {
- // 拿到文件的后缀名与文件名
- const { base, ext } = path.parse(pathname);
- // 根据后缀名拼接上对应的路径
- let baseUrl = "./client";
- if (ext === ".html") {
- baseUrl += "/views";
- } else if (ext === ".css") {
- baseUrl += "/css";
- } else if (ext === ".js") {
- baseUrl += "/js";
- }
- // 根据处理过的路径读取对应文件返回给请求者
- fs.readFile(`${baseUrl}/${base}`, "utf-8", function (err, data) {
- if (err) {
- if (ext === ".html") {
- fs.readFile("./404.html", "utf-8", (err, data) => {
- if (err) return;
- res.end(data);
- });
- } else {
- res.end("");
- }
- return;
- }
- res.end(data);
- });
- }
- /**
- * 约定, 所有 接口相关的, 全都 以 /api 开头
- */
- if (/^\/api/.test(pathname)) {
- if (pathname === "/api/users/info" && req.method === "GET") {
- // 接收到请求, 去数据库 拿到对应的 数据 返回给 请求者
- const info = {
- code: 1,
- message: "请求 /users/info 接口 成功",
- info: {
- id: 1,
- name: "QF666",
- age: 18,
- },
- youparams: query,
- };
- // 返回给前端
- res.end(JSON.stringify(info));
- }
- if (pathname === "/api/users/login" && req.method === "POST") {
- /**
- * post 请求 传参 世界约定
- * 要么传递 查询字符串, 要么传递 json 字符串
- *
- * post 请求 传参解析 是 世界约定
- * 在请求头内部 配置 content-type
- * 如果 值 为 application/x-www-form-urlencoded 代表传递是 查询字符串
- * 如果 值 为 application/json 代表传递的 json
- */
- let str = "";
- req.on("data", (paramsStr) => {
- str += paramsStr;
- });
- req.on("end", () => {
- /*
- console.log(req.headers['content-type'])
- {
- ...
- 'content-type': 'application/x-www-form-urlencoded',
- ...
- }
- */
- if (req.headers["content-type"] === "application/json") {
- str = JSON.parse(str);
- }
- if (
- req.headers["content-type"] ===
- "application/x-www-form-urlencoded"
- ) {
- /**
- console.log(str); // username=QF001&password=123456
- let { query } = url.parse("?" + str, true);
- console.log(query)
- query === {
- username: QF001,
- password: 123456
- }
- */
- str = url.parse("?" + str, true).query;
- }
- const info = {
- code: 1,
- message: "请求 /users/login 接口 成功",
- youparams: str,
- };
- res.end(JSON.stringify(info));
- });
- }
- }
- });
- server.listen(8080, () => {
- console.log('恭喜你,服务器启动成功');
- console.log('目前正在监听8080端口! ');
- console.log('基准地址:http://localhost:8080');
- });
-
相关阅读:
【OpenAI】新功能发布
MobaXterm常用使用功能设置
Python 和 MatLab 模拟粒子动力系统
SESSION详解
linux如何抓包数据
[附源码]java毕业设计智慧教学平台
【1】请问什么是 AQS?
SpringFramework 之EnableAsync
Java并发编程学习笔记4——共享模型之内存
二本4年软件测试经验,三面阿里(定薪35K),分享我的心得
- 原文地址:https://blog.csdn.net/m0_58190023/article/details/128109235

- 最新文章
-
沪漂五周年了:我越来越迷茫了
Agentic Skill Routing 实战:别再把所有 Skill 塞进 AI Agent 上下文
MySQL-Seconds_behind_master的精度误差
[MAF预定义ChatClient中间件-03]CachingChatClient——利用缓存省钱省时间
AI的至暗历史:从万众期待到被政府撤资,AI的两次死亡徘徊
Agent OS :五种驯服不确定性的范式
PortSwigger SQL注入LAB11
数据库即时编译JIT
[Begin]AI Learn Data Day 0
深度学习进阶(二十七)现代 LLM 的核心架构设计其二:SwiGLU