-
【JavaEE】博客系统【前后端分离版本】
笔记【博客系统】
测试网站:小孙的博客系统
- 测试:admin
- 测试:123456
实现一个网站,有两种典型的风格:
- 服务器渲染
- 客户端渲染(前后端分离)
所谓渲染,就是把一个动态页面给构造出来
页面的基本结构+里面的数据
引入前后端分离,就把前端工程师和后端工程师彻底分开了
往后端只是给前端返回数据据———(数据往往是json格式组织了),后端彻底不用关心页面结构和样式。
表白墙就是基于前后端分离的方式来开发的 表白墙
- 前端页面
- 约定前后端交互接口
- 实现服务器代码,处理请求,返回json数据
- 实现了客户端代码,发送请求,处理响应
博客系统
- 前端页面
- 博客系统服务器
准备工作
-
引入依赖
servlet- 1
jackson- 1
mysql- 1

- 创建必要的目录结构

- 编写代码
- 打包部署(直接基于smart tomcat)
- 在浏览器中验证
MVC
V

把前端页面引入到项目中,直接拷贝到 webapp 目录下.
这些文件属于静态资源,后续打包部署的时候,这些静态资源也会一并打包部署。后续也就可以在浏览器中访问到了。
下面就是C和M了,我们先来实现Model层。
M
一、编写数据库的操作代码
- 创建数据库/表结构=>数据库设计 【根据需求】
- 博客列表页:显示博客的列表
- 博客详情页:点击博客列表页,上面列出博客的条目,跳转到的页面,显示博客的完整内容
- 登录页
- 博客编辑页,基于editor.md 搞了一个markdown 编辑器 。 基于这个页面来发布博客。
- 存储博客 当点击发布,博客发布到服务器上,就要被存起来
- 获取博客 在博客列表页和博客详情页,能够拿到博客的内容
- 还要能够进行登录校验
博客表+用户表
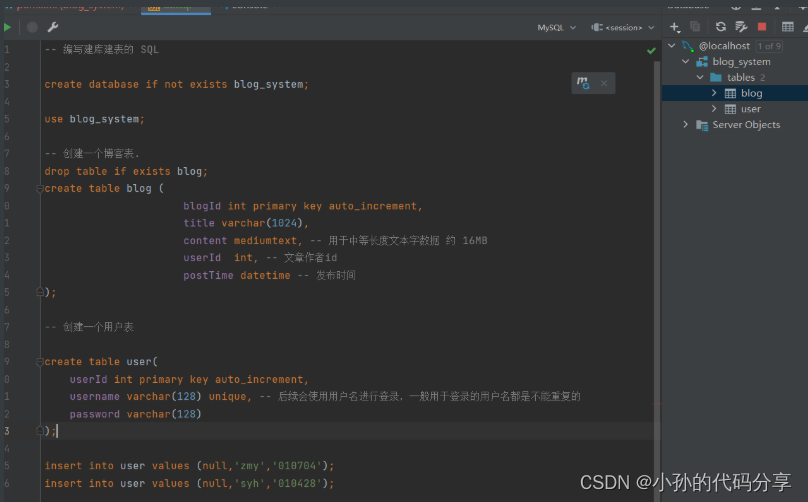
二、封装数据库操作
- 创建DBUtil 完成封装数据库连接操作
- 创建实体类–使用实体类来表示数据库中的一条记录

- 封装针对数据的增删改查
- 提供增删改查这样的类,称为 DAO


完成上面的步骤,数据库的基本操作就准备好了。
接下来,我们就来实现服务器中的代码。(Model搞定,写Controller)
此时我们就需要阅读前后端交互接口。
C
针对给各个页面”约定前后端交互接口“,”编写服务器代码“,”编写客户端代码“
1.博客列表页
在页面加载对的时候,让页面通过Ajax访问服务器,获取到数据库中的博客数据,并且填到页面中!
1.1 约定前后端交互接口
-
博客列表页 能够展示数据库中的博客列表
-
请求 GET/blog
-
响应 json格式:
[
{
blogId :1,
title:‘这是第一篇博客’,
content:'这是博客正文',- 1
userId: 1,
postTime :‘2022-05-21 20:00:00’
},
{
blogId :2,
title:‘这是第二篇博客’,
content:'这是博客正文',- 1
userId: 1,
postTime :‘2022-05-21 20:00:00’
},
]
-
接下来就编写服务器和客户端代码。
1.2 编写服务器代码

在构造响应时,这两行代码顺序不能颠倒!!!

设置返回时间格式
Linux Shell
M 表示分钟 m 表示月份 h 表示24小时制的 小时
1.3 编写客户端代码
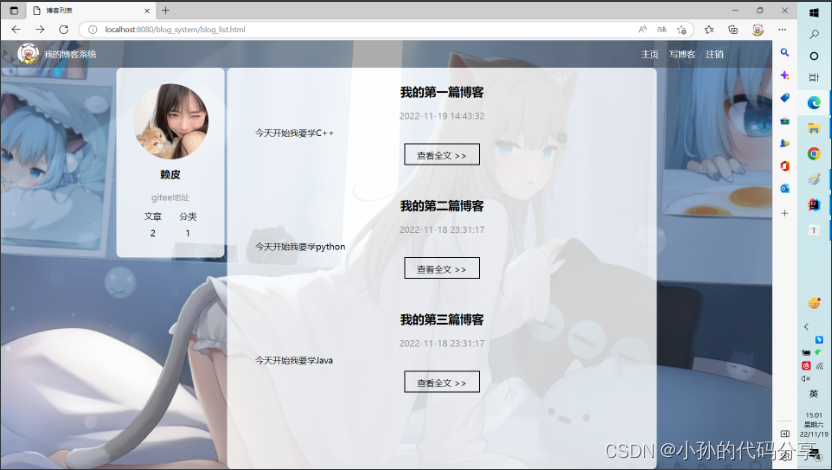
2.博客详情页
获取博客详情页,发送对的请求,页面显示当前这个给博客的正文内容
通过Ajax来进行获取
2.1 约定前后端交互接口
-
博客列表页 能够展示数据库中的博客列表
-
请求 GET/blog?blogId=1
-
响应 HTTP/1.1 200 OK
json格式:
{ blogId :1, title:'这是第一篇博客', content:'这是博客正文', userId: 1, postTime :'2022-05-21 20:00:00' }- 1
- 2
- 3
- 4
- 5
- 6
- 7
- 8
- 9
- 10
- 11
- 12
-
接下来就编写服务器和客户端代码。
2.2 编写服务器代码

当进行程序验证的时候,要时刻牢记,浏览器缓存可能会影响到结果。

2.3 编写客户端代码
![[外链图片转存失败,源站可能有防盗链机制,建议将图片保存下来直接上传(img-ypIT68Eo-1669714405451)(C:\Users\17512\AppData\Roaming\Typora\typora-user-images\1668844867105.png)]](https://1000bd.com/contentImg/2024/04/17/2bfe5b47e6234e29.png)
3.登录页
3.1 约定前后端交互接口
-
博客列表页 能够展示数据库中的博客列表
-
请求 POST/login
-
Content-Type:application/x-www-from-urlencoded
-
username=zhangsan&password=123
-
响应
HTTP/1.1 302 [登录成功跳转到博客列表页]
Location:blog_list.html
-

接下来就编写服务器和客户端代码。
3.2 编写服务器代码

3.3 编写客户端代码

4.检测用户登录状态
在博客列表页/详情页加载的时候,通过ajax访问一下服务器,获取当前的登录状态,看能不能获取到?
如果获取到了,就说明以及登录,此时就可以留在这个页面了,否则跳转到登录页面。
约定前后端交互接口
请求:
GET/login
响应:
HTTP/1.1 200 OK
Content-Type:application/json
{
userId:1,
username:‘zahngsan’
}
登录了就直接返回当前登录的用户信息
未登录就直接返回一个userId为0的对象(也可以使用403来表示当前未登录)


5.能够正确显示用户信息

- 在博客列表页显示用户信息就是当前登录的用户信息
- 在博客详情页显示当前文章的作者信息
- 登录的用户与文章作者可能是一个人,有可能不是一个人
针对博客列表页


目前只实现了用户名根据登录用户名更新。文章、分类、gitee链接、头像在实现上方法也是一样的。
针对博客详情页


设置新接口,让客户端指定blogId,获取指定blogId的作者信息
请求:
GET/authorInfo?blogId=4
响应:
{
userId :3;
username:‘金雷’
}
用 postman 发送一个get请求测试接口

为了安全期间,让密码隐藏起来。


服务器端代码:

客户端代码:
![[外链图片转存失败,源站可能有防盗链机制,建议将图片保存下来直接上传(img-qX90DO5u-1669714405461)(C:\Users\17512\AppData\Roaming\Typora\typora-user-images\1669165459341.png)]](https://1000bd.com/contentImg/2024/04/17/1229c951a9594acb.png)
6.实现“注销”功能
当用户点击注销之后,就会在服务器是取消登录状态,并且能够跳转到登录页面。
约定前后端间交互接口
请求:
GET/logout
响应:
HTTP/1.1 302
Location:login.html
注销逻辑的服务器代码

检测登录状态的代码之前有,要求同时具备user属性和session对象,才可实现登录,而注销则是移除user属性,所以就不在登录状态了。

注销逻辑客户端代码
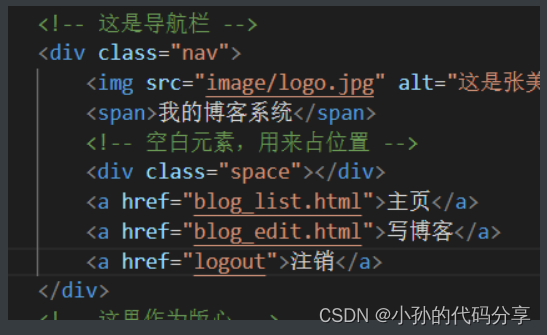
上述核心逻辑
-
约定前后端交互接口
-
实现服务器代码
a. 写controller层,写servlet来实现api
b. 写model层,通过jdbc来操作数据据
-
实现客户端代码
ajax/from/a标签跳转
7.实现发布博客

约定前后端接口
请求:
POST/blog
Context-Type:application/x-www-form-urlencoded
tittle=这是标题&content=这是正文 【urlencoded】
响应:
HTTP/1.1 302
Location:blog_list.html
实现服务器代码,在BlogServlet里面吗添加一个doPost方法,来处理上述post请求
![[外链图片转存失败,源站可能有防盗链机制,建议将图片保存下来直接上传(img-uKy2Gd0A-1669714405463)(C:\Users\17512\AppData\Roaming\Typora\typora-user-images\1669167684333.png)]](https://1000bd.com/contentImg/2024/04/17/3a2ba6bed4e33bbd.png)
实现客户端代码

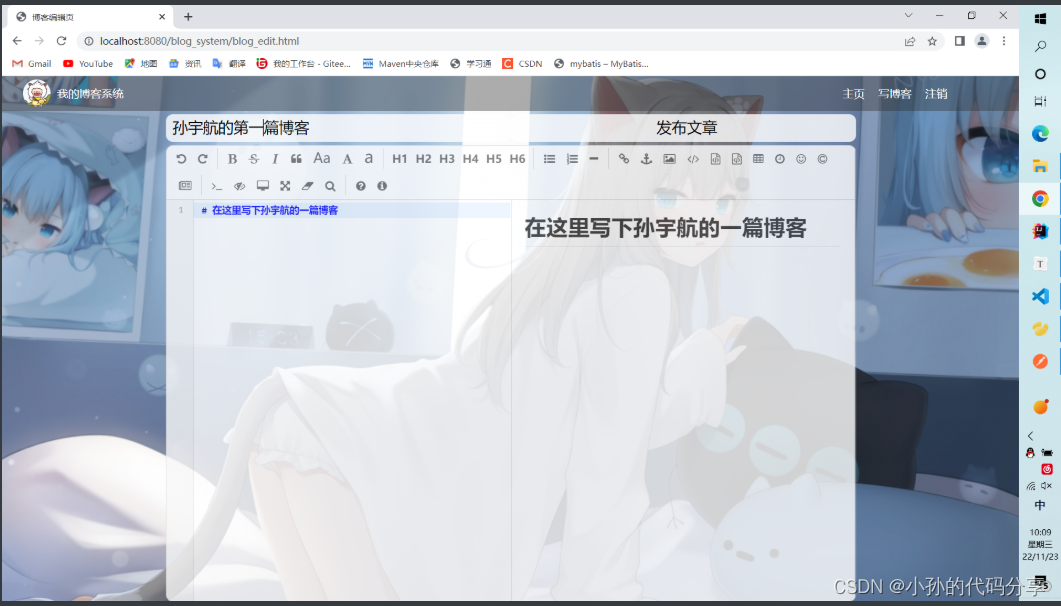
点击发布文章按钮
![[外链图片转存失败,源站可能有防盗链机制,建议将图片保存下来直接上传(img-i7Ad6TAN-1669714405464)(C:\Users\17512\AppData\Roaming\Typora\typora-user-images\1669169430510.png)]](https://1000bd.com/contentImg/2024/04/17/3fc134eab9546ee1.png)
点击查看全文

8.删除博客
约定:自己删除自己的博客(此处不考虑管理员)
界面处理
在博客详情页,判断当前博客的作者是否就是登录的用户,如果是,就在导航栏里显示删除按钮,如果不是就不显示。[外链图片转存失败,源站可能有防盗链机制,建议将图片保存下来直接上传
![(img-Wu08pLrx-1669714405465)(C:\Users\17512\AppData\Roaming\Typora\typora-user-images\1669169949912.png)]](https://1000bd.com/contentImg/2024/04/17/4ae62fb3645ed376.png)
服务器处理
用户点击删除按钮,触发一个HTTP请求,HTTP请求会让服务器删除指定的博客
服务器收到请求之后,就会把这个博客从数据库中删除
![[外链图片转存失败,源站可能有防盗链机制,建议将图片保存下来直接上传(img-IhZP25Ft-1669714405465)(C:\Users\17512\AppData\Roaming\Typora\typora-user-images\1669171437720.png)]](https://1000bd.com/contentImg/2024/04/17/b4a209a58973c51b.png)
当前登录用户为 金雷
所以
![[外链图片转存失败,源站可能有防盗链机制,建议将图片保存下来直接上传(img-r9rremlx-1669714405466)(C:\Users\17512\AppData\Roaming\Typora\typora-user-images\1669171480750.png)]](https://1000bd.com/contentImg/2024/04/17/bfe79f153c9835e6.png)
请求:
GET/blogDelete?blogId=9
响应:
直接跳转到 博客列表页 即可


删除博客测试


博客列表中就不存在 111 的博客。
结语
到这也就差不多完成了一个简单的博客系统【增删改查的的功能】
MySQL,JDBC, Servlet,Http,Ajax,JS
配置目录结构
[外链图片转存失败,源站可能有防盗链机制,建议将图片保存下来直接上传(img-czmqi1FP-1669714405467)(C:\Users\17512\AppData\Roaming\Typora\typora-user-images\1669172504317.png)]
源代码:
AuthorServlet
package controller; import com.fasterxml.jackson.databind.ObjectMapper; import model.Blog; import model.BlogDao; import model.User; import model.UserDao; import javax.servlet.ServletException; import javax.servlet.annotation.WebServlet; import javax.servlet.http.HttpServlet; import javax.servlet.http.HttpServletRequest; import javax.servlet.http.HttpServletResponse; import java.io.IOException; @WebServlet("/authorInfo") public class AuthorServlet extends HttpServlet { private ObjectMapper objectMapper = new ObjectMapper(); @Override protected void doGet(HttpServletRequest req, HttpServletResponse resp) throws ServletException, IOException { resp.setContentType("application/json;charset=utf-8"); String param = req.getParameter("blogId"); if (param == null || "".equals(param)){ resp.getWriter().write("{\"ok\":false,\"reason\":\"当前参数缺失\"}"); return; } BlogDao blogDao = new BlogDao(); Blog blog = blogDao.selectOne(Integer.parseInt(param)); if (blog == null){ resp.getWriter().write("{\"ok\":false,\"reason\":\"当前查询博客不存在\"}"); return; } UserDao userDao = new UserDao(); User author = userDao.selectById(blog.getUserId()); if (author == null){ resp.getWriter().write("{\"ok\":false,\"reason\":\"当前查询用户不存在\"}"); return; } //把author 信息返回到浏览器中 author.setPassword(""); resp.getWriter().write(objectMapper.writeValueAsString(author)); } }- 1
- 2
- 3
- 4
- 5
- 6
- 7
- 8
- 9
- 10
- 11
- 12
- 13
- 14
- 15
- 16
- 17
- 18
- 19
- 20
- 21
- 22
- 23
- 24
- 25
- 26
- 27
- 28
- 29
- 30
- 31
- 32
- 33
- 34
- 35
- 36
- 37
- 38
- 39
- 40
- 41
- 42
- 43
- 44
- 45
- 46
BlogDeleteServlet
package controller; import model.Blog; import model.BlogDao; import model.User; import javax.servlet.ServletException; import javax.servlet.annotation.WebServlet; import javax.servlet.http.HttpServlet; import javax.servlet.http.HttpServletRequest; import javax.servlet.http.HttpServletResponse; import javax.servlet.http.HttpSession; import java.io.IOException; @WebServlet("/blogDelete") public class BlogDeleteServlet extends HttpServlet { @Override protected void doGet(HttpServletRequest req, HttpServletResponse resp) throws ServletException, IOException { // 1. 检查当前用户是否登录 HttpSession session = req.getSession(false); if (session == null) { resp.setContentType("text/html; charset=utf8"); resp.getWriter().write("当前尚未登录, 不能删除!"); return; } User user = (User) session.getAttribute("user"); if (user == null) { resp.setContentType("text/html; charset=utf8"); resp.getWriter().write("当前尚未登录, 不能删除!"); return; } // 2. 获取到参数中的 blogId String blogId = req.getParameter("blogId"); if (blogId == null || "".equals(blogId)) { resp.setContentType("text/html; charset=utf8"); resp.getWriter().write("当前 blogId 参数不对!"); return; } // 3. 获取要删除的博客信息. BlogDao blogDao = new BlogDao(); Blog blog = blogDao.selectOne(Integer.parseInt(blogId)); if (blog == null) { resp.setContentType("text/html; charset=utf8"); resp.getWriter().write("当前要删除的博客不存在!"); return; } // 4. 再次校验, 当前的用户是否就是博客的作者 if (user.getUserId() != blog.getUserId()) { // 这一点在前端这里其实也处理过~~ 但是此处还是再校验一次, 不是坏事!!! resp.setContentType("text/html; charset=utf8"); resp.getWriter().write("当前登录的用户不是作者, 没有权限删除!"); return; } // 5. 确认无误, 开始删除 blogDao.delete(Integer.parseInt(blogId)); // 6. 重定向到博客列表页 resp.sendRedirect("blog_list.html"); } }- 1
- 2
- 3
- 4
- 5
- 6
- 7
- 8
- 9
- 10
- 11
- 12
- 13
- 14
- 15
- 16
- 17
- 18
- 19
- 20
- 21
- 22
- 23
- 24
- 25
- 26
- 27
- 28
- 29
- 30
- 31
- 32
- 33
- 34
- 35
- 36
- 37
- 38
- 39
- 40
- 41
- 42
- 43
- 44
- 45
- 46
- 47
- 48
- 49
- 50
- 51
- 52
- 53
- 54
- 55
- 56
- 57
- 58
- 59
- 60
- 61
- 62
- 63
- 64
- 65
BlogServlet
package controller; import com.fasterxml.jackson.databind.ObjectMapper; import model.Blog; import model.BlogDao; import model.User; import javax.servlet.ServletException; import javax.servlet.annotation.WebServlet; import javax.servlet.http.HttpServlet; import javax.servlet.http.HttpServletRequest; import javax.servlet.http.HttpServletResponse; import javax.servlet.http.HttpSession; import java.io.IOException; import java.util.List; // 通过这个类, 来处理 /blog 路径对应的请求 @WebServlet("/blog") public class BlogServlet extends HttpServlet { private ObjectMapper objectMapper = new ObjectMapper(); // 这个方法用来获取到数据库中的博客列表. @Override protected void doGet(HttpServletRequest req, HttpServletResponse resp) throws ServletException, IOException { resp.setContentType("application/json; charset=utf8"); BlogDao blogDao = new BlogDao(); // 先尝试获取到 req 中的 blogId 参数. 如果该参数存在, 说明是要请求博客详情 // 如果该参数不存在, 说明是要请求博客的列表. String param = req.getParameter("blogId"); if (param == null) { // 不存在参数, 获取博客列表 List<Blog> blogs = blogDao.selectAll(); // 把 blogs 对象转成 JSON 格式. String respJson = objectMapper.writeValueAsString(blogs); resp.getWriter().write(respJson); } else { // 存在参数, 获取博客详情 int blogId = Integer.parseInt(param); Blog blog = blogDao.selectOne(blogId); String respJson = objectMapper.writeValueAsString(blog); resp.getWriter().write(respJson); } } @Override protected void doPost(HttpServletRequest req, HttpServletResponse resp) throws ServletException, IOException { HttpSession session = req.getSession(false); if (session == null) { // 当前用户未登录, 不能提交博客! resp.setContentType("text/html;charset=utf8"); resp.getWriter().write("当前用户未登录, 不能提交博客!"); return; } User user = (User) session.getAttribute("user"); if (user == null) { // 当前用户未登录, 不能提交博客! resp.setContentType("text/html;charset=utf8"); resp.getWriter().write("当前用户未登录, 不能提交博客!"); return; } // 一定要先指定好请求按照哪种编码来解析 req.setCharacterEncoding("utf8"); // 先从请求中, 取出参数(博客的标题和正文) String title = req.getParameter("title"); String content = req.getParameter("content"); if (title == null || "".equals(title) || content == null || "".equals(content)) { // 直接告诉客户端, 请求参数不对 resp.setContentType("text/html;charset=utf8"); resp.getWriter().write("提交博客失败! 缺少必要的参数!"); return; } // 构造 Blog 对象, 把当前的信息填进去, 并插入数据库中 // 此处要给 Blog 设置的属性, 主要是 title, content, userId (作者信息) // postTime 和 blogId 都不需要手动指定, 都是插入数据库的时候自动生成的. Blog blog = new Blog(); blog.setTitle(title); blog.setContent(content); // 作者 id 就是当前提交这个博客的用户的身份信息!! blog.setUserId(user.getUserId()); BlogDao blogDao = new BlogDao(); blogDao.insert(blog); // 重定向到, 博客列表页! resp.sendRedirect("blog_list.html"); } }- 1
- 2
- 3
- 4
- 5
- 6
- 7
- 8
- 9
- 10
- 11
- 12
- 13
- 14
- 15
- 16
- 17
- 18
- 19
- 20
- 21
- 22
- 23
- 24
- 25
- 26
- 27
- 28
- 29
- 30
- 31
- 32
- 33
- 34
- 35
- 36
- 37
- 38
- 39
- 40
- 41
- 42
- 43
- 44
- 45
- 46
- 47
- 48
- 49
- 50
- 51
- 52
- 53
- 54
- 55
- 56
- 57
- 58
- 59
- 60
- 61
- 62
- 63
- 64
- 65
- 66
- 67
- 68
- 69
- 70
- 71
- 72
- 73
- 74
- 75
- 76
- 77
- 78
- 79
- 80
- 81
- 82
- 83
- 84
- 85
- 86
LoginServlet
package controller; import com.fasterxml.jackson.databind.ObjectMapper; import model.User; import model.UserDao; import javax.servlet.ServletException; import javax.servlet.annotation.WebServlet; import javax.servlet.http.HttpServlet; import javax.servlet.http.HttpServletRequest; import javax.servlet.http.HttpServletResponse; import javax.servlet.http.HttpSession; import java.io.IOException; @WebServlet("/login") public class LoginServlet extends HttpServlet { private ObjectMapper objectMapper = new ObjectMapper(); @Override protected void doPost(HttpServletRequest req, HttpServletResponse resp) throws ServletException, IOException { req.setCharacterEncoding("utf8"); resp.setCharacterEncoding("utf8"); // 1. 获取到请求中的参数 String username = req.getParameter("username"); String password = req.getParameter("password"); System.out.println("username=" + username + ", password=" + password); if (username == null || "".equals(username) || password == null || "".equals(password)) { // 请求的内容缺失, 肯定是登录失败!! resp.setContentType("text/html; charset=utf8"); resp.getWriter().write("当前的用户名或密码为空!"); return; } // 2. 和数据库中的内容进行比较 UserDao userDao = new UserDao(); User user = userDao.selectByName(username); if (user == null || !user.getPassword().equals(password)) { // 用户没有查到或者密码不匹配, 也是登录失败! resp.setContentType("text/html; charset=utf8"); resp.getWriter().write("用户名或密码错误!"); return; } // 3. 如果比较通过, 就创建会话. HttpSession session = req.getSession(true); // 把刚才的用户信息, 存储到会话中. session.setAttribute("user", user); // 4. 返回一个重定向报文, 跳转到博客列表页. resp.sendRedirect("blog_list.html"); } // 这个方法用来让前端检测当前的登录状态. @Override protected void doGet(HttpServletRequest req, HttpServletResponse resp) throws ServletException, IOException { resp.setContentType("application/json;charset=utf8"); HttpSession session = req.getSession(false); if (session == null) { // 检测下会话是否存在, 不存在说明未登录! User user = new User(); resp.getWriter().write(objectMapper.writeValueAsString(user)); return; } User user = (User) session.getAttribute("user"); if (user == null) { // 虽然有会话, 但是会话里没有 user 对象, 也视为未登录. user = new User(); resp.getWriter().write(objectMapper.writeValueAsString(user)); return; } // 已经登录的状态!! // 注意, 此处不要把密码给返回到前端~~ user.setPassword(""); resp.getWriter().write(objectMapper.writeValueAsString(user)); } }- 1
- 2
- 3
- 4
- 5
- 6
- 7
- 8
- 9
- 10
- 11
- 12
- 13
- 14
- 15
- 16
- 17
- 18
- 19
- 20
- 21
- 22
- 23
- 24
- 25
- 26
- 27
- 28
- 29
- 30
- 31
- 32
- 33
- 34
- 35
- 36
- 37
- 38
- 39
- 40
- 41
- 42
- 43
- 44
- 45
- 46
- 47
- 48
- 49
- 50
- 51
- 52
- 53
- 54
- 55
- 56
- 57
- 58
- 59
- 60
- 61
- 62
- 63
- 64
- 65
- 66
- 67
- 68
- 69
- 70
- 71
- 72
- 73
- 74
LogoutServlet
package controller; import javax.servlet.ServletException; import javax.servlet.annotation.WebServlet; import javax.servlet.http.HttpServlet; import javax.servlet.http.HttpServletRequest; import javax.servlet.http.HttpServletResponse; import javax.servlet.http.HttpSession; import java.io.IOException; @WebServlet("/logout") public class LogoutServlet extends HttpServlet { @Override protected void doGet(HttpServletRequest req, HttpServletResponse resp) throws ServletException, IOException { HttpSession session = req.getSession(false); if (session==null){ resp.getWriter().write("当前用户尚未登录无法注销!"); return; } session.removeAttribute("user"); resp.sendRedirect("blog_login.html"); } }- 1
- 2
- 3
- 4
- 5
- 6
- 7
- 8
- 9
- 10
- 11
- 12
- 13
- 14
- 15
- 16
- 17
- 18
- 19
- 20
- 21
- 22
- 23
- 24
- 25
- 26
Blog
package model; import java.sql.Timestamp; import java.text.SimpleDateFormat; //每个Blog对应blog表中的每一条记录 public class Blog { private int blogId; private String title; private String content; private int userId; private Timestamp postTime; public int getBlogId() { return blogId; } public void setBlogId(int blogId) { this.blogId = blogId; } public String getTitle() { return title; } public void setTitle(String title) { this.title = title; } public String getContent() { return content; } public void setContent(String content) { this.content = content; } public int getUserId() { return userId; } public void setUserId(int userId) { this.userId = userId; } // public Timestamp getPostTime() { // return postTime; // } //不返回时间戳 返回一个 String(格式化好的时间) public String getPostTime() { //使用 SimpleDateFormat 完成世纪初格式化日期时间的转化 SimpleDateFormat simpleDateFormat = new SimpleDateFormat("yyyy-MM-dd HH:mm:ss"); return simpleDateFormat.format(postTime); } public void setPostTime(Timestamp postTime) { this.postTime = postTime; } }- 1
- 2
- 3
- 4
- 5
- 6
- 7
- 8
- 9
- 10
- 11
- 12
- 13
- 14
- 15
- 16
- 17
- 18
- 19
- 20
- 21
- 22
- 23
- 24
- 25
- 26
- 27
- 28
- 29
- 30
- 31
- 32
- 33
- 34
- 35
- 36
- 37
- 38
- 39
- 40
- 41
- 42
- 43
- 44
- 45
- 46
- 47
- 48
- 49
- 50
- 51
- 52
- 53
- 54
- 55
- 56
- 57
- 58
- 59
- 60
BlogDao
package model; import java.sql.Connection; import java.sql.PreparedStatement; import java.sql.ResultSet; import java.sql.SQLException; import java.util.ArrayList; import java.util.List; // 这个类用于去封装博客表的基本操作 public class BlogDao { // 1. 往博客表里, 插入一个博客. public void insert(Blog blog) { // JDBC 基本代码~~ Connection connection = null; PreparedStatement statement = null; try { // 1) 和数据库建立连接. connection = DBUtil.getConnection(); // 2) 构造 SQL 语句 String sql = "insert into blog values(null, ?, ?, ?, now())"; statement = connection.prepareStatement(sql); statement.setString(1, blog.getTitle()); statement.setString(2, blog.getContent()); statement.setInt(3, blog.getUserId()); // 3) 执行 SQL statement.executeUpdate(); } catch (SQLException e) { e.printStackTrace(); } finally { // 4) 关闭连接, 释放资源 DBUtil.close(connection, statement, null); } } // 2. 能够获取到博客表中的所有博客的信息 (用于在博客列表页, 此处每篇博客不一定会获取到完整的正文) public List<Blog> selectAll() { List<Blog> blogs = new ArrayList<>(); Connection connection = null; PreparedStatement statement = null; ResultSet resultSet = null; try { connection = DBUtil.getConnection(); String sql = "select * from blog order by postTime desc"; statement = connection.prepareStatement(sql); resultSet = statement.executeQuery(); while (resultSet.next()) { Blog blog = new Blog(); blog.setBlogId(resultSet.getInt("blogId")); blog.setTitle(resultSet.getString("title")); // 这里需要针对内容进行截断(太长了, 就去掉后面) String content = resultSet.getString("content"); // 这个 50 纯属拍脑门出来的!! 这个数字具体写多少, 都可以灵活应对!! if (content.length() > 50) { content = content.substring(0, 50) + "..."; } blog.setContent(content); blog.setUserId(resultSet.getShort("userId")); blog.setPostTime(resultSet.getTimestamp("postTime")); blogs.add(blog); } } catch (SQLException throwables) { throwables.printStackTrace(); } finally { DBUtil.close(connection, statement, resultSet); } return blogs; } // 3. 能够根据博客 id 获取到指定的博客内容 (用于在博客详情页) public Blog selectOne(int blogId) { Connection connection = null; PreparedStatement statement = null; ResultSet resultSet = null; try { connection = DBUtil.getConnection(); String sql = "select * from blog where blogId = ?"; statement = connection.prepareStatement(sql); statement.setInt(1, blogId); resultSet = statement.executeQuery(); // 此处我们是使用 主键 来作为查询条件的. 查询结果, 要么是 1 , 要么是 0. if (resultSet.next()) { Blog blog = new Blog(); blog.setBlogId(resultSet.getInt("blogId")); blog.setTitle(resultSet.getString("title")); blog.setContent(resultSet.getString("content")); blog.setUserId(resultSet.getShort("userId")); blog.setPostTime(resultSet.getTimestamp("postTime")); return blog; } } catch (SQLException throwables) { throwables.printStackTrace(); } finally { DBUtil.close(connection, statement, resultSet); } return null; } // 4. 从博客表中, 根据博客 id 删除博客. public void delete(int blogId) { Connection connection = null; PreparedStatement statement = null; try { connection = DBUtil.getConnection(); String sql = "delete from blog where blogId = ?"; statement = connection.prepareStatement(sql); statement.setInt(1, blogId); statement.executeUpdate(); } catch (SQLException throwables) { throwables.printStackTrace(); } finally { DBUtil.close(connection, statement, null); } } // 注意, 上述操作是 增删查, 没有改~~ }- 1
- 2
- 3
- 4
- 5
- 6
- 7
- 8
- 9
- 10
- 11
- 12
- 13
- 14
- 15
- 16
- 17
- 18
- 19
- 20
- 21
- 22
- 23
- 24
- 25
- 26
- 27
- 28
- 29
- 30
- 31
- 32
- 33
- 34
- 35
- 36
- 37
- 38
- 39
- 40
- 41
- 42
- 43
- 44
- 45
- 46
- 47
- 48
- 49
- 50
- 51
- 52
- 53
- 54
- 55
- 56
- 57
- 58
- 59
- 60
- 61
- 62
- 63
- 64
- 65
- 66
- 67
- 68
- 69
- 70
- 71
- 72
- 73
- 74
- 75
- 76
- 77
- 78
- 79
- 80
- 81
- 82
- 83
- 84
- 85
- 86
- 87
- 88
- 89
- 90
- 91
- 92
- 93
- 94
- 95
- 96
- 97
- 98
- 99
- 100
- 101
- 102
- 103
- 104
- 105
- 106
- 107
- 108
- 109
- 110
- 111
- 112
- 113
- 114
- 115
- 116
- 117
- 118
- 119
DBUtil
package model;//使用这个类建立数据库连接 import com.mysql.jdbc.jdbc2.optional.MysqlDataSource; import javax.sql.DataSource; import java.sql.Connection; import java.sql.PreparedStatement; import java.sql.ResultSet; import java.sql.SQLException; public class DBUtil { private static final String URL = "jdbc:mysql://127.0.0.1:3306/blog_system?characterEncoding=utf8&useSSL=false"; private static final String USERNAME = "root"; private static final String PASSWORD="111111"; //连接流程 private static volatile DataSource dataSource = null; private static DataSource getDataSource(){ if (dataSource==null) { synchronized (DBUtil.class) { if (dataSource == null) { dataSource = new MysqlDataSource(); ((MysqlDataSource) dataSource).setUrl(URL); ((MysqlDataSource) dataSource).setUser(USERNAME); ((MysqlDataSource) dataSource).setPassword(PASSWORD); } } } return dataSource; } public static Connection getConnection() throws SQLException { return getDataSource().getConnection(); } //关闭流程 public static void close(Connection connection, PreparedStatement statement, ResultSet resultSet){ if (resultSet!=null){ try { resultSet.close(); } catch (SQLException e) { e.printStackTrace(); } } if (statement!=null){ try { statement.close(); } catch (SQLException e) { e.printStackTrace(); } } if (connection!=null){ try { connection.close(); } catch (SQLException e) { e.printStackTrace(); } } } }- 1
- 2
- 3
- 4
- 5
- 6
- 7
- 8
- 9
- 10
- 11
- 12
- 13
- 14
- 15
- 16
- 17
- 18
- 19
- 20
- 21
- 22
- 23
- 24
- 25
- 26
- 27
- 28
- 29
- 30
- 31
- 32
- 33
- 34
- 35
- 36
- 37
- 38
- 39
- 40
- 41
- 42
- 43
- 44
- 45
- 46
- 47
- 48
- 49
- 50
- 51
- 52
- 53
- 54
- 55
- 56
- 57
- 58
- 59
- 60
- 61
- 62
- 63
- 64
User
package model; //每个User对象表示user表中的一条记录 public class User { private int userId = 0; private String username = ""; private String password =""; public int getUserId() { return userId; } public void setUserId(int userId) { this.userId = userId; } public String getUsername() { return username; } public void setUsername(String username) { this.username = username; } public String getPassword() { return password; } public void setPassword(String password) { this.password = password; } }- 1
- 2
- 3
- 4
- 5
- 6
- 7
- 8
- 9
- 10
- 11
- 12
- 13
- 14
- 15
- 16
- 17
- 18
- 19
- 20
- 21
- 22
- 23
- 24
- 25
- 26
- 27
- 28
- 29
- 30
- 31
- 32
- 33
- 34
UserDao
package model; import java.sql.Connection; import java.sql.PreparedStatement; import java.sql.ResultSet; import java.sql.SQLException; //用于封装用户表的基本操作 public class UserDao { // 需要实现的操作 //针对这个类简化 注册/注销功能 未考虑 // 主要实现 // 1. 根据用户名查找用户信息 会在登录逻辑中使用 public User selectByName(String username){ Connection connection = null; PreparedStatement statement = null; ResultSet resultSet = null; try { connection = DBUtil.getConnection(); String sql = "select * from user where username =?"; statement = connection.prepareStatement(sql); statement.setString(1,username); resultSet = statement.executeQuery(); //此处username使用unique约数 if (resultSet.next()){ User user = new User(); user.setUserId(resultSet.getInt("userId")); user.setUsername(resultSet.getString("username")); user.setPassword(resultSet.getString("password")); return user; } } catch (SQLException e) { e.printStackTrace(); }finally { DBUtil.close(connection,statement,resultSet); } return null; } // 2. 根据用户id来找用户信息,会在博客详情页根据用户id查询作者名字,把作者名字显示出来。 public User selectById(int userId){ Connection connection = null; PreparedStatement statement = null; ResultSet resultSet = null; try { connection = DBUtil.getConnection(); String sql = "select * from user where userId =?"; statement = connection.prepareStatement(sql); statement.setInt(1,userId); resultSet = statement.executeQuery(); //此处username使用unique约数 if (resultSet.next()){ User user = new User(); user.setUserId(resultSet.getInt("userId")); user.setUsername(resultSet.getString("username")); user.setPassword(resultSet.getString("password")); return user; } } catch (SQLException e) { e.printStackTrace(); }finally { DBUtil.close(connection,statement,resultSet); } return null; } }- 1
- 2
- 3
- 4
- 5
- 6
- 7
- 8
- 9
- 10
- 11
- 12
- 13
- 14
- 15
- 16
- 17
- 18
- 19
- 20
- 21
- 22
- 23
- 24
- 25
- 26
- 27
- 28
- 29
- 30
- 31
- 32
- 33
- 34
- 35
- 36
- 37
- 38
- 39
- 40
- 41
- 42
- 43
- 44
- 45
- 46
- 47
- 48
- 49
- 50
- 51
- 52
- 53
- 54
- 55
- 56
- 57
- 58
- 59
- 60
- 61
- 62
- 63
- 64
- 65
- 66
- 67
- 68
- 69
- 70
- 71
- 72
前端部分放到了我的码云https://gitee.com/sun-yuhang-bite/blog-system-project
-
相关阅读:
2022R2移动式压力容器充装考题及模拟考试
案例:购物车(Vue基础)
图像处理解决方案 veImageX 技术演进之路
ISO27001认证办理流程及2022年补贴政策汇总
Docker安装
基于显扬科技3D机器视觉HY-M5在汽车行业曲轴抓取上下料的应用
数据可视化设计经验分享:10分钟做出炫酷数据大屏
奥克斯变频空调的控温温度波动初步研究
re:从0开始的CSS之旅 16. 高度塌陷问题
Redis
- 原文地址:https://blog.csdn.net/weixin_53939785/article/details/128102197

- 最新文章
-
沪漂五周年了:我越来越迷茫了
Agentic Skill Routing 实战:别再把所有 Skill 塞进 AI Agent 上下文
MySQL-Seconds_behind_master的精度误差
[MAF预定义ChatClient中间件-03]CachingChatClient——利用缓存省钱省时间
AI的至暗历史:从万众期待到被政府撤资,AI的两次死亡徘徊
Agent OS :五种驯服不确定性的范式
PortSwigger SQL注入LAB11
数据库即时编译JIT
[Begin]AI Learn Data Day 0
深度学习进阶(二十七)现代 LLM 的核心架构设计其二:SwiGLU