-
OpenCV函数及类理解记录
1. detectAndCompute
这是一个特征检测的函数,在ORB下的常用用法
detectAndCompute(cv::Mat image,cv::noArray(), cv::KeyPoints kps, cv::Mat desc)
第一个参数image是被检测特征的图像
第二个参数noArray()不知道啥用
第三个参数kps就是特征点的坐标值
第四个参数是特征点的描述子,用Mat矩阵表示,每一行是每个关键点的特征向量。2. cv::DescriptorMatcher
用来进行特征点匹配的一个类,通常有下面的用法
cv::Ptr<cv::DescriptorMatcher> matcher = cv::DescriptorMatcher::create("BruteForce-Hamming"); matches.clear(); matcher->knnMatch(desclr.front(), desclr.back(), matches, 2);- 1
- 2
- 3
knnMatch(cv::Mat, cv::Mat, std::vector
该函数是为查询集合中的每个描述子在训练集合中找到最好的k个匹配,k nearest neighbor match:
第一个参数是查询集合
第二个参数是训练集合
第三个参数是保存匹配点之间距离的一个类
第四个参数是返回k最近邻个数
这种方法找到的描述子一般还需要查看第一个最近邻和第二个最近邻的距离比例,如果相差很大则认为是好的匹配。
knnMatch是找到前k个最好的匹配,而match仅找到最好的那个匹配3. cv::DMatch
用于存储匹配点距离的一个类,其中存储了4个变量,opencv的cv::Descripter的knnMatch方法(见2)会输出一个std::vector
matches[i][j].queryIdx查找与左图中第i个特征点右图中最相似的第j个特征点。j的数量是前面knnMatch中设置的k。- queryIdx
- trainIdx
- imgIdx
- distance
4. cv::Mat
cv::Mat::row(i),row(i)这个函数返回的Mat是代表的原矩阵的数据地址,OpenCV中的=赋值操作全部是浅拷贝,只有CopyTo操作是深拷贝。
如何将一个行向量赋值给矩阵的某一行cv::Mat data_matrix = cv::Mat(10, 8, CV_32F); for(int i=0;i<data_matrix.rows;i++){ float lxi = lptsx[i]; float lyi = lptsy[i]; float rxi = rptsy[i]; float ryi = rptsy[i]; float tmp[8] = {lxi*rxi,lxi*ryi,lxi,lyi*rxi,lyi*ryi,lyi,rxi,ryi}; cv::Mat(1,8,CV_32F,tmp).copyTo(data_matrix.row(i)); }- 1
- 2
- 3
- 4
- 5
- 6
- 7
- 8
- 9
一种快速直接初始化cv::Mat的写法
Mat K = (Mat_<double>(3, 3) << 520.9, 0, 325.1, 0, 521.0, 249.7, 0, 0, 1);- 1
5. recoverPose
用于从两个图像的对应点中恢复相机的旋转和平移矩阵,有3个重载的方法
int cv::recoverPose ( InputArray E, InputArray points1, InputArray points2, InputArray cameraMatrix, OutputArray R, OutputArray t, InputOutputArray mask = noArray() // E, 计算得到的本质矩阵 // points1, 第一张图像中的N个2D点数组 // points2, 第二张图像中的对应点数组 // cameraMatrix, 相机内参矩阵 // )- 1
- 2
- 3
- 4
- 5
- 6
- 7
- 8
- 9
- 10
- 11
- 12
- 13
6. drawMatches
绘制两幅图像中匹配的关键点的函数
void cv::drawMatches (
InputArray img1,
const std::vector< KeyPoint > & keypoints1,
InputArray img2,
const std::vector< KeyPoint > & keypoints2,
const std::vector< DMatch > & matches1to2,
InputOutputArray outImg,
const Scalar & matchColor = Scalar::all(-1),
const Scalar & singlePointColor = Scalar::all(-1),
const std::vector< char > & matchesMask = std::vector< char >(),
DrawMatchesFlags flags = DrawMatchesFlags::DEFAULT
)
img1,左边图像的cv::Mat
keypoints1,左边图像的关键点std::vector类型
img2,右边图像的cv::Mat
keypoints2,右边图像的关键点std::vector类型
matches1to2,std::vector类型
outImg,输出图像
matchColor,连线的颜色
singlePointColor,关键点的颜色
flgs,是否绘制7. stereoRectify
用于进行双目相机中图像校正的函数,就是构造两个虚拟相机,将三维空间中的点进行重映射,
void cv::stereoRectify ( InputArray cameraMatrix1, // 第一个相机的内参矩阵,3×3的cv::Mat InputArray distCoeffs1, // 第一个相机的畸变参数,如果没有可以cv::Matx- 1
- 2
- 3
- 4
- 5
- 6
- 7
- 8
- 9
- 10
- 11
- 12
- 13
- 14
- 15
- 16
- 17
- 18
- 19
8.remap()
将src中的一些点(由map1和map2分别指定其行和列坐标),但当map1通道数为2的时候,map2不起作用。提取出来保存到dst中,即 dst ( x , y ) = src ( m a p x ( x , y ) , m a p y ( x , y ) ) \texttt{dst} (x,y) = \texttt{src} (map_x(x,y),map_y(x,y)) dst(x,y)=src(mapx(x,y),mapy(x,y)),dst与map1由相同的shape,元素类型与src相同,dst的长度不超过short int的最大值。
void cv::remap ( InputArray src, // 原始图像 OutputArray dst, // 目标图像 InputArray map1, // map1(x,y) 原图像(x,y)处的像素对应的x坐标 InputArray map2, // map2(x,y) 原图像(x,y)处的像素对应的y坐标 int interpolation, // 插值方法,因为对应坐标可能为浮点数 int borderMode = BORDER_CONSTANT, const Scalar & borderValue = Scalar() )- 1
- 2
- 3
- 4
- 5
- 6
- 7
- 8
- 9
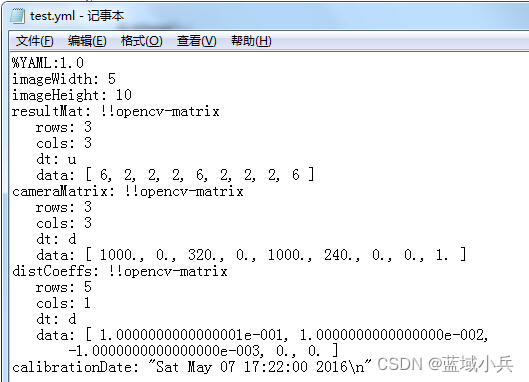
9. FileStorage类
用于存储OpenCV中的一些数据到硬盘中的类,大致用法如下:
来自于博客// 1.create our writter cv::FileStorage fs("test.yml", FileStorage::WRITE); // 2.Save an int int imageWidth= 5; int imageHeight= 10; fs << "imageWidth" << imageWidth; fs << "imageHeight" << imageHeight; // 3.Write a Mat cv::Mat m1= Mat::eye(3,3, CV_8U); cv::Mat m2= Mat::ones(3,3, CV_8U); cv::Mat resultMat= (m1+1).mul(m1+2); fs << "resultMat" << resultMat; // 4.Write multi-variables cv::Mat cameraMatrix = (Mat_<double>(3,3) << 1000, 0, 320, 0, 1000, 240, 0, 0, 1); cv::Mat distCoeffs = (Mat_<double>(5,1) << 0.1, 0.01, -0.001, 0, 0); fs << "cameraMatrix" << cameraMatrix << "distCoeffs" << distCoeffs; // 5.Save local time time_t rawtime; time(&rawtime); //#includefs << "calibrationDate" << asctime(localtime(&rawtime)); // 6.close the file opened fs.release(); - 1
- 2
- 3
- 4
- 5
- 6
- 7
- 8
- 9
- 10
- 11
- 12
- 13
- 14
- 15
- 16
- 17
- 18
- 19
- 20
- 21
- 22
- 23
- 24
- 25
- 26
保存结果如下:
-
相关阅读:
springboot基于协同过滤算法的私人诊所管理系统
Kettle分布式集群安装部署详细步骤和使用分布式Kettle集群示例
Arcgis克里金插值报错:ERROR 010079: 无法估算半变异函数。 执行(Kriging)失败。
数据分析---numpy补充
【实验记录1】行人重识别
STM32F103VET6基于STM32CubeMX 配置非DMA方式获取内部温度
Vue项目流程7,交易页面,提交订单,支付页面,利用element UI 以及 QRCode 完成微信支付,弹出框按钮的相关工作,个人中心以及子路由我的订单
day01-GUI坦克大战01
Android对接华为AI - 文本识别
vite+react+typescript 遇到的问题
- 原文地址:https://blog.csdn.net/u013238941/article/details/127306276
