-
vue2升级vue3的新变化

vue 作者(尤大)在2022-2-7起宣布 vue3 正式作为默认版本,vue3目前也是可以投入生产项目中了,vue3 + vite + TS也是当前比较流行的配置。本篇博客主要记录一下相比较于vue2,vue3的新变化。

1、组合式API和setup语法糖
Vue3.0给我们提供了composition API,而实现composition API这种代码风格主要是使用官方提供的setup这个函数。
<script lang="ts"> import { defineComponent, ref } from 'vue' import NavMenu from '@/components/nav-menu' import NavHeader from '@/components/nav-header' export default defineComponent({ //需要声明引入的组件 components: { NavMenu, NavHeader }, //setup中props和context参数 setup(props,context) { const isCollapse = ref(false) const handleFoldChange = (isFold: boolean) => { isCollapse.value = isFold } //需要在setup中导出变量和函数 return { isCollapse, handleFoldChange } } }) script>- 1
- 2
- 3
- 4
- 5
- 6
- 7
- 8
- 9
- 10
- 11
- 12
- 13
- 14
- 15
- 16
- 17
- 18
- 19
- 20
- 21
- 22
- 23
- 24
- 25
- 26
- 27
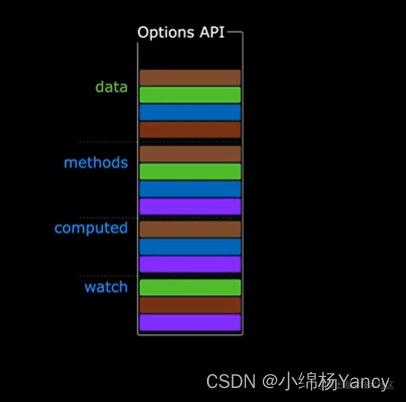
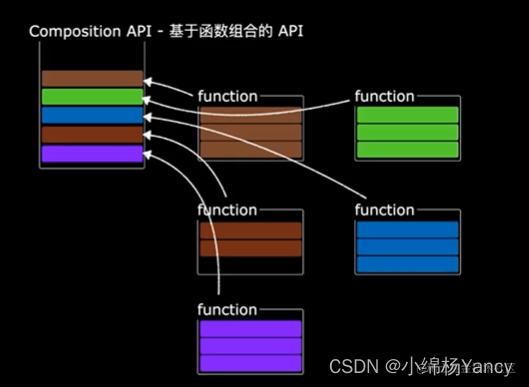
可以看到,可以在setup函数中书写逻辑,不需要像vue2那样在data和methods定义对应的数据和方法,当然,对于computed、watch等需要通过hooks来创建,这也是选项式(vue2)和组合式(vue3)的区别所在,对于vue3来说,同一部分的业务逻辑代码(需要的数据,时间、监听等)可以写在一起,这样对于代码复盘、业务逻辑提取都是十分友好的。


vue3.2更是进一步优化了组合式api:<script setup lang="ts"> import { ref } from 'vue' import AccountLogin from './account-login.vue' const isRememberPassword = ref(true) const accountRef = ref<InstanceType<typeof AccountLogin>>() const activeName = ref('account') const login = () => { activeName.value === 'account' ? accountRef.value?.loginAction(isRememberPassword.value) : phoneRef.value?.loginAction(isRememberPassword.value) } script>- 1
- 2
- 3
- 4
- 5
- 6
- 7
- 8
- 9
- 10
- 11
- 12
- 13
可以看到,相比较于vue3.0,vue3.2的script标签直接使用setup属性(也就是setup语法糖),代码中的变量和方法不需要return便可以直接在模板中直接使用,并且引入的组件也不需要在components中声明,直接也可以使用。
需要考虑的问题:如何获取props和emits……defineProps
用于获取父组件传递的props。
<template> <div> <h2>{{message}}h2> div> template> <script lang="ts" setup> import {defineProps} from 'vue' defineProps({ message:{ type:String, default:'hahha' } }) script>- 1
- 2
- 3
- 4
- 5
- 6
- 7
- 8
- 9
- 10
- 11
- 12
- 13
- 14
defineEmits
用于调试父组件调用子组件时定义的方法。
<template> <div> <button @click='sendEmit'>给父组件发送事件button> div> template> <script lang="ts" setup> import {defineEmits} from 'vue' //使用defineEmits创建名称,接受一个数组 const emit = defineEmits(['sendEmit']) //调用事件参数 const sendEmit = () =>{ emit('sendEmit','传递的数据') } script>- 1
- 2
- 3
- 4
- 5
- 6
- 7
- 8
- 9
- 10
- 11
- 12
- 13
- 14
- 15
defineExpose
父组件可以通过在组件中设置ref属性,然后在script中声明对应变量,来直接获取子组件实例(并不推荐)。
子组件:ChildComponent.vue<template> <div> <p>{{ name }}p> div> template> <script setup lang="ts"> import { ref } from "vue"; const name = ref("ChildComponent"); //暴露 defineExpose({ name, }); script> <style scoped>style>- 1
- 2
- 3
- 4
- 5
- 6
- 7
- 8
- 9
- 10
- 11
- 12
- 13
- 14
- 15
- 16
- 17
- 18
- 19
- 20
- 21
父组件:
<template> <ChildComponentVue ref="child">ChildComponentVue> template> <script setup lang="ts"> import ChildComponentVue from "./ChildComponent.vue"; import { onMounted, ref } from "vue"; let child = ref(null); //需要在onMounted中获取 因为是获取的DOM实例 onMounted(() => { console.log(child.value); }); script> <style scoped>style>- 1
- 2
- 3
- 4
- 5
- 6
- 7
- 8
- 9
- 10
- 11
- 12
- 13
- 14
- 15
- 16
- 17
其他
script setup会默认声明async,类似于async setup()的效果,你可以在script setup中直接使用await函数。
之前可以通过useContext从上下文中获取 slots 和 attrs。不过提案在正式通过后,废除了这个语法,被拆分成了useAttrs和useSlots。2、响应式原理ref和reactive
vue2双向数据绑定是利用ES5的Object.defineProperty()对数据进行劫持,结合发布订阅模式来实现。
vue3中使用ES6的ProxyAPI对数据代理。
Proxy是直接代理一整个对象,所以相比较于Object.defineProperty劫持单个属性,Proxy有着先天的优势,比如可以直接代理对象的深层属性,对象添加或者移除属性时,也能直接监听到(Object.defineProperty不可以),直接代理数组等。
如果要在vue3.2中定义响应式数据(数据改变,页面更新),需要借助ref和reactive来处理数据。ref
- 作用:定义一个响应式的数据,或者说是生成一个引用实现对象
- 语法:const xxx = ref(initValue)
● 创建一个包含响应式数据的引用对象(reference对象)
● JS中操作数据需要:xxx.value
● 模板中读取数据:直接使用即可
PS:
- ref接收的数据可以是基本类型数据,也可以是对象类型。
- 基本类型的数据:响应式是靠Object.defineProperty()的get和set完成的。
- 对象类型的数据:内部使用了reactive函数。
<template> <div> <p>{{ msg }}p> <button @click="msg = 'Hello Vue!'">Changebutton> div> template> <script setup lang="ts"> import { ref } from "@vue/reactivity"; let msg = ref("Hello World!"); script> <style scoped>style>- 1
- 2
- 3
- 4
- 5
- 6
- 7
- 8
- 9
- 10
- 11
- 12
- 13
- 14
reactive
- 作用:定义一个对象类型的响应式数据。
- 语法:const 代理对象 = reactive(源对象) 参数是一个对象或者数组,返回一个代理对象(Proxy的实例对象,简称proxy对象)。
- reactive定义的响应式数据是深层次的。
- 内部基于ES6的Proxy实现,通过代理对象操作源对象内部数据。
<template> <div> <p>{{ user.name }}p> <p>{{ user.age }}p> <p>{{ user.country }}p> div> template> <script setup lang="ts"> import { reactive } from "@vue/reactivity"; let user = reactive({ name: "Yancy Zhang", age: 20, country: "China", }); setTimeout(() => { user.age++; }, 1000); script> <style scoped>style>- 1
- 2
- 3
- 4
- 5
- 6
- 7
- 8
- 9
- 10
- 11
- 12
- 13
- 14
- 15
- 16
- 17
- 18
- 19
- 20
- 21
- 22
- 23
- 若要避免深层响应式转换,只想保留对这个对象顶层次访问的响应性,请使用 shallowReactive() 作替代。
- 不能通过 …state (扩展运算符)方式结构,这样会丢失响应式。
- 注意reactive封装的响应式对象,不要通过解构的方式返回,这是不具有响应式的。可以通过 toRefs 处理,然后再解构返回,这样才具有响应式。
const state = reactive({ foo: 1, bar: 2 }) // state.foo 本来是一个响应式对象,被重新赋值后就不是响应式对象了,只是一个普通基本类型值 const {foo, bar} = state; // 此时 foo 就等于 1 了,1 是一个值,不是一个响应式对象 foo = 6; // 更改在视图中并不会生效,因为解构时 foo 被重新赋值了,即 const foo = state.foo; const foo = 1;- 1
- 2
- 3
- 4
- 5
- 6
- 7
- 8
- 9
- 10
toRef
基于响应式对象上的一个属性,创建一个对应的 ref。这样创建的 ref 与其源属性保持同步:改变源属性的值将更新 ref 的值,反之亦然。
const state = reactive({ foo: 1, bar: 2 }) const fooRef = toRef(state, 'foo') // 更改该 ref 会更新源属性 fooRef.value++ console.log(state.foo) // 2 // 更改源属性也会更新该 ref state.foo++ console.log(fooRef.value) // 3- 1
- 2
- 3
- 4
- 5
- 6
- 7
- 8
- 9
- 10
- 11
- 12
- 13
- 14
toRefs
将一个响应式对象转换为一个普通对象,这个普通对象的每个属性都是指向源对象相应属性的 ref。每个单独的 ref 都是使用 toRef() 创建的。
当从组合式函数中返回响应式对象时,toRefs 相当有用。使用它,消费者组件可以解构/展开返回的对象而不会失去响应性:function useFeatureX() { const state = reactive({ foo: 1, bar: 2 }) // ...基于状态的操作逻辑 // 在返回时都转为 ref return toRefs(state) } // 可以解构而不会失去响应性,因为解构后的 foo 是个 Ref 对象,如果直接解构state的话解构完是一个值 ‘1’ const { foo, bar } = useFeatureX()- 1
- 2
- 3
- 4
- 5
- 6
- 7
- 8
- 9
- 10
- 11
- 12
- 13
- 14
3、computed和watch
我们知道,在vue2的选项式API中,可以在computed:{}和watch:{}中定义对应的计算属性和监听器。
computed: { fullName: function () { return this.firstName + ' ' + this.lastName } }- 1
- 2
- 3
- 4
- 5
watch: { firstName: function (val) { this.fullName = val + ' ' + this.lastName }, lastName: function (val) { this.fullName = this.firstName + ' ' + val } }- 1
- 2
- 3
- 4
- 5
- 6
- 7
- 8
那么在vue3的组合式API中,如何使用计算属性和监听器呢?
computed
我们可以直接使用computed方法来定义一个计算属性:
<script setup> import { reactive, computed } from 'vue' const author = reactive({ name: 'John Doe', books: [ 'Vue 2 - Advanced Guide', 'Vue 3 - Basic Guide', 'Vue 4 - The Mystery' ] }) // 一个计算属性 ref const publishedBooksMessage = computed(() => { return author.books.length > 0 ? 'Yes' : 'No' }) script> <template> <p>Has published books:p> <span>{{ publishedBooksMessage }}span> template>- 1
- 2
- 3
- 4
- 5
- 6
- 7
- 8
- 9
- 10
- 11
- 12
- 13
- 14
- 15
- 16
- 17
- 18
- 19
- 20
- 21
- 22
- 23
watch
同理,可以使用watch函数定义一个监听器:
<script setup> import { ref, watch } from 'vue' const question = ref('') const answer = ref('Questions usually contain a question mark. ;-)') // 可以直接侦听一个 ref watch(question, async (newQuestion, oldQuestion) => { if (newQuestion.indexOf('?') > -1) { answer.value = 'Thinking...' try { const res = await fetch('https://yesno.wtf/api') answer.value = (await res.json()).answer } catch (error) { answer.value = 'Error! Could not reach the API. ' + error } } }) script> <template> <p> Ask a yes/no question: <input v-model="question" /> p> <p>{{ answer }}p> template>- 1
- 2
- 3
- 4
- 5
- 6
- 7
- 8
- 9
- 10
- 11
- 12
- 13
- 14
- 15
- 16
- 17
- 18
- 19
- 20
- 21
- 22
- 23
- 24
- 25
- 26
- 27
- 28
直接给 watch() 传入一个响应式对象,会隐式地创建一个深层侦听器——该回调函数在所有嵌套的变更时都会被触发。
对于一个返回响应式对象的 getter 函数,只有在返回不同的对象时,才会触发回调,可以通过添加第三个配置参数,来实现监听深层次属性变化:watch( () => state.someObject, (newValue, oldValue) => { // 注意:`newValue` 此处和 `oldValue` 是相等的 // *除非* state.someObject 被整个替换了 }, { deep: true } )- 1
- 2
- 3
- 4
- 5
- 6
- 7
- 8
watchEffect
watch() 是懒执行的:仅当数据源变化时,才会执行回调。但在某些场景中,我们希望在创建侦听器时,立即执行一遍回调。
const url = ref('https://...') const data = ref(null) async function fetchData() { const response = await fetch(url.value) data.value = await response.json() } // 立即获取 fetchData() // ...再侦听 url 变化 watch(url, fetchData)- 1
- 2
- 3
- 4
- 5
- 6
- 7
- 8
- 9
- 10
- 11
- 12
我们可以用 watchEffect函数 来简化上面的代码。watchEffect() 会立即执行一遍回调函数,如果这时函数产生了副作用,Vue 会自动追踪副作用的依赖关系,自动分析出响应源。上面的例子可以重写为:
watchEffect(async () => { const response = await fetch(url.value) data.value = await response.json() })- 1
- 2
- 3
- 4
所以相比较于watch,watchEffect只有一个参数,就是一个回调函数。
4、v-model
v-model适用于双向绑定的指令,在vue2中,一个组件或者标签只能有一个v-model,并且默认属性和事件为value和input,所以我们也可以用于父子组件之间数据双向绑定。
vue3变化概述:
● 非兼容:用于自定义组件时,v-model prop 和事件默认名称已更改:
○ prop:value -> modelValue;
○ 事件:input -> update:modelValue;
● 非兼容:v-bind 的 .sync 修饰符和组件的 model 选项已移除,可在 v-model 上加一个参数代替;
● 新增:现在可以在同一个组件上使用多个 v-model 绑定;
● 新增:现在可以自定义 v-model 修饰符。
在 3.x 中,自定义组件上的 v-model 相当于传递了 modelValue prop 并接收抛出的 update:modelValue 事件:<ChildComponent v-model="pageTitle" /> <ChildComponent :modelValue="pageTitle" @update:modelValue="pageTitle = $event" />- 1
- 2
- 3
- 4
- 5
- 6
- 7
- 8
v-model参数
若需要更改 model 的名称,现在我们可以为 v-model 传递一个参数,以作为组件内 model 选项的替代(默认为modelValue):
<ChildComponent v-model:title="pageTitle" /> <ChildComponent :title="pageTitle" @update:title="pageTitle = $event" />- 1
- 2
- 3
- 4
这也可以作为 .sync 修饰符的替代,而且允许我们在自定义组件上使用多个 v-model。
<ChildComponent v-model:title="pageTitle" v-model:content="pageContent" /> <ChildComponent :title="pageTitle" @update:title="pageTitle = $event" :content="pageContent" @update:content="pageContent = $event" />- 1
- 2
- 3
- 4
- 5
- 6
- 7
- 8
- 9
- 10
- 11
v-model修饰符
除了像 .trim 这样的 2.x 硬编码的 v-model 修饰符外,现在 3.x 还支持自定义修饰符:
<ChildComponent v-model.capitalize="pageTitle" />- 1
<script setup> const props = defineProps({ modelValue: String, modelModifiers: { default: () => ({}) } }) defineEmits(['update:modelValue']) console.log(props.modelModifiers) // { capitalize: true } script> <template> <input type="text" :value="modelValue" @input="$emit('update:modelValue', $event.target.value)" /> template>- 1
- 2
- 3
- 4
- 5
- 6
- 7
- 8
- 9
- 10
- 11
- 12
- 13
- 14
- 15
- 16
- 17
- 18
注意这里组件的 modelModifiers prop 包含了 capitalize 且其值为 true,因为它在模板中的 v-model 绑定上被使用了。
有了 modelModifiers 这个 prop,我们就可以在原生事件侦听函数中检查它的值,然后决定触发的自定义事件中要向父组件传递什么值。5、key
● 新增:对于 v-if/v-else/v-else-if 的各分支项 key 将不再是必须的,因为现在 Vue 会自动生成唯一的 key。
○ 非兼容:如果你手动提供 key,那么每个分支必须使用唯一的 key。你将不再能通过故意使用相同的 key 来强制重用分支。
● 非兼容: 的 key 应该设置在 标签上 (而不是设置在它的子节点上)。
● 在 Vue 3.x 中,key 则应该被设置在 标签上。6、v-if和v-for的优先级对比
两者作用于同一个元素上时,v-if 会拥有比 v-for 更高的优先级。(与vue2正好相反)
7、异步组件
在大型项目中,我们可能需要拆分应用为更小的块,并仅在需要时再从服务器加载相关组件。
import { defineAsyncComponent } from 'vue' const AsyncComp = defineAsyncComponent(() => { return new Promise((resolve, reject) => { // ...从服务器获取组件 resolve(/* 获取到的组件 */) }) }) // ... 像使用其他一般组件一样使用 `AsyncComp`- 1
- 2
- 3
- 4
- 5
- 6
- 7
- 8
- 9
ES 模块动态导入也会返回一个 Promise,所以多数情况下我们会将它和 defineAsyncComponent 搭配使用。类似 Vite 和 Webpack 这样的构建工具也支持此语法 (并且会将它们作为打包时的代码分割点),因此我们也可以用它来导入 Vue 单文件组件:
import { defineAsyncComponent } from 'vue' const AsyncComp = defineAsyncComponent(() => import('./components/MyComponent.vue') )- 1
- 2
- 3
- 4
- 5
全局注册:
app.component('MyComponent', defineAsyncComponent(() => import('./components/MyComponent.vue') ))- 1
- 2
- 3
也可以直接在父组件中直接定义它们:
<script setup> import { defineAsyncComponent } from 'vue' const AdminPage = defineAsyncComponent(() => import('./components/AdminPageComponent.vue') ) script> <template> <AdminPage /> template>- 1
- 2
- 3
- 4
- 5
- 6
- 7
- 8
- 9
- 10
- 11
- 12
-
相关阅读:
掌握PyQt6/Pyside6如何用QTreeView QFileSystemModel 展示指定目录结构
echarts+node+ajax实现时间天气服务器
stm32 HSUSB
【Android Studio程序开发】文本设置--设置文本的大小
详解欧拉计划第757题:隐匿数
DLT645转modbus协议网关采集电表的数据方法
Flutter简易弹窗
《lwip学习7》-- IP协议
go的数据类型
电脑重装系统 Win11 如何打开DirectX诊断工具
- 原文地址:https://blog.csdn.net/ZHANGYANG_1109/article/details/128027610
