-
【App自动化测试】(六)移动端自动化中常用的元素定位方式
前言:
本文为在霍格沃兹测试开发学社中学习到的一些技术写出来分享给大家,希望有志同道合的小伙伴可以一起交流技术,一起进步~ 😘1. Android/iOS基础知识
1.1 Android基础知识
1.1.1 七大布局
Android 是通过容器的布局属性来管理子控件的位置关系,布局过程就是把界面上的所有空间根据他们的间距的大小摆放在正确的位置。
- 线性布局:以线性方式进行布局,横向或者纵向进行布局,使用最对的布局方式
- 相对布局:现在确定一个元素的位置,再根据这个位置去确定另一个元素的位置
- 帧布局:最底层的布局。先设置layout,然后再在上面进行横向布局或者纵向布局
- 绝对布局:根据绝对坐标值进行布局,很少使用,兼容性不太好
- 表格布局:把页面的图片文字,以表格的方式进行布局
- 网格布局:把页面的图片文字,以网格的方式进行布局
- 约束布局:是一个ViewGroup,可以在Api9以上的Android系统使用它,它的出现主要是为了解决布局嵌套过多的问题,以灵活的方式定位和调整小部件
1.1.2 四大组件
- activity:与用户交互的可视化界面
- service:实现程序后台运行的解决方案
- content provider:内容提供者,提供程序所需要的数据
- broadcast receiver:广播接收器,监听外部事件的到来(比如来电)
1.1.3 常用控件
- TextView:文本控件
- EditText:可编辑文本控件
- Button:按钮
- ImageButton:图片按钮
- ToggleButton:开关按钮
- ImageView:图片控件
- CheckBox:复选框控件
- RadioButton:单选框控件
1.1.4 控件的布局
布局是一种可用于放置很多控件的容器,它可以按照一定的规律调整内部控件的位置,从而编写出精美的界面。当然,布局的内部除了放置控件外,也可以放置布局,通过多层布局的嵌套,我们就能完成一些比较复杂的界面。

1.2 iOS基础知识
1.2.1 iOS介绍
- 由苹果公司为iPhone开发的操作系统,主要给iPhone、iTouch、iPad使用
- 原名为iPhoneOS,2010年WWDC大会改名为iOS。
1.2.2 布局
iOS去掉了布局的概念,直接用变量之间的相对关系完成位置的计算。
1.2.3 开发环境
系统:MacOS X
开发工具:Xcode
开发语言:ObjectC
安装文件:.ipa文件/.app文件
注意:
使用Appium测试iOS应用需要使用MacOS操作系统。
2.控件定位
2.1 元素定位法
元素定位,实际上就是定位控件。想要一个脚本同时支持android/iOS两个系统,就得保证元素属性(id,aid,xpath等)一致。
2.1.1 dom结构介绍
dom定义:
- Document Object Model ,文档对象模型
dom应用定义:
- 最早应用于html和js的交互。用于表示界面的控件层级,界面的结构化描述,常见的格式为html、xml。核心元素为节点和属性。
Xpath的定义:
- xml路径语言,用于xml中的节点定位。
Android的层级结构:
- Android应用的层级结构与html不一样,是一个定制的xml
- app source类似于dom,表示app的层级,代表了界面里面所有的控件树的结构。
- 每个控件都有它的属性(resourceid,xpath,aid……),没有css属性。

iOS与Andriod的dom结构的区别:
- dom属性和节点结构类似。
- 名字和属性的命名不同(比如:android resourceid,ios name,android content-des,ios accessibility-id)
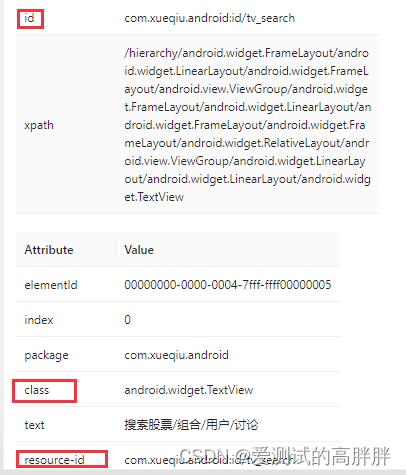
2.1.2 定位方式
- 使用id属性定位
- 使用accessibility_id属性定位
- 使用xpath定位
- 使用classname属性定位(不推荐)
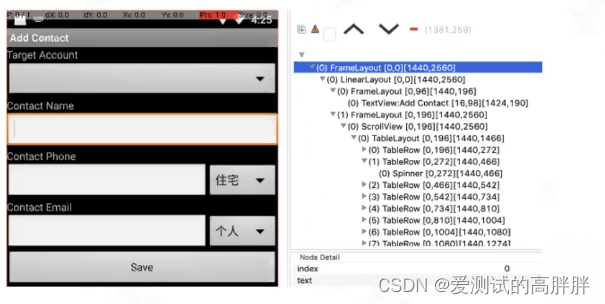
Appium Inspector上的元素属性展示:
2.1.3 演示代码
from appium import webdriver from appium.webdriver.common.appiumby import AppiumBy class TestXueQiu: def setup(self): # 创建一个字典 desire_cap = {} # 平台 desire_cap['platform'] = 'Android' #手机系统版本 desire_cap['platformVersion']= '6.0' # 设备名 desire_cap['deviceName'] = '127.0.0.1:7555' # app 包名 desire_cap['appPackage'] = 'com.xueqiu.android' # app 页面名 desire_cap['appActivity'] = '.common.MainActivity' desire_cap['noReset'] = 'true' #每次测试重置数据 desire_cap['skipDeviceInitization']= 'true' #保证可以正常输入中文 desire_cap['unicodeKeyBoard'] = 'true' desire_cap['resetKeyBoard'] = 'true' self.driver = webdriver.Remote("http://127.0.0.1:4723/wd/hub", desire_cap) self.driver.implicitly_wait(10) def teardown(self): # 回收session self.driver.quit() def test_api_demo(self): """ 1、打开 雪球 app 2、点击搜索输入框 3、像搜索框中输入“阿里巴巴” 4、在搜索结果中选择“阿里巴巴”,然后进行点击 5、获取这只上 阿里巴巴的股价,并判断这只股价的价格<200 6、断言 :return: """ #定位搜索框并进行点击,使用id进行定位 self.driver.find_element(AppiumBy.ID,'com.xueqiu.android:id/tv_search').click() #搜索框输入“阿里巴巴”,使用id进行定位 self.driver.find_element(AppiumBy.ID,'com.xueqiu.android:id/search_input_text').send_keys("阿里巴巴") #在搜索结果中选择“阿里巴巴”,并且点击;使用Xpath进行定位 self.driver.find_element(AppiumBy.XPATH,"//*[@resource-id='com.xueqiu.android:id/name' and @text='阿里巴巴']").click() #获取当前股价,使用id进行定位 current_price=float(self.driver.find_element(AppiumBy.ID,'com.xueqiu.android:id/current_price').text) # 断言 assert current_price<200- 1
- 2
- 3
- 4
- 5
- 6
- 7
- 8
- 9
- 10
- 11
- 12
- 13
- 14
- 15
- 16
- 17
- 18
- 19
- 20
- 21
- 22
- 23
- 24
- 25
- 26
- 27
- 28
- 29
- 30
- 31
- 32
- 33
- 34
- 35
- 36
- 37
- 38
- 39
- 40
- 41
- 42
- 43
- 44
- 45
- 46
- 47
- 48
- 49
- 50
2.2 xpath定位
当存在无法直接定位的元素,或者通过控件定位无法精准的定位我们想要的元素的时可以使用xapth的层级定位方法来精准定位我们想要的元素。
2.2.1 xpath的层级定位
- 通过父结点定位子结点
- 通过子结点定位父结点
- 通过子结点定位兄弟结点
- 通过爷爷结点定位孙子结点
2.2.2 Xpath语法
以下示例都根据此xml文档进行演示
<bookstore> <book> <title lang="eng">Harry Pottertitle> <price>29.99price> book> <book> <title lang="eng">Learning XMLtitle> <price>39.95price> book> bookstore>- 1
- 2
- 3
- 4
- 5
- 6
- 7
- 8
- 9
- 10
- 11
- 12
- 13
- 14
- 15
2.2.2.1 选取节点
XPath 使用路径表达式在 XML 文档中选取节点。节点是通过沿着路径或者 step 来选取的。
语法:
表达式 描述 nodename 选取此节点的所有子节点。 / 从根节点选取。 // 从匹配选择的当前节点选择文档中的节点,而不考虑它们的位置。 . 选取当前节点。 … 选取当前节点的父节点。 @ 选取属性。 示例:
路径表达式 结果 bookstore 选取 bookstore 元素的所有子节点。 /bookstore 选取根元素 bookstore。 注释:假如路径起始于正斜杠( / ),则此路径始终代表到某元素的绝对路径! bookstore/book 选取属于 bookstore 的子元素的所有 book 元素。 //book 选取所有 book 子元素,而不管它们在文档中的位置。 bookstore//book 选择属于 bookstore 元素的后代的所有 book 元素,而不管它们位于 bookstore 之下的什么位置。 //@lang 选取名为 lang 的所有属性。 2.2.2.2 谓语
- 谓语用来查找某个特定的节点或者包含某个指定的值的节点。
- 谓语被嵌在方括号中。
示例:
在下面的表格中,我们列出了带有谓语的一些路径表达式,以及表达式的结果:
路径表达式 结果 /bookstore/book[1] 选取属于 bookstore 子元素的第一个 book 元素。 /bookstore/book[last()] 选取属于 bookstore 子元素的最后一个 book 元素。 /bookstore/book[last()-1] 选取属于 bookstore 子元素的倒数第二个 book 元素。 /bookstore/book[position()< 3] 选取最前面的两个属于 bookstore 元素的子元素的 book 元素。 //title[@lang] 选取所有拥有名为 lang 的属性的 title 元素。 //title[@lang=‘eng’] 选取所有 title 元素,且这些元素拥有值为 eng 的 lang 属性。 /bookstore/book[price>35.00] 选取 bookstore 元素的所有 book 元素,且其中的 price 元素的值须大于 35.00。 /bookstore/book[price>35.00]/title 选取 bookstore 元素中的 book 元素的所有 title 元素,且其中的 price 元素的值须大于 35.00。 2.2.2.3 选取未知节点
语法:
XPath 通配符可用来选取未知的 XML 元素。
通配符 描述 * 匹配任何元素节点。 @* 匹配任何属性节点。 node() 匹配任何类型的节点。 示例:
在下面的表格中,我们列出了一些路径表达式,以及这些表达式的结果:
路径表达式 结果 /bookstore/* 选取 bookstore 元素的所有子元素。 //* 选取文档中的所有元素。 //title[@*] 选取所有带有属性的 title 元素。 2.2.2.4 选取若干路径
语法:
通过在路径表达式中使用
|运算符,您可以选取若干个路径。示例:
在下面的表格中,我们列出了一些路径表达式,以及这些表达式的结果:
路径表达式 结果 //book/title | //book/price 选取 book 元素的所有 title 和 price 元素。 //title | //price 选取文档中的所有 title 和 price 元素。 /bookstore/book/title | //price 选取属于 bookstore 元素的 book 元素的所有 title 元素,以及文档中所有的 price 元素。 2.3 原生定位——uiautomator定位
2.3.1 使用uiautomator定位的优缺点
优点:
- xpath定位速度慢
- uiautomator是android的工作引擎,速度快
缺点:
- 表达式书写复杂,容易写错,IDE没有提示。
2.3.2 uiautomator定位方式
2.3.2.1 单一元素定位
使用方法:
driver.find_element_by_android_uiautomator(表达式)可定位元素:
- 通过resourceid定位:
new UiSelector().resourceid("id") - 通过classname定位:
new UiSelector().className("className") - 通过content-desc定位:
new UiSelector().description("content-desc属性") - 通过文本进行定位:
- 通过text文本定位语法:
new UiSelector().text("text文本") - 如果文本较长,可以使用textContains模糊匹配:
new UiSelector().textContains("包含text文本") - 同样可以使用textStartsWith是以某个文件开头来匹配:
new UiSelector().textStartsWith("以text开头的文本") - 可以使用正则表达式textMathes匹配:
new UiSelector().textMathes("正则表达式")
- 通过text文本定位语法:
备注:Appium不支持通过text进行定位的,如果要想通过text进行定位需要借助xpath表达式,但uiautomator可以使用text进行定位。
2.2.3.2 组合定位(多属性方式定位)
可以自由添加多个属性进行定位
例1:id与text属性组合
ind_text ='resourceId("com.baidu.yuedu:ia/ webbooktitle" ).text("小说")' driver.find_element_by_android_uiautomator(id_text)- 1
- 2
例2:class与text属性组合
class_text='className("android.widget.TextView").text("图书")' driver.find_element_by_android_uiautomator(class_text)- 1
- 2
2.2.3.3 父子关系定位 - childselector
有时候不能直接定位某个元素,但是它的父元素很好定位,这时候就先定位父元素,通过父元素找儿子。
示例:
son='resourceId("com.baidu.yuedu:id /rl_tabs".childselector(text("股票")' driver.find_element_by_android_uiautomator(son)- 1
- 2
2.2.3.4 兄弟定位-fromParent
有时候父元素不好定位,但是跟他相邻的兄弟元素很好定位,这时候就可以通过兄弟元素,找到通一父级元素下的子元素
示例:
brother = 'resourceId("com.baidu.yuedu:id/lefttitle").fromParent(text("用户"))' driver.find_element_by_android_uiautomator(brother)- 1
- 2
2.2.3.5 滑动定位
书写方法:
实现滚动查询找元素:
'new UiScrollable(new UiSelector().scrollable(true).instance(0)).scrollIntoView(new UiSelector().text("查找的文本".instance(0)));'- 1
- 2
示例:
from appium import webdriver from appium.webdriver.common.appiumby import AppiumBy from selenium.webdriver.support.wait import WebDriverWait class TestWebView: def setup_class(self): desired_caps = {} desired_caps['platformName'] = 'Android' desired_caps['platformVersion'] = '6.0' desired_caps['deviceName'] = 'emulator-5554' desired_caps['appPackage'] = 'com.example.android.apis' desired_caps['appActivity'] = '.ApiDemos' desired_caps['noReset'] = 'true' desired_caps['chromeOptions']={'w3c':False} #设置chromedriver所在路径 desired_caps['chromedriverExecutableDir']='E:\chromedriver_webview_test' #设置显式指定chromedriver和webview版本对应关系 #desired_caps['chromedriverChromeMappingFile']='E:\chromedriver_webview_test\mapping.json' #开启chromedriverlog desired_caps['showChromedriverLog']=True self.driver = webdriver.Remote('http://127.0.0.1:4723/wd/hub', desired_caps) # 使用隐式等待 self.driver.implicitly_wait(10) def teardown(self): self.driver.quit() def test_webview(self): self.driver.find_element(AppiumBy.ANDROID_UIAUTOMATOR,"new UiScrollable(new UiSelector().scrollable(true).instance(0)).scrollIntoView(new UiSelector().text(\"Views\").instance(0))").click() self.driver.find_element(AppiumBy.ANDROID_UIAUTOMATOR,"new UiScrollable(new UiSelector().scrollable(true).instance(0)).scrollIntoView(new UiSelector().text(\"WebView\").instance(0))").click() #打印上下文情况 #['NATIVE_APP', 'WEBVIEW_com.example.android.apis'] print(self.driver.contexts) #webview组件加载慢的时候不一定会及时出现webview上下文,最好显示等待 WebDriverWait(self.driver,5).until(lambda driver:len(self.driver.contexts)>1) #最好显示指定,在多进程同时有webview的时候,最后一个context不一定是当前app的webview self.driver.switch_to.context('WEBVIEW_com.example.android.apis') from selenium.webdriver.common.by import By self.driver.find_element(By.LINK_TEXT,'Hello World! - 1').click() #查看当前所在context #WEBVIEW_com.example.android.apis print(self.driver.current_context)- 1
- 2
- 3
- 4
- 5
- 6
- 7
- 8
- 9
- 10
- 11
- 12
- 13
- 14
- 15
- 16
- 17
- 18
- 19
- 20
- 21
- 22
- 23
- 24
- 25
- 26
- 27
- 28
- 29
- 30
- 31
- 32
- 33
- 34
- 35
- 36
- 37
- 38
- 39
- 40
- 41
- 42
- 43
- 44
- 45
2.4 CSS Selector
在 Android的Appium Server 1.19.0版本以后和iOS的Appium Server 1.21.0 版本以后,定位方式增加了 CSS Selector。Css selector 会转化为 Android/iOS 原生定位的定位策略,Android转为Android Uiautomator定位方式,而iOS会转为 class chain 定位方式。
2.4.1 定位方式
2.4.1.1 属性定位
id:
driver.find_element_by_css_selector('#id')- 1
description:
driver.find_element_by_css_selector('*[description="Some description"]')- 1
text:
driver.find_element_by_css_selector('*[text="Some description"]')- 1
2.4.1.2 类定位
.android.widget.EditText.android.widget.TextView[description="Some description"]
driver.find_element_by_css_selector('.android.widget.EditText') driver.find_element_by_css_selector('.android.widget.TextView[description="Some description"]')- 1
- 2
2.4.2 演示代码
from appium import webdriver from appium.webdriver.common.appiumby import AppiumBy class TestXueQiu: def setup(self): desired_caps = {} desired_caps['platformName'] = 'Android' desired_caps['platformVersion'] = '6.0' desired_caps['deviceName'] = '127.0.0.1:7555' desired_caps['appPackage'] = 'com.xueqiu.android' desired_caps['appActivity'] = '.view.WelcomeActivityAlias' desired_caps['noReset'] = 'true' self.driver = webdriver.Remote('http://127.0.0.1:4723/wd/hub', desired_caps) self.driver.implicitly_wait(10) def teardown(self): self.driver.quit() def test_search(self): """ 1. 打开【雪球】应用首页 2. 点击搜索框 3. 向搜索框输入:alibaba 4. 判断【阿里巴巴】可见 """ # 点击搜索框 element = self.driver.find_element(AppiumBy.CSS_SELECTOR, "#com\.xueqiu\.android\:id\/tv_search") element.click() # 向搜索框输入:alibaba self.driver.find_element(AppiumBy.CSS_SELECTOR, "#com\.xueqiu\.android\:id\/search_input_text").send_keys("alibaba") alibaba_element = self.driver.find_element(AppiumBy.CSS_SELECTOR, "*[text='阿里巴巴']") displayed = alibaba_element.get_attribute("displayed") print(displayed) # 判断【阿里巴巴】可见 assert displayed == "true"- 1
- 2
- 3
- 4
- 5
- 6
- 7
- 8
- 9
- 10
- 11
- 12
- 13
- 14
- 15
- 16
- 17
- 18
- 19
- 20
- 21
- 22
- 23
- 24
- 25
- 26
- 27
- 28
- 29
- 30
- 31
- 32
- 33
- 34
- 35
- 36
❗ 注意:匹配公式前每一个符号都要加上转义符"
\"
文末说明:
接口测试中我们很容易混淆Session、cookie和token,你知道他们有什么区别吗?快来跟我一起看,一篇文章让你了解三者的区别。😎
⬇⬇⬇⬇⬇⬇⬇
👍👍👍:接口测试经典面试题:Session、cookie、token有什么区别? -
相关阅读:
(31)Verilog实现单bit数据时钟域转换【快到慢】
B树和B+树试题解析
在VScode中如何将界面语言设置为中文
Fair|Fur —— Geometry Nodes
人工智能 绪论
第二章:25+ Python 数据操作教程(第二十一节PIP连接错误:SSL 证书验证失败解决办法)
Java 字节与进制转换
CSS总结第七天
3. 投票 案例项目(合集)
React封装自定义表单校验方法
- 原文地址:https://blog.csdn.net/gjj920318/article/details/127996295