-
Hive三种模式安装部署
1. 内嵌模式安装

安装准备
- 下载hive:pass
- 将文件复制到安装目录下:

- 解压安装包:
tar zxvf apache-hive-3.1.2-bin.tar.gz - 修改名字:
mv apache-hive-3.1.2-bin hive

解决hadoop、hive之间guava版本差异
- 进入hive目录:
cd /export/server/hive - 删除原本jar包:
rm -rf lib/guava-19.0.jar - 复制新的jar包:
cp /export/server/hadoop-3.3.0/share/hadoop/common/lib/guava-27.0-jre.jar ./lib/
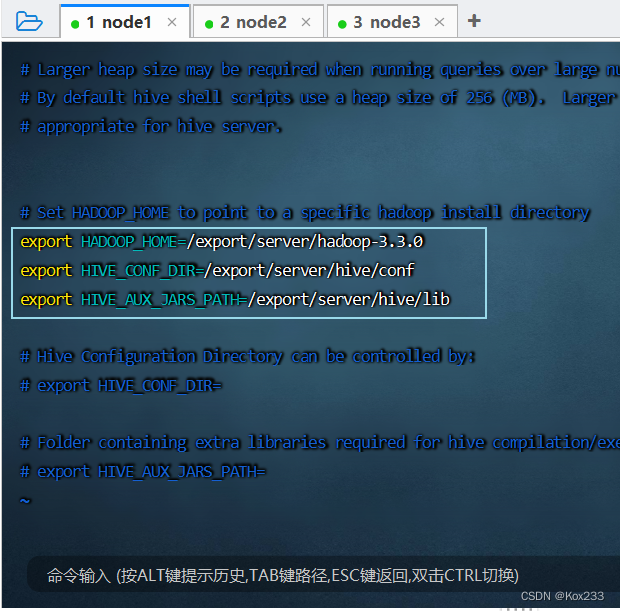
修改hive环境变量文件 添加Hadoop_HOME
- 进入指定目录:
cd /export/server/hive/conf/ - 修改为hive-env.sh:
mv hive-env.sh.template hive-env.sh - 编辑hive-env.sh:
vim hive-env.shi
export HADOOP_HOME=/export/server/hadoop-3.3.0 export HIVE_CONF_DIR=/export/server/hive/conf export HIVE_AUX_JARS_PATH=/export/server/hive/lib- 1
- 2
- 3
初始化metadata
- 进入指定目录:
cd /export/server/hive - 执行初始化命令:
bin/schematool -dbType derby -initSchema

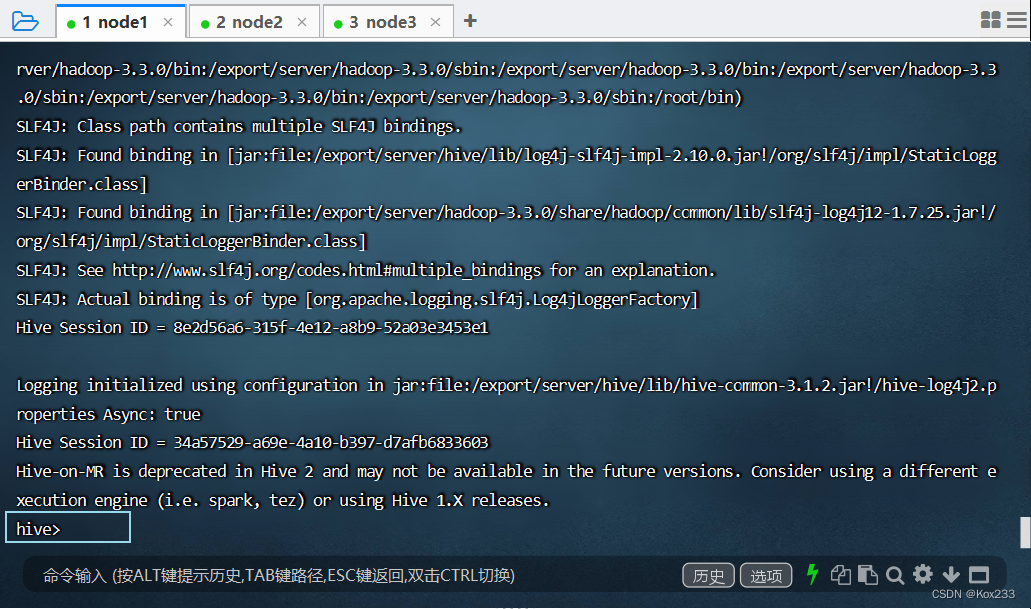
启动hive服务
- 启动命令:
bin/hive
2. 本地模式安装

2.1 Mysql安装
- 卸载Centos7自带mariadb:
rpm -qa|grep mariadb

- 创建mysql安装包存放点:
mkdir /export/software/mysql - 进入目录、上传mysql-5.7.29安装包到上述文件夹下、解压:
tar xvf mysql-5.7.29-1.el7.x86_64.rpm-bundle.tar

- 执行安装:
yum -y install libaiorpm -ivh mysql-community-common-5.7.29-1.el7.x86_64.rpm mysql-community-libs-5.7.29-1.el7.x86_64.rpm mysql-community-client-5.7.29-1.el7.x86_64.rpm mysql-community-server-5.7.29-1.el7.x86_64.rpm

- 初始化mysql:
mysqld --initialize - 更改所属组:
chown mysql:mysql /var/lib/mysql -R - 启动mysql:
systemctl start mysqld.service - 查看生成的临时root密码:
cat /var/log/mysqld.log - 这行日志的最后就是随机生成的临时密码:

- 修改mysql root密码、授权远程访问:
mysql -u root -pEnter password:
- 更新root密码 设置为hadoop
alter user user() identified by "hadoop";- 1
- 授权:
use mysql; GRANT ALL PRIVILEGES ON *.* TO 'root'@'%' IDENTIFIED BY 'hadoop' WITH GRANT OPTION; FLUSH PRIVILEGES;- 1
- 2
- 3
- mysql的启动和关闭 状态查看:
systemctl stop mysqldsystemctl status mysqldsystemctl start mysqld
- 设置为开机自启动服务:
systemctl enable mysqld - 查看是否已经设置自启动成功:
systemctl list-unit-files | grep mysqld
2.2 Hive安装配置
- 上传解压安装包并修改名字
cd /export/server/tar zxvf apache-hive-3.1.2-bin.tar.gzmv apache-hive-3.1.2-bin hive

- 解决hadoop、hive之间guava版本差异
cd /export/server/hiverm -rf lib/guava-19.0.jarcp /export/server/hadoop-3.3.0/share/hadoop/common/lib/guava-27.0-jre.jar ./lib/
- 添加mysql jdbc驱动到hive安装包lib/文件下:(jar包pass)

- 修改hive环境变量文件 添加Hadoop_HOME:
cd /export/server/hive/conf/mv hive-env.sh.template hive-env.shvim hive-env.sh
export HADOOP_HOME=/export/server/hadoop-3.3.0 export HIVE_CONF_DIR=/export/server/hive/conf export HIVE_AUX_JARS_PATH=/export/server/hive/lib- 1
- 2
- 3
- 新增hive-site.xml 配置mysql等相关信息:
vim hive-site.xml
javax.jdo.option.ConnectionURL jdbc:mysql://node1:3306/hive?createDatabaseIfNotExist=true&useSSL=false&useUnicode=true&characterEncoding=UTF-8 javax.jdo.option.ConnectionDriverName com.mysql.jdbc.Driver javax.jdo.option.ConnectionUserName root javax.jdo.option.ConnectionPassword hadoop hive.metastore.event.db.notification.api.auth false hive.metastore.schema.verification false - 1
- 2
- 3
- 4
- 5
- 6
- 7
- 8
- 9
- 10
- 11
- 12
- 13
- 14
- 15
- 16
- 17
- 18
- 19
- 20
- 21
- 22
- 23
- 24
- 25
- 26
- 27
- 28
- 29
- 30
- 31
- 32
- 33
- 34
- 初始化metadata:
cd /export/server/hivebin/schematool -initSchema -dbType mysql -verbos
- 启动hive服务:
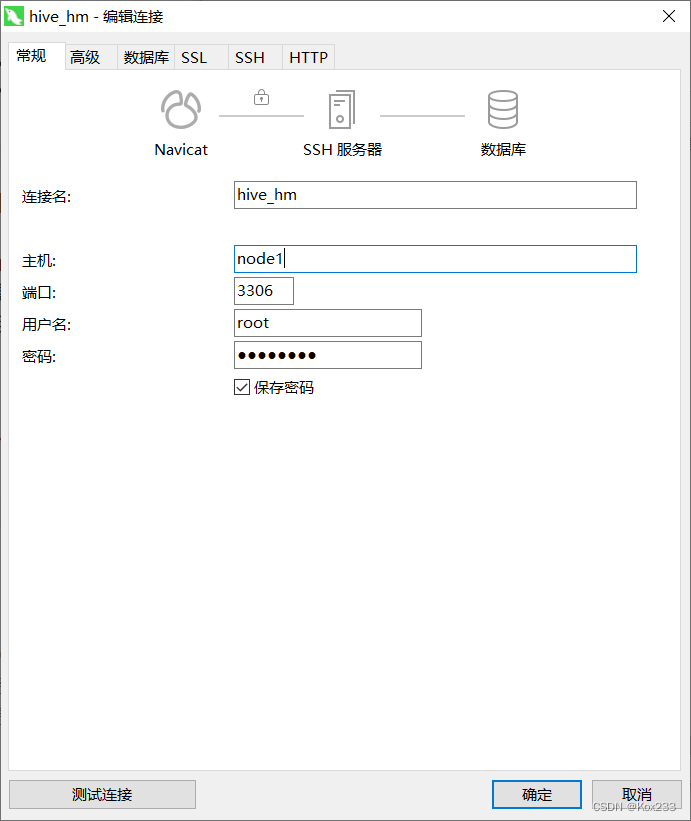
bin/hive - 使用navicat连接mysql验证hive数据中的表数量(74张表):


3. 远程模式安装

基于本地模式的基础上,将hive-site.xml修改为:
javax.jdo.option.ConnectionURL jdbc:mysql://node1:3306/hive?createDatabaseIfNotExist=true&useSSL=false&useUnicode=true&characterEncoding=UTF-8 javax.jdo.option.ConnectionDriverName com.mysql.jdbc.Driver javax.jdo.option.ConnectionUserName root javax.jdo.option.ConnectionPassword hadoop hive.server2.thrift.bind.host node1 hive.metastore.uris thrift://node1:9083 hive.metastore.event.db.notification.api.auth false hive.metastore.schema.verification false - 1
- 2
- 3
- 4
- 5
- 6
- 7
- 8
- 9
- 10
- 11
- 12
- 13
- 14
- 15
- 16
- 17
- 18
- 19
- 20
- 21
- 22
- 23
- 24
- 25
- 26
- 27
- 28
- 29
- 30
- 31
- 32
- 33
- 34
- 35
- 36
- 37
- 38
- 39
- 40
- 41
- 42
- 43
- 44
- 45
- 46
Metastore Hiveserver2启动
- 前台启动 关闭ctrl+c:
/export/server/hive/bin/hive --service metastore - 后台启动 进程挂起 关闭使用jps + kill
输入命令回车执行 再次回车 进程将挂起后台:nohup /export/server/hive/bin/hive --service metastore & - 前台启动开启debug日志:
/export/server/hive/bin/hive --service metastore --hiveconf hive.root.logger=DEBUG,console
-
相关阅读:
java: 程序包XXX.XXX.XXX不存在解决方法
Spring6-单元测试:JUnit
Oracle/PLSQL: BFilename Function
acwing基础课——Dijkstra
0001 - Hadoop及其大数据生态圈
高级架构师_Docker_第3章Docker运维管理__ 第1节Swarm集群管理
在项目中应用SpringSecurity权限控制
某款服务器插上4张TDP功耗75瓦PCIE卡无法开机的调试过程
Vite依赖预构建
MySQL进阶(数据库引擎)——MyISAM和InnoDB引擎的区别
- 原文地址:https://blog.csdn.net/Kox_233/article/details/127939408
