-
怎样使用kornia库中的LoFTR(Image matching example with LoFTR)
Image matching example with LoFTR
本篇博客是对LoFTR使用的一个探索,LoFTR源码请访问:https://github.com/zju3dv/LoFTR#reproduce-the-testing-results-with-pytorch-lightning
kornia请访问:https://github.com/kornia/kornia
如何使用LoFTR实现图片匹配:
第一步:安装需要的库- 使用LoFTR需要安装最新版本的kornia
pip install kornia -i http://pypi.douban.com/simple --trusted-host pypi.douban.com- 1
- 使用MAGSAC++稳健估计方法需要安装最新版本的OpenCV
- 使用kornia_moons实现转换和可视化
%%capture !pip install kornia==0.6.7 !pip install kornia_moons !pip install opencv-python --upgrade- 1
- 2
- 3
- 4
现在我们来下载一个图像对(示例)
!wget https://github.com/kornia/data/raw/main/matching/kn_church-2.jpg !wget https://github.com/kornia/data/raw/main/matching/kn_church-8.jpg- 1
- 2
首先,我们将用OpenCV SIFT特征定义图像匹配框架。我们还将使用kornia作为最先进的匹配过滤-Lowe ratio+相互最近邻检查和MAGSAC+作为RANSAC。
import matplotlib.pyplot as plt import cv2 import kornia as K import kornia.feature as KF import numpy as np import torch from kornia_moons.feature import * def load_torch_image(fname): img = K.image_to_tensor(cv2.imread(fname), False).float() /255. img = K.color.bgr_to_rgb(img) return img fname1 = 'kn_church-2.jpg' fname2 = 'kn_church-8.jpg' img1 = load_torch_image(fname1) img2 = load_torch_image(fname2) matcher = KF.LoFTR(pretrained='outdoor') input_dict = {"image0": K.color.rgb_to_grayscale(img1), # LofTR 只在灰度图上作用 "image1": K.color.rgb_to_grayscale(img2)} with torch.inference_mode(): correspondences = matcher(input_dict) for k,v in correspondences.items(): print (k) # 现在让我们用现代RANSAC清理对应关系,并估计两幅图像之间的基本矩阵 mkpts0 = correspondences['keypoints0'].cpu().numpy() mkpts1 = correspondences['keypoints1'].cpu().numpy() Fm, inliers = cv2.findFundamentalMat(mkpts0, mkpts1, cv2.USAC_MAGSAC, 0.5, 0.999, 100000) inliers = inliers > 0 # 最后,让我们使用kornia_moons的函数绘制匹配图像。正确的匹配用绿色表示,不精确的匹配用蓝色表示 draw_LAF_matches( KF.laf_from_center_scale_ori(torch.from_numpy(mkpts0).view(1,-1, 2), torch.ones(mkpts0.shape[0]).view(1,-1, 1, 1), torch.ones(mkpts0.shape[0]).view(1,-1, 1)), KF.laf_from_center_scale_ori(torch.from_numpy(mkpts1).view(1,-1, 2), torch.ones(mkpts1.shape[0]).view(1,-1, 1, 1), torch.ones(mkpts1.shape[0]).view(1,-1, 1)), torch.arange(mkpts0.shape[0]).view(-1,1).repeat(1,2), K.tensor_to_image(img1), K.tensor_to_image(img2), inliers, draw_dict={'inlier_color': (0.2, 1, 0.2), 'tentative_color': None, 'feature_color': (0.2, 0.5, 1), 'vertical': False})- 1
- 2
- 3
- 4
- 5
- 6
- 7
- 8
- 9
- 10
- 11
- 12
- 13
- 14
- 15
- 16
- 17
- 18
- 19
- 20
- 21
- 22
- 23
- 24
- 25
- 26
- 27
- 28
- 29
- 30
- 31
- 32
- 33
- 34
- 35
- 36
- 37
- 38
- 39
- 40
- 41
- 42
- 43
- 44
- 45
- 46
- 47
- 48
- 49
- 50
效果示例:

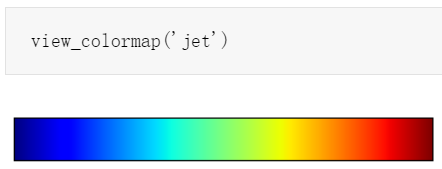
图片采用matplotlib.cm.jet也就是与matplotlib.pyplot.set_cmap()函数同理,越靠近红色分数越高

如果想要直接对比两张图片,但不需要画出对比图像,可以直接使用LoFTR(更多资料需要科学上网)class kornia.feature.LoFTR- 1
参数:
- config(Dict类型,可选)-初始参数Dict,默认值:default_cfg
- 预训练(可选)-下载设置预训练模型权重:‘outdoor’-在MegaDepth上训练,‘indoor’-在ScanNet上训练,默认值:‘outdoor’
返回:图片匹配结果和置信度分数Dict
示例:
img1 = torch.rand(1, 1, 320, 200) img2 = torch.rand(1, 1, 128, 128) input = {"image0": img1, "image1": img2} loftr = LoFTR('outdoor') out = loftr(input)- 1
- 2
- 3
- 4
- 5
关键字参数
- image0 - 左图形如(N,1,H1,W1)
- image1 - 右图形如(N,1,H2,W2)
- mask0(可选) - 左图的mask。‘0’ 指示填充位置 (N,H1,W1)
- mask1(可选) - 右图的mask。‘0’ 指示填充位置 (N,H2,W2)
返回类型
Dict[ str , Tensor]
返回值- keypoints0:image0的匹配关键点,shape为(NC,2)
- keypoints1:image1的匹配关键点,shape为(NC,2)
- confidence:[ 0 , 1 ]之间的置信度,shape为(NC)
- batch_indexes: batch indexes for the keypoints and lafs,shape为(NC)
-
相关阅读:
电化学氧气传感器寿命、工作原理及应用介绍
【毕业设计】深度学习人体跌倒检测 -yolo 机器视觉 opencv python
LeetCode 第6题:Z字形变换(Python3解法)
ubuntu虚拟环境安装以及远程jupyter
【Vue3.0移动端项目--旅游网】-- 首页日期和热门推荐处理
nlp 自然语言处理的dataset数据库积累
Java之消息推送浅入浅出
springBoot--ssm整合
LeetCode刷题复盘笔记——51. N 皇后(一文搞懂回溯解决经典的N皇后问题上篇)
自己本地写完代码后,不要直接git pull拉远程代码,会导致代码丢失
- 原文地址:https://blog.csdn.net/weixin_44177494/article/details/127942672
