-
vue中使用wangeditor富文本编辑器
项目中要求实现富文本编辑器取编辑内容
这种编辑器有好多选择了wangeditor富文本编辑器
首先根据文档安装
- yarn add @wangeditor/editor
- # 或者 npm install @wangeditor/editor --save
- yarn add @wangeditor/editor-for-vue@next
- # 或者 npm install @wangeditor/editor-for-vue@next --save
再按照官方的指引 cv 如下代码
- <template>
- <div style="border: 1px solid #ccc">
- <Toolbar
- style="border-bottom: 1px solid #ccc"
- :editor="editorRef"
- :defaultConfig="toolbarConfig"
- :mode="mode"
- />
- <Editor
- style="height: 500px; overflow-y: hidden;"
- v-model="valueHtml"
- :defaultConfig="editorConfig"
- :mode="mode"
- @onCreated="handleCreated"
- />
- div>
- template>
- <script>
- import '@wangeditor/editor/dist/css/style.css' // 引入 css
- import { onBeforeUnmount, ref, shallowRef, onMounted } from 'vue'
- import { Editor, Toolbar } from '@wangeditor/editor-for-vue'
- export default {
- components: { Editor, Toolbar },
- setup() {
- // 编辑器实例,必须用 shallowRef
- const editorRef = shallowRef()
- // 内容 HTML
- const valueHtml = ref('
hello
') - // 模拟 ajax 异步获取内容
- onMounted(() => {
- setTimeout(() => {
- valueHtml.value = '
模拟 Ajax 异步设置内容
' - }, 1500)
- })
- const toolbarConfig = {}
- const editorConfig = { placeholder: '请输入内容...' }
- // 组件销毁时,也及时销毁编辑器
- onBeforeUnmount(() => {
- const editor = editorRef.value
- if (editor == null) return
- editor.destroy()
- })
- const handleCreated = (editor) => {
- editorRef.value = editor // 记录 editor 实例,重要!
- }
- return {
- editorRef,
- valueHtml,
- mode: 'default', //默认模式
- mode: 'simple', //简洁模式
- toolbarConfig,
- editorConfig,
- handleCreated
- };
- }
- }
- script>
这个时候编辑器的功能已经实现了 如下图

但是目前为止他还不是我想要的
因为这个编辑器我想让他在弹窗中出现,而且我不需要那么多功能
接着更文档的步子走

文档里面既然有这个那就肯定可以实现
研究一番发现弱国想要怎加或者修改编辑器的功能首先要获取这个功能的key

点击Deom示例
打开控制台,输入toolbar.getConfig().toolbarKeys这个时候就可以看到每个功能的key了

在回个车

就可以看到详细内容了
这个时候只需要回到代码里面添加
- toolbarConfig.toolbarKeys = [
- // 菜单 key
- 'headerSelect',
- // 分割线
- '|',
- // 菜单 key
- 'bold',
- 'italic',
- 'color',
- 'justifyLeft',
- 'justifyRight',
- 'justifyCenter'
- // 继续配置其他菜单...
- ]
就可以实现你想要的功能了,如下图
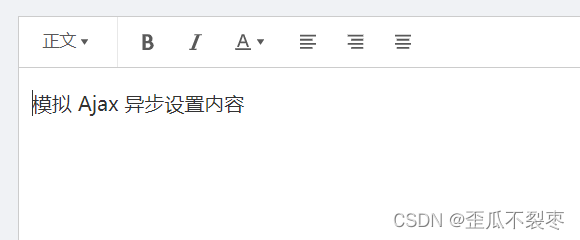
我们可通过toolbarKeys: [], 去实现显示哪些菜单,如何排序、分组的功能 通过excludeKeys: []选择去隐藏哪些菜单
最复杂的就是上传图片了,其实这个也很简单
看看文档
一目了然
 https://www.wangeditor.com/v5/menu-config.html#%E4%B8%8A%E4%BC%A0%E5%9B%BE%E7%89%87return中写上如下代码,需要注意的时上传图片后,后端必须返回url图片的链接,否则编辑器中不会显示图片
- editorConfig: {
- placeholder: '点击全屏介绍产品吧...',
- // autoFocus: false,
- // 所有的菜单配置,都要在 MENU_CONF 属性下
- MENU_CONF: {
- // 配置字号
- // fontSize: [... ],
- // 图片上传
- uploadImage: {
- server: '/api/admin/uploade',
- fieldName: 'img',
- // 单个文件的最大体积限制,默认为 2M
- maximgSize: 10 * 1024 * 1024, // 10M
- // 最多可上传几个文件,默认为 100
- maxNumberOfimgs: 10,
- // 选择文件时的类型限制,默认为 ['image/*'] 。如不想限制,则设置为 []
- allowedimgTypes: ['image/*'],
- // 自定义上传参数,例如传递验证的 token 等。参数会被添加到 formData 中,一起上传到服务端。
- meta: {
- // token: 'xxx',
- // otherKey: 'yyy'
- // img:''
- },
- // 将 meta 拼接到 url 参数中,默认 false
- metaWithUrl: false,
- // 自定义增加 http header
- headers: {
- // Accept: 'text/x-json',
- // otherKey: 'xxx'
- },
- // 跨域是否传递 cookie ,默认为 false
- withCredentials: true,
- // 超时时间,默认为 10 秒
- timeout: 10 * 1000, //10 秒
- // 上传前
- onBeforeUpload(imgs) {
- ElMessage({
- message: '图片正在上传中,请耐心等待',
- grouping: true,
- duration: 0,
- customClass: 'uploadTip',
- iconClass: 'el-icon-loading',
- showClose: true
- });
- return imgs;
- },
- // 自定义插入图片
- customInsert(res, insertFn) {
- // 因为自定义插入导致onSuccess与onFailed回调函数不起作用,自己手动处理
- // 先关闭等待的ElMessage
- ElMessage.closeAll();
- if (res.code === 200) {
- ElMessage.success({
- message: "图片上传成功",
- grouping: true,
- });
- } else {
- ElMessage.error({
- message: "图片上传失败,请重新尝试",
- grouping: true,
- });
- }
- // 从 res 中找到 url alt href ,然后插入图片
- insertFn(res.data.url);
- // console.log(res, "res.data")
- },
- // 单个文件上传成功之后
- onSuccess(img, res) {
- console.log(`${img.name} 上传成功`, res);
- },
- // 单个文件上传失败
- onFailed(img, res) {
- console.log(`${img.name} 上传失败`, res);
- },
- // 上传进度的回调函数
- onProgress(progress) {
- console.log('progress', progress);
- // progress 是 0-100 的数字
- },
- // 上传错误,或者触发 timeout 超时
- onError(img, err, res) {
- console.log(`${img.name} 上传出错`, err, res);
- }
- },
到这里其实基本功能已经实现了,那我们怎么保存,编辑器中的内容呢
需要知道富文本编辑器是所见即所得的文本编辑器,简单来说就是文本上面写的行内样式,那我们该怎样保存这些行内样式呢,在这里我是写成了组件的形式
官方文档中给出

methods中写上
- onChange(editor) {
- const text = editor.getHtml()
- this.$emit('update:content', text)
- },
当内容变化是就获取当前行内样式
然后在父组件中监听下
- watch: {
- "addlist.content"(value) {
- // console.log(value, "就是这里")
- },
在需要的地方
- <editor-all v-model:content="addlist.content" :passSon="addlist.content" />
就可以实现需要的功能啦
完整代码
- <template>
- <div style="border: 1px solid #ccc; margin-top: 10px;z-index:999;width:537px">
- <Toolbar style="border-bottom: 1px solid #ccc" :editor="editor" :defaultConfig="toolbarConfig" />
- <Editor style="height:200px; overflow-y: hidden;" :defaultConfig="editorConfig" v-model="passSon"
- @onChange="onChange" @onCreated="onCreated" />
- div>
- template>
- <script>
- import { ElMessage } from 'element-plus'
- import { Editor, Toolbar } from '@wangeditor/editor-for-vue'
- export default {
- props: {
- passSon: ''
- },
- data() {
- return {
- editor: null,
- toolbarConfig: {
- /* 显示哪些菜单,如何排序、分组 */
- // toolbarKeys: [],
- /* 隐藏哪些菜单 */
- excludeKeys: [
- // '|',
- 'blockquote',
- 'fontSize',
- 'fontFamily',
- 'lineHeight',
- 'bulletedList',
- 'numberedList',
- 'todo',
- 'emotion',
- 'group-video',
- 'group-indent',
- 'group-more-style',
- 'insertTable',
- 'codeBlock',],
- },
- editorConfig: {
- placeholder: '点击全屏介绍产品吧...',
- // autoFocus: false,
- // 所有的菜单配置,都要在 MENU_CONF 属性下
- MENU_CONF: {
- // 配置字号
- // fontSize: [... ],
- // 图片上传
- uploadImage: {
- server: '/api/admin/uploade',
- fieldName: 'img',
- // 单个文件的最大体积限制,默认为 2M
- maximgSize: 10 * 1024 * 1024, // 10M
- // 最多可上传几个文件,默认为 100
- maxNumberOfimgs: 10,
- // 选择文件时的类型限制,默认为 ['image/*'] 。如不想限制,则设置为 []
- allowedimgTypes: ['image/*'],
- // 自定义上传参数,例如传递验证的 token 等。参数会被添加到 formData 中,一起上传到服务端。
- meta: {
- // token: 'xxx',
- // otherKey: 'yyy'
- // img:''
- },
- // 将 meta 拼接到 url 参数中,默认 false
- metaWithUrl: false,
- // 自定义增加 http header
- headers: {
- // Accept: 'text/x-json',
- // otherKey: 'xxx'
- },
- // 跨域是否传递 cookie ,默认为 false
- withCredentials: true,
- // 超时时间,默认为 10 秒
- timeout: 10 * 1000, //10 秒
- // 上传前
- onBeforeUpload(imgs) {
- ElMessage({
- message: '图片正在上传中,请耐心等待',
- grouping: true,
- duration: 0,
- customClass: 'uploadTip',
- iconClass: 'el-icon-loading',
- showClose: true
- });
- return imgs;
- },
- // 自定义插入图片
- customInsert(res, insertFn) {
- // 因为自定义插入导致onSuccess与onFailed回调函数不起作用,自己手动处理
- // 先关闭等待的ElMessage
- ElMessage.closeAll();
- if (res.code === 200) {
- ElMessage.success({
- message: "图片上传成功",
- grouping: true,
- });
- } else {
- ElMessage.error({
- message: "图片上传失败,请重新尝试",
- grouping: true,
- });
- }
- // 从 res 中找到 url alt href ,然后插入图片
- insertFn(res.data.url);
- // console.log(res, "res.data")
- },
- // 单个文件上传成功之后
- onSuccess(img, res) {
- console.log(`${img.name} 上传成功`, res);
- },
- // 单个文件上传失败
- onFailed(img, res) {
- console.log(`${img.name} 上传失败`, res);
- },
- // 上传进度的回调函数
- onProgress(progress) {
- console.log('progress', progress);
- // progress 是 0-100 的数字
- },
- // 上传错误,或者触发 timeout 超时
- onError(img, err, res) {
- console.log(`${img.name} 上传出错`, err, res);
- }
- },
- }
- },
- }
- },
- mounted() {
- },
- methods: {
- onCreated(editor) {
- this.editor = Object.seal(editor) // 【注意】一定要用 Object.seal() 否则会报错
- },
- onChange(editor) {
- const text = editor.getHtml()
- this.$emit('update:content', text)
- },
- },
- beforeDestroy() {
- const editor = this.editor
- if (editor == null) return
- editor.destroy() // 组件销毁时,及时销毁 editor ,重要!!!
- },
- components: { Editor, Toolbar },
- }
- script>
- <style src="@wangeditor/editor/dist/css/style.css">
- style>
ok
-
相关阅读:
多线程(线程互斥)
一起Talk Android吧(第三百六十八回:多线程之精准唤醒)
周四见 | 物流人的一周资讯
unity基础 常用的API及脚本模板
[附源码]计算机毕业设计springboot演唱会门票售卖系统
1569. 将子数组重新排序得到同一个二叉查找树的方案数 数学+DFS
(01)ORB-SLAM2源码无死角解析-(57) 闭环线程→计算Sim3:理论推导(1)求解R,使用四元数
GnosisSafeProxyFactory合约学习
跨平台应用开发进阶(四十五)uni-app集成企微客服实战
Registry Keys for Windows 10 Application Privacy Settings
- 原文地址:https://blog.csdn.net/u014181423/article/details/127937487
