-
【笔记】samba shell 脚本 离线安装 - Ubuntu 20.04
前言
按照官网调试代码、网上各种步骤来走(还收费)都不行
结果发现是防火墙问题
公司服务器安装的ufw使用失效,导致端口号放行添加失败
换用firewall-cmd成功
现在免费放下代码,气死他们收费的目录
├── home │ ├── katja │ │ ├── samba │ │ │ ├── install_samba.sh │ │ │ ├── smb.conf │ │ │ ├── xxxxx.deb │ │ │ ├── ... │ │ │ └── │ │ ├── localoss │ │ │ ├── test (被共享的目录) │ │ │ └── │ │ └── │ └── └──- 1
- 2
- 3
- 4
- 5
- 6
- 7
- 8
- 9
- 10
- 11
- 12
- 13
- 14
代码
install_samba.sh
#!/bin/bash # -*- coding: utf-8 -*- # @Time : 2022/11/14 14:38 # @Author: katja # @File : install_samba.sh # @Desc : samba 共享文件夹 # path=/home/katja/samba share_user=tps_share share_group=sambashare share_path=/home/katja/localoss # 安装samba is_exist(){ package=$1 package_deb=$2 if test ! -z "$(dpkg -l | grep -w $package)";then echo -e "$package exist " else dpkg -i ${path}/$package_deb fi } install(){ is_exist python3-ldb python3-ldb_2%3a2.2.3-0ubuntu0.20.04.3_amd64.deb is_exist libldb2 libldb2_2%3a2.2.3-0ubuntu0.20.04.3_amd64.deb is_exist libsmbclient libsmbclient_2%3a4.13.17~dfsg-0ubuntu1.20.04.1_amd64.deb is_exist libwbclient0 libwbclient0_2%3a4.13.17~dfsg-0ubuntu1.20.04.1_amd64.deb is_exist samba-libs samba-libs_2%3a4.13.17~dfsg-0ubuntu1.20.04.1_amd64.deb is_exist python3-dnspython python3-dnspython_1.16.0-1ubuntu1_all.deb is_exist python3-crypto python3-crypto_2.6.1-13ubuntu2_amd64.deb is_exist python3-tdb python3-tdb_1.4.3-0ubuntu0.20.04.1_amd64.deb is_exist python3-samba python3-samba_2%3a4.13.17~dfsg-0ubuntu1.20.04.1_amd64.deb is_exist samba-common samba-common_2%3a4.13.17~dfsg-0ubuntu1.20.04.1_all.deb is_exist samba-common-bin samba-common-bin_2%3a4.13.17~dfsg-0ubuntu1.20.04.1_amd64.deb is_exist tdb-tools tdb-tools_1.4.3-0ubuntu0.20.04.1_amd64.deb is_exist samba samba_2%3a4.13.17~dfsg-0ubuntu1.20.04.1_amd64.deb is_exist attr attr_1%3a2.4.48-5_amd64.deb is_exist libibverbs1 libibverbs1_28.0-1ubuntu1_amd64.deb is_exist ibverbs-providers ibverbs-providers_28.0-1ubuntu1_amd64.deb is_exist librdmacm1 librdmacm1_28.0-1ubuntu1_amd64.deb is_exist libboost-iostreams1.71.0 libboost-iostreams1.71.0_1.71.0-6ubuntu6_amd64.deb is_exist librados2 librados2_15.2.16-0ubuntu0.20.04.1_amd64.deb is_exist libcephfs2 libcephfs2_15.2.16-0ubuntu0.20.04.1_amd64.deb is_exist python3-gpg python3-gpg_1.13.1-7ubuntu2_amd64.deb is_exist python3-pyparsing python3-pyparsing_2.4.6-1_all.deb is_exist python3-packaging python3-packaging_20.3-1_all.deb is_exist python3-markdown python3-markdown_3.1.1-3_all.deb is_exist python3-pygments python3-pygments_2.3.1+dfsg-1ubuntu2.2_all.deb is_exist samba-dsdb-modules samba-dsdb-modules_2%3a4.13.17~dfsg-0ubuntu1.20.04.1_amd64.deb is_exist samba-vfs-modules samba-vfs-modules_2%3a4.13.17~dfsg-0ubuntu1.20.04.1_amd64.deb # 安装完毕后会自动启动 echo 'starting service' sudo systemctl status nmbd smbd } install # 防火墙 sudo ufw allow ssh sudo firewall-cmd --zone=public --add-service=samba --permanent sudo firewall-cmd --zone=public --add-port=139/tcp --permanent sudo firewall-cmd --zone=public --add-port=445/tcp --permanent sudo firewall-cmd --zone=public --add-port=137/udp --permanent sudo firewall-cmd --zone=public --add-port=138/udp --permanent sudo firewall-cmd --reload sudo ufw enable group_add(){ # 新建组 sudo groupadd ${share_group} # 主目录 sudo mkdir ${share_path} # 群组所有权 sudo chgrp ${share_group} ${share_path} } normal_add(){ group_add user_name=normal # 普通用户 (ubuntu的)无需Ubuntu登录密码 sudo useradd -M -d ${share_path}/$user_name -s /usr/sbin/nologin -G ${share_group} $user_name # 主目录 sudo mkdir ${share_path}/$user_name # 权限 sudo chown $user_name:${share_group} ${share_path}/$user_name # 新创建文件继承所属组 sudo chmod 2770 ${share_path}/$user_name # 密码设置 sudo smbpasswd -a $user_name # 启用 sudo smbpasswd -e $user_name } #normal_add # 我的业务用不到,所以注释了 admin_add(){ group_add user_name=sadmin # 管理员用户 sudo useradd -M -d ${share_path}/users -s /usr/sbin/nologin -G ${share_group} $user_name # 共享目录 sudo mkdir ${share_path}/users # 权限 sudo chown $user_name:${share_group} ${share_path}/users # 新创建文件继承所属组 sudo chmod 2770 ${share_path}/users # 密码设置 sudo smbpasswd -a $user_name # 启用 sudo smbpasswd -e $user_name } #admin_add # 同上 file_add(){ # 无密码用户 sudo mkdir -p ${share_path}/test sudo chmod -R 777 ${share_path}/test # 创建Ubuntu的新用户 sudo useradd smbuser sudo passwd smbuser # 新用户加入smb服务器 sudo smbpasswd -a smbuser } file_add # 配置smb.conf mv /etc/samba/smb.conf /etc/samba/smb.conf.bak cp smb.conf /etc/samba/smb.conf # 重启服务 echo 'starting smbd' sudo service smbd restart echo 'starting smbd' sudo service nmbd restart # 查看状态 sudo systemctl status smbd nmbd- 1
- 2
- 3
- 4
- 5
- 6
- 7
- 8
- 9
- 10
- 11
- 12
- 13
- 14
- 15
- 16
- 17
- 18
- 19
- 20
- 21
- 22
- 23
- 24
- 25
- 26
- 27
- 28
- 29
- 30
- 31
- 32
- 33
- 34
- 35
- 36
- 37
- 38
- 39
- 40
- 41
- 42
- 43
- 44
- 45
- 46
- 47
- 48
- 49
- 50
- 51
- 52
- 53
- 54
- 55
- 56
- 57
- 58
- 59
- 60
- 61
- 62
- 63
- 64
- 65
- 66
- 67
- 68
- 69
- 70
- 71
- 72
- 73
- 74
- 75
- 76
- 77
- 78
- 79
- 80
- 81
- 82
- 83
- 84
- 85
- 86
- 87
- 88
- 89
- 90
- 91
- 92
- 93
- 94
- 95
- 96
- 97
- 98
- 99
- 100
- 101
- 102
- 103
- 104
- 105
- 106
- 107
- 108
- 109
- 110
- 111
- 112
- 113
- 114
- 115
- 116
- 117
- 118
- 119
- 120
- 121
- 122
- 123
- 124
- 125
- 126
- 127
- 128
- 129
- 130
- 131
- 132
- 133
- 134
- 135
- 136
- 137
- 138
- 139
- 140
- 141
smb.conf
在最末尾追加代码
share# # Sample configuration file for the Samba suite for Debian GNU/Linux. # # # This is the main Samba configuration file. You should read the # smb.conf(5) manual page in order to understand the options listed # here. Samba has a huge number of configurable options most of which # are not shown in this example # # Some options that are often worth tuning have been included as # commented-out examples in this file. # - When such options are commented with ";", the proposed setting # differs from the default Samba behaviour # - When commented with "#", the proposed setting is the default # behaviour of Samba but the option is considered important # enough to be mentioned here # # NOTE: Whenever you modify this file you should run the command # "testparm" to check that you have not made any basic syntactic # errors. #======================= Global Settings ======================= [global] ## Browsing/Identification ### # Change this to the workgroup/NT-domain name your Samba server will part of workgroup = WORKSPACE # server string is the equivalent of the NT Description field server string = %h server (Samba, Ubuntu) #### Networking #### # The specific set of interfaces / networks to bind to # This can be either the interface name or an IP address/netmask; # interface names are normally preferred ; interfaces = 127.0.0.0/8 eth0 # Only bind to the named interfaces and/or networks; you must use the # 'interfaces' option above to use this. # It is recommended that you enable this feature if your Samba machine is # not protected by a firewall or is a firewall itself. However, this # option cannot handle dynamic or non-broadcast interfaces correctly. ; bind interfaces only = yes #### Debugging/Accounting #### # This tells Samba to use a separate log file for each machine # that connects log file = /var/log/samba/log.%m # Cap the size of the individual log files (in KiB). max log size = 1000 # We want Samba to only log to /var/log/samba/log.{smbd,nmbd}. # Append syslog@1 if you want important messages to be sent to syslog too. logging = file log level = 2 # Do something sensible when Samba crashes: mail the admin a backtrace panic action = /usr/share/samba/panic-action %d ####### Authentication ####### # Server role. Defines in which mode Samba will operate. Possible # values are "standalone server", "member server", "classic primary # domain controller", "classic backup domain controller", "active # directory domain controller". # # Most people will want "standalone server" or "member server". # Running as "active directory domain controller" will require first # running "samba-tool domain provision" to wipe databases and create a # new domain. server role = standalone server obey pam restrictions = yes # This boolean parameter controls whether Samba attempts to sync the Unix # password with the SMB password when the encrypted SMB password in the # passdb is changed. unix password sync = yes # For Unix password sync to work on a Debian GNU/Linux system, the following # parameters must be set (thanks to Ian Kahan <- 1
- 2
- 3
- 4
- 5
- 6
- 7
- 8
- 9
- 10
- 11
- 12
- 13
- 14
- 15
- 16
- 17
- 18
- 19
- 20
- 21
- 22
- 23
- 24
- 25
- 26
- 27
- 28
- 29
- 30
- 31
- 32
- 33
- 34
- 35
- 36
- 37
- 38
- 39
- 40
- 41
- 42
- 43
- 44
- 45
- 46
- 47
- 48
- 49
- 50
- 51
- 52
- 53
- 54
- 55
- 56
- 57
- 58
- 59
- 60
- 61
- 62
- 63
- 64
- 65
- 66
- 67
- 68
- 69
- 70
- 71
- 72
- 73
- 74
- 75
- 76
- 77
- 78
- 79
- 80
- 81
- 82
- 83
- 84
- 85
- 86
- 87
- 88
- 89
- 90
- 91
- 92
- 93
- 94
- 95
- 96
- 97
- 98
- 99
- 100
- 101
- 102
- 103
- 104
- 105
- 106
- 107
- 108
- 109
- 110
- 111
- 112
- 113
- 114
- 115
- 116
- 117
- 118
- 119
- 120
- 121
- 122
- 123
- 124
- 125
- 126
- 127
- 128
- 129
- 130
- 131
- 132
- 133
- 134
- 135
- 136
- 137
- 138
- 139
- 140
- 141
- 142
- 143
- 144
- 145
- 146
- 147
- 148
- 149
- 150
- 151
- 152
- 153
- 154
- 155
- 156
- 157
- 158
- 159
- 160
- 161
- 162
- 163
- 164
- 165
- 166
- 167
- 168
- 169
- 170
- 171
- 172
- 173
- 174
- 175
- 176
- 177
- 178
- 179
- 180
- 181
- 182
- 183
- 184
- 185
- 186
- 187
- 188
- 189
- 190
- 191
- 192
- 193
- 194
- 195
- 196
- 197
- 198
- 199
- 200
- 201
- 202
- 203
- 204
- 205
- 206
- 207
- 208
- 209
- 210
- 211
- 212
- 213
- 214
- 215
- 216
- 217
- 218
- 219
- 220
- 221
- 222
- 223
- 224
- 225
- 226
- 227
- 228
- 229
- 230
- 231
- 232
- 233
- 234
- 235
- 236
- 237
- 238
- 239
- 240
- 241
- 242
- 243
- 244
- 245
- 246
- 247
- 248
- 249
- 250
- 251
- 252
- 253
- 254
- 255
- 256
- 257
- 258
- 259
- 260
- 261
- 262
- 263
- 264
- 265
- 266
- 267
- 268
- 269
- 270
- 271
- 272
- 273
- 274
- 275
- 276
- 277
deb 包
链接:https://pan.baidu.com/s/10Iy3b4jIJnZM0srPlh2HvA
提取码:pptd使用方法
-
把deb包、bash文件、conf文件一起放到你想要放的路径下,假设这个路径是A
则,修改bash文件里path为A -
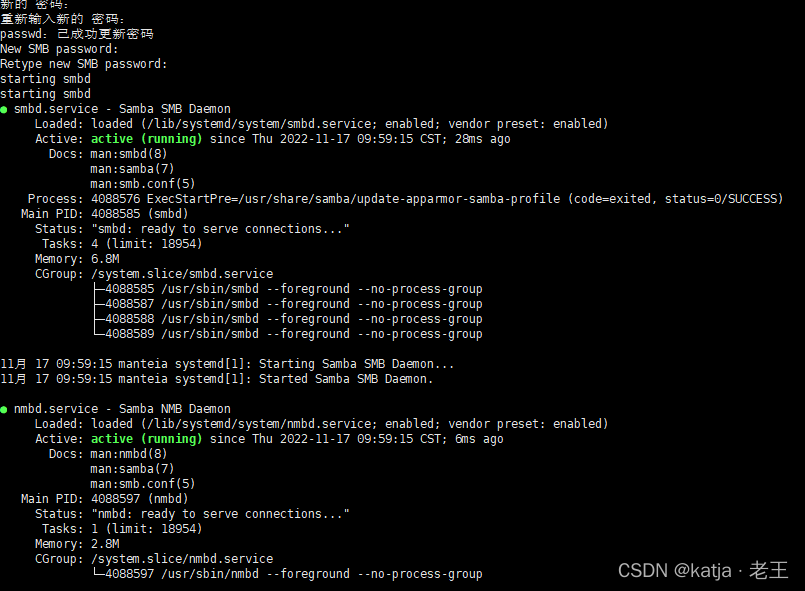
sudo bash ./install_samba.sh运行
中途会停下来4次让你输入账号密码
前2次是让你输入新用户登录Ubuntu的密码
后2次是让你输入这个新用户在Samba服务器里的登录密码 -
最后显示状态,不代表一定创建成功
-
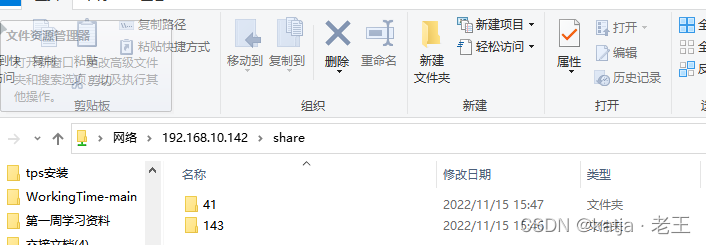
查看当前电脑ip
ip address: 我的是192.168.10.142 -
用其他电脑试试能否访问
- windows——
- linux ubuntu ——
smbclient //192.168.10.142

centos 是mbclient
如果没有就直接安装
如图就是成功了
失败
- NT_STATUS_HOST_UNREACHABLE
- 查看SMB配置文件是否正确
testparam /etc/samba/smb.conf

- 确认防火墙已经通过了samba和端口
(按照我的脚本应该没有问题)
- Failed to start smb.service: Unit smb.service not found
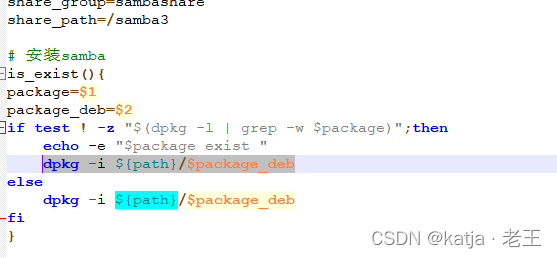
先人工看下安装失败的包是不是系统包,如果不是的话可以不用进行is_exist 判断,直接覆盖安装
覆盖安装的过程中可能会有个别的包提示失败,不用管,只要最后服务启动就行
更新
- 2022-12-16
今天被告知突然不能连接了,我把日志级别调成了5,重启samba后发现了报错
pid_to_procid messaging_dgm_get_unique failed no such file or directory- 1
搜了一下,是因为Ubuntu linux 中的apparmor 安全内核会把不属于home或者usershares的路径链接断开
所以需要加一下白名单cd /etc/apparmor.d/local sudo vim usr.sbin.smbd- 1
- 2
在里面添加两行
"/samba3/" rk, "/samba3/**" lrwk,- 1
- 2
然后重启samba服务,再连就可以了
官方文档链接:https://wiki.archlinux.org/title/Samba#Permission_issues_on_AppArmor- 2022-12-28
今天安装后运行不起来,首先测试配置文件是否正确
cd /etc/samba testparm- 1
- 2
有个警告提示security的位置不在global下,于是给挪上去
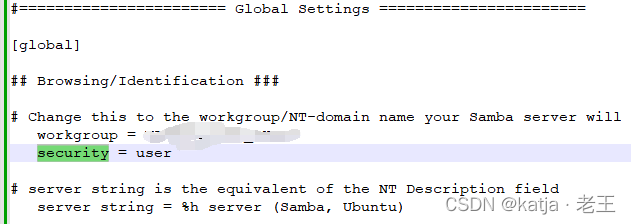
然后再testparm没报错了,但是再启动还是提示Job for smbd.service failed because the control process exited with error code

于是把smb.conf的日志级别调成6
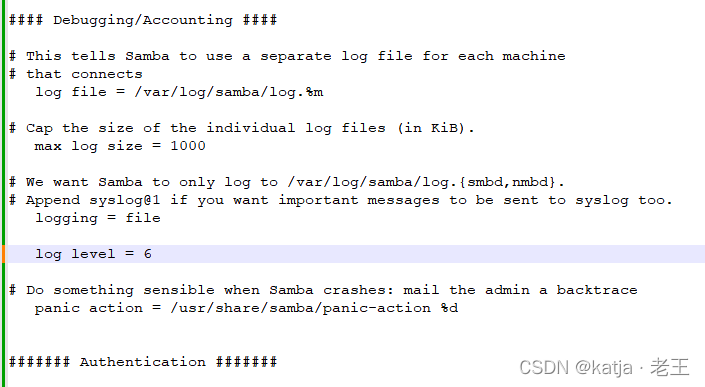
再次启动后,查看日志 :/var/log/samba/log.smbd
这时就会提示 :directory_create_or_exist_strict: invalid ownership on directory /var/lib/samba/private/msg.sock
说该目录的归属用户错误,samba 是以root运行,所属的文件目录理应也是root
但我去这个目录下看了下,果然不是root,所以需要修改sudo chown -R root.root /var/lib/samba/private/msg.sock- 1
还有可能报其他路径归属权的错误,也是一样的操作
除此之外,还可能报权限错误问题 :invalid permissions on directory '/run/samba/msg.lock': has 0777 should be 0755sudo chmod -R 0755 /run/samba/msg.lock- 1
多次反复
开启-看日志-修改后,最终成功启动 -
相关阅读:
Ubuntu安装git方法
C++STL----list的模拟实现
你了解Polysciences PEI 25K转染试剂吗?
每天一个设计模式之解释器模式(Interpreter Pattern)
Zilliz 论文入选数据库顶会 VLDB‘22
隐藏用户的创建和使用
String类的详解
7.代理模式
matlab 13折线法数据量化编码与解码
HR人才测评,采用线上测评做春招秋招
- 原文地址:https://blog.csdn.net/qq_35567179/article/details/127897492
