-
Mybatis+Mybatis-plus+SpringBoot整合(完整版)
文章目录
- 一、Mybatis
- (一)Mybatis简介
- (二)搭建Mybatis
- (三)log4j日志功能
- (四)在Idea中创建模板的方法
- (五)MyBatis获取参数值的两种方式
- (六)MyBatis的各种查询功能
- (七)自定义映射resultMap
- (八)一对多映射处理
- (九)动态SQL
- (十)MyBatis的缓存
- (十)MyBatis的逆向工程
- (十一)分页插件
- (十二)Mybatis的注解式编程
- 二、Mybatis-plus及和SpringBoot的整合
- 三、SpringBoot整合Mybatis
- 四、SpringBoot整合Mybatis-plus
一、Mybatis
(一)Mybatis简介
1、Mybatis历史
1、MyBatis最初是Apache的一个开源项目iBatis, 2010年6月这个项目由Apache Software Foundation迁移到了Google Code。随着开发团队转投Google Code旗下, iBatis3.x正式更名为MyBatis。代码于2013年11月迁移到Github。iBatis一词来源于“internet”和“abatis”的组合,是一个基于Java的持久层框架。 iBatis提供的持久层框架包括SQL Maps和Data Access Objects(DAO)。
2、MyBatis是一个持久层的框架(就是DAO与数据库的交互),MyBatis也叫半自动的ORM框
架,ORM(Object Relational Mapping):数据库的表与java对象domain之间的映射关系2、Mybatis特性
1) MyBatis 是支持定制化 SQL、存储过程以及高级映射的优秀的持久层框架
2) MyBatis 避免了几乎所有的 JDBC 代码和手动设置参数以及获取结果集
3) MyBatis可以使用简单的XML或注解用于配置和原始映射,将接口和Java的POJO(Plain Old Java Objects,普通的Java对象)映射成数据库中的记录
4) MyBatis 是一个 半自动的ORM(Object Relation Mapping)框架3、Mybatis下载
MyBatis下载地址:https://github.com/mybatis/mybatis-3

解压之后的目录:

4、和其它持久化层技术对比
JDBC
1、SQL 夹杂在Java代码中耦合度高,导致硬编码内伤
2、维护不易且实际开发需求中 SQL 有变化,频繁修改的情况多见
3、代码冗长,开发效率低
Hibernate 和 JPA
1、操作简便,开发效率高
2、程序中的长难复杂 SQL 需要绕过框架
3、内部自动生产的 SQL,不容易做特殊优化
4、基于全映射的全自动框架,大量字段的 POJO 进行部分映射时比较困难。
5、反射操作太多,导致数据库性能下降
MyBatis
1、轻量级,性能出色
2、SQL 和 Java 编码分开,功能边界清晰。Java代码专注业务、SQL语句专注数据
3、开发效率稍逊于HIbernate,但是完全能够接受(二)搭建Mybatis
1、MySQL不同版本的注意事项
1、驱动类driver-class-name
MySQL 5版本使用jdbc5驱动,驱动类使用:com.mysql.jdbc.Driver
MySQL 8版本使用jdbc8驱动,驱动类使用:com.mysql.cj.jdbc.Driver
2、连接地址url
MySQL 5版本的url:jdbc:mysql://localhost:3306/ssm
MySQL 8版本的url:jdbc:mysql://localhost:3306/ssm?serverTimezone=UTC注意:
如果MySQL 8版本的url不加时区(serverTimezone=UTC),则运行报如下错误:
java.sql.SQLException: The server time zone value ‘Öйú±ê׼ʱ¼ä’ is unrecognized or
represents more2、创建Maven工程
1、引入依赖
<dependencies> <dependency> <groupId>org.mybatisgroupId> <artifactId>mybatisartifactId> <version>3.5.7version> dependency> <dependency> <groupId>junitgroupId> <artifactId>junitartifactId> <version>4.12version> <scope>testscope> dependency> <dependency> <groupId>mysqlgroupId> <artifactId>mysql-connector-javaartifactId> <version>8.0.16version> dependency> dependencies>- 1
- 2
- 3
- 4
- 5
- 6
- 7
- 8
- 9
- 10
- 11
- 12
- 13
- 14
- 15
- 16
- 17
- 18
- 19
- 20
- 21
- 22
- 23
3、创建MyBatis的核心配置文件
习惯上命名为mybatis-config.xml,这个文件名仅仅只是建议,并非强制要求。将来整合Spring
之后,这个配置文件可以省略,所以大家操作时可以直接复制、粘贴。3.1、核心配置文件的作用
核心配置文件主要用于配置连接数据库的环境以及MyBatis的全局配置信息
3.3、核心配置文件存放的位置
核心配置文件存放的位置是src/main/resources目录下
3.4、核心配置文件中的标签必须按照固定的顺序:
properties?,settings?,typeAliases?,typeHandlers?,objectFactory?,objectWrapperFactory?,refl
ectorFactory?,plugins?,environments?,databaseIdProvider?,mappers?3.5、核心配置文件详解
核心配置文件的跟标记是configuration,其中子标记有:
DOCTYPE configuration PUBLIC "-//mybatis.org//DTD Config 3.0//EN" "http://mybatis.org/dtd/mybatis-3-config.dtd"> <configuration> <properties resource="jdbc.properties"/> <settings> <setting name="mapUnderscoreToCamelCase" value="true"/> <setting name="lazyLoadingEnabled " value="true"/> <setting name="aggressiveLazyLoading " value="true"/> settings> <typeAliases> <package name="com.cy.pojo"/> typeAliases> <environments default="development"> <environment id="development"> <transactionManager type="JDBC"/> <dataSource type="POOLED"> <property name="driver" value="${jdbc.driver}"/> <property name="url" value="${jdbc.url}"/> <property name="username" value="${jdbc.username}"/> <property name="password" value="${jdbc.password}"/> dataSource> environment> <environment id="test"> <transactionManager type="JDBC"/> <dataSource type="POOLED"> <property name="driver" value="com.mysql.cj.jdbc.Driver"/> <property name="url" value="jdbc:mysql://localhost:3306/ssm?serverTimezone=UTC"/> <property name="username" value="root"/> <property name="password" value="123456"/> dataSource> environment> environments> <mappers> <package name="com.cy.mapper"/> <mapper class="读取一个类,为了找到方法上面的注解--SQL ">mapper> <mapper url="读取一个外部的网络文件">mapper> mappers> configuration>- 1
- 2
- 3
- 4
- 5
- 6
- 7
- 8
- 9
- 10
- 11
- 12
- 13
- 14
- 15
- 16
- 17
- 18
- 19
- 20
- 21
- 22
- 23
- 24
- 25
- 26
- 27
- 28
- 29
- 30
- 31
- 32
- 33
- 34
- 35
- 36
- 37
- 38
- 39
- 40
- 41
- 42
- 43
- 44
- 45
- 46
- 47
- 48
- 49
- 50
- 51
- 52
- 53
- 54
- 55
- 56
- 57
- 58
- 59
- 60
- 61
- 62
- 63
- 64
- 65
- 66
- 67
- 68
- 69
- 70
- 71
- 72
- 73
- 74
- 75
- 76
- 77
- 78
- 79
- 80
- 81
- 82
- 83
- 84
- 85
- 86
- 87
- 88
- 89
- 90
- 91
- 92
- 93
- 94
- 95
- 96
- 97
- 98
- 99
- 100
- 101
- 102
- 103
- 104
4、创建mapper接口
MyBatis中的mapper接口相当于以前的dao。但是区别在于,mapper仅仅是接口,我们不需要
提供实现类。package com.cy.mapper; public interface UserMapper { /** * 添加用户信息 */ int insertUser(); }- 1
- 2
- 3
- 4
- 5
- 6
- 7
- 8
- 9
5、创建MyBatis的映射文件
5.1、相关概念:
1、ORM(Object Relationship Mapping)对象关系映射。
对象:Java的实体类对象
关系:关系型数据库
映射:二者之间的对应关系Java概念 数据库概念 类 表 属性 字段/列 对象 记录/行 2、映射文件的命名规则:
1、表所对应的实体类的类名+Mapper.xml
例如:表t_user,映射的实体类为User,所对应的映射文件为UserMapper.xml
因此一个映射文件对应一个实体类,对应一张表的操作3、MyBatis映射文件的作用和目的:
作用是存储某个dao类中执行时需要的所有SQL语句
目的是访问以及操作表中的数据4、MyBatis映射文件存放的位置:
在src/main/resources/mappers目录下
5、MyBatis映射文件中标记的说明
跟标记为mapper,mapper标记中有一个属性namespace,值为:mapper接口的全名
mapper中有很多子标签<insert id=””> insert> <delete id=””> delete>- 1
- 2
- 3
6、MyBatis中可以面向接口操作数据,要保证两个一致:
1、mapper接口的全类名和映射文件的命名空间(namespace)保持一致
2、mapper接口中方法的方法名和映射文件中编写SQL的标签的id属性保持一致7、Mybatis映射文件如下
DOCTYPE mapper PUBLIC "-//mybatis.org//DTD Mapper 3.0//EN" "http://mybatis.org/dtd/mybatis-3-mapper.dtd"> <mapper namespace="com.cy.mapper.UserMapper"> <insert id="insertUser"> insert into t_user values (null, 'admin', '123456', 23, '男', '12345@qq.com') insert> <update id="updateUser"> update t_user set username='root', password='123' where id = 3 update> <delete id="deleteUser"> delete from t_user where id = 3 delete> <select id="getUserById" resultType="com.atguigu.mybatis.pojo.User"> select * from t_user where id = 1 select> <select id="getAllUser" resultType="User"> select * from t_user select> mapper>- 1
- 2
- 3
- 4
- 5
- 6
- 7
- 8
- 9
- 10
- 11
- 12
- 13
- 14
- 15
- 16
- 17
- 18
- 19
- 20
- 21
- 22
- 23
- 24
- 25
- 26
- 27
- 28
- 29
- 30
- 31
- 32
- 33
- 34
- 35
- 36
- 37
- 38
- 39
- 40
- 41
- 42
- 43
- 44
- 45
- 46
- 47
- 48
- 49
- 50
- 51
- 52
6、通过junit测试功能(mapper接口是如何去对应mybatis映射文件及如何去执行对应的sql语句的流程)
package com.cy.test; import com.cy.mapper.UserMapper; import org.apache.ibatis.io.Resources; import org.apache.ibatis.session.SqlSession; import org.apache.ibatis.session.SqlSessionFactory; import org.apache.ibatis.session.SqlSessionFactoryBuilder; import org.junit.Test; import java.io.IOException; import java.io.InputStream; public class MybatisTest { @Test public void testInsert() throws IOException { //1、创建SqlSessionFactoryBuilder对象(创建工人对象) SqlSessionFactoryBuilder sqlSessionFactoryBuilder = new SqlSessionFactoryBuilder(); //2、读取MyBatis的核心配置文件(获取图纸) InputStream is = Resources.getResourceAsStream("mybatis-config.xml"); //3、通过核心配置文件所对应的字节输入流创建工厂类SqlSessionFactory,生产SqlSession对象(创建工厂对象) SqlSessionFactory sqlSessionFactory = sqlSessionFactoryBuilder.build(is); //4、获取工厂提供的sqlSession对象,slqSession是Mybaits提供的操作数据库的对象 //SqlSession sqlSession = sqlSessionFactory.openSession(); //创建SqlSession对象,此时通过SqlSession对象所操作的sql都必须手动提交或回滚事务 SqlSession sqlSession = sqlSessionFactory.openSession(true); //创建SqlSession对象,此时通过SqlSession对象所操作的sql都会自动提交,true表示自动提交 //5、通过代理模式创建 UserMapper接口的代理实现类对象,之所以用代理模式创建是因为接口无法直接创建对象 UserMapper userMapper = sqlSession.getMapper(UserMapper.class); //6、调用UserMapper接口中的方法,就可以根据UserMapper的全类名匹配元素文件,通过调用的方法名匹配映射文件中的SQL标签,并执行标签中的SQL语句 int result = userMapper.insertUser(); //7、如果没有设置自动提交事务则要用sqlSession.commit();手动提交事务 //sqlSession.commit(); System.out.println("结果:"+result); //8、关闭会话 sqlSession.close(); } }- 1
- 2
- 3
- 4
- 5
- 6
- 7
- 8
- 9
- 10
- 11
- 12
- 13
- 14
- 15
- 16
- 17
- 18
- 19
- 20
- 21
- 22
- 23
- 24
- 25
- 26
- 27
- 28
- 29
- 30
- 31
- 32
- 33
- 34
- 35
- 36
- 37
注意:
5、6步可以用sqlSession提供的方法直接调用(最原始方法):
sqlSession对象中的两方法: selectOne selectList insert update delete等,参数为mapper的id
方法有返回值:
selectOne:一个对象 一个map 基本类型 一个数组
selectList:一个List List里面的泛型有:对象 map 变量 数组
泛型的类型是在mapper文件中用resultType属性规定的,
resultType=“单行记录的存储类型”
注意:
查询的标签select必须设置属性resultType或resultMap,用于设置实体类和数据库表的映射
关系
resultType: 设置结果类型,即查询的数据要转换为的java类型(实体类的类型)返回值的类型
resultMap: 自定义映射,处理多对一或一对多的映射关系(实体中有别的对象作为属性)SqlSession:
代表Java程序和数据库之间的会话。(HttpSession是Java程序和浏览器之间的
会话)
SqlSessionFactory:
是“生产”SqlSession的“工厂”。
工厂模式:
如果创建某一个对象,使用的过程基本固定,那么我们就可以把创建这个对象的相关代码封装到一个“工厂类”中,以后都使用这个工厂类来“生产”我们需要的对象。(三)log4j日志功能
1、log4j的依赖
<dependency> <groupId>log4jgroupId> <artifactId>log4jartifactId> <version>1.2.17version> dependency>- 1
- 2
- 3
- 4
- 5
- 6
2、log4j的配置文件
log4j的配置文件名为log4j.xml,存放的位置是src/main/resources目录下
DOCTYPE log4j:configuration SYSTEM "log4j.dtd"> <log4j:configuration xmlns:log4j="http://jakarta.apache.org/log4j/"> <appender name="STDOUT" class="org.apache.log4j.ConsoleAppender"> <param name="Encoding" value="UTF-8"/> <layout class="org.apache.log4j.PatternLayout"> <param name="ConversionPattern" value="%-5p %d{MM-dd HH:mm:ss,SSS} %m (%F:%L) \n"/> layout> appender> <logger name="java.sql"> <level value="debug"/> logger> <logger name="org.apache.ibatis"> <level value="info"/> logger> <root> <level value="debug"/> <appender-ref ref="STDOUT"/> root> log4j:configuration>- 1
- 2
- 3
- 4
- 5
- 6
- 7
- 8
- 9
- 10
- 11
- 12
- 13
- 14
- 15
- 16
- 17
- 18
- 19
- 20
- 21
- 22
3、日志的级别
FATAL(致命)>ERROR(错误)>WARN(警告)>INFO(信息)>DEBUG(调试)
从左到右打印的内容越来越详细(四)在Idea中创建模板的方法
1、方法
File----------Settings-------------Editor------------------File and Code Templates

2、模板
Mybatis核心配置文件
DOCTYPE configuration PUBLIC "-//mybatis.org//DTD Config 3.0//EN" "http://mybatis.org/dtd/mybatis-3-config.dtd"> <configuration> <properties resource="jdbc.properties"/> <typeAliases> <package name="com.cy.pojo"/> typeAliases> <environments default="development"> <environment id="development"> <transactionManager type="JDBC"/> <dataSource type="POOLED"> <property name="driver" value="${jdbc.driver}"/> <property name="url" value="${jdbc.url}"/> <property name="username" value="${jdbc.username}"/> <property name="password" value="${jdbc.password}"/> dataSource> environment> <environment id="test"> <transactionManager type="JDBC"/> <dataSource type="POOLED"> <property name="driver" value="com.mysql.cj.jdbc.Driver"/> <property name="url" value="jdbc:mysql://localhost:3306/ssm?serverTimezone=UTC"/> <property name="username" value="root"/> <property name="password" value="123456"/> dataSource> environment> environments> <mappers> <package name="com.cy.mapper"/> mappers> configuration>- 1
- 2
- 3
- 4
- 5
- 6
- 7
- 8
- 9
- 10
- 11
- 12
- 13
- 14
- 15
- 16
- 17
- 18
- 19
- 20
- 21
- 22
- 23
- 24
- 25
- 26
- 27
- 28
- 29
- 30
- 31
- 32
- 33
- 34
- 35
- 36
- 37
- 38
- 39
- 40
- 41
- 42
- 43
- 44
- 45
- 46
- 47
- 48
- 49
- 50
- 51
- 52
- 53
- 54
- 55
- 56
- 57
- 58
- 59
- 60
- 61
- 62
- 63
- 64
- 65
- 66
- 67
- 68
- 69
- 70
- 71
- 72
- 73
- 74
- 75
- 76
- 77
- 78
- 79
- 80
- 81
- 82
- 83
- 84
- 85
- 86
- 87
- 88
- 89
- 90
- 91
- 92
- 93
映射文件
DOCTYPE mapper PUBLIC "-//mybatis.org//DTD Mapper 3.0//EN" "http://mybatis.org/dtd/mybatis-3-mapper.dtd"> <mapper namespace="com.cy.mapper.UserMapper"> <insert id="insertUser"> insert into t_user values (null, 'admin', '123456', 23, '男', '12345@qq.com') insert> <update id="updateUser"> update t_user set username='root', password='123' where id = 3 update> <delete id="deleteUser"> delete from t_user where id = 3 delete> <select id="getUserById" resultType="com.cy.pojo.User"> select * from t_user where id = 1 select> <select id="getAllUser" resultType="com.cy.pojo.User"> select * from t_user select> mapper>- 1
- 2
- 3
- 4
- 5
- 6
- 7
- 8
- 9
- 10
- 11
- 12
- 13
- 14
- 15
- 16
- 17
- 18
- 19
- 20
- 21
- 22
- 23
- 24
- 25
- 26
- 27
- 28
- 29
- 30
- 31
- 32
- 33
- 34
- 35
- 36
- 37
- 38
- 39
- 40
- 41
- 42
- 43
- 44
- 45
- 46
- 47
- 48
- 49
- 50
- 51
- 52
日志文件
DOCTYPE log4j:configuration SYSTEM "log4j.dtd"> <log4j:configuration xmlns:log4j="http://jakarta.apache.org/log4j/"> <appender name="STDOUT" class="org.apache.log4j.ConsoleAppender"> <param name="Encoding" value="UTF-8"/> <layout class="org.apache.log4j.PatternLayout"> <param name="ConversionPattern" value="%-5p %d{MM-dd HH:mm:ss,SSS} %m (%F:%L) \n"/> layout> appender> <logger name="java.sql"> <level value="debug"/> logger> <logger name="org.apache.ibatis"> <level value="info"/> logger> <root> <level value="debug"/> <appender-ref ref="STDOUT"/> root> log4j:configuration>- 1
- 2
- 3
- 4
- 5
- 6
- 7
- 8
- 9
- 10
- 11
- 12
- 13
- 14
- 15
- 16
- 17
- 18
- 19
- 20
- 21
- 22
(五)MyBatis获取参数值的两种方式
1、概念
1、MyBatis获取参数值的两种方式:${}和#{}
2、区别
${}的本质就是字符串拼接(就是一个普通的字串,通常参数为:表名,列名 关键字等时用)
#{}的本质就是占位符赋值(表示类型或值,通常用来做条件 )3、${}使用字符串拼接的方式拼接sql,若为字符串类型或日期类型的字段进行赋值时,需要手动加单引号;但是#{}使用占位符赋值的方式拼接sql,此时为字符串类型或日期类型的字段进行赋值时,可以自动添加单引号
2、单个字面量类型的参数
若mapper接口中的方法参数为单个的字面量类型(如int a=1; 则1是字面量,a为变量)
此时可以使用:
${}和#{}
以任意的名称获取参数的值,注意${}需要手动加单引号
例如:
DOCTYPE mapper PUBLIC "-//mybatis.org//DTD Mapper 3.0//EN" "http://mybatis.org/dtd/mybatis-3-mapper.dtd"> <mapper namespace="com.cy.mapper.UserMapper"> <select id="getUserByUsername" resultType="user"> /*用${},需要加单引号 */ select *from t_user where username = '${username}' /*用#{}*/ select * from t_user where username = #{username} select> mapper>- 1
- 2
- 3
- 4
- 5
- 6
- 7
- 8
- 9
- 10
- 11
- 12
- 13
- 14
- 15
- 16
- 17
- 18
- 19
- 20
- 21
- 22
- 23
- 24
3、多个字面量类型的参数
若mapper接口中的方法参数为多个时
此时MyBatis会自动将这些参数放在一个map集合中,
{}中以arg0,arg1…为键,以参数为值或以param1,param2…为键,以参数为值;因此只需要通过${}和#{}
访问map集合的键就可以获取相对应的值,注意${}需要手动加单引号
例如:DOCTYPE mapper PUBLIC "-//mybatis.org//DTD Mapper 3.0//EN" "http://mybatis.org/dtd/mybatis-3-mapper.dtd"> <mapper namespace="com.cy.mapper.UserMapper"> <select id="checkLogin" resultType="user"> /*用#{}*/ select * from t_user where username = #{arg0} and password=#{arg1} select * from t_user where username = #{param1} and password=#{param2} /*用${},需要加单引号 */ select * from t_user where username = '${arg0}' and password='${arg1}' select * from t_user where username = '${param1}' and password='${param2}' select> mapper>- 1
- 2
- 3
- 4
- 5
- 6
- 7
- 8
- 9
- 10
- 11
- 12
- 13
- 14
- 15
- 16
- 17
- 18
- 19
- 20
- 21
- 22
- 23
- 24
- 25
4、map集合类型的参数
若mapper接口中的方法需要的参数为多个时,此时可以手动创建map集合,将这些数据放在
map中
只需要通过${}和#{}
访问map集合的键就可以获取相对应的值,注意${}需要手动加单引号
<select id="checkLoginMap" resultType="user"> select * from t_user where username = #{username} and password=#{password} select>- 1
- 2
- 3
- 4
- 5
- 6
- 7
- 8
- 9
5、实体类类型的参数
若mapper接口中的方法参数为实体类对象时
此时可以使用${}和#{}
通过访问实体类对象中的属性名获取属性值,注意${}需要手动加单引号
<insert id="insertUser"> insert into t_user values (null,#{username},#{password},#{age},#{gender},#{email}) insert>- 1
- 2
- 3
- 4
- 5
- 6
- 7
- 8
- 9
6、使用@Param标识参数
可以通过@Param注解标识mapper接口中的方法参数
此时,会自动将这些参数放在map集合中,以**@Param注解的value属性值**为键,以参数为值;以param1,param2…为键,以参数为值;只需要通过${}和#{}
访问map集合的键就可以获取相对应的值,
注意${}需要手动加单引号<select id="checkLoginByParam" resultType="user"> select * from t_user where username = #{username} and password=#{password} select>- 1
- 2
- 3
- 4
- 5
- 6
- 7
- 8
7、总结
- MyBatis获取参数值的两种方式:#{}和KaTeX parse error: Expected 'EOF', got '#' at position 9: {} * #̲{}的本质是占位符赋值,{}的本质是字符串拼接
* 1、若mapper接口方法的参数为单个的字面量类型
* 此时可以通过#{}和 以 任 意 的 内 容 获 取 参 数 值 , 一 定 要 注 意 {}以任意的内容获取参数值,一定要注意 以任意的内容获取参数值,一定要注意{}的单引号问题
* 2、若mapper接口方法的参数为多个的字面量类型
* 此时MyBatis会将参数放在map集合中,以两种方式存储数据
* a>以arg0,arg1…为键,以参数为值
* b>以param1,param2…为键,以参数为值
* 因此,只需要通过#{}和 访 问 m a p 集 合 的 键 , 就 可 以 获 取 相 对 应 的 值 , 一 定 要 注 意 {}访问map集合的键,就可以获取相对应的值,一定要注意 访问map集合的键,就可以获取相对应的值,一定要注意{}的单引号问题
* 3、若mapper接口方法的参数为map集合类型的参数
* 只需要通过#{}和 访 问 m a p 集 合 的 键 , 就 可 以 获 取 相 对 应 的 值 , 一 定 要 注 意 {}访问map集合的键,就可以获取相对应的值,一定要注意 访问map集合的键,就可以获取相对应的值,一定要注意{}的单引号问题
* 4、若mapper接口方法的参数为实体类类型的参数
* 只需要通过#{}和 访 问 实 体 类 中 的 属 性 名 , 就 可 以 获 取 相 对 应 的 属 性 值 , 一 定 要 注 意 {}访问实体类中的属性名,就可以获取相对应的属性值,一定要注意 访问实体类中的属性名,就可以获取相对应的属性值,一定要注意{}的单引号问题
* 5、可以在mapper接口方法的参数上设置@Param注解
* 此时MyBatis会将这些参数放在map中,以两种方式进行存储
* a>以@Param注解的value属性值为键,以参数为值
* b>以param1,param2…为键,以参数为值
* 只需要通过#{}和 访 问 m a p 集 合 的 键 , 就 可 以 获 取 相 对 应 的 值 , 一 定 要 注 意 {}访问map集合的键,就可以获取相对应的值,一定要注意 访问map集合的键,就可以获取相对应的值,一定要注意{}的单引号问题
(六)MyBatis的各种查询功能
1、查询多条数据为map集合
①方式一
/** * 查询所有用户信息为map集合 * @return * 将表中的数据以map集合的方式查询,一条数据对应一个map;若有多条数据,就会产生多个map集合,此 时可以将这些map放在一个list集合中获取 */ List<Map<String, Object>> getAllUserToMap();- 1
- 2
- 3
- 4
- 5
- 6
- 7
<select id="getAllUserToMap" resultType="map"> select * from t_user select>- 1
- 2
- 3
- 4
②方式二
/** * 查询所有用户信息为map集合 * @return * 将表中的数据以map集合的方式查询,一条数据对应一个map;若有多条数据,就会产生多个map集合,并 且最终要以一个map的方式返回数据,此时需要通过@MapKey注解设置map集合的键,值是每条数据所对应的 map集合 */ @MapKey("id") Map<String, Object> getAllUserToMap();- 1
- 2
- 3
- 4
- 5
- 6
- 7
- 8
- 9
<select id="getAllUserToMap" resultType="map"> select * from t_user select>- 1
- 2
- 3
- 4
- 5
- 6
- 7
- 8
- 9
- 10
- 11
2、模糊查询的三种方案
DOCTYPE mapper PUBLIC "-//mybatis.org//DTD Mapper 3.0//EN" "http://mybatis.org/dtd/mybatis-3-mapper.dtd"> <mapper namespace="com.cy.mapper.SpecialSQLMapper"> <select id="getUserBylike" resultType="User"> select * from t_user where username like '%${mohu}%' select * from t_user where username like "%"#{mohu}"%" select * from t_user where username like concat('%',#{mohu},'%')/*利用java中字符串拼接的函数concat来拼接*/ select> mapper>- 1
- 2
- 3
- 4
- 5
- 6
- 7
- 8
- 9
- 10
- 11
- 12
- 13
- 14
- 15
- 16
- 17
- 18
- 19
- 20
3、批量删除
<delete id="deleteMore"> delete from t_user where id in(${ids}) /*因为#{}会自动拼接单引号*/ delete>- 1
- 2
- 3
- 4
- 5
- 6
- 7
- 8
- 9
4、动态设置表名
<select id="getUserList" resultType="User"> select * from ${tableName}/*因为#{}会自动拼接单引号*/ select>- 1
- 2
- 3
- 4
- 5
- 6
- 7
- 8
- 9
- 10
5、添加功能获取自增的主键
- useGeneratedKeys:设置使用自增的主键
- keyProperty:因为增删改有统一的返回值是受影响的行数,因此只能将获取的自增的主键放在传输的参数user对象的某个属性中
<insert id="insertUser" useGeneratedKeys="true" keyProperty="id"> insert into t_user values(null,#{username},#{password},#{age},#{gender},#{email}) insert>- 1
- 2
- 3
- 4
- 5
- 6
- 7
- 8
- 9
- 10
- 11
- 12
- 13
(七)自定义映射resultMap
1、resultMap中标签及属性的用法
resultMap:设置自定义映射
- 属性:
id:表示自定义映射的唯一标识
type:查询的数据要映射的实体类的类型
子标签:
- id:设置主键和实体类中属性的映射关系
result:设置普通字段和实体类中属性的映射关系
association:设置多对一的映射关系(属性中存在另一个类的对象)
collection:设置一对多的映射关系(属性中存在另一个类对象的集合) - 属性:
javaType:设置association标签要处理属性对象的类型
ofType:设置collection标签所处理的集合属性中存储数据的类型
fetchType=“eager”|”lazy“ :设置分步查询为立即加载或延迟加载
select:设置分布查询sql的唯一标识
property:设置映射关系中实体类中的属性名,必须是要处理的实体类中的属性名
column:设置映射关系中表中的字段名,必须是sql查询出的某个字段名
2、处理字段名和属性名不一致的三种方法
若字段名和实体类中的属性名不一致,但是字段名符合数据库的规则(使用_),实体类中的属性
名符合Java的规则(使用驼峰)
如:实体类和数据库如下package com.cy.pojo; import lombok.Data; @Data public class Emp { private Integer empId; private String empName; private Integer age; private String gender; } /*数据库 emp_id int emp_name varchar emp_age int gender varchar dept_id int */- 1
- 2
- 3
- 4
- 5
- 6
- 7
- 8
- 9
- 10
- 11
- 12
- 13
- 14
- 15
- 16
- 17
- 18
此时也可通过以下两种方式处理字段名和实体类中的属性的映射关系
方法一:可以通过为字段起别名的方式,保证和实体类中的属性名保持一致
DOCTYPE mapper PUBLIC "-//mybatis.org//DTD Mapper 3.0//EN" "http://mybatis.org/dtd/mybatis-3-mapper.dtd"> <mapper namespace="com.cy.mapper.EmpMapper"> <select id="getEmpByEmpid" resultType="Emp"> select emp_id empId,emp_name empName,age,gender from t_emp where emp_id=#{empId} select> mapper>- 1
- 2
- 3
- 4
- 5
- 6
- 7
- 8
- 9
- 10
- 11
- 12
- 13
- 14
- 15
- 16
方法二:可以在MyBatis的核心配置文件中设置一个全局配置信息
在核心配置文件中mapUnderscoreToCamelCase,可以在查询表中数据时,自动将_类型的字段名转换为驼峰
Mybatis核心配置文件如下:<settings> <setting name="mapUnderscoreToCamelCase" value="true"/> settings>- 1
- 2
- 3
- 4
Mybatis映射文件如下:
DOCTYPE mapper PUBLIC "-//mybatis.org//DTD Mapper 3.0//EN" "http://mybatis.org/dtd/mybatis-3-mapper.dtd"> <mapper namespace="com.cy.mapper.EmpMapper"> <select id="getEmpByEmpid" resultType="Emp"> /*方法二:可以在MyBatis的核心配置文件中设置一个全局配置信息mapUnderscoreToCamelCase, 可以在查询表中数据时,自动将_类型的字段名转换为驼峰 */ select * from t_emp where emp_id=#{empId} select> mapper>- 1
- 2
- 3
- 4
- 5
- 6
- 7
- 8
- 9
- 10
- 11
- 12
- 13
- 14
- 15
- 16
- 17
- 18
- 19
- 20
- 21
例如:字段名user_name,设置了mapUnderscoreToCamelCase,此时字段名就会转换为
userName方法三:使用resultMap自定义映射处理
DOCTYPE mapper PUBLIC "-//mybatis.org//DTD Mapper 3.0//EN" "http://mybatis.org/dtd/mybatis-3-mapper.dtd"> <mapper namespace="com.cy.mapper.EmpMapper"> <resultMap id="empResultMap" type="Emp"> <id column="emp_id" property="empId"/> <result column="emp_name" property="empName"/> <result column="age" property="age"/> <result column="gender" property="gender"/> resultMap> <select id="getEmpByEmpid" resultMap="empResultMap"> select * from t_emp where emp_id=#{empId} select> mapper>- 1
- 2
- 3
- 4
- 5
- 6
- 7
- 8
- 9
- 10
- 11
- 12
- 13
- 14
- 15
- 16
- 17
- 18
- 19
- 20
- 21
- 22
- 23
- 24
- 25
3、一对一或多对一映射处理(属性中存在另一个类的对象)
注意:一对一和多对一处理方式一样
场景模拟:
查询员工信息以及员工所对应的部门信息方法一:级联方式处理一对一或多对一映射关系
映射文件
DOCTYPE mapper PUBLIC "-//mybatis.org//DTD Mapper 3.0//EN" "http://mybatis.org/dtd/mybatis-3-mapper.dtd"> <mapper namespace="com.cy.mapper.EmpMapper"> <resultMap id="empAndDeptResultMap" type="Emp"> <id column="emp_id" property="empId"/> <result column="emp_name" property="empName"/> <result column="age" property="age"/> <result column="gender" property="empName"/> <result column="dept_id" property="dept.deptId"/> <result column="dept_Name" property="dept.deptName"/> resultMap> <select id="getEmpAndDeptByEmpId" resultMap="empAndDeptResultMap"> select emp.*, dept.* from t_emp emp left join t_dept dept on emp.dept_id = dept.dept_id where emp.emp_id = #{empId}; select> mapper>- 1
- 2
- 3
- 4
- 5
- 6
- 7
- 8
- 9
- 10
- 11
- 12
- 13
- 14
- 15
- 16
- 17
- 18
- 19
- 20
- 21
- 22
- 23
- 24
- 25
- 26
实体类:
员工实体类 package com.cy.pojo; import lombok.Data; @Data public class Emp { private Integer empId; private String empName; private Integer age; private String gender; private Dept dept; } /*数据库 emp_id int emp_name varchar emp_age int gender varchar dept_id int */ 部门实体类 package com.cy.pojo; import lombok.Data; @Data public class Dept { private Integer deptId; private String deptName; }- 1
- 2
- 3
- 4
- 5
- 6
- 7
- 8
- 9
- 10
- 11
- 12
- 13
- 14
- 15
- 16
- 17
- 18
- 19
- 20
- 21
- 22
- 23
- 24
- 25
- 26
- 27
- 28
- 29
- 30
- 31
- 32
- 33
方法二:使用association处理一对一或多对一映射关系
DOCTYPE mapper PUBLIC "-//mybatis.org//DTD Mapper 3.0//EN" "http://mybatis.org/dtd/mybatis-3-mapper.dtd"> <mapper namespace="com.cy.mapper.EmpMapper"> <!-- <association property="dept" javaType="Dept"> <id column="dept_id" property="deptId"/> <result column="dept_name" property="deptName"/> association> resultMap> <select id="getEmpAndDeptByEmpId" resultMap="empAndDeptResultMap"> select emp.*, dept.* from t_emp emp left join t_dept dept on emp.dept_id = dept.dept_id where emp.emp_id = #{empId}; select> mapper>- 1
- 2
- 3
- 4
- 5
- 6
- 7
- 8
- 9
- 10
- 11
- 12
- 13
- 14
- 15
- 16
- 17
- 18
- 19
- 20
- 21
- 22
- 23
- 24
- 25
- 26
- 27
- 28
- 29
- 30
- 31
- 32
- 33
- 34
- 35
- 36
- 37
- 38
- 39
- 40
- 41
- 42
- 43
- 44
- 45
方法三:分步查询处理一对一或多对一映射关系
DOCTYPE mapper PUBLIC "-//mybatis.org//DTD Mapper 3.0//EN" "http://mybatis.org/dtd/mybatis-3-mapper.dtd"> <mapper namespace="com.cy.mapper.EmpMapper"> <resultMap id="empAndDeptStep" type="Emp"> <id column="emp_id" property="empId"/> <result column="emp_name" property="empName"/> <result column="age" property="age"/> <result column="gender" property="empName"/> <association property="dept" select="com.cy.mapper.DeptMapper.getEmpAndDeptTwo" column="dept_id"> association> resultMap> <select id="getEmpAndDeptOne" resultMap="empAndDeptStep"> select * from t_emp where emp_id=#{empId} select> mapper>- 1
- 2
- 3
- 4
- 5
- 6
- 7
- 8
- 9
- 10
- 11
- 12
- 13
- 14
- 15
- 16
- 17
- 18
- 19
- 20
- 21
- 22
- 23
- 24
- 25
- 26
- 27
- 28
- 29
- 30
- 31
- 32
- 33
- 34
- 35
- 36
- 37
deptMapper中有getEmpAndDeptTwo方法的映射文件
DOCTYPE mapper PUBLIC "-//mybatis.org//DTD Mapper 3.0//EN" "http://mybatis.org/dtd/mybatis-3-mapper.dtd"> <mapper namespace="com.cy.mapper.DeptMapper"> <select id="getEmpAndDeptTwo" resultType="Dapt"> select * from t_dept where dept_id=#{deptId} select> mapper>- 1
- 2
- 3
- 4
- 5
- 6
- 7
- 8
- 9
- 10
- 11
- 12
- 13
- 14
- 15
- 16
4、分布查询的优点:
分步查询的优点:可以实现延迟加载
但是必须在核心配置文件中设置全局配置信息:
lazyLoadingEnabled:延迟加载的全局开关。当开启时,所有关联对象都会延迟加载
aggressiveLazyLoading:当开启时,任何方法的调用都会加载该对象的所有属性。否则,每个属
性会按需加载
此时就可以实现按需加载,获取的数据是什么,就只会执行相应的sql。此时可通过association和
collection中的fetchType属性设置当前的分步查询是否使用延迟加载, fetchType=“lazy(延迟加
载)|eager(立即加载)”但是这是全局配置,如果某个查询需要实现完整的加载,则在实现分步查询的地方加上fetchType=“eager”
如:DOCTYPE mapper PUBLIC "-//mybatis.org//DTD Mapper 3.0//EN" "http://mybatis.org/dtd/mybatis-3-mapper.dtd"> <mapper namespace="com.cy.mapper.EmpMapper"> <resultMap id="empAndDeptStep" type="Emp"> <id column="emp_id" property="empId"/> <result column="emp_name" property="empName"/> <result column="age" property="age"/> <result column="gender" property="empName"/> <association property="dept" fetchType="eager" select="com.cy.mapper.DeptMapper.getEmpAndDeptTwo" column="dept_id"> association> resultMap> <select id="getEmpAndDeptOne" resultMap="empAndDeptStep"> select * from t_emp where emp_id=#{empId} select> mapper>- 1
- 2
- 3
- 4
- 5
- 6
- 7
- 8
- 9
- 10
- 11
- 12
- 13
- 14
- 15
- 16
- 17
- 18
- 19
- 20
- 21
- 22
- 23
- 24
- 25
- 26
- 27
- 28
- 29
- 30
- 31
- 32
- 33
- 34
- 35
- 36
5 、使用延迟加载的原因及配置
因为采用的是两次查询的配置方案,但查询的时候可能出现N+1的问题(N个人
都要执行一次查询身份证的sql语句),会降低查询效率,所以如果查询的数据只有主表的的数据,从表的暂时没用的,就可以在Mybatis核心配置文件中添加一个延迟加载机制,用来提升性能!配置如下:
<settings> 目的是为了开启延迟加载的机制,让关联的对象可以延迟加载 <setting name="lazyLoadingEnabled " value="true"/> 关闭对象的侵略性,不用就不需要加载,如果用到了关联对象的任意属性就加载用到的那条 <setting name="aggressiveLazyLoading " value="true"/> settings>- 1
- 2
- 3
- 4
- 5
- 6
(八)一对多映射处理
方法一:collection处理一对多查询
DOCTYPE mapper PUBLIC "-//mybatis.org//DTD Mapper 3.0//EN" "http://mybatis.org/dtd/mybatis-3-mapper.dtd"> <mapper namespace="com.cy.mapper.DeptMapper"> <resultMap id="deptEmpMap" type="Dept"> <id property="did" column="did"/> <result property="dname" column="dname"/> <collection property="emps" ofType="Emp"> <id property="eid" column="eid"/> <result property="ename" column="ename"/> <result property="age" column="age"/> <result property="sex" column="sex"/> collection> resultMap> <select id="getEmpAndEmpByDeptId" resultMap="deptEmpMap"> select dept.*,emp.* from t_dept dept left join t_emp emp on dept.did =emp.did where dept.did = #{did} select> mapper>- 1
- 2
- 3
- 4
- 5
- 6
- 7
- 8
- 9
- 10
- 11
- 12
- 13
- 14
- 15
- 16
- 17
- 18
- 19
- 20
- 21
- 22
- 23
- 24
- 25
- 26
- 27
- 28
- 29
- 30
实体类:
package com.cy.pojo; import lombok.Data; import java.util.List; @Data public class Dept { private Integer deptId; private String deptName; private List<Emp> emps; }- 1
- 2
- 3
- 4
- 5
- 6
- 7
- 8
- 9
- 10
- 11
- 12
- 13
- 14
方法二:分步查询处理一对多查询
<resultMap id="deptEmpStep" type="Dept"> <id property="did" column="did">id> <result property="dname" column="dname">result> <collection property="emps" fetchType="eager" select="com.cy.mapper.EmpMapper.getEmpListByDid" column="did"> collection> resultMap> <select id="getDeptByStep" resultMap="deptEmpStep"> select * from t_dept where did = #{did} select>- 1
- 2
- 3
- 4
- 5
- 6
- 7
- 8
- 9
- 10
- 11
(九)动态SQL
Mybatis框架的动态SQL技术是一种根据特定条件动态拼装SQL语句的功能,它存在的意义是为了
解决 拼接SQL语句字符串时的痛点问题。动态SQL:
1、if,通过test属性中的表达式判断标签中的内容是否有效(是否会拼接到sql中)
2、where
a.若where标签中有条件成立,会自动生成where关键字
b.会自动将where标签中内容前多余的and去掉,但是其中内容后多余的and无法去掉
c.若where标签中没有任何一个条件成立,则where没有任何功能
3、trim
prefix、suffix:在标签中内容前面或后面添加指定内容
prefixOverrides、suffixOverrides:在标签中内容前面或后面去掉指定内容
4、choose、when、otherwise
相当于java中的if…else if…else
when至少设置一个,otherwise最多设置一个
5、foreach
collection:设置要循环的数组或集合
item:用一个字符串表示数组或集合中的每一个数据
separator:设置每次循环的数据之间的分隔符
open:循环的所有内容以什么开始
close:循环的所有内容以什么结束
6、sql片段
可以记录一段sql,在需要用的地方使用include标签进行引用
emp_id,emp_name,age,gender,dept_id
1、if
if标签可通过test属性的表达式进行判断,若表达式的结果为true,则标签中的内容会执行;反之
标签中的内容不会执行<select id="getEmpListByMoreTJ" resultType="Emp"> select * from t_emp where 1=1 <if test="ename != '' and ename != null"> and ename = #{ename} if> <if test="age != '' and age != null"> and age = #{age} if> <if test="sex != '' and sex != null"> and sex = #{sex} if> select>- 1
- 2
- 3
- 4
- 5
- 6
- 7
- 8
- 9
- 10
- 11
- 12
- 13
2、where
where和if一般结合使用:
a>若where标签中的if条件都不满足,则where标签没有任何功能,即不会添加where关键字
b>若where标签中的if条件满足,则where标签会自动添加where关键字,并将条件最前方多余的
and去掉
注意:where标签不能去掉条件最后多余的and<select id="getEmpListByMoreTJ2" resultType="Emp"> select * from t_emp <where> <if test="ename != '' and ename != null"> ename = #{ename} if> <if test="age != '' and age != null"> and age = #{age} if> <if test="sex != '' and sex != null"> and sex = #{sex} if> where> select>- 1
- 2
- 3
- 4
- 5
- 6
- 7
- 8
- 9
- 10
- 11
- 12
- 13
- 14
3、trim
trim用于去掉或添加标签中的内容
常用属性:
prefix:在trim标签中的内容的前面添加某些内容
prefixOverrides:在trim标签中的内容的前面去掉某些内容
suffix:在trim标签中的内容的后面添加某些内容
suffixOverrides:在trim标签中的内容的后面去掉某些内容4、choose、when、otherwise
choose、when、 otherwise相当于if…else if…else
<sql id="empColumns"> emp_id,emp_name,age,gender,dept_id sql> <select id="getEmpListByChoose" resultType="Emp"> select <include refid="empColumns">include> from t_emp <where> <choose> <when test="ename != '' and ename != null"> ename = #{ename} when> <when test="age != '' and age != null"> age = #{age} when> <when test="sex != '' and sex != null"> sex = #{sex} when> <when test="email != '' and email != null"> email = #{email} when> <otherwise> 1 = 1 otherwise> choose> where> select>- 1
- 2
- 3
- 4
- 5
- 6
- 7
- 8
- 9
- 10
- 11
- 12
- 13
- 14
- 15
- 16
- 17
- 18
- 19
- 20
- 21
- 22
- 23
- 24
- 25
- 26
- 27
- 28
- 29
5、foreach
<insert id="insertMoreEmp"> insert into t_emp values <foreach collection="emps" item="emp" separator=","> (null,#{emp.empName},#{emp.age},#{emp.gender},null) foreach> insert> <delete id="deleteMoreEmp"> delete from t_emp where <foreach collection="empIds" item="empId" separator="or"> emp_id = #{empId} foreach> delete>- 1
- 2
- 3
- 4
- 5
- 6
- 7
- 8
- 9
- 10
- 11
- 12
- 13
- 14
- 15
- 16
- 17
- 18
- 19
(十)MyBatis的缓存
1、MyBatis的一级缓存(是默认开启的)
一级缓存是SqlSession级别的,通过同一个SqlSession查询的数据会被缓存,下次查询相同的数据,就会从缓存中直接获取,不会从数据库重新访问使一级缓存失效的四种情况:
- 不同的SqlSession对应不同的一级缓存
- 同一个SqlSession但是查询条件不同
- 同一个SqlSession两次查询期间执行了任何一次增删改操作
- 同一个SqlSession两次查询期间手动清空了缓存 :sqlSession.clearCache();
2、MyBatis的二级缓存(需要手动开始)
二级缓存是SqlSessionFactory级别,通过同一个SqlSessionFactory创建的SqlSession查询的结果会被缓存;此后若再次执行相同的查询语句,结果就会从缓存中获取
二级缓存开启的条件:
a>在核心配置文件中,设置全局配置属性cacheEnabled=“true”,默认为true,不需要设置
b>在映射文件中设置标签
c>二级缓存必须在SqlSession关闭或提交之后有效
d>查询的数据所转换的实体类类型必须实现序列化的接口DOCTYPE mapper PUBLIC "-//mybatis.org//DTD Mapper 3.0//EN" "http://mybatis.org/dtd/mybatis-3-mapper.dtd"> <mapper namespace="com.cy.mapper.CacheMapper"> <cache/> <sql id="empColumns"> emp_id,emp_name,age,gender,dept_id sql> <select id="getEmpByEmpId" resultType="Emp"> select <include refid="empColumns"/> from t_emp where emp_id=#{empId} select> mapper>- 1
- 2
- 3
- 4
- 5
- 6
- 7
- 8
- 9
- 10
- 11
- 12
- 13
- 14
- 15
- 16
- 17
- 18
- 19
- 20
使二级缓存失效的情况:
两次查询之间执行了任意的增删改,会使一级和二级缓存同时失效3、二级缓存的相关配置(了解)
在mapper配置文件中添加的cache标签可以设置一些属性:
①eviction属性:缓存回收策略,默认的是 LRU。
LRU(Least Recently Used) – 最近最少使用的:移除最长时间不被使用的对象。
FIFO(First in First out) – 先进先出:按对象进入缓存的顺序来移除它们。
SOFT – 软引用:移除基于垃圾回收器状态和软引用规则的对象。
WEAK – 弱引用:更积极地移除基于垃圾收集器状态和弱引用规则的对象。
②flushInterval属性:刷新间隔(就是指定之间里清除缓存),单位毫秒
默认情况是不设置,也就是没有刷新间隔,缓存仅仅调用语句时刷新(在两次查询之间执行增删改)
③size属性:引用数目,正整数
代表缓存最多可以存储多少个对象,太大容易导致内存溢出
④readOnly属性:只读, true/false
true:只读缓存;会给所有调用者返回缓存对象的相同实例。因此这些对象不能被修改。这提供了很重要的性能优势。
false:读写缓存;会返回缓存对象的拷贝(通过序列化)。这会慢一些,但是安全,因此默认是false。4、MyBatis缓存查询的顺序
先查询二级缓存,因为二级缓存中可能会有其他程序已经查出来的数据,可以拿来直接使用。
如果二级缓存没有命中,再查询一级缓存
如果一级缓存也没有命中,则查询数据库
SqlSession关闭之后,一级缓存中的数据会写入二级缓存5、整合第三方缓存EHCache
5.1、添加依赖
<dependency> <groupId>org.mybatis.cachesgroupId> <artifactId>mybatis-ehcacheartifactId> <version>1.2.1version> dependency> <dependency> <groupId>ch.qos.logbackgroupId> <artifactId>logback-classicartifactId> <version>1.2.3version> dependency>- 1
- 2
- 3
- 4
- 5
- 6
- 7
- 8
- 9
- 10
- 11
- 12
5.2、创建EHCache的配置文件ehcache.xml
注意:配置文件名必须是:ehcache.xml
<ehcache xmlns:xsi="http://www.w3.org/2001/XMLSchema-instance" xsi:noNamespaceSchemaLocation="../config/ehcache.xsd"> <diskStore path="D:\atguigu\ehcache"/> <defaultCache maxElementsInMemory="1000" maxElementsOnDisk="10000000" eternal="false" overflowToDisk="true" timeToIdleSeconds="120" timeToLiveSeconds="120" diskExpiryThreadIntervalSeconds="120" memoryStoreEvictionPolicy="LRU"> defaultCache> ehcache>- 1
- 2
- 3
- 4
- 5
- 6
- 7
- 8
- 9
- 10
- 11
- 12
- 13
- 14
- 15
- 16
5.3、设置二级缓存的类型
在mybatis映射文件中的cache标签中加入type
5.4、各jar包功能
jar包名称 作用 mybatis-ehcache Mybatis和EHCache的整合包 ehcache EHCache核心包 slf4j-api SLF4J日志门面包 logback-classic 支持SLF4J门面接口的一个具体实现 5.5 、EHCache配置文件说明
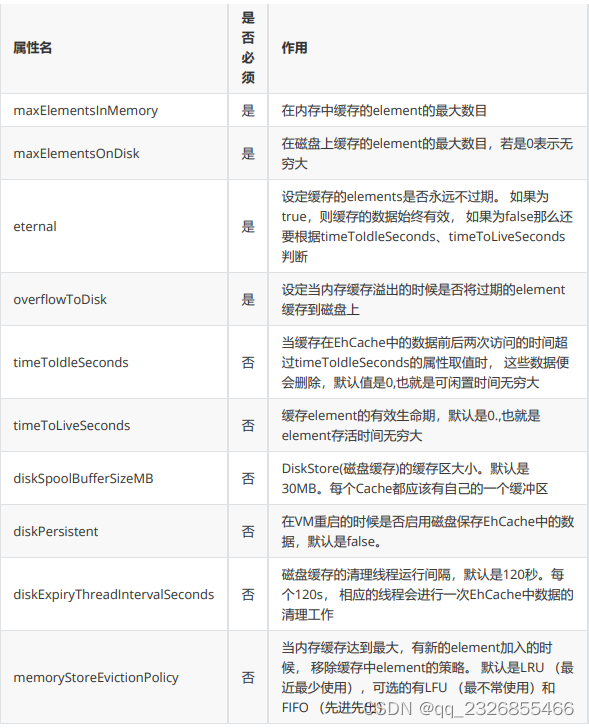
5.6、加入logback日志
存在SLF4J时,作为简易日志的log4j将失效,此时我们需要借助SLF4J的具体实现logback来打印日志。 创建logback的配置文件logback.xml
<configuration debug="true"> <appender name="STDOUT" class="ch.qos.logback.core.ConsoleAppender"> <encoder> <pattern>[%d{HH:mm:ss.SSS}] [%-5level] [%thread] [%logger] [%msg]%npattern> encoder> appender> <root level="DEBUG"> <appender-ref ref="STDOUT" /> root> <logger name="com.cy.mapper" level="DEBUG"/> configuration>- 1
- 2
- 3
- 4
- 5
- 6
- 7
- 8
- 9
- 10
- 11
- 12
- 13
- 14
- 15
- 16
- 17
- 18
- 19
- 20
- 21
(十)MyBatis的逆向工程
正向工程:先创建Java实体类,由框架负责根据实体类生成数据库表。 Hibernate是支持正向工程的。
逆向工程:先创建数据库表,由框架负责根据数据库表,反向生成如下资源:
Java实体类
Mapper接口
Mapper映射文件1、创建逆向工程的步骤
①添加依赖和插件
<dependencies> <dependency> <groupId>org.mybatisgroupId> <artifactId>mybatisartifactId> <version>3.5.7version> dependency> <dependency> <groupId>junitgroupId> <artifactId>junitartifactId> <version>4.12version> <scope>testscope> dependency> <dependency> <groupId>log4jgroupId> <artifactId>log4jartifactId> <version>1.2.17version> dependency> <dependency> <groupId>mysqlgroupId> <artifactId>mysql-connector-javaartifactId> <version>8.0.16version> dependency> dependencies> <build> <plugins> <plugin> <groupId>org.mybatis.generatorgroupId> <artifactId>mybatis-generator-maven-pluginartifactId> <version>1.3.0version> <dependencies> <dependency> <groupId>org.mybatis.generatorgroupId> <artifactId>mybatis-generator-coreartifactId> <version>1.3.2version> dependency> <dependency> <groupId>mysqlgroupId> <artifactId>mysql-connector-javaartifactId> <version>8.0.16version> dependency> dependencies> plugin> plugins> build>- 1
- 2
- 3
- 4
- 5
- 6
- 7
- 8
- 9
- 10
- 11
- 12
- 13
- 14
- 15
- 16
- 17
- 18
- 19
- 20
- 21
- 22
- 23
- 24
- 25
- 26
- 27
- 28
- 29
- 30
- 31
- 32
- 33
- 34
- 35
- 36
- 37
- 38
- 39
- 40
- 41
- 42
- 43
- 44
- 45
- 46
- 47
- 48
- 49
- 50
- 51
- 52
- 53
②创建MyBatis的核心配置文件
DOCTYPE configuration PUBLIC "-//mybatis.org//DTD Config 3.0//EN" "http://mybatis.org/dtd/mybatis-3-config.dtd"> <configuration> <properties resource="jdbc.properties"/> <settings> <setting name="mapUnderscoreToCamelCase" value="true"/> <setting name="lazyLoadingEnabled" value="true"/> <setting name="aggressiveLazyLoading" value="false"/> settings> <typeAliases> <package name="com.cy.pojo"/> typeAliases> <environments default="development"> <environment id="development"> <transactionManager type="JDBC"/> <dataSource type="POOLED"> <property name="driver" value="${jdbc.driver}"/> <property name="url" value="${jdbc.url}"/> <property name="username" value="${jdbc.username}"/> <property name="password" value="${jdbc.password}"/> dataSource> environment> environments> <mappers> <package name="com.cy.mapper"/> mappers> configuration>- 1
- 2
- 3
- 4
- 5
- 6
- 7
- 8
- 9
- 10
- 11
- 12
- 13
- 14
- 15
- 16
- 17
- 18
- 19
- 20
- 21
- 22
- 23
- 24
- 25
- 26
- 27
- 28
- 29
- 30
- 31
- 32
- 33
- 34
- 35
- 36
- 37
- 38
- 39
- 40
- 41
- 42
- 43
- 44
- 45
- 46
③创建逆向工程的配置文件
文件名必须是:generatorConfig.xml
DOCTYPE generatorConfiguration PUBLIC "-//mybatis.org//DTD MyBatis Generator Configuration 1.0//EN" "http://mybatis.org/dtd/mybatis-generator-config_1_0.dtd"> <generatorConfiguration> <context id="DB2Tables" targetRuntime="MyBatis3"> <jdbcConnection driverClass="com.mysql.cj.jdbc.Driver" connectionURL="jdbc:mysql://localhost:3306/mybatis?serverTimezone=UTC" userId="root" password="123456"> jdbcConnection> <javaModelGenerator targetPackage="com.cy.pojo" targetProject=".\src\main\java"> <property name="enableSubPackages" value="true" /> <property name="trimStrings" value="true" /> javaModelGenerator> <sqlMapGenerator targetPackage="com.cy.mapper" targetProject=".\src\main\resources"> <property name="enableSubPackages" value="true" /> sqlMapGenerator> <javaClientGenerator type="XMLMAPPER" targetPackage="com.cy.mapper" targetProject=".\src\main\java"> <property name="enableSubPackages" value="true" /> javaClientGenerator> <table tableName="t_emp" domainObjectName="Emp"/> <table tableName="t_dept" domainObjectName="Dept"/> context> generatorConfiguration>- 1
- 2
- 3
- 4
- 5
- 6
- 7
- 8
- 9
- 10
- 11
- 12
- 13
- 14
- 15
- 16
- 17
- 18
- 19
- 20
- 21
- 22
- 23
- 24
- 25
- 26
- 27
- 28
- 29
- 30
- 31
- 32
- 33
- 34
- 35
- 36
- 37
- 38
- 39
- 40
④执行MBG插件的generate目标(双击mybatis-generatot:generate)

2、逆向工程清新简洁版和奢华尊享版
在逆向工程的配置文件中修改 targetRuntime的值:
targetRuntime: 执行生成的逆向工程的版本
值:
MyBatis3Simple: 生成基本的CRUD(清新简洁版)
MyBatis3: 生成带条件的CRUD(奢华尊享版)3、奢华尊享版的使用,有时需要使用QBC查询
自动生成的mapper接口
package com.cy.mapper; import com.cy.pojo.Emp; import com.cy.pojo.EmpExample; import java.util.List; import org.apache.ibatis.annotations.Param; public interface EmpMapper { /** * This method was generated by MyBatis Generator. * This method corresponds to the database table t_emp * * @mbg.generated Fri Nov 18 11:04:27 CST 2022 */ long countByExample(EmpExample example); /** * This method was generated by MyBatis Generator. * This method corresponds to the database table t_emp * * @mbg.generated Fri Nov 18 11:04:27 CST 2022 */ int deleteByExample(EmpExample example); /** * This method was generated by MyBatis Generator. * This method corresponds to the database table t_emp * * @mbg.generated Fri Nov 18 11:04:27 CST 2022 */ int insert(Emp record); /** * This method was generated by MyBatis Generator. * This method corresponds to the database table t_emp * * @mbg.generated Fri Nov 18 11:04:27 CST 2022 */ int insertSelective(Emp record); /** * This method was generated by MyBatis Generator. * This method corresponds to the database table t_emp * * @mbg.generated Fri Nov 18 11:04:27 CST 2022 */ List<Emp> selectByExample(EmpExample example); /** * This method was generated by MyBatis Generator. * This method corresponds to the database table t_emp * * @mbg.generated Fri Nov 18 11:04:27 CST 2022 */ int updateByExampleSelective(@Param("record") Emp record, @Param("example") EmpExample example); /** * This method was generated by MyBatis Generator. * This method corresponds to the database table t_emp * * @mbg.generated Fri Nov 18 11:04:27 CST 2022 */ int updateByExample(@Param("record") Emp record, @Param("example") EmpExample example); }- 1
- 2
- 3
- 4
- 5
- 6
- 7
- 8
- 9
- 10
- 11
- 12
- 13
- 14
- 15
- 16
- 17
- 18
- 19
- 20
- 21
- 22
- 23
- 24
- 25
- 26
- 27
- 28
- 29
- 30
- 31
- 32
- 33
- 34
- 35
- 36
- 37
- 38
- 39
- 40
- 41
- 42
- 43
- 44
- 45
- 46
- 47
- 48
- 49
- 50
- 51
- 52
- 53
- 54
- 55
- 56
- 57
- 58
- 59
- 60
- 61
- 62
- 63
- 64
生成的映射文件
DOCTYPE mapper PUBLIC "-//mybatis.org//DTD Mapper 3.0//EN" "http://mybatis.org/dtd/mybatis-3-mapper.dtd"> <mapper namespace="com.cy.mapper.EmpMapper"> <resultMap id="BaseResultMap" type="com.cy.pojo.Emp"> <result column="emp_id" jdbcType="INTEGER" property="empId" /> <result column="emp_name" jdbcType="VARCHAR" property="empName" /> <result column="emp_age" jdbcType="INTEGER" property="empAge" /> <result column="gender" jdbcType="VARCHAR" property="gender" /> <result column="dept_id" jdbcType="INTEGER" property="deptId" /> resultMap> <sql id="Example_Where_Clause"> <where> <foreach collection="oredCriteria" item="criteria" separator="or"> <if test="criteria.valid"> <trim prefix="(" prefixOverrides="and" suffix=")"> <foreach collection="criteria.criteria" item="criterion"> <choose> <when test="criterion.noValue"> and ${criterion.condition} when> <when test="criterion.singleValue"> and ${criterion.condition} #{criterion.value} when> <when test="criterion.betweenValue"> and ${criterion.condition} #{criterion.value} and #{criterion.secondValue} when> <when test="criterion.listValue"> and ${criterion.condition} <foreach close=")" collection="criterion.value" item="listItem" open="(" separator=","> #{listItem} foreach> when> choose> foreach> trim> if> foreach> where> sql> <sql id="Update_By_Example_Where_Clause"> <where> <foreach collection="example.oredCriteria" item="criteria" separator="or"> <if test="criteria.valid"> <trim prefix="(" prefixOverrides="and" suffix=")"> <foreach collection="criteria.criteria" item="criterion"> <choose> <when test="criterion.noValue"> and ${criterion.condition} when> <when test="criterion.singleValue"> and ${criterion.condition} #{criterion.value} when> <when test="criterion.betweenValue"> and ${criterion.condition} #{criterion.value} and #{criterion.secondValue} when> <when test="criterion.listValue"> and ${criterion.condition} <foreach close=")" collection="criterion.value" item="listItem" open="(" separator=","> #{listItem} foreach> when> choose> foreach> trim> if> foreach> where> sql> <sql id="Base_Column_List"> emp_id, emp_name, emp_age, gender, dept_id sql> <select id="selectByExample" parameterType="com.cy.pojo.EmpExample" resultMap="BaseResultMap"> select <if test="distinct"> distinct if> <include refid="Base_Column_List" /> from t_emp <if test="_parameter != null"> <include refid="Example_Where_Clause" /> if> <if test="orderByClause != null"> order by ${orderByClause} if> select> <delete id="deleteByExample" parameterType="com.cy.pojo.EmpExample"> delete from t_emp <if test="_parameter != null"> <include refid="Example_Where_Clause" /> if> delete> <insert id="insert" parameterType="com.cy.pojo.Emp"> insert into t_emp (emp_id, emp_name, emp_age, gender, dept_id) values (#{empId,jdbcType=INTEGER}, #{empName,jdbcType=VARCHAR}, #{empAge,jdbcType=INTEGER}, #{gender,jdbcType=VARCHAR}, #{deptId,jdbcType=INTEGER}) insert> <insert id="insertSelective" parameterType="com.cy.pojo.Emp"> insert into t_emp <trim prefix="(" suffix=")" suffixOverrides=","> <if test="empId != null"> emp_id, if> <if test="empName != null"> emp_name, if> <if test="empAge != null"> emp_age, if> <if test="gender != null"> gender, if> <if test="deptId != null"> dept_id, if> trim> <trim prefix="values (" suffix=")" suffixOverrides=","> <if test="empId != null"> #{empId,jdbcType=INTEGER}, if> <if test="empName != null"> #{empName,jdbcType=VARCHAR}, if> <if test="empAge != null"> #{empAge,jdbcType=INTEGER}, if> <if test="gender != null"> #{gender,jdbcType=VARCHAR}, if> <if test="deptId != null"> #{deptId,jdbcType=INTEGER}, if> trim> insert> <select id="countByExample" parameterType="com.cy.pojo.EmpExample" resultType="java.lang.Long"> select count(*) from t_emp <if test="_parameter != null"> <include refid="Example_Where_Clause" /> if> select> <update id="updateByExampleSelective" parameterType="map"> update t_emp <set> <if test="record.empId != null"> emp_id = #{record.empId,jdbcType=INTEGER}, if> <if test="record.empName != null"> emp_name = #{record.empName,jdbcType=VARCHAR}, if> <if test="record.empAge != null"> emp_age = #{record.empAge,jdbcType=INTEGER}, if> <if test="record.gender != null"> gender = #{record.gender,jdbcType=VARCHAR}, if> <if test="record.deptId != null"> dept_id = #{record.deptId,jdbcType=INTEGER}, if> set> <if test="_parameter != null"> <include refid="Update_By_Example_Where_Clause" /> if> update> <update id="updateByExample" parameterType="map"> update t_emp set emp_id = #{record.empId,jdbcType=INTEGER}, emp_name = #{record.empName,jdbcType=VARCHAR}, emp_age = #{record.empAge,jdbcType=INTEGER}, gender = #{record.gender,jdbcType=VARCHAR}, dept_id = #{record.deptId,jdbcType=INTEGER} <if test="_parameter != null"> <include refid="Update_By_Example_Where_Clause" /> if> update> mapper>- 1
- 2
- 3
- 4
- 5
- 6
- 7
- 8
- 9
- 10
- 11
- 12
- 13
- 14
- 15
- 16
- 17
- 18
- 19
- 20
- 21
- 22
- 23
- 24
- 25
- 26
- 27
- 28
- 29
- 30
- 31
- 32
- 33
- 34
- 35
- 36
- 37
- 38
- 39
- 40
- 41
- 42
- 43
- 44
- 45
- 46
- 47
- 48
- 49
- 50
- 51
- 52
- 53
- 54
- 55
- 56
- 57
- 58
- 59
- 60
- 61
- 62
- 63
- 64
- 65
- 66
- 67
- 68
- 69
- 70
- 71
- 72
- 73
- 74
- 75
- 76
- 77
- 78
- 79
- 80
- 81
- 82
- 83
- 84
- 85
- 86
- 87
- 88
- 89
- 90
- 91
- 92
- 93
- 94
- 95
- 96
- 97
- 98
- 99
- 100
- 101
- 102
- 103
- 104
- 105
- 106
- 107
- 108
- 109
- 110
- 111
- 112
- 113
- 114
- 115
- 116
- 117
- 118
- 119
- 120
- 121
- 122
- 123
- 124
- 125
- 126
- 127
- 128
- 129
- 130
- 131
- 132
- 133
- 134
- 135
- 136
- 137
- 138
- 139
- 140
- 141
- 142
- 143
- 144
- 145
- 146
- 147
- 148
- 149
- 150
- 151
- 152
- 153
- 154
- 155
- 156
- 157
- 158
- 159
- 160
- 161
- 162
- 163
- 164
- 165
- 166
- 167
- 168
- 169
- 170
- 171
- 172
- 173
- 174
- 175
- 176
- 177
- 178
- 179
- 180
- 181
- 182
- 183
- 184
- 185
- 186
- 187
- 188
- 189
- 190
- 191
- 192
- 193
- 194
- 195
- 196
- 197
- 198
- 199
- 200
- 201
- 202
- 203
- 204
- 205
- 206
- 207
- 208
- 209
- 210
- 211
- 212
- 213
- 214
- 215
- 216
- 217
- 218
- 219
- 220
- 221
- 222
- 223
- 224
- 225
- 226
- 227
- 228
- 229
- 230
测试类(QBC查询)
package com.cy; import com.cy.mapper.EmpMapper; import com.cy.pojo.Emp; import com.cy.pojo.EmpExample; import org.apache.ibatis.io.Resources; import org.apache.ibatis.session.SqlSession; import org.apache.ibatis.session.SqlSessionFactory; import org.apache.ibatis.session.SqlSessionFactoryBuilder; import java.io.IOException; import java.io.InputStream; import java.util.List; public class Test { @Test public void testMBG() { try { InputStream is = Resources.getResourceAsStream("mybatis-config.xml"); SqlSessionFactory sqlSessionFactory = new SqlSessionFactoryBuilder().build(is); SqlSession sqlSession = sqlSessionFactory.openSession(true); EmpMapper mapper = sqlSession.getMapper(EmpMapper.class); //查询所有数据 List<Emp> list = mapper.selectByExample(null); list.forEach(emp -> System.out.println(emp)); //根据条件查询 EmpExample example = new EmpExample(); example.createCriteria().andEmpNameEqualTo("张三").andEmpAgeGreaterThanOrEqualTo(20); example.or().andDeptIdIsNotNull(); List<Emp> list = mapper.selectByExample(example); list.forEach(emp -> System.out.println(emp)); mapper.updateByExampleSelective(new Emp(), example); } catch (IOException e) { e.printStackTrace(); } } }- 1
- 2
- 3
- 4
- 5
- 6
- 7
- 8
- 9
- 10
- 11
- 12
- 13
- 14
- 15
- 16
- 17
- 18
- 19
- 20
- 21
- 22
- 23
- 24
- 25
- 26
- 27
- 28
- 29
- 30
- 31
- 32
- 33
- 34
- 35
- 36
- 37
- 38
- 39
- 40
(十一)分页插件
limit index,pageSize
pageSize:每页显示的条数
pageNum:当前页的页码
index:当前页的起始索引,index=(pageNum-1)*pageSize
count:总记录数
totalPage:总页数
totalPage = count / pageSize;
还要判断是否能整除,如果不能整除,则要加1
if(count % pageSize != 0){
totalPage += 1;
}效果:
首页 上一页 2 3 4 5 6 下一页 末页1、分页插件的使用步骤
①添加依赖
<dependency> <groupId>com.github.pagehelpergroupId> <artifactId>pagehelperartifactId> <version>5.2.0version> dependency>- 1
- 2
- 3
- 4
- 5
②在MyBatis的核心配置文件中配置分页插件
<plugins> <plugin interceptor="com.github.pagehelper.PageInterceptor">plugin> plugins>- 1
- 2
- 3
- 4
2、分页插件的使用
1、在查询功能之前使用PageHelper.startPage(int pageNum, int pageSize)开启分页功能
pageNum:当前页的页码
pageSize:每页显示的条数
2、在查询获取list集合之后,使用PageInfo pageInfo = new PageInfo<>(List list, int
navigatePages)获取分页相关数据
list:分页之后的数据
navigatePages:导航分页的页码数
3、分页相关数据
PageInfo{
pageNum=8, pageSize=4, size=2, startRow=29, endRow=30, total=30, pages=8,
list=Page{count=true, pageNum=8, pageSize=4, startRow=28, endRow=32, total=30,
pages=8, reasonable=false, pageSizeZero=false},
prePage=7, nextPage=0, isFirstPage=false, isLastPage=true, hasPreviousPage=true,
hasNextPage=false, navigatePages=5, navigateFirstPage4, navigateLastPage8,
navigatepageNums=[4, 5, 6, 7, 8]
}
pageNum:当前页的页码
pageSize:每页显示的条数
size:当前页显示的真实条数
total:总记录数
pages:总页数
prePage:上一页的页码
nextPage:下一页的页码
isFirstPage/isLastPage:是否为第一页/最后一页
hasPreviousPage/hasNextPage:是否存在上一页/下一页
navigatePages:导航分页的页码数
navigatepageNums:导航分页的页码,[1,2,3,4,5](十二)Mybatis的注解式编程
二、Mybatis-plus及和SpringBoot的整合
官网:https://baomidou.com/
1、简介
MyBatis-Plus (简称 MP)是一个 MyBatis 的增强工具,在 MyBatis 的基础上只做增强不做改变,为简化开发、提高效率而生。
2、特点
- 无侵入:只做增强不做改变,引入它不会对现有工程产生影响,如丝般顺滑
- 损耗小:启动即会自动注入基本 CURD,性能基本无损耗,直接面向对象操作
- 强大的 CRUD 操作:内置通用 Mapper、通用 Service,仅仅通过少量配置即可实现单表大部分 CRUD 操作,更有强大的条件构造器,满足各类使用需求
- 支持 Lambda 形式调用:通过 Lambda 表达式,方便的编写各类查询条件,无需再担心字段写错
- 支持主键自动生成:支持多达 4 种主键策略(内含分布式唯一 ID 生成器 - Sequence),可自由配置,完美解决主键问题
- 支持 ActiveRecord 模式:支持 ActiveRecord 形式调用,实体类只需继承 Model 类即可进行强大的 CRUD 操作
- 支持自定义全局通用操作:支持全局通用方法注入( Write once, use anywhere )
- 内置代码生成器:采用代码或者 Maven 插件可快速生成 Mapper 、 Model 、 Service 、 Controller 层代码,支持模板引擎,更有超多自定义配置等您来使用
- 内置分页插件:基于 MyBatis 物理分页,开发者无需关心具体操作,配置好插件之后,写分页等同于普通 List 查询
- 分页插件支持多种数据库:支持 MySQL、MariaDB、Oracle、DB2、H2、HSQL、SQLite、Postgre、SQLServer 等多种数据库
- 内置性能分析插件:可输出 SQL 语句以及其执行时间,建议开发测试时启用该功能,能快速揪出慢查询
- 内置全局拦截插件:提供全表 delete 、 update 操作智能分析阻断,也可自定义拦截规则,预防误操作
3、支持数据库
MySQL,Oracle,DB2,H2,HSQL,SQLite,PostgreSQL,SQLServer,Phoenix,Gauss ,ClickHouse,Sybase,OceanBase,Firebird,Cubrid,Goldilocks,csiidb等。
官网:https://baomidou.com/1、简介
MyBatis-Plus (简称 MP)是一个 MyBatis 的增强工具,在 MyBatis 的基础上只做增强不做改变,为简化开发、提高效率而生。
2、特点
- 无侵入:只做增强不做改变,引入它不会对现有工程产生影响,如丝般顺滑
- 损耗小:启动即会自动注入基本 CURD,性能基本无损耗,直接面向对象操作
- 强大的 CRUD 操作:内置通用 Mapper、通用 Service,仅仅通过少量配置即可实现单表大部分 CRUD 操作,更有强大的条件构造器,满足各类使用需求
- 支持 Lambda 形式调用:通过 Lambda 表达式,方便的编写各类查询条件,无需再担心字段写错
- 支持主键自动生成:支持多达 4 种主键策略(内含分布式唯一 ID 生成器 - Sequence),可自由配置,完美解决主键问题
- 支持 ActiveRecord 模式:支持 ActiveRecord 形式调用,实体类只需继承 Model 类即可进行强大的 CRUD 操作
- 支持自定义全局通用操作:支持全局通用方法注入( Write once, use anywhere )
- 内置代码生成器:采用代码或者 Maven 插件可快速生成 Mapper 、 Model 、 Service 、 Controller 层代码,支持模板引擎,更有超多自定义配置等您来使用
- 内置分页插件:基于 MyBatis 物理分页,开发者无需关心具体操作,配置好插件之后,写分页等同于普通 List 查询
- 分页插件支持多种数据库:支持 MySQL、MariaDB、Oracle、DB2、H2、HSQL、SQLite、Postgre、SQLServer 等多种数据库
- 内置性能分析插件:可输出 SQL 语句以及其执行时间,建议开发测试时启用该功能,能快速揪出慢查询
- 内置全局拦截插件:提供全表 delete 、 update 操作智能分析阻断,也可自定义拦截规则,预防误操作
3、支持数据库
MySQL,Oracle,DB2,H2,HSQL,SQLite,PostgreSQL,SQLServer,Phoenix,Gauss ,ClickHouse,Sybase,OceanBase,Firebird,Cubrid,Goldilocks,csiidb等。
三、SpringBoot整合Mybatis
四、SpringBoot整合Mybatis-plus
-
相关阅读:
MySQL之COUNT性能到底如何?
【JavaScript】 一万字 JavaScript 笔记(详细讲解 + 代码演示 + 图解)
Django: 3. 创建游戏界面
【知识分享】Java获取当前周的开始时间结束时间
ros2 安装UR机器人仿真包
IDEA 整合 Tomcat 开发 Javaweb 工程 2022-7-28
GIT rebase 命令使用
R语言电信公司churn数据客户流失 k近邻(knn)模型预测分析
Android - Handler
vue3-数据模拟json -server
- 原文地址:https://blog.csdn.net/qq_45429856/article/details/127865953

- 最新文章
-
沪漂五周年了:我越来越迷茫了
Agentic Skill Routing 实战:别再把所有 Skill 塞进 AI Agent 上下文
MySQL-Seconds_behind_master的精度误差
[MAF预定义ChatClient中间件-03]CachingChatClient——利用缓存省钱省时间
AI的至暗历史:从万众期待到被政府撤资,AI的两次死亡徘徊
Agent OS :五种驯服不确定性的范式
PortSwigger SQL注入LAB11
数据库即时编译JIT
[Begin]AI Learn Data Day 0
深度学习进阶(二十七)现代 LLM 的核心架构设计其二:SwiGLU