-
mybatisPlus
第十一章:Mybatis_plus
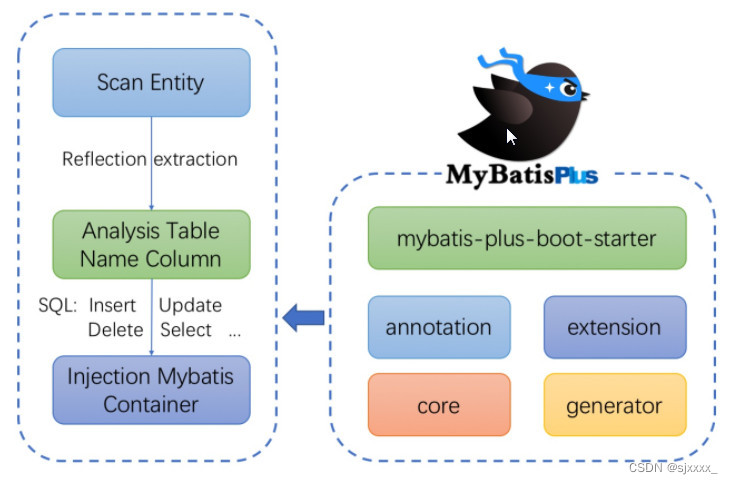
第1节:简介
本章节主要介绍mybatisPlus是mybatis的增强工具,只做增强不做改变,不会对mybatis产生任何影响。它的主要优势具有无侵入、损耗小、强大的CRUD操作、支持 Lambda 形式调用、支持 ActiveRecord模式、支持自定义全局通用操作、内置代码生成器、内置分页插件、分页插件支持多种数据库、内置性能分析插件、内置全局拦截插件等。主要突出其强大性能,提交开发效率。- 1
1.1 概念
MybatisPlus是一个 MyBatis (opens new window)的增强工具,在 MyBatis的基础上只做增强不做改变,为简化开发、提高效率而生。愿景是成为 MyBatis最好的搭档,就像魂斗罗中的 1P、2P,基友搭配,效率翻倍。- 1
1.2 优势
- 无侵入:只做增强不做改变,引入它不会对现有工程产生影响,如丝般顺滑。 - 损耗小:启动即会自动注入基本 CURD,性能基本无损耗,直接面向对象操作。 - 强大的 CRUD 操作:内置通用 Mapper、通用 Service,仅仅通过少量配置即可实现单表大部分 CRUD 操作,更有强大的条件构造器,满足各类使用需求。 - 支持 Lambda 形式调用:通过 Lambda 表达式,方便的编写各类查询条件,无需再担心字段写错。 - 支持主键自动生成:支持多达 4 种主键策略(内含分布式唯一 ID 生成器 - Sequence),可自由配置,完美解决主键问题: 主键策略: 可以选择主键自增 Sequence UUID design - 支持自定义全局通用操作:支持全局通用方法注入( Write once, use anywhere )。 - 内置代码生成器(逆向工程):采用代码或者 Maven 插件可快速生成 Mapper 、 Model 、 Service 、 Controller 层代码,支持模板引擎(thymeleaf,jsp,freemark),更有超多自定义配置等您来使用。 - 内置分页插件:基于 MyBatis 物理分页,开发者无需关心具体操作,配置好插件之后,写分页等同于普通 List 查询。 - 分页插件支持多种数据库:支持 MySQL、MariaDB、Oracle、DB2、H2、HSQL、SQLite、Postgre、SQLServer 等多种数据库。 - 内置性能分析插件:可输出 Sql 语句以及其执行时间,建议开发测试时启用该功能,能快速揪出慢查询。- 1
- 2
- 3
- 4
- 5
- 6
- 7
- 8
- 9
- 10
1.3 框架结构
第2节:入门案例
本章主要回顾springboot项目的创建步聚及整合mybatis—plus的步聚。mybatis-plus的DAO层接口必须实现BaseMapper接口,调用selectList查测查询结果。- 1
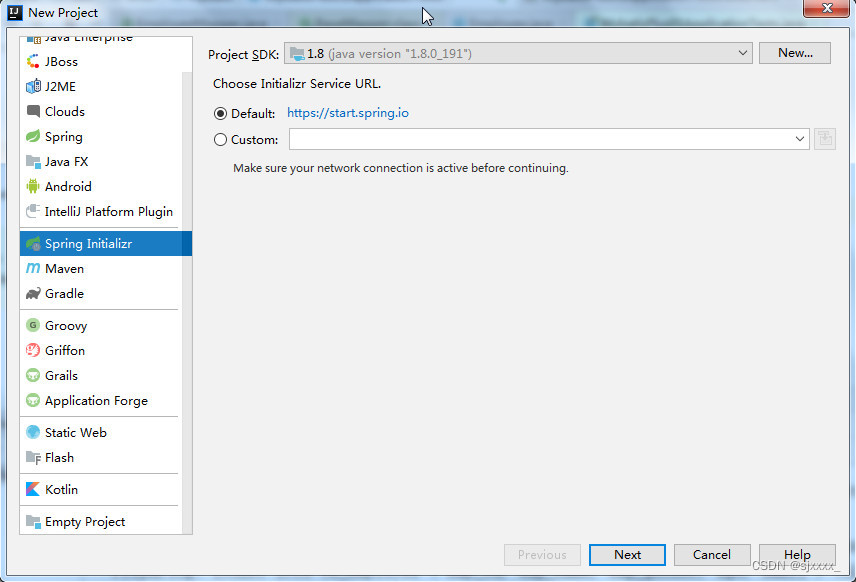
2.1 创建工程添加依赖
2.1.1 创建工程
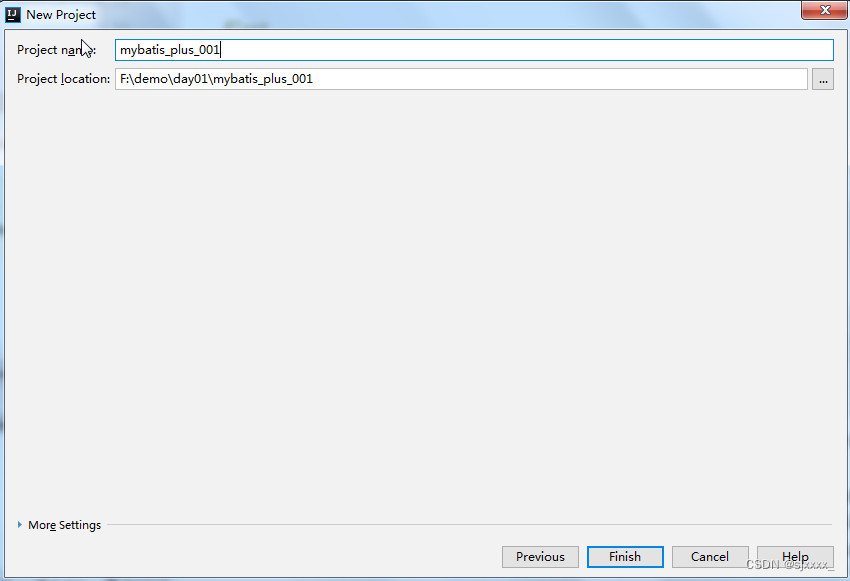
2.1.2 输入项目组、项目名称及版本

2.1.3 检查项目名称及存储位置
2.1.4 引用依赖
<dependency> <groupId>mysqlgroupId> <artifactId>mysql-connector-javaartifactId> <version>5.1.47version> dependency> <dependency> <groupId>org.springframework.bootgroupId> <artifactId>spring-boot-starter-testartifactId> <scope>testscope> dependency> <dependency> <groupId>com.baomidougroupId> <artifactId>mybatis-plus-boot-starterartifactId> <version>3.4.2version> dependency>- 1
- 2
- 3
- 4
- 5
- 6
- 7
- 8
- 9
- 10
- 11
- 12
- 13
- 14
- 15
- 16
2.2 创建数据库表
CREATE TABLE employee( emp_id BIGINT(20) NOT NULL, emp_name VARCHAR(30), emp_gender VARCHAR(6), age INT, email VARCHAR(50), PRIMARY KEY(emp_id) ); INSERT INTO employee(emp_id,emp_name,emp_gender,age,email) VALUES(1367686308726788098,'刘晓娟','女',20,'liuxianjuan@qq.com'); INSERT INTO employee(emp_id,emp_name,emp_gender,age,email) VALUES(1367709299695099906,'张春雨','男',28,'zhangchunyu@sina.com'); INSERT INTO employee(emp_id,emp_name,emp_gender,age,email) VALUES(1367717669156028418,'何雨柱','男',23,'heyuzhu@126.com');- 1
- 2
- 3
- 4
- 5
- 6
- 7
- 8
- 9
- 10
- 11
- 12
- 13
- 14
2.3 构建数据模型
public class Employee { private Long empId; private String empName; private String empGender; private Integer age; private String email; public Long getEmpId() { return empId; } public void setEmpId(Long empId) { this.empId = empId; } public String getEmpGender() { return empGender; } public void setEmpGender(String empGender) { this.empGender = empGender; } public Integer getAge() { return age; } public void setAge(Integer age) { this.age = age; } public String getEmail() { return email; } public void setEmail(String email) { this.email = email; } @Override public String toString() { return "Employee{" + "empId=" + empId + ", name='" + empName + '\'' + ", empGender='" + empGender + '\'' + ", age=" + age + ", email='" + email + '\'' + '}'; } }- 1
- 2
- 3
- 4
- 5
- 6
- 7
- 8
- 9
- 10
- 11
- 12
- 13
- 14
- 15
- 16
- 17
- 18
- 19
- 20
- 21
- 22
- 23
- 24
- 25
- 26
- 27
- 28
- 29
- 30
- 31
- 32
- 33
- 34
- 35
- 36
- 37
- 38
- 39
- 40
- 41
- 42
- 43
- 44
- 45
- 46
- 47
- 48
- 49
- 50
- 51
2.4 配置application.yml
spring: datasource: driver-class-name: com.mysql.jdbc.Driver url: jdbc:mysql:///mybatis_plus username: root password: root mybatis-plus: configuration: log-impl: org.apache.ibatis.logging.stdout.StdOutImpl #控制台显示sql语句 #map-underscore-to-camel-case: true #开启驼峰标识 #mp和springboot整合时默认开启驼峰命名格式,也就是实例类中的属性为empId时会自动映射数据库表中的emp_id,即使数据库中列名为empId时也不能映射上- 1
- 2
- 3
- 4
- 5
- 6
- 7
- 8
- 9
- 10
- 11
- 12
2.5 编写Spring Boot 启动类
@SpringBootApplication @MapperScan("com.offcn.mp.dao") 指定包下的所有mapper接口, 不需要再使用@Mapper注解。 public class MybatisPlus01Application { public static void main(String[] args) { SpringApplication.run(MybatisPlus01Application.class, args); } }- 1
- 2
- 3
- 4
- 5
- 6
- 7
- 8
- 9
- 10
2.6 编写mapper接口
public interface EmployeeMapper extends BaseMapper<Employee> {}- 1
2.7 启动服务测试结果
@SpringBootTest public class MybatisPlus01ApplicationTests { @Autowired private EmployeeMapper employeeMapper; @Test public void testSelect(){ List<Employee> employeeList = employeeMapper.selectList(null); employeeList.forEach( System.out::println); } }- 1
- 2
- 3
- 4
- 5
- 6
- 7
- 8
- 9
- 10
- 11
- 12
- 13
第3节:Lombok插件
本章主要讲解Lombok插件的安装、常用注解和使用,突出lombok插件在开发中的优势,具体解讲@NoArgsConstructor、@AllArgsConstructor、@Data、@ToString注解的含义。- 1
3.1 lombok插件简介
lombok是一个插件,用途是使用注解给你类里面的字段,自动的加上属性,构造器,ToString方法,Equals方法等等,比较方便的一点是,你在更改字段的时候,lombok会立即发生改变以保持和你代码的一致性。- 1
3.2 常用的 lombok 注解介绍
@Getter 加在类上,可以自动生成参数的getter方法。 @Setter 加在类上,可以自动生成参数的setter方法 @ToString 加在类上,调用toString()方法,可以输出实体类中所有属性的值 @RequiredArgsConstructor会生成一个包含常量,和标识了NotNull的变量的构造方法。生成的构造方法是私有的private。这个我用的很少。 @EqualsAndHashCode 1.它会生成equals和hashCode方法 2.默认使用非静态的属性 3.可以通过exclude参数排除不需要生成的属性 4.可以通过of参数来指定需要生成的属性 5.它默认不调用父类的方法,只使用本类定义的属性进行操作,可以使用callSuper=true来解决,会在@Data中进行讲解。 @Data这个是非常常用的注解,这个注解其实是五个注解的合体: @NoArgsConstructor生成一个无参数的构造方法。 @AllArgsConstructor生成一个包含所有变量的构造方法。- 1
- 2
- 3
- 4
- 5
- 6
- 7
- 8
- 9
- 10
- 11
- 12
- 13
- 14
- 15
- 16
- 17
- 18
- 19
- 20
- 21
3.3 idea安装lombok插件
1. 首先我们需要安装IntelliJ IDEA中的lombok插件,打开IntelliJ IDEA后点击菜单栏中的File-->Settings,或者使用快捷键Ctrl+Alt+S进入到设置页面- 1

2. 我们点击设置中的Plugins进行插件的安装,在右侧选择Browse repositories...,然后在搜索页面输入lombok变可以查询到下方的Lombok Plugin,鼠标点击Lombok Plugin可在右侧看到Install按钮,点击该按钮便可安装。- 1


安装完成之后重启idea即可。- 1
3.4 lombok插件的使用
3.4.1 引入lombok的依赖
<dependency> <groupId>org.projectlombokgroupId> <artifactId>lombokartifactId> dependency>- 1
- 2
- 3
- 4
- 5
3.4.2 去除setter和getter方法
public class Employee { private Long empId; private String name; private String empGender; private Integer age; private String email; }- 1
- 2
- 3
- 4
- 5
- 6
- 7
3.4.3 添加lombok注解
@NoArgsConstructor @AllArgsConstructor @Data @ToString public class Employee { private Long empId; private String name; private String empGender; private Integer age; private String email; }- 1
- 2
- 3
- 4
- 5
- 6
- 7
- 8
- 9
- 10
- 11
第4节:Mybatis-Plus通用CRUD
重点解决mybatis-plus的BaseMapper接口中常用方法介绍,具本演示增、删、改、查方法的使用。- 1
4.1 BaseMapper接口方法
baseMaper中提供了CRUD方法,具体方法如下: // 插入一条记录 int insert(T entity); // 根据 entity 条件,删除记录 int delete(@Param(Constants.WRAPPER) Wrapper<T> wrapper); // 删除(根据ID 批量删除) int deleteBatchIds(@Param(Constants.COLLECTION) Collection<? extends Serializable> idList); // 根据 ID 删除 int deleteById(Serializable id); // 根据 columnMap 条件,删除记录 int deleteByMap(@Param(Constants.COLUMN_MAP) Map<String, Object> columnMap); // 根据 whereEntity 条件,更新记录 int update(@Param(Constants.ENTITY) T entity, @Param(Constants.WRAPPER) Wrapper<T> updateWrapper); // 根据 ID 修改 int updateById(@Param(Constants.ENTITY) T entity); List<T> selectList(@Param(Constants.WRAPPER) Wrapper<T> queryWrapper); // 查询(根据 columnMap 条件) List<T> selectByMap(@Param(Constants.COLUMN_MAP) Map<String, Object> columnMap); // 根据 Wrapper 条件,查询全部记录 List<Map<String, Object>> selectMaps(@Param(Constants.WRAPPER) Wrapper<T> queryWrapper); // 根据 Wrapper 条件,查询全部记录。注意: 只返回第一个字段的值 List<Object> selectObjs(@Param(Constants.WRAPPER) Wrapper<T> queryWrapper); // 根据 entity 条件,查询全部记录(并翻页) IPage<T> selectPage(IPage<T> page, @Param(Constants.WRAPPER) Wrapper<T> queryWrapper); // 根据 Wrapper 条件,查询全部记录(并翻页) IPage<Map<String, Object>> selectMapsPage(IPage<T> page, @Param(Constants.WRAPPER) Wrapper<T> queryWrapper); // 根据 Wrapper 条件,查询总记录数 Integer selectCount(@Param(Constants.WRAPPER) Wrapper<T> queryWrapper);- 1
- 2
- 3
- 4
- 5
- 6
- 7
- 8
- 9
- 10
- 11
- 12
- 13
- 14
- 15
- 16
- 17
- 18
- 19
- 20
- 21
- 22
- 23
- 24
- 25
- 26
- 27
- 28
- 29
- 30
- 31
- 32
- 33
- 34
4.2 环境搭建
4.2.1 创建数据库表
CREATE TABLE `employee` ( `emp_id` int(11) NOT NULL, `emp_name` varchar(32) DEFAULT NULL, `age` int(11) DEFAULT NULL, `email` varchar(32) DEFAULT NULL, `emp_gender` varchar(32) DEFAULT NULL, PRIMARY KEY (`empid`), )- 1
- 2
- 3
- 4
- 5
- 6
- 7
- 8
4.2.2 构建类并使用lombok
@Data public class Employee { private Long empId; private String empName; private String empGender; private Integer age; private String email;- 1
- 2
- 3
- 4
- 5
- 6
- 7
4.3 insert方法
// 插入一条记录 int insert(T entity); 测试: @Test public void testInsert() { Employee employee=new Employee(); //employee.setEmpId(100000); employee.setEmpName("刘龙"); employee.setEmpGender("男"); employee.setAge(25); employee.setEmail("liulong@163.com"); employeeMapper.insert(employee); }- 1
- 2
- 3
- 4
- 5
- 6
- 7
- 8
- 9
- 10
- 11
- 12
- 13
- 14

从上面的异常可以看出,我们没有给Employee类的empId属性赋值,定义数据库时对应的emp_id列不能为空,所以出错了,为了解决这个错误,你可以给empId属性赋值一个值,可以解决此问题。mybatis-plus默认采用雪花算法生成唯一值,如果想使用mybatis-plus自动生成的雪花算法值可以在实体类的属性上加@TableId注解。- 1
4.4 @TableId注解
描述:主键注解- 1
属性 类型 必须指定 默认值 描述 value String 否 “” 主键字段名 type Enum 否 IdType.NONE 主键类型 IdType- 1
值 描述 AUTO 数据库ID自增: 前提条件, 数据库必须支持自增。 oracle 不支持自增。 NONE 无状态,该类型为未设置主键类型(注解里等于跟随全局,全局里约等于 INPUT) INPUT insert前自行set主键值 ASSIGN_ID 分配ID(主键类型为Number(Long和Integer)或String)(since 3.3.0),使用接口 IdentifierGenerator的方法nextId(默认实现类为DefaultIdentifierGenerator雪花算法)ASSIGN_UUID 分配UUID,主键类型为String(since 3.3.0),使用接口 IdentifierGenerator的方法nextUUID(默认default方法)@NoArgsConstructor @AllArgsConstructor @Data @ToString public class Employee { //@TableId(type=IdType.AUTO) //使用数据库自增策略,数据库必须支持自增并进行了设置。但当数据库中设置了自增这个又可以不配置 //默认使用雪花算法生成数字 @TableId private Long empId; private String empName; private String empGender; private Integer age; private String email; }- 1
- 2
- 3
- 4
- 5
- 6
- 7
- 8
- 9
- 10
- 11
- 12
- 13
- 14
- 15
4.5 @TableName
描述:表名注解- 1
属性 类型 必须指定 默认值 描述 value【重点】 String 否 “” 表名 schema String 否 “” schema keepGlobalPrefix boolean 否 false 是否保持使用全局的 tablePrefix 的值(如果设置了全局 tablePrefix 且自行设置了 value 的值) resultMap String 否 “” xml 中 resultMap 的 id autoResultMap boolean 否 false 是否自动构建 resultMap 并使用(如果设置 resultMap 则不会进行 resultMap 的自动构建并注入) excludeProperty String[] 否 {} 需要排除的属性名(@since 3.3.1) 当表名跟实体类类名不一致时,要使用@TableName注解进行映射 @NoArgsConstructor @AllArgsConstructor @Data @ToString @TableName(value = "tb_employee") public class Employee { //使用数据库自增策略 //@TableId(type=IdType.AUTO) //默认使用雪花算法生成数字 @TableId private Long empId; private String empName; private String empGender; private Integer age; private String email; }- 1
- 2
- 3
- 4
- 5
- 6
- 7
- 8
- 9
- 10
- 11
- 12
- 13
- 14
- 15
- 16
- 17
- 18
- 19
- 20
4.6 @TableField注解
描述:字段注解(非主键)- 1
属性 类型 必须指定 默认值 描述 value【掌握】 String 否 “” 数据库字段名 el String 否 “” 映射为原生 #{ ... }逻辑,相当于写在 xml 里的#{ ... }部分exist【掌握】 boolean 否 true 是否为数据库表字段 condition String 否 “” 字段 where实体查询比较条件,有值设置则按设置的值为准,没有则为默认全局的%s=#{%s},参考update String 否 “” 字段 update set部分注入, 例如:update=“%s+1”:表示更新时会set version=version+1(该属性优先级高于el属性)insertStrategy Enum N DEFAULT 举例:NOT_NULL: insert into table_a(column ) values (#{columnProperty} )updateStrategy Enum N DEFAULT 举例:IGNORED: update table_a set column=#{columnProperty}whereStrategy Enum N DEFAULT 举例:NOT_EMPTY: wherecolumn=#{columnProperty} fill Enum 否 FieldFill.DEFAULT 字段自动填充策略 select boolean 否 true 是否进行 select 查询 keepGlobalFormat boolean 否 false 是否保持使用全局的 format 进行处理 jdbcType JdbcType 否 JdbcType.UNDEFINED JDBC类型 (该默认值不代表会按照该值生效) typeHandler Class 否 UnknownTypeHandler.class 类型处理器 (该默认值不代表会按照该值生效) numericScale String 否 “” 指定小数点后保留的位数 @NoArgsConstructor @AllArgsConstructor @Data @ToString @TableName(value = "tb_employee") public class Employee { @TableId private Long empId; //当表中的列与实体类属性不一致时,使用TableField指定数据库中的列名 @TableField(value = "emp_name") private String name; private String empGender; private Integer age; private String email; //当表中没有remark时,使用TableField的exist=false属性忽略该字段 @TableField(exist = false) private String remark; }- 1
- 2
- 3
- 4
- 5
- 6
- 7
- 8
- 9
- 10
- 11
- 12
- 13
- 14
- 15
- 16
- 17
- 18
4.7 插入数据【主键返回】
修改Employee的empId注解 mybatis: 方式一: <insert > 方式二: <insert> <selectKey> </insert> @TableId(type=IdType.AUTO) private Long empId; mysql-plus会自获取自增主键,把数据库的emp_id设置为自增。测试获取自增主键。 测试: public void testInsert() { Employee employee=new Employee(); employee.setName("刘龙200"); employee.setEmpGender("男"); employee.setAge(25); employee.setEmail("liulong@163.com"); employee.setRemark("该员工是一个好员工"); employeeMapper.insert(employee); System.out.println(employee.getEmpId()); } mybatis 自动配置好主键返回。- 1
- 2
- 3
- 4
- 5
- 6
- 7
- 8
- 9
- 10
- 11
- 12
- 13
- 14
- 15
- 16
- 17
- 18
- 19
- 20
- 21
- 22
- 23
4.8 更新数据的通用方法
4.8.1 updateById方法
根据id进行记录更新,如果对象属性未传值,则不会更新该字段,保持数据库表原来字段值。 public void testUpdateById() { Employee employee=new Employee(); employee.setEmpId(10) employee.setName("刘龙"); employee.setEmpGender("女"); employee.setAge(23); employee.setEmail("liulong@163.com"); employeeMapper.updateById(employee); }- 1
- 2
- 3
- 4
- 5
- 6
- 7
- 8
- 9
- 10
- 11
4.8.2 update方法[稍后讲解]
根据传递的更新条件进行更新。 public void testUpdate(){ Employee employee=new Employee(); employee.setEmpId(1379401965896806402L); employee.setEmpName("王永"); UpdateWrapper updateWrapper = new UpdateWrapper(); updateWrapper.eq("emp_name","刘龙long"); int i = employeeMapper.update(employee,updateWrapper); System.out.println("update:"+i); }- 1
- 2
- 3
- 4
- 5
- 6
- 7
- 8
- 9
- 10
4.9 查询数据的通用方法
4.9.1 selectById方法
根据id查询指定记录 @Test public void testSelectById() { Employee employee=employeeMapper.selectById(1); System.out.println(employee); }- 1
- 2
- 3
- 4
- 5
- 6
4.9.2 selectBatchIds方法
批量查询指多个id的记录集合 @Test public void testSelectBatchIds() { List list= Arrays.asList(1,2,3); List<Employee> employeeList = employeeMapper.selectBatchIds(list); employeeList.forEach(System.out::println); }- 1
- 2
- 3
- 4
- 5
- 6
- 7
4.9.3 selectByMap方法
根据Map集合中传入的条件进行查询,每个条件都是and关系。 @Test public void testSelectByMap() { Map<String,Object> map=new HashMap<>(); map.put("emp_gender","男"); map.put("age",29); List<Employee> employeeList = employeeMapper.selectByMap(map); employeeList.forEach(System.out::println); }- 1
- 2
- 3
- 4
- 5
- 6
- 7
- 8
- 9
- 10
4.10 删除数据方法
4.10.1 deleteById方法
根据id删除记录 @Test public void testDeleteById(){ int rows=employeeMapper.deleteById(1); System.out.println("受影响的行数:"+rows); }- 1
- 2
- 3
- 4
- 5
- 6
4.10.2 deleteByMap方法
根据Map中的条件进行删除,map中的条件在sql语句中是and关系。 @Test public void testDeleteByMap(){ Map<String,Object> map=new HashMap<>(); map.put("emp_gender","男"); map.put("emp_name","刘辉"); int rows=employeeMapper.deleteByMap(map); System.out.println("受影响的行数:"+rows); }- 1
- 2
- 3
- 4
- 5
- 6
- 7
- 8
- 9
4.10.3 deleteBatchIds方法
根据传入List集合中的id进行批量删除 @Test public void testDeleteBatchIds(){ List list= Arrays.asList(4,7,1); int rows=employeeMapper.deleteBatchIds(list); System.out.println("受影响的行数:"+rows); }- 1
- 2
- 3
- 4
- 5
- 6
- 7
第5节:Mybatis-Plus条件构造器【重要】
本章针对于复杂查询需要使用Mybatis-plus条件的构造器,具体讲解和演示条件构造器中的QueryWrapper中的方法使用,使多种案例进行方法演示。- 1
5.1 条件构造器介绍
在mybatis-plus中提了构造条件的类Wrapper,它可以根据自己的意图定义我们需要的条件。Wrapper是一个抽象类,一般情况下我们用它的子类QueryWrapper来实现自定义条件查询.- 1
5.2 selectOne方法
//查询姓名为刘辉军并且性别为男的员工 @Test public void testSelectOne(){ QueryWrapper<Employee> queryWrapper=new QueryWrapper<>(); queryWrapper.eq("emp_name","刘辉军"); queryWrapper.eq("emp_gender","男"); Employee employee = employeeMapper.selectOne(queryWrapper); System.out.println(employee); }- 1
- 2
- 3
- 4
- 5
- 6
- 7
- 8
- 9
5.3 selectList方法
//查询姓名中带有"磊"的并且年龄小于30的员工 @Test public void testSelectList(){ QueryWrapper<Employee> queryWrapper=new QueryWrapper<>(); queryWrapper.like("emp_name","磊").lt("age",30);// less than List<Employee> employeeList = employeeMapper.selectList(queryWrapper); employeeList.forEach(System.out::println); } //查询姓王的或者性别为男,按年龄的降序排序 @Test public void testSelectList2(){ QueryWrapper<Employee> queryWrapper=new QueryWrapper<>(); queryWrapper.like("emp_name","王") .or().eq("emp_gender","男") .orderByDesc("age"); List<Employee> employeeList = employeeMapper.selectList(queryWrapper); employeeList.forEach(System.out::println); } //查询姓刘的并且(年龄小于35或者邮箱不为空) @Test public void testSelectList3(){ QueryWrapper<Employee> queryWrapper=new QueryWrapper<>(); queryWrapper.likeRight("emp_name","刘") .and(wq->wq.lt("age",35).or().isNotNull("email")); List<Employee> employeeList = employeeMapper.selectList(queryWrapper); employeeList.forEach(System.out::println); }- 1
- 2
- 3
- 4
- 5
- 6
- 7
- 8
- 9
- 10
- 11
- 12
- 13
- 14
- 15
- 16
- 17
- 18
- 19
- 20
- 21
- 22
- 23
- 24
- 25
- 26
- 27
5.4 selectPage方法
selectPage用于分页,在mybatis-plus中分页有两种一种是罗辑分页或叫内存分页,另一种是物理分页,内存分页就是把数据全部查询出来放到内存中,返回你想要的一部分数据,当数据量非常庞大时这种方法就行不通了,因为太耗内存,所以一般采用物理分页,需要springboot中加入物理分页配置:- 1
@Configuration public class MybatisPlusConfig { @Bean public MybatisPlusInterceptor mybatisPlusInterceptor() { MybatisPlusInterceptor interceptor = new MybatisPlusInterceptor(); interceptor.addInnerInterceptor(new PaginationInnerInterceptor(DbType.MYSQL)); return interceptor; } }- 1
- 2
- 3
- 4
- 5
- 6
- 7
- 8
- 9
@Test public void testSelectPage(){ QueryWrapper<Employee> queryWrapper=new QueryWrapper<>(); queryWrapper.lt("age",50); Page<Employee> page=new Page<>(1,2); Page<Employee> employeePage = employeeMapper.selectPage(page, queryWrapper); System.out.println("当前页:"+ employeePage.getCurrent()); System.out.println("每页记录数:"+employeePage.getSize()); System.out.println("总记录数:"+employeePage.getTotal()); System.out.println("总页数:"+employeePage.getPages()); List<Employee> employeeList = employeePage.getRecords(); employeeList.forEach(System.out::println); }- 1
- 2
- 3
- 4
- 5
- 6
- 7
- 8
- 9
- 10
- 11
- 12
- 13
5.5 update方法
//根据姓名和年龄修改记录 @Test public void testUpdate(){ QueryWrapper<Employee> updateWrapper=new QueryWrapper<>(); updateWrapper.eq("emp_name","刘龙") .eq("age",25); Employee employee=new Employee(); employee.setEmpId(1367720249630318593L); employee.setName("刘龙"); employee.setEmail("lilong111@.qq.com"); employee.setAge(26); employee.setEmpGender("女"); int rows=employeeMapper.update(employee,updateWrapper); System.out.println("受影响的行数:"+rows); } 可以使用UpdateWrapper 进行更新操作: @Test public void updateTest3(){ Employee employee =new Employee(); //设置更新的数据: employee.setEmpName("李华"); employee.setEmail("lihua@qq.com"); UpdateWrapper<Employee> updateWrapper = new UpdateWrapper<>(); updateWrapper.eq("age",24); updateWrapper.eq("emp_name","何雨柱"); //参数一: employee 要更新的数据: //参数二: 设置查询条件: employeeMapper.update(employee,updateWrapper); }- 1
- 2
- 3
- 4
- 5
- 6
- 7
- 8
- 9
- 10
- 11
- 12
- 13
- 14
- 15
- 16
- 17
- 18
- 19
- 20
- 21
- 22
- 23
- 24
- 25
- 26
- 27
- 28
- 29
- 30
- 31
- 32
5.6 delete方法
//根据姓名和年龄删除记录 @Test public void testDelete(){ QueryWrapper<Employee> queryWrapper=new QueryWrapper<>(); queryWrapper.eq("emp_name","刘龙") .eq("age",26); int rows=employeeMapper.delete(queryWrapper); System.out.println("受影响的行数:"+rows); }- 1
- 2
- 3
- 4
- 5
- 6
- 7
- 8
- 9
第6节:Mybatis-Plus的Service封装
本章主要描述讲解Mybatis-Plus生成Service层的好处和生成步聚,对原始的mapper方法的功能进一步增加。- 1
6.1 通用service简介
Mybatis-Plus除了通用的Mapper还有通用的Servcie层,这也减少了相对应的代码工作量,把通用的接口提取到公共。其实按照MP的这种思想,也可以自己实现一些通用的Controller。- 1
6.2 通用service常用方法
/** * 插入一条记录(选择字段,策略插入) * @param entity 实体对象 */ default boolean save(T entity) { return SqlHelper.retBool(getBaseMapper().insert(entity)); } /** * 根据 ID 选择修改 * @param entity 实体对象 */ default boolean updateById(T entity) { return SqlHelper.retBool(getBaseMapper().updateById(entity)); } /** * TableId 注解存在更新记录,否插入一条记录 * @param entity 实体对象 */ boolean saveOrUpdate(T entity); /** * 根据 Wrapper,查询一条记录
*结果集,如果是多个会抛出异常,随机取一条加上限制条件 wrapper.last("LIMIT 1")
* @param queryWrapper 实体对象封装操作类 {@link com.baomidou.mybatisplus.core.conditions.query.QueryWrapper} */ default T getOne(Wrapper<T> queryWrapper) { return getOne(queryWrapper, true); } /** * 根据 Wrapper,查询一条记录 * * @param queryWrapper 实体对象封装操作类 {@link com.baomidou.mybatisplus.core.conditions.query.QueryWrapper} * @param throwEx 有多个 result 是否抛出异常 */ T getOne(Wrapper<T> queryWrapper, boolean throwEx); 其它方法请参考IService接口。 IService接口的具体实现类: ServiceImpl ServiceImpl 实现类, 就对IService接口当中的方法进行了实现~ ~- 1
- 2
- 3
- 4
- 5
- 6
- 7
- 8
- 9
- 10
- 11
- 12
- 13
- 14
- 15
- 16
- 17
- 18
- 19
- 20
- 21
- 22
- 23
- 24
- 25
- 26
- 27
- 28
- 29
- 30
- 31
- 32
- 33
- 34
- 35
- 36
- 37
- 38
- 39
- 40
- 41
- 42
- 43
- 44
6.3 通用service的案例
6.3.1 构建工程添加依赖
<dependency> <groupId>mysqlgroupId> <artifactId>mysql-connector-javaartifactId> <version>5.1.47version> dependency> <dependency> <groupId>org.projectlombokgroupId> <artifactId>lombokartifactId> <optional>trueoptional> dependency> <dependency> <groupId>org.springframework.bootgroupId> <artifactId>spring-boot-starter-testartifactId> <scope>testscope> dependency> <dependency> <groupId>com.baomidougroupId> <artifactId>mybatis-plus-boot-starterartifactId> <version>3.4.2version> dependency>- 1
- 2
- 3
- 4
- 5
- 6
- 7
- 8
- 9
- 10
- 11
- 12
- 13
- 14
- 15
- 16
- 17
- 18
- 19
- 20
- 21
- 22
6.3.2 构建service接口
// IService 是Mybatis-plus提供的一个通用的Service接口 public interface EmloyeeService extends IService<Employee> { }- 1
- 2
- 3
6.3.3 构建service实现类
// ServiceImpl 是Mybatis-plus提供的一个通用的Service接口的实现类 // 注意实现类的泛型: EmployeeMapper Employee @Service public class EmployeeServiceImpl extends ServiceImpl<EmployeeMapper,Employee> implements EmloyeeService { }- 1
- 2
- 3
- 4
- 5
- 6
6.3.4 通用servcie测试
@Test public void testSave(){ Employee employee=new Employee(); employee.setName("孙宝来"); employee.setEmpGender("男"); employee.setAge(30); employee.setEmail("sunbaolai@qq.com"); employeeService.save(employee); } @Test public void testSaveOrUpdate(){ Employee employee=new Employee(); employee.setEmpId(1367720249630318594L); employee.setName("孙宝来"); employee.setEmpGender("女"); employee.setAge(33); employee.setEmail("sunbaolai@qq.com"); employeeService.saveOrUpdate(employee); } @Test public void testGetOne(){ // false:表明到查询的值超过一个,不会抛出异常,默认取结果集的第一条记录。, QueryWrapper<Employee> queryWrapper=new QueryWrapper<>(); queryWrapper.gt("age",24); Employee employee = employeeService.getOne(queryWrapper,false); System.out.println(employee); }- 1
- 2
- 3
- 4
- 5
- 6
- 7
- 8
- 9
- 10
- 11
- 12
- 13
- 14
- 15
- 16
- 17
- 18
- 19
- 20
- 21
- 22
- 23
- 24
- 25
- 26
- 27
- 28
- 29
- 30
第7节:Mybatis-Plus代码生成器(逆向工程)
本章主要讲解Mybatis-Plus代码生成器的步聚配置,进一步简化开发中的工作量,提升开发速度。生成后在springboot的controller层写查询方法,启动springboot进行测试。- 1
7.1 代码生成器介绍
代码生成器顾名思义就是为我们生成一些代码,省去了我们一些时间。AutoGenerator 是 MyBatis-Plus 的代码生成器,通过 AutoGenerator 可以快速生成 Entity(pojo)、Mapper、Mapper XML、Service、Controller 等各个模块的代码,极大的提升了开发效率,MyBatis-Plus从3.0.3 之后移除了代码生成器与模板引擎的默认依赖,需要手动添加相关依赖,才能实现代码生成器功能。- 1
7.2 构建工程引入依赖
<dependency> <groupId>org.springframework.bootgroupId> <artifactId>spring-boot-starter-testartifactId> <scope>testscope> dependency> <dependency> <groupId>com.baomidougroupId> <artifactId>mybatis-plus-generatorartifactId> <version>3.4.1version> dependency> <dependency> <groupId>org.apache.velocitygroupId> <artifactId>velocity-engine-coreartifactId> <version>2.3version> dependency> <dependency> <groupId>org.springframework.bootgroupId> <artifactId>spring-boot-starter-webartifactId> dependency> <dependency> <groupId>mysqlgroupId> <artifactId>mysql-connector-javaartifactId> <version>5.1.47version> dependency> <dependency> <groupId>com.baomidougroupId> <artifactId>mybatis-plus-boot-starterartifactId> <version>3.2.0version> dependency> <dependency> <groupId>org.projectlombokgroupId> <artifactId>lombokartifactId> dependency>- 1
- 2
- 3
- 4
- 5
- 6
- 7
- 8
- 9
- 10
- 11
- 12
- 13
- 14
- 15
- 16
- 17
- 18
- 19
- 20
- 21
- 22
- 23
- 24
- 25
- 26
- 27
- 28
- 29
- 30
- 31
- 32
- 33
- 34
- 35
- 36
- 37
7.3 编写生成器代码
7.3.1 GlobalConfig全局配置编码
// 代码生成器 AutoGenerator mpg = new AutoGenerator(); // 全局配置 GlobalConfig gc = new GlobalConfig();//注意导入包的时候, 是generator包当中的对象 String projectPath = System.getProperty("user.dir"); gc.setOutputDir(projectPath + "/src/main/java"); gc.setAuthor("offcn");//设置作者 gc.setOpen(false);//生成时候是否打开资源管理器 gc.setFileOverride(false);//重新生成文件时是否覆盖 gc.setServiceName("%sService"); //生成service时候去掉I // gc.setSwagger2(true); 实体属性 Swagger2 注解 mpg.setGlobalConfig(gc);- 1
- 2
- 3
- 4
- 5
- 6
- 7
- 8
- 9
- 10
- 11
- 12
7.3.2 DataSourceConfig数据源配置编码
// 数据源配置 DataSourceConfig dsc = new DataSourceConfig(); dsc.setUrl("jdbc:mysql://localhost:3306/mybatis_plus?useUnicode=true&useSSL=false&characterEncoding=utf8"); // dsc.setSchemaName("public"); dsc.setDriverName("com.mysql.jdbc.Driver"); dsc.setUsername("root"); dsc.setPassword("root"); dsc.setDbType(DbType.MYSQL); mpg.setDataSource(dsc);- 1
- 2
- 3
- 4
- 5
- 6
- 7
- 8
- 9
7.3.3 PackageConfig包名策略配置
// 包配置 PackageConfig pc = new PackageConfig(); pc.setModuleName(null); pc.setParent("com.offcn.ssm"); pc.setController("controller"); pc.setEntity("entity"); pc.setService("service"); pc.setMapper("mapper"); mpg.setPackageInfo(pc);- 1
- 2
- 3
- 4
- 5
- 6
- 7
- 8
- 9
7.3.4 StrategyConfig策略配置编码
//策略配置 StrategyConfig strategy = new StrategyConfig(); strategy.setInclude("tb_employee");//对那一张表生成代码 strategy.setNaming(NamingStrategy.underline_to_camel);//数据库表映射到实体的命名策略 strategy.setTablePrefix(pc.getModuleName() + "_"); //生成实体时去掉表前缀 strategy.setColumnNaming(NamingStrategy.underline_to_camel);//数据库表字段映射到实体的命名策略 strategy.setEntityLombokModel(true); // lombok 模型 @Accessors(chain = true) setter链式操作 strategy.setRestControllerStyle(true); //restful api风格控制器 strategy.setControllerMappingHyphenStyle(true); //url中驼峰转连字符 mpg.setStrategy(strategy);- 1
- 2
- 3
- 4
- 5
- 6
- 7
- 8
- 9
- 10
- 11
- 12
7.3.5 执行
//执行 mpg.execute();- 1
- 2
7.4 执行生成器代码完成测试
在主启动类上用@MapperScan扫描mapper接口 @MapperScan("com.offcn.ssm.mapper") 在application.yml中添加数据库配置信息 spring: datasource: driver-class-name: com.mysql.jdbc.Driver url: jdbc:mysql:///mybatis_plus username: root password: root logging: level: com: offcn: mybatis: dao: debug 在生成的contorller中编写查询方法 @RestController @RequestMapping("/employee") public class EmployeeController { @Autowired private EmployeeService employeeService; @RequestMapping("/emps") public List<Employee> getEmployees(){ List<Employee> list = employeeService.list(); return list; } } 启动springboot在浏览器中输入http://localhost:8080/tb-employee/emps- 1
- 2
- 3
- 4
- 5
- 6
- 7
- 8
- 9
- 10
- 11
- 12
- 13
- 14
- 15
- 16
- 17
- 18
- 19
- 20
- 21
- 22
- 23
- 24
- 25
- 26
- 27
- 28
- 29
- 30
- 31
- 32
- 33

-
相关阅读:
PyQt5快速开发与实战 5.3 多线程
挑战杯 基于深度学习的动物识别 - 卷积神经网络 机器视觉 图像识别
【JVM】类加载器
LeetCode-81. 搜索旋转排序数组 II-Java-medium
第1章 初识AOP
计算机毕业设计Java婚纱摄影网站(源码+系统+mysql数据库+lw文档)
Linux命令之常用基础命令备查手册
2022ICPC 网络赛第二场 B Non-decreasing Array(区间dp)
基于HMM隐马尔可夫模型的金融数据预测算法matlab仿真
VTK网格细分-vtkAdaptiveSubdivisionFilter
- 原文地址:https://blog.csdn.net/sjxxxx_/article/details/127889531
