-
ARouter详解
ARouter简介
ARouter 是阿里巴巴开发的一款,页面路由工具库,旨在解决组件化或者模块之间界面跳转的问题。一、ARouter页面路由产生的背景
- Intent intent = new Intent(mContext, XxxActivity.class);
- intent.putExtra("key","value");
- startActivity(intent);
- Intent intent = new Intent(mContext, XxxActivity.class);
- intent.putExtra("key","value");
- startActivityForResult(intent, 666);
先看下上面的代码,在未使用ARouter路由框架之前是这样的。在Android开发中,最常见的常用功能就是页面的跳转了,我们经常遇到从浏览器或者其他App 跳转到自己App中某个页面的需求。不过就算是App内部简单的页面跳转,随着时间的推移,也会遇到一些问题:1. 集中式的URL管理:谈到集中式的管理,总是比较蛋疼,多人协同开发的时候,大家都去AndroidManifest.xml文件中,定义各种,然后使用隐式Intent实现跳转。最终发现AndroidManifest.xml中充斥着各种Schame、各种Path,需要经常解决Path冲突的问题。 2. 可培植性较差:AndroidManifest.xml限制于xml格式,书写比较麻烦,配置较为复杂,可以进行自定义的东西也很少。3. 跳转过程中无法干预:直接通过Intent的方式跳转,跳转过程,开发者是无法进行干预的,一些面向切面的事情也难以实施。比如:登录、埋点的逻辑,在每个子页面中判断是很不合理的。4. 跨模块无法显示依赖:当App程序越来越大的时候我们会对App做水平拆分,按照业务拆分成多个子模块,模块与模块之间完全解藕,通过打包流程控制App功能,这样更有利于多人协作开发,逻辑相互不干扰。这种情况下,就只能依赖隐式Intent实现页面间的跳转了 ,书写麻烦,成功与否也难以控制。为了解决上述问题,我们需要一款能够解藕、简单、功能全面、定制性强、支持拦截跳转过程的路由组件,为此ARouter便诞生了。二、原生路由方案的缺点
1,显式:直接的类依赖,耦合严重2,隐式:会在AndroidManifest.xml中进行集中式管理,写作困难。3,AndroidManifest.xml扩展性差。4,跳转过程无法控制。5,失败无法降级。三、ARouter的优势
1,使用注解,实现了映射关系自动注册 与 分布式路由管理2,编译期间处理注解,并生成映射文件,没有使用反射,不影响运行时性能3,映射关系按组分类,多级管理,按需初始化。4,灵活的降级策略,每次跳转都会回调跳转结果,避免StartActivity() 一旦失败会抛出异常。5,自定义拦截器,自定义拦截顺序,可以对路由进行拦截,比如登陆判断,和埋点处理。6,支持依赖注入,可单独作为依赖注入框架使用,从而实现 跨模块API调用。7,支持直接解析标准Url进行跳转,并自动注入参数到目标页面中。8,支持多模块使用,支持组件化开发。四、ARouter功能介绍
1,支持直接解析URL进行跳转、参数将按照类型解析到Bundle,支持Java基本类型。2,支持应用内的标准页面跳转,API接近Android原生接口。3,支持模块工程,允许分别打包,包结构符合Android包规范即可。4,支持组件化开发。5,支持拦截跳转过程,在跳转过程中自定义拦截逻辑,自定义拦截顺序。6,支持服务托管,可以通过ByName、ByType这两种方式获取服务实例,方便面向接口开发 与 跨模块调用解藕。7,支持 映射关系按组分类、多级管理,按需初始化,减少内存占用,提高查询效率。8,支持用户指定全局降级策略。9,支持获取单次跳转结果。10,支持丰富的API和可定制化。11,被ARouter管理的页面、拦截器、服务等均无需主动注册到ARouter,是被动发现的。12,支持Android N推出的Jack编译链。13,支持获取Fragment。14,支持MultiDex (Google方案)。15,支持多种方式配置专场动画。16,支持Kotlin及混编。17,支持第三方App加固。18,支持生成路由文档。19,支持InstantRun热运行。五、ARouter的典型应用场景
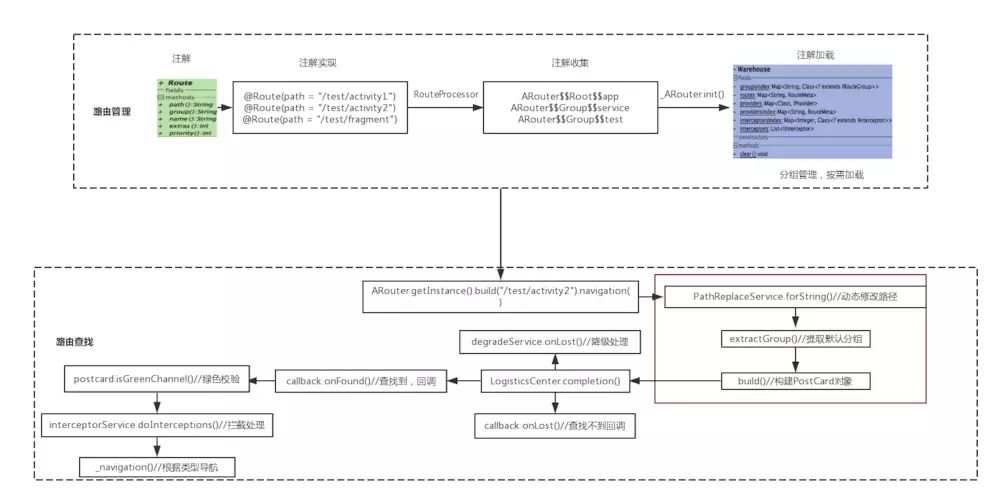
1,从APP外部URL映射到App内的某个页面,以及参数传递与解析。2,App内的跨模块页面之间的跳转,实现模块间解藕。3,拦截跳转过程,处理登陆、埋点等逻辑。4,跨模块API调用,模块之间解藕 (注册ARouter服务的形式,通过接口相互调用)。六、ARouter路由导航流程图1、添加依赖和配置在app.gradle 和 每个module.gradle 里面都需要进行配置- android {
- defaultConfig {
- ...
- javaCompileOptions {
- annotationProcessorOptions {
- arguments = [AROUTER_MODULE_NAME: project.getName()]
- }
- }
- }
- }
- dependencies {
- // 替换成最新版本, 需要注意的是api
- // 要与compiler匹配使用,均使用最新版可以保证兼容
- compile 'com.alibaba:arouter-api:x.x.x'
- annotationProcessor 'com.alibaba:arouter-compiler:x.x.x'
- }
2、使用Gradle插件,实现路由列表的自动加载 (可选)- apply plugin: 'com.alibaba.arouter'
- buildscript {
- repositories {
- jcenter()
- }
- dependencies {
- classpath "com.alibaba:arouter-register:?"
- }
- }
3、添加混淆配置- -keep public class com.alibaba.android.arouter.routes.**{*;}
- -keep public class com.alibaba.android.arouter.facade.**{*;}
- -keep class * implements com.alibaba.android.arouter.facade.template.ISyringe{*;}
- # 如果使用了 byType 的方式获取 Service,需添加下面规则,保护接口
- -keep interface * implements com.alibaba.android.arouter.facade.template.IProvider
- # 如果使用了 单类注入,即不定义接口实现 IProvider,需添加下面规则,保护实现
- # -keep class * implements com.alibaba.android.arouter.facade.template.IProvider
4、生成路由文档- // 更新 build.gradle, 添加参数 AROUTER_GENERATE_DOC = enable
- // 生成的文档路径 : build/generated/source/apt/
- // (debug or release)/com/alibaba/android/arouter/docs/arouter-map-of-${moduleName}.json
- android {
- defaultConfig {
- ...
- javaCompileOptions {
- annotationProcessorOptions {
- arguments = [AROUTER_MODULE_NAME: project.getName(), AROUTER_GENERATE_DOC: "enable"]
- }
- }
- }
- }
八、ARouter基本功能的使用
1、ARouter初始化- public static void initRouter(Application application) {
- if (BuildConfig.DEBUG) { // 这两行必须写在init之前,否则这些配置在init过程中将无效
- ARouter.openLog(); // 打印日志
- // 开启调试模式(如果在InstantRun模式下运行,必须开启调试模式!线上版本需要关闭,否则有安全风险)
- ARouter.openDebug();
- }
- ARouter.init(application); // 尽可能早,推荐在Application中初始化
- }
2、为目标Activity页面 添加注解- // 在支持路由的页面上添加注解(必选)
- // 这里的路径需要注意的是至少需要有两级,/xx/xx
- @Route(path = "/test/activity")
- public class YourActivity extend Activity {
- ...
- }
3,发起路由跳转- // 1. 应用内简单的跳转(通过URL跳转在'进阶用法'中)
- ARouter.getInstance().build("/test/activity").navigation();
- // 2. 跳转并携带参数
- ARouter.getInstance().build("/test/1")
- .withLong("key1", 666L)
- .withString("key3", "888")
- .withObject("key4", new Test("Jack", "Rose"))
- .navigation();
4,跳转到其他moudleARouter跳转到其他moudle时,需要注意的是,moudle中的目标Activity或者service服务类上使用@Route(path = “xx/xxx”) 与 app moudle中使用的@Route里的path路径不能相同,否则会报错,找不到索引。步骤一:鼠标右键项目 -> New -> Module -> 直至创建完成;步骤二:注释掉module中build.gradle里面相应的配置,如:(applicationId 和apply plugin等)同时引入ARouter中的依赖库,同app module;步骤三:删除module中AndoridManifest.xml中不需要的配置;步骤四:为module中的目标页面配置路由步骤五:实现module之间的跳转。九、ARouter注解
注解共有三种:@Route、@AutoWired、@Interceptor1、注解路由 @Route用于注解一个目标Activity或者 一个目标服务类。参数包括@Route (path = “/self/test_activity”, group = “default”, name = “这是一个测试页面”,)- /**
- * Path of route
- */
- String path();
- /**
- * Used to merger routes, the group name must be use the common words !!!
- */
- String group() default "";
- /**
- * Name of route, used to generate javadoc.
- */
- String name() default "";
- /**
- * Extra data, 可以被用户设置
- * Ps. U should use the integer num sign the switch, by bits. 10001010101010
- */
- int extras() default Integer.MIN_VALUE;
- /**
- * The priority of route.
- * 值越小,优先级越高
- */
- int priority() default -1;
2、注解字段 @AutoWired接收参数时,不要忘记 进行注册 ARouter.getInstance().inject(this);用户注解字段参数,需要配合ARouter.getInstance().inject(this)配置。2.1 传递参数- @OnClick(R2.id.enter_activity_inject)
- public void onClick9() {
- TestSerializable testSerializable = new TestSerializable("Titanic", 555);
- TestParcelable testParcelable = new TestParcelable("jack", 666);
- TestObj testObj = new TestObj("Rose", 777);
- List
objList = new ArrayList<>(); - objList.add(testObj);
- Map
- map.put("testMap", objList);
- ARouter.getInstance().build("/self/activity_inject")
- .withString("name", "老王")
- .withInt("age", 18)
- .withBoolean("boy", true)
- .withLong("high", 180)
- .withString("url", "https://a.b.c")
- .withSerializable("ser", testSerializable)
- .withParcelable("pac", testParcelable)
- .withObject("obj", testObj)
- .withObject("objList", objList)
- .withObject("map", map)
- .navigation();
- }
2.2 接收参数值- @Autowired(desc = "姓名")
- String name = "jack";
- @Autowired
- int age = 10;
- @Autowired
- int height = 175;
- //通过name来映射URL中的不同参数,及girl是传递参数时的字段名,在当前,可以改变字段名称,使用boy替换girl。
- @Autowired(name = "boy", required = true)
- boolean girl;
- @Autowired
- char ch = 'A';
- @Autowired
- float fl = 12.00f;
- @Autowired
- double dou = 12.01d;
- @Autowired
- TestSerializable ser;
- @Autowired
- TestParcelable pac;
- // URL中不能传递Parcelable类型数据,通过ARouter api可以传递Parcelable对象
- // 支持解析自定义对象,URL中使用json传递
- @Autowired
- TestObj obj;
- //使用withObject传递实现Serializable接口ArrayList和HashMap的时候,
- //接收对象的地方不能标注为具体实现的类型,否则会影响序列化中类型的判断,
- //应该标注为:List 和 Map.
- @Autowired
- List
objList; - @Autowired
- Map
- @Autowired
- String url;
- //获取服务实例的第三种方式 -- 通过注解获取
- @Autowired
- HelloService helloService;
自定义类型参数--用于网页传递json数据网页传递json参数到App页面,然后ARouter帮助我们自动转换为我们的自定义数据类- // 如果需要传递自定义对象,新建一个类(并非自定义对象类),
- // 然后实现 SerializationService, 并使用@Route注解标注(方便用户自行选择序列化方式),例如
- @Route(path = "/self_service/json")
- public class JsonServiceImpl implements SerializationService {
- @Override
- public void init(Context context) {
- }
- //json字符串转换为对象
- @Override
- public
T json2Object(String text, Class clazz) { - return JSON.parseObject(text, clazz);
- }
- //自定义对象转换为json字符串
- @Override
- public String object2Json(Object instance) {
- return JSON.toJSONString(instance);
- }
- @Override
- public
T parseObject(String input, Type clazz) { - return JSON.parseObject(input, clazz);
- }
- }
网页链接为:- <p>
- <a href="arouter://m.aliyun.com/test/activity1?name=tpnet&age=21&sex=true&obj=%7B%22name%22:%22jack%22,%22id%22:666%7D">
- 带json自定义对象
- a>
- p>
自定义对象为:- public class TestObj() {
- //这里变量名称对应Url的json的key
- public String name;
- public int id;
- }
然后在目标Activity中接收对象:- @AutoWired
- String name;
- @AutoWired(name = “id”)
- int ID;
3、拦截器 @Interceptor (拦截跳转过程,面向切面编程)拦截器注解,在跳转的过程中进行拦截,方便添加某些逻辑处理。- /**
- * 自定义拦截器
- * priority: 为拦截器的优先级,其值越小,优先级越高;多个拦截器时候有用;
- */
- @Interceptor(priority = 7, name = "测试用拦截器")
- public class Test1Interceptor implements IInterceptor {
- Context mContext;
- /**
- * process:拦截器操作
- * @param postcard 数据
- * @param callback 回调
- */
- @Override
- public void process(final Postcard postcard, final InterceptorCallback callback) {
- if ("/self/activity_page".equals(postcard.getPath())) {
- // 这里的弹窗仅做举例,代码写法不具有可参考价值
- final AlertDialog.Builder ab = new AlertDialog.Builder(ARouterHomeActivity.getThis());
- ab.setCancelable(false);
- ab.setTitle("温馨提醒");
- ab.setMessage(
- "想要跳转到ARouterPageActivity么?(触发了\"/inter/test\"拦截器,拦截了本次跳转)”
- );
- ab.setNegativeButton("继续", new DialogInterface.OnClickListener() {
- @Override
- public void onClick(DialogInterface dialog, int which) {
- //继续执行跳转,不做额外的拦截操作
- callback.onContinue(postcard);
- }
- });
- ab.setNeutralButton("算了", new DialogInterface.OnClickListener() {
- @Override
- public void onClick(DialogInterface dialog, int which) {
- //直接终止跳转
- callback.onInterrupt(null);
- callback.onInterrupt(new RuntimeException("出现跳转终止的异常"));
- }
- });
- ab.setPositiveButton("加参数", new DialogInterface.OnClickListener() {
- @Override
- public void onClick(DialogInterface dialog, int which) {
- postcard.withString("extra", "这拦截器中附加的参数");
- callback.onContinue(postcard);
- }
- });
- MainLooper.runOnUiThread(new Runnable() {
- @Override
- public void run() {
- ab.create().show();
- }
- });
- } else {
- callback.onContinue(postcard);
- }
- }
- /**
- * 拦截器的初始化,会在sdk初始化的时候调用该方法,且仅会调用一次;
- */
- @Override
- public void init(Context context) {
- mContext = context;
- Log.e("testService", Test1Interceptor.class.getName() + " has init.");
- }
- }
十、服务
并不是说的四大组件中的service服务,而是一个普通对象。ARouter中的服务,可以通过注入的方式解藕,实现moudle模块之间的API调用。1、服务管理——暴露服务- // 声明接口,其他组件通过接口来调用服务
- public interface HelloService implements IProvider {
- String sayHello(String name);
- }
- // 实现接口
- @Route(path = "/yourservicegroupname/hello", name = "测试服务")
- public class HelloServiceImpl implements HelloService {
- @Override
- public String sayHello(String name) {
- return "hello, " + name;
- }
- @Override
- public void init(Context context) {
- }
- }
2、服务管理——发现服务- public class Test {
- //注解的方式获取服务
- @Autowired
- HelloService helloService;
- //注解的方式获取服务—重命名服务
- @Autowired(name = "/yourservicegroupname/hello")
- HelloService helloService2;
- //其他方式获取服务
- HelloService helloService3;
- HelloService helloService4;
- public Test() {
- //这里是重点********** 出过错,忘记在使用 Aroter的组件(Activity)中注册了
- ARouter.getInstance().inject(this);
- }
- public void testService() {
- // 1. (推荐)使用依赖注入的方式发现服务,通过注解标注字段,即可使用,无需主动获取
- // Autowired注解中标注name之后,将会使用byName的方式注入对应的字段,
- // 不设置name属性,会默认使用byType的方式发现服务
- // (当同一接口有多个实现的时候,必须使用byName的方式发现服务)
- helloService.sayHello("Vergil");
- helloService2.sayHello("Vergil");
- // 2. 使用依赖查找的方式发现服务,主动去发现服务并使用,下面两种方式分别是byName和byType
- helloService3 = ARouter.getInstance().navigation(HelloService.class);
- helloService4 = (HelloService) ARouter.getInstance().build("/yourservicegroupname/hello").navigation();
- helloService3.sayHello("Vergil");
- helloService4.sayHello("Vergil");
- }
- }
3、预处理服务
- // 实现 PretreatmentService 接口,并加上一个Path内容任意的注解即可
- @Route(path = "/xxx/xxx")
- public class PretreatmentServiceImpl implements PretreatmentService {
- @Override
- public boolean onPretreatment(Context context, Postcard postcard) {
- // 跳转前预处理,如果需要自行处理跳转,该方法返回 false 即可
- }
- @Override
- public void init(Context context) {
- }
- }
4、重写跳转Url的服务
即会拦截跳转时的Path 和 Url (app内部跳转,以及页面跳转到app页面) ,拦截之后可以重新定义跳转路径,改变跳转的目标页面。- @Route(path = "/self/repace_pathorurl_service")
- public class ReplacePathOrUrlServiceImpl implements PathReplaceService {
- Context mContext;
- /**
- * void 重写跳转路径path
- * @param path 原始的跳转路径
- * @return 按照一定的规则处理之后返回处理后的结果
- */
- @Override
- public String forString(String path) {
- return path;
- }
- /**
- * void 重写跳转Uri
- * @param uri 原始的跳转url
- * @return 按照一定的规则处理之后返回处理后的结果
- */
- @Override
- public Uri forUri(Uri uri) {
- return uri;
- }
- @Override
- public void init(Context context) {
- this.mContext = context;
- }
十一、为目标页面,声明更多参数
// 我们经常需要在目标页面中配置一些属性,比方说"是否需要登陆”之类的,// 可以通过 Route 注解中的 extras 属性进行扩展,这个属性是一个 int值,// 换句话说,单个int有4字节,也就是32位,可以配置32个开关// 剩下的可以自行发挥,通过字节操作可以标识32个开关,通过开关标记目标页面的一些属性,// 在拦截器中可以拿到这个标记进行业务逻辑判断@Route(path = "/test/activity", extras = Consts.XXXX)十二,降级策略
通俗的讲,降级就是,在使用ARouter实现跳转的时候,如果发生错误,而进行相应的逻辑处理,不至于导致崩溃现象。十三、API总结
- //构建标准的路由请求
- ARouter.getInstance().build("/home/main").navigation();
- //构建标准的路由请求,并指定分组
- ARouter.getInstance().build("/home/main", "ap").navigation();
- //构建标准的路由请求,通过Uri直接解析
- Uri uri;
- ARouter.getInstance().build(uri).navigation();
- //构建标准的路由请求,startActivityForResult
- //navigation的第一个参数必须是Activity,第二个参数则是RequestCode
- ARouter.getInstance().build("/home/main", "ap").navigation(this, 5);
- //直接传递Bundle
- Bundle params = new Bundle();
- ARouter.getInstance()
- .build("/home/main")
- .with(params)
- .navigation();
- //指定Flag
- ARouter.getInstance()
- .build("/home/main")
- .withFlags();
- .navigation();
- //获取Fragment
- Fragment fragment = (Fragment) ARouter.getInstance().build("/test/fragment").navigation();
- //对象传递
- ARouter.getInstance()
- .withObject("key", new TestObj("Jack", "Rose"))
- .navigation();
- //觉得接口不够多,可以直接拿出Bundle赋值
- ARouter.getInstance()
- .build("/home/main")
- .getExtra();
- //转场动画(常规方式)
- ARouter.getInstance()
- .build("/test/activity2")
- .withTransition(R.anim.slide_in_bottom, R.anim.slide_out_bottom)
- .navigation(this);
- //转场动画(API16+)
- ActivityOptionsCompat compat = ActivityOptionsCompat.
- makeScaleUpAnimation(v, v.getWidth() / 2, v.getHeight() / 2, 0, 0);
- //ps. makeSceneTransitionAnimation 使用共享元素的时候,需要在navigation方法中传入当前Activity
- ARouter.getInstance()
- .build("/test/activity2")
- .withOptionsCompat(compat)
- .navigation();
- //使用绿色通道(跳过所有的拦截器)
- ARouter.getInstance().build("/home/main").greenChannel().navigation();
- //使用自己的日志工具打印日志
- ARouter.setLogger();
- //获取原始的URI
- String uriStr = getIntent().getStringExtra(ARouter.RAW_URI);
- //关闭ARouter
- ARouter.getInstance().destroy();
十四、使用IDE插件,导航到目标类
在 Android Studio 插件市场中搜索 ARouter Helper, 或者直接下载文档上方 最新版本 中列出的 arouter-idea-plugin zip 安装包手动安装,安装后 插件无任何设置,可以在跳转代码的行首找到一个图标 () 点击该图标,即可跳转到标识了代码中路径的目标类 -
相关阅读:
springboot docker
使用C++的CCF-CSP满分解决方案 202012-2 期末预测之最佳阈值
【HMS Core】【SDK集成】Android Studio中Gradle Version7.1+以上版本如何集成agcp插件?
LCT 的基本操作
python Matplotlib Tkinter-->tab切换3
华为机试 HJ36 字符串加密【Java实现】
LCR 175.计算二叉树的深度
递归查找树形状结(利用steam流的方式)leval值标明
[漏洞复现]Text4shell(CVE-2022-42889)
js 数组移除指定元素【函数封装】(含对象数组移除指定元素)
- 原文地址:https://blog.csdn.net/m0_49508485/article/details/127786294