-
系统开发系列 之MyEclipse创建WebService详细教程和调用教程(spring框架+maven+CXF框架)
1 回顾
【系统开发系列 之MyEclipse创建WebService详细教程和调用教程】介绍了使用JWS实现WebService接口的发布和调用,主要涉及的点有:
(1)MyEclipse点击File->New->Web services project,选择JAX-WS 版本为2.0;
(2)添加相应的JAX-WSLibrary,右键项目->properties->JavaBuildPath->Libraries,搜索JAX选择确认,右键项目->properties->JavaBuildPath->Libraries如下如图,点击选中JAX-WS Library在点击Edit,将JAX-WS Library另外两个包添加进去;
(3)添加对应的业务主类并利用tomcat发布接口。
详细内容可参考:https://blog.csdn.net/Zmj_Dns/article/details/104435559 MyEclipse创建WebService最详细(避坑)教程2 使用spring框架+maven+CXF框架实现
(1)介绍CXF框架
CXF可以用来构建和开发 WebService,这些服务可以支持多种协议,比如:SOAP、POST/HTTP、HTTP ,CXF 大大简化了WebService并且可以天然地和 Spring 进行无缝集成。
SOAP:HTTP 协议 + XML 数据格式
WSDL:WebService Description Language基于Xml语言,用来描述WebService 以及其函数、参数和返回值
(2)操作步骤【亲测实现 + 详细步骤,整合了许多资料,避坑手册】
Step1:运行用spring框架搭建maven web项目
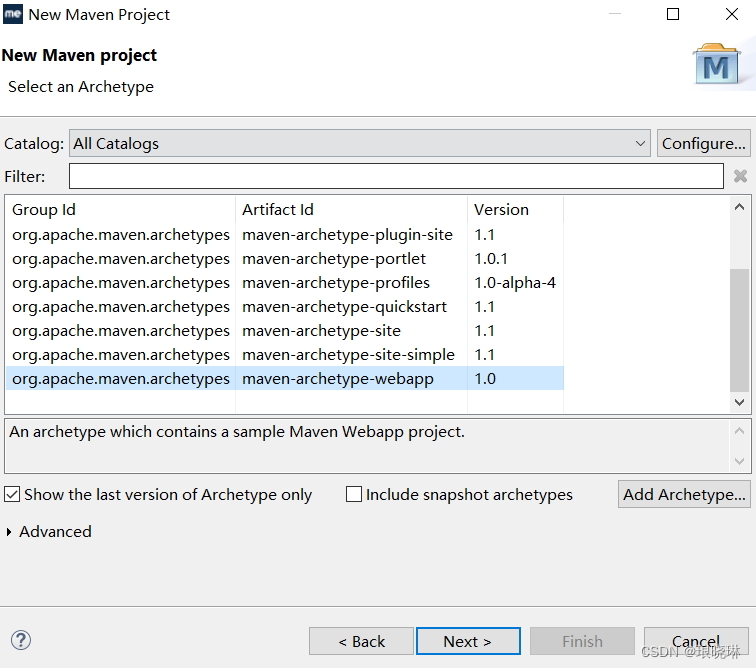
MyEclipse中选择File —> New —> Other —> Maven Project —> webapp:
设置group id和artifact id —> 点击finish
在resource目录下创建一个spring.xml的配置文件 —> 去spring的官网找到spring框架的文档,将IOC容器的配置文件的格式拷贝到自己刚刚创建的spring.xml中,参考样例为:<beans xmlns="http://www.springframework.org/schema/beans" xmlns:xsi="http://www.w3.org/2001/XMLSchema-instance" xmlns:context="http://www.springframework.org/schema/context" xmlns:jaxws="http://cxf.apache.org/jaxws" xsi:schemaLocation="http://www.springframework.org/schema/beans http://www.springframework.org/schema/beans/spring-beans-3.0.xsd http://www.springframework.org/schema/context http://www.springframework.org/schema/context/spring-context-3.0.xsd http://cxf.apache.org/jaxws http://cxf.apache.org/schemas/jaxws.xsd"> beans>- 1
- 2
- 3
- 4
- 5
- 6
- 7
- 8
- 9
- 10
- 11
- 12
- 13
Step2:使用POM的方式引入依赖
<dependency> <groupId>org.apache.cxfgroupId> <artifactId>cxf-rt-frontend-jaxwsartifactId> <version>3.1.9version> dependency> <dependency> <groupId>org.apache.cxfgroupId> <artifactId>cxf-rt-transports-http-jettyartifactId> <v- 1
- 2
- 3
- 4
- 5
- 6
- 7
- 8
- 9
-
相关阅读:
MapV地理数据可视化_API-初始化及初步使用
编译chromium错误小记
PromQL 查询监控数据
大数据Flink(六十四):Flink运行时架构介绍
【AR隔空手势交互】Unity中基于Manomotion实现隔空手势交互
《算法导论》第14章-数据结构的扩张 14.1-动态顺序统计 14.2-如何扩张数据结构
什么是行锁、间隙锁
一篇文章,Vue快速入门
基于Springboot的宠物医院管理系统-JAVA【数据库设计、论文、源码、开题报告】
HCM 初学 ( 二 ) - 信息类型
- 原文地址:https://blog.csdn.net/langxiaolin/article/details/127712552