-
springBoot_swagger、异步任务、邮件发送、定时任务、集成redis、分布式(Dubbo、Zookeeper)
一、swagger
1、spring boot集成swagger
创建一个新spring项目,添加web依赖,编写一个hello程序,保证项目初始化正常
1、导入swagger依赖版本2.9.2,spring boot版本调整为2.5.6<dependency> <groupId>io.springfoxgroupId> <artifactId>springfox-swagger2artifactId> <version>2.9.2version> dependency> <dependency> <groupId>io.springfoxgroupId> <artifactId>springfox-swagger-uiartifactId> <version>2.9.2version> dependency>- 1
- 2
- 3
- 4
- 5
- 6
- 7
- 8
- 9
- 10
- 11
- 12
- 13
- 14
2、config目录中配置swagger
package com.jjl.swagger.config; import org.springframework.context.annotation.Configuration; import springfox.documentation.swagger2.annotations.EnableSwagger2; @Configuration @EnableSwagger2 public class SwaggerConfig { }- 1
- 2
- 3
- 4
- 5
- 6
- 7
- 8
- 9
3、启动测试,访问:http://localhost:8080/swagger-ui.html

2、swagger基本信息配置
swagger的bean实例docket
package com.jjl.swagger.config; import org.springframework.context.annotation.Bean; import org.springframework.context.annotation.Configuration; import springfox.documentation.service.ApiInfo; import springfox.documentation.service.Contact; import springfox.documentation.spi.DocumentationType; import springfox.documentation.spring.web.plugins.Docket; import springfox.documentation.swagger2.annotations.EnableSwagger2; import java.util.ArrayList; @Configuration @EnableSwagger2 public class SwaggerConfig { //配置swagger的Docket实例 //用docket()对象接管默认配置信息 @Bean public Docket docket(){ return new Docket(DocumentationType.SWAGGER_2) .apiInfo(apiInfo()); } //配置Swagger信息=apiInfo private ApiInfo apiInfo(){ Contact contact = new Contact("蒋樊","https://blog.csdn.net/qq_43427354","http:test@qq.com"); return new ApiInfo( "蒋樊SwaggerAPI文档", "不忘初心", "1.0", "https://www.baidu.com/", contact, "Apache 2.0", "http://www.apache.org/licenses/LICENSE-2.0", new ArrayList()); } }- 1
- 2
- 3
- 4
- 5
- 6
- 7
- 8
- 9
- 10
- 11
- 12
- 13
- 14
- 15
- 16
- 17
- 18
- 19
- 20
- 21
- 22
- 23
- 24
- 25
- 26
- 27
- 28
- 29
- 30
- 31
- 32
- 33
- 34
- 35
- 36
重启测试

3、swagger配置扫描接口
@Bean public Docket docket(){ return new Docket(DocumentationType.SWAGGER_2) .apiInfo(apiInfo()) .select() //RequestHandlerSelectors,配置要扫描的方式 //.basePackage:指定要扫描的包basePackage("com.jjl.swagger.controller") //.any():扫描全部 //.none:都不扫描 //.withClassAnnotation(RestController.class):扫描有RestController注解的类 //.withMethodAnnotation(GetMapping.class)扫描有GetMapping注解的方法 .apis(RequestHandlerSelectors.basePackage("com.jjl.swagger.controller")) .paths(PathSelectors.ant("/jjl/**"))//过滤的路径,只扫描/jjl下的所有接口 .build();// }- 1
- 2
- 3
- 4
- 5
- 6
- 7
- 8
- 9
- 10
- 11
- 12
- 13
- 14
- 15
4、配置是否启动swagger,默认true

配置当生产环境时则启动swagger,当发布或者测试环境时自动关闭swagger
1、新建两个springboot配置文件,一个用于生产环境时调用,一个用于发布时或测试时调用,通过默认的配置文件去激活要使用的配置文件。

2、去swagger中获取当前的环境

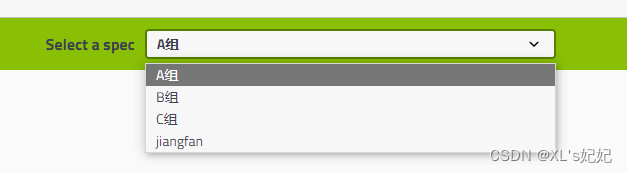
5、创建多个分组,模拟多人开发
添加多个Docket即可
@Bean public Docket docket1(){return new Docket(DocumentationType.SWAGGER_2).groupName("A组");} @Bean public Docket docket2(){return new Docket(DocumentationType.SWAGGER_2).groupName("B组");} @Bean public Docket docket3(){return new Docket(DocumentationType.SWAGGER_2).groupName("C组");}- 1
- 2
- 3
- 4
- 5
- 6
6、添加注释
1、实体类注释
package com.jjl.swagger.pojo; import io.swagger.annotations.ApiModel; import io.swagger.annotations.ApiModelProperty; @ApiModel("用户实体类") //==@Api("用户实体类") public class User { @ApiModelProperty("用户名") public String username; @ApiModelProperty("密码") public String password; }- 1
- 2
- 3
- 4
- 5
- 6
- 7
- 8
- 9
- 10
- 11

3、方法的注释
package com.jjl.swagger.controller; import com.jjl.swagger.pojo.User; import io.swagger.annotations.ApiOperation; import io.swagger.annotations.ApiParam; import org.springframework.web.bind.annotation.PostMapping; import org.springframework.web.bind.annotation.RequestMapping; import org.springframework.web.bind.annotation.RestController; @RestController public class HelloConterller { @RequestMapping("/hello") public String hello(){ return "hello swagger"; } //只要我们的接口中存在实体类,就会被扫描到 @PostMapping(value = "/user") public User user(){ return new User(); } @ApiOperation("hello传参username") @PostMapping(value = "/hello2") public String hello2(@ApiParam("传入用户名") String username){ return "hello2"+username; } }- 1
- 2
- 3
- 4
- 5
- 6
- 7
- 8
- 9
- 10
- 11
- 12
- 13
- 14
- 15
- 16
- 17
- 18
- 19
- 20
- 21
- 22
- 23
- 24
- 25
- 26
- 27
- 28
- 29
- 30

4、接口测试


二、异步任务
1、模拟后台程序处理业务时的延时
package com.jjl.service; import org.springframework.stereotype.Service; @Service public class AsyncService { public void hello() throws InterruptedException { Thread.sleep(3000); System.out.println("数据正在处理……………………"); } }- 1
- 2
- 3
- 4
- 5
- 6
- 7
- 8
- 9
- 10
- 11
- 12
调用延时任务
package com.jjl.controller; import com.jjl.service.AsyncService; import org.springframework.beans.factory.annotation.Autowired; import org.springframework.web.bind.annotation.RequestMapping; import org.springframework.web.bind.annotation.RestController; @RestController public class AsyncController { @Autowired AsyncService asyncService; @RequestMapping("/hello") public String hello() throws InterruptedException { asyncService.hello(); return "ok"; } }- 1
- 2
- 3
- 4
- 5
- 6
- 7
- 8
- 9
- 10
- 11
- 12
- 13
- 14
- 15
- 16
- 17
- 18
当调用这个延时任务时,前端页面会出现白屏等待
2、启用spring异步任务
启用spring异步任务之后,spring会继续处理延时任务,但是前端页面会跳过等待直接加载页面

在spring启动类上开启异步任务

测试目录

三、邮件发送
1、导入依赖
<dependency> <groupId>org.springframework.bootgroupId> <artifactId>spring-boot-starter-mailartifactId> dependency>- 1
- 2
- 3
- 4
2、配置mail参数
spring.mail.username=17709966@qq.com spring.mail.password=iurwbuhuclytfd spring.mail.host=smtp.qq.com # 开启安全验证 spring.mail.properties.mail.smtp.ssl.enable=true- 1
- 2
- 3
- 4
- 5
4、测试简单邮件发送和带附件的邮件发送
package com.jjl; import com.jjl.config.SendMail; import org.junit.jupiter.api.Test; import org.springframework.beans.factory.annotation.Autowired; import org.springframework.boot.test.context.SpringBootTest; import org.springframework.mail.SimpleMailMessage; import org.springframework.mail.javamail.JavaMailSenderImpl; import org.springframework.mail.javamail.MimeMailMessage; import org.springframework.mail.javamail.MimeMessageHelper; import javax.mail.MessagingException; import javax.mail.internet.MimeMessage; import java.io.File; @SpringBootTest class Springboot09TestApplicationTests { @Autowired JavaMailSenderImpl mailSender; @Test void contextLoads() { //简单邮件发生测试 SimpleMailMessage message = new SimpleMailMessage(); message.setSubject("spring mail test"); message.setText("邮件发送测试"); message.setTo("2959351531@qq.com"); message.setFrom("1770990966@qq.com"); mailSender.send(message); } @Test void contextLoads2() throws MessagingException { //复杂邮件发生测试 MimeMessage message = mailSender.createMimeMessage(); //组装 MimeMessageHelper helper = new MimeMessageHelper(message,true); helper.setSubject("spring复杂邮件测试"); //true,支持html helper.setText("邮件测试
",true); //添加附件 helper.addAttachment("1.jpg",new File("E:\\desktop_wallpaper\\2.jpg")); helper.setTo("2959351531@qq.com"); helper.setFrom("1770990966@qq.com"); mailSender.send(message); } }- 1
- 2
- 3
- 4
- 5
- 6
- 7
- 8
- 9
- 10
- 11
- 12
- 13
- 14
- 15
- 16
- 17
- 18
- 19
- 20
- 21
- 22
- 23
- 24
- 25
- 26
- 27
- 28
- 29
- 30
- 31
- 32
- 33
- 34
- 35
- 36
- 37
- 38
- 39
- 40
- 41
- 42
- 43
- 44
- 45
- 46
- 47
- 48
- 49
- 50
- 51
四、定时任务
TaskScheduler 任务调度者
TaskExecutor 任务执行者
@EnableScheduling //开启定时任务
@Scheduled //执行的时间1、写一个定时任务的测试类
package com.jjl.service; import org.springframework.scheduling.annotation.Scheduled; import org.springframework.stereotype.Service; @Service public class ScheduledService { //在特定的时间执行 //cron表达式:cron = "秒 分 时 日 月 周几" //网上有很多cron表达式的写法"0/2 * * * * ?”每两秒执行一次 @Scheduled(cron = "0 32 9 * * ?") //在每天的9点32分执行 public void hello(){ System.out.println("定时任务测试"); } }- 1
- 2
- 3
- 4
- 5
- 6
- 7
- 8
- 9
- 10
- 11
- 12
- 13
- 14
- 15
- 16
2、在spring启动类中开启定时任务

3、cron表达式

五、集成redis
1、导入redis依赖
<dependency> <groupId>org.springframework.bootgroupId> <artifactId>spring-boot-starter-data-redisartifactId> dependency>- 1
- 2
- 3
- 4
2、配置redis连接参数

3、测试连接
package com.jjl; import org.junit.jupiter.api.Test; import org.springframework.beans.factory.annotation.Autowired; import org.springframework.boot.test.context.SpringBootTest; import org.springframework.data.redis.connection.RedisConnection; import org.springframework.data.redis.core.RedisTemplate; @SpringBootTest class Redis01SpringbootApplicationTests { @Autowired private RedisTemplate redisTemplate; @Test void contextLoads() { // opsForValue() 操作字符串 类似String //opsForList() 操作list 类似list /*//获取连接 RedisConnection connection = redisTemplate.getConnectionFactory().getConnection(); connection.flushAll(); connection.flushDb();*/ //往redis中放值 redisTemplate.opsForValue().set("mykey","hello redis"); //取值 System.out.println(redisTemplate.opsForValue().get("mykey")); } }- 1
- 2
- 3
- 4
- 5
- 6
- 7
- 8
- 9
- 10
- 11
- 12
- 13
- 14
- 15
- 16
- 17
- 18
- 19
- 20
- 21
- 22
- 23
- 24
- 25
- 26
- 27
- 28
- 29
- 30
- 31
- 32
- 33
4、序列化
为什么要序列化
1、当传入未序列化的实体类时,redis会报错
2、使用默认redis默认的Template时,向数据库中插入了一个中文字符串,虽然在 Java 端可以看到返回了中文,但是在 Redis 中查看是一串乱码。可直接使用的redisTemplate模板
package com.jjl.config; import com.fasterxml.jackson.annotation.JsonAutoDetect; import com.fasterxml.jackson.annotation.PropertyAccessor; import com.fasterxml.jackson.databind.ObjectMapper; import com.fasterxml.jackson.databind.jsontype.impl.LaissezFaireSubTypeValidator; import org.springframework.context.annotation.Bean; import org.springframework.context.annotation.Configuration; import org.springframework.data.redis.connection.RedisConnectionFactory; import org.springframework.data.redis.core.RedisTemplate; import org.springframework.data.redis.serializer.Jackson2JsonRedisSerializer; import org.springframework.data.redis.serializer.StringRedisSerializer; import java.net.UnknownHostException; @Configuration public class RedisConfig { /** * 编写自定义的 redisTemplate * 这是一个比较固定的模板 */ @Bean @SuppressWarnings("all") public RedisTemplate<String, Object> redisTemplate(RedisConnectionFactory redisConnectionFactory) throws UnknownHostException { // 为了开发方便,直接使用- 1
- 2
- 3
- 4
- 5
- 6
- 7
- 8
- 9
- 10
- 11
- 12
- 13
- 14
- 15
- 16
- 17
- 18
- 19
- 20
- 21
- 22
- 23
- 24
- 25
- 26
- 27
- 28
- 29
- 30
- 31
- 32
- 33
- 34
- 35
- 36
- 37
- 38
- 39
- 40
- 41
- 42
- 43
- 44
- 45
- 46
- 47
- 48
- 49
- 50
- 51
- 52
- 53
测试

127.0.0.1:6379> keys * 1) "user" 127.0.0.1:6379>- 1
- 2
- 3

5、redis工具类
在项目真实开发中,基本不会使用redis自带的redisTemplate
因此为了方便所以会自定义一个工具类package com.zxy.demo.redis; import java.util.List; import java.util.Map; import java.util.Set; import java.util.concurrent.TimeUnit; import org.springframework.beans.factory.annotation.Autowired; import org.springframework.data.redis.core.RedisTemplate; import org.springframework.stereotype.Component; import org.springframework.util.CollectionUtils; /** * Redis工具类 * @author ZENG.XIAO.YAN * @date 2018年6月7日 */ @Component public final class RedisUtil { @Autowired private RedisTemplate<String, Object> redisTemplate; // =============================common============================ /** * 指定缓存失效时间 * @param key 键 * @param time 时间(秒) * @return */ public boolean expire(String key, long time) { try { if (time > 0) { redisTemplate.expire(key, time, TimeUnit.SECONDS); } return true; } catch (Exception e) { e.printStackTrace(); return false; } } /** * 根据key 获取过期时间 * @param key 键 不能为null * @return 时间(秒) 返回0代表为永久有效 */ public long getExpire(String key) { return redisTemplate.getExpire(key, TimeUnit.SECONDS); } /** * 判断key是否存在 * @param key 键 * @return true 存在 false不存在 */ public boolean hasKey(String key) { try { return redisTemplate.hasKey(key); } catch (Exception e) { e.printStackTrace(); return false; } } /** * 删除缓存 * @param key 可以传一个值 或多个 */ @SuppressWarnings("unchecked") public void del(String... key) { if (key != null && key.length > 0) { if (key.length == 1) { redisTemplate.delete(key[0]); } else { redisTemplate.delete(CollectionUtils.arrayToList(key)); } } } // ============================String============================= /** * 普通缓存获取 * @param key 键 * @return 值 */ public Object get(String key) { return key == null ? null : redisTemplate.opsForValue().get(key); } /** * 普通缓存放入 * @param key 键 * @param value 值 * @return true成功 false失败 */ public boolean set(String key, Object value) { try { redisTemplate.opsForValue().set(key, value); return true; } catch (Exception e) { e.printStackTrace(); return false; } } /** * 普通缓存放入并设置时间 * @param key 键 * @param value 值 * @param time 时间(秒) time要大于0 如果time小于等于0 将设置无限期 * @return true成功 false 失败 */ public boolean set(String key, Object value, long time) { try { if (time > 0) { redisTemplate.opsForValue().set(key, value, time, TimeUnit.SECONDS); } else { set(key, value); } return true; } catch (Exception e) { e.printStackTrace(); return false; } } /** * 递增 * @param key 键 * @param delta 要增加几(大于0) * @return */ public long incr(String key, long delta) { if (delta < 0) { throw new RuntimeException("递增因子必须大于0"); } return redisTemplate.opsForValue().increment(key, delta); } /** * 递减 * @param key 键 * @param delta 要减少几(小于0) * @return */ public long decr(String key, long delta) { if (delta < 0) { throw new RuntimeException("递减因子必须大于0"); } return redisTemplate.opsForValue().increment(key, -delta); } // ================================Map================================= /** * HashGet * @param key 键 不能为null * @param item 项 不能为null * @return 值 */ public Object hget(String key, String item) { return redisTemplate.opsForHash().get(key, item); } /** * 获取hashKey对应的所有键值 * @param key 键 * @return 对应的多个键值 */ public Map<Object, Object> hmget(String key) { return redisTemplate.opsForHash().entries(key); } /** * HashSet * @param key 键 * @param map 对应多个键值 * @return true 成功 false 失败 */ public boolean hmset(String key, Map<String, Object> map) { try { redisTemplate.opsForHash().putAll(key, map); return true; } catch (Exception e) { e.printStackTrace(); return false; } } /** * HashSet 并设置时间 * @param key 键 * @param map 对应多个键值 * @param time 时间(秒) * @return true成功 false失败 */ public boolean hmset(String key, Map<String, Object> map, long time) { try { redisTemplate.opsForHash().putAll(key, map); if (time > 0) { expire(key, time); } return true; } catch (Exception e) { e.printStackTrace(); return false; } } /** * 向一张hash表中放入数据,如果不存在将创建 * @param key 键 * @param item 项 * @param value 值 * @return true 成功 false失败 */ public boolean hset(String key, String item, Object value) { try { redisTemplate.opsForHash().put(key, item, value); return true; } catch (Exception e) { e.printStackTrace(); return false; } } /** * 向一张hash表中放入数据,如果不存在将创建 * @param key 键 * @param item 项 * @param value 值 * @param time 时间(秒) 注意:如果已存在的hash表有时间,这里将会替换原有的时间 * @return true 成功 false失败 */ public boolean hset(String key, String item, Object value, long time) { try { redisTemplate.opsForHash().put(key, item, value); if (time > 0) { expire(key, time); } return true; } catch (Exception e) { e.printStackTrace(); return false; } } /** * 删除hash表中的值 * @param key 键 不能为null * @param item 项 可以使多个 不能为null */ public void hdel(String key, Object... item) { redisTemplate.opsForHash().delete(key, item); } /** * 判断hash表中是否有该项的值 * @param key 键 不能为null * @param item 项 不能为null * @return true 存在 false不存在 */ public boolean hHasKey(String key, String item) { return redisTemplate.opsForHash().hasKey(key, item); } /** * hash递增 如果不存在,就会创建一个 并把新增后的值返回 * @param key 键 * @param item 项 * @param by 要增加几(大于0) * @return */ public double hincr(String key, String item, double by) { return redisTemplate.opsForHash().increment(key, item, by); } /** * hash递减 * @param key 键 * @param item 项 * @param by 要减少记(小于0) * @return */ public double hdecr(String key, String item, double by) { return redisTemplate.opsForHash().increment(key, item, -by); } // ============================set============================= /** * 根据key获取Set中的所有值 * @param key 键 * @return */ public Set<Object> sGet(String key) { try { return redisTemplate.opsForSet().members(key); } catch (Exception e) { e.printStackTrace(); return null; } } /** * 根据value从一个set中查询,是否存在 * @param key 键 * @param value 值 * @return true 存在 false不存在 */ public boolean sHasKey(String key, Object value) { try { return redisTemplate.opsForSet().isMember(key, value); } catch (Exception e) { e.printStackTrace(); return false; } } /** * 将数据放入set缓存 * @param key 键 * @param values 值 可以是多个 * @return 成功个数 */ public long sSet(String key, Object... values) { try { return redisTemplate.opsForSet().add(key, values); } catch (Exception e) { e.printStackTrace(); return 0; } } /** * 将set数据放入缓存 * @param key 键 * @param time 时间(秒) * @param values 值 可以是多个 * @return 成功个数 */ public long sSetAndTime(String key, long time, Object... values) { try { Long count = redisTemplate.opsForSet().add(key, values); if (time > 0) expire(key, time); return count; } catch (Exception e) { e.printStackTrace(); return 0; } } /** * 获取set缓存的长度 * @param key 键 * @return */ public long sGetSetSize(String key) { try { return redisTemplate.opsForSet().size(key); } catch (Exception e) { e.printStackTrace(); return 0; } } /** * 移除值为value的 * @param key 键 * @param values 值 可以是多个 * @return 移除的个数 */ public long setRemove(String key, Object... values) { try { Long count = redisTemplate.opsForSet().remove(key, values); return count; } catch (Exception e) { e.printStackTrace(); return 0; } } // ===============================list================================= /** * 获取list缓存的内容 * @param key 键 * @param start 开始 * @param end 结束 0 到 -1代表所有值 * @return */ public List<Object> lGet(String key, long start, long end) { try { return redisTemplate.opsForList().range(key, start, end); } catch (Exception e) { e.printStackTrace(); return null; } } /** * 获取list缓存的长度 * @param key 键 * @return */ public long lGetListSize(String key) { try { return redisTemplate.opsForList().size(key); } catch (Exception e) { e.printStackTrace(); return 0; } } /** * 通过索引 获取list中的值 * @param key 键 * @param index 索引 index>=0时, 0 表头,1 第二个元素,依次类推;index<0时,-1,表尾,-2倒数第二个元素,依次类推 * @return */ public Object lGetIndex(String key, long index) { try { return redisTemplate.opsForList().index(key, index); } catch (Exception e) { e.printStackTrace(); return null; } } /** * 将list放入缓存 * @param key 键 * @param value 值 * @param time 时间(秒) * @return */ public boolean lSet(String key, Object value) { try { redisTemplate.opsForList().rightPush(key, value); return true; } catch (Exception e) { e.printStackTrace(); return false; } } /** * 将list放入缓存 * @param key 键 * @param value 值 * @param time 时间(秒) * @return */ public boolean lSet(String key, Object value, long time) { try { redisTemplate.opsForList().rightPush(key, value); if (time > 0) expire(key, time); return true; } catch (Exception e) { e.printStackTrace(); return false; } } /** * 将list放入缓存 * @param key 键 * @param value 值 * @param time 时间(秒) * @return */ public boolean lSet(String key, List<Object> value) { try { redisTemplate.opsForList().rightPushAll(key, value); return true; } catch (Exception e) { e.printStackTrace(); return false; } } /** * 将list放入缓存 * * @param key 键 * @param value 值 * @param time 时间(秒) * @return */ public boolean lSet(String key, List<Object> value, long time) { try { redisTemplate.opsForList().rightPushAll(key, value); if (time > 0) expire(key, time); return true; } catch (Exception e) { e.printStackTrace(); return false; } } /** * 根据索引修改list中的某条数据 * @param key 键 * @param index 索引 * @param value 值 * @return */ public boolean lUpdateIndex(String key, long index, Object value) { try { redisTemplate.opsForList().set(key, index, value); return true; } catch (Exception e) { e.printStackTrace(); return false; } } /** * 移除N个值为value * @param key 键 * @param count 移除多少个 * @param value 值 * @return 移除的个数 */ public long lRemove(String key, long count, Object value) { try { Long remove = redisTemplate.opsForList().remove(key, count, value); return remove; } catch (Exception e) { e.printStackTrace(); return 0; } } }- 1
- 2
- 3
- 4
- 5
- 6
- 7
- 8
- 9
- 10
- 11
- 12
- 13
- 14
- 15
- 16
- 17
- 18
- 19
- 20
- 21
- 22
- 23
- 24
- 25
- 26
- 27
- 28
- 29
- 30
- 31
- 32
- 33
- 34
- 35
- 36
- 37
- 38
- 39
- 40
- 41
- 42
- 43
- 44
- 45
- 46
- 47
- 48
- 49
- 50
- 51
- 52
- 53
- 54
- 55
- 56
- 57
- 58
- 59
- 60
- 61
- 62
- 63
- 64
- 65
- 66
- 67
- 68
- 69
- 70
- 71
- 72
- 73
- 74
- 75
- 76
- 77
- 78
- 79
- 80
- 81
- 82
- 83
- 84
- 85
- 86
- 87
- 88
- 89
- 90
- 91
- 92
- 93
- 94
- 95
- 96
- 97
- 98
- 99
- 100
- 101
- 102
- 103
- 104
- 105
- 106
- 107
- 108
- 109
- 110
- 111
- 112
- 113
- 114
- 115
- 116
- 117
- 118
- 119
- 120
- 121
- 122
- 123
- 124
- 125
- 126
- 127
- 128
- 129
- 130
- 131
- 132
- 133
- 134
- 135
- 136
- 137
- 138
- 139
- 140
- 141
- 142
- 143
- 144
- 145
- 146
- 147
- 148
- 149
- 150
- 151
- 152
- 153
- 154
- 155
- 156
- 157
- 158
- 159
- 160
- 161
- 162
- 163
- 164
- 165
- 166
- 167
- 168
- 169
- 170
- 171
- 172
- 173
- 174
- 175
- 176
- 177
- 178
- 179
- 180
- 181
- 182
- 183
- 184
- 185
- 186
- 187
- 188
- 189
- 190
- 191
- 192
- 193
- 194
- 195
- 196
- 197
- 198
- 199
- 200
- 201
- 202
- 203
- 204
- 205
- 206
- 207
- 208
- 209
- 210
- 211
- 212
- 213
- 214
- 215
- 216
- 217
- 218
- 219
- 220
- 221
- 222
- 223
- 224
- 225
- 226
- 227
- 228
- 229
- 230
- 231
- 232
- 233
- 234
- 235
- 236
- 237
- 238
- 239
- 240
- 241
- 242
- 243
- 244
- 245
- 246
- 247
- 248
- 249
- 250
- 251
- 252
- 253
- 254
- 255
- 256
- 257
- 258
- 259
- 260
- 261
- 262
- 263
- 264
- 265
- 266
- 267
- 268
- 269
- 270
- 271
- 272
- 273
- 274
- 275
- 276
- 277
- 278
- 279
- 280
- 281
- 282
- 283
- 284
- 285
- 286
- 287
- 288
- 289
- 290
- 291
- 292
- 293
- 294
- 295
- 296
- 297
- 298
- 299
- 300
- 301
- 302
- 303
- 304
- 305
- 306
- 307
- 308
- 309
- 310
- 311
- 312
- 313
- 314
- 315
- 316
- 317
- 318
- 319
- 320
- 321
- 322
- 323
- 324
- 325
- 326
- 327
- 328
- 329
- 330
- 331
- 332
- 333
- 334
- 335
- 336
- 337
- 338
- 339
- 340
- 341
- 342
- 343
- 344
- 345
- 346
- 347
- 348
- 349
- 350
- 351
- 352
- 353
- 354
- 355
- 356
- 357
- 358
- 359
- 360
- 361
- 362
- 363
- 364
- 365
- 366
- 367
- 368
- 369
- 370
- 371
- 372
- 373
- 374
- 375
- 376
- 377
- 378
- 379
- 380
- 381
- 382
- 383
- 384
- 385
- 386
- 387
- 388
- 389
- 390
- 391
- 392
- 393
- 394
- 395
- 396
- 397
- 398
- 399
- 400
- 401
- 402
- 403
- 404
- 405
- 406
- 407
- 408
- 409
- 410
- 411
- 412
- 413
- 414
- 415
- 416
- 417
- 418
- 419
- 420
- 421
- 422
- 423
- 424
- 425
- 426
- 427
- 428
- 429
- 430
- 431
- 432
- 433
- 434
- 435
- 436
- 437
- 438
- 439
- 440
- 441
- 442
- 443
- 444
- 445
- 446
- 447
- 448
- 449
- 450
- 451
- 452
- 453
- 454
- 455
- 456
- 457
- 458
- 459
- 460
- 461
- 462
- 463
- 464
- 465
- 466
- 467
- 468
- 469
- 470
- 471
- 472
- 473
- 474
- 475
- 476
- 477
- 478
- 479
- 480
- 481
- 482
- 483
- 484
- 485
- 486
- 487
- 488
- 489
- 490
- 491
- 492
- 493
- 494
- 495
- 496
- 497
- 498
- 499
- 500
- 501
- 502
- 503
- 504
- 505
- 506
- 507
- 508
- 509
- 510
- 511
- 512
- 513
- 514
- 515
- 516
- 517
- 518
- 519
- 520
- 521
- 522
- 523
- 524
- 525
- 526
- 527
- 528
- 529
- 530
- 531
- 532
- 533
- 534
- 535
- 536
- 537
六、dubbo及Zookeeper安装测试
狂神说SpringBoot17:Dubbo和Zookeeper集成
1、源码下载
2、解压运行
1、apache-zookeeper-3.8.0-bin.tar.gz
将apache-zookeeper-3.8.0-bin\conf的zoo_sample.cfg复制一个为zoo.cfg并且在里面添加一行,修改它默认admin服务端口(8080):admin.serverPort=8088,因为dubbo-server启动时需要8080


测试: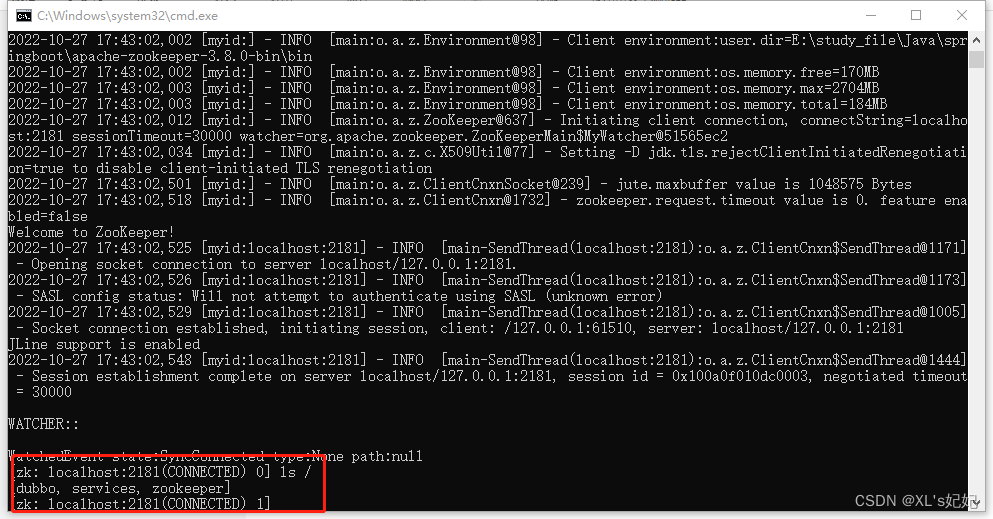
zookeeper启动成功
2、incubator-dubbo-ops-develop
测试文档参考:Dubbo控制台

七、springboot整合分布式
1、开始zookeeper和dubbo-admin服务
2、创建一个springboot项目模拟分布式接口提供者
1、创建spring boot项目,导入一个web依赖
2、导入zookeeper和dubbo的依赖
<dependency> <groupId>org.apache.dubbogroupId> <artifactId>dubbo-spring-boot-starterartifactId> <version>3.1.0version> dependency> <dependency> <groupId>org.apache.dubbogroupId> <artifactId>dubbo-dependencies-zookeeperartifactId> <version>3.1.0version> <type>pomtype> dependency> <dependency> <groupId>com.github.sgroschupfgroupId> <artifactId>zkclientartifactId> <version>0.1version> dependency>- 1
- 2
- 3
- 4
- 5
- 6
- 7
- 8
- 9
- 10
- 11
- 12
- 13
- 14
- 15
- 16
- 17
- 18
- 19
- 20
- 21
- 22
3、创建一个service接口
package com.jjl.service; public interface TicketService{ public String getTicket(); }- 1
- 2
- 3
- 4
- 5
4、创建一个serviceImpl接口实现接口
导入两个注解
- import org.apache.dubbo.config.annotation.DubboService;
- import org.springframework.stereotype.Component;
package com.jjl.service; import org.apache.dubbo.config.annotation.DubboService; import org.springframework.stereotype.Component; @DubboService // 被扫描并注册到注册中心 @Component //将接口放入容器中 public class TicketServiceImpl implements TicketService{ @Override public String getTicket() { return "远程调用测-服务端"; } }- 1
- 2
- 3
- 4
- 5
- 6
- 7
- 8
- 9
- 10
- 11
- 12
- 13
- 14
5、配置application.properties
由于是本机模拟远程,需要启动两springboot项目,会涉及端口冲突,还有idea热部署问题- 修改springboot默认端口
- 修改dubbo服务端口
- 配置提供者这名字
- 配置注册中心ip
server.port=8001 # 服务应用名字 dubbo.application.name=prioder-server # 注册中心地址 dubbo.registry.address=zookeeper://127.0.0.1:2181 # 那些服务要被注册 dubbo.scan.base-packages=com.jjl.service dubbo.protocol.name=dubbo dubbo.protocol.port=20881 dubbo.protocol.host=192.168.58.44- 1
- 2
- 3
- 4
- 5
- 6
- 7
- 8
- 9
- 10
- 11
- 12
- 13
6、启动项目,在dubbo-admin中查看服务是否被注册

3、创建一个springboot项目模拟分布式接口消费者
1、创建spring boot项目,导入一个web依赖
2、导入zookeeper和dubbo的依赖(与提供者依赖一样)
3、新建service目录,在目录中创建一个与提供者项目中一模一样的接口,因为消费者需要靠这个接口名称去注册中心寻址

4、创建一个模拟调用远程方法的类
注意导入的两个注解
- import org.apache.dubbo.config.annotation.DubboReference;
- import org.springframework.stereotype.Service;
package com.jjl.service; import org.apache.dubbo.config.annotation.DubboReference; import org.springframework.stereotype.Service; @Service //放在容器中 public class UserService { //拿到prioder里面的方法 @DubboReference //远程调用 TicketService ticketService; public void BuyTicket(){ String ticket = ticketService.getTicket(); System.out.println("通过远处调用在注册中心成功调取接口==> " + ticket); } }- 1
- 2
- 3
- 4
- 5
- 6
- 7
- 8
- 9
- 10
- 11
- 12
- 13
- 14
- 15
5、配置application.properties
-
修改springboot端口
-
配置消费者项目名称
-
配置注册中心ip
server.port=8090 # 当前服务名字 dubbo.application.name=consumer-server #注册中心地址 dubbo.registry.address=zookeeper://127.0.0.1:2181- 1
- 2
- 3
- 4
- 5
6、编写测试类
package com.jjl; import com.jjl.service.UserService; import org.junit.jupiter.api.Test; import org.springframework.beans.factory.annotation.Autowired; import org.springframework.boot.test.context.SpringBootTest; @SpringBootTest class ConsumerServerApplicationTests { @Autowired UserService userService; @Test void contextLoads() { userService.BuyTicket(); } }- 1
- 2
- 3
- 4
- 5
- 6
- 7
- 8
- 9
- 10
- 11
- 12
- 13
- 14
- 15
- 16
- 17
- 18
- 19
- 20
7、处理ieda启动多个项目,报端口被占用问题


8、启动测试类,调用远程方法

9、查看dubbo

-
相关阅读:
Bug:Mac版Goland无法进行debug
12-2- DCGAN -简单网络-卷积网络
[附源码]Python计算机毕业设计SSM家教管理系统(程序+LW)
Stream流的使用及Lambda表达式与QueryWrapper的配合使用
IDEA Debug调试简单程序的时候不需要进入源码
Zabbix监控入门到跑路
uniapp app端使用谷歌地图选点定位
程序的耦合
Pr:编辑字幕
【蓝桥杯选拔赛真题62】Scratch判断小球 少儿编程scratch图形化编程 蓝桥杯选拔赛真题解析
- 原文地址:https://blog.csdn.net/qq_43427354/article/details/127531664