-
【视觉基础篇】10 # 图形系统如何表示颜色?
说明
【跟月影学可视化】学习笔记。
RGB 和 RGBA 颜色
RGB 和 RGBA 的颜色表示法
#RRGGBB是 RGB 颜色的十六进制表示法,其中 RR、GG、BB 分别是两位十六进制数字,表示红、绿、蓝三色通道的色阶。色阶可以表示某个通道的强弱。
每个通道一共有 256 阶,取值是 0 到 255。一共能表示
2^24种不同的颜色。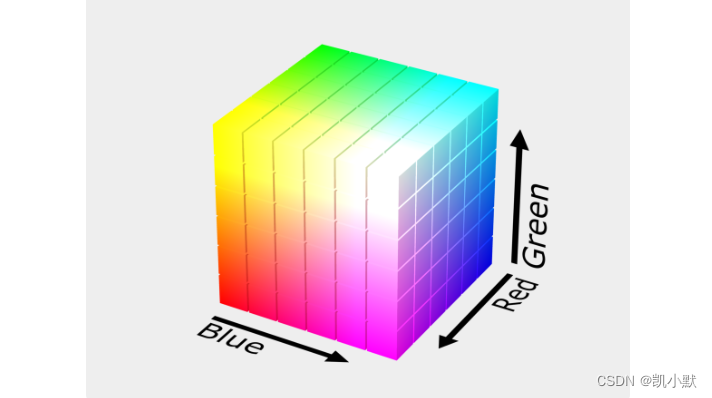
#RRGGBBAA的表示 RGBA 色值,其中增加了一个 Alpha 通道,也就是透明度。(alpha 是一个从 0 到 1 的数)WebGL 的 shader 默认支持 RGBA。是使用一个四维向量来表示颜色,并采用归一化的浮点数值。就是分量 r、g、b、a 的数值都是 0 到 1 之间的浮点数。
人眼看到的颜色 vs RGB能表示的颜色
灰色区域是人眼所能见到的全部颜色,中间的三角形是 RGB 能表示的所有颜色。
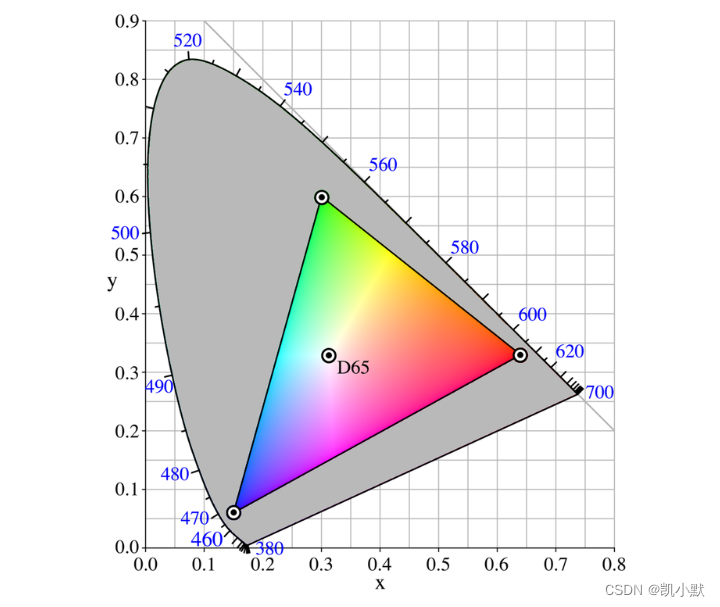
RGB(A) 颜色表示法的局限性
局限性:当要选择一组颜色给图表使用时,我们并不知道要以什么样的规则来配置颜色,才能让不同数据对应的图形之间的对比尽可能鲜明。
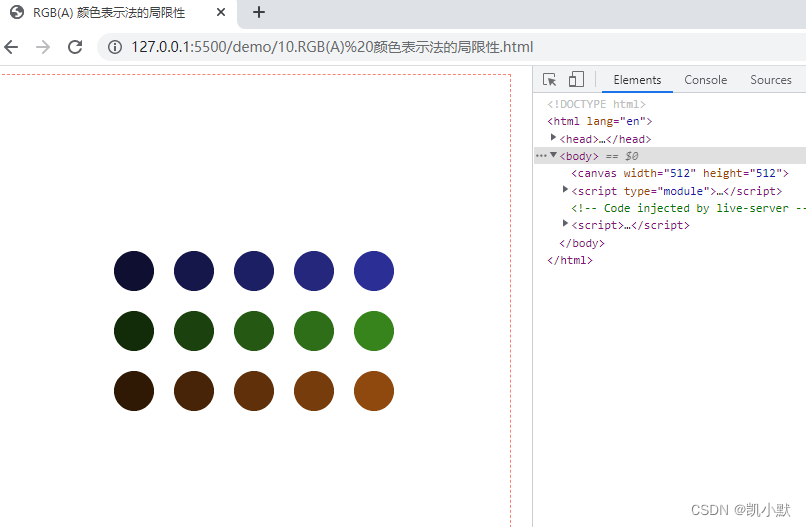
举个例子:在画布上显示 3 组颜色不同的圆,每组各 5 个,用来表示重要程度不同的信息。
DOCTYPE html> <html lang="en"> <head> <meta charset="UTF-8" /> <meta http-equiv="X-UA-Compatible" content="IE=edge" /> <meta name="viewport" content="width=device-width, initial-scale=1.0" /> <title>RGB(A) 颜色表示法的局限性title> <style> canvas { border: 1px dashed salmon; } style> head> <body> <canvas width="512" height="512">canvas> <script type="module"> import { Vec3 } from "./common/lib/math/vec3.js"; const canvas = document.querySelector("canvas"); const ctx = canvas.getContext("2d"); // 生成随机的三维向量 function randomRGB() { return new Vec3( 0.5 * Math.random(), 0.5 * Math.random(), 0.5 * Math.random() ); } ctx.translate(256, 256); ctx.scale(1, -1); // 转成 RGB 颜色 for (let i = 0; i < 3; i++) { const colorVector = randomRGB(); for (let j = 0; j < 5; j++) { // 依次用 0.5、0.75、1.0、1.25 和 1.5 的比率乘上随机生成的 RGB 数值,一组圆就能呈现不同的亮度 const c = colorVector.clone().scale(0.5 + 0.25 * j); ctx.fillStyle = `rgb( ${Math.floor(c[0] * 256)}, ${Math.floor(c[1] * 256)}, ${Math.floor(c[2] * 256)}) `; ctx.beginPath(); ctx.arc((j - 2) * 60, (i - 1) * 60, 20, 0, Math.PI * 2); ctx.fill(); } } script> body> html>- 1
- 2
- 3
- 4
- 5
- 6
- 7
- 8
- 9
- 10
- 11
- 12
- 13
- 14
- 15
- 16
- 17
- 18
- 19
- 20
- 21
- 22
- 23
- 24
- 25
- 26
- 27
- 28
- 29
- 30
- 31
- 32
- 33
- 34
- 35
- 36
- 37
- 38
- 39
- 40
- 41
- 42
- 43
- 44
- 45
- 46
- 47
- 48
- 49
- 50
- 51
总体效果如下:颜色是越左边的越暗,越右边的越亮。
缺陷:
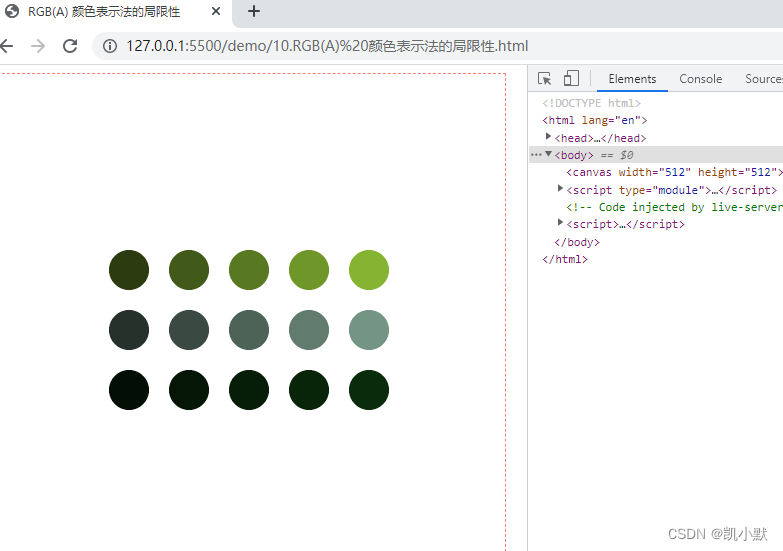
- 无法保证具体的颜色差别大小
- 无法控制随机生成的颜色本身的亮度
比如下面这种:后面一行的颜色很暗,区分度太差。
需要动态构建视觉颜色效果,很少直接选用 RGB(A) 色值,比较常用的就是 HSL 和 HSV 颜色表示形式。HSL 和 HSV 颜色
各字母的含义:
H:色相(Hue),Hue 是角度,取值范围是 0 到 360 度S:饱和度(Saturation),取值范围从 0 到 100%。L:亮度(Lightness),取值范围从 0 到 100%。V:明度(Value),取值范围从 0 到 100%。
HSL和HSV的产生原理
可以把 HSL 和 HSV 颜色理解为,是将 RGB 颜色的立方体从直角坐标系投影到极坐标的圆柱上,所以它的色值和 RGB 色值是一一对应的。
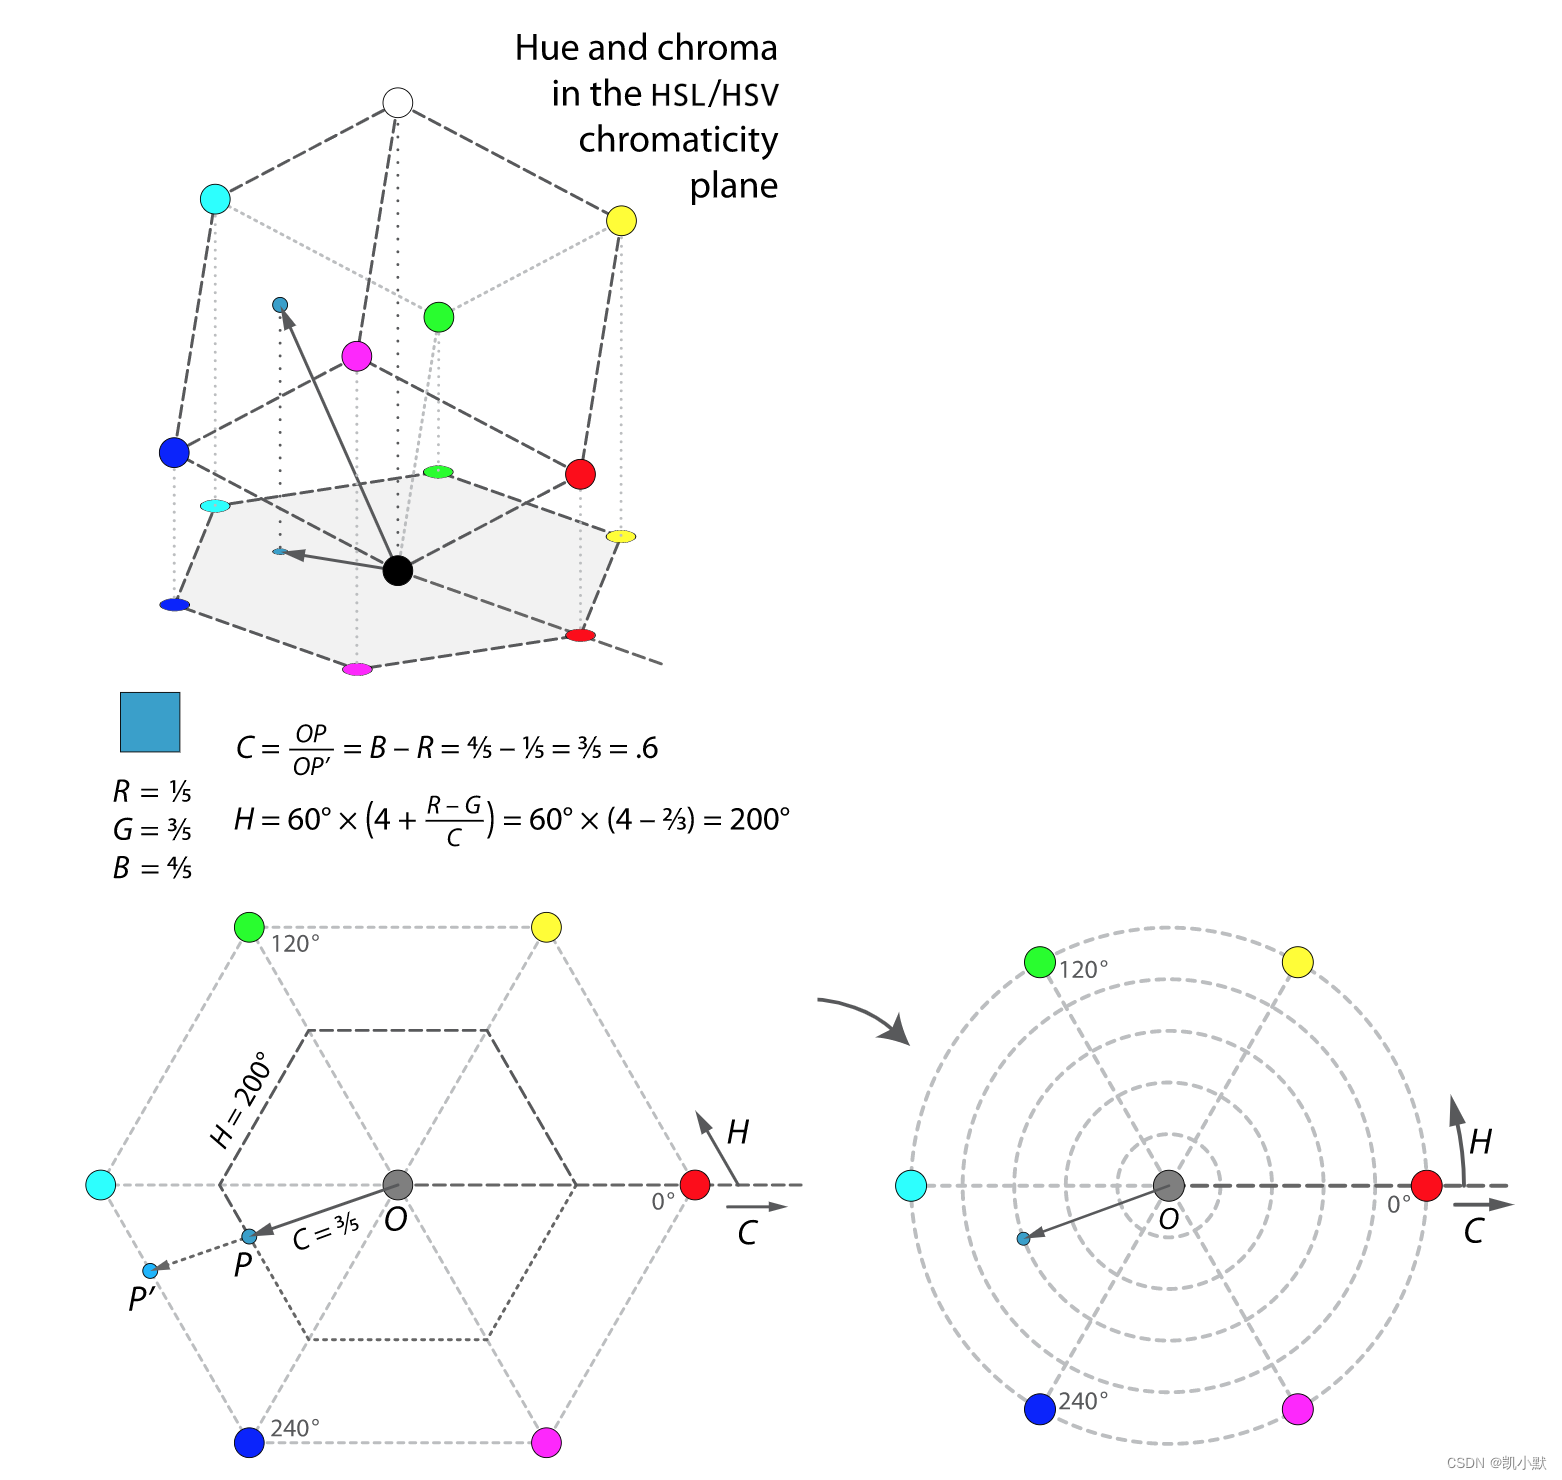
RGB 和 HSV 的转换代码
vec3 rgb2hsv(vec3 c){ vec4 K = vec4(0.0, -1.0 / 3.0, 2.0 / 3.0, -1.0); vec4 p = mix(vec4(c.bg, K.wz), vec4(c.gb, K.xy), step(c.b, c.g)); vec4 q = mix(vec4(p.xyw, c.r), vec4(c.r, p.yzx), step(p.x, c.r)); float d = q.x - min(q.w, q.y); float e = 1.0e-10; return vec3(abs(q.z + (q.w - q.y) / (6.0 * d + e)), d / (q.x + e), q.x); } vec3 hsv2rgb(vec3 c){ vec3 rgb = clamp(abs(mod(c.x*6.0+vec3(0.0,4.0,2.0), 6.0)-3.0)-1.0, 0.0, 1.0); rgb = rgb * rgb * (3.0 - 2.0 * rgb); return c.z * mix(vec3(1.0), rgb, c.y); }- 1
- 2
- 3
- 4
- 5
- 6
- 7
- 8
- 9
- 10
- 11
- 12
- 13
- 14
HSL 和 HSV 的颜色表示方法
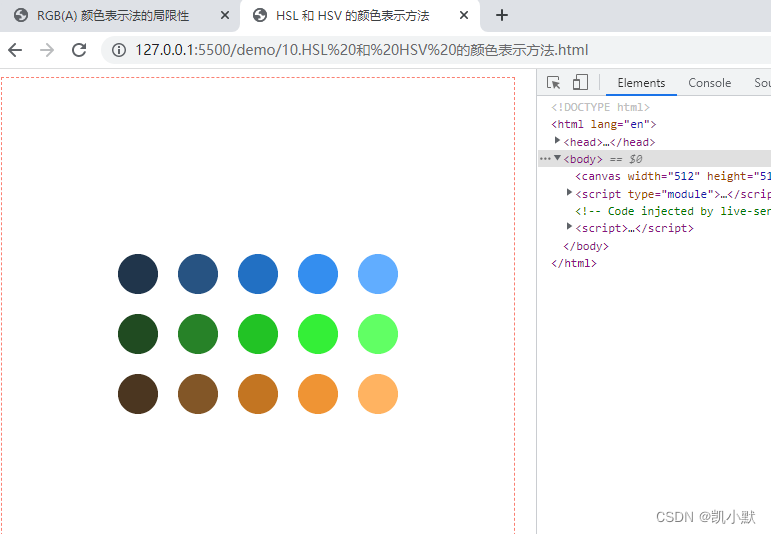
用 HSL 颜色改写前面绘制三排圆的例子
DOCTYPE html> <html lang="en"> <head> <meta charset="UTF-8" /> <meta http-equiv="X-UA-Compatible" content="IE=edge" /> <meta name="viewport" content="width=device-width, initial-scale=1.0" /> <title>HSL 和 HSV 的颜色表示方法title> <style> canvas { border: 1px dashed salmon; } style> head> <body> <canvas width="512" height="512">canvas> <script type="module"> import { Vec3 } from "./common/lib/math/vec3.js"; const canvas = document.querySelector("canvas"); const ctx = canvas.getContext("2d"); // 生成随机的三维向量 function randomColor() { return new Vec3( 0.5 * Math.random(), // 初始色相随机取0~0.5之间的值 0.7, // 初始饱和度0.7 0.45 // 初始亮度0.45 ); } ctx.translate(256, 256); ctx.scale(1, -1); // 生成随机 hsl const [h, s, l] = randomColor(); for (let i = 0; i < 3; i++) { const p = (i * 0.25 + h) % 1; for (let j = 0; j < 5; j++) { const d = j - 2; // 根据 HSL 的规则,亮度越高,颜色越接近白色,只有同时提升饱和度,才能确保圆的颜色不会太浅。 ctx.fillStyle = `hsl( ${Math.floor(p * 360)}, ${Math.floor((0.15 * d + s) * 100)}%, ${Math.floor((0.12 * d + l) * 100)}%) `; ctx.beginPath(); ctx.arc((j - 2) * 60, (i - 1) * 60, 20, 0, Math.PI * 2); ctx.fill(); } } script> body> html>- 1
- 2
- 3
- 4
- 5
- 6
- 7
- 8
- 9
- 10
- 11
- 12
- 13
- 14
- 15
- 16
- 17
- 18
- 19
- 20
- 21
- 22
- 23
- 24
- 25
- 26
- 27
- 28
- 29
- 30
- 31
- 32
- 33
- 34
- 35
- 36
- 37
- 38
- 39
- 40
- 41
- 42
- 43
- 44
- 45
- 46
- 47
- 48
- 49
- 50
- 51
- 52
- 53
HSL 和 HSV 的局限性
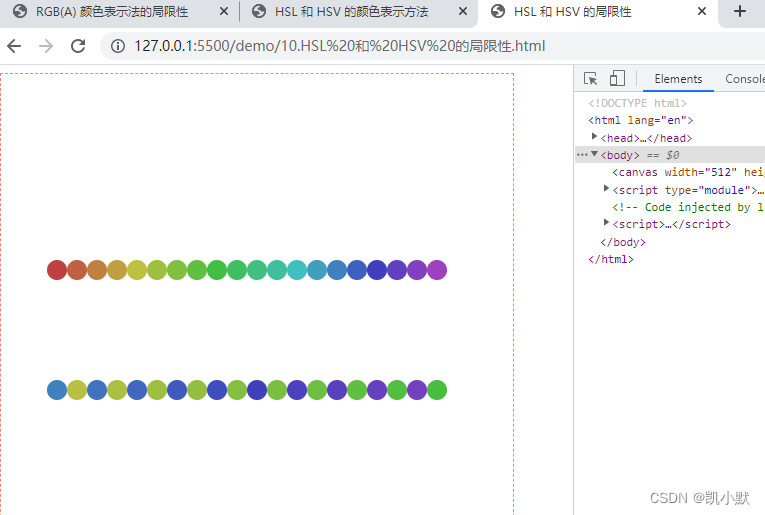
上面的例子可以看到有的颜色看起来和其他的颜色差距明显,有的颜色还是没那么明显。这是为什么?
例子:绘制两排不同的圆
DOCTYPE html> <html lang="en"> <head> <meta charset="UTF-8" /> <meta http-equiv="X-UA-Compatible" content="IE=edge" /> <meta name="viewport" content="width=device-width, initial-scale=1.0" /> <title>HSL 和 HSV 的局限性title> <style> canvas { border: 1px dashed salmon; } style> head> <body> <canvas width="512" height="512">canvas> <script type="module"> const canvas = document.querySelector("canvas"); const ctx = canvas.getContext("2d"); ctx.translate(256, 256); ctx.scale(1, -1); // 第一排每个圆的色相间隔都是 15,饱和度和亮度都是 50% for (let i = 0; i < 20; i++) { ctx.fillStyle = `hsl(${Math.floor(i * 15)}, 50%, 50%)`; ctx.beginPath(); ctx.arc((i - 10) * 20, 60, 10, 0, Math.PI * 2); ctx.fill(); } // 第二排圆的颜色在色相 60 和 210 附近两两交错,饱和度和亮度都是 50% for (let i = 0; i < 20; i++) { ctx.fillStyle = `hsl(${Math.floor( (i % 2 ? 60 : 210) + 3 * i )}, 50%, 50%)`; ctx.beginPath(); ctx.arc((i - 10) * 20, -60, 10, 0, Math.PI * 2); ctx.fill(); } script> body> html>- 1
- 2
- 3
- 4
- 5
- 6
- 7
- 8
- 9
- 10
- 11
- 12
- 13
- 14
- 15
- 16
- 17
- 18
- 19
- 20
- 21
- 22
- 23
- 24
- 25
- 26
- 27
- 28
- 29
- 30
- 31
- 32
- 33
- 34
- 35
- 36
- 37
- 38
- 39
- 40
- 41
- 42
效果如下:
- 第一排:色相相差都是 15,但是中间几个绿色圆的颜色比较接近。
- 第二排:圆的亮度都是 50%,蓝色和紫色的圆不如偏绿偏黄的圆亮。
这是由于人眼对不同频率的光的敏感度不同造成的。
HSL 依然不是最完美的颜色方法,所以需要建立一套针对人类知觉的标准,它就是 CIE Lab。
标准需满足以下 2 个原则
- 人眼看到的色差 = 颜色向量间的欧氏距离
- 相同的亮度,能让人感觉亮度相同
CIE Lab 和 CIE Lch 颜色
CIELab是CIE的一个颜色系统,表色体系,基于 CIELab 的意思是基于这个颜色系统之上,基本是用于确定某个颜色的数值信息。
Lab 模式是由国际照明委员会(CIE)于 1976 年公布的一种色彩模式。是 CIE 组织确定的一个理论上包括了人眼可见的所有色彩的色彩模式。Lab 模式弥补了 RGB 与 CMYK 两种彩色模式的不足,是 Photoshop 用来从一种色彩模式向另一种色彩模式转换时使用的一种内部色彩模式。Lab模式也是由三个通道组成,第一个通道是明度,即
L。a 通道的颜色是从红色到深绿;b 通道则是从蓝色到黄色。 在表达色彩范围上,最全的是 Lab 模式,其次是 RGB 模式,最窄的是 CMYK 模式。也就是说 Lab 模式所定义的色彩最多,且与光线及设备无关,并且处理速度与 RGB 模式同样快,比 CMYK 模式快数倍。CSS Color Module Level 4规范给出了 Lab 颜色值的定义
lab() = lab( [| | none] [ | | none] [ | | none] [ / [ | none] ]? ) - 1
- 2
- 3
- 4
例子:

一些 JavaScript 库也可以直接处理 Lab 颜色空间,比如:【d3-color】:https://github.com/d3/d3-color
例子:使用
d3.lab来定义 Lab 色彩。<script src="https://d3js.org/d3-color.v1.min.js">script>- 1
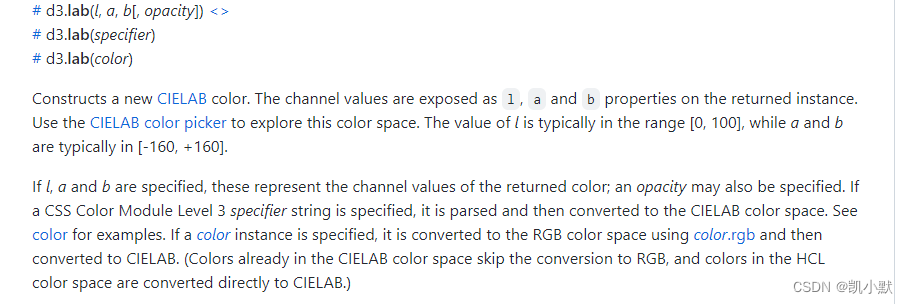
DOCTYPE html> <html lang="en"> <head> <meta charset="UTF-8" /> <meta http-equiv="X-UA-Compatible" content="IE=edge" /> <meta name="viewport" content="width=device-width, initial-scale=1.0" /> <title>CIE Lab 和 CIE Lch 颜色title> <script src="https://d3js.org/d3-color.v1.min.js">script> <style> canvas { border: 1px dashed salmon; } style> head> <body> <canvas width="512" height="512">canvas> <script type="module"> const canvas = document.querySelector("canvas"); const ctx = canvas.getContext("2d"); ctx.translate(256, 256); ctx.scale(1, -1); // 使用 d3.lab().rgb() 获取到rgb的值 for (let i = 0; i < 20; i++) { const c = d3.lab(30, i * 15 - 150, i * 15 - 150).rgb(); ctx.fillStyle = `rgb(${c.r}, ${c.g}, ${c.b})`; ctx.beginPath(); ctx.arc((i - 10) * 20, 60, 10, 0, Math.PI * 2); ctx.fill(); } for (let i = 0; i < 20; i++) { const c = d3.lab(i * 5, 80, 80).rgb(); ctx.fillStyle = `rgb(${c.r}, ${c.g}, ${c.b})`; ctx.beginPath(); ctx.arc((i - 10) * 20, -60, 10, 0, Math.PI * 2); ctx.fill(); } script> body> html>- 1
- 2
- 3
- 4
- 5
- 6
- 7
- 8
- 9
- 10
- 11
- 12
- 13
- 14
- 15
- 16
- 17
- 18
- 19
- 20
- 21
- 22
- 23
- 24
- 25
- 26
- 27
- 28
- 29
- 30
- 31
- 32
- 33
- 34
- 35
- 36
- 37
- 38
- 39
- 40
- 41
- 42
- 43
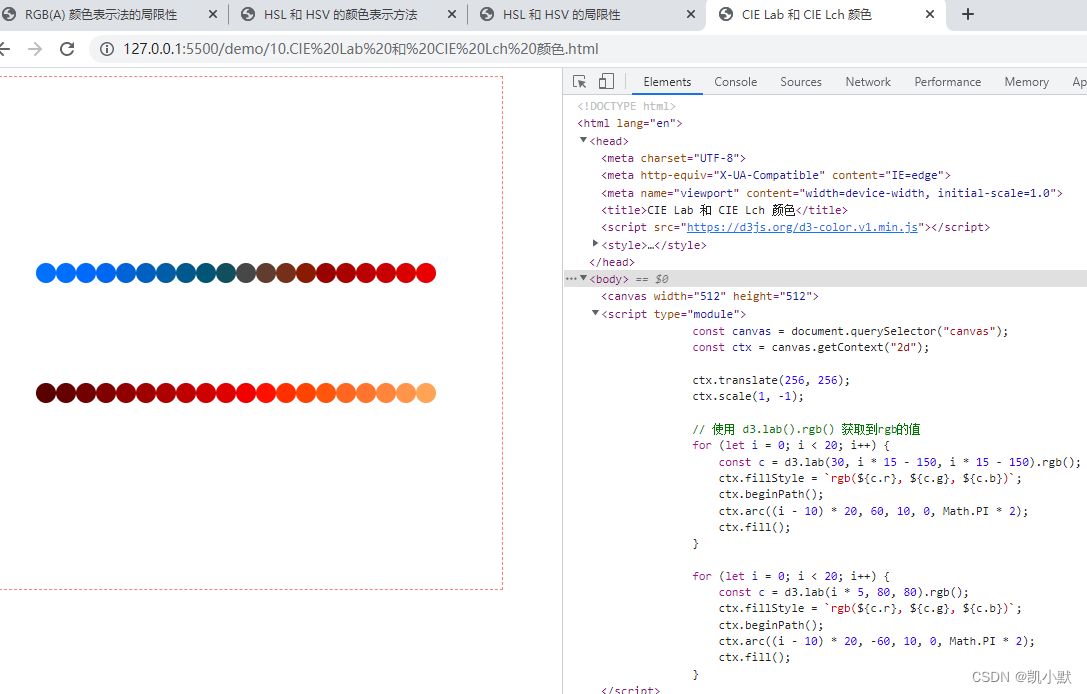
可以看到以 CIELab 方式呈现的色彩变化中,设置的数值和人眼感知的一致性比较强。
Cubehelix 色盘
Cubehelix “立方螺旋” 算法会生成给定数量的颜色列表。此颜色表拥有线性增加的强度曲线,同时也会在色轮周围旋转产生各种颜色的渐变。
优点:生成的色表在转换为灰度或替换色调后,其强度的变化不会有影响。因为红绿蓝三色本身的感知亮度是不一样的,如果更改了基础色,则还需要再修一遍整体平衡。这个算法能够在不破坏亮度平衡的情况下替换起始颜色。
Cubehelix 渐变

Cubehelix 渐变加亮度渐变

推荐阅读:Cubehelix颜色表算法
Cubehelix色盘的原理
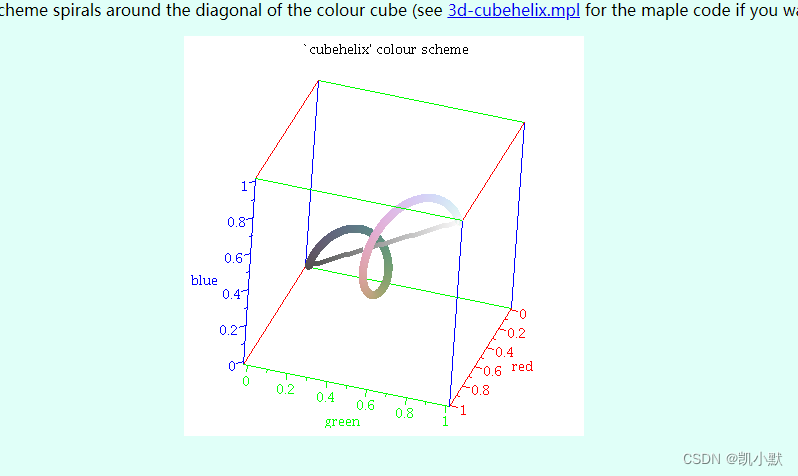
Cubehelix 色盘(立方螺旋色盘)的原理就是在 RGB 的立方中构建一段螺旋线,让色相随着亮度增加螺旋变换。可以查看Dave Green’s ‘cubehelix’ colour scheme
Cubehelix 的应用
例子:使用 cubehelix:https://github.com/mperdikeas/js-cubehelix#readme 模块写一个颜色随着长度变化的柱状图
cubehelix:A JavaScript library implementing Dave Green’s `cubehelix’ algorithm to generate a family of mapping functions. I.e., a family of functions that map values in the [0, 1] domain to points in the RGB colorspace employing a wide variety of color and ensuring that the perceived brightness monotonically increases.
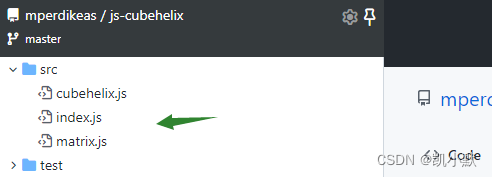
可以自己将 cubehelix 的代码弄一份到自己的 lib 库里,方便使用
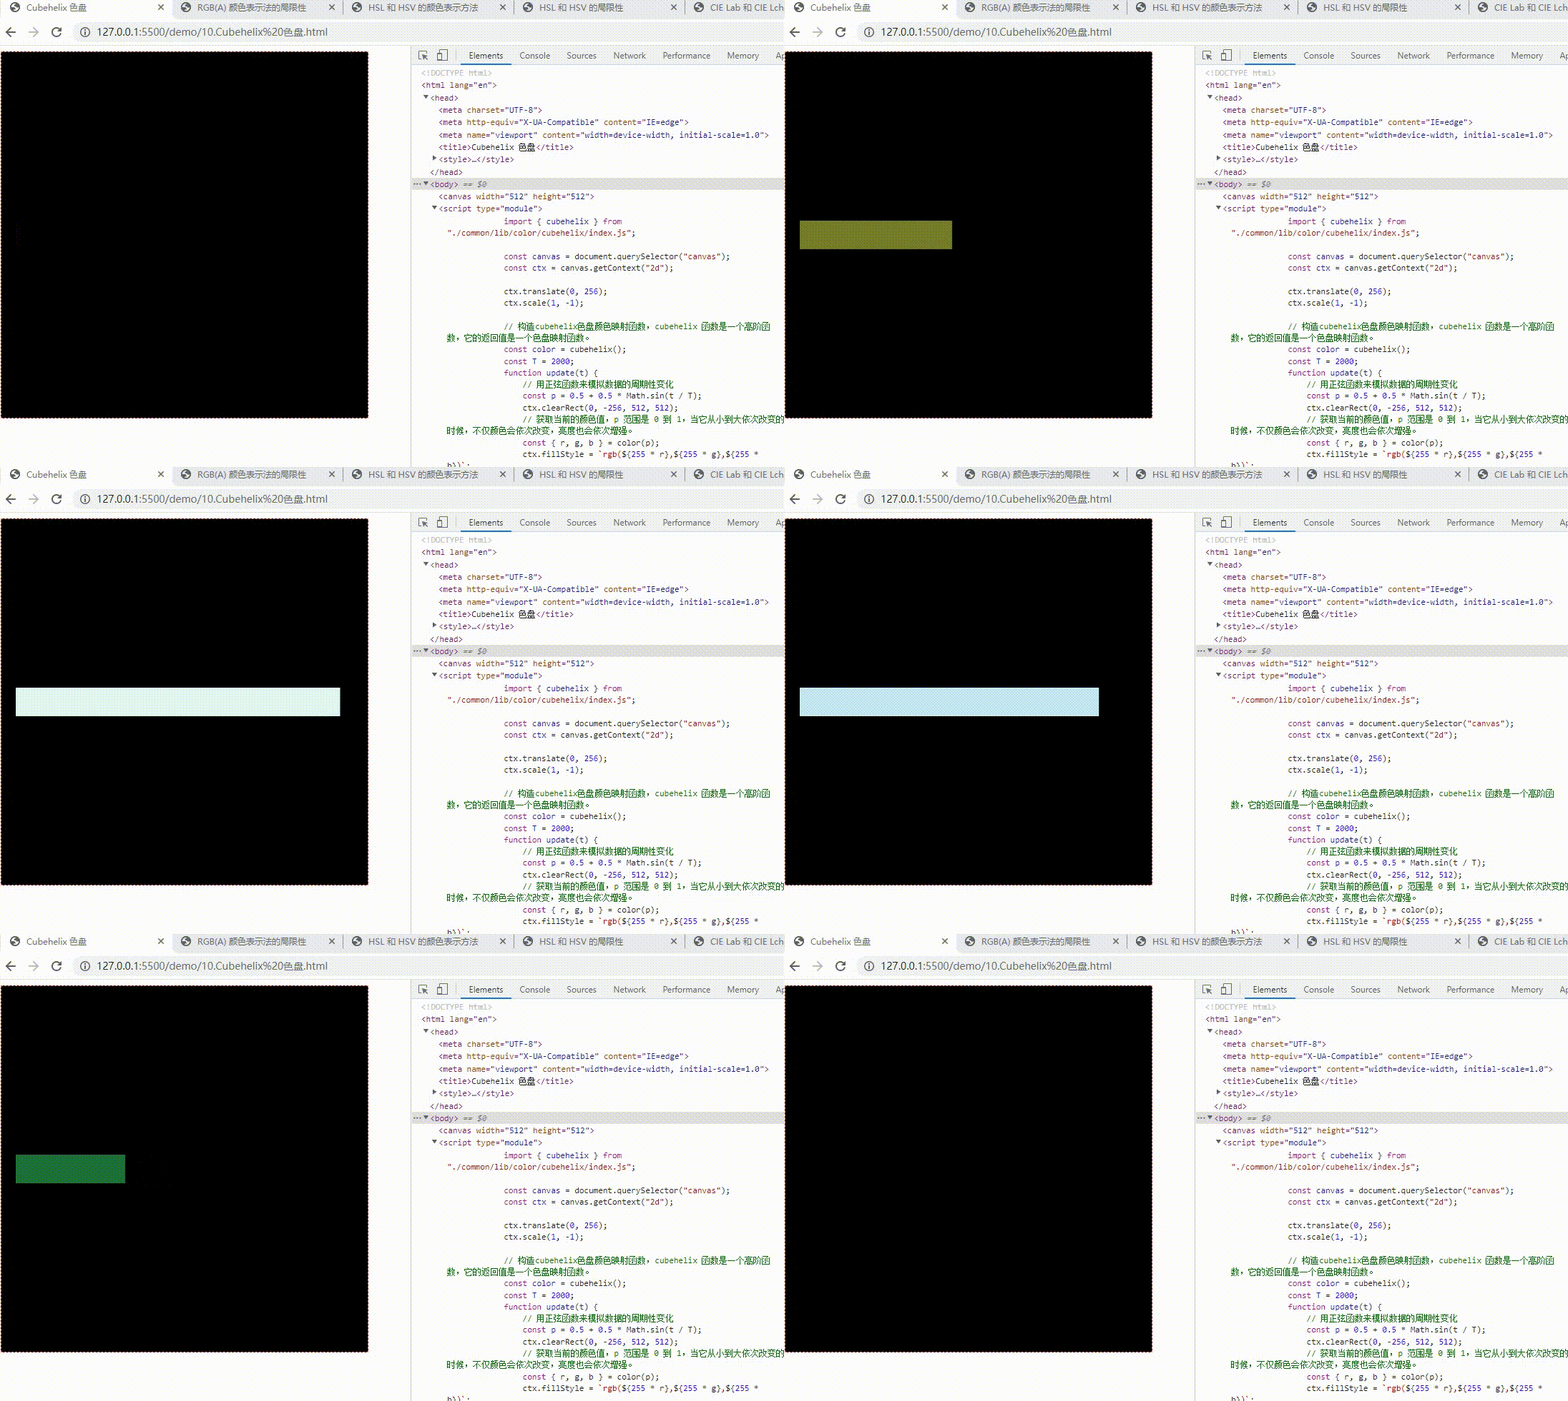
DOCTYPE html> <html lang="en"> <head> <meta charset="UTF-8" /> <meta http-equiv="X-UA-Compatible" content="IE=edge" /> <meta name="viewport" content="width=device-width, initial-scale=1.0" /> <title>Cubehelix 色盘title> <style> canvas { border: 1px dashed salmon; background: #000; } style> head> <body> <canvas width="512" height="512">canvas> <script type="module"> import { cubehelix } from "./common/lib/color/cubehelix/index.js"; const canvas = document.querySelector("canvas"); const ctx = canvas.getContext("2d"); ctx.translate(0, 256); ctx.scale(1, -1); // 构造cubehelix色盘颜色映射函数,cubehelix 函数是一个高阶函数,它的返回值是一个色盘映射函数。 const color = cubehelix(); const T = 2000; function update(t) { // 用正弦函数来模拟数据的周期性变化 const p = 0.5 + 0.5 * Math.sin(t / T); ctx.clearRect(0, -256, 512, 512); // 获取当前的颜色值,p 范围是 0 到 1,当它从小到大依次改变的时候,不仅颜色会依次改变,亮度也会依次增强。 const { r, g, b } = color(p); ctx.fillStyle = `rgb(${255 * r},${255 * g},${255 * b})`; ctx.beginPath(); ctx.rect(20, -20, 480 * p, 40); ctx.fill(); window.ctx = ctx; requestAnimationFrame(update); } update(0); script> body> html>- 1
- 2
- 3
- 4
- 5
- 6
- 7
- 8
- 9
- 10
- 11
- 12
- 13
- 14
- 15
- 16
- 17
- 18
- 19
- 20
- 21
- 22
- 23
- 24
- 25
- 26
- 27
- 28
- 29
- 30
- 31
- 32
- 33
- 34
- 35
- 36
- 37
- 38
- 39
- 40
- 41
- 42
- 43
- 44
- 45
- 46
效果如下:
推荐阅读资料
-
相关阅读:
学会这 29 个 函数,你就是 Pandas 专家
【Linux】《Linux命令行与shell脚本编程大全 (第4版) 》笔记-ChapterA-bash 命令快速指南
数据结构与算法--图
详解ServletContext
git使用patch进行补丁操作
spring gateway 简约易懂版
什么是社会工程学?
HashMap/ConcurrentHashMap/头插法/尾插法
如何给视频加上酷炫边框?简单几步搞定
下载高清地图最好的网站!【文末附免费地图资料包】
- 原文地址:https://blog.csdn.net/kaimo313/article/details/126833999
