-
Linux 磁盘扩容及挂载新盘
前言
在使用虚拟机的时候默认创建的磁盘大小是20G,有时候需要更大的磁盘空间,在虚拟机设置调整之后,还要手动在Linux的里面扩容或者添加新盘
一、磁盘扩容
1、修改虚拟机的硬盘大小
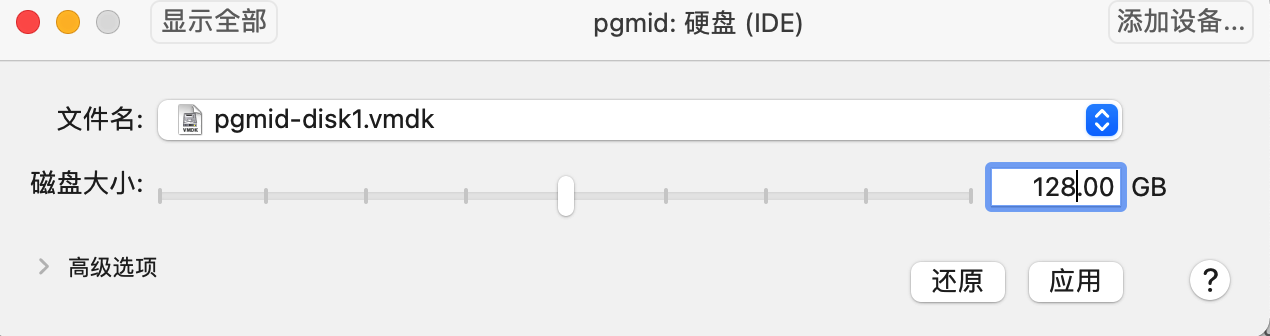
2、查看磁盘大小
#查看磁盘大小107.4 GB
[root@postgres ~]# fdisk -l
磁盘 /dev/sda:107.4 GB, 107374182400 字节,209715200 个扇区
Units = 扇区 of 1 * 512 = 512 bytes
扇区大小(逻辑/物理):512 字节 / 512 字节
I/O 大小(最小/最佳):512 字节 / 512 字节

#调整后查看磁盘大小已经为 137G了
[root@postgres ~]# fdisk -l

磁盘 /dev/sda:137.4 GB, 137438953472 字节,268435456 个扇区
Units = 扇区 of 1 * 512 = 512 bytes

#查看磁盘使用,并没有用完,还是原来的大小并没有扩容还是100G
[root@postgres ~]# df -TH
文件系统                类型      容量  已用  可用 已用% 挂载点
/dev/mapper/centos-root xfs        98G   15G   84G   15% /
devtmpfs                devtmpfs  1.1G     0  1.1G    0% /dev
tmpfs                   tmpfs     1.1G  623k  1.1G    1% /dev/shm
tmpfs                   tmpfs     1.1G  9.0M  1.1G    1% /run
tmpfs                   tmpfs     1.1G     0  1.1G    0% /sys/fs/cgroup
/dev/sda1               xfs       1.1G  131M  933M   13% /boot
tmpfs                   tmpfs     210M     0  210M    0% /run/user/0
3、创建分区
扩容一个10G的分区
操作步骤
[root@postgres ~]# fdisk /dev/sda
命令(输入 m 获取帮助):m
命令(输入 m 获取帮助):n
Select (default p): p
分区号 (3,4,默认 3):3
起始 扇区 (209715200-268435455,默认为 209715200):
将使用默认值 209715200
Last 扇区, +扇区 or +size{K,M,G} (209715200-268435455,默认为 268435455):+10G
分区 3 已设置为 Linux 类型,大小设为 10 GiB

命令(输入 m 获取帮助):t
分区号 (1-3,默认 3):3
Hex 代码(输入 L 列出所有代码):L
ex 代码(输入 L 列出所有代码):8e
已将分区“Linux”的类型更改为“Linux LVM”

命令(输入 m 获取帮助):w
The partition table has been altered!
完整的操作步骤参考(可以按照上面步骤执行)
[root@postgres ~]# fdisk /dev/sda
欢迎使用 fdisk (util-linux 2.23.2)。

更改将停留在内存中,直到您决定将更改写入磁盘。
使用写入命令前请三思。


命令(输入 m 获取帮助):m
命令操作
   a   toggle a bootable flag
   b   edit bsd disklabel
   c   toggle the dos compatibility flag
   d   delete a partition
   g   create a new empty GPT partition table
   G   create an IRIX (SGI) partition table
   l   list known partition types
   m   print this menu
   n   add a new partition
   o   create a new empty DOS partition table
   p   print the partition table
   q   quit without saving changes
   s   create a new empty Sun disklabel
   t   change a partition s system id
   u   change display/entry units
   v   verify the partition table
   w   write table to disk and exit
   x   extra functionality (experts only)

命令(输入 m 获取帮助):n
Partition type:
   p   primary (2 primary, 0 extended, 2 free)
   e   extended
Select (default p): p
分区号 (3,4,默认 3):3
起始 扇区 (209715200-268435455,默认为 209715200):
将使用默认值 209715200
Last 扇区, +扇区 or +size{K,M,G} (209715200-268435455,默认为 268435455):+10G
分区 3 已设置为 Linux 类型,大小设为 10 GiB

命令(输入 m 获取帮助):t
分区号 (1-3,默认 3):3
Hex 代码(输入 L 列出所有代码):L

 0  空              24  NEC DOS         81  Minix / 旧 Linu bf  Solaris
 1  FAT12           27  隐藏的 NTFS Win 82  Linux 交换 / So c1  DRDOS/sec (FAT-
 2  XENIX root      39  Plan 9          83  Linux           c4  DRDOS/sec (FAT-
 3  XENIX usr       3c  PartitionMagic  84  OS/2 隐藏的 C:  c6  DRDOS/sec (FAT-
 4  FAT16 <32M      40  Venix 80286     85  Linux 扩展      c7  Syrinx
 5  扩展            41  PPC PReP Boot   86  NTFS 卷集       da  非文件系统数据
 6  FAT16           42  SFS             87  NTFS 卷集       db  CP/M / CTOS / .
 7  HPFS/NTFS/exFAT 4d  QNX4.x          88  Linux 纯文本    de  Dell 工具
 8  AIX             4e  QNX4.x 第2部分  8e  Linux LVM       df  BootIt
 9  AIX 可启动      4f  QNX4.x 第3部分  93  Amoeba          e1  DOS 访问
 a  OS/2 启动管理器 50  OnTrack DM      94  Amoeba BBT      e3  DOS R/O
 b  W95 FAT32       51  OnTrack DM6 Aux 9f  BSD/OS          e4  SpeedStor
 c  W95 FAT32 (LBA) 52  CP/M            a0  IBM Thinkpad 休 eb  BeOS fs
 e  W95 FAT16 (LBA) 53  OnTrack DM6 Aux a5  FreeBSD         ee  GPT
 f  W95 扩展 (LBA)  54  OnTrackDM6      a6  OpenBSD         ef  EFI (FAT-12/16/
10  OPUS            55  EZ-Drive        a7  NeXTSTEP        f0  Linux/PA-RISC
11  隐藏的 FAT12    56  Golden Bow      a8  Darwin UFS      f1  SpeedStor
12  Compaq 诊断     5c  Priam Edisk     a9  NetBSD          f4  SpeedStor
14  隐藏的 FAT16 <3 61  SpeedStor       ab  Darwin 启动     f2  DOS 次要
16  隐藏的 FAT16    63  GNU HURD or Sys af  HFS / HFS+      fb  VMware VMFS
17  隐藏的 HPFS/NTF 64  Novell Netware  b7  BSDI fs         fc  VMware VMKCORE
18  AST 智能睡眠    65  Novell Netware  b8  BSDI swap       fd  Linux raid 自动
1b  隐藏的 W95 FAT3 70  DiskSecure 多启 bb  Boot Wizard 隐  fe  LANstep
1c  隐藏的 W95 FAT3 75  PC/IX           be  Solaris 启动    ff  BBT
1e  隐藏的 W95 FAT1 80  旧 Minix
Hex 代码(输入 L 列出所有代码):8e
已将分区“Linux”的类型更改为“Linux LVM”

命令(输入 m 获取帮助):w
The partition table has been altered!

Calling ioctl() to re-read partition table.

WARNING: Re-reading the partition table failed with error 16: 设备或资源忙.
The kernel still uses the old table. The new table will be used at
the next reboot or after you run partprobe(8) or kpartx(8)
正在同步磁盘。
[root@postgres ~]#
4、查看分区
查看已创建的分区。命令“fdisk -l“,可以看到多了/dev/sda3
[root@postgres ~]# fdisk -l

磁盘 /dev/sda:137.4 GB, 137438953472 字节,268435456 个扇区
Units = 扇区 of 1 * 512 = 512 bytes
扇区大小(逻辑/物理):512 字节 / 512 字节
I/O 大小(最小/最佳):512 字节 / 512 字节
磁盘标签类型:dos
磁盘标识符:0x000b06d5

   设备 Boot      Start         End      Blocks   Id  System
/dev/sda1   *        2048     2099199     1048576   83  Linux
/dev/sda2         2099200   209715199   103808000   8e  Linux LVM
/dev/sda3       209715200   230686719    10485760   8e  Linux LVM
5、同步分区并创建物理卷
创建分区后,需要同步分区和创建物理卷。命令分别是“partprobe“和”pvcreate /dev/sda3“
[root@postgres ~]# partprobe
[root@postgres ~]# pvcreate /dev/sda3
  Physical volume "/dev/sda3" successfully created.
[root@postgres ~]#
查看物理卷
[root@postgres ~]# pvdisplay
  --- Physical volume ---
  PV Name               /dev/sda2
  VG Name               centos
  PV Size               <99.00 GiB / not usable 3.00 MiB
  Allocatable           yes (but full)
  PE Size               4.00 MiB
  Total PE              25343
  Free PE               0
  Allocated PE          25343
  PV UUID               rYKqk9-fhz6-DJeG-SGmE-WOA8-wQbJ-fEX1OZ

  --- Physical volume ---
  PV Name               /dev/sda3
  VG Name               centos
  PV Size               10.00 GiB / not usable 4.00 MiB
  Allocatable           yes (but full)
  PE Size               4.00 MiB
  Total PE              2559
  Free PE               0
  Allocated PE          2559
  PV UUID               RYFcba-7kP7-bNSf-lyMC-nO0N-oUR1-dXYfZi
6、查看卷组
[root@postgres ~]# vgdisplay
  --- Volume group ---
  VG Name               centos
  System ID
  Format                lvm2
  Metadata Areas        1
  Metadata Sequence No  3
  VG Access             read/write
  VG Status             resizable
  MAX LV                0
  Cur LV                2
  Open LV               2
  Max PV                0
  Cur PV                1
  Act PV                1
  VG Size               <99.00 GiB
  PE Size               4.00 MiB
  Total PE              25343
  Alloc PE / Size       25343 / <99.00 GiB
  Free  PE / Size       0 / 0
  VG UUID               mZQeMJ-sRF9-bnpv-gl7Y-PubR-krJY-WpOYfm
7、创建的物理卷,加入到卷组
将创建的物理卷,加入到卷组中。命令“vgextend 卷组名 物理卷”,其中卷组名是上一步获取的值,物理卷是新创建的物理卷。例:”vgextend centos /dev/sda3“
[root@postgres ~]# vgextend centos /dev/sda3
  Volume group "centos" successfully extended
8、将加入卷组的容量扩容到文件系统上
将加入卷组的容量扩容到文件系统上,首先选择自己要挂载的扩展的文件系统 df-Th
命令 lvextend -l +100%FREE /dev/mapper/centos-root
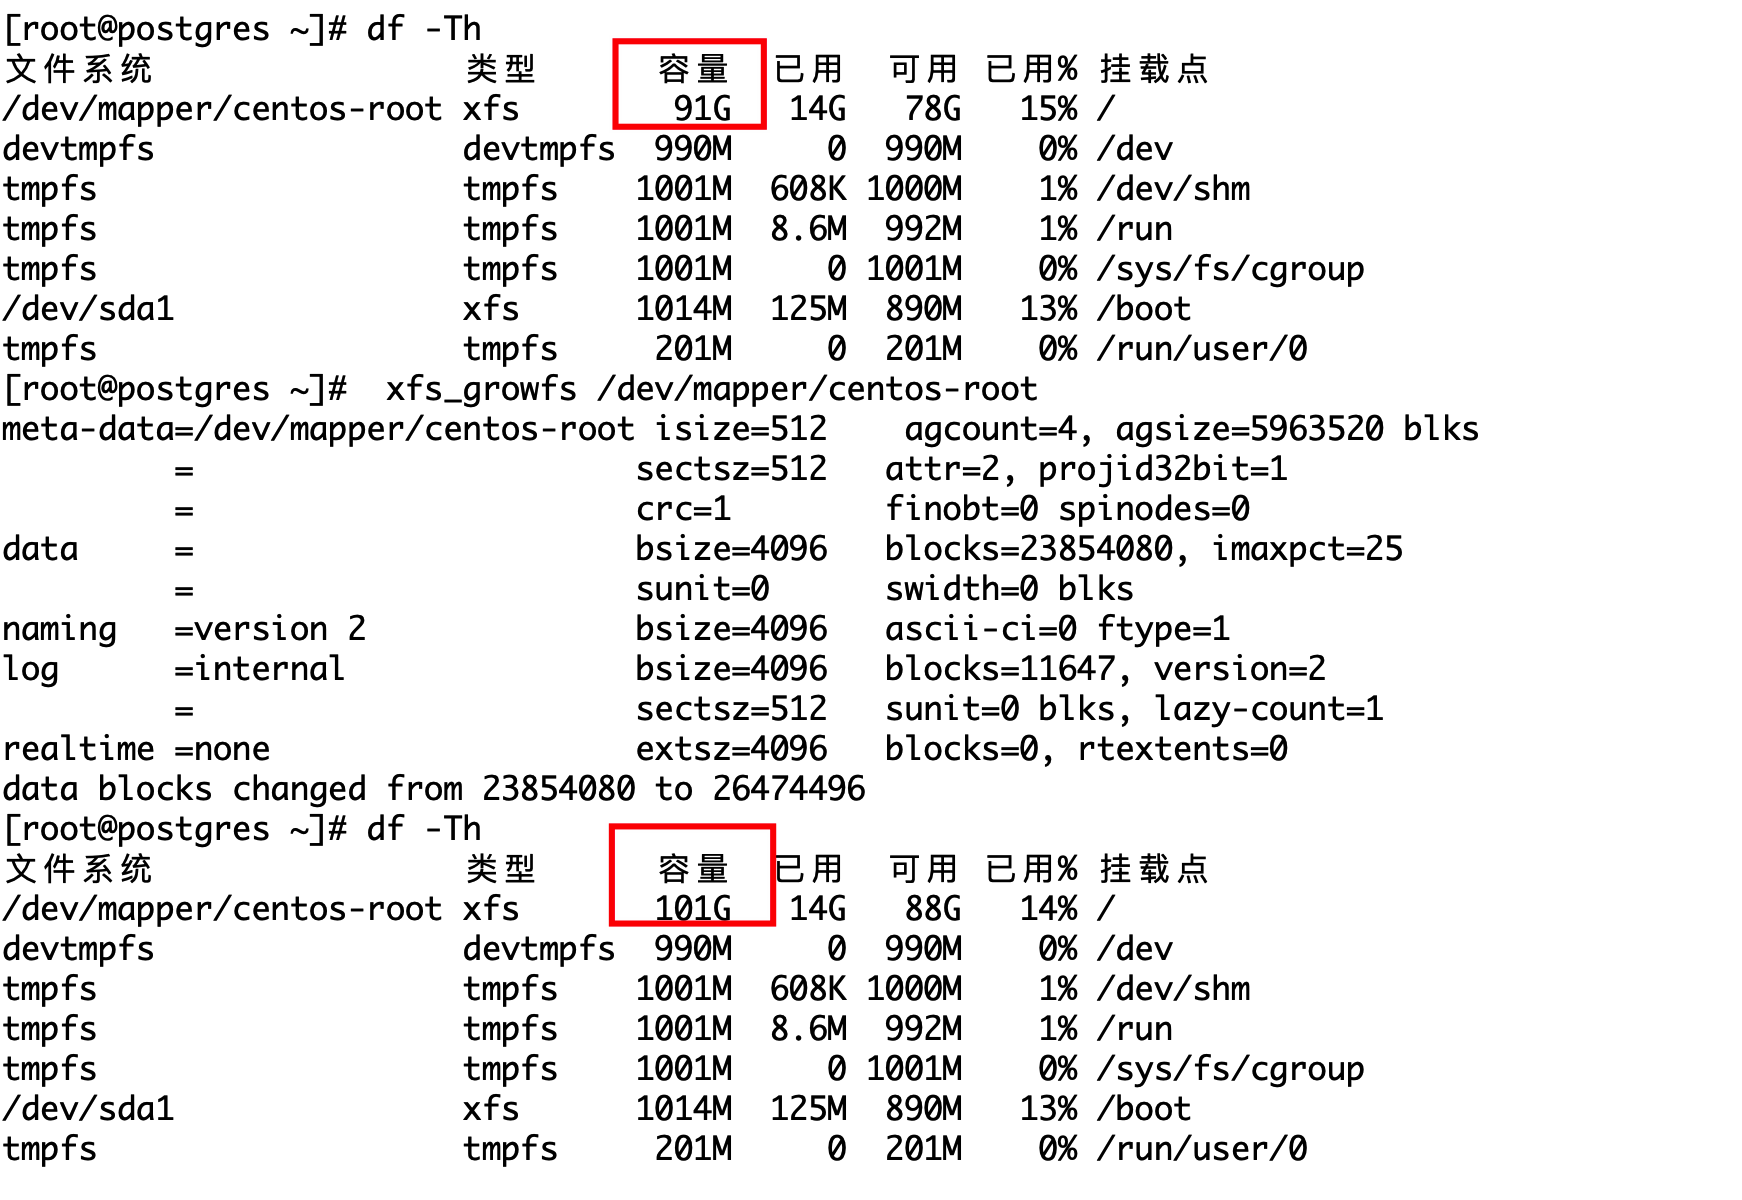
[root@postgres ~]# df -Th
文件系统                类型      容量  已用  可用 已用% 挂载点
/dev/mapper/centos-root xfs        91G   14G   78G   15% /
devtmpfs                devtmpfs  990M     0  990M    0% /dev
tmpfs                   tmpfs    1001M  608K 1000M    1% /dev/shm
tmpfs                   tmpfs    1001M  8.6M  992M    1% /run
tmpfs                   tmpfs    1001M     0 1001M    0% /sys/fs/cgroup
/dev/sda1               xfs      1014M  125M  890M   13% /boot
tmpfs                   tmpfs     201M     0  201M    0% /run/user/0
[root@postgres ~]# lvextend -l +100%FREE /dev/mapper/centos-root
  Size of logical volume centos/root changed from <91.00 GiB (23295 extents) to 100.99 GiB (25854 extents).
  Logical volume centos/root successfully resized.
9、刷新文件系统的存储容量
查看文件类型发现是xfs
刷新文件系统的存储容量
文件类型是ext4的使用:resize2fs /dev/mapper/centos-root
文件类型是xfs的使用:xfs_growfs /dev/mapper/centos-root
命令 xfs_growfs /dev/mapper/centos-root
执行命令后,使用命令”df -TH“可以看到这个盘的容量已经变成101G了。
[root@postgres ~]# df -Th
文件系统                类型      容量  已用  可用 已用% 挂载点
/dev/mapper/centos-root xfs        91G   14G   78G   15% /
devtmpfs                devtmpfs  990M     0  990M    0% /dev
tmpfs                   tmpfs    1001M  608K 1000M    1% /dev/shm
tmpfs                   tmpfs    1001M  8.6M  992M    1% /run
tmpfs                   tmpfs    1001M     0 1001M    0% /sys/fs/cgroup
/dev/sda1               xfs      1014M  125M  890M   13% /boot
tmpfs                   tmpfs     201M     0  201M    0% /run/user/0
[root@postgres ~]#  xfs_growfs /dev/mapper/centos-root
meta-data=/dev/mapper/centos-root isize=512    agcount=4, agsize=5963520 blks
         =                       sectsz=512   attr=2, projid32bit=1
         =                       crc=1        finobt=0 spinodes=0
data     =                       bsize=4096   blocks=23854080, imaxpct=25
         =                       sunit=0      swidth=0 blks
naming   =version 2              bsize=4096   ascii-ci=0 ftype=1
log      =internal               bsize=4096   blocks=11647, version=2
         =                       sectsz=512   sunit=0 blks, lazy-count=1
realtime =none                   extsz=4096   blocks=0, rtextents=0
data blocks changed from 23854080 to 26474496
[root@postgres ~]# df -Th
文件系统                类型      容量  已用  可用 已用% 挂载点
/dev/mapper/centos-root xfs       101G   14G   88G   14% /
devtmpfs                devtmpfs  990M     0  990M    0% /dev
tmpfs                   tmpfs    1001M  608K 1000M    1% /dev/shm
tmpfs                   tmpfs    1001M  8.6M  992M    1% /run
tmpfs                   tmpfs    1001M     0 1001M    0% /sys/fs/cgroup
/dev/sda1               xfs      1014M  125M  890M   13% /boot
tmpfs                   tmpfs     201M     0  201M    0% /run/user/0
[root@postgres ~]#
10、可以看到容量成功扩容了
11、参考资料
https://blog.csdn.net/weixin_41891696/article/details/118805670
https://blog.csdn.net/john1337/article/details/119749350
二、挂载新盘
1、创建分区
磁盘从100G扩容到了128G,其中第一步磁盘扩容了10G,再创建一个10G的新分区
[root@postgres ~]# fdisk -l

磁盘 /dev/sda:137.4 GB, 137438953472 字节,268435456 个扇区
Units = 扇区 of 1 * 512 = 512 bytes
扇区大小(逻辑/物理):512 字节 / 512 字节
I/O 大小(最小/最佳):512 字节 / 512 字节
磁盘标签类型:dos
磁盘标识符:0x000b06d5

   设备 Boot      Start         End      Blocks   Id  System
/dev/sda1   *        2048     2099199     1048576   83  Linux
/dev/sda2         2099200   209715199   103808000   8e  Linux LVM
/dev/sda3       209715200   230686719    10485760   8e  Linux LVM

磁盘 /dev/mapper/centos-root:108.4 GB, 108439535616 字节,211795968 个扇区
Units = 扇区 of 1 * 512 = 512 bytes
扇区大小(逻辑/物理):512 字节 / 512 字节
I/O 大小(最小/最佳):512 字节 / 512 字节


磁盘 /dev/mapper/centos-swap:8589 MB, 8589934592 字节,16777216 个扇区
Units = 扇区 of 1 * 512 = 512 bytes
扇区大小(逻辑/物理):512 字节 / 512 字节
I/O 大小(最小/最佳):512 字节 / 512 字节

[root@postgres ~]# pvcreate /dev/sdb4
  Device /dev/sdb4 not found (or ignored by filtering).
[root@postgres ~]# fdisk /dev/sda
欢迎使用 fdisk (util-linux 2.23.2)。

更改将停留在内存中,直到您决定将更改写入磁盘。
使用写入命令前请三思。


命令(输入 m 获取帮助):n
Partition type:
   p   primary (3 primary, 0 extended, 1 free)
   e   extended
Select (default e): p
已选择分区 4
起始 扇区 (230686720-268435455,默认为 230686720):
将使用默认值 230686720
Last 扇区, +扇区 or +size{K,M,G} (230686720-268435455,默认为 268435455):+10G
分区 4 已设置为 Linux 类型,大小设为 10 GiB

命令(输入 m 获取帮助):t
分区号 (1-4,默认 4):4
Hex 代码(输入 L 列出所有代码):8e
已将分区“Linux”的类型更改为“Linux LVM”

命令(输入 m 获取帮助):w
The partition table has been altered!

Calling ioctl() to re-read partition table.

WARNING: Re-reading the partition table failed with error 16: 设备或资源忙.
The kernel still uses the old table. The new table will be used at
the next reboot or after you run partprobe(8) or kpartx(8)
正在同步磁盘。
[root@postgres ~]# fdisk -l

磁盘 /dev/sda:137.4 GB, 137438953472 字节,268435456 个扇区
Units = 扇区 of 1 * 512 = 512 bytes
扇区大小(逻辑/物理):512 字节 / 512 字节
I/O 大小(最小/最佳):512 字节 / 512 字节
磁盘标签类型:dos
磁盘标识符:0x000b06d5

   设备 Boot      Start         End      Blocks   Id  System
/dev/sda1   *        2048     2099199     1048576   83  Linux
/dev/sda2         2099200   209715199   103808000   8e  Linux LVM
/dev/sda3       209715200   230686719    10485760   8e  Linux LVM
/dev/sda4       230686720   251658239    10485760   8e  Linux LVM
2、同步分区并创建物理卷pv
[root@postgres ~]# pvs
  PV         VG     Fmt  Attr PSize   PFree
  /dev/sda2  centos lvm2 a--  <99.00g    0
  /dev/sda3  centos lvm2 a--  <10.00g    0
[root@postgres ~]# partprobe
[root@postgres ~]# pvcreate /dev/sda4
  Physical volume "/dev/sda4" successfully created.
[root@postgres ~]# pvs
  PV         VG     Fmt  Attr PSize   PFree
  /dev/sda2  centos lvm2 a--  <99.00g     0
  /dev/sda3  centos lvm2 a--  <10.00g     0
  /dev/sda4         lvm2 ---   10.00g 10.00g
[root@postgres ~]#
3、创建新的卷组vg
#查看pv及vg
[root@postgres ~]# pvs
  PV         VG     Fmt  Attr PSize   PFree
  /dev/sda2  centos lvm2 a--  <99.00g     0
  /dev/sda3  centos lvm2 a--  <10.00g     0
  /dev/sda4         lvm2 ---   10.00g 10.00g
[root@postgres ~]# vgcreate  cosmic  /dev/sda4
  Volume group "cosmic" successfully created
[root@postgres ~]# pvs
  PV         VG     Fmt  Attr PSize   PFree
  /dev/sda2  centos lvm2 a--  <99.00g      0
  /dev/sda3  centos lvm2 a--  <10.00g      0
  /dev/sda4  cosmic lvm2 a--  <10.00g <10.00g
4、查看卷组vg并创建逻辑卷lv
[root@postgres ~]# vgs
  VG     #PV #LV #SN Attr   VSize   VFree
  centos   2   2   0 wz--n- 108.99g      0
  cosmic   1   0   0 wz--n- <10.00g <10.00g
[root@postgres ~]# lvcreate -L 10G -n cosmiclv cosmic
  Volume group "cosmic" has insufficient free space (2559 extents): 2560 required.
[root@postgres ~]# lvs
  LV   VG     Attr       LSize   Pool Origin Data%  Meta%  Move Log Cpy%Sync Convert
  root centos -wi-ao---- 100.99g
  swap centos -wi-ao----   8.00g
[root@postgres ~]# lvcreate -L 8G -n cosmiclv cosmic
  Logical volume "cosmiclv" created.
[root@postgres ~]# lvdisplay
  --- Logical volume ---
  LV Path                /dev/cosmic/cosmiclv
  LV Name                cosmiclv
  VG Name                cosmic
  LV UUID                YAX3zl-AFQz-TJIO-Zx5n-HAS4-QbpE-gnBOB3
  LV Write Access        read/write
  LV Creation host, time postgres, 2022-09-29 19:36:39 +0800
  LV Status              available
  # open                 0
  LV Size                8.00 GiB
  Current LE             2048
  Segments               1
  Allocation             inherit
  Read ahead sectors     auto
  - currently set to     8192
  Block device           253:2

  --- Logical volume ---
  LV Path                /dev/centos/root
  LV Name                root
  VG Name                centos
  LV UUID                TDLwUc-hDfB-BTuB-QzCS-LwTF-a7KK-pAc2CA
  LV Write Access        read/write
  LV Creation host, time localhost, 2021-07-29 11:18:17 +0800
  LV Status              available
  # open                 1
  LV Size                100.99 GiB
  Current LE             25854
  Segments               2
  Allocation             inherit
  Read ahead sectors     auto
  - currently set to     8192
  Block device           253:0

  --- Logical volume ---
  LV Path                /dev/centos/swap
  LV Name                swap
  VG Name                centos
  LV UUID                EMo8Jz-4CrJ-g5z5-A9Jq-vrpE-cVV6-ZoxFrm
  LV Write Access        read/write
  LV Creation host, time localhost, 2021-07-29 11:18:18 +0800
  LV Status              available
  # open                 2
  LV Size                8.00 GiB
  Current LE             2048
  Segments               1
  Allocation             inherit
  Read ahead sectors     auto
  - currently set to     8192
  Block device           253:1
5、将新创建的lv逻辑卷格式化为xfs格式
[root@postgres ~]# mkfs.xfs  /dev/cosmic/cosmiclv
meta-data=/dev/cosmic/cosmiclv   isize=512    agcount=4, agsize=524288 blks
         =                       sectsz=512   attr=2, projid32bit=1
         =                       crc=1        finobt=0, sparse=0
data     =                       bsize=4096   blocks=2097152, imaxpct=25
         =                       sunit=0      swidth=0 blks
naming   =version 2              bsize=4096   ascii-ci=0 ftype=1
log      =internal log           bsize=4096   blocks=2560, version=2
         =                       sectsz=512   sunit=0 blks, lazy-count=1
realtime =none                   extsz=4096   blocks=0, rtextents=0
6、创建一个数据目录并挂载lv
[root@postgres /]#  mkdir  /data
[root@postgres /]#  mount  /dev/cosmic/cosmiclv    /data
[root@postgres /]# df -Th
文件系统                    类型      容量  已用  可用 已用% 挂载点
/dev/mapper/centos-root     xfs       101G   14G   88G   14% /
devtmpfs                    devtmpfs  990M     0  990M    0% /dev
tmpfs                       tmpfs    1001M  608K 1000M    1% /dev/shm
tmpfs                       tmpfs    1001M  8.6M  992M    1% /run
tmpfs                       tmpfs    1001M     0 1001M    0% /sys/fs/cgroup
/dev/sda1                   xfs      1014M  125M  890M   13% /boot
tmpfs                       tmpfs     201M     0  201M    0% /run/user/0
/dev/mapper/cosmic-cosmiclv xfs       8.0G   33M  8.0G    1% /data
[root@postgres /]#
7、将新挂载的目录加入开机启动项,重启后自动挂载
[root@postgres /]# lvdisplay
  --- Logical volume ---
  LV Path                /dev/cosmic/cosmiclv
#修改文件
vi /etc/fstab
#添加内容
/dev/cosmic/cosmiclv    /data  xfs  defaults 0  0
#验证
[root@postgres /]# reboot
Last login: Thu Sep 29 18:50:21 2022 from 172.16.94.1
[root@postgres ~]#
[root@postgres ~]# df -Th
文件系统                    类型      容量  已用  可用 已用% 挂载点
/dev/mapper/centos-root     xfs       101G   14G   88G   14% /
devtmpfs                    devtmpfs  990M     0  990M    0% /dev
tmpfs                       tmpfs    1001M  608K 1000M    1% /dev/shm
tmpfs                       tmpfs    1001M  8.6M  992M    1% /run
tmpfs                       tmpfs    1001M     0 1001M    0% /sys/fs/cgroup
/dev/sda1                   xfs      1014M  125M  890M   13% /boot
/dev/mapper/cosmic-cosmiclv xfs       8.0G   33M  8.0G    1% /data
tmpfs                       tmpfs     201M     0  201M    0% /run/user/0
[root@postgres ~]#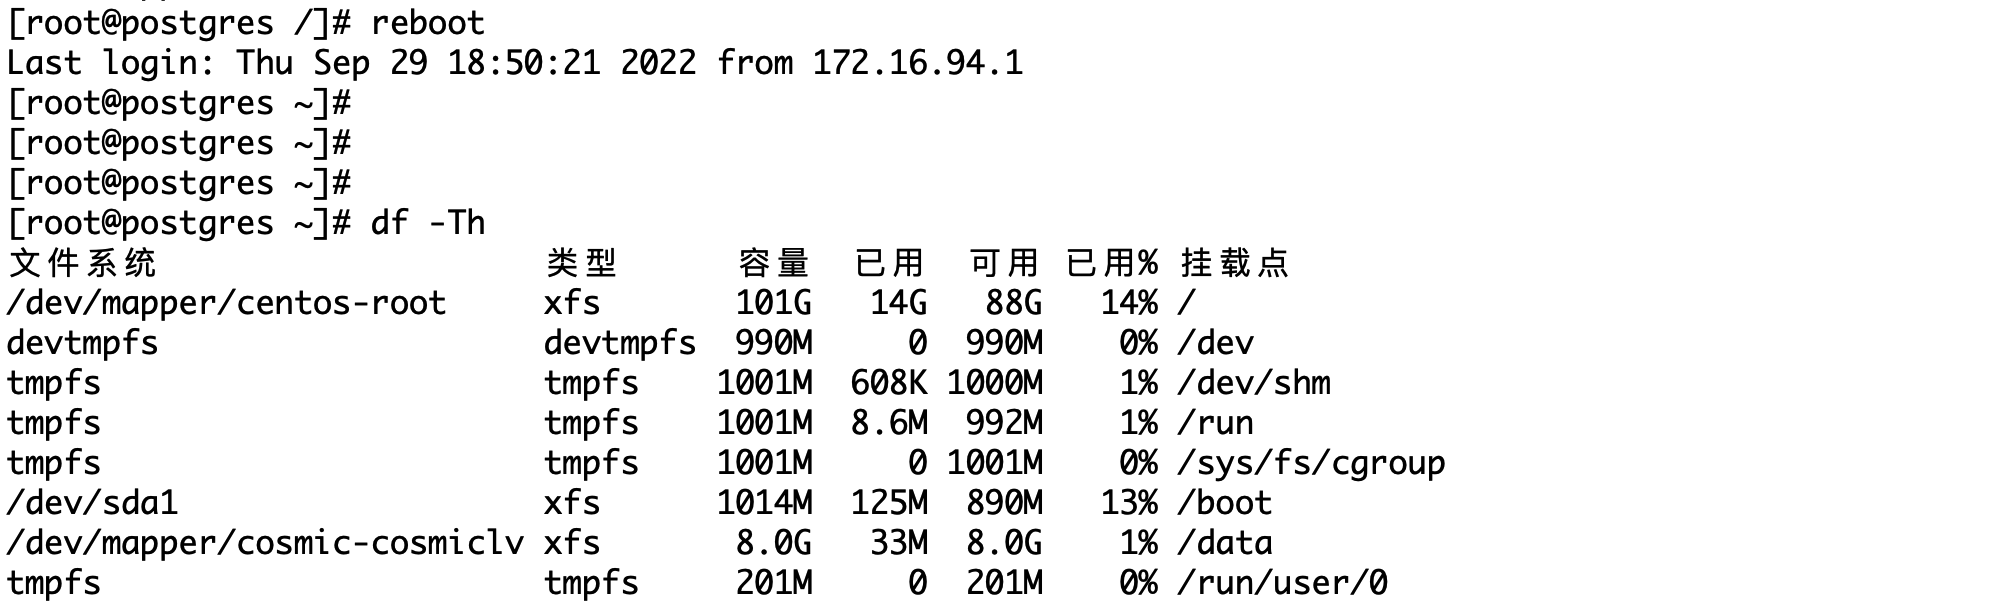
8、参考资料
# 添加一个70G的硬盘
# fdisk -l    查看新增加的磁盘
# pvcreate /dev/sdb  	  (创建PV)
# pvs      查看新增加的pv盘
# vgcreate  cosmicvg  /dev/sdb      (创建vg)

# vgs      查看新增加的vg
# lvcreate -L 69G -n cosmiclv cosmicvg      (创建lv )

# lvdisplay	   查看逻辑卷路径

# mkfs.xfs  /dev/cosmicvg/cosmiclv       (将新创建的LV逻辑卷格式化为xfs格式)

# mkdir  /kingdee     (创建一个存数据目录)
# mount  /dev/cosmicvg/cosmiclv    /kingdee     (挂载新目录出来)

# df  -h   可以查看到新挂载的目录
#将新挂载的目录加入开机启动项,重启后自动挂载
# vi /etc/fstab
# /dev/cosmicvg/cosmiclv    /kingdee  xfs  defaults 0  0
-
相关阅读:
Vue:关于如何配置一级路由和二级路由的方法
联邦学习开源框架FATE架构
基于51单片机的PID直流电机调速Proteus仿真
极智开发 | Ant Design 组件库之步骤条
移动WEB开发之rem布局--苏宁首页案例制作(技术方案1)
苹果曝出严重安全漏洞,黑客可全面接管设备!!!
C++项目实战——基于多设计模式下的同步&异步日志系统(总集篇)
驱动day8
基础化学试题A卷
【黑马程序员】mysql进阶再进阶篇笔记
- 原文地址:https://blog.csdn.net/LaneDu/article/details/127123880