-
Dobbo微服务项目实战(详细介绍+案例源码) - 2.用户登录
飞盘是给狗玩的吧

系列文章目录
1. 项目介绍及环境配置
2.短信验证码登录
3. 用户信息
4. MongoDB
5. 推荐好友列表/MongoDB集群/动态发布与查看
6. 圈子动态/圈子互动
7. 即时通讯(基于第三方API)
8. 附近的人(百度地图APi)
9. 小视频
10.网关配置
11.后台管理
一、短信服务案例
1. 阿里云短信服务
官方网站: https://www.aliyun.com/product/sms

2. SDK 示例
官方文档: https://help.aliyun.com/document_detail/101414.html
API示例: https://next.api.aliyun.com/api/Dysmsapi/2017-05-25/SendSms
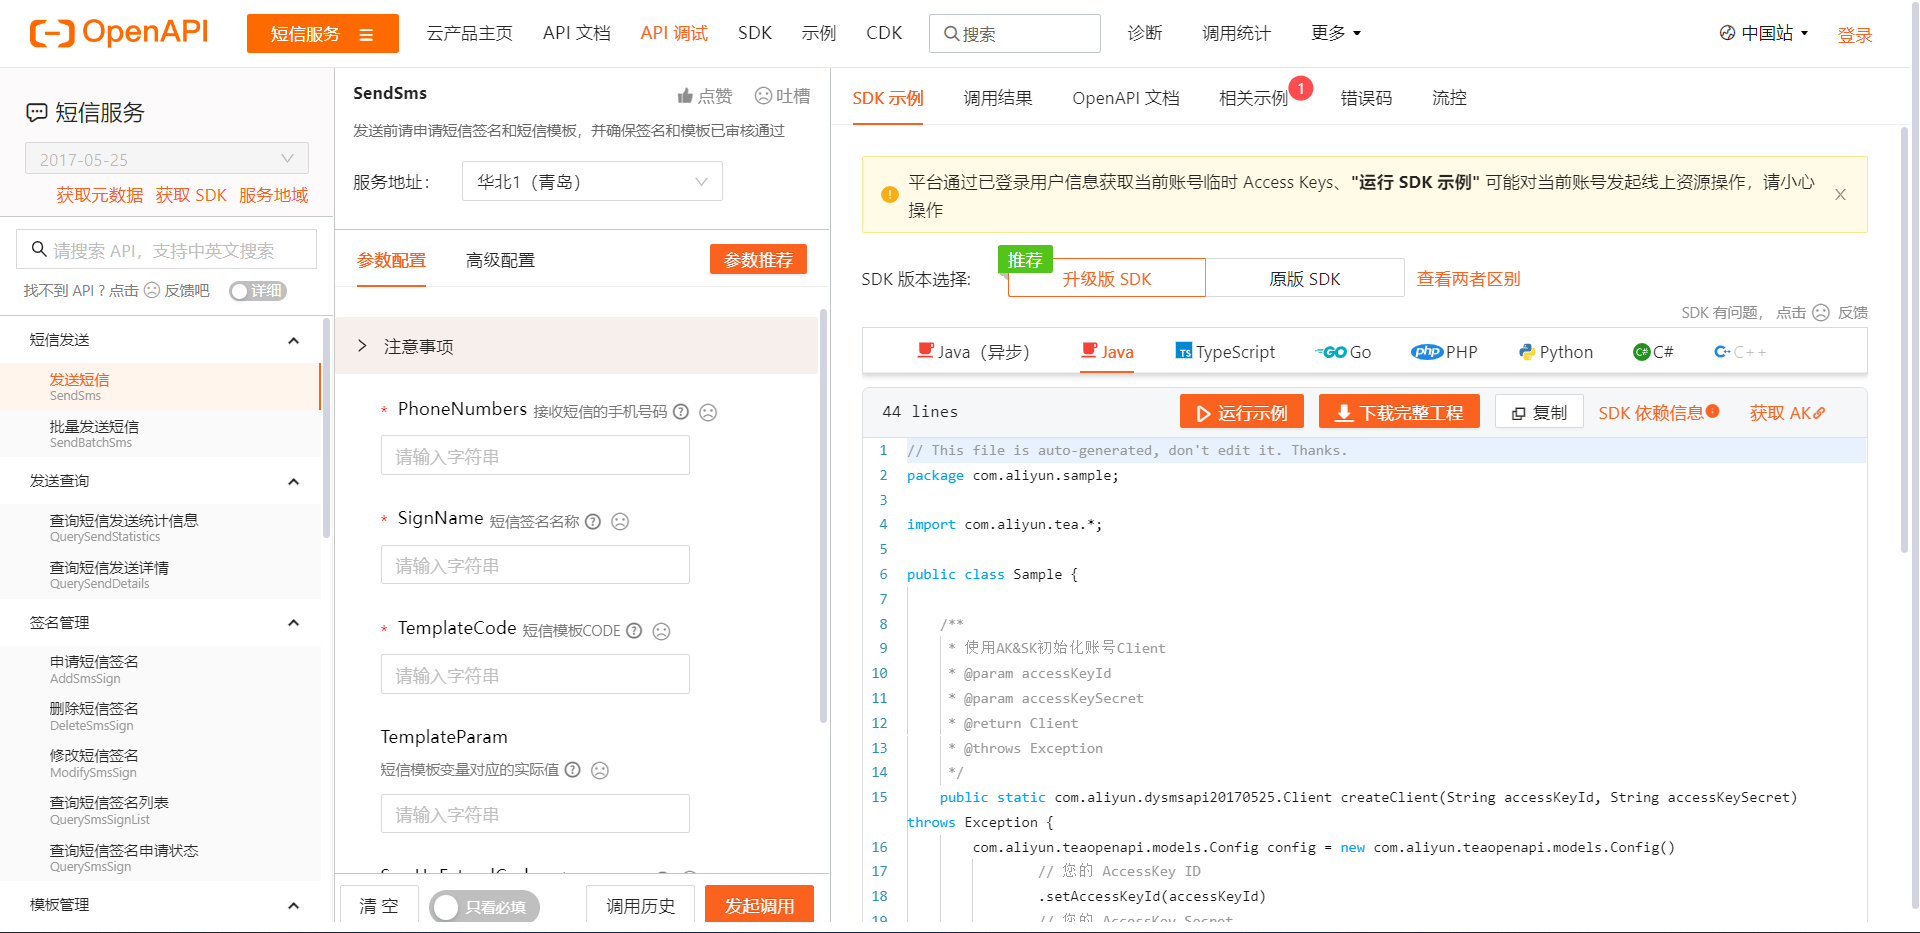
3. Code
新建
tanhua-app-server/src/test/java/com/tanhua/test/Sample.java实现类:public class Sample { public static void main(String[] args_) throws Exception { // 手动输入 accessKeyId (之后动态配置) String accessKeyId = "****"; String accessKeySecret= "****"; // 配置对象阿里云 Config config = new Config() // 您的AccessKey ID .setAccessKeyId(accessKeyId) // 您的AccessKey Secret .setAccessKeySecret(accessKeySecret); // 访问的域名 config.endpoint = "dysmsapi.aliyuncs.com"; // 创建请求客户端对象 com.aliyun.dysmsapi20170525.Client client = new com.aliyun.dysmsapi20170525.Client(config); // 设置短信参数 SendSmsRequest sendSmsRequest = new SendSmsRequest() .setPhoneNumbers("18618412321") //目标手机号 .setSignName("物流云商") //签名名称 .setTemplateCode("SMS_205134115") //短信模板code .setTemplateParam("{\"code\":\"1234\"}"); //模板中变量替换 // 复制代码运行请自行打印 API 的返回值 SendSmsResponse response = client.sendSms(sendSmsRequest); // response.body.message code = OK 代表成功 SendSmsResponseBody body = response.getBody(); } }调试
Sample.main()方法查看返回结果
二、使用步骤
企业开发中,往往将常见工具类封装抽取,以简洁便利的方式供其他工程模块使用。而
SpringBoot的自动装配机制可以方便的实现组件抽取。
1. 定义模板对象
新建
tanhua-autoconfig/src/main/java/com/tanhua/autoconfig/template/SmsTemplate.java文件:public class SmsTemplate { public void sendSms(String mobile, String code) { // 填写阿里云 accessKeyId String accessKeyId = "****"; String accessKeySecret= "****"; try { Config config = new Config() .setAccessKeyId(accessKeyId) .setAccessKeySecret(accessKeySecret); config.endpoint = "dysmsapi.aliyuncs.com"; com.aliyun.dysmsapi20170525.Client client = new com.aliyun.dysmsapi20170525.Client(config); SendSmsRequest sendSmsRequest = new SendSmsRequest() .setPhoneNumbers(mobile) .setSignName("物流云商") .setTemplateCode("SMS_205134115") .setTemplateParam("{\"code\":\""+ code +"\"}"); SendSmsResponse response = client.sendSms(sendSmsRequest); // response.body.message code = OK 代表成功 SendSmsResponseBody body = response.getBody(); // 打印返回结果 System.out.println(body.getMessage()); } catch(Exception e) { e.printStackTrace(); } } }
2. 定义自动装配类型
新建
tanhua-autoconfig/src/main/java/com/tanhua/autoconfig/TanhuaAutoConfiguration.java文件:public class TanhuaAutoConfiguration { @Bean public SmsTemplate smsTemplate() { return new SmsTemplate(); } }新建
tanhua-autoconfig/src/main/resources/META-INF/spring.factories文件:org.springframework.boot.autoconfigure.EnableAutoConfiguration=\ com.tanhua.autoconfig.TanhuaAutoConfiguration
3. 添加装配文件
新建
tanhua-app-server/src/main/resources/application.yml文件:spring: application: name: tanhua-app-server
4. 启动类
新建
tanhua-app-server/src/main/java/com/tanhua/server/AppServerApplication.java启动类://启动类 @SpringBootApplication public class AppServerApplication { public static void main(String[] args) { SpringApplication.run(AppServerApplication.class,args); } }
5. 测试类
新建
tanhua-app-server/src/test/java/com/tanhua/test/SmsTemplateTest.java测试类:@RunWith(SpringRunner.class) @SpringBootTest(classes = AppServerApplication.class) public class SmsTemplateTest { // 注入 @Autowired private SmsTemplate smsTemplate; // 测试 @Test public void testSendSms() { smsTemplate.sendSms("15112341234", "5678"); } }调试
SmsTemplateTest.main()方法查看返回结果
三、发送短信验证码

1. Redis配置
编辑
tanhua-app-server/src/main/resources/application.yml文件:#服务端口 server: port: 18080 spring: application: name: tanhua-app-server redis: #redis配置 port: 6379 host: 192.168.136.160 cloud: #nacos配置 nacos: discovery: server-addr: 192.168.136.160:8848 dubbo: #dubbo配置 registry: address: spring-cloud://localhost consumer: check: false tanhua: sms: signName: 物流云商 templateCode: SMS_106590012 accessKey: **** secret: ****
2. 发送短信验证码
新建
tanhua-app-server/src/main/java/com/tanhua/server/service/UserService.java文件:@Service public class UserService { @Autowired private SmsTemplate template; @Autowired private RedisTemplate<String, String> redisTemplate; public void sendMsg(String phone) { // 1. 随机生成6位数数字 String code = RandomStringUtils.randomNumeric(6); // 2. 调用template对象, 发送验证码 template.sendSms(phone, code); // 3. 将验证码存入redis redisTemplate.opsForValue().set("CHECK_CODE_" + phone, code, Duration.ofMinutes(5)); } }
3. 登录请求
新建
tanhua-app-server/src/main/java/com/tanhua/server/controller/LoginController.java文件:@RestController @RequestMapping("/user") public class LoginController { @Autowired private UserService userService; /** * 获取登录验证码 * 请求参数: photo (map) * 相应数据: void * 返回对象: ResponseEntity */ @PostMapping("/login") public ResponseEntity login(Map map) { String phone = (String) map.get("phone"); userService.sendMsg(phone); // return ResponseEntity.status(500).body("出错了"); // 指定状态码和返回内容 return ResponseEntity.ok(null); // 正常返回状态码 200 } }
4. API接口
YAPI接口地址: http://192.168.136.160:3000/project/19/interface/api/94

# 如果API文档打不开,是因为项目YAPI未启动

# 连接虚拟机
cd /root/docker-file/base/
# 启动docker镜像
docker-compose up -d
5. Postman请求

编辑
tanhua-app-server/src/main/java/com/tanhua/server/controller/LoginController.java文件:... return ResponseEntity.status(500).body("出错了"); // 指定状态码和返回内容 // return ResponseEntity.ok(null); // 正常返回状态码 200
四、JWT
1. 简介
JSON Web token 简称 JWT , 是用于对应用程序上的用户进行身份验证的标记。也就是说, 使用 JWTS 的应用程序不再需要保存有关其用户的 cookie 或其他 session 数据。此特性便于可伸缩性, 同时保证应用程序的安全
官方网址: https://jwt.io/
2. 格式

- JWT就是一个字符串,经过加密处理与校验处理的字符串,形式为:A.B.C
- A 由JWT头部信息 header 加密得到
- B 由JWT用到的身份验证信息 json数据 加密得到
- C 由A和B加密得到,是 校验 部分
3. 示例

新增
tanhua-app-server/src/test/java/com/tanhua/test/JwtTest.java文件:public class JwtTest { // 生成token @Test public void testJwtCreateToken() { // 1. 准备数据 Map map = new HashMap(); map.put("id", 1); map.put("mobile", "13800138000"); // 2. 使用JWT工具类生成token long now = System.currentTimeMillis(); String token = Jwts.builder() .signWith(SignatureAlgorithm.HS512, "itcast") // 指定加密算法 .setClaims(map) // 写入数据 .setExpiration(new Date(now + 30000)) .compact(); System.out.println(token); // => eyJhbGciOiJIUzUxMiJ9.eyJtb2JpbGUiOiIxMzgwMDEzODAwMCIsImlkIjoxLCJleHAiOjE2NjM5MzA5NDd9.blu3bhMCaEDkaKbolQNFNBrLT5-_2yhHInPKnXbdtm38dW6Cvh6swmtjdVuLxro_OIaduZw9_hLLA9BbMKtCxg } // 解析token /** * ExpiredJwtException: token过期 * SignatureException: token不合法 */ @Test public void testParseToken() { String token = "eyJhbGciOiJIUzUxMiJ9.eyJtb2JpbGUiOiIxMzgwMDEzODAwMCIsImlkIjoxLCJleHAiOjE2NjM5MzA5NDd9.blu3bhMCaEDkaKbolQNFNBrLT5-_2yhHInPKnXbdtm38dW6Cvh6swmtjdVuLxro_OIaduZw9_hLLA9BbMKtCxg"; try { Claims claims = Jwts.parser() .setSigningKey("itcast") .parseClaimsJws(token) .getBody(); Object id = claims.get("id"); Object mobile = claims.get("mobile"); System.out.println(id + "--" + mobile); // => 1--13800138000 } catch (ExpiredJwtException e) { System.out.println("token已过期"); } catch (SignatureException e) { System.out.println("token不合法"); } } }
五、Dubbo服务提供者

1. 配置实体类
新建
tanhua-model/src/main/java/com/tanhua/model/domain/User.java文件:@Data @AllArgsConstructor //满参构造方法 @NoArgsConstructor //无参构造方法 public class User implements Serializable { private Long id; private String mobile; private String password; private Date created; private Date updated; }
2. 创建数据库层Mapper接口
新建
tanhua-dubbo/tanhua-dubbo-db/src/main/java/com/tanhua/dubbo/mappers/UserMapper.java文件:public interface UserMapper extends BaseMapper<User> { }
3. 配置API接口
新建
tanhua-dubbo/tanhua-dubbo-db/src/main/java/com/tanhua/dubbo/api/UserApiImpl.java文件:@DubboService public class UserApiImpl implements UserApi { @Autowired private UserMapper userMapper; // 根据手机号查询用户 public User findByMobile(String mobile) { QueryWrapper<User> qw = new QueryWrapper<>(); qw.eq("mobile", mobile); return userMapper.selectOne(qw); } }
4. 实现类
新建
tanhua-dubbo/tanhua-dubbo-interface/src/main/java/com/tanhua/dubbo/api/UserApi.java文件:public interface UserApi { // 根据手机号查询用户 User findByMobile(String mobile); }
5. 创建引导类
新建
tanhua-dubbo/tanhua-dubbo-db/src/main/java/com/tanhua/dubbo/DubboDBApplication.java文件:@SpringBootApplication @MapperScan("com.tanhua.dubbo.mappers") public class DubboDBApplication { public static void main(String[] args) { SpringApplication.run(DubboDBApplication.class, args); } }
6. 添加 yml 配置
新建
tanhua-dubbo/tanhua-dubbo-db/src/main/resources/application.yml文件:server: port: 18081 spring: application: name: tanhua-dubbo-db datasource: driver-class-name: com.mysql.jdbc.Driver # 也可以用虚拟机的数据库 localhost:3306 -> 127.0.0.1:3306 url: jdbc:mysql://localhost:3306/tanhua?useUnicode=true&characterEncoding=utf8&autoReconnect=true&allowMultiQueries=true&useSSL=false username: root # 本地数据库的用户名 password: 123456 # 本地数据库的密码 cloud: nacos: discovery: server-addr: 192.168.136.160:8848 dubbo: protocol: name: dubbo port: 20881 registry: address: spring-cloud://localhost scan: base-packages: com.tanhua.dubbo.api #dubbo中包扫描 mybatis-plus: global-config: db-config: table-prefix: tb_ # 表名前缀 id-type: auto # id策略为自增长
7. nacos服务列表
Nacos地址: http://192.168.136.160:8848/nacos

8. 单元测试
新建
tanhua-app-server/src/test/java/com/tanhua/test/UserApiTest.java文件:@RunWith(SpringRunner.class) @SpringBootTest(classes = AppServerApplication.class) public class UserApiTest { @DubboReference private UserApi userApi; @Test public void testFindByMobile() { User user = userApi.findByMobile("13800138000"); System.out.println(user); } }执行
UserApiTest.main()方法查看返回结果(User(id: 100, mobile: 13800138000, pass…))
六. 验证码校验

1. 定义登录校验方法
新建
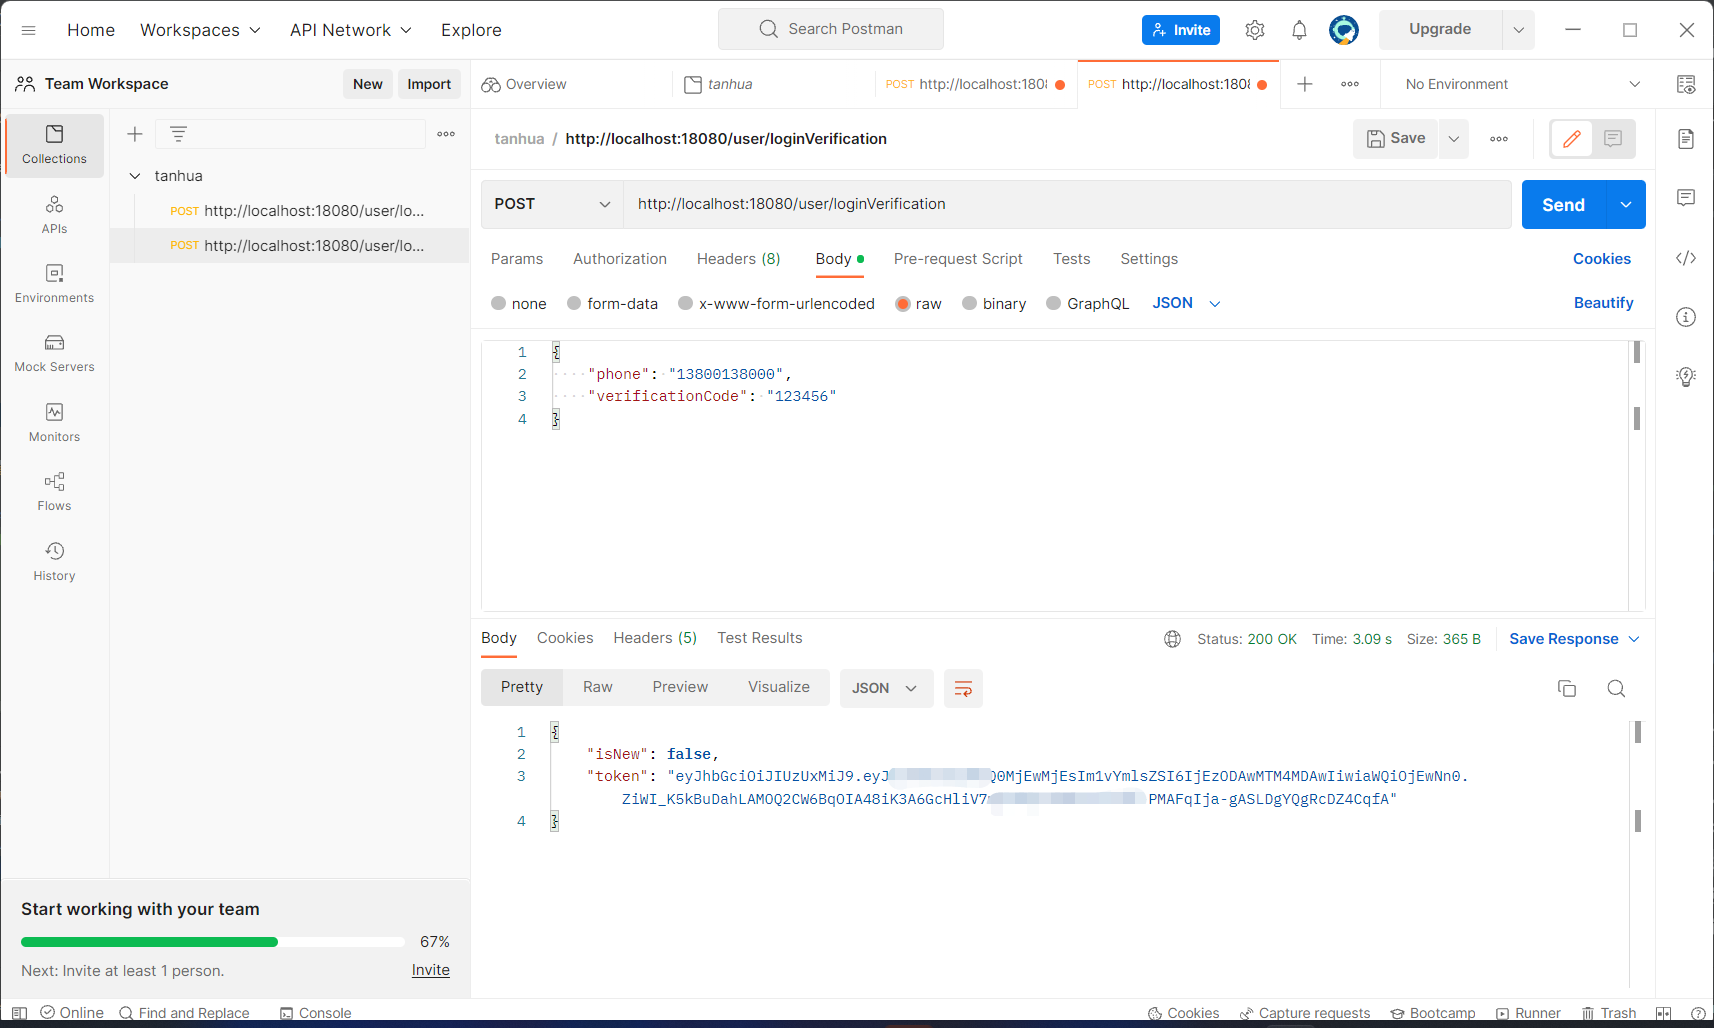
tanhua-app-server/src/main/java/com/tanhua/server/controller/LoginController.java文件:@RestController @RequestMapping("/user") public class LoginController { @Autowired private UserService userService; /** * 获取登录验证码 * 请求参数: photo (map) * 相应数据: void * 返回对象: ResponseEntity */ @PostMapping("/login") public ResponseEntity login(@RequestBody Map map) { String phone = (String) map.get("phone"); userService.sendMsg(phone); // return ResponseEntity.status(500).body("出错了"); // 指定状态码和返回内容 return ResponseEntity.ok(null); // 正常返回状态码 200 } /** * 校验登录 * /user/loginVerification * phone * verificationCode */ @PostMapping("/loginVerification") public ResponseEntity loginVerification(@RequestBody Map map) { // 1. 调用map集合获取请求参数 String phone =(String) map.get("phone"); String code =(String) map.get("verificationCode"); // 2. 调用userService完成用户登录 Map retMap = userService.loginVerification(phone, code); // 3. 构造返回 return ResponseEntity.ok(retMap); } }
2. 完成校验
新建
tanhua-app-server/src/main/java/com/tanhua/server/service/UserService.java文件:@Service public class UserService { @Autowired private SmsTemplate template; @Autowired private RedisTemplate<String, String> redisTemplate; @DubboReference private UserApi userApi; /** * 发送短信验证码 * @param phone */ public void sendMsg(String phone) { // 1. 随机生成6位数数字 // String code = RandomStringUtils.randomNumeric(6); // !!! 项目开发不用真正实现短信发送 String code = "123456"; // 2. 调用template对象, 发送验证码 // !!! 项目开发不用真正实现短信发送 // template.sendSms(phone, code); // 3. 将验证码存入redis redisTemplate.opsForValue().set("CHECK_CODE_"+phone,code, Duration.ofMinutes(5)); } /** * 验证登录 * @param phone * @param code */ public Map loginVerification(String phone, String code) { // 1. 从redis中获取验证码 String redisCode = redisTemplate.opsForValue().get("CHECK_CODE_" + phone); // 2. 对验证码进行校验 if(StringUtils.isEmpty(redisCode) || !redisCode.equals(code)) { throw new RuntimeException("验证码错误"); } // 3. 删除redis中的验证码 redisTemplate.delete("CHECK_CODE_" + phone); // 4. 通过手机号查询用户 User user = userApi.findByMobile(phone); boolean isNew = false; // 5. 如果用户不存在,创建用户保存到数据库 if(user == null) { user = new User(); user.setMobile(phone); user.setCreated(new Date()); user.setUpdated(new Date()); user.setPassword(DigestUtils.md5Hex("123456")); Long userId = userApi.save(user); user.setId(userId); isNew = true; } // 6. 通过JWT生成token(存入手机号和用户ID) Map tokenMap = new HashMap(); tokenMap.put("id", user.getId()); tokenMap.put("mobile", phone); String token = JwtUtils.getToken(tokenMap); // 7. 构造返回值 Map retMap = new HashMap(); retMap.put("token", token); retMap.put("isNew", isNew); return retMap; } }
3. Jwt工具类
新建
tanhua-commons/src/main/java/com/tanhua/commons/JwtUtils.java文件:public class JwtUtils { // TOKEN的有效期1小时(S) private static final int TOKEN_TIME_OUT = 1 * 3600; // 加密KEY private static final String TOKEN_SECRET = "itcast"; // 生成Token public static String getToken(Map params) { long currentTime = System.currentTimeMillis(); return Jwts.builder() .signWith(SignatureAlgorithm.HS512, TOKEN_SECRET) //加密方式 .setExpiration(new Date(currentTime + TOKEN_TIME_OUT * 1000)) //过期时间戳 .addClaims(params) .compact(); } /** * 获取Token中的claims信息 */ public static Claims getClaims(String token) { return Jwts.parser() .setSigningKey(TOKEN_SECRET) .parseClaimsJws(token).getBody(); } /** * 是否有效 true-有效,false-失效 */ public static boolean verifyToken(String token) { if (StringUtils.isEmpty(token)) { return false; } try { Claims claims = Jwts.parser() .setSigningKey("itcast") .parseClaimsJws(token) .getBody(); } catch (Exception e) { return false; } return true; } }
4. 创建新用户
新建
tanhua-dubbo/tanhua-dubbo-interface/src/main/java/com/tanhua/dubbo/api/UserApi.java文件:public interface UserApi { // 根据手机号查询用户 User findByMobile(String phone); // 保存用户, 返回用户ID Long save(User user); }
新建
tanhua-dubbo/tanhua-dubbo-db/src/main/java/com/tanhua/dubbo/api/UserApiImpl.java文件:@DubboService public class UserApiImpl implements UserApi { @Autowired private UserMapper userMapper; // 根据手机号查询用户 public User findByMobile(String mobile) { QueryWrapper<User> qw = new QueryWrapper<>(); qw.eq("mobile", mobile); return userMapper.selectOne(qw); } // 保存用户,返回用户ID @Override public Long save(User user) { userMapper.insert(user); return user.getId(); } }
5. postman测试

mysql数据库:

七. 代码优化
1. 抽取公共父类(内部封装公共属性)
新建
tanhua-model/src/main/java/com/tanhua/model/domain/BasePojo.java文件:@Data public abstract class BasePojo implements Serializable { @TableField(fill = FieldFill.INSERT) //自动填充 private Date created; @TableField(fill = FieldFill.INSERT_UPDATE) private Date updated; }
2. 子类继承父类
编辑
tanhua-model/src/main/java/com/tanhua/model/domain/User.java文件:@Data @AllArgsConstructor //满参构造方法 @NoArgsConstructor //无参构造方法 public class User extends BasePojo { private Long id; private String mobile; private String password; }
3. 编写自动填充实体类
新建
tanhua-dubbo/tanhua-dubbo-db/src/main/java/com/tanhua/dubbo/handler/MyMetaObjectHandler.java文件:@Component public class MyMetaObjectHandler implements MetaObjectHandler { @Override public void insertFill(MetaObject metaObject) { Object created = getFieldValByName("created", metaObject); if (null == created) { //字段为空,可以进行填充 setFieldValByName("created", new Date(), metaObject); } Object updated = getFieldValByName("updated", metaObject); if (null == updated) { //字段为空,可以进行填充 setFieldValByName("updated", new Date(), metaObject); } } @Override public void updateFill(MetaObject metaObject) { //更新数据时,直接更新字段 setFieldValByName("updated", new Date(), metaObject); } }
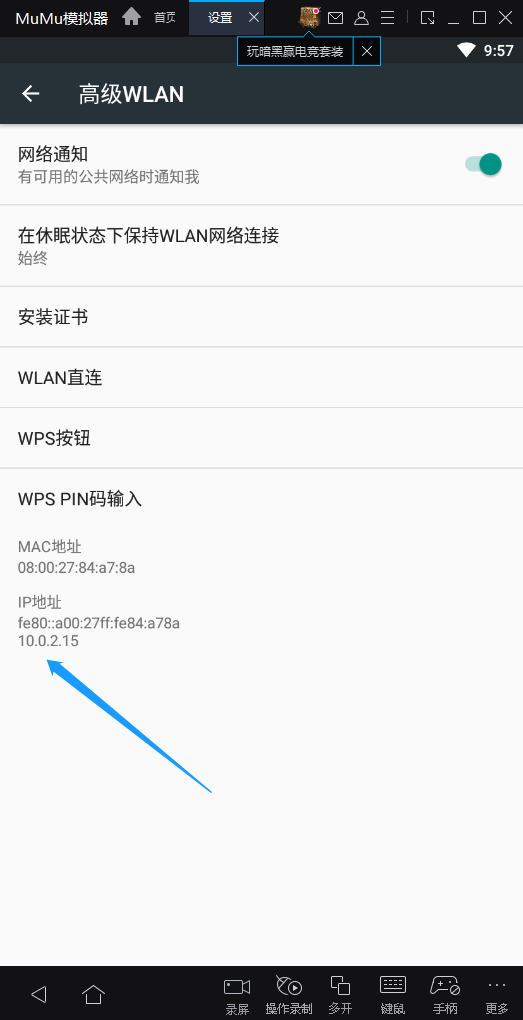
4. MUMU模拟器测试
1. IP地址
设置 -> WIFI -> 高级 -> IP地址
2. 修改服务器配置
启动 探花 APP

3. 新用户 登录、注册

4. 首页(登录成功)

-
相关阅读:
【ROS】给ROS小车加点Active SLAM的调料
完整的loader引导代码详解
kafka生产者异步发送、同步发送、回调异步发送,是什么情况?
SpringBoot 学习(九)Redis
华为mate60麒麟9000s的架构体系
Python设置进程名称
python3 词频统计计数分析+可视化词云 jieba+wordcloud 数据分析
博客园主题美化(仅兼容 Markdown)
〖全域运营实战白宝书 - 运营角色认知篇③〗- 运营的底层逻辑是什么?
【力扣算法简单五十题】06.X的平方根
- 原文地址:https://blog.csdn.net/weixin_45137565/article/details/126923272