-
早期的Haar Cascade 哈尔级联人脸识别
Haar Cascade 哈尔级联
1、核心原理
1、使用Haar-like特征监测
2、Integral Image:积分图加速特征计算
3、AdaBoost:选择关键特征,进行人脸和非人脸分类
4、Cascade:级联,弱分类器称为强分类器论文:Rapid Object Derection using a Boosted Cascade of Simple Features
OpenCV源码 :GitHub - opencv/opencv: Open Source Computer Vision Library
Haar-like特征检测,就是用白色矩形像素减去黑色矩形像素,作为一个特征点

先下载OpenCv源码:解压打开

复制到目录下:

开始编码:识别图像的人脸
- #1、导入库
- import cv2
- import numpy as np
- import matplotlib.pyplot as plt
- #2、显示图片
- def show_image(image,title,pos):
- #BGR 转换RGB
- img_RGB = image[:,:,::-1]
- plt.subplot(2,2,pos)
- plt.title(title)
- plt.imshow(img_RGB)
- plt.axis("off")
- #3、绘制图片中检测到的人脸
- def plot_rectangle(image,faces):
- #拿到检测到的人脸数据,返回4搁置:坐标(x,y),宽高width,height
- for(x,y,w,h) in faces:
- cv2.rectangle(image,(x,y),(x+w,y+h),(255,0,0),3)
- return image
- #4、主函数
- def main():
- # 5、读取一张图片
- image = cv2.imread("../images/chenqiaoen.jpg")
- # 6、转换成一张灰度图片
- gray = cv2.cvtColor(image,cv2.COLOR_BGR2GRAY)
- # 7、通过OpenCv自带方法CV2.CascadeClassifier()加载级联分类器
- face_alt2 = cv2.CascadeClassifier("haarcascade_frontalface_alt2.xml")
- # 8、分类器对图片中人脸进行检测
- face_alt2_detect = face_alt2.detectMultiScale(gray)
- # 9、绘制图片中检测到的人脸
- face_alt2_result = plot_rectangle(image.copy(),face_alt2_detect)
- # 10、创建画布
- plt.figure(figsize=(9,6))
- plt.suptitle("Face detection with haar Cascade ",fontsize = 14,fontweight="bold")
- # 11、显示整个检测效果
- show_image(face_alt2_result,"face_alt2",1) #表示显示到第一的位置
- plt.show()
- if __name__ == "__main__":
- main()
效果:
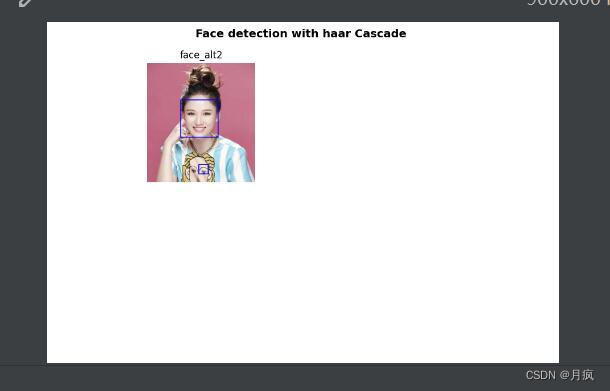
不准确,有些可能还是别不出来。
视频的人脸识别代码:
- #摄像头读取
- #1、导入库
- import cv2
- import numpy as np
- import matplotlib.pyplot as plt
- #2、显示图片
- def show_image(image,title,pos):
- #BGR 转换RGB
- img_RGB = image[:,:,::-1]
- plt.subplot(2,2,pos)
- plt.title(title)
- plt.imshow(img_RGB)
- plt.axis("off")
- #3、绘制图片中检测到的人脸
- def plot_rectangle(image,faces):
- #拿到检测到的人脸数据,返回4搁置:坐标(x,y),宽高width,height
- for(x,y,w,h) in faces:
- cv2.rectangle(image,(x,y),(x+w,y+h),(255,0,0),3)
- return image
- #4、主函数
- def main():
- # 5、读取摄像头
- capture = cv2.VideoCapture(0)
- #判断摄像头是否正常工作
- if capture.isOpened() is False:
- print("Camera Error")
- while True:
- #通过摄像头读取每一帧
- ret,frame = capture.read() # ret表示是否可以读取到图片,ret是true和false,true表示可以读取照片,false表示不能读取图片
- if ret:
- # 6、转换成一张灰度图片
- gray = cv2.cvtColor(frame,cv2.COLOR_BGR2GRAY)
- # 7、通过OpenCv自带方法CV2.CascadeClassifier()加载级联分类器
- face_alt2 = cv2.CascadeClassifier("haarcascade_frontalface_alt2.xml")
- # 8、分类器对图片中人脸进行检测
- face_alt2_detect = face_alt2.detectMultiScale(gray)
- # 9、绘制图片中检测到的人脸
- face_alt2_result = plot_rectangle(frame.copy(),face_alt2_detect)
- cv2.imshow("face detection" ,face_alt2_result)
- if cv2.waitKey(10) & 0xFF == ord('q'):
- break
- if __name__ == "__main__":
- main()
-
相关阅读:
职场PUA:为什么你就不能逼自己一把呢?
JavaEE技术点:MySQL目录及基本命令介绍
用Qt实现一个计算器demo
了解这几点,让你轻松掌握滑台模组的选型方法!
用 SpringBoot 和 SSE 打造动态前端更新的终极指南
Spring 事务原理总结七
12c向19c迁移:使用数据泵(impdp)+dblink做全量迁移
Linux网络通信(线程池和线程池版本的服务器代码)
会声会影2024(Corel VideoStudio)正式版安装下载步骤教程
R语言使用ggplot2可视化泊松回归模型(Poisson Regression)的结果、可视化不同参量组合下的计数结果
- 原文地址:https://blog.csdn.net/chehec2010/article/details/126918649