-
iText7高级教程之构建基础块——5.使用AbstractElement对象(part 2)
作者:CuteXiaoKe
微信公众号:CuteXiaoKe介绍完本章后,iText 7中所有的基础构建块都已经涵盖并介绍了。我们将两个最常用的构建块放在最后:
Table和Cell。 这些对象旨在以表格形式呈现内容。 许多开发人员使用 iText 将数据库查询的结果集转换为 PDF 格式的报告/页面。 他们创建了一个Table,其中每一行对应一个数据库记录,将每个字段值包装在一个Cell对象中。我们可以使用之前的“Jekyll and Hyde”例子的数据库轻松地创建一个与 PDF 类似的表格,但让我们先从几个简单的例子开始。
1. 第一个表格
如图5.1是我们用iText7创建的第一个表格:

图5.1 第一个表格 创建的代码很简单:
public void createPdf(String dest) throws IOException { PdfDocument pdf = new PdfDocument(new PdfWriter(dest)); Document document = new Document(pdf); Table table = new Table(new float[] {1, 1, 1}); table.addCell(new Cell(1, 3).add("Cell with colspan 3")); table.addCell(new Cell(2, 1).add("Cell with rowspan 2")); table.addCell("row 1; cell 1"); table.addCell("row 1; cell 2"); table.addCell("row 2; cell 1"); table.addCell("row 2; cell 2"); document.add(table); document.close(); }- 1
- 2
- 3
- 4
- 5
- 6
- 7
- 8
- 9
- 10
- 11
- 12
- 13
我们在第4行创建了有3列的表格。通过传递一个包含三个
float的数组,我们表明我们需要三列,但我们还没有定义宽度(1远远小于实际宽度,会自适应改变大小,具体解释后面会提及)。对于这个表格,就我们从行5-10添加了6个单元格:
- 第一个单元格的行跨度为 1,列跨度为 3。
- 第二个单元格的行跨度为 2,列跨度为 1。
- 后续四个单元格的行跨度和列跨度为 1。
对于前两个单元格,我因为我们想要定义一个特定的行跨度或列跨度,所以显式创建了一个
Cell对象。对于接下来的四个单元格,我们直接使用String添加到Table中,也就是Cell对象是由 iText 在内部创建的,例如第 7 行是table.addCell(new Cell().add("row 1; cell 1"))的简写。
你可能记得的在iText 5中的PdfPTable和PdfPCell类不再存在。它们被Table和Cell取代,同时iText 7简化了表格的创建方式,文本模式与复合模式的 iText 5 概念在初次使用 iText 的用户中引起了很多混淆。iText 7现在使用add()方法向Cell添加内容。浮点数组中的值是以用户单位表示的最小值。我们传递了 1 pt 的值。作为每列的宽度,很明显单元格的内容不适合宽度为 1/72 英寸(1pt)的列,因此 iText 自动扩展列以确保内容分布正确。在这种情况下,实际宽度由单元格的内容决定。当然我们有不同的方法来改变列的宽度。
2. 定义列宽度
如图5.2展示第一个表格的变体:

图5.2 使用绝对宽度定义列宽度 上图实现的代码和之前的几乎一模一样,唯一的改变是创建表格时传入构造器的值,现在为100:
Table table = new Table(new float[]{200, 100, 100});- 1
到目前为止,我们使用了
float数字来创建Table实例。还有一种构造器,传递的参数为UnitValue对象数组。UnitValue类有两个属性,unitType为类型,value为具体值。可以分为两大类:- 类型为
UnitValue.POINT:绝对值类型; - 类型为
UnitValue.PERCENT:相对值类型,在这我们可以用来定义相对宽度;
上面的例子中,其实就是隐式使用类型为
UnitValue.POINT的UnitValue。如图5.3所示,我们使用相对宽度来创建表格:

图5.3 使用相对宽度定义列宽度 同样,我能也只改变了一行代码:
Table table = new Table(UnitValue.createPercentArray(new float[]{1, 1, 1}));- 1
我们使用现有的便利方法
createPercentArray()创建了一个UnitValue对象数组,这些对象将每列的宽度定义为整个表格宽度的三分之一。 由于我们没有定义完整表格的宽度,因此每列的宽度由单元格的内容(最多的内容)决定。 在这种情况下,在计算表格的总宽度时,决定性的是“Cell with rowspan 2”单元格的内容。3. 定义表格宽度
我们也可以自定义表格的总宽度。 同样通过使用绝对宽度或相对宽度来完成。 如图 5.4 显示了两个表格,一个宽度为 450 个用户单位,另一个宽度为页面上可用宽度的 80%,不包括页边距。 请注意,我们还更改了表格的对齐方式。

图5.4 定义表格宽度 让我们比较一下两者的代码,上半图片的实现代码如下:
Table table = new Table(UnitValue.createPercentArray(new float[]{2, 1, 1})); table.setWidth(450); table.setHorizontalAlignment(HorizontalAlignment.CENTER);- 1
- 2
- 3
下半图片的实现代码如下:
Table table = new Table(UnitValue.createPercentArray(new float[]{2, 1, 1})); table.setWidthPercent(80); table.setHorizontalAlignment(HorizontalAlignment.CENTER);- 1
- 2
- 3
和之前一样,我们同样也定义了列宽度的相对宽度,也就是第一列的宽度等于第二、三列宽度之和。第一段代码,我们使用
setWidth()方法来定义绝对宽度:450用户单位。第二段代码,我们使用setWidthPercent()方法来告诉iText添加表格的时候使用80%的可用宽度。
假设你不管有意或无意地定义了一个太窄而无法展示所有内容的宽度(例如450用户单位改成20或者更小),在这种情况下,iText 将忽略使用setWidth()或setWidthPercent()方法传递的宽度。发生这种情况时不会引发异常,但您会在日志文件中看到以下消息:WARN c.i.layout.renderer.TableWidths - Table width is more than expected due to min width of cell(s).
让我们再举一个示例来显示使用绝对宽度与使用相对宽度之间的区别。
如图 5.5中,我们有一个占可用宽度 80% 的表格。但是我们宽度定义使用绝对宽度。
图5.5 定义表格宽度(额外的例子) 整体实现的代码如下:
Table table = new Table(new float[]{2, 1, 1}); table.setWidthPercent(80); table.setHorizontalAlignment(HorizontalAlignment.CENTER);- 1
- 2
- 3
乍一看,我们可能认为使用
new float[]{2, 1, 1}等价于使用UnitValue.createPercentArray(new float[]{2, 1, 1}),但仔细观察,你会注意到第一列的宽度不是第二列和第三列的两倍,因为new float[]{2, 1, 1}中的 float 数组的值是以用户单位表示的最小值,它们不是使用UnitValue数组时的相对值类型。在这种情况下,iText 会根据单元格的内容来定义不同列的宽度,试图使结果尽可能令人赏心悦目。我们现在已经使用
setHorizontalAlignment()方法将表格居中了几次,接下来让我们来看看一般是如何进行对齐表格和内容的。4. 选择正确的对齐配置
如图5.6所示,我们同样改变了单元格内容的对齐方式。

图5.6 单元格内容对齐 我们有多种方式改变
Cell内容的对齐方式,代码如下:Table table = new Table(UnitValue.createPercentArray(new float[]{2, 1, 1})); table.setWidthPercent(80); table.setHorizontalAlignment(HorizontalAlignment.CENTER); table.setTextAlignment(TextAlignment.CENTER); table.addCell(new Cell(1, 3).add("Cell with colspan 3")); table.addCell(new Cell(2, 1).add("Cell with rowspan 2") .setTextAlignment(TextAlignment.RIGHT)); table.addCell("row 1; cell 1"); table.addCell("row 1; cell 2"); table.addCell("row 2; cell 1"); table.addCell("row 2; cell 2"); Cell cell = new Cell() .add(new Paragraph("Left").setTextAlignment(TextAlignment.LEFT)) .add(new Paragraph("Center")) .add(new Paragraph("Right").setTextAlignment(TextAlignment.RIGHT)); table.addCell(cell); cell = new Cell().add("Middle") .setVerticalAlignment(VerticalAlignment.MIDDLE); table.addCell(cell); cell = new Cell().add("Bottom") .setVerticalAlignment(VerticalAlignment.BOTTOM); table.addCell(cell); document.add(table);- 1
- 2
- 3
- 4
- 5
- 6
- 7
- 8
- 9
- 10
- 11
- 12
- 13
- 14
- 15
- 16
- 17
- 18
- 19
- 20
- 21
- 22
- 23
我们再次使用
setHorizontalAlignment()方法来定义表格本身的水平对齐方式(第 3 行)。改方法参数为枚举,所有的值为HorizontalAlignment.LEFT——左对齐,默认值、HorizontalAlignment.CENTER——居中对齐,在本例中使用和HorizontalAlignment.RIGHT。此外,我们使用
setTextAlignment()法更改添加到此表的Cell内容的默认对齐方式。默认情况下,此内容左对齐(TextAlignment.LEFT);我们将对齐方式更改为TextAlignment.CENTER(第 4 行)。最后的结果显示,“Cell with colspan 3”将位于我们添加的第一个单元格的中心(第 5 行)。我们将第二个单元格的“Cell with rowspan 2”的对齐方式更改为
TextAlignment.RIGHT。进一步,我们在Cell级别使用setTextAlignment()方法(第 6-7 行)。通过在不指定对齐方式的情况下再添加四个单元格来完成此行跨度中的两(第8-11行)。对齐是从表中继承的,所以内容居中。从第 12 行开始,我们定义了一个
Cell,定义了内容级别的对齐方式:- 行13:添加为左对齐的
Paragraph; - 行14:我们没有为段落定义对齐方式。对齐是从
Cell继承的。Cell级别也没有定义对齐方式,因此对齐方式是从Table继承的。所以内容居中。 - 行15:添加为右对齐的
Paragraph;
接下来的两个单元格演示了垂直对齐和
setVerticalAlignment()方法。默认情况下,内容与顶部对齐 (VerticalAlignment.TOP)。在第 17-18 行,我们创建了一个对齐设置为中间的 Cell(垂直方向:VerticalAlignment.MIDDLE)。在第 20-21 行,内容是底部对齐的(VerticalAlignment.BOTTOM)。如图 5.6所示,一行的高度会自动适应该行中单元格的高度。单元格的高度取决于其内容,但我们可以改变它.
5. 更改单元高度
我来看看一下代码:
Paragraph p = new Paragraph("The Strange Case of\nDr. Jekyll\nand\nMr. Hyde") .setBorder(new DashedBorder(0.3f));- 1
- 2
- 3
上述
String包含换行符\n,这将导致这个Paragraph由多行组成。我们还定义了 0.3 个用户单位的虚线边框。然后会把同样的Paragraph添加到Table中7次。
图5.7 完整单元格和裁剪单元格 由于虚线边框,很容易区分
Paragraph的边界和Cell的实线边框。 如图 5.7中,我们看到前两个单元格:一个显示全文; 在另一个中,文本被剪裁。让我们分段看一下代码:
Table table = new Table(UnitValue.createPercentArray(new float[]{1})); table.setWidthPercent(100); table.addCell(p); Cell cell = new Cell().setHeight(45).add(p); table.addCell(cell);- 1
- 2
- 3
- 4
- 5
表格第二行的内容被裁剪,是因为我们限制了单元格高度为45pt(行4),而第一行的高度我们没有定义(行3)。在这种情况下是 iText 以
Paragraph的全部内容计算适合Cell的高度。 45 pt 的高度不足以渲染Paragraph对象中的所有行,因此文本将被剪裁。
当定义一个不足以呈现内容的固定高度时,不会抛出异常。 但是,你将在日志文件中看到以下消息:c.i.layout.renderer.BlockRenderer - Element content was clipped because some height properties are set.
接下来的代码片段如下:
cell = new Cell().setMinHeight(45).add(p); table.addCell(cell); cell = new Cell().setMinHeight(135).add(p); table.addCell(cell); cell = new Cell().setMaxHeight(45).add(p); table.addCell(cell); cell = new Cell().setMaxHeight(135).add(p); table.addCell(cell);- 1
- 2
- 3
- 4
- 5
- 6
- 7
- 8
结果如图5.8所示:

图5.8 单元格的最小和最高高度 我们可以看到有4行:
- 第一行的最小高度为 45 pt。 当然我们的内容大于45pt,因此该行高于 45 pt。
- 第二行的最小高度为 135 pt。 这绰绰有余,因此我们可以在段落的底部边框和单元格的底部边框之间看到一些额外的空间。
- 第三行的最大高度为 45 pt。 内容被剪裁,我们得到与使用
setHeight()方法设置高度时相同的警告日志。 - 第四行的最大高度为 135 pt。 同样也绰绰有余,因此文本不会被剪裁,但段落下方也不会添加额外的空格。
最后是内容别旋转以后高度以后改变,如图5.9:

图5.9 内容旋转的单元格 旋转
Cell内容是使用setRotationAngle()方法,角度需要以弧度表示。代码如下所示:cell = new Cell().add(p).setRotationAngle(Math.PI / 6); table.addCell(cell);- 1
- 2
我们引入
Paragraph边框来查看Paragraph占用的空间——带有虚线边框的矩形,和单元格占用的空间——带有实线边框的矩形。 虚线边框和实线边框之间的空间称为填充。 默认情况下,使用 2 pt 的填充。在下一个示例中,我们将更改一些单元格的填充,还将讨论单元格边距的概念。
6. 单元格颜色和填充
如图5.10所示,我们修改了表格的背景颜色为橙色,并且我们为某些单元格定义了不同的背景颜色。 此外,我们在不同的地方更改了填充。

图5.10 带填充单元格 让我们实现上图的代码:
Table table = new Table( UnitValue.createPercentArray(new float[]{2, 1, 1})); table.setBackgroundColor(Color.ORANGE); table.setWidthPercent(80); table.setHorizontalAlignment(HorizontalAlignment.CENTER); table.addCell( new Cell(1, 3).add("Cell with colspan 3") .setPadding(10).setBackgroundColor(Color.GREEN)); table.addCell(new Cell(2, 1).add("Cell with rowspan 2") .setPaddingLeft(30) .setFontColor(Color.WHITE).setBackgroundColor(Color.BLUE)); table.addCell(new Cell().add("row 1; cell 1") .setFontColor(Color.WHITE).setBackgroundColor(Color.RED)); table.addCell(new Cell().add("row 1; cell 2")); table.addCell(new Cell().add("row 2; cell 1") .setFontColor(Color.WHITE).setBackgroundColor(Color.RED)); table.addCell(new Cell().add("row 2; cell 2").setPadding(10) .setFontColor(Color.WHITE).setBackgroundColor(Color.RED)); document.add(table);- 1
- 2
- 3
- 4
- 5
- 6
- 7
- 8
- 9
- 10
- 11
- 12
- 13
- 14
- 15
- 16
- 17
- 18
- 19
行3我们把这个表格设置为橙色,然后我们添加6个单元格到这个表格:
- 行6-9:具有绿色背景和 10 单位用户大小填充的单元格。 填充指的是绿色矩形的边框和段落的边界之间的空间。
- 行9-11:一个带有白色文本、蓝色背景和 30 个用户单位的左侧填充的单元格。 文本不会从做左侧开始,因为左边框和文本之间有 30 个用户单位的空间。
- 行12-13:具有白色文本、红色背景和填充默认值的单元格。 文本不会粘在边框上,因为 iText 使用 2 个用户单位的默认填充。
- 行14:具有默认属性的单元格。 这个背景是橙色的,因为继承表格的背景颜色。
- 行15-16:一个带有白色文本和红色背景的单元格。
- 行17-18:一个带有白色文本、红色背景和 10 个用户单位的填充的单元格。
其实所有操作都与在 HTML 中使用 CSS 定义颜色和填充时发生的情况非常相似。上述Java 代码等效的 HTML/CSS代码如下所示:
<table style="background: orange; text-align: center; width: 80%" border="solid black 0.5pt" align="center" cellspacing="0"> <tr> <td style="padding: 10pt; margin: 5pt; background: green;" colspan="3">Cell with colspan 3td> tr> <tr> <td style="color: white; background: blue; margin-top: 5pt; margin-bottom: 30pt; padding-left: 30pt" rowspan="2">Cell with rowspan 2td> <td style="color: white; background: red">row 1; cell 1td> <td>row 1; cell 2td> tr> <tr> <td style="color: white; background: red; margin: 10pt;"> row 2; cell 1td> <td style="color: white; background: red; padding: 10pt;"> row 2; cell 2td> tr>- 1
- 2
- 3
- 4
- 5
- 6
- 7
- 8
- 9
- 10
- 11
- 12
- 13
- 14
- 15
- 16
- 17
- 18
- 19
- 20
在浏览器中打开的效果如图5.11所示:

图5.11 浏览器中的 HTML 表格 当然我们可以使用pdfHTML插件来把这个HTML转换成PDF,得到的结果会和图5.10一样。
如果你对HTML很熟悉的话,你现在可能会提出疑问:“HTML中定义的边距呢?怎么不见了?”
事实上,在研究 HTML 时,你会看到 CSS 属性,例如
margin: 5pt,margin-top: 5pt等等。 我们之所以在浏览器中看不到任何这些边距,是因为 HTML 中的单元格没有考虑边距。 浏览器只是忽略这些值。 由于 HTML 和 CSS 中的这种行为,iText的设计会忽略Cell对象的边距属性。 这是默认行为,当然iText中也是可以改变的。7. 单元格边距
实现边距的效果如图5.12所示:

图5.12 具有填充和边距的单元格 基于5.11的代码我们重新调整一下,把
margin添加进去:Table table = new Table( UnitValue.createPercentArray(new float[]{2, 1, 1})); table.setBackgroundColor(Color.ORANGE); table.setWidthPercent(80); table.setHorizontalAlignment(HorizontalAlignment.CENTER); table.addCell( new MarginCell(1, 3).add("Cell with colspan 3") .setPadding(10).setMargin(5).setBackgroundColor(Color.GREEN)); table.addCell(new MarginCell(2, 1).add("Cell with rowspan 2") .setMarginTop(5).setMarginBottom(5).setPaddingLeft(30) .setFontColor(Color.WHITE).setBackgroundColor(Color.BLUE)); table.addCell(new MarginCell().add("row 1; cell 1") .setFontColor(Color.WHITE).setBackgroundColor(Color.RED)); table.addCell(new MarginCell().add("row 1; cell 2")); table.addCell(new MarginCell().add("row 2; cell 1").setMargin(10) .setFontColor(Color.WHITE).setBackgroundColor(Color.RED)); table.addCell(new MarginCell().add("row 2; cell 2").setPadding(10) .setFontColor(Color.WHITE).setBackgroundColor(Color.RED)); document.add(table);- 1
- 2
- 3
- 4
- 5
- 6
- 7
- 8
- 9
- 10
- 11
- 12
- 13
- 14
- 15
- 16
- 17
- 18
- 19
- 20
和之前的代码有2点主要不同:
- 我们通过
setMargin()、setMarginBottom()等方法引入边距,具体在行8,10和15。 - 使用
MarginCell代替Cell对象。
MarginCell类是Cell类的自定义继承类,代码如下:private class MarginCell extends Cell { public MarginCell() { super(); } public MarginCell(int rowspan, int colspan) { super(rowspan, colspan); } @Override protected IRenderer makeNewRenderer() { return new MarginCellRenderer(this); } }- 1
- 2
- 3
- 4
- 5
- 6
- 7
- 8
- 9
- 10
- 11
- 12
- 13
在这个类中,我们重写了
makeNewRenderer()方法,以便它返回一个新的MarginCellRenderer实例,而不仅仅是一个新的CellRenderer。MarginCellRenderer类继承自CellRenderer类:private class MarginCellRenderer extends CellRenderer { public MarginCellRenderer(Cell modelElement) { super(modelElement); } @Override public IRenderer getNextRenderer() { return new MarginCellRenderer((Cell)getModelElement()); } @Override protected Rectangle applyMargins(Rectangle rect, float[] margins, boolean reverse) { return rect.applyMargins(margins[0], margins[1], margins[2], margins[3], reverse); } }- 1
- 2
- 3
- 4
- 5
- 6
- 7
- 8
- 9
- 10
- 11
- 12
- 13
超类
CellRenderer的applyMargins()方法为空:也就是完全忽略边距,CellRenderer的行为就好像所有边距都是 0。在我们的子类中,我们实现了该方法,不再忽略边距。重要事项:在覆盖重写渲染器(在本例中为
CellRenderer)时,应该始终覆盖重写getNextRenderer()方法,以便它返回你正在创建的子类的实例。假如你不这样做,你在子类中定义的功能将仅在渲染器第一次用于特定对象时执行。例如:如果创建一个包含跨多个页面的内容的Cell对象,则将对在第一页上呈现的单元格部分执行该功能,但在后续页面上将使用标准CellRenderer功能。通过实现getNextRenderer()方法,可以确保在无法一次全部渲染对象时创建正确的渲染器。到目前为止,我们还没有定义任何单元格的边框。在我们之前所有的示例中,都使用了默认边框;也就是一个
Border,对应的实例定义如下:new SolidBorder(0.5f)。接下来让我们创建一些带有特殊边框的表格和单元格。8. 表格和单元格边框
如图5.13所示表格的单元格有不同样式和颜色的边框,引入了虚线和点线边框、具有不同边框宽度的边框和彩色边框。

图5.13 不同颜色和样式的边框 让我们看一下源代码:
Table table = new Table( UnitValue.createPercentArray(new float[]{2, 1, 1})); table.setWidthPercent(80) .setHorizontalAlignment(HorizontalAlignment.CENTER) .setTextAlignment(TextAlignment.CENTER); table.addCell(new Cell(1, 3) .add("Cell with colspan 3") .setVerticalAlignment(VerticalAlignment.MIDDLE) .setBorder(new DashedBorder(0.5f))); table.addCell(new Cell(2, 1) .add("Cell with rowspan 2") .setVerticalAlignment(VerticalAlignment.MIDDLE) .setBorderBottom(new DottedBorder(0.5f)) .setBorderLeft(new DottedBorder(0.5f))); table.addCell(new Cell() .add("row 1; cell 1") .setBorder(new DottedBorder(Color.ORANGE, 0.5f))); table.addCell(new Cell() .add("row 1; cell 2")); table.addCell(new Cell() .add("row 2; cell 1") .setBorderBottom(new SolidBorder(2))); table.addCell(new Cell() .add("row 2; cell 2") .setBorderBottom(new SolidBorder(2))); document.add(table);- 1
- 2
- 3
- 4
- 5
- 6
- 7
- 8
- 9
- 10
- 11
- 12
- 13
- 14
- 15
- 16
- 17
- 18
- 19
- 20
- 21
- 22
- 23
- 24
- 25
- 26
我们创建了有3列的表格(行1-2),宽度为80%(行3)。和以往一样,我们设置表格水平对齐为居中,单元格的内容为水平居中。
接下来我们一个一个单元格添加:
- 行6-9:第一个单元格有一个0.5用户单位的虚线边框,边框由一个完整的矩形组成。
- 行10-14:对于第二个单元格,我们只定义了下边框和左边框。在单元格的左侧和底部绘制一条虚线。顶部和右侧边框是默认的边框,同时也是其他单元格的边框。
- 行15-17:引入了一个 0.5 个用户单位宽的橙色虚线边框。虽然我们为整个单元格设置了边框,但是看顶部边框并未绘制为橙色虚线,是因为顶部边框是我们第一个单元格的虚线边框的一部分; iText 不会在已经存在的边框之上绘制额外的边框。
- 行18-19:没有定义边界的情况——默认情况,会绘制 0.5 个用户单位的实心边框。这个单元在之前已经在其他先前添加的单元格的中定义了两个边界,也就是上边框和左边框,优先取之前定义的边框。
- 行20-22和行23-25:定义了一个实心底边/下边框,其宽度为2用户单位。两个单元格的上边框已经定义:它们也是上一行中相应单元格的下边框。左右边界没有在任何地方定义; iText 将使用默认边框:0.5 个用户单位的实线。
这些行为其实设计决策结果。
设计决策:所有边框都由
TableRenderer类绘制,而不是由CellRenderer类绘制。当然还可以进行其他设计决策:例如,决定每个
Cell的CellRenderer都必须绘制自己的边框。在这种情况下,相邻单元格的边界会重叠。例如:第一行单元格底部的虚线边框将与第二行单元格的橙色虚线顶部边框重叠。这是以前版本的iText中会发生的情况。两个相邻单元格的边界通常由两条相互重叠的相同线组成。额外的线不仅是多余的,而且还给一些观众带来了视觉上的副作用。许多PDF阅读器以特殊方式呈现重叠的相同内容。在重叠文本的情况下,常规字体看起来好像是粗体。在重叠线的情况下,线宽看起来比定义的要粗。在完全相同的坐标处相加的两条 0.5 个用户单位宽的线的线宽被渲染为略高于 0.5 个用户单位的宽度。虽然这种差异并不总是肉眼可见,但iText做出了设计决定来避免这种情况。
当我们在
Table对象级别更改文本对齐方式时,此属性由添加到表中的 Cell 对象继承。但是边界属性不是这种情况。为Table对象定义边框时,更改的是整个表格的边框,而不是单独的单元格的边框。示例见图 5.14:
图5.14 表格边框属性不会被单元格继承 代码如下:
Table table = new Table( UnitValue.createPercentArray(new float[]{2, 1, 1})); table.setBorder(new SolidBorder(3)) .setWidthPercent(80) .setHorizontalAlignment(HorizontalAlignment.CENTER) .setTextAlignment(TextAlignment.CENTER); table.addCell(new Cell(1, 3) .add("Cell with colspan 3") .setVerticalAlignment(VerticalAlignment.MIDDLE) .setBorder(Border.NO_BORDER)); table.addCell(new Cell(2, 1) .add("Cell with rowspan 2") .setVerticalAlignment(VerticalAlignment.MIDDLE) .setBorder(Border.NO_BORDER)); table.addCell(new Cell().add("row 1; cell 1")); table.addCell(new Cell().add("row 1; cell 2")); table.addCell(new Cell().add("row 2; cell 1")); table.addCell(new Cell().add("row 2; cell 2")); document.add(table);- 1
- 2
- 3
- 4
- 5
- 6
- 7
- 8
- 9
- 10
- 11
- 12
- 13
- 14
- 15
- 16
- 17
- 18
- 19
在第 3 行中,我们为表格定义了一个 3pt 实线边框,但该边框值不会传播到表格中的单元格。 在第 10 行和第 14 行中,我们删除了前两个单元格的边框,但在第 15 到 18 行中,我们添加了四个未定义边框的单元格。 表格的实心 3pt 边框不会被继承; 而是使用默认的 0.5pt 实心边框。
在接下来的几个示例中,我们将覆盖单元格和表格的默认行为以创建一些自定义边框。
9. 创建自定义边框
如图5.15所示是一个有圆角边框单元格的表格。

图5.15 自定义带有圆角的边框 带有圆角的单元格在iText中不是开箱即用的,但是我们可以创建继承
Cell对象的RoundedCornersCell对象,代码如下所示:Table table = new Table( UnitValue.createPercentArray(new float[]{2, 1, 1})); table.setWidthPercent(80) .setHorizontalAlignment(HorizontalAlignment.CENTER) .setTextAlignment(TextAlignment.CENTER); Cell cell = new RoundedCornersCell(1, 3) .add("Cell with colspan 3"); table.addCell(cell); cell = new RoundedCornersCell(2, 1) .add("Cell with rowspan 2"); table.addCell(cell); cell = new RoundedCornersCell() .add("row 1; cell 1"); table.addCell(cell); cell = new RoundedCornersCell() .add("row 1; cell 2"); table.addCell(cell); cell = new RoundedCornersCell() .add("row 2; cell 1"); table.addCell(cell); cell = new RoundedCornersCell() .add("row 2; cell 2"); table.addCell(cell); document.add(table);- 1
- 2
- 3
- 4
- 5
- 6
- 7
- 8
- 9
- 10
- 11
- 12
- 13
- 14
- 15
- 16
- 17
- 18
- 19
- 20
- 21
- 22
- 23
- 24
和之前的
MarginCell对象类似,我们引入了RounderCornerCell对象:private class RoundedCornersCell extends Cell { public RoundedCornersCell() { super(); setBorder(Border.NO_BORDER); setMargin(2); } public RoundedCornersCell(int rowspan, int colspan) { super(rowspan, colspan); setBorder(Border.NO_BORDER); setVerticalAlignment(VerticalAlignment.MIDDLE); setMargin(5); } @Override protected IRenderer makeNewRenderer() { return new RoundedCornersCellRenderer(this); } }- 1
- 2
- 3
- 4
- 5
- 6
- 7
- 8
- 9
- 10
- 11
- 12
- 13
- 14
- 15
- 16
- 17
在这里我们添加了没有传递行跨度和列跨度的构造参数,并且边距为2pt。当有传递行列跨度的构造函数时,边距为5pt。在这两种构造函数下,我们移除了边框,所以默认的
TableRenderer不会画任何边框。由于Text的设计策略,所有边框都在
Table级别绘制,默认CellRenderer类中的drawBorder()方法为空。 在我们的自定义RoundedCornersCellRenderer类中,我们以绘制圆角矩形的方式覆盖此方法。代码如下:private class RoundedCornersCellRenderer extends CellRenderer { public RoundedCornersCellRenderer(Cell modelElement) { super(modelElement); } @Override public void drawBorder(DrawContext drawContext) { Rectangle occupiedAreaBBox = getOccupiedAreaBBox(); float[] margins = getMargins(); Rectangle rectangle = applyMargins(occupiedAreaBBox, margins, false); PdfCanvas canvas = drawContext.getCanvas(); canvas.roundRectangle(rectangle.getX(), rectangle.getY(), rectangle.getWidth(), rectangle.getHeight(), 5).stroke(); super.drawBorder(drawContext); } @Override public IRenderer getNextRenderer() { return new RoundedCornersCellRenderer((Cell)getModelElement()); } @Override protected Rectangle applyMargins( Rectangle rect, float[] margins, boolean reverse) { return rect.applyMargins( margins[0], margins[1], margins[2], margins[3], reverse); } }- 1
- 2
- 3
- 4
- 5
- 6
- 7
- 8
- 9
- 10
- 11
- 12
- 13
- 14
- 15
- 16
- 17
- 18
- 19
- 20
- 21
- 22
- 23
- 24
- 25
和之前一样我们还覆盖重写了
getNextRenderer()方法(这在单元格需要拆分到不同页面的情况下很重要)。 最后,我们重写applyMargins()方法以避免忽略边距值。如图5.16所示的样例与之前的实例略有不同:

图5.16 表格和单元格自定义边框 在这个样例中,我们创建了一个自定义的
TableRenderer实现来为整个表格引入圆角。代码如下:Table table = new Table( UnitValue.createPercentArray(new float[]{2, 1, 1})) .setWidthPercent(80) .setHorizontalAlignment(HorizontalAlignment.CENTER) .setTextAlignment(TextAlignment.CENTER); Cell cell = new RoundedCornersCell(1, 3) .add("Cell with colspan 3"); table.addCell(cell); cell = new RoundedCornersCell(2, 1) .add("Cell with rowspan 2"); table.addCell(cell); cell = new RoundedCornersCell() .add("row 1; cell 1"); table.addCell(cell); cell = new RoundedCornersCell() .add("row 1; cell 2"); table.addCell(cell); cell = new RoundedCornersCell() .add("row 2; cell 1"); table.addCell(cell); cell = new RoundedCornersCell() .add("row 2; cell 2"); table.addCell(cell); table.setNextRenderer( new RoundedCornersTableRenderer(table)); document.add(table);- 1
- 2
- 3
- 4
- 5
- 6
- 7
- 8
- 9
- 10
- 11
- 12
- 13
- 14
- 15
- 16
- 17
- 18
- 19
- 20
- 21
- 22
- 23
- 24
- 25
- 26
- 27
- 28
将所有单元格添加到表格后,我们使用
setNextRenderer()方法引入自定义RoundedCornersTableRenderer。
重要:如果过早引入自定义TableRenderer,您可能会遇到IndexOutOfBoundsException异常。 如果你想覆盖并实现一个TableRenderer,以下2种情况满足其一即可:- 如果你提前知道表格的行数,并在创建
TableRenderer实例时定义一个Table.RowRange。 - 或者比较简单的做法是,只在最后时刻引入渲染器,当表格完成并且 iText 就知道总行数。
而我们采用第二种在把
table加入到document前引入了RoundedCornersTableRenderer,这种方式可以让我们的TableRenderer实现比较简单,代码如下:private class RoundedCornersTableRenderer extends TableRenderer { public RoundedCornersTableRenderer(Table modelElement) { super(modelElement); } @Override public IRenderer getNextRenderer() { return new RoundedCornersTableRenderer((Table)getModelElement()); } @Override protected void drawBorders(DrawContext drawContext) { Rectangle occupiedAreaBBox = getOccupiedAreaBBox(); float[] margins = getMargins(); Rectangle rectangle = applyMargins(occupiedAreaBBox, margins, false); PdfCanvas canvas = drawContext.getCanvas(); canvas.roundRectangle(rectangle.getX() + 1, rectangle.getY() + 1, rectangle.getWidth() - 2, rectangle.getHeight() -2, 5).stroke(); super.drawBorder(drawContext); } }- 1
- 2
- 3
- 4
- 5
- 6
- 7
- 8
- 9
- 10
- 11
- 12
- 13
- 14
- 15
- 16
- 17
- 18
- 19
再一次,我们使用了自定义
RoundedCornersCell实现。 我们不再需要移除边框,因为我们已经覆盖了TableRenderer实现中的drawBorders()方法。private class RoundedCornersCell extends Cell { public RoundedCornersCell() { super(); setMargin(2); } public RoundedCornersCell(int rowspan, int colspan) { super(rowspan, colspan); setMargin(2); } @Override protected IRenderer makeNewRenderer() { return new RoundedCornersCellRenderer(this); } }- 1
- 2
- 3
- 4
- 5
- 6
- 7
- 8
- 9
- 10
- 11
- 12
- 13
- 14
对于之前的
RounderCornersCellRenderer类,我们不需要改变任何的代码。接下来,我们将要在表格里面添加表格。10. 嵌套表格
如图5.17所示有3个或者6个表格,具体取决于您查看屏幕截图的方式。 外部有三张表格。 这些表中的每一个都有一个嵌套在内部的表。

图5.17 嵌套表格 我们来分段讲解如何创建这些嵌套,首先是第一个表格,代码如下:
Table table = new Table(new float[]{1, 1}) .setWidthPercent(80) .setHorizontalAlignment(HorizontalAlignment.CENTER); table.addCell(new Cell(1, 2).add("Cell with colspan 2")); table.addCell(new Cell().add("Cell with rowspan 1")); Table inner = new Table(new float[]{1, 1}); inner.addCell("row 1; cell 1"); inner.addCell("row 1; cell 2"); inner.addCell("row 2; cell 1"); inner.addCell("row 2; cell 2"); table.addCell(inner);- 1
- 2
- 3
- 4
- 5
- 6
- 7
- 8
- 9
- 10
- 11
- 12
我们创建变量名为
table的Table对象。我们将三个Cell对象添加到此表中,但其中的一个Cell对象是特殊的。 我们创建了另一个名为inner的Table象,并使用addCell()方法将此表添加到外部表表中。 如果我们看图 5.17,我们会看到第四个单元格的边框和内表的边框之间有一个填充。 这是 2 个用户单位的默认填充。第二个表的创建方式与第一个表几乎完全相同。 主要区别可以在最后一行中找到,我们将内表的填充设置为 0。
table.addCell(new Cell().add(inner).setPadding(0));- 1
我们现在先创建一
Cell对象,而不是将嵌套表直接添加到表对象中,我们将向其中添加内部表。 并将此单元格的填充设置为 0。对于第三张表,我使内部表的占用100%可用宽度:
inner = new Table(new float[]{1, 1}) .setWidthPercent(100);- 1
- 2
现在看起来,内容为“Cell with rowspan 1”的单元格的行跨度为 2。事实并非如此。我们通过使用嵌套表模拟,使之行跨度看起来像2。
如果仔细查看屏幕截图,你可能会明白为什么应该避免使用嵌套表。常识告诉我们,嵌套表对应用程序的性能有负面影响,但还有另一个原因是你可能希望避免在 iText 的上下文中使用它们:如前所述,所有单元格边框都是在表格级别绘制的。在这种情况下,包含嵌套表格的单元格的边框由外部表格的TableRenderer绘制。嵌套表格的单元格边框由内表inner的TableRenderer绘制。这会导致重叠线,同时可能会导致不希望的效果。在某些 PDF 阅读器中,重叠线的宽度可能看起来比每条单独线的宽度更宽。现在让我们切换到一些不那么人为的例子。让我们将 CSV 文件转换为表格并将其呈现为 PDF。
11. 重复头部和尾部单元格
在第 3 章中,我们使用
Tab元素以表格结构呈现包含电影和视频的数据库,该数据库基于"Stevenson’s story about Dr. Jekyll and Mr. Hyde"系列故事。 虽然展示的效果不错,但我们遇到了一些缺点,例如当内容大于我们分配的空间时。在这种情况下适合中
Table元素。 如图 5.18显示了当表格内容不适配当前页面时,我们引入一个带有列名的重复头部和一个显示“Continued on next page…”的重复尾部。
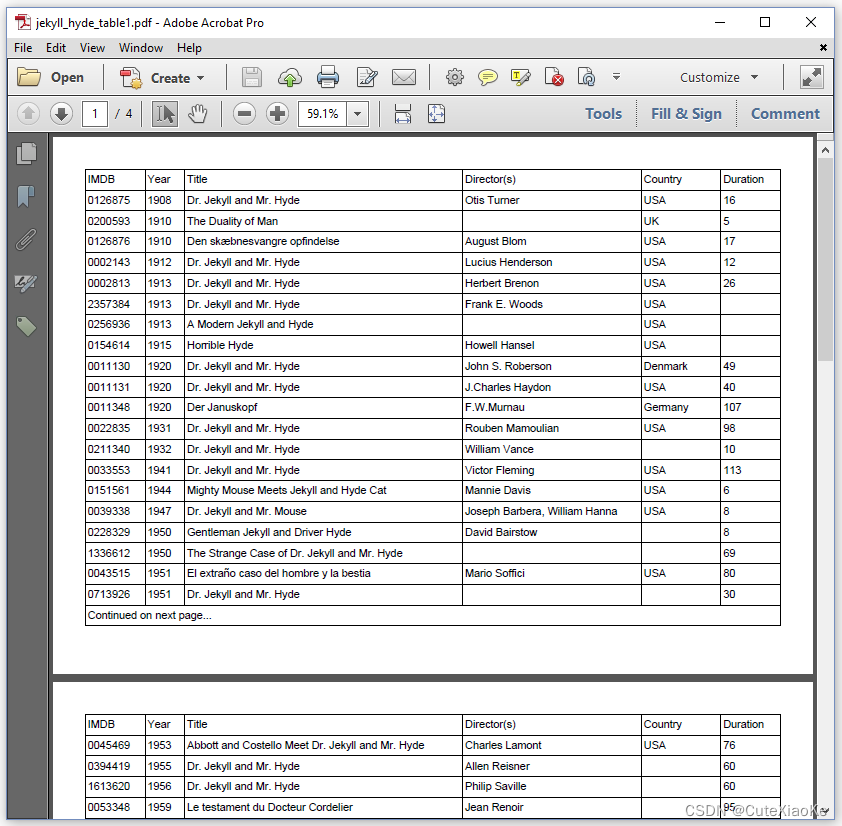
图5.18 重复头部和尾部 代码如下:
Table table = new Table( UnitValue.createPercentArray(new float[]{3, 2, 14, 9, 4, 3})); table.setWidthPercent(100); List> resultSet = CsvTo2DList.convert(SRC, "|"); List header = resultSet.remove(0); for (String field : header) { table.addHeaderCell(field); } Cell cell = new Cell(1, 6).add("Continued on next page..."); table.addFooterCell(cell) .setSkipLastFooter(true); for (List record : resultSet) { for (String field : record) { table.addCell(field); } } document.add(table);- 1
- 2
- 3
- 4
- 5
- 6
- 7
- 8
- 9
- 10
- 11
- 12
- 13
- 14
- 15
- 16
- 17
我们从 CSV 文件(第 3 行)中获取数据,并获得包含标头部题信息的行(第 4 行)。 我们不使用
addCell(),而是使用addHeaderCell()方法在该行中添加每个字段。 这将这些单元格标记为头部标题单元格:每次启动新页面时,它们将在页面顶部重复。我们还创建了跨越六列的页脚单元格(第 8 行)。 使用
addFooterCell()方法(第 9 行)将此单元格设置为尾部页脚单元格。 我们指示表格跳过最后一个尾部单元格(第 10 行)。 这样,这个尾部页脚单元格就不会在表格的最后一行之后显示。 如图 5.19所示。
图5.19 重复头部和尾部-尾页 还有一种跳过第一个头部页眉的方法。如图5.20所示:

图5.20 重复头部 在这种情况下,我们必须使用嵌套表,因为我们有两种类型的表头/头部。 我们有一个需要在第一页跳过的标题。 还有一个需要出现在每一页上的标题。 如下代码展示了如何完成的:
Table table = new Table( UnitValue.createPercentArray(new float[]{3, 2, 14, 9, 4, 3})); table.setWidthPercent(100); List<List<String>> resultSet = CsvTo2DList.convert(SRC, "|"); List<String> header = resultSet.remove(0); for (String field : header) { table.addHeaderCell(field); } for (List<String> record : resultSet) { for (String field : record) { table.addCell(field); } } Table outerTable = new Table(1) .addHeaderCell("Continued from previous page:") .setSkipFirstHeader(true) .addCell(new Cell().add(table).setPadding(0)); document.add(outerTable);- 1
- 2
- 3
- 4
- 5
- 6
- 7
- 8
- 9
- 10
- 11
- 12
- 13
- 14
- 15
- 16
- 17
- 18
第 1-13 行和之前一样。 在第 14-17 行中,我们使用我们在讨论嵌套表时学到的知识来创建一个带有第二个标题的外部表。 然后使用
setSkipFirstHeader()方法来确保标题不会出现在第一页上,而只会出现在后续页面上。12. 在表格里面的图像
如图 5.21展示了我们也可以将图像添加到表格中。 我们甚至可以使它们缩放以适应单元格的宽度。

图5.21 在表格里面的图像 代码如下:
Table table = new Table( UnitValue.createPercentArray(new float[]{3, 2, 14, 9, 4, 3})); table.setWidthPercent(100); List<List<String>> resultSet = CsvTo2DList.convert(SRC, "|"); List<String> header = resultSet.remove(0); for (String field : header) { table.addHeaderCell(field); } Cell cell; for (List<String> record : resultSet) { cell = new Cell(); File file = new File(String.format( "src/main/resources/img/%s.jpg", record.get(0))); if (file.exists()) { Image img = new Image(ImageDataFactory.create(file.getPath())); img.setAutoScaleWidth(true); cell.add(img); } else { cell.add(record.get(0)); } table.addCell(cell); table.addCell(record.get(1)); table.addCell(record.get(2)); table.addCell(record.get(3)); table.addCell(record.get(4)); table.addCell(record.get(5)); } document.add(table);- 1
- 2
- 3
- 4
- 5
- 6
- 7
- 8
- 9
- 10
- 11
- 12
- 13
- 14
- 15
- 16
- 17
- 18
- 19
- 20
- 21
- 22
- 23
- 24
- 25
- 26
- 27
- 28
- 29
和之前添加内容到
Cell一样,我们使用add()方法把图片添加到一个Cell中。我们使用setAutoScaleWidth()方法告诉图像它应该尝试缩放自身以适应其容器的宽度,在本例中是添加它的单元格。
如果您希望图像根据可用高度自动缩放,还有一个setAutoScaleHeight()方法,以及一个根据宽度和高度缩放图像的setAutoScale()方法。不缩放图像会导致表格难看; 当图像对于单元格来说太大时,它们会占用相邻单元格的空间。
13. 拆分单元格vs保持内容一起
如图5.22所示,我们不添加图形,第二列仅包含添加到
Cell的不同Paragraph对象的信息。
图5.22 拆分不适配页面的单元格 当内容不适合页面时,单元格将被拆分。 制作年份和标题在一个页面上,导演和电影制作的国家在另一页上。 这是下面代码中编写代码时的默认行为。
Table table = new Table( UnitValue.createPercentArray(new float[]{3, 32})); table.setWidthPercent(100); List<List<String>> resultSet = CsvTo2DList.convert(SRC, "|"); resultSet.remove(0); table.addHeaderCell("imdb") .addHeaderCell("Information about the movie"); Cell cell; for (List<String> record : resultSet) { table.addCell(record.get(0)); cell = new Cell() .add(new Paragraph(record.get(1))) .add(new Paragraph(record.get(2))) .add(new Paragraph(record.get(3))) .add(new Paragraph(record.get(4))) .add(new Paragraph(record.get(5))); table.addCell(cell); } document.add(table);- 1
- 2
- 3
- 4
- 5
- 6
- 7
- 8
- 9
- 10
- 11
- 12
- 13
- 14
- 15
- 16
- 17
- 18
- 19
你可能希望 iText 努力将单元格的内容保持在一页上(如果可以的话)。

图5.23 保持单元格内容在一起 想要实现如图5.23的效果,我们只需在行15以后添加一下代码:
cell.setKeepTogether(true);- 1
setKeepTogether()方法在BlockElement级别定义,我们在之前章节提及过。注意setKeepWithNext()方法在这不能使用,因为我们不是把Cell直接添加到Document里面。14. 表格和单元格渲染器
我们来更多渲染器方法。我们之前创建了一个
RoundedCornerTableRenderer渲染器实现了添加圆角。如图5.24所示,我们引入了AlternatingBackgroundTableRenderer来展示不同行的交替变化背景。
图5.24 使用表格渲染器(TableRenderer)创建交替变化的背景 以下代码展示了自定义
TableRenderer该如何编写:class AlternatingBackgroundTableRenderer extends TableRenderer { private boolean isOdd = true; public AlternatingBackgroundTableRenderer( Table modelElement, Table.RowRange rowRange) { super(modelElement, rowRange); } public AlternatingBackgroundTableRenderer(Table modelElement) { super(modelElement); } @Override public AlternatingBackgroundTableRenderer getNextRenderer() { return new AlternatingBackgroundTableRenderer( (Table) modelElement); } @Override public void draw(DrawContext drawContext) { for (int i = 0; i < rows.size() && null != rows.get(i) && null != rows.get(i)[0]; i++) { CellRenderer[] renderers = rows.get(i); Rectangle leftCell = renderers[0].getOccupiedAreaBBox(); Rectangle rightCell = renderers[renderers.length - 1].getOccupiedAreaBBox(); Rectangle rect = new Rectangle( leftCell.getLeft(), leftCell.getBottom(), rightCell.getRight() - leftCell.getLeft(), leftCell.getHeight()); PdfCanvas canvas = drawContext.getCanvas(); canvas.saveState(); if (isOdd) { canvas.setFillColor(Color.LIGHT_GRAY); isOdd = false; } else { canvas.setFillColor(Color.YELLOW); isOdd = true; } canvas.rectangle(rect); canvas.fill(); canvas.restoreState(); } super.draw(drawContext); } }- 1
- 2
- 3
- 4
- 5
- 6
- 7
- 8
- 9
- 10
- 11
- 12
- 13
- 14
- 15
- 16
- 17
- 18
- 19
- 20
- 21
- 22
- 23
- 24
- 25
- 26
- 27
- 28
- 29
- 30
- 31
- 32
- 33
- 34
- 35
- 36
- 37
- 38
- 39
- 40
- 41
- 42
- 43
- 44
我们创建类似于
TableRenderer构造函数的构造函数(第 3-9 行),并重写getNextRenderer()方法,使其返回AlternatingBackgroundTableRenderer(第 10-14 行)。 我们引入了一个名为isOdd的布尔变量来跟踪行(第 2 行)。draw()方法是关键的(第 15-43 行)。 我们遍历行(第 17-19 行),并获得每行中所有单元格的CellRenderer实例(第 20 行)。 我们得到每一行中最左单元格和最右单元格的渲染器(第 21-24 行),使用这些渲染器来确定行的坐标(第 25-28 行)。 根据这些坐标绘制Rectangle,交替值颜色取决于 isOdd 参数的值(第 29-40 行)。在下一个代码片段中,我们将创建一个表,并将
AlternatingBackgroundTableRenderer声明为该表的新渲染器。Table table = new Table( UnitValue.createPercentArray(new float[]{3, 2, 14, 9, 4, 3})); int nRows = resultSet.size(); table.setNextRenderer(new AlternatingBackgroundTableRenderer( table, new Table.RowRange(0, nRows - 1)));- 1
- 2
- 3
- 4
- 5
请注意,在此示例中添加任何单元格之前,请使用
setNextRenderer()方法。在这种情况下,需使用带有Table.RowRange的构造函数。如果我们的结果集中有nRows元素,其中不包括头部页眉,我们将有nRows行实际数据,因此我们定义了一个从0到nRows - 1的行范围。请记住,如果你在一开始不使用
setNextRenderer()方法而是在添加所有单元格后调用它,则可以避免添加Table.RowRange。你也可以对总行数做一个夸张的猜测,但是如果表包含更多的行,就会抛出一个IndexOutOfBoundsException。如果表包含较少的行,则不会引发异常,但你将在错误日志中看到以下行:WARN c.i.layout.renderer.TableRenderer - Last row is not completed. Table bottom border may collapse as you do not expect it
如果表格的最后一行没有所需数量的单元格,也会引发此警告,例如因为缺少一个单元格。
如图5.25所展示的是另外一种背景:

图5.25 使用CellRenderer引入视频长度信息 “Title”栏的宽度代表四个小时; “Title”单元格中的彩色条表示视频的运行长度。 例如:如果彩色条占单元格宽度的一半,则电影的运行长度是四个小时的一半; 即:两个小时。 这些是我们使用的颜色代码:
- 没有背景颜色 - 我们不知道电影视频的时长;
- 绿色背景 - 电影短于 90 分钟;
- 橙色背景 - 电影时长超过 90 分钟,但短于 4 小时;
- 红色背景 - 时长超过 4 小时(例如,这是一个有很多集的系列)。 在这种情况下,我们将长度剪辑为 240 分钟。
自定义的
CellRender代码如下:private class RunlengthRenderer extends CellRenderer { private int runlength; public RunlengthRenderer(Cell modelElement, String duration) { super(modelElement); if (duration.trim().isEmpty()) runlength = 0; else runlength = Integer.parseInt(duration); } @Override public CellRenderer getNextRenderer() { return new RunlengthRenderer( getModelElement(), String.valueOf(runlength)); } @Override public void drawBackground(DrawContext drawContext) { if (runlength == 0) return; PdfCanvas canvas = drawContext.getCanvas(); canvas.saveState(); if (runlength 240) { runlength = 240; canvas.setFillColor(Color.RED); } else { canvas.setFillColor(Color.ORANGE); } Rectangle rect = getOccupiedAreaBBox(); canvas.rectangle(rect.getLeft(), rect.getBottom(), rect.getWidth() * runlength / 240, rect.getHeight()); canvas.fill(); canvas.restoreState(); super.drawBackground(drawContext); } }- 1
- 2
- 3
- 4
- 5
- 6
- 7
- 8
- 9
- 10
- 11
- 12
- 13
- 14
- 15
- 16
- 17
- 18
- 19
- 20
- 21
- 22
- 23
- 24
- 25
- 26
- 27
- 28
- 29
- 30
- 31
再一次,我们创建了一个构造函数(第 3-7 行)并覆盖重写了
getNextRenderer()方法(第 8-12 行)。 我们将视频的运行长度存储在runlength变量中(第 2 行)。 我们覆盖重写drawBackground()方法,并根据运行长度变量的值使用适当的大小和颜色绘制背景(第 13-32 行)。我们将用一个编程技巧来结束本章,以在创建表格并将其添加到文档时保持低内存使用。
15. 表格和内存使用
如图 5.26显示了一个跨越 33 页的表格。 它有三列和一千行。

图5.26 大容量表格 假设我们将创建一个包含 3 个头部页眉单元格、3 个尾部页脚单元格和 3,000 个普通单元格的
Table对象,然后再将此Table添加到文档中。 这意味着在某个时候,我们将在内存中拥有 3,006 个Cell对象。 这很容易导致OutOfMemoryException或OutOfMemoryError异常。 我们可以通过将表格添加到文档中来避免这种情况,同时我们仍在向表格中添加内容。 请参阅以下代码示例。Table table = new Table( new float[]{100, 100, 100}, true); table.addHeaderCell("Table header 1"); table.addHeaderCell("Table header 2"); table.addHeaderCell("Table header 3"); table.addFooterCell("Table footer 1"); table.addFooterCell("Table footer 2"); table.addFooterCell("Table footer 3"); document.add(table); for (int i = 0; i < 1000; i++) { table.addCell(String.format("Row %s; column 1", i + 1)); table.addCell(String.format("Row %s; column 2", i + 1)); table.addCell(String.format("Row %s; column 3", i + 1)); if (i %50 == 0) { table.flush(); } } table.complete();- 1
- 2
- 3
- 4
- 5
- 6
- 7
- 8
- 9
- 10
- 11
- 12
- 13
- 14
- 15
- 16
- 17
- 18
Table类实现了ILargeElement接口。该接口定义了 iText 内部使用的setDocument()、isComplete()和flushContent()等方法。当我们在代码中使用ILargeElement接口时,只需要使用flush()和complete()方法即可。我们首先创建一个表,我们将
largeTable参数的值设置为true(第 1-2 行)。在完成添加内容之前,将Table对象添加到文档中(第 9 行)。由于我们将表格标记为大表格,iText 将在内部使用setDocument()方法,以便table和document知道彼此的存在。我们在循环中添加 3,000 个单元格(第 10 行),但每 50 行(第 14-16 行)使用flush()方法刷新内容。当刷新内容时,就已经渲染了表格的一部分。已渲染的Cell对象可供垃圾收集器使用,以便可以释放这些对象使用的内存。添加完所有单元格后,我们使用complete()方法写入尚未呈现的表格的其余部分,包括尾部页脚行。关于表格和单元格的章节到此结束。
16. 总结
在本章中,我们对表格和单元格进行讲解。讨论了表格、单元格和单元格内容的尺寸和对齐方式。 了解了单元格的填充,以及为什么默认不支持边距。 我们使用预定义的
Border对象更改了表格和单元格的边框。 然后嵌套表格,重复页眉和页脚,更改了表格在不适合页面时的拆分方式。 紧接着集成了TableRenderer和CellRenderer类以实现开箱即用未提供的特殊功能。 最后,我们学习了如何在创建和添加Table时减少内存使用。讲完这一章基本上就可以完结这系列,因为现在已经涵盖了每个构建块,但是我们将再添加两章来讨论一些在使用 iText 创建 PDF 文档时很有用的额外功能。
本章代码资源下载地址:
- 关注我的微信公众号CuteXiaoKe,点击代码资源-iText官网代码即可
- 或者直接点击微信文章
-
相关阅读:
Halcon Geometry-Measurement-or-Calculation相关算子(一)
LeetCode 1334. 阈值距离内邻居最少的城市:多次运用单源最短路的迪杰斯特拉算法
【LeetCode】209. 长度最小的子数组
mybatis-plus-ext注解学习
VB个人邮件处理系统设计与实现
数据结构 栈和队列部分代码c
SpringBoot快速入门
干货|关于代码无法烧录进入Model3开发板的问题整理
Tubian0.43,完善对QQ微信的支持
二分查找实例1(在排序数组中查找元素的第一个和最后一个位置)
- 原文地址:https://blog.csdn.net/u012397189/article/details/126345744
