-
Vue2.x秘籍(上)
文章目录
1.初识Vue
1. el:'#app',//指定Vue为哪个容器服务 2. data用于存储数据,供给el绑定的容器使用 DOCTYPE html> <html lang="en"> <head> <meta charset="UTF-8"> <meta http-equiv="X-UA-Compatible" content="IE=edge"> <meta name="viewport" content="width=device-width, initial-scale=1.0"> <title>Documenttitle> <script src="../js/vue.js">script> head> <body> <div id="app"><h1>Hello {{name}}h1>div> <script type="text/javascript"> Vue.config.productionTip = false; // 创建Vue实例 const vm = new Vue({ el:'#app',//指定Vue为哪个容器服务 data:{//data用于存储数据,供给el绑定的容器使用 name:'China' } }) script> body> html>- 1
- 2
- 3
- 4
- 5
- 6
- 7
- 8
- 9
- 10
- 11
- 12
- 13
- 14
- 15
- 16
- 17
- 18
- 19
- 20
- 21
- 22
- 23
- 24
- 25
- 26
- 27
- 28
2.模板语法
- 使元素里面的属性值绑定data里面的数据要用v-bind
{{shool.name}}
DOCTYPE html> <html lang="en"> <head> <meta charset="UTF-8"> <meta http-equiv="X-UA-Compatible" content="IE=edge"> <meta name="viewport" content="width=device-width, initial-scale=1.0"> <title>Documenttitle> <script src="../js/vue.js">script> head> <body> <div id="app"> <h1>Hello {{name}}h1> <a v-bind:href='shool.url'>{{shool.name}}a> div> <script type="text/javascript"> Vue.config.productionTip = false; // 创建Vue实例 const vm = new Vue({ el:'#app',//指定Vue为哪个容器服务 data:{//data用于存储数据,供给el绑定的容器使用 name:'China', shool:{ name:'四川三河职业学院官网', url:'http://baidu.com' } } }) script> body> html>- 1
- 2
- 3
- 4
- 5
- 6
- 7
- 8
- 9
- 10
- 11
- 12
- 13
- 14
- 15
- 16
- 17
- 18
- 19
- 20
- 21
- 22
- 23
- 24
- 25
- 26
- 27
- 28
- 29
- 30
3.数据绑定
总结:
- 单向绑定(v-bind):数据只能从data流向页面
- 双向绑定(v-model):数据不仅可以从data流向页面还可以从页面流向data
注意: - 双向绑定一般都应用在表单类元素上(如inpuut、select等)
- v-model:value可以简写为v-model因为v-model 的默认值就是value
DOCTYPE html> <html lang="en"> <head> <meta charset="UTF-8"> <meta http-equiv="X-UA-Compatible" content="IE=edge"> <meta name="viewport" content="width=device-width, initial-scale=1.0"> <title>Documenttitle> <script src="../js/vue.js">script> head> <body> <div id="app"> 单向数据绑定: <input type="text" v-bind:value="value"> <br> 双向数据绑定: <input type="text" v-model:value="value"> div> <script type="text/javascript"> Vue.config.productionTip = false; // 创建Vue实例 const vm = new Vue({ el:'#app',//指定Vue为哪个容器服务 data:{//data用于存储数据,供给el绑定的容器使用 value:'China' } }) script> body> html>- 1
- 2
- 3
- 4
- 5
- 6
- 7
- 8
- 9
- 10
- 11
- 12
- 13
- 14
- 15
- 16
- 17
- 18
- 19
- 20
- 21
- 22
- 23
- 24
- 25
- 26
- 27
- 28
4.el和data的第二种写法
4-1.el第二种写法 ---- vm.$mount(‘#app’)
总结:
- new Vue的时候配置el属性
- 先创建Vue 实例,随后通过vm.$mount()指定el的值
const vm = new Vue({ // el:'#app',第一种写法 data:{ name:'China' } }) vm.$mount('#app')// 第二种写法- 1
- 2
- 3
- 4
- 5
- 6
- 7
4-2.data第二种写法 ---- vm.$mount(‘#app’)
总结:
- 对象式
- 函数式(一般使用函数式)
- 用vue管理的函数一定不要用箭头函数
const vm = new Vue({ el:'#app', // 第二种写法函数 data:function(){ return { name:'world' } } })- 1
- 2
- 3
- 4
- 5
- 6
- 7
- 8
- 9
5.MVVM模型
- M:模型(Model):对应data中的数据
- V:试图(View):对应页面中的东西
- VM:试图模型(ViewModel):对应Vue这个实例对象

6.事件处理
总结:
- 给按钮添加事件用v-on:‘事件’=‘方法’
- 方法卸载methods:{里面}
- 如果要传参数就在v-on:‘事件’='方法’的方法后面加个括号传参
- 只传一个参数的话,会丢失事件对象要用$event占个位
DOCTYPE html> <html lang="en"> <head> <meta charset="UTF-8"> <meta http-equiv="X-UA-Compatible" content="IE=edge"> <meta name="viewport" content="width=device-width, initial-scale=1.0"> <title>Documenttitle> <script src="../js/vue.js">script> head> <body> <div id="app"> <h1>欢迎来到{{msg}}h1> <button v-on:click='alert1'>点击我不传参button> <button v-on:click='alert2($event,66)'>点击我传参用$event占位button> div> <script type="text/javascript"> const vm = new Vue({ el:'#app', data:{ msg:'事件点击' }, methods:{ alert1(){ alert('欢迎来到事件点击1') }, alert2(event,num){ console.log(event,num); } } }) script> body> html>- 1
- 2
- 3
- 4
- 5
- 6
- 7
- 8
- 9
- 10
- 11
- 12
- 13
- 14
- 15
- 16
- 17
- 18
- 19
- 20
- 21
- 22
- 23
- 24
- 25
- 26
- 27
- 28
- 29
- 30
- 31
- 32
- 33
7.事件修饰符(六个)
7-1.prevent ---- 阻止默认事件
7-2.stop ---- 阻止事件冒泡
7-3.once ---- 事件值触发一次
7-4.capture ---- 使用事件的捕获模式
7-5.self; ---- 阻止默认事件
7-6.passive ---- 事件的默认行为立即执行,无需等待事件回调执行完毕
DOCTYPE html> <html lang="en"> <head> <meta charset="UTF-8"> <meta http-equiv="X-UA-Compatible" content="IE=edge"> <meta name="viewport" content="width=device-width, initial-scale=1.0"> <title>Documenttitle> <script src="../js/vue.js">script> head> <style> .stop{ width: 200px; height: 200px; background-color: antiquewhite; } .stop1{ width: 100px; height: 100px; background-color: rgb(202, 139, 55); } .once{ width: 50px; height: 50px; background-color: rgb(202, 139, 55); } .capture1{ width: 100px; height: 100px; background-color: rgb(55, 202, 60); } .capture2{ width: 50px; height: 50px; background-color: rgb(55, 202, 202); } .self1{ width: 100px; height: 100px; background-color: rgb(192, 55, 202); } .self2{ width: 50px; height: 50px; background-color: rgb(202, 55, 146); } style> <body> <div id="app"> <h1>{{msg}}h1> <a @click.prevent = 'prevent' href="www.baidu.com">prevent阻止默认事件a> <div class="stop" @click="stop" >2 <button class="stop1" @click.stop="stop1">stopbutton> div> <div class="once" @click.once="once">oncediv> <div class="capture1" @click.capture="capture1" >capture1 <button class="capture2" @click="capture2">capture2button> div> <div class="self1" @click.self="self1" >self1 <button class="self2" @click="self2">self2button> div> div> <script type="text/javascript"> const vm = new Vue({ el: '#app', data: function(){ return { msg:'时间修饰符' } }, methods: { prevent() { alert('欢迎来到事件点击1') }, stop() { alert(1) }, stop1() { alert(2) }, once() { alert('只触发一次') }, capture1() { alert('我是外层') }, capture2() { alert('我是内层') }, self1() { alert('我是外层') }, self2() { alert('我是内层') } } }) script> body> html>- 1
- 2
- 3
- 4
- 5
- 6
- 7
- 8
- 9
- 10
- 11
- 12
- 13
- 14
- 15
- 16
- 17
- 18
- 19
- 20
- 21
- 22
- 23
- 24
- 25
- 26
- 27
- 28
- 29
- 30
- 31
- 32
- 33
- 34
- 35
- 36
- 37
- 38
- 39
- 40
- 41
- 42
- 43
- 44
- 45
- 46
- 47
- 48
- 49
- 50
- 51
- 52
- 53
- 54
- 55
- 56
- 57
- 58
- 59
- 60
- 61
- 62
- 63
- 64
- 65
- 66
- 67
- 68
- 69
- 70
- 71
- 72
- 73
- 74
- 75
- 76
- 77
- 78
- 79
- 80
- 81
- 82
- 83
- 84
- 85
- 86
- 87
- 88
- 89
- 90
- 91
- 92
- 93
- 94
- 95
- 96
- 97
- 98
- 99
- 100
- 101
- 102
- 103
- 104
- 105
- 106
- 107
- 108
8.键盘事件
8-1.常见的键盘事件的别名
- enter
- delet
- esc
- space
- tab(必须配合keydown使用)
- up
- down
- left
- right
8-2.系统修饰键
- ctrl
- alt
- shift
- meta
- 配合keyup使用,要按下该键的同时按其他键释放才可以触发
- 配合keydown正常触发
9.computed计算属性姓名案例
- computed里面必须包括get和set方法
- 当初次计算的时候调用一次get方法,算出fullName,然后computed里面有一个缓存 ,把fullName的值存储到里面供其他要用的地方使用
- 当fullName所依赖的属性值发生变化的时候,又会调用get方法
- 当fullName发送改变的时候会用到set方法,把fullName的值分割开,给到firstName和lastName
DOCTYPE html> <html lang="en"> <head> <meta charset="UTF-8"> <meta http-equiv="X-UA-Compatible" content="IE=edge"> <meta name="viewport" content="width=device-width, initial-scale=1.0"> <title>Documenttitle> <script src="../js/vue.js">script> head> <body> <div id="app"> <h1>Hello {{msg}}h1> 姓:<input type="text" v-model='firstName'><br> 名:<input type="text" v-model='lastName'><br> 全名:<span>{{fullName}}span> div> <script type="text/javascript"> const vm = new Vue({ el:'#app', data:function(){ return{ msg:'computed', firstName:'李', lastName:'四' } }, computed:{ fullName:{ get(){ console.log('get被调用了'); return this.firstName + '-' + this.lastName }, set(value){ var arr = value.split('-') this.firstName = arr[0] this.lastName = arr[1] console.log('set被调用了'); } } } }) script> body> html>- 1
- 2
- 3
- 4
- 5
- 6
- 7
- 8
- 9
- 10
- 11
- 12
- 13
- 14
- 15
- 16
- 17
- 18
- 19
- 20
- 21
- 22
- 23
- 24
- 25
- 26
- 27
- 28
- 29
- 30
- 31
- 32
- 33
- 34
- 35
- 36
- 37
- 38
- 39
- 40
- 41
- 42
- 43
- 44
- 45
10.watch监听属性
总结:
- whach里面写要监听的对象,然后在这个对象里面写处理函数handler,可以接收旧值和新值
- 第二种写法在实例外写$vm.watch(‘监听的对象’,处理函数)
DOCTYPE html> <html lang="en"> <head> <meta charset="UTF-8"> <meta http-equiv="X-UA-Compatible" content="IE=edge"> <meta name="viewport" content="width=device-width, initial-scale=1.0"> <title>Documenttitle> <script src="../js/vue.js">script> head> <body> <div id="app"> <h1>Hello {{msg}}h1><br> <h2>今天天气很{{info}}h2> <button @click="shift">点击切换天气button> div> <script type="text/javascript"> const vm = new Vue({ el:'#app', data:function(){ return{ msg:'watch', isHot:true } }, computed:{ info(){ return this.isHot ? '炎热':'凉爽' } }, methods:{ shift(){ return this.isHot = !this.isHot } }, watch:{ isHot:{ handler(oldValue,newValue){ console.log('监听到了'+'修改前'+oldValue+'修改后'+newValue); } } } }) script> body> html>- 1
- 2
- 3
- 4
- 5
- 6
- 7
- 8
- 9
- 10
- 11
- 12
- 13
- 14
- 15
- 16
- 17
- 18
- 19
- 20
- 21
- 22
- 23
- 24
- 25
- 26
- 27
- 28
- 29
- 30
- 31
- 32
- 33
- 34
- 35
- 36
- 37
- 38
- 39
- 40
- 41
- 42
- 43
- 44
- 45
- 46
11.深度监视
总结:
- Vue中的watch默认不监视对象内部值的变化(一层)
- 配置deep配置可以监视对象内部值的变化(多层)
- Vue自身可以检测对象内布值的改变,但是Vue提供的watch默认不可以
- 使用watch时根据数据的具体结构,决定是否采用深度监视
watch:{ // 如果说要监视num下面的a 的变化就要把监听对象写成'num.a' // 'num.a':{ // handler(){ // console.log('a变化了'); // } // } // 如果说要监视num下面的所有属性值的变化就要在监听对象里添加一个配置对象deep:true num:{ deep:true, handler(){ console.log('num里的属性值变化了'); } } }- 1
- 2
- 3
- 4
- 5
- 6
- 7
- 8
- 9
- 10
- 11
- 12
- 13
- 14
- 15
12.computed和watch的区别
总结:
- computed能完成的功能,watch都可以完成
- watch能完成的功能computed不一定能完成
- watch可以进行异步操作,computed不行
- 所有被Vue管理的函数,最好写成普通函数,这样的this才可以指向vm
- 所有不被Vue管理的函数(定时器的回调函数和ajax的回调函数)最好写成箭头函数,这样this的指向才是vm或者组件实例对象
13.绑定样式
13-1.字符串写法,适用于动态指定
DOCTYPE html> <html lang="en"> <head> <meta charset="UTF-8"> <meta http-equiv="X-UA-Compatible" content="IE=edge"> <meta name="viewport" content="width=device-width, initial-scale=1.0"> <title>Documenttitle> <script src="../js/vue.js">script> head> <style> .basic{ width: 200px; height: 200px; border: 1px solid black; } .sad{ background-color: aquamarine; } .happy{ background-color: brown; } .normal{ background-color: burlywood; } style> <body> <div id="app"> <h1>{{msg}}h1> <div class="basic" v-bind:class="mood" @click="changeMood">div> div> <script type="text/javascript"> const vm = new Vue({ el:'#app', data:function(){ return{ msg:'绑定样式', mood:'normal' } }, methods:{ changeMood(){ let arr = ['normal','sad','happy'] const index = Math.floor(Math.random()*3) console.log(index); this.mood = arr[index] } } }) script> body> html>- 1
- 2
- 3
- 4
- 5
- 6
- 7
- 8
- 9
- 10
- 11
- 12
- 13
- 14
- 15
- 16
- 17
- 18
- 19
- 20
- 21
- 22
- 23
- 24
- 25
- 26
- 27
- 28
- 29
- 30
- 31
- 32
- 33
- 34
- 35
- 36
- 37
- 38
- 39
- 40
- 41
- 42
- 43
- 44
- 45
- 46
- 47
- 48
- 49
- 50
- 51
- 52
- 53
13-2.数组写法适用于样式个数不确定
<body> <div id="app"> <h1>{{msg}}h1> <div class="basic" v-bind:class="arr" @click="changeMood">div> div> <script type="text/javascript"> const vm = new Vue({ el:'#app', data:function(){ return{ msg:'绑定样式', arr:['sad'] } }, methods:{ // changeMood(){ // let arr = ['normal','sad','happy'] // const index = Math.floor(Math.random()*3) // console.log(index); // this.mood = arr[index] // } } }) script> body>- 1
- 2
- 3
- 4
- 5
- 6
- 7
- 8
- 9
- 10
- 11
- 12
- 13
- 14
- 15
- 16
- 17
- 18
- 19
- 20
- 21
- 22
- 23
- 24
- 25
- 26
- 27
13-3.对象写法适用于样式个数确定,名字确定,但不确定用不用
data:function(){ return{ msg:'绑定样式', arr:{ sad:false } } }- 1
- 2
- 3
- 4
- 5
- 6
- 7
- 8
14.条件渲染
总结:
- v-show不删除节点
- v-if删除节点
- v-else-if和if else用法一样
- template只能和v-if一起用
14-1.v-show
<body> <div id="app"> <h1>{{msg}}h1> <button @click="n++">点击n就加一:{{n}}button> <div v-show="n===1">我是v-show,不删除节点div> div> <script type="text/javascript"> const vm = new Vue({ el:'#app', data:function(){ return{ msg:'条件渲染', n:0 } }, }) script> body>- 1
- 2
- 3
- 4
- 5
- 6
- 7
- 8
- 9
- 10
- 11
- 12
- 13
- 14
- 15
- 16
- 17
- 18
- 19
14-2.v-if
<body> <div id="app"> <h1>{{msg}}h1> <button @click="n++">点击n就加一:{{n}}button> <br> <div v-if="n === 1">等于{{n}}我显示div><br> <div v-if="n === 2">等于{{n}}我显示div><br> <div v-if="n === 3">等于{{n}}我显示div><br> <div v-if="n === 4">等于{{n}}我显示div><br> div> <script type="text/javascript"> const vm = new Vue({ el:'#app', data:function(){ return{ msg:'条件渲染', n:0 } }, }) script> body>- 1
- 2
- 3
- 4
- 5
- 6
- 7
- 8
- 9
- 10
- 11
- 12
- 13
- 14
- 15
- 16
- 17
- 18
- 19
- 20
- 21
- 22
- 23
- 24
15.列表渲染
15-1.列表渲染
<body> <div id="app"> <h1>{{msg}}h1> <li v-for="p in filterArr" :key="persons.id">{{p.name}}-{{p.age}}-{{p.sex}}li> div> <script type="text/javascript"> const vm = new Vue({ el:'#app', data:function(){ return{ msg:'列表渲染过滤', persons:[ {id:1,name:'马冬梅',age:19,sex:'女'}, {id:2,name:'周冬雨',age:20,sex:'女'}, {id:3,name:'周杰伦',age:22,sex:'男'}, {id:4,name:'艾伦',age:23,sex:'男'} ], } } }) script> body>- 1
- 2
- 3
- 4
- 5
- 6
- 7
- 8
- 9
- 10
- 11
- 12
- 13
- 14
- 15
- 16
- 17
- 18
- 19
- 20
- 21
- 22
- 23
- 24
- 25
15-2.列表过滤filter((obj)=>{})
DOCTYPE html> <html lang="en"> <head> <meta charset="UTF-8"> <meta http-equiv="X-UA-Compatible" content="IE=edge"> <meta name="viewport" content="width=device-width, initial-scale=1.0"> <title>Documenttitle> <script src="../js/vue.js">script> head> <style> style> <body> <div id="app"> <h1>{{msg}}h1> <input type="text" v-model="keyWords" placeholder="模糊搜索"> 这里就是列表渲染 <li v-for="p in filterArr" :key="persons.id">{{p.name}}-{{p.age}}-{{p.sex}}li> div> <script type="text/javascript"> const vm = new Vue({ el:'#app', data:function(){ return{ msg:'列表渲染过滤', keyWords:'', persons:[ {id:1,name:'马冬梅',age:19,sex:'女'}, {id:2,name:'周冬雨',age:20,sex:'女'}, {id:3,name:'周杰伦',age:22,sex:'男'}, {id:4,name:'艾伦',age:23,sex:'男'} ], filterArr:[] } }, watch:{ // 1.监听input里的值 keyWords:{ immediate:true,//初始化把persons的值给filterArr handler(val){ this.filterArr = this.persons.filter((p)=>{ // 2.如果包含input里面的值旧return return p.name.indexOf(val) !== -1 }) } } } }) script> body> html>- 1
- 2
- 3
- 4
- 5
- 6
- 7
- 8
- 9
- 10
- 11
- 12
- 13
- 14
- 15
- 16
- 17
- 18
- 19
- 20
- 21
- 22
- 23
- 24
- 25
- 26
- 27
- 28
- 29
- 30
- 31
- 32
- 33
- 34
- 35
- 36
- 37
- 38
- 39
- 40
- 41
- 42
- 43
- 44
- 45
- 46
- 47
- 48
- 49
- 50
- 51
- 52
15-3.列表排序
<body> <div id="app"> <h1>{{msg}}h1> <input type="text" v-model="keyWords" placeholder="模糊搜索"> <button @click="sortType = 2">年龄升序2button> <button @click="sortType = 1">年龄降序1button> <button @click="sortType = 0">原顺序0button> <li v-for="p in filpersons" :key="persons.id">{{p.name}}-{{p.age}}-{{p.sex}}li> div> <script type="text/javascript"> const vm = new Vue({ el:'#app', data:function(){ return{ msg:'列表渲染过滤', keyWords:'', sortType:0, persons:[ {id:1,name:'马冬梅',age:19,sex:'女'}, 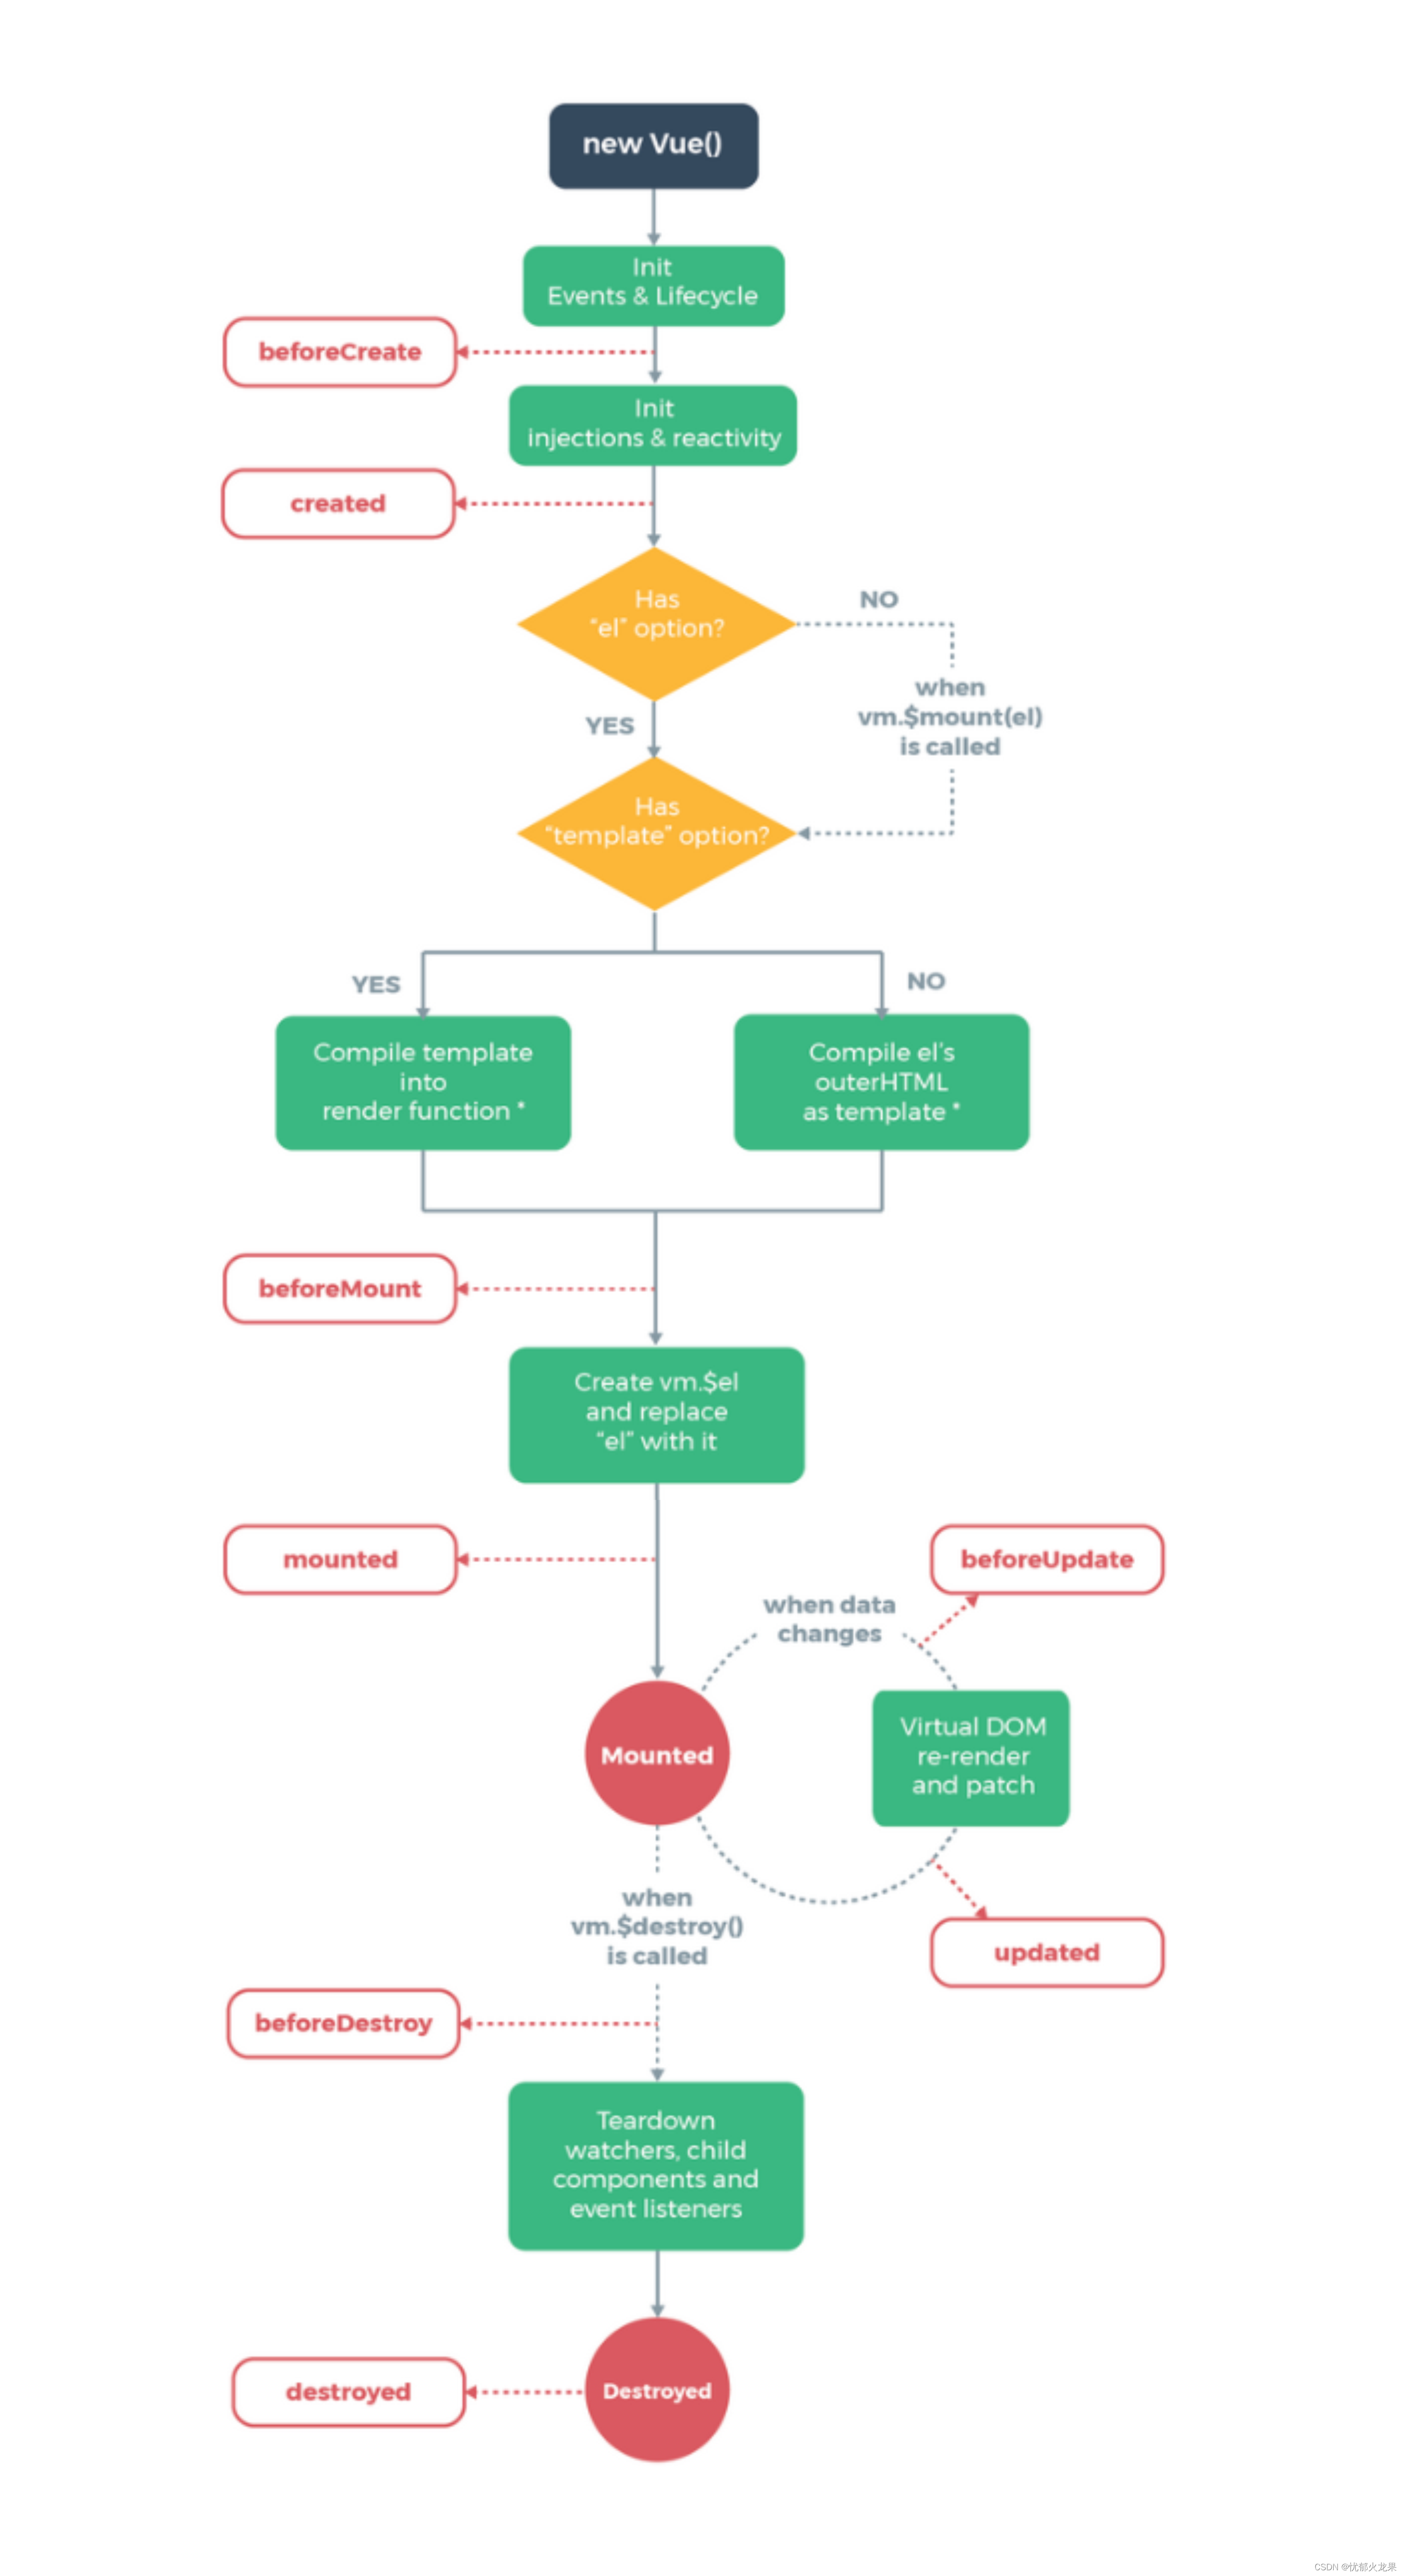 {id:2,name:'周冬雨',age:20,sex:'女'}, {id:3,name:'周杰伦',age:22,sex:'男'}, {id:4,name:'艾伦',age:23,sex:'男'} ], } }, computed:{ filpersons(){ const arr = this.persons.filter((p)=>{ return p.name.indexOf(this.keyWords) !== -1 }) // 判断是否需要排序 if(this.sortType){ arr.sort((a,b)=>{ return this.sortType === 1 ? a.age - b.age : b.age - a.age }) } return arr } } }) script> body>- 1
- 2
- 3
- 4
- 5
- 6
- 7
- 8
- 9
- 10
- 11
- 12
- 13
- 14
- 15
- 16
- 17
- 18
- 19
- 20
- 21
- 22
- 23
- 24
- 25
- 26
- 27
- 28
- 29
- 30
- 31
- 32
- 33
- 34
- 35
- 36
- 37
- 38
- 39
- 40
- 41
- 42
- 43
- 44
- 45
- 46
- 47
16.监测数据改变原理
16-1.监测对象
总结:
- Vue.set()要改变的对象,不能是vm实例上面的,或者实例的跟数据对象,必须是data里面的对象里面的东西
- vm.$set
DOCTYPE html> <html lang="en"> <head> <meta charset="UTF-8"> <meta http-equiv="X-UA-Compatible" content="IE=edge"> <meta name="viewport" content="width=device-width, initial-scale=1.0"> <title>Documenttitle> <script src="../js/vue.js">script> head> <style> style> <body> <div id="app"> <h1>{{msg}}h1> <li>姓名:{{students.name}}-年龄:{{students.age}}li> <li>性别:{{students.sex}}li> <button @click.once="addSex">点击添加一个属性,性别为男button> div> <script type="text/javascript"> const vm = new Vue({ el:'#app', data:function(){ return { msg:'监测对象', students:{name:'张三',age:'21'}, } }, methods:{ addSex(){ Vue.set(this.students,'sex','男') } } }) script> body> html>- 1
- 2
- 3
- 4
- 5
- 6
- 7
- 8
- 9
- 10
- 11
- 12
- 13
- 14
- 15
- 16
- 17
- 18
- 19
- 20
- 21
- 22
- 23
- 24
- 25
- 26
- 27
- 28
- 29
- 30
- 31
- 32
- 33
- 34
- 35
- 36
- 37
16-2.监测数组
总结:
- 必须使用Vue提供对数组修改的方法
push()
pop()
shift()
unshift()
splice()
sort()
reverse()
DOCTYPE html> <html lang="en"> <head> <meta charset="UTF-8"> <meta http-equiv="X-UA-Compatible" content="IE=edge"> <meta name="viewport" content="width=device-width, initial-scale=1.0"> <title>Documenttitle> <script src="../js/vue.js">script> head> <style> style> <body> <div id="app"> <h1>{{msg}}h1> <li v-for="stu in students">姓名:{{stu.name}}-年龄:{{stu.age}}li> <button @click.once="addStu">点击添加一个老六button> div> <script type="text/javascript"> const vm = new Vue({ el:'#app', data:function(){ return { msg:'监测数组', students:[ {name:'张三',age:21}, {name:'李四',age:21}, {name:'王五',age:21}, ] } }, methods:{ addStu(){ this.students.unshift({name:'老六',age:21}) } } }) script> body> html>- 1
- 2
- 3
- 4
- 5
- 6
- 7
- 8
- 9
- 10
- 11
- 12
- 13
- 14
- 15
- 16
- 17
- 18
- 19
- 20
- 21
- 22
- 23
- 24
- 25
- 26
- 27
- 28
- 29
- 30
- 31
- 32
- 33
- 34
- 35
- 36
- 37
- 38
- 39
- 40
17.过滤器
总结:
- 注册过滤器的两种方法,Vue.filter( name,fn), ---- new Vue({ filters:{}})
- 过滤器可以接收额外参数,也可以多个多个过滤器串联
- 没有改变原本的数据而是产生新的数据
- 只能普通使用或者配合v-bind使用
17-1.局部过滤器
DOCTYPE html> <html lang="en"> <head> <meta charset="UTF-8"> <meta http-equiv="X-UA-Compatible" content="IE=edge"> <meta name="viewport" content="width=device-width, initial-scale=1.0"> <title>Documenttitle> <script src="../js/vue.js">script> head> <style> style> <body> <div id="app"> <h1>{{msg}}h1> <li>{{fil | filtersStr}}li> div> <script type="text/javascript"> const vm = new Vue({ el:'#app', data:{ msg:'过滤器', fil:'需要被过滤的字符串' }, filters:{ filtersStr(value){ return value.slice(1,5) } } }) script> body> html>- 1
- 2
- 3
- 4
- 5
- 6
- 7
- 8
- 9
- 10
- 11
- 12
- 13
- 14
- 15
- 16
- 17
- 18
- 19
- 20
- 21
- 22
- 23
- 24
- 25
- 26
- 27
- 28
- 29
- 30
- 31
- 32
- 33
- 34
17-2.全局过滤器
<script type="text/javascript"> Vue.filter('filtersStr',function(value){ return value.slice(1,5) }) const vm = new Vue({ el:'#app', data:{ msg:'过滤器', fil:'需要被过滤的字符串' }, }) script>- 1
- 2
- 3
- 4
- 5
- 6
- 7
- 8
- 9
- 10
- 11
- 12
- 13
18.内置指令
- v-text ---- 更新div里面所有的内容
- v-html ---- 跟v-text差不多,但是可以解析标签
- v-once ---- 加了这个指令的标签,只渲染一次
- v-pre ---- 加了这个的标签跳过Vue的渲染
- v-cloak ---- 配置css使用
- v-bind ---- 单向绑定
- v-model ---- 双向绑定
- v-if ---- 条件显示或隐藏
- v-show ---- 显示
10.v-for ---- 遍历对象或者数组
19.自定义指令
19-1.局部函数式
总结:
- 在vm节点上添加属性directivers
- directives里面有一个自定义的函数名,回调函数接收两个参数,一个是绑定element绑定的元素,一个是binding是绑定的属性值
DOCTYPE html> <html lang="en"> <head> <meta charset="UTF-8"> <meta http-equiv="X-UA-Compatible" content="IE=edge"> <meta name="viewport" content="width=device-width, initial-scale=1.0"> <title>Documenttitle> <script src="../js/vue.js">script> head> <body> <div id="app"> <h1>{{msg}}h1> <h1>h1的n的大小{{n}}h1> <h1>*10后n的值: <span v-big="n">span>h1> div> <script type="text/javascript"> const vm = new Vue({ el:'#app', data:{ msg:'局部函数式', n:1 }, directives:{ 'big':function(element,binding){ element.innerText = binding.value *10 } } }) script> body> html>- 1
- 2
- 3
- 4
- 5
- 6
- 7
- 8
- 9
- 10
- 11
- 12
- 13
- 14
- 15
- 16
- 17
- 18
- 19
- 20
- 21
- 22
- 23
- 24
- 25
- 26
- 27
- 28
- 29
- 30
- 31
- 32
- 33
19-2.全局函数式
- Vue.directive(‘big’,function(element,binding){
element.innerText = binding.value *10
})
<script type="text/javascript"> Vue.directive('big',function(element,binding){ element.innerText = binding.value *10 }) const vm = new Vue({ el:'#app', data:{ msg:'局部函数式', n:1 }, // directives:{ // 'big':function(element,binding){ // element.innerText = binding.value *10 // } // } }) script>- 1
- 2
- 3
- 4
- 5
- 6
- 7
- 8
- 9
- 10
- 11
- 12
- 13
- 14
- 15
- 16
- 17
19-3.局部对象式
总结:
- 对象式里多了三个回调函数分别是
- bind 指令与元素绑定成功时就调用
- inserted 指令所在元素被插入页面时被调用
- update 指令所在的模板被重新解析时
<script type="text/javascript"> const vm = new Vue({ el:'#app', data:{ msg:'局部对象式', n:1 }, directives:{ 'fbind':{ // bind:指令与元素绑定成功时就调用 bind(element,binding){ // console.log('bind'); element.value = binding.value }, // inserted:指令所在元素被插入页面时被调用 inserted(element,binding){ // console.log('inserted'); element.focus() element.value = binding.value }, // uptade:指令所在的模板被重新解析时 update(element,binding){ // console.log('uptade'); element.value = binding.value } } } }) script>- 1
- 2
- 3
- 4
- 5
- 6
- 7
- 8
- 9
- 10
- 11
- 12
- 13
- 14
- 15
- 16
- 17
- 18
- 19
- 20
- 21
- 22
- 23
- 24
- 25
- 26
- 27
- 28
- 29
- 30
19-4.全局对象式
Vue.directive('fbind',{ // bind:指令与元素绑定成功时就调用 bind(element,binding){ // console.log('bind'); element.value = binding.value }, // inserted:指令所在元素被插入页面时被调用 inserted(element,binding){ // console.log('inserted'); element.focus() element.value = binding.value }, // uptade:指令所在的模板被重新解析时 update(element,binding){ // console.log('uptade'); element.value = binding.value } })- 1
- 2
- 3
- 4
- 5
- 6
- 7
- 8
- 9
- 10
- 11
- 12
- 13
- 14
- 15
- 16
- 17
- 18
20.生命周期
**总结:**八个阶段
- beforeCreate
- created
- beforeMounte
- mounted
- beforeUpdate
- updated
- beforeDestroy
- destroyed
总结:重要注意事项
- mounted : 发送ajax请求、启动定时器、绑定自定义事件、订阅消息等
- beforeDestroy:清除定时器、解绑自定义事件、取消订阅等收尾工作
总结:关于销毁Vue实例
- 销毁后借助Vue开发者工具看不到任何信息
- 销毁后自定义事件会失效,但原生dom事件依然有效
- 一般不会有beforeDestroy操作数据,即使操作了数据,也不会触发更新流程了

-
相关阅读:
【vue全局注册组件--小趴菜教程】
树莓派4B串口通信配置方式
边缘计算(Edge Computing)
盘点52个Python各行各业管理系统源码Python爱好者不容错过
Fabric 账本数据块结构解析(二):如何解析账本中的配置块数据
element ui - el-table 表头筛选
CAN电压测试(电工)
设计院图纸加密防泄密方案——天锐绿盾加密软件@德人合科技
定制自己的 Excel 界面 + 保存 Excel
取消elementUI中table的选中状态和勾选状态赋值
- 原文地址:https://blog.csdn.net/LQlove1/article/details/126689351
