-
JAVA-JDBC 原理及使用
JAVA-JDBC 原理及使用
一、简介
JDBC是什么?JDBC英文名为:Java Data Base Connectivity(Java数据库连接),数据库是由不同生产产商决定的,例如Mysql、Oracle、SQL Server,JAVA JDK不可能提供对不同数据库的实现,因此,它就提供了JDBC的接口API,具体的实现由不同的生产产商决定。这样,数据库生产产商都根据JAVA API去实现各自的应用驱动,这问题就迎刃而解了
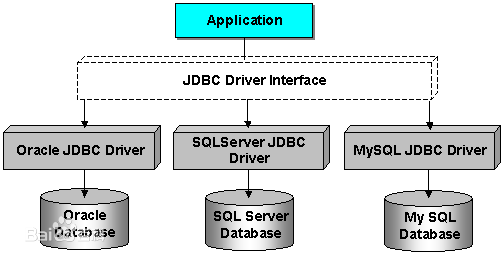
二、工作原理图
三、常用接口
-
DriverManager:这个类管理数据库驱动程序的列表,查看加载的驱动是否符合JAVA Driver API的规范
-
Connection:与数据库中的连接对象,通过该对象与数据库进行通信
-
Statement:把创建的SQL对象,转而存储到数据库当中
-
ResultSet:它是一个迭代器,用于检索查询数据
四、JDBC的使用步骤
准备工作:导入mysql数据库的驱动 ,驱动的版本根据数据库的版本选择
-
注册驱动
//注册驱动的方式1 @Test public void test02() { try { //注册驱动 每个驱动程序类必须实现的接口 Driver Driver driver = new Driver(); DriverManager.registerDriver(driver); /* *public static Connection getConnection(String url,String user,String password) * * url: 统一资源定位符 通信协议 ip 端口 资源名称 http://localhost:3306/index.html * user: 用户名 * password: 密码 * */ Connection connection = DriverManager.getConnection("jdbc:mysql://localhost:3306/jgs2111", "root", "root"); System.out.println(connection); //执行数据的操作 //释放资源 connection.close(); } catch (Exception e) { e.printStackTrace(); } } //获取连接的第二种方式 (推荐) public void test03() { //获取连接的第二种方式 (推荐) //初始化参数 Connection connection = null; String url = "jdbc:mysql:///jgs2111"; String username="root"; String password = "root"; try { //加载驱动 java.sql.DriverManager.registerDriver(new Driver()); Class.forName("com.mysql.jdbc.Driver"); //获取连接 connection = DriverManager.getConnection(url,username,password); System.out.println(connection); //执行操作 } catch (Exception e) { }finally { try { //关闭连接 if(connection!=null) { connection.close(); } } catch (SQLException e) { e.printStackTrace(); } } }- 1
- 2
- 3
- 4
- 5
- 6
- 7
- 8
- 9
- 10
- 11
- 12
- 13
- 14
- 15
- 16
- 17
- 18
- 19
- 20
- 21
- 22
- 23
- 24
- 25
- 26
- 27
- 28
- 29
- 30
- 31
- 32
- 33
- 34
- 35
- 36
- 37
- 38
- 39
- 40
- 41
- 42
- 43
- 44
- 45
- 46
- 47
- 48
- 49
- 50
- 51
- 52
- 53
-
获取连接
DriverManager.getConnection(url,username,password);- 1
- 获取Statement对象
createStatement() 创建一个 Statement对象,用于将SQL语句发送到数据库- 1
- 执行sql
- 处理结果集ResultSet: 表示数据库结果集的数据表,通常通过执行查询数据库的语句生成,对象保持一个光标指向其当前的数据行。 最初,光标位于第一行之前。 next方法将光标移动到下一行,并且在ResultSet对象中没有更多行时返回false ,因此可以在while循环中使用循环来遍历结果集
while(result.next()){ //查询语句时执行 //获取每一个字段 通过get方法获取查询记录中的每个字段 }- 1
- 2
- 3
- 关闭连接 写在finally块中 确保连接被关闭
connection.close();- 1
通过数据库连接实现数据的CRUD
public void test04() { //查询数据库中的所有数据 //初始化参数 Connection connection = null; String driver = "com.mysql.jdbc.Driver"; String url = "jdbc:mysql:///jgs2111"; String username="root"; String password = "root"; try { //注册驱动 Class.forName(driver); //获取连接 connection = DriverManager.getConnection(url, username, password); //获取statement对象 Statement st = connection.createStatement(); //编写sql String sql = "select * from user"; //执行sql ResultSet result = st.executeQuery(sql); //处理结果集 while (result.next()) { //获取用户名 getString(String colName) String uname = result.getString("username"); System.out.println("uname"+uname); //获取密码 getString(int cloIndex) String pwd = result.getString(2); System.out.println("pwd:"+pwd); //获取生日 Date date1 = result.getDate("birth"); System.out.println("生日:"+new SimpleDateFormat("yyyy-MM-dd").format(date1)); //获取注册时间 Date date2 = result.getTimestamp(5); System.out.println("注册时间:"+new SimpleDateFormat("yyyy-MM-dd HH:mm:ss").format(date2)); System.out.println(); //获取最后的登录时间 Timestamp timestamp = result.getTimestamp(6); System.out.println("timestamp:"+timestamp.getTime()); } } catch (Exception e) { e.printStackTrace(); }finally { try { //关闭连接 if(connection!=null) { connection.close(); } } catch (SQLException e) { e.printStackTrace(); } } } //插入一条数据到数据库 public void test05() {//插入一条数据到数据库 try { Statement st= conn.createStatement(); //编写sql String sql = "insert into user(username,password,birth,create_time)" + "values('tom','12345','1991-12-08','2021-6-8 12:12:12')"; //执行sql 返回影响的行数 int line = st.executeUpdate(sql); //st.executeUpdate(sql,Statement.RETURN_GENERATED_KEYS ); //获取自增的主键 /*ResultSet keys = st.getGeneratedKeys(); while(keys.next()) { int index = keys.getInt(1); System.out.println("主键:"+index); }*/ System.out.println(line); st.close(); } catch (Exception e) { e.printStackTrace(); }finally { try { //关闭连接 if(conn!=null) { conn.close(); } } catch (SQLException e) { e.printStackTrace(); } } } } #更新一条数据 public void test06() {//更新一条数据到数据库 try { //获取statement对象 Statement st = conn.createStatement(); //创建sql语句 String sql = "update user set username = 'lily' where id = 1"; //执行sql int line = st.executeUpdate(sql); System.out.println(line); } catch (Exception e) { e.printStackTrace(); }finally { try { //关闭连接 if(conn!=null) { conn.close(); } } catch (SQLException e) { e.printStackTrace(); } } } #删除一条数据 public void test07() {//删除一条数据到数据库 try { //获取statement对象 Statement st = conn.createStatement(); //创建sql语句 String sql = "delete from user where id = 2"; //执行sql int line = st.executeUpdate(sql); System.out.println(line); } catch (Exception e) { e.printStackTrace(); }finally { try { //关闭连接 if(conn!=null) { conn.close(); } } catch (SQLException e) { e.printStackTrace(); } } }- 1
- 2
- 3
- 4
- 5
- 6
- 7
- 8
- 9
- 10
- 11
- 12
- 13
- 14
- 15
- 16
- 17
- 18
- 19
- 20
- 21
- 22
- 23
- 24
- 25
- 26
- 27
- 28
- 29
- 30
- 31
- 32
- 33
- 34
- 35
- 36
- 37
- 38
- 39
- 40
- 41
- 42
- 43
- 44
- 45
- 46
- 47
- 48
- 49
- 50
- 51
- 52
- 53
- 54
- 55
- 56
- 57
- 58
- 59
- 60
- 61
- 62
- 63
- 64
- 65
- 66
- 67
- 68
- 69
- 70
- 71
- 72
- 73
- 74
- 75
- 76
- 77
- 78
- 79
- 80
- 81
- 82
- 83
- 84
- 85
- 86
- 87
- 88
- 89
- 90
- 91
- 92
- 93
- 94
- 95
- 96
- 97
- 98
- 99
- 100
- 101
- 102
- 103
- 104
- 105
- 106
- 107
- 108
- 109
- 110
- 111
- 112
- 113
- 114
- 115
- 116
- 117
- 118
- 119
- 120
- 121
- 122
- 123
- 124
- 125
- 126
- 127
- 128
- 129
- 130
- 131
- 132
- 133
- 134
- 135
- 136
- 137
批处理语句
public void test01() throws SQLException { Connection connection = JDBCUtile.getConnection(); Statement cst = connection.createStatement(); String sql1 = "insert into user(username,password)values('ll','2222')"; String sql2 = "delete from user where id = 1"; String sql3 = "update user set username = 'lisi' where id = 5"; cst.addBatch(sql1); cst.addBatch(sql2); cst.addBatch(sql3); int[] executeBatch = cst.executeBatch(); for (int i : executeBatch) { System.out.println(i); } }- 1
- 2
- 3
- 4
- 5
- 6
- 7
- 8
- 9
- 10
- 11
- 12
- 13
- 14
- 15
- 16
- 17
- 18
- 19
- 20
- 21
案例:模拟注册登录(代码分层思想)
@Test public void testRegist_login() throws Exception { //regist(); login(); } public void regist() throws Exception{ Scanner scanner = new Scanner(System.in); System.out.println("请输入您的账号"); String uname = scanner.nextLine(); System.out.println("请输入您的密码"); String password = scanner.nextLine(); System.out.println("请输入您的生日"); String birth = scanner.nextLine(); //获取当前系统时间 Date date = new Date(); String dt = new SimpleDateFormat("yyyy-MM-dd").format(date); //获取statement对象 将数据持久化 Statement st = conn.createStatement(); //编写sql String sql = "insert into user(username,password,birth,create_time)values('"+uname+"','"+password+"','"+birth+"','"+dt+"')"; System.out.println(sql); int line = st.executeUpdate(sql); System.out.println(line); if(line==1) { System.out.println("注册成功"); }else { System.out.println("注册失败!"); } } public void login() throws Exception { Scanner scanner = new Scanner(System.in); System.out.println("请输入您的账号"); String uname = scanner.nextLine(); System.out.println("请输入您的密码"); String password = scanner.nextLine(); //获取statement对象 将数据持久化 Statement st = conn.createStatement(); //根据用户名查询 String sql = "select * from user where username ='"+uname+"' and password = '"+password+"' "; //执行查询 处理结果集 ResultSet rs = st.executeQuery(sql); User user = null; while(rs.next()) { String username = rs.getString("username"); String pwd = rs.getString("password"); user = new User(); user.setUsername(username); user.setPassword(password); } System.out.println(user); if(user==null) { System.out.println("登录失败"); }else { System.out.println("登录成功"); } }- 1
- 2
- 3
- 4
- 5
- 6
- 7
- 8
- 9
- 10
- 11
- 12
- 13
- 14
- 15
- 16
- 17
- 18
- 19
- 20
- 21
- 22
- 23
- 24
- 25
- 26
- 27
- 28
- 29
- 30
- 31
- 32
- 33
- 34
- 35
- 36
- 37
- 38
- 39
- 40
- 41
- 42
- 43
- 44
- 45
- 46
- 47
- 48
- 49
- 50
- 51
- 52
- 53
- 54
- 55
- 56
- 57
- 58
- 59
- 60
- 61
- 62
- 63
- 64
使用分层的思想优化以上代码
/** * 用户数据的持久化层 * 只操作数据 不做业务逻辑分析 * @author USER * */ public class UserDao { public User selectUserByUserNameAndPassword(String username,String password) { Connection connection = null; try { //加载驱动 Class.forName("com.mysql.jdbc.Driver"); //获取连接 connection = DriverManager.getConnection("jdbc:mysql:///jgs2111","root","root"); //获取statement对象 Statement st = connection.createStatement(); //执行sql String sql = "select * from user where username = '"+username+"' and password = '"+password+"'"; ResultSet rs = st.executeQuery(sql); //处理结果集 User user = null; while(rs.next()) { String uname = rs.getString("username"); String pwd = rs.getString("password"); user = new User(); user.setUsername(uname); user.setPassword(pwd); } return user; } catch (Exception e) { e.printStackTrace(); }finally { try { if(connection!=null) { connection.close(); } } catch (Exception e) { e.printStackTrace(); } } //关闭连接 return null; } public int addUser(User user) { Connection connection = null; try { //加载驱动 Class.forName("com.mysql.jdbc.Driver"); //获取连接 connection = DriverManager.getConnection("jdbc:mysql:///jgs2111","root","root"); //获取statement对象 Statement st = connection.createStatement(); //执行sql String ctime = new SimpleDateFormat("yyyy-MM-dd").format(user.getCreateTime()); String birth = new SimpleDateFormat("yyyy-MM-dd").format(user.getBirth()); String sql = "insert into user(username,password,birth,create_time)values('"+user.getUsername()+"','"+user.getPassword()+"','"+birth+"','"+ctime+"')"; return st.executeUpdate(sql); } catch (Exception e) { e.printStackTrace(); }finally { try { if(connection!=null) { connection.close(); } } catch (Exception e) { e.printStackTrace(); } } return 0; } } /** * 用户操作业务层 只做逻辑业务 不进行数据操作 * @author USER */ public class UserService { private UserDao userDao = new UserDao(); //登录业务 public boolean login(String username,String password) { User user = userDao.selectUserByUserNameAndPassword(username, password); return user!=null; } //注册业务 public boolean register(User user) { int line = userDao.addUser(user); return line!=0; } } /** * 测试用户的登录和注册 * @author USER * */ public class UserTest { private UserService userService = new UserService(); @Test public void testLogin() { Scanner scan = new Scanner(System.in); System.out.println("请输入账号"); String username = scan.nextLine(); System.out.println("请输入密码"); String password = scan.nextLine(); //调用业务层 查看用户是否存在 if(userService.login(username, password)) { System.out.println("登录成功"); }else { System.out.println("登录失败"); } } @Test public void testRegister() { Scanner scan = new Scanner(System.in); System.out.println("请输入账号"); String username = scan.nextLine(); System.out.println("请输入密码"); String password = scan.nextLine(); System.out.println("请输入生日"); String birth = scan.nextLine(); //获取系统时间 用于封装用户注册的日期 Date date = new Date(); User user = new User(); try { user.setBirth(new SimpleDateFormat("yyyy-MM-dd").parse(birth)); user.setPassword(password); user.setUsername(username); user.setCreateTime(date); } catch (ParseException e) { e.printStackTrace(); } //调用业务层 注册用户业务 if(userService.register(user)) { System.out.println("注册成功"); }else { System.out.println("注册失败"); } } }- 1
- 2
- 3
- 4
- 5
- 6
- 7
- 8
- 9
- 10
- 11
- 12
- 13
- 14
- 15
- 16
- 17
- 18
- 19
- 20
- 21
- 22
- 23
- 24
- 25
- 26
- 27
- 28
- 29
- 30
- 31
- 32
- 33
- 34
- 35
- 36
- 37
- 38
- 39
- 40
- 41
- 42
- 43
- 44
- 45
- 46
- 47
- 48
- 49
- 50
- 51
- 52
- 53
- 54
- 55
- 56
- 57
- 58
- 59
- 60
- 61
- 62
- 63
- 64
- 65
- 66
- 67
- 68
- 69
- 70
- 71
- 72
- 73
- 74
- 75
- 76
- 77
- 78
- 79
- 80
- 81
- 82
- 83
- 84
- 85
- 86
- 87
- 88
- 89
- 90
- 91
- 92
- 93
- 94
- 95
- 96
- 97
- 98
- 99
- 100
- 101
- 102
- 103
- 104
- 105
- 106
- 107
- 108
- 109
- 110
- 111
- 112
- 113
- 114
- 115
- 116
- 117
- 118
- 119
- 120
- 121
- 122
- 123
- 124
- 125
- 126
- 127
- 128
- 129
- 130
- 131
- 132
- 133
- 134
- 135
- 136
- 137
- 138
- 139
- 140
- 141
- 142
- 143
- 144
- 145
- 146
- 147
- 148
- 149
- 150
- 151
- 152
- 153
- 154
Statement对象sql注入问题
SELECT * FROM user WHERE username = 'mosin' and `password` = '123' or '1'='1';- 1
prepareStatement对象实现CRUD
五、JDBC工具类
/** * jdbc工具类 实现数据库连接代码的重用性 * @author USER * */ import java.io.File; import java.io.FileInputStream; import java.sql.Connection; import java.sql.DriverManager; import java.sql.ResultSet; import java.sql.SQLException; import java.sql.Statement; import java.util.Properties; public final class JDBCUtile { private static String url; private static String username; private static String password; private JDBCUtile() { } static { try { // 加载驱动 Class.forName("com.mysql.jdbc.Driver"); // 加载文件初始化参数 Properties ps = new Properties(); FileInputStream fis = new FileInputStream(new File("jdbc.properties")); ps.load(fis); url = ps.getProperty("url"); username = ps.getProperty("username"); password = ps.getProperty("password"); } catch (Exception e) { e.printStackTrace(); } } public static Connection getConnection() { Connection conn = null; try { conn = DriverManager.getConnection(url, username, password); return conn; } catch (Exception e) { e.printStackTrace(); } return conn; } public static void closeAll(ResultSet rs, Statement st, Connection conn) { try { if (rs != null) { rs.close(); System.out.println("rs close"); } } catch (SQLException e) { e.printStackTrace(); } try { if (st != null) { st.close(); System.out.println("st close"); } } catch (SQLException e) { e.printStackTrace(); } try { if (conn != null) { conn.close(); System.out.println("conn close"); } } catch (SQLException e) { e.printStackTrace(); } } }- 1
- 2
- 3
- 4
- 5
- 6
- 7
- 8
- 9
- 10
- 11
- 12
- 13
- 14
- 15
- 16
- 17
- 18
- 19
- 20
- 21
- 22
- 23
- 24
- 25
- 26
- 27
- 28
- 29
- 30
- 31
- 32
- 33
- 34
- 35
- 36
- 37
- 38
- 39
- 40
- 41
- 42
- 43
- 44
- 45
- 46
- 47
- 48
- 49
- 50
- 51
- 52
- 53
- 54
- 55
- 56
- 57
- 58
- 59
- 60
- 61
- 62
- 63
- 64
- 65
- 66
- 67
- 68
- 69
- 70
- 71
- 72
- 73
- 74
- 75
- 76
- 77
- 78
- 79
- 80
- 81
- 82
- 83
- 84
- 85
- 86
- 87
- 88
案例:
1.创建表和对应实体(10分)
学生表: id、姓名、班级id 班级表: id、班级名称
科目表: id、科目名称
成绩表: id、学生id、科目id、分数
2.分别创建对应的dao类,编写必要的数据操作方法(20分)
3.创建学生业务类StudentService,实现以下业务方法:(30分)
1.增加学生
2.根据id删除学生
3.根据学生id和班级名称给学生分班(根据班级名称查询班级ID,然后根据学生id,更新学生的班级信息)
4.查询所有学生信息,要求显示对应班级名称
4.创建成绩业务类ScoreService,实现以下业务方法:(30分)
1.根据学生姓名和科目名称给学生记录成绩
2.根据科目名称查询所有学生的成绩,并降序排列5.编写Controller类,测试以上业务(10分)
六、数据库连接池
数据库连接池(Connection pooling)是程序启动时建立足够的数据库连接,并将这些连接组成一个连接池,由程序动态地对池中的连接进行申请,使用,释放
为何使用数据库连接池?
- 数据库连接是一件费时的操作,连接池可以使多个操作共享一个连接
- 数据库连接池的基本思想就是为数据库连接建立一个“缓冲池”。预先在缓冲池中放入一定数量的连接,当需要建立数据库连接时,只需从“缓冲池”中取出一个,使用完毕之后再放回去。可以通过设定连接池最大连接数来防止系统无尽的与数据库连接。
- 使用连接池是为了提高对数据库连接资源的管理,数据库连接池负责分配、管理和释放数据库连接,它允许应用程序重复使用一个现有的数据库连接,而不是重新建立一个。
一般的数据连接:建立连接是一个费时的活动,每次都得花费0.05s~1s的时间,而且系统还要分配内存资源

可是对于现在的web应用,尤其是大型电子商务网站,同时有几百人甚至几千人在线,则需要大量的资源。

通过上面的分析,我们可以看出来,
数据库连接是一种稀缺的资源,为了保障网站的正常使用,应该对其进行妥善管理。其实我们查询完数据库后,如果不关闭连接,而是暂时存放起来,当别人使用时,把这个连接给他们使用
数据库连接池的运行机制
(1) 程序初始化时创建连接池
(2) 使用时向连接池申请可用连接
(3) 使用完毕,将连接返还给连接池
(4) 程序退出时,断开所有连接,并释放资源常见连接池种类:
- DBCP连接池
- c3p0连接池
- druid连接池
druid连接池的使用
使用步骤:
1.导入jar包: druid-xxx.jar、mysql-connector-java-5.1.47.jar
2.定义配置文件:可以命名为druid.properties
driverClassName=com.mysql.jdbc.Driver url=jdbc:mysql://MySQL地址/数据库名 username=用户名 password=密码 initialSize=初始化连接数 maxActive=最大连接数 maxWait=最大等待时间(毫秒为单位)- 1
- 2
- 3
- 4
- 5
- 6
- 7
3.加载配置文件druid.properties
4.获取连接池对象
5.获取数据库连接
public class JdbcUtils { /** * 数据库连接对象 */ private static DataSource dataSource; /* 获取数据库连接池对象 */ static { try { // 获取加载配置文件的对象 Properties properties = new Properties(); // 获取类的类加载器 ClassLoader classLoader = JdbcUtils.class.getClassLoader(); // 获取druid-1.0.9.properties配置文件资源输入流 InputStream resourceAsStream = classLoader.getResourceAsStream("druid-1.0.9.properties"); // 加载配置文件 properties.load(resourceAsStream); // 获取连接池对象 dataSource = DruidDataSourceFactory.createDataSource(properties); } catch (Exception e) { e.printStackTrace(); } } /** * 获取连接池对象 */ public static DataSource getDataSource() { return dataSource; } /** * 获取数据库连接对象 */ public static Connection getConnection() throws Exception { return dataSource.getConnection(); } }- 1
- 2
- 3
- 4
- 5
- 6
- 7
- 8
- 9
- 10
- 11
- 12
- 13
- 14
- 15
- 16
- 17
- 18
- 19
- 20
- 21
- 22
- 23
- 24
- 25
- 26
- 27
- 28
- 29
- 30
- 31
- 32
- 33
- 34
- 35
- 36
- 37
- 38
- 39
- 40
- 41
- 42
- 43
- 44
c3p0连接池的使用
1.导入jar包文件,并添加路径
2.在 src 路径下配置文件 c3p0-config.xml(
必须是这个名字)<c3p0-config> <default-config> <property name="driverClass">com.mysql.jdbc.Driverproperty> <property name="jdbcUrl">jdbc:mysql://localhost/stusproperty> <property name="user">rootproperty> <property name="password">1234property> <property name="initialPoolSize">10property> <property name="maxIdleTime">30property> <property name="maxPoolSize">100property> <property name="minPoolSize">10property> <property name="maxStatements">200property> default-config> c3p0-config>- 1
- 2
- 3
- 4
- 5
- 6
- 7
- 8
- 9
- 10
- 11
- 12
- 13
- 14
- 15
- 16
3.获取连接池对象
public class JDBCUtils { static ComboPooledDataSource dataSource =null; static{ dataSource = new ComboPooledDataSource(); } public static DataSource getDataSource(){ return dataSource; } public static Connection getConnection() throws SQLException{ return dataSource.getConnection(); } public static void close(Connection con,Statement stat,ResultSet rs){ if(stat != null){ try{ stat.close(); }catch(SQLException ex){}; } if(con != null){ try{ con.close(); }catch(SQLException ex){}; } if(rs != null){ try{ rs.close(); }catch(SQLException ex){}; }}}- 1
- 2
- 3
- 4
- 5
- 6
- 7
- 8
- 9
- 10
- 11
- 12
- 13
- 14
- 15
- 16
- 17
- 18
- 19
- 20
- 21
- 22
- 23
- 24
- 25
- 26
- 27
- 28
- 29
- 30
- 31
- 32
- 33
七、DBUtils工具的使用
如果只使用JDBC进行开发,会发现冗余代码过多,为了简化JDBC开发,采用apache commons组件一个成员:DBUtils。DBUtils是java编程中的数据库操作实用工具,小巧简单实用,DBUtils封装了对JDBC的操作,简化了JDBC操作,可以少写代码。
Dbutils三个核心功能介绍:- QueryRunner中提供对sql语句操作的API.
- ResultSetHandler接口,用于定义select操作后,怎样封装结果集.
- DbUtils类,它就是一个工具类,定义了关闭资源与事务处理的方法
QueryRunner核心类:
- QueryRunner(DataSource ds) ;传入参数为连接池
- update(String sql, Object… params) ,执行insert update delete操作
- query(String sql, ResultSetHandler rsh, Object… params) ,执行 select操作
ResultSetHandler 结果集处理类

动态sql的实现
根据用户传递的参数进行查询
public void test07() { //动态sql 查询 Usr usr = new Usr(); try { usr.setBirth(new SimpleDateFormat("yyyy-MM-dd").parse("1992-3-2")); } catch (ParseException e1) { e1.printStackTrace(); } usr.setUsername("小黑子"); usr.setPassword("123456"); String sql = "select * from usr where 1=1 "; ArrayList<Object> usrs = new ArrayList<Object>(); if(usr.getUsername()!=null) { sql+="and username= ? "; usrs.add(usr.getUsername()); } if(usr.getPassword()!=null) { sql+="and password= ? "; usrs.add(usr.getPassword()); } if(usr.getBirth()!=null) { sql+="and birth= ? "; usrs.add(new SimpleDateFormat("yyyy-MM-dd").format(usr.getBirth())); } System.out.println(sql); QueryRunner runner = new QueryRunner(DruidUtile.getDataSource()); try { List<Usr> list = runner.query(sql, new BeanListHandler<Usr>(Usr.class),usrs.toArray()); for (Usr usr2 : list) { System.out.println(usr2); } } catch (SQLException e) { e.printStackTrace(); } }- 1
- 2
- 3
- 4
- 5
- 6
- 7
- 8
- 9
- 10
- 11
- 12
- 13
- 14
- 15
- 16
- 17
- 18
- 19
- 20
- 21
- 22
- 23
- 24
- 25
- 26
- 27
- 28
- 29
- 30
- 31
- 32
- 33
- 34
- 35
- 36
- 37
- 38
八、JDBC事务演示
转账案例
public void test02() throws SQLException { Connection connection = JDBCUtile.getConnection(); // 关闭自动提交 connection.setAutoCommit(false); String sql = "update account set money = money+? where id = ?"; PreparedStatement ps = connection.prepareStatement(sql); ps.setInt(1, -1000); ps.setInt(2, 1); ps.executeUpdate(); ps.setInt(1, 1000); ps.setInt(2, 9); ps.executeUpdate(); //int a = 1/0; connection.commit(); JDBCUtile.closeAll(null, ps, connection); }- 1
- 2
- 3
- 4
- 5
- 6
- 7
- 8
- 9
- 10
- 11
- 12
- 13
- 14
- 15
- 16
- 17
- 18
- 19
- 20
- 21
-
-
相关阅读:
Elaticsearch timestamp 与 LocalDateTime 映射
翻译prompt
【FPGA】FPGA实现UART串口通信回环
【解决方案】多租户技术架构设计入门(一)
手写编程语言-递归函数是如何实现的?
每日一题 136. 只出现一次的数字(简单,位运算)
【无标题】
vue项目H5传递数据向uniapp的web-view
反爬篇 | 手把手教你处理 JS 逆向之 CSS 偏移
一文讲明 网络调试助手的基本使用 NetAssist
- 原文地址:https://blog.csdn.net/sparkstark/article/details/126722249