-
Hexo+Github+Vscode搭建个人博客内含添加图片和更换主题
Why I want to get a personal blog?
从2021年开始写博客以来,我发现了如下几个好处:- 独立思考的能力。为了将知识解释清楚,我必须反复思考。
- 逻辑能力的提升。写博客的文字必须减少废话,这对之前的我来说是一件困难的事情,但是现在通过我写PPT和汇报的能力来看是有所提升的。
- 激励学习。发布博客的瞬间让我的学习变得有成就感,我能通过博客了解消失的时间花费在哪里。
- 交流。
那么为什么我选择搭建自己的博客呢?原因有三:其一是csdn博客网站打开缓慢;其二是想尝试搭建自己的博客网站;最后希望熟悉markdown语法。
此博客网站为主是我的学习笔记,有值得发布的内容会再继续同步到csdn博客。
本人现在已经不更新博客了,建议正在搭建的人也三思。hexo生成的博客是静态的,需要每次都手动生成页面,甚至因为浏览器缓存无法看见更新。因此我现在放弃了这个搭建方法,之后会另寻他法。总的来说搭建完还是挺有成就感的。
0. 环境配置
所需工具:Node.js、npm、git
安装Node.js和git:
- Node.js: https://link.zhihu.com/?target=https%3A//nodejs.org/zh-cn
- Git: https://link.zhihu.com/?target=https%3A//git-scm.com/downloads
安装完成后,在cmd下输入如下命令查看版本号:
node -v- 1
npm -v- 1
git --version- 1

1. 连接GitHub
打开git bash,输入命令设置用户名和邮箱:
git config --global user.name "GitHub 用户名" git config --global user.email "GitHub 邮箱"- 1
- 2
创建SSH密钥:
ssh-keygen -t rsa -C "GitHub 邮箱"- 1
所生成文件在[C:\Users\用户名.ssh] 目录,查看id_rsa.pub公钥内容并复制。
添加公钥至github: Setting-> SSH and GPG keys-> New SSH key


验证连接:
打开GitBash,输入:ssh -T git@github.com- 1
显示 “Hi xxx! You’ve successfully……” 即连接成功。
2. 创建Github Pages仓库
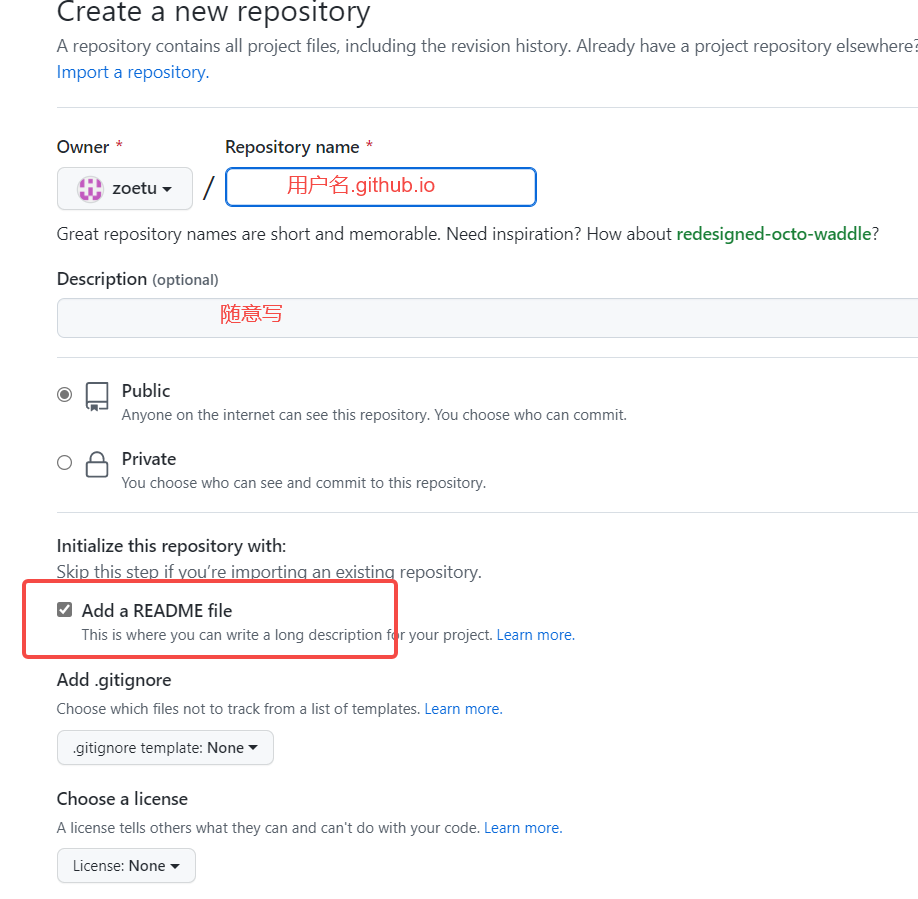
GitHub 主页右上角加号 -> New repository:
- Repository name 中输入 用户名.github.io
- 勾选 “Initialize this repository with a README”
- Description 选填
填好后点击 Create repository 创建。
3. 本地安装Hexo博客程序
tips:先添加代理,否则会非常缓慢
- 查看原来的代理
npm config get registry- 1
- 修改代理
npm config set registry https://registry.npm.taobao.org- 1
- 安装Hexo
npm install -g hexo-cli- 1
如果界面没有反应,请耐心等待!
4. Hexo初始化和本地预览
初始化并安装所需组件:
hexo init # 初始化- 1
npm install # 安装组件- 1
完成后依次输入下面命令,启动本地服务器进行预览:
hexo g # 生成页面 hexo s # 启动预览- 1
- 2
访问 http://localhost:4000,出现 Hexo 默认页面,本地博客安装成功!
博客目录结构
. ├── _config.landscape.yml ├── _config.yml ├── node_modules ├── package-lock.json ├── package.json ├── scaffolds ├── source └── themes- 1
- 2
- 3
- 4
- 5
- 6
- 7
- 8
- 9
- _config.yml :全局配置文件,比如网站名称,副标题,秒速,作者,语言等等。具体可以参考官方文档:https://hexo.io/zh-cn/docs/configuration.html。
- scaffolds :骨架文件,是生成新页面或者新博客的模版。可以根据需求编辑,当hexo生成新博客的时候,会用这里面的模版进行初始化。
- source : 这个文件夹下面存放的是网站的markdown源文件,里面有一个_post文件夹,所有的.md博客文件都会存放在这个文件夹下。现在有一个hello-world.md文件。
- themes :网站主题目录,hexo有非常丰富的主题支持,主题目录会存放在这个目录下面。更多的主题参见:https://hexo.io/themes/
5. 部署Hexo到GithubPages
安装 hexo-deployer-git:
npm install hexo-deployer-git --save- 1
修改 _config.yml 文件末尾的 Deployment 部分,修改成如下:
deploy: type: git repository: git@github.com:用户名/用户名.github.io.git branch: master- 1
- 2
- 3
- 4
- 5
完成后运行 hexo d 将网站上传部署到 GitHub Pages。
完成!访问GitHub 域名 https://用户名.github.io 就可以看到 Hexo 网站了。
6. 发布第一篇文章
hexo new "First post"- 1
其中source 文件夹中会出现一个 First post.md 文件,就可以使用 Markdown 编辑器在该文件中撰写文章了。
写完后运行下面代码将文章渲染并部署到 GitHub Pages 上完成发布,以后每次发布文章都是这两条命令!
生成页面
hexo g- 1

部署发布
hexo d- 1

也可以不使用命令自己创建 .md 文件,只需在文件开头手动加入如下格式 Front-matter 即可,写完后运行 hexo g 和 hexo d 发布。
--- title: Tutorial:基于Hexo和Github搭建个人博客 date: 2022-08-25 14:07:06 tags: - other keywords: - hexo - github - blog --- 摘要 <!--more--> 正文- 1
- 2
- 3
- 4
- 5
- 6
- 7
- 8
- 9
- 10
- 11
- 12
- 13
- 14
- 15
至此,博客搭建成功 !!!
其他
1) hexo更换主题
- 下载主题
主题链接:https://github.com/jerryc127/hexo-theme-butterfly
Blog根目录下
git clone -b master https://github.com/jerryc127/hexo-theme-butterfly.git themes/butterfly- 1
- 更改配置文件
theme: butterfly- 1
错误解决: https://blog.csdn.net/weixin_44318830/article/details/104884936
npm install --save hexo-renderer-jade hexo-generator-feed hexo-generator-sitemap hexo-browsersync hexo-generator-archive- 1
- 清除缓存
hexo clean- 1
- 生成静态文件
hexo g- 1
2) 插入图片
下载插件
进入根目录,右键打开git bash,输入如下命令:
npm install hexo-asset-image --save- 1
修改插件
该插件在hexo3.1版本时发布,需要修改一处代码。
进入博客根目录找到node_modules-> hexo-asset-image-> index.js在第58行
$(this).attr('src', config.root + link + src);- 1
改成
$(this).attr('src', config.root + link + src);- 1
保存文件
修改配置文件
- 在_config.yml配置文件将post_asset_folder:false改成true
- hexo new "blog name"的时候会同时生成同名文件夹用来存放资源(将所有图片放在这个文件夹内)

插入图片命令
- [ ](imgName.png)
- [ ](./ImgFolder/imgName.png)
在vscode等markdown编辑器下也会正常显示图片
最后,hexo clean -> hexo g -> hexo s -> hexo d,查看博客。
3) 使用vscode在markdown粘贴图片
插件:Paste Image

快捷键如下:
ctrl + alt + v- 1
参考资料:
_config.yml文件含义
# Site title: Hexo # 网站标题 subtitle: # 网站副标题 description: # 网站描述 author: John Doe # 作者 language: # 语言 timezone: # 网站时区, Hexo默认使用您电脑的时区 # URL ## If your site is put in a subdirectory, set url as 'http://yoursite.com/child' ## and root as '/child/' url: http://yoursite.com # 你的站点Url root: / # 站点的根目录 permalink: :year/:month/:day/:title/ # 文章的 永久链接 格式 permalink_defaults: # 永久链接中各部分的默认值 # Directory source_dir: source # 资源文件夹,这个文件夹用来存放内容 public_dir: public # 公共文件夹,这个文件夹用于存放生成的站点文件。 tag_dir: tags # 标签文件夹 archive_dir: archives # 归档文件夹 category_dir: categories # 分类文件夹 code_dir: downloads/code # Include code 文件夹 i18n_dir: :lang # 国际化(i18n)文件夹 skip_render: # 跳过指定文件的渲染,您可使用 glob 表达式来匹配路径。 # Writing new_post_name: :title.md # 新文章的文件名称 default_layout: post # 预设布局 titlecase: false # 把标题转换为 title case external_link: true # 在新标签中打开链接 filename_case: 0 # 把文件名称转换为 (1) 小写或 (2) 大写 render_drafts: false # 是否显示草稿 post_asset_folder: false # 是否启动 Asset 文件夹 relative_link: false # 把链接改为与根目录的相对位址 future: true # 显示未来的文章 highlight: # 内容中代码块的设置 enable: true # 开启代码块高亮 line_number: true # 显示行数 auto_detect: false # 如果未指定语言,则启用自动检测 tab_replace: # 用 n 个空格替换 tabs;如果值为空,则不会替换 tabs # Category & Tag default_category: uncategorized category_map: # 分类别名 tag_map: # 标签别名 # Date / Time format ## Hexo uses Moment.js to parse and display date ## You can customize the date format as defined in ## http://momentjs.com/docs/#/displaying/format/ date_format: YYYY-MM-DD # 日期格式 time_format: HH:mm:ss # 时间格式 # Pagination ## Set per_page to 0 to disable pagination per_page: 10 # 分页数量 pagination_dir: page # 分页目录 # Extensions ## Plugins: https://hexo.io/plugins/ ## Themes: https://hexo.io/themes/ theme: landscape # 主题名称 # Deployment ## Docs: https://hexo.io/docs/deployment.html # 部署部分的设置 deploy: type: '' # 类型,常用的git- 1
- 2
- 3
- 4
- 5
- 6
- 7
- 8
- 9
- 10
- 11
- 12
- 13
- 14
- 15
- 16
- 17
- 18
- 19
- 20
- 21
- 22
- 23
- 24
- 25
- 26
- 27
- 28
- 29
- 30
- 31
- 32
- 33
- 34
- 35
- 36
- 37
- 38
- 39
- 40
- 41
- 42
- 43
- 44
- 45
- 46
- 47
- 48
- 49
- 50
- 51
- 52
- 53
- 54
- 55
- 56
- 57
- 58
- 59
- 60
- 61
- 62
- 63
- 64
- 65
- 66
- 67
- 68
- 69
-
相关阅读:
深眸科技以需求定制AI视觉解决方案,全面赋能产品外观缺陷检测
<十三>objectARX开发:模拟实现CAD的移动Move命令
mysql机试题笔记425
C#:Bitmap类使用方法—第1讲
【周赛复盘】力扣第 86 场双周赛
Python的函数
深度学习笔记--权重文件、模型参数和预训练模型的使用
yolov5官方开源项目地址github记录一下
Web_单一视频文件mp4转换为m3u分段ts文件实现边下边播
MySQL学习笔记:一条SQL语句的执行过程
- 原文地址:https://blog.csdn.net/qq_43800119/article/details/126587680