-
17【JDBC基本操作】
上一篇:16【数据库的范式】
下一篇:18【PreparedStatement接口详细解析】
17【JDBC基本操作】
1.1 JDBC概述
Java Database Connectivity,简称JDBC;是Java语言中用来规范客户端程序如何来访问数据库的应用程序接口,提供了操作数据库的所有方法;与我们之前的Navicate一样,JDBC也是一个MySQL的客户端,只不过Navicate提供了一系列图形化的控件让我们操作数据库,现在使用JDBC则需要编写Java代码才能操作数据库;
1.1.1 使用JDBC的好处:
JDBC是一组接口,没有具体的实现。核心功能也就是实现类由各**数据库厂商去实现,**这些实现类也被成为数据库的驱动。
在使用Java代码操作任意数据库时,我们只需要调用JDBC接口中的方法,然后引入对应的驱动包即可完成功能的实现。这样一来,以后我们要使用Java代码(JDBC)操作其他的数据库时,只需要更换对应的实现类(引入其他数据库驱动)即可,不需要改动源代码;这样使得程序的耦合性大大降低;

1.1.2 JDBC连接参数
JDBC连接数据库的四个参数 说明 用户名 root 密码 root URL连接字符串 指定客户端与服务器连接的参数 驱动名 com.mysql.jdbc.Driver 
MySQL中简写:
jdbc:mysql:///test(服务器必须是localhost,端口号必须是3306)- 乱码的处理
如果数据库出现乱码,可以指定参数:
?characterEncoding=utf8,表示让数据库以UTF-8编码来处理数据。jdbc:mysql://localhost:3306/test?characterEncoding=utf8&serverTimezone=GMT%2b8- 1
-
characterEncoding:JDBC连接使用的编码 -
serverTimezone:JDBC连接使用的时区
1.1.3 JDBC中常用接口
- JDBC编程中常用的接口如下:
接口或类 作用 Driver 驱动接口,定义建立链接的方式 DriverManager 1. 加载和注册第三方厂商的驱动程序
2. 创建一个数据库的连接对象Connection 与数据库的一个连接对象 Statement SQL语句对象,用于封装SQL语句发送给MySQL服务器 PreparedStatement 是Statement接口的子接口,功能更加强大 ResultSet 封装从数据库中查询到的结果集 1.1.3 JDBC快速入门
JDBC接口在JDK中已经集成,因此我们不导入任何的第三方包都可以编写JDBC代码,但是我们知道JDBC底层会去选择具体的驱动包来达到对应的功能,因此在编译期间代码不会有问题,在运行期间则会出现异常(没引入驱动);
- 1)引入驱动:

- 2)案例代码:
package com.dfbz.demo; import java.sql.Connection; import java.sql.DriverManager; /** * @author lscl * @version 1.0 * @intro: */ public class Demo01_测试驱动 { public static void main(String[] args) throws Exception { // 1.加载和注册驱动 jdbc4以后不需要 Class.forName("com.mysql.jdbc.Driver"); //使用用户名、密码、URL得到连接对象 Connection c1 = DriverManager.getConnection("jdbc:mysql://localhost:3306/test?useSSL=true", "root", "admin"); System.out.println(c1); } }- 1
- 2
- 3
- 4
- 5
- 6
- 7
- 8
- 9
- 10
- 11
- 12
- 13
- 14
- 15
- 16
- 17
- 18
- 19
- 20
- 21
输出结果:

如果没有引入驱动则会出现异常:
- 移除添加的jar包:
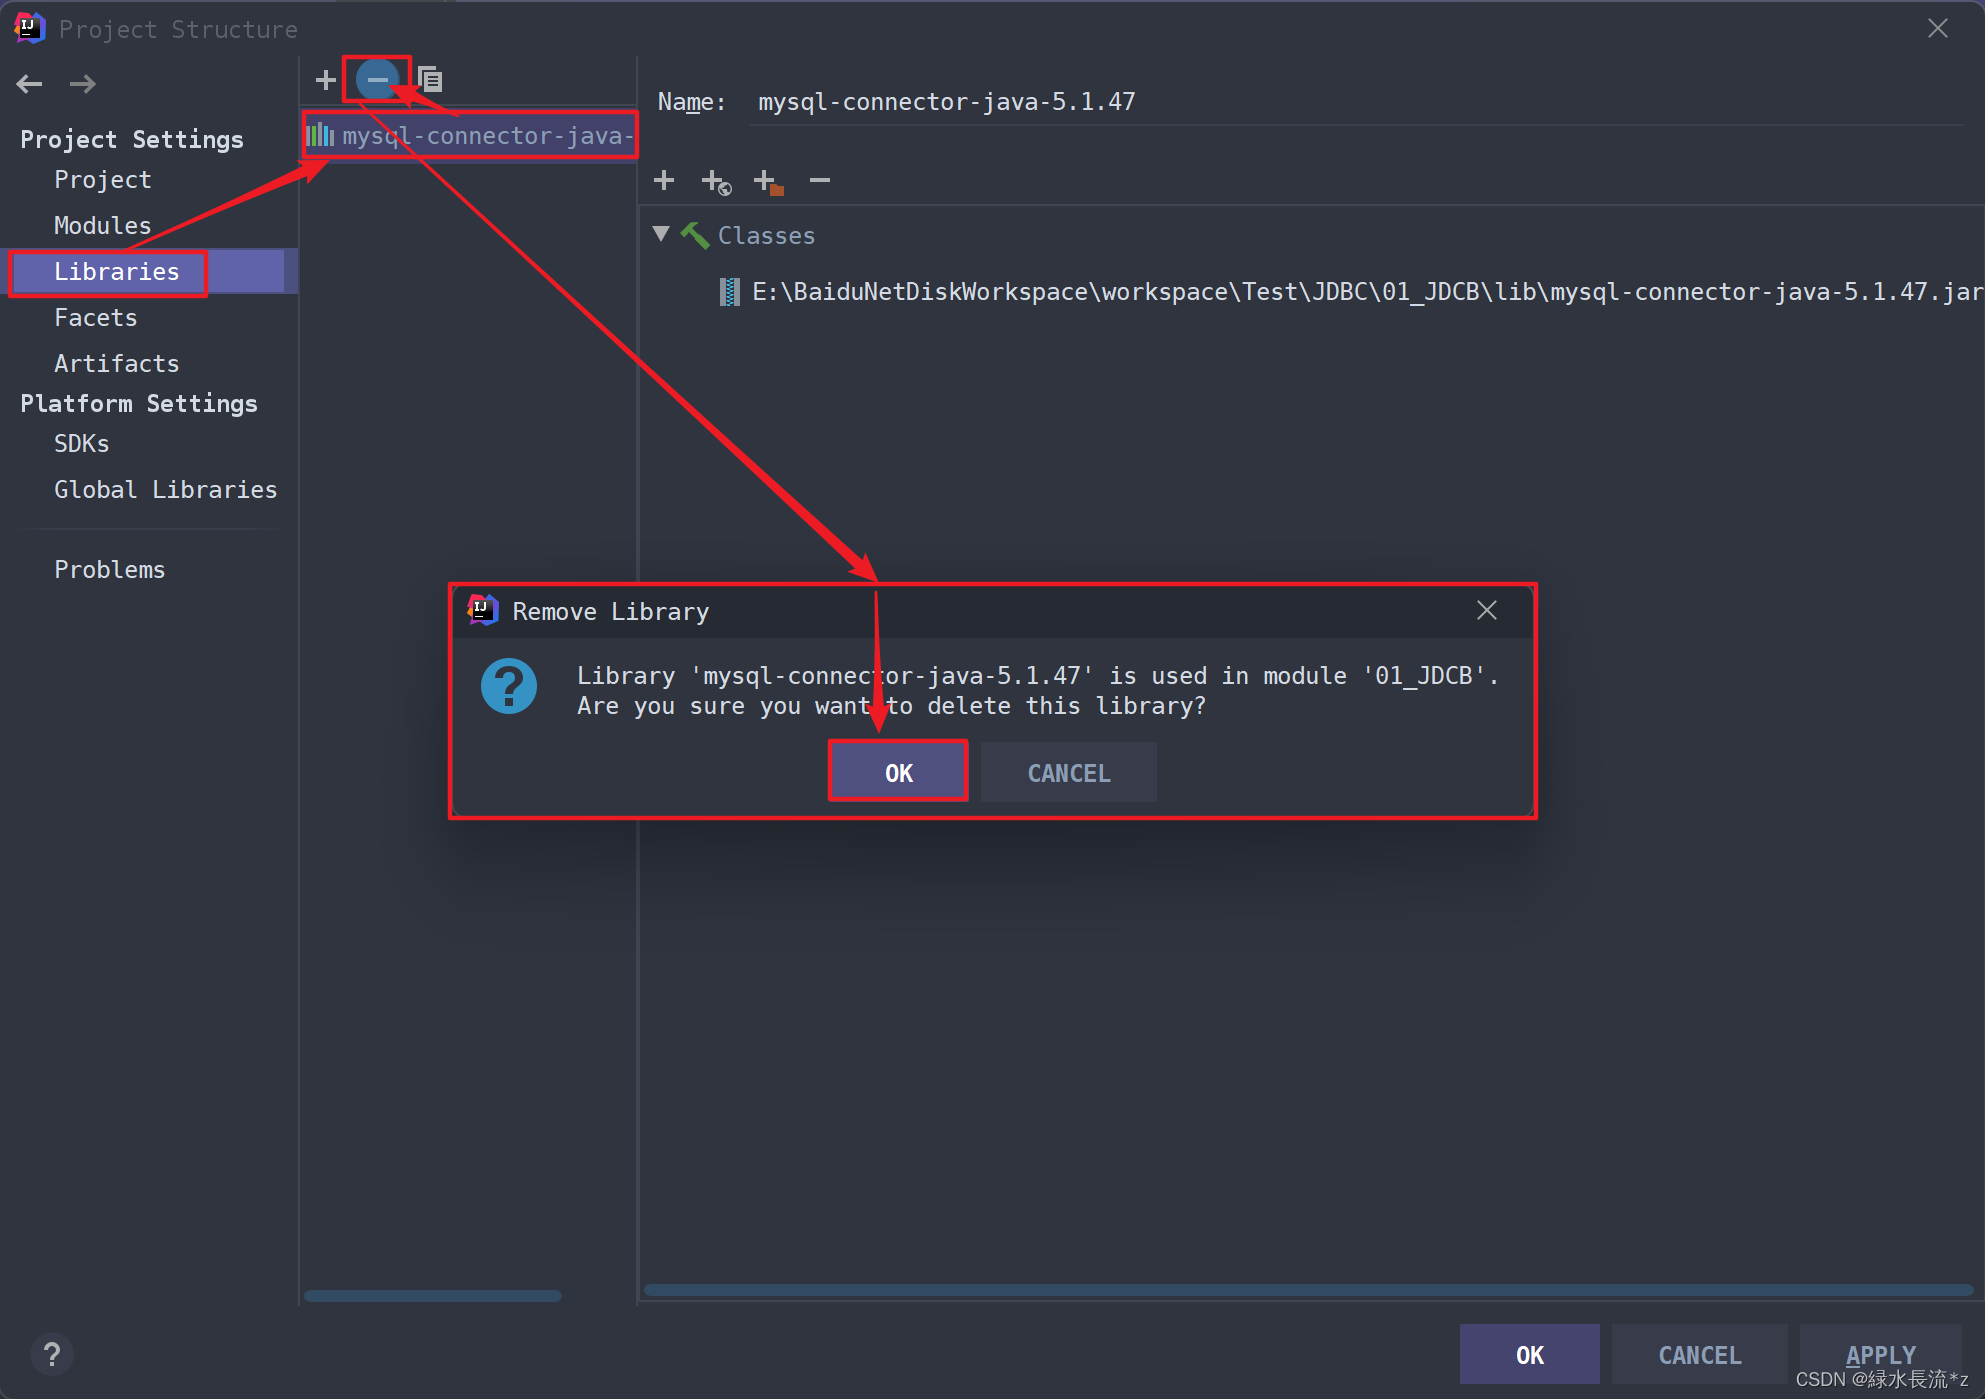
再次运行代码:

1.1 Connection接口
1.1.1 Connection接口简介
Connection代表一个客户端与服务器端之间创建的一个网络连接对象,只有与数据库服务器连接之后才可以做后续的所有操作;包括执行SQL、预编译处理、执行存储过程/存储函数、事务管理等操作。这些具体的操作在JDBC中被具体的接口/对象所定义;
1.1.2 Connection的获取
DriverManager类中的静态方法 描述 Connection getConnection (String url, String user, String password) 得到一个连接对象 url: 连接字符串 user: 用户名 password: 密码 Connection getConnection (String url, Properties info) 得到一个连接对象 url: 连接字符串 info: 属性集合对象,封装了所有的数据库连接参数 获取Connection:
package com.dfbz.demo; import org.junit.Test; import java.sql.Connection; import java.sql.DriverManager; import java.util.Properties; /** * @author lscl * @version 1.0 * @intro: */ public class Demo02_Connection接口 { @Test public void test1() throws Exception { // 加载和注册驱动 Class.forName("com.mysql.jdbc.Driver"); // 使用用户名、密码、URL得到连接对象 Connection c1 = DriverManager.getConnection("jdbc:mysql://localhost:3306/test?useSSL=true", "root", "admin"); System.out.println(c1); // 创建属性对象 Properties info = new Properties(); // 设置用户名和密码 info.setProperty("user", "root"); info.setProperty("password", "admin"); // 使用属性对象和url得到连接对象 Connection c2 = DriverManager.getConnection("jdbc:mysql:///test?useSSL=true", info); System.out.println(c2); } }- 1
- 2
- 3
- 4
- 5
- 6
- 7
- 8
- 9
- 10
- 11
- 12
- 13
- 14
- 15
- 16
- 17
- 18
- 19
- 20
- 21
- 22
- 23
- 24
- 25
- 26
- 27
- 28
- 29
- 30
- 31
- 32
- 33
- 34
- 35
Tips:SSL是一种加密协议,默认为false,JDBC会触发一些警告信息(也不会影响我们),如果不想要警告信息可以将其设置为useSSL=true;
1.1.3 Connection的常用方法
Connection在JDBC中代表的是一个数据库的网络连接,我们可以通过这个连接来执行后续的所有操作;常用方法如下:
1)基本方法:
方法名 描述 String getCatalog() 获取本次连接所连接的数据库名 void setCatalog(String catalog) 设置本次连接所连接的数据库 void close() 关闭此数据库连接,释放网络资源 boolean isClosed() 检测当前JDBC连接是否关闭 - 测试代码:
/** * Connection 基本方法 * @throws Exception */ @Test public void test2() throws Exception { // 1. 注册驱动 Class.forName("com.mysql.jdbc.Driver"); // 2. 创建连接 Connection connection = DriverManager.getConnection("jdbc:mysql://localhost:3306/test?useSSL=true", "root", "admin"); System.out.println(connection.isClosed()); // false: 代表连接没有关闭 // 获取本次数据库连接的数据库名 String dbName = connection.getCatalog(); System.out.println("数据库名: 【" + dbName + "】"); // test // 切换连接的数据库 类似于: use db01 connection.setCatalog("db01"); System.out.println("数据库名: 【" + connection.getCatalog() + "】"); // db01 // 关闭数据库连接,是否网络资源 connection.close(); System.out.println(connection.isClosed()); // true: 代表连接被关闭 }- 1
- 2
- 3
- 4
- 5
- 6
- 7
- 8
- 9
- 10
- 11
- 12
- 13
- 14
- 15
- 16
- 17
- 18
- 19
- 20
- 21
- 22
- 23
- 24
- 25
- 26
- 27
执行结果:

2)执行SQL相关方法:
方法名 描述 Statement createStatement() 通过连接对象创建SQL语句对象 PreparedStatement prepareStatement(String sql) 创建PreparedStatement对象 CallableStatement prepareCall(String sql) 执行存储过程/存储函数 3)事务管理相关方法:
方法名 描述 boolean getAutoCommit() 获取本次连接是否自动提交事务 void setAutoCommit(boolean autoCommit) 设置本次连接是否自动提交事务 void commit() 提交事务 void rollback() 回滚事务 int getTransactionIsolation() 获取事务的隔离级别 void setTransactionIsolation(int level) 设置事务的隔离级别 Savepoint setSavepoint(String name) 设置事务保存点 void rollback(Savepoint savepoint) 回滚到保存点 Tips:关于操作SQL、事务管理相关方法我们下一章再深入学习;
1.2 Statement接口
Statement代表一个SQL语句对象,任何的SQL语句都需要Statement来封装,最终并执行它;
1.2.1 Statement中的方法
Statement接口中的方法 描述 boolean execute(String sql) 作用:可以执行任何的SQL语句,但一般用于执行DDL
返回值:如果SQL语句执行后有结果集,返回true,如果没有,返回falseint executeUpdate(String sql) 作用:用于执行DML语句,增删改:insert, update, delete
返回值:影响的行数ResultSet executeQuery(String sql) 作用:用于DQL语句,查询select
返回值:查询到的结果集1.2.2 执行DDL操作
- 1)创建表:
package com.dfbz.demo; import org.junit.Test; import java.sql.Connection; import java.sql.DriverManager; import java.sql.Statement; /** * @author lscl * @version 1.0 * @intro: */ public class Demo04_JDBC执行DDL { @Test public void test1() throws Exception { // 执行DDL创建表 // 1. 注册驱动 Class.forName("com.mysql.jdbc.Driver"); // 2. 创建连接对象 Connection conn = DriverManager.getConnection("jdbc:mysql://localhost:3306/test", "root", "admin"); // 3. 通过连接对象得到语句对象 Statement stmt = conn.createStatement(); // 4. 定义SQL语句 String sql = "CREATE TABLE student (\n" + " id int PRIMARY KEY auto_increment,\n" + " name VARCHAR(20) not null,\n" + " gender char(1),\n" + " birthday date,\n" + " address varchar(30)\n" + ");"; // 5. 执行SQL语句,返回结果集 boolean result = stmt.execute(sql); /* true: 代表本次SQL语句有结果集 false: 代表本次SQL语句没有结果集 */ System.out.println(result); // false // 释放资源 conn.close(); stmt.close(); } }- 1
- 2
- 3
- 4
- 5
- 6
- 7
- 8
- 9
- 10
- 11
- 12
- 13
- 14
- 15
- 16
- 17
- 18
- 19
- 20
- 21
- 22
- 23
- 24
- 25
- 26
- 27
- 28
- 29
- 30
- 31
- 32
- 33
- 34
- 35
- 36
- 37
- 38
- 39
- 40
- 41
- 42
- 43
- 44
- 45
- 46
- 47
- 48
- 49
- 50
- 2)修改表结构:
// 修改表结构 @Test public void test2() throws Exception{ // 1. 注册驱动 Class.forName("com.mysql.jdbc.Driver"); // 2. 创建连接对象 Connection conn = DriverManager.getConnection("jdbc:mysql://localhost:3306/test", "root", "admin"); // 3. 通过连接对象得到语句对象 Statement stmt = conn.createStatement(); // 4. 执行SQL // stmt.execute("alter table student add new_col varchar(30);"); // 新增一列 // stmt.execute("alter table student drop new_col;"); // 删除一列 stmt.execute("rename table student to stu;"); // 改表名 conn.close(); stmt.close(); }- 1
- 2
- 3
- 4
- 5
- 6
- 7
- 8
- 9
- 10
- 11
- 12
- 13
- 14
- 15
- 16
- 17
- 18
- 19
- 20
- 21
- 3)删除表:
// 删除表 @Test public void test3() throws Exception{ // 1. 注册驱动 Class.forName("com.mysql.jdbc.Driver"); // 2. 创建连接对象 Connection conn = DriverManager.getConnection("jdbc:mysql://localhost:3306/test", "root", "admin"); // 3. 通过连接对象得到语句对象 Statement stmt = conn.createStatement(); // 4. 执行SQL stmt.execute("drop table stu;"); conn.close(); stmt.close(); }- 1
- 2
- 3
- 4
- 5
- 6
- 7
- 8
- 9
- 10
- 11
- 12
- 13
- 14
- 15
- 16
- 17
- 18
Connection、Statement、ResultSet等接口都继承了AutoCloseable接口,因此都可以放在try()中;
可将代码改造成如下:
// 删除表 @Test public void test4() { // 1. 注册驱动 try { Class.forName("com.mysql.jdbc.Driver"); } catch (ClassNotFoundException e) { e.printStackTrace(); } try ( // 2. 创建连接对象 Connection conn = DriverManager.getConnection("jdbc:mysql://localhost:3306/test", "root", "admin"); // 3. 通过连接对象得到语句对象 Statement stmt = conn.createStatement(); ) { // 4. 执行SQL stmt.execute("drop table stu;"); } catch (Exception e) { e.printStackTrace(); } }- 1
- 2
- 3
- 4
- 5
- 6
- 7
- 8
- 9
- 10
- 11
- 12
- 13
- 14
- 15
- 16
- 17
- 18
- 19
- 20
- 21
- 22
- 23
- 24
1.2.3 执行DML操作
我们发现执行任何的SQL语句都需要先创建连接(Connection)然后再获取语句对象(Statement),然后执行完SQL语句之后都需要关闭连接释放资源;因此我们将这些操作放在前置测试方法和后置测试方法中来完成:
private Connection connection; private Statement statement; /** * 在执行测试方法之前执行该方法(创建好连接以及语句对象) * * @throws Exception */ @Before public void before() throws Exception { connection = DriverManager.getConnection("jdbc:mysql:///test?use", "root", "admin"); statement = connection.createStatement(); } /** * 执行完测试方法将资源释放 * * @throws Exception */ @After public void after() throws Exception { connection.close(); statement.close(); }- 1
- 2
- 3
- 4
- 5
- 6
- 7
- 8
- 9
- 10
- 11
- 12
- 13
- 14
- 15
- 16
- 17
- 18
- 19
- 20
- 21
- 22
- 23
- 24
- 1)新增记录:
/** * 添加记录 */ @Test public void test1() throws Exception { /* insert into student values (null,'小明','男','2000-10-20','湖南永州'), (null,'小红','女','1998-08-24','福建南平'), (null,'小军','男','1997-06-18','四川泸州'), (null,'小聪','男','2001-10-21','贵州遵义'); */ String sql = "insert into student values\n" + "(null,'小明','男','2000-10-20','湖南永州'),\n" + "(null,'小红','女','1998-08-24','福建南平'),\n" + "(null,'小军','男','1997-06-18','四川泸州'),\n" + "(null,'小聪','男','2001-10-21','贵州遵义');"; //执行SQL语句 int row = statement.executeUpdate(sql); System.out.println("影响的行数:" + row); }- 1
- 2
- 3
- 4
- 5
- 6
- 7
- 8
- 9
- 10
- 11
- 12
- 13
- 14
- 15
- 16
- 17
- 18
- 19
- 20
- 21
- 22
- 2)修改记录:
// 修改记录 @Test public void test2() throws SQLException { String sql = "update student set name='明明', gender='女', birthday='1999-05-14', address='山东菏泽' where id=1"; //执行SQL语句 int row = statement.executeUpdate(sql); System.out.println("影响的行数: " + row); }- 1
- 2
- 3
- 4
- 5
- 6
- 7
- 8
- 9
- 10
- 3)删除记录:
// 删除记录 @Test public void test3() throws SQLException { String sql = "delete from student where id=2"; //执行SQL语句 int row = statement.executeUpdate(sql); System.out.println("影响的行数: " + row); }- 1
- 2
- 3
- 4
- 5
- 6
- 7
- 8
- 9
- 10
- 11
1.2.4 执行DQL操作
1) ResultSet接口:
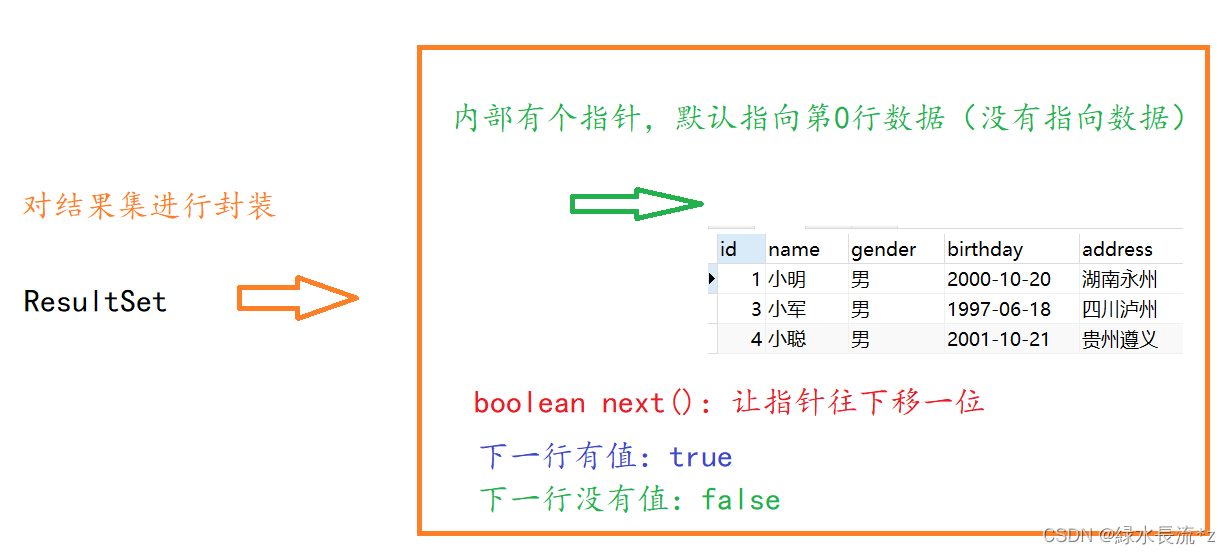
作用:封装从数据库服务器中查询到的所有记录。从结果集对象中得到查询的数据
-
原理:
-
如果光标在第一行之前,使用rs.getXX()获取列值,报错:Before start of resultset
-
如果光标在最后一行之后,使用rs.getXX()获取列值,报错:After end of resultset
- 接口中的方法:
ResultSet接口中的方法 描述 boolean next() 1) 向下移动一行
2) 判断当前所指的是否是记录,如果是记录则返回true,如果是最后一行的后面,则返回false数据类型 getXxx(参数) 得到每一列的数据
1) 通过列名来取
2) 通过列号来取 注:数据库中的数据类型如果可以自动转换,可以使用其它的java类型来取值。 如:数据库中是int,可以按String来取2)常用数据类型转换表
SQL类型 Jdbc对应方法 返回类型 BIT(1) bit(n) getBoolean() boolean TINYINT getByte() byte SMALLINT getShort() short INT getInt() int BIGINT getLong() long CHAR,VARCHAR getString() String DATE getDate() java.sql.Date 只表示日期 TIME getTime() java.sql.Time 只表示时间 TIMESTAMP,DateTime getTimestamp() java.sql.Timestamp 同时有日期和时间 3)日期和时间相关
-
日期:java.sql.Date
-
时间:java.sql.Time
-
时间戳:java.sql.Timestamp
-
共同父类:java.util.Date
需求:确保数据库中有3条以上的记录,查询所有的学员信息
4)DQL代码测试
- 1)结果单行单列:
package com.dfbz.demo; import org.junit.After; import org.junit.Before; import org.junit.Test; import java.sql.*; /** * @author lscl * @version 1.0 * @intro: */ public class Demo06_JDBC执行DQL { private Connection connection; private Statement statement; /** * 在执行测试方法之前执行该方法(创建好连接以及语句对象) * @throws Exception */ @Before public void before() throws Exception { connection = DriverManager.getConnection("jdbc:mysql:///test?use", "root", "admin"); statement = connection.createStatement(); } /** * 执行完测试方法将资源释放 * @throws Exception */ @After public void after() throws Exception { connection.close(); statement.close(); } /** * 结果单行单列 * * @throws Exception */ @Test public void test1() throws Exception { // 执行DQL获取结果集 ResultSet rs = statement.executeQuery("select count(1) as num from student"); // 取了别名,方便ResultSet取值 // 指针往下移动一行 boolean flag = rs.next(); System.out.println("这一行是否有数据?: " + flag); // true // int num = rs.getInt("num"); // 通过列名获取值 int num = rs.getInt(1); // 通过列号获取值 System.out.println("查询到的数据: " + num); rs.close(); } }- 1
- 2
- 3
- 4
- 5
- 6
- 7
- 8
- 9
- 10
- 11
- 12
- 13
- 14
- 15
- 16
- 17
- 18
- 19
- 20
- 21
- 22
- 23
- 24
- 25
- 26
- 27
- 28
- 29
- 30
- 31
- 32
- 33
- 34
- 35
- 36
- 37
- 38
- 39
- 40
- 41
- 42
- 43
- 44
- 45
- 46
- 47
- 48
- 49
- 50
- 51
- 52
- 53
- 54
- 55
- 56
- 57
- 58
- 59
- 60
- 61
- 62
- 2)查询结果为多行单列:
/** * 结果多行单列 * * @throws Exception */ @Test public void test2() throws Exception { // 执行DQL获取结果集 ResultSet rs = statement.executeQuery("select name from student"); // 取了别名,方便ResultSet取值 while (rs.next()) { // 指针每次循环都往下移动一行,如果这一行有数据则进入循环体 String name = rs.getString("name"); System.out.println("name: " + name); } rs.close(); }- 1
- 2
- 3
- 4
- 5
- 6
- 7
- 8
- 9
- 10
- 11
- 12
- 13
- 14
- 15
- 16
- 17
- 18
- 19
- 20
- 21
- 3)查询结果为多行多列:
/** * 结果多行多列 * * @throws Exception */ @Test public void test3() throws Exception { // 执行DQL获取结果集 ResultSet rs = statement.executeQuery("select * from student"); // 取了别名,方便ResultSet取值 while (rs.next()) { //通过列名来取 /* int id = rs.getInt("id"); String name = rs.getString("name"); String gender = rs.getString("gender"); Date Date = rs.getBoolean("birthday"); String address = rs.getString("address"); */ //通过列号来取 int id = rs.getInt(1); String name = rs.getString(2); String gender = rs.getString(3); Date birthday = rs.getDate(4); String address = rs.getString(5); System.out.println("id: " + id); System.out.println("name: " + name); System.out.println("gender: " + gender); System.out.println("birthday: " + birthday); System.out.println("address: " + address); System.out.println("-----------------------------"); } rs.close(); }- 1
- 2
- 3
- 4
- 5
- 6
- 7
- 8
- 9
- 10
- 11
- 12
- 13
- 14
- 15
- 16
- 17
- 18
- 19
- 20
- 21
- 22
- 23
- 24
- 25
- 26
- 27
- 28
- 29
- 30
- 31
- 32
- 33
- 34
- 35
- 36
- 37
- 38
- 39
1.2.5 执行DCL操作
在JDBC中执行DCL操作也是使用Statement对象的execute()方法;只不过execute()方法中传递的是DCL相关语句;
1)DCL语句回顾
- 1)查询用户:
select * from mysql.user;- 1
- 2)创建用户:
create user 'zhangsan'@'localhost' identified by '123456'; flush privileges; -- 刷新权限- 1
- 2
- 3
- 3)查询用户的权限:
show grants for 'zhangsan'@'localhost';- 1
- 4)赋予权限:
grant create,alter,insert,update,select on test.* to 'zhangsan'@'localhost'; flush privileges;- 1
- 2
- 5)回收权限:
revoke update on test.* from 'zhangsan'@'localhost'; revoke select on test.* from 'zhangsan'@'localhost'; flush privileges;- 1
- 2
- 3
- 4
- 5
- 6)删除用户:
drop user 'zhangsan'@'localhost';- 1
2)JDBC操作DCL语句
- 1)创建用户:
package com.dfbz.demo; import org.junit.After; import org.junit.Before; import org.junit.Test; import java.sql.Connection; import java.sql.DriverManager; import java.sql.ResultSet; import java.sql.Statement; /** * @author lscl * @version 1.0 * @intro: */ public class Demo07_JDBC执行DCL { private Connection connection; private Statement statement; /** * 在执行测试方法之前执行该方法(创建好连接以及语句对象) * * @throws Exception */ @Before public void before() throws Exception { connection = DriverManager.getConnection("jdbc:mysql:///test?use", "root", "admin"); statement = connection.createStatement(); } /** * 执行完测试方法将资源释放 * * @throws Exception */ @After public void after() throws Exception { connection.close(); statement.close(); } /** * 创建用户 * * @throws Exception */ @Test public void test1() throws Exception { System.out.println("之前的用户: "); ResultSet rs = statement.executeQuery("select * from mysql.user;"); while (rs.next()) { String host = rs.getString("host"); String user = rs.getString("user"); String select_priv = rs.getString("select_priv"); // 是否有查询权限 System.out.println("host:【" + host + "】,user:【" + user + "】,select_priv:【" + select_priv + "】"); } statement.executeUpdate("create user 'zhangsan'@'localhost' identified by '123456';"); statement.executeUpdate("flush privileges;"); rs = statement.executeQuery("select * from mysql.user;"); System.out.println("之后的用户: "); while (rs.next()) { String host = rs.getString("host"); String user = rs.getString("user"); String select_priv = rs.getString("select_priv"); // 是否有查询权限 System.out.println("host:【" + host + "】,user:【" + user + "】,select_priv:【" + select_priv + "】"); } rs.close(); } }- 1
- 2
- 3
- 4
- 5
- 6
- 7
- 8
- 9
- 10
- 11
- 12
- 13
- 14
- 15
- 16
- 17
- 18
- 19
- 20
- 21
- 22
- 23
- 24
- 25
- 26
- 27
- 28
- 29
- 30
- 31
- 32
- 33
- 34
- 35
- 36
- 37
- 38
- 39
- 40
- 41
- 42
- 43
- 44
- 45
- 46
- 47
- 48
- 49
- 50
- 51
- 52
- 53
- 54
- 55
- 56
- 57
- 58
- 59
- 60
- 61
- 62
- 63
- 64
- 65
- 66
- 67
- 68
- 69
- 70
- 71
- 72
- 73
- 74
- 75
- 76
- 77
- 78
执行效果:
之前的用户: host:【localhost】,user:【root】,select_priv:【Y】 host:【localhost】,user:【mysql.sys】,select_priv:【N】 之后的用户: host:【localhost】,user:【root】,select_priv:【Y】 host:【localhost】,user:【mysql.sys】,select_priv:【N】 host:【localhost】,user:【zhangsan】,select_priv:【N】- 1
- 2
- 3
- 4
- 5
- 6
- 7
- 2)赋予权限:
/** * 赋予权限 * * @throws Exception */ @Test public void test2() throws Exception { System.out.println("之前的权限: "); ResultSet rs = statement.executeQuery("show grants for 'zhangsan'@'localhost';"); while (rs.next()) { String roleInfo = rs.getString(1); System.out.println(roleInfo); } statement.executeUpdate("grant select on test.* to 'zhangsan'@'localhost';"); statement.executeUpdate("flush privileges;"); rs = statement.executeQuery("show grants for 'zhangsan'@'localhost';"); System.out.println("之前的权限: "); while (rs.next()) { String roleInfo = rs.getString(1); System.out.println(roleInfo); } rs.close(); }- 1
- 2
- 3
- 4
- 5
- 6
- 7
- 8
- 9
- 10
- 11
- 12
- 13
- 14
- 15
- 16
- 17
- 18
- 19
- 20
- 21
- 22
- 23
- 24
- 25
- 26
- 27
执行效果:
之前的权限: GRANT USAGE ON *.* TO 'zhangsan'@'localhost' 之前的权限: GRANT USAGE ON *.* TO 'zhangsan'@'localhost' GRANT SELECT ON `test`.* TO 'zhangsan'@'localhost'- 1
- 2
- 3
- 4
- 5
- 3)撤销权限:
/** * 撤销权限 * * @throws Exception */ @Test public void test3() throws Exception { System.out.println("之前的权限: "); ResultSet rs = statement.executeQuery("show grants for 'zhangsan'@'localhost';"); while (rs.next()) { String roleInfo = rs.getString(1); System.out.println(roleInfo); } statement.executeUpdate("revoke select on test.* from 'zhangsan'@'localhost';"); statement.executeUpdate("flush privileges;"); rs = statement.executeQuery("show grants for 'zhangsan'@'localhost';"); System.out.println("之前的权限: "); while (rs.next()) { String roleInfo = rs.getString(1); System.out.println(roleInfo); } rs.close(); }- 1
- 2
- 3
- 4
- 5
- 6
- 7
- 8
- 9
- 10
- 11
- 12
- 13
- 14
- 15
- 16
- 17
- 18
- 19
- 20
- 21
- 22
- 23
- 24
- 25
- 26
- 27
执行效果:
之前的权限: GRANT USAGE ON *.* TO 'zhangsan'@'localhost' GRANT SELECT ON `test`.* TO 'zhangsan'@'localhost' 之前的权限: GRANT USAGE ON *.* TO 'zhangsan'@'localhost'- 1
- 2
- 3
- 4
- 5
- 4)删除用户:
/** * 删除用户 * * @throws Exception */ @Test public void test4() throws Exception { System.out.println("之前的用户: "); ResultSet rs = statement.executeQuery("select * from mysql.user;"); while (rs.next()) { String host = rs.getString("host"); String user = rs.getString("user"); String select_priv = rs.getString("select_priv"); // 是否有查询权限 System.out.println("host:【" + host + "】,user:【" + user + "】,select_priv:【" + select_priv + "】"); } statement.executeUpdate("drop user 'zhangsan'@'localhost';"); statement.executeUpdate("flush privileges;"); rs = statement.executeQuery("select * from mysql.user;"); System.out.println("之后的用户: "); while (rs.next()) { String host = rs.getString("host"); String user = rs.getString("user"); String select_priv = rs.getString("select_priv"); // 是否有查询权限 System.out.println("host:【" + host + "】,user:【" + user + "】,select_priv:【" + select_priv + "】"); } rs.close(); }- 1
- 2
- 3
- 4
- 5
- 6
- 7
- 8
- 9
- 10
- 11
- 12
- 13
- 14
- 15
- 16
- 17
- 18
- 19
- 20
- 21
- 22
- 23
- 24
- 25
- 26
- 27
- 28
- 29
- 30
- 31
执行效果:
之前的用户: host:【localhost】,user:【root】,select_priv:【Y】 host:【localhost】,user:【mysql.sys】,select_priv:【N】 host:【localhost】,user:【zhangsan】,select_priv:【N】 之后的用户: host:【localhost】,user:【root】,select_priv:【Y】 host:【localhost】,user:【mysql.sys】,select_priv:【N】- 1
- 2
- 3
- 4
- 5
- 6
- 7
-
相关阅读:
smile——Java机器学习引擎
算法基础(二)| 高精度算法详解
网络安全(黑客)自学
一个高性能类型安全的.NET枚举实用开源库
目标检测网络之Fast-RCNN
mysql错误代码
Spring Boot配置全局时间格式和特殊时间格式
【NOI模拟赛】字符串匹配(后缀自动机SAM,莫队,分块)
springboot启动后和停止前执行方法
leetcode 754. 到达终点数字
- 原文地址:https://blog.csdn.net/Bb15070047748/article/details/126568100