-
Kubernetes---Kubernetes集群部署Mysql集群
Kubernetes集群部署Mysql集群
一、Ansible安装NFS服务
kubernets集群信息如下:
[root@master ansible]# cat hosts.ini [k8s-master] master [k8s-nodes] node1 node2 [k8s] [k8s:children] k8s-master k8s-nodes [root@master ansible]# cat /etc/hosts 127.0.0.1 localhost localhost.localdomain localhost4 localhost4.localdomain4 ::1 localhost localhost.localdomain localhost6 localhost6.localdomain6 192.168.76.100 master 192.168.76.101 node1 192.168.76.102 node2- 1
- 2
- 3
- 4
- 5
- 6
- 7
- 8
- 9
- 10
- 11
- 12
- 13
- 14
- 15
- 16
- 17
- 18
- 19
- 20
所有节点安装nfs并设置开机自启:
[root@master ansible]# cat deploy-nfs.yaml - name: deploy docker hosts: k8s gather_facts: no vars: pkgs_dir: /nfs-pkg pkgs: - nfs-utils - rpcbind #变量 download_host 需要手动设置 #且值需要是此 playbook 目标主机中的一个 #需要写在 inventory 文件中的名称 download_host: "master" tasks: - name: 创建存放 rmp 包的目录 when: inventory_hostname == download_host file: path: "{{ pkgs_dir }}" state: directory tags: - deploy - name: 开始下载软件包 when: inventory_hostname == download_host yum: name: "{{ pkgs }}" download_only: yes download_dir: "{{ pkgs_dir }}" tags: - deploy - name: 传输 rpm 包到远程节点 when: inventory_hostname != download_host copy: src: "{{ pkgs_dir }}" dest: "/" tags: - deploy - name: 正在执行从本地安装软件包 shell: cmd: yum -y localinstall * chdir: "{{ pkgs_dir }}" warn: no async: 600 poll: 0 tags: - deploy - name: 启动 nfs systemd: name: nfs enabled: yes state: started - name: 启动 rpcbind systemd: name: rpcbind enabled: yes state: started- 1
- 2
- 3
- 4
- 5
- 6
- 7
- 8
- 9
- 10
- 11
- 12
- 13
- 14
- 15
- 16
- 17
- 18
- 19
- 20
- 21
- 22
- 23
- 24
- 25
- 26
- 27
- 28
- 29
- 30
- 31
- 32
- 33
- 34
- 35
- 36
- 37
- 38
- 39
- 40
- 41
- 42
- 43
- 44
- 45
- 46
- 47
- 48
- 49
- 50
- 51
- 52
- 53
- 54
- 55
- 56
- 57
- 58
- 59
- 60
- 61
[root@master ansible]# ansible-playbook -i hosts.ini deploy-nfs.yaml [WARNING] Ansible is being run in a world writable directory (/etc/ansible), ignoring it as an ansible.cfg source. For more information see https://docs.ansible.com/ansible/devel/reference_appendices/config.html#cfg-in-world-writable-dir [WARNING]: Invalid characters were found in group names but not replaced, use -vvvv to see details PLAY [deploy docker] ******************************************************************************************************************************************************************* TASK [创建存放 rmp 包的目录] ******************************************************************************************************************************************************************* skipping: [node1] skipping: [node2] ok: [master] TASK [开始下载软件包] ************************************************************************************************************************************************************************* skipping: [node1] skipping: [node2] ok: [master] TASK [传输 rpm 包到远程节点] ******************************************************************************************************************************************************************* skipping: [master] ok: [node2] ok: [node1] TASK [正在执行从本地安装软件包] ******************************************************************************************************************************************************************** changed: [node1] changed: [node2] changed: [master] TASK [启动 nfs] ************************************************************************************************************************************************************************** ok: [node1] ok: [master] changed: [node2] TASK [启动 rpcbind] ********************************************************************************************************************************************************************** ok: [node2] ok: [node1] ok: [master] PLAY RECAP ***************************************************************************************************************************************************************************** master : ok=5 changed=1 unreachable=0 failed=0 skipped=1 rescued=0 ignored=0 node1 : ok=4 changed=1 unreachable=0 failed=0 skipped=2 rescued=0 ignored=0 node2 : ok=4 changed=2 unreachable=0 failed=0 skipped=2 rescued=0 ignored=0- 1
- 2
- 3
- 4
- 5
- 6
- 7
- 8
- 9
- 10
- 11
- 12
- 13
- 14
- 15
- 16
- 17
- 18
- 19
- 20
- 21
- 22
- 23
- 24
- 25
- 26
- 27
- 28
- 29
- 30
- 31
- 32
- 33
- 34
- 35
- 36
- 37
- 38
- 39
- 40
安装成功,创建挂载:
# 创建共享目录 master上操作 mkdir /home/data # 设置环境变量 vi /etc/exports # 添加以下内容 /home/data *(insecure,rw,sync,no_subtree_check,no_root_squash) # 重启服务 systemctl restart nfs rpcbind #查看共享目录 showmount -e- 1
- 2
- 3
- 4
- 5
- 6
- 7
- 8
- 9
- 10
#创建共享目录 nodes上操作 mkdir -p ~/volume/node1 # 挂载 mount -t nfs 192.168.76.100:/home/data ~/volume/node1 # 查看挂载结果 df -h [root@node1 ~]# df -h Filesystem Size Used Avail Use% Mounted on devtmpfs 963M 0 963M 0% /dev tmpfs 977M 0 977M 0% /dev/shm tmpfs 977M 9.5M 968M 1% /run tmpfs 977M 0 977M 0% /sys/fs/cgroup /dev/mapper/centos-root 17G 6.3G 11G 37% / /dev/sda1 1014M 219M 796M 22% /boot tmpfs 1.9G 12K 1.9G 1% /var/lib/kubelet/pods/ec1c0e84-6d0e-404 2-8581-6ff4c3c7bc2f/volumes/kubernetes.io~projected/kube-api-access-x4sbm tmpfs 1.9G 12K 1.9G 1% /var/lib/kubelet/pods/df3eb1bb-a156-4ec c-9e85-5802c3e6d86d/volumes/kubernetes.io~projected/kube-api-access-4zpps overlay 17G 6.3G 11G 37% /var/lib/docker/overlay2/d2cadab12b70d0 f7f260b99959b37d1da16928ccb9ad23102faea808d2e9febe/merged shm 64M 0 64M 0% /var/lib/docker/containers/8f3724de8ea7 03dc3ce7f49ae0f0225586877deb11fbdba4d1728ec2a639dd1e/mounts/shm overlay 17G 6.3G 11G 37% /var/lib/docker/overlay2/54d872067cdf7a bb1849de13d13043cfae0a3dc30861e2065a9212b37dca4210/merged shm 64M 0 64M 0% /var/lib/docker/containers/09ed2454c42d 101e68fb2412853d110e18a8e45a5b6458d6f8dcd26be7a813b6/mounts/shm overlay 17G 6.3G 11G 37% /var/lib/docker/overlay2/95edd93cc29fc3 8a9aab4c17e87bf59e93a6a20a3ef766b42a04a8bc09f7f300/merged overlay 17G 6.3G 11G 37% /var/lib/docker/overlay2/a6daa65abf3faf e28c115744768bad9ee7ef1c786550d1b9d8e822197a5f4f58/merged tmpfs 196M 0 196M 0% /run/user/0 192.168.76.100:/home/data 17G 8.9G 8.2G 53% /root/volume/node1- 1
- 2
- 3
- 4
- 5
- 6
- 7
- 8
- 9
- 10
- 11
- 12
- 13
- 14
- 15
- 16
- 17
- 18
- 19
- 20
- 21
- 22
- 23
- 24
- 25
二、使用NFS实现持久化
1、部署 Rbac
[root@master k8s]# cat rbac.yaml apiVersion: v1 kind: ServiceAccount metadata: name: nfs-client-provisioner # replace with namespace where provisioner is deployed namespace: default --- kind: ClusterRole apiVersion: rbac.authorization.k8s.io/v1 metadata: name: nfs-client-provisioner-runner rules: - apiGroups: [""] resources: ["persistentvolumes"] verbs: ["get", "list", "watch", "create", "delete"] - apiGroups: [""] resources: ["persistentvolumeclaims"] verbs: ["get", "list", "watch", "update"] - apiGroups: ["storage.k8s.io"] resources: ["storageclasses"] verbs: ["get", "list", "watch"] - apiGroups: [""] resources: ["events"] verbs: ["create", "update", "patch"] --- kind: ClusterRoleBinding apiVersion: rbac.authorization.k8s.io/v1 metadata: name: run-nfs-client-provisioner subjects: - kind: ServiceAccount name: nfs-client-provisioner # replace with namespace where provisioner is deployed namespace: default roleRef: kind: ClusterRole name: nfs-client-provisioner-runner apiGroup: rbac.authorization.k8s.io --- kind: Role apiVersion: rbac.authorization.k8s.io/v1 metadata: name: leader-locking-nfs-client-provisioner # replace with namespace where provisioner is deployed namespace: default rules: - apiGroups: [""] resources: ["endpoints"] verbs: ["get", "list", "watch", "create", "update", "patch"] --- kind: RoleBinding apiVersion: rbac.authorization.k8s.io/v1 metadata: name: leader-locking-nfs-client-provisioner # replace with namespace where provisioner is deployed namespace: default subjects: - kind: ServiceAccount name: nfs-client-provisioner # replace with namespace where provisioner is deployed namespace: default roleRef: kind: Role name: leader-locking-nfs-client-provisioner apiGroup: rbac.authorization.k8s.io- 1
- 2
- 3
- 4
- 5
- 6
- 7
- 8
- 9
- 10
- 11
- 12
- 13
- 14
- 15
- 16
- 17
- 18
- 19
- 20
- 21
- 22
- 23
- 24
- 25
- 26
- 27
- 28
- 29
- 30
- 31
- 32
- 33
- 34
- 35
- 36
- 37
- 38
- 39
- 40
- 41
- 42
- 43
- 44
- 45
- 46
- 47
- 48
- 49
- 50
- 51
- 52
- 53
- 54
- 55
- 56
- 57
- 58
- 59
- 60
- 61
- 62
- 63
- 64
- 65
- 66
部署rbac配置文件:
kubectl apply -f rbac.yaml- 1
2、部署 Deployment
[root@master k8s]# cat deployment.yaml apiVersion: apps/v1 kind: Deployment metadata: name: nfs-client-provisioner labels: app: nfs-client-provisioner # replace with namespace where provisioner is deployed namespace: default spec: replicas: 1 strategy: type: Recreate selector: matchLabels: app: nfs-client-provisioner template: metadata: labels: app: nfs-client-provisioner spec: serviceAccountName: nfs-client-provisioner containers: - name: nfs-client-provisioner image: quay.io/external_storage/nfs-client-provisioner:latest volumeMounts: - name: nfs-client-root mountPath: /home/data env: - name: PROVISIONER_NAME value: nfs-diy # StorageClass 三个重要字段之一 Provisioner,名字自己指定 - name: NFS_SERVER value: 192.168.76.100 # nfs 服务器地址 - name: NFS_PATH value: /home/data # nfs 共享文件夹 volumes: - name: nfs-client-root nfs: server: 192.168.76.100 # nfs 服务器地址 path: /home/data # nfs 共享文件夹- 1
- 2
- 3
- 4
- 5
- 6
- 7
- 8
- 9
- 10
- 11
- 12
- 13
- 14
- 15
- 16
- 17
- 18
- 19
- 20
- 21
- 22
- 23
- 24
- 25
- 26
- 27
- 28
- 29
- 30
- 31
- 32
- 33
- 34
- 35
- 36
- 37
- 38
- 39
- 40
部署deployment:
kubectl apply -f deployment.yaml- 1
3、部署 StorageClass
每个 StorageClass 都包含 provisioner、parameters 和 reclaimPolicy 字段, 这些字段会在 StorageClass 需要动态分配 PersistentVolume 时会使用到。
StorageClass 对象的命名很重要,用户使用这个命名来请求生成一个特定的类。 当创建 StorageClass 对象时,管理员设置 StorageClass 对象的命名和其他参数,一旦创建了对象就不能再对其更新。
[root@master k8s]# cat class.yaml apiVersion: storage.k8s.io/v1 kind: StorageClass metadata: name: nfs-storage # 这个名字很重要,后面要用到 provisioner: nfs-diy # 和 deployment.yaml 中 env.PROVISIONER_NAME 保持一致 reclaimPolicy: Retain parameters: archiveOnDelete: "false"- 1
- 2
- 3
- 4
- 5
- 6
- 7
- 8
- 9
部署StorageClass:
kubectl apply -f class.yaml- 1
三、部署Mysql集群
1、创建命名空间 Namespace
[root@master k8s]# cat namespace.yaml apiVersion: v1 kind: Namespace metadata: name: mysql labels: app: mysql- 1
- 2
- 3
- 4
- 5
- 6
- 7
部署namespace:
kubectl apply -f namespace.yaml- 1
2、连接数据库
[root@master k8s]# cat secret.yaml apiVersion: v1 kind: Secret metadata: name: mysql-secret namespace: mysql labels: app: mysql type: Opaque data: password: MTIzNDU2 # echo -n "123456" | base64- 1
- 2
- 3
- 4
- 5
- 6
- 7
- 8
- 9
- 10
- 11
部署secret.yaml:
kubectl apply -f secret.yaml- 1
3、创建一个 ConfigMap
[root@master k8s]# cat mysql-configmap.yaml apiVersion: v1 kind: ConfigMap metadata: name: mysql namespace: mysql labels: app: mysql data: master.cnf: | # Master [mysqld] log-bin=mysqllog skip-name-resolve slave.cnf: | # Slave [mysqld] super-read-only skip-name-resolve log-bin=mysql-bin replicate-ignore-db=mysql- 1
- 2
- 3
- 4
- 5
- 6
- 7
- 8
- 9
- 10
- 11
- 12
- 13
- 14
- 15
- 16
- 17
- 18
- 19
- 20
- 21
部署mysql-configmap.yaml:
kubectl apply -f mysql-configmap.yaml- 1
4、创建 Service
[root@master k8s]# cat mysql-services.yaml apiVersion: v1 kind: Service metadata: name: mysql namespace: mysql labels: app: mysql spec: type: NodePort ports: - name: mysql port: 3306 nodePort: 30002 #对外暴露的端口 selector: app: mysql --- apiVersion: v1 kind: Service metadata: name: mysql-read namespace: mysql labels: app: mysql spec: ports: - name: mysql port: 3306 selector: app: mysql- 1
- 2
- 3
- 4
- 5
- 6
- 7
- 8
- 9
- 10
- 11
- 12
- 13
- 14
- 15
- 16
- 17
- 18
- 19
- 20
- 21
- 22
- 23
- 24
- 25
- 26
- 27
- 28
- 29
- 30
部署mysql-service.yaml:
kubectl apply -f mysql-services.yaml- 1
5、创建 StatefulSet
[root@master k8s]# cat mysql-statefulset.yaml apiVersion: apps/v1 kind: StatefulSet metadata: name: mysql namespace: mysql labels: app: mysql spec: selector: matchLabels: app: mysql serviceName: mysql replicas: 2 # 副本数量,集群中的数量 template: metadata: labels: app: mysql spec: initContainers: - name: init-mysql image: mysql:5.7 env: - name: MYSQL_ROOT_PASSWORD valueFrom: secretKeyRef: name: mysql-secret key: password command: - bash - "-c" - | set -ex # 从 Pod 的序号,生成 server-id [[ $(hostname) =~ -([0-9]+)$ ]] || exit 1 ordinal=${BASH_REMATCH[1]} echo [mysqld] > /mnt/conf.d/server-id.cnf # 由于 server-id 不能为 0,因此给 ID 加 100 来避开它 echo server-id=$((100 + $ordinal)) >> /mnt/conf.d/server-id.cnf # 如果 Pod 的序号为 0,说明它是 Master 节点,从 ConfigMap 里把 Master 的配置文件拷贝到 /mnt/conf.d 目录下 # 否则,拷贝 ConfigMap 里的 Slave 的配置文件 if [[ ${ordinal} -eq 0 ]]; then cp /mnt/config-map/master.cnf /mnt/conf.d else cp /mnt/config-map/slave.cnf /mnt/conf.d fi volumeMounts: - name: conf mountPath: /mnt/conf.d - name: config-map mountPath: /mnt/config-map - name: clone-mysql image: gcr.io/google-samples/xtrabackup:1.0 image: registry.cn-shenzhen.aliyuncs.com/jbjb/csi:xtrabackup-1.0 env: - name: MYSQL_ROOT_PASSWORD valueFrom: secretKeyRef: name: mysql-secret key: password command: - bash - "-c" - | set -ex # 拷贝操作只需要在第一次启动时进行,所以数据已经存在则跳过 [[ -d /var/lib/mysql/mysql ]] && exit 0 # Master 节点(序号为 0)不需要这个操作 [[ $(hostname) =~ -([0-9]+)$ ]] || exit 1 ordinal=${BASH_REMATCH[1]} [[ $ordinal == 0 ]] && exit 0 # 使用 ncat 指令,远程地从前一个节点拷贝数据到本地 ncat --recv-only mysql-$(($ordinal-1)).mysql 3307 | xbstream -x -C /var/lib/mysql # 执行 --prepare,这样拷贝来的数据就可以用作恢复了 xtrabackup --prepare --target-dir=/var/lib/mysql volumeMounts: - name: data mountPath: /var/lib/mysql subPath: mysql - name: conf mountPath: /etc/mysql/conf.d containers: - name: mysql image: mysql:5.7 env: # - name: MYSQL_ALLOW_EMPTY_PASSWORD # value: "1" - name: MYSQL_ROOT_PASSWORD valueFrom: secretKeyRef: name: mysql-secret key: password ports: - name: mysql containerPort: 3306 volumeMounts: - name: data mountPath: /var/lib/mysql subPath: mysql - name: conf mountPath: /etc/mysql/conf.d resources: requests: cpu: 500m memory: 1Gi livenessProbe: exec: command: ["mysqladmin", "ping", "-uroot", "-p${MYSQL_ROOT_PASSWORD}"] initialDelaySeconds: 30 periodSeconds: 10 timeoutSeconds: 5 readinessProbe: exec: command: ["mysqladmin", "ping", "-uroot", "-p${MYSQL_ROOT_PASSWORD}"] initialDelaySeconds: 5 periodSeconds: 2 timeoutSeconds: 1 - name: xtrabackup image: gcr.io/google-samples/xtrabackup:1.0 image: registry.cn-shenzhen.aliyuncs.com/jbjb/csi:xtrabackup-1.0 ports: - name: xtrabackup containerPort: 3307 env: - name: MYSQL_ROOT_PASSWORD valueFrom: secretKeyRef: name: mysql-secret key: password command: - bash - "-c" - | set -ex cd /var/lib/mysql # 从备份信息文件里读取 MASTER_LOG_FILE 和 MASTER_LOG_POS 这 2 个字段的值,用来拼装集群初始化 SQL if [[ -f xtrabackup_slave_info ]]; then # 如果 xtrabackup_slave_info 文件存在,说明这个备份数据来自于另一个 Slave 节点 # 这种情况下,XtraBackup 工具在备份的时候,就已经在这个文件里自动生成了 "CHANGE MASTER TO" SQL 语句 # 所以,只需要把这个文件重命名为 change_master_to.sql.in,后面直接使用即可 mv xtrabackup_slave_info change_master_to.sql.in # 所以,也就用不着 xtrabackup_binlog_info 了 rm -f xtrabackup_binlog_info elif [[ -f xtrabackup_binlog_info ]]; then # 如果只是存在 xtrabackup_binlog_info 文件,说明备份来自于 Master 节点,就需要解析这个备份信息文件,读取所需的两个字段的值 [[ $(cat xtrabackup_binlog_info) =~ ^(.*?)[[:space:]]+(.*?)$ ]] || exit 1 rm xtrabackup_binlog_info # 把两个字段的值拼装成 SQL,写入 change_master_to.sql.in 文件 echo "CHANGE MASTER TO MASTER_LOG_FILE='${BASH_REMATCH[1]}',\ MASTER_LOG_POS=${BASH_REMATCH[2]}" > change_master_to.sql.in fi # 如果存在 change_master_to.sql.in,就意味着需要做集群初始化工作 if [[ -f change_master_to.sql.in ]]; then # 但一定要先等 MySQL 容器启动之后才能进行下一步连接 MySQL 的操作 echo "Waiting for mysqld to be ready(accepting connections)" until mysql -h 127.0.0.1 -uroot -p${MYSQL_ROOT_PASSWORD} -e "SELECT 1"; do sleep 1; done echo "Initializing replication from clone position" # 将文件 change_master_to.sql.in 改个名字 # 防止这个 Container 重启的时候,因为又找到了 change_master_to.sql.in,从而重复执行一遍初始化流程 mv change_master_to.sql.in change_master_to.sql.orig # 使用 change_master_to.sql.orig 的内容,也就是前面拼装的 SQL,组成一个完整的初始化和启动 Slave 的 SQL 语句 mysql -h 127.0.0.1 -uroot -p${MYSQL_ROOT_PASSWORD} << EOF $(< change_master_to.sql.orig), MASTER_HOST='mysql-0.mysql.mysql', MASTER_USER='root', MASTER_PASSWORD='${MYSQL_ROOT_PASSWORD}', MASTER_CONNECT_RETRY=10; START SLAVE; EOF fi # 使用 ncat 监听 3307 端口。 # 它的作用是,在收到传输请求的时候,直接执行 xtrabackup --backup 命令,备份 MySQL 的数据并发送给请求者 exec ncat --listen --keep-open --send-only --max-conns=1 3307 -c \ "xtrabackup --backup --slave-info --stream=xbstream --host=127.0.0.1 --user=root --password=${MYSQL_ROOT_PASSWORD}" volumeMounts: - name: data mountPath: /var/lib/mysql subPath: mysql - name: conf mountPath: /etc/mysql/conf.d volumes: - name: conf emptyDir: {} - name: config-map configMap: name: mysql volumeClaimTemplates: - metadata: name: data #annotations: #volume.beta.kubernetes.io/storage-class: nfs-csi spec: accessModes: - "ReadWriteOnce" storageClassName: nfs-storage #需要和你自己创建的class.yaml保持名称一致 resources: requests: storage: 5Gi- 1
- 2
- 3
- 4
- 5
- 6
- 7
- 8
- 9
- 10
- 11
- 12
- 13
- 14
- 15
- 16
- 17
- 18
- 19
- 20
- 21
- 22
- 23
- 24
- 25
- 26
- 27
- 28
- 29
- 30
- 31
- 32
- 33
- 34
- 35
- 36
- 37
- 38
- 39
- 40
- 41
- 42
- 43
- 44
- 45
- 46
- 47
- 48
- 49
- 50
- 51
- 52
- 53
- 54
- 55
- 56
- 57
- 58
- 59
- 60
- 61
- 62
- 63
- 64
- 65
- 66
- 67
- 68
- 69
- 70
- 71
- 72
- 73
- 74
- 75
- 76
- 77
- 78
- 79
- 80
- 81
- 82
- 83
- 84
- 85
- 86
- 87
- 88
- 89
- 90
- 91
- 92
- 93
- 94
- 95
- 96
- 97
- 98
- 99
- 100
- 101
- 102
- 103
- 104
- 105
- 106
- 107
- 108
- 109
- 110
- 111
- 112
- 113
- 114
- 115
- 116
- 117
- 118
- 119
- 120
- 121
- 122
- 123
- 124
- 125
- 126
- 127
- 128
- 129
- 130
- 131
- 132
- 133
- 134
- 135
- 136
- 137
- 138
- 139
- 140
- 141
- 142
- 143
- 144
- 145
- 146
- 147
- 148
- 149
- 150
- 151
- 152
- 153
- 154
- 155
- 156
- 157
- 158
- 159
- 160
- 161
- 162
- 163
- 164
- 165
- 166
- 167
- 168
- 169
- 170
- 171
- 172
- 173
- 174
- 175
- 176
- 177
- 178
- 179
- 180
- 181
- 182
- 183
- 184
- 185
- 186
- 187
- 188
- 189
- 190
- 191
- 192
- 193
- 194
- 195
- 196
- 197
- 198
部署mysql-statefulset:
kubectl apply -f mysql-statefulset.yaml- 1
四、验证部署情况
通过运行以下命令查看启动进度:
[root@master k8s]# kubectl get pods -n mysql NAME READY STATUS RESTARTS AGE mysql-0 2/2 Running 0 70m mysql-1 2/2 Running 0 70m- 1
- 2
- 3
- 4
检查主从状态:
[root@master k8s]# kubectl -n mysql exec mysql-1 -c mysql -- bash -c "mysql -uroot -p123456 -e 'show slave status \G'" mysql: [Warning] Using a password on the command line interface can be insecure. *************************** 1. row *************************** Slave_IO_State: Waiting for master to send event Master_Host: mysql-0.mysql.mysql Master_User: root Master_Port: 3306 Connect_Retry: 10 Master_Log_File: mysqllog.000003 Read_Master_Log_Pos: 154 Relay_Log_File: mysql-1-relay-bin.000002 Relay_Log_Pos: 319 Relay_Master_Log_File: mysqllog.000003 Slave_IO_Running: Yes Slave_SQL_Running: Yes Replicate_Do_DB: Replicate_Ignore_DB: mysql Replicate_Do_Table: Replicate_Ignore_Table: Replicate_Wild_Do_Table: Replicate_Wild_Ignore_Table: Last_Errno: 0 Last_Error: Skip_Counter: 0 Exec_Master_Log_Pos: 154 Relay_Log_Space: 528 Until_Condition: None Until_Log_File: Until_Log_Pos: 0 Master_SSL_Allowed: No Master_SSL_CA_File: Master_SSL_CA_Path: Master_SSL_Cert: Master_SSL_Cipher: Master_SSL_Key: Seconds_Behind_Master: 0 Master_SSL_Verify_Server_Cert: No Last_IO_Errno: 0 Last_IO_Error: Last_SQL_Errno: 0 Last_SQL_Error: Replicate_Ignore_Server_Ids: Master_Server_Id: 100 Master_UUID: 469ced73-2518-11ed-9138-1e82d73ed269 Master_Info_File: /var/lib/mysql/master.info SQL_Delay: 0 SQL_Remaining_Delay: NULL Slave_SQL_Running_State: Slave has read all relay log; waiting for more updates Master_Retry_Count: 86400 Master_Bind: Last_IO_Error_Timestamp: Last_SQL_Error_Timestamp: Master_SSL_Crl: Master_SSL_Crlpath: Retrieved_Gtid_Set: Executed_Gtid_Set: Auto_Position: 0 Replicate_Rewrite_DB: Channel_Name: Master_TLS_Version:- 1
- 2
- 3
- 4
- 5
- 6
- 7
- 8
- 9
- 10
- 11
- 12
- 13
- 14
- 15
- 16
- 17
- 18
- 19
- 20
- 21
- 22
- 23
- 24
- 25
- 26
- 27
- 28
- 29
- 30
- 31
- 32
- 33
- 34
- 35
- 36
- 37
- 38
- 39
- 40
- 41
- 42
- 43
- 44
- 45
- 46
- 47
- 48
- 49
- 50
- 51
- 52
- 53
- 54
- 55
- 56
- 57
- 58
- 59
- 60
通过主库访问,创建表,插入数据:
[root@master k8s]# kubectl exec -it mysql-0 -n mysql /bin/bash kubectl exec [POD] [COMMAND] is DEPRECATED and will be removed in a future version. Use kubectl exec [POD] -- [COMMAND] instead. Defaulted container "mysql" out of: mysql, xtrabackup, init-mysql (init), clone-mysql (init) root@mysql-0:/# mysql -uroot -p123456 mysql: [Warning] Using a password on the command line interface can be insecure. Welcome to the MySQL monitor. Commands end with ; or \g. Your MySQL connection id is 2592 Server version: 5.7.36-log MySQL Community Server (GPL) Copyright (c) 2000, 2021, Oracle and/or its affiliates. Oracle is a registered trademark of Oracle Corporation and/or its affiliates. Other names may be trademarks of their respective owners. Type 'help;' or '\h' for help. Type '\c' to clear the current input statement. mysql> create database test; Query OK, 1 row affected (0.04 sec) mysql> use test; Database changed mysql> create table table1(Name text); Query OK, 0 rows affected (0.07 sec) mysql> insert into table1 values("ShanHai"); Query OK, 1 row affected (0.05 sec) mysql>- 1
- 2
- 3
- 4
- 5
- 6
- 7
- 8
- 9
- 10
- 11
- 12
- 13
- 14
- 15
- 16
- 17
- 18
- 19
- 20
- 21
- 22
- 23
- 24
- 25
- 26
- 27
- 28
- 29
通过从库访问,获取插入的数据:
[root@master k8s]# kubectl exec -it mysql-1 -n mysql /bin/bash kubectl exec [POD] [COMMAND] is DEPRECATED and will be removed in a future version. Use kubectl exec [POD] -- [COMMAND] instead. Defaulted container "mysql" out of: mysql, xtrabackup, init-mysql (init), clone-mysql (init) root@mysql-1:/# mysql -uroot -p123456 mysql: [Warning] Using a password on the command line interface can be insecure. Welcome to the MySQL monitor. Commands end with ; or \g. Your MySQL connection id is 1752 Server version: 5.7.36-log MySQL Community Server (GPL) Copyright (c) 2000, 2021, Oracle and/or its affiliates. Oracle is a registered trademark of Oracle Corporation and/or its affiliates. Other names may be trademarks of their respective owners. Type 'help;' or '\h' for help. Type '\c' to clear the current input statement. mysql> use test; Reading table information for completion of table and column names You can turn off this feature to get a quicker startup with -A Database changed mysql> select * from table1; +---------+ | Name | +---------+ | ShanHai | +---------+ 1 row in set (0.00 sec) mysql>- 1
- 2
- 3
- 4
- 5
- 6
- 7
- 8
- 9
- 10
- 11
- 12
- 13
- 14
- 15
- 16
- 17
- 18
- 19
- 20
- 21
- 22
- 23
- 24
- 25
- 26
- 27
- 28
- 29
- 30
- 31
五、部署时出现的问题
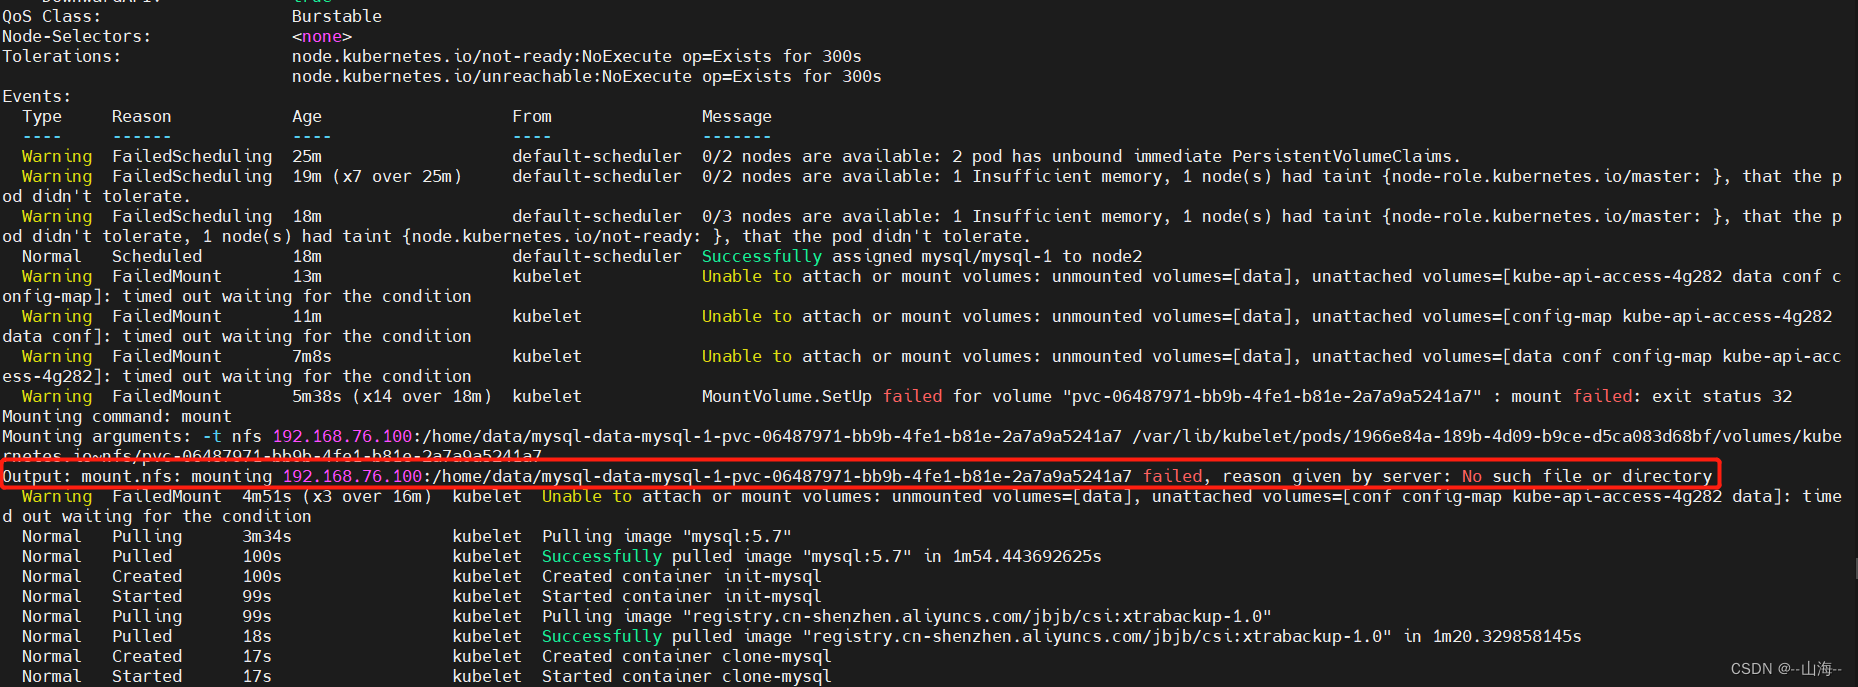
在部署时,出现问题,通过以下指令查看:[root@master k8s]# kubectl describe pods/mysql-1 -n mysql- 1
可以看到报错为找不到对应的文件或文件夹,在显示出的相应目录下创建缺失的文件或文件夹。
[root@master run]# mkdir -p /home/data/mysql-data-mysql-0-pvc-f4c40880-65ed-4e74-8184-f94b4b003942 [root@master run]# mkdir -p /home/data/mysql-data-mysql-1-pvc-06487971-bb9b-4fe1-b81e-2a7a9a5241a7 [root@master run]# cd /home/data/ [root@master data]# ls mysql-data-mysql-0-pvc-f4c40880-65ed-4e74-8184-f94b4b003942 mysql-data-mysql-1-pvc-06487971-bb9b-4fe1-b81e-2a7a9a5241a7- 1
- 2
- 3
- 4
- 5
重新执行
kubectl apply -f mysql-statefulset.yaml后,可以看到后面已经成功,开始拉取镜像了。
再次执行kubectl get pods -n mysql查看部署状态,可以看到mysql集群已经成功部署。Warning FailedMount 5m1s (x3 over 16m) kubelet Unable to attach or mount volumes: unmounted volumes=[data], unattached volumes=[conf config-map kube-api-access-4g282 data]: timed out waiting for the condition Normal Pulling 3m44s kubelet Pulling image "mysql:5.7" Normal Pulled 110s kubelet Successfully pulled image "mysql:5.7" in 1m54.443692625s Normal Created 110s kubelet Created container init-mysql Normal Started 109s kubelet Started container init-mysql Normal Pulling 109s kubelet Pulling image "registry.cn-shenzhen.aliyuncs.com/jbjb/csi:xtrabackup-1.0" Normal Pulled 28s kubelet Successfully pulled image "registry.cn-shenzhen.aliyuncs.com/jbjb/csi:xtrabackup-1.0" in 1m20.329858145s Normal Created 27s kubelet Created container clone-mysql Normal Started 27s kubelet Started container clone-mysql [root@master k8s]# kubectl get pods -n mysql NAME READY STATUS RESTARTS AGE mysql-0 2/2 Running 0 25m mysql-1 0/2 Init:1/2 0 25m [root@master k8s]# kubectl get pods -n mysql NAME READY STATUS RESTARTS AGE mysql-0 2/2 Running 0 26m mysql-1 2/2 Running 0 26m- 1
- 2
- 3
- 4
- 5
- 6
- 7
- 8
- 9
- 10
- 11
- 12
- 13
- 14
- 15
- 16
- 17
-
相关阅读:
阿里云混合云管理平台多Region架构
【无人机】太阳能伪卫星VoLTE无人机设计(Matlab代码实现)
JSON和全局异常处理
autpoi 1.4.3版本发布—Excel傻瓜式API,快速实现Excel导入导出、Word模板导出
如何快速上手短视频创作,有什么建议吗?
微信小程序:点击按钮出现右侧弹窗
SpringBoot的测试方案
Linux——文件传输协议知识点梳理
研发管理工具选型要考虑哪些内容?
【c代码】【字符串数组排序】
- 原文地址:https://blog.csdn.net/AnNan1997/article/details/126546907
