-
品味Spring Cache设计之美
最近负责教育类产品的架构工作,两位研发同学建议:“团队封装的Redis客户端可否适配Spring Cache,这样加缓存就会方便多了” 。
于是边查阅文档边实战,收获颇丰,写这篇文章,想和大家分享笔者学习的过程,一起品味Spring Cache设计之美。

1 硬编码
在学习Spring Cache之前,笔者经常会硬编码的方式使用缓存。
举个例子,为了提升用户信息的查询效率,我们对用户信息使用了缓存,示例代码如下:
- @Autowire
- private UserMapper userMapper;
- @Autowire
- private StringCommand stringCommand;
- //查询用户
- public User getUserById(Long userId) {
- String cacheKey = "userId_" + userId;
- User user=stringCommand.get(cacheKey);
- if(user != null) {
- return user;
- }
- user = userMapper.getUserById(userId);
- if(user != null) {
- stringCommand.set(cacheKey,user);
- return user;
- }
- //修改用户
- public void updateUser(User user){
- userMapper.updateUser(user);
- String cacheKey = "userId_" + userId.getId();
- stringCommand.set(cacheKey , user);
- }
- //删除用户
- public void deleteUserById(Long userId){
- userMapper.deleteUserById(userId);
- String cacheKey = "userId_" + userId.getId();
- stringCommand.del(cacheKey);
- }
- }
相信很多同学都写过类似风格的代码,这种风格符合面向过程的编程思维,非常容易理解。但它也有一些缺点:
- 代码不够优雅。业务逻辑有四个典型动作:存储,读取,修改,删除。每次操作都需要定义缓存Key ,调用缓存命令的API,产生较多的重复代码;
- 缓存操作和业务逻辑之间的代码耦合度高,对业务逻辑有较强的侵入性。 侵入性主要体现如下两点: 开发联调阶段,需要去掉缓存,只能注释或者临时删除缓存操作代码,也容易出错;某些场景下,需要更换缓存组件,每个缓存组件有自己的API,更换成本颇高。
2 缓存抽象
首先需要明确一点:Spring Cache不是一个具体的缓存实现方案,而是一个对缓存使用的抽象(Cache Abstraction)。

2.1 Spring AOP
Spring AOP是基于代理模式(proxy-based)。
通常情况下,定义一个对象,调用它的方法的时候,方法是直接被调用的。
- Pojo pojo = new SimplePojo();
- pojo.foo();

将代码做一些调整,pojo对象的引用修改成代理类。
- ProxyFactory factory = new ProxyFactory(new SimplePojo());
- factory.addInterface(Pojo.class);
- factory.addAdvice(new RetryAdvice());
- Pojo pojo = (Pojo) factory.getProxy();
- //this is a method call on the proxy!
- pojo.foo();

调用pojo的foo()方法的时候,实际上是动态生成的代理类调用foo方法。
代理类在方法调用前可以获取方法的参数,当调用方法结束后,可以获取调用该方法的返回值,通过这种方式就可以实现缓存的逻辑。
2.2 缓存声明
缓存声明,也就是标识需要缓存的方法以及缓存策略。
Spring Cache 提供了五个注解。
- @Cacheable:根据方法的请求参数对其结果进行缓存,下次同样的参数来执行该方法时可以直接从缓存中获取结果,而不需要再次执行该方法;
- @CachePut:根据方法的请求参数对其结果进行缓存,它每次都会触发真实方法的调用;
- @CacheEvict:根据一定的条件删除缓存;
- @Caching:组合多个缓存注解;
- @CacheConfig:类级别共享缓存相关的公共配置。
我们重点讲解:@Cacheable,@CachePut,@CacheEvict三个核心注解。
2.2.1 @Cacheable注解
@Cacheble注解表示这个方法有了缓存的功能。
- @Cacheable(value="user_cache",key="#userId", unless="#result == null")
- public User getUserById(Long userId) {
- User user = userMapper.getUserById(userId);
- return user;
- }
上面的代码片段里,getUserById方法和缓存user_cache 关联起来,若方法返回的User对象不为空,则缓存起来。第二次相同参数userId调用该方法的时候,直接从缓存中获取数据,并返回。
▍ 缓存key的生成
我们都知道,缓存的本质是key-value存储模式,每一次方法的调用都需要生成相应的Key, 才能操作缓存。
通常情况下,@Cacheable有一个属性key可以直接定义缓存key,开发者可以使用SpEL语言定义key值。
若没有指定属性key,缓存抽象提供了 KeyGenerator来生成key ,默认的生成器代码见下图:

它的算法也很容易理解:
- 如果没有参数,则直接返回SimpleKey.EMPTY;
- 如果只有一个参数,则直接返回该参数;
- 若有多个参数,则返回包含多个参数的SimpleKey对象。
当然Spring Cache也考虑到需要自定义Key生成方式,需要我们实现
org.springframework.cache.interceptor.KeyGenerator 接口。Object generate(Object target, Method method, Object... params);然后指定@Cacheable的keyGenerator属性。
- @Cacheable(value="user_cache", keyGenerator="myKeyGenerator", unless="#result == null")
- public User getUserById(Long userId)
▍ 缓存条件
有的时候,方法执行的结果是否需要缓存,依赖于方法的参数或者方法执行后的返回值。
注解里可以通过condition属性,通过Spel表达式返回的结果是true 还是false 判断是否需要缓存。
- @Cacheable(cacheNames="book", condition="#name.length() < 32")
- public Book findBook(String name)
上面的代码片段里,当参数的长度小于32,方法执行的结果才会缓存。
除了condition,unless属性也可以决定结果是否缓存,不过是在执行方法后。
- @Cacheable(value="user_cache",key="#userId", unless="#result == null")
- public User getUserById(Long userId) {
上面的代码片段里,当返回的结果为null则不缓存。
2.2.2 @CachePut注解
@CachePut注解作用于缓存需要被更新的场景,和 @Cacheable 非常相似,但被注解的方法每次都会被执行。
返回值是否会放入缓存,依赖于condition和unless,默认情况下结果会存储到缓存。
- @CachePut(value = "user_cache", key="#user.id", unless = "#result != null")
- public User updateUser(User user) {
- userMapper.updateUser(user);
- return user;
- }
当调用updateUser方法时,每次方法都会被执行,但是因为unless属性每次都是true,所以并没有将结果缓存。当去掉unless属性,则结果会被缓存。
2.2.3 @CacheEvict注解
@CacheEvict 注解的方法在调用时会从缓存中移除已存储的数据。
- @CacheEvict(value = "user_cache", key = "#id")
- public void deleteUserById(Long id) {
- userMapper.deleteUserById(id);
- }
当调用deleteUserById方法完成后,缓存key等于参数id的缓存会被删除,而且方法的返回的类型是Void ,这和@Cacheable明显不同。
2.3 缓存配置
Spring Cache是一个对缓存使用的抽象,它提供了多种存储集成。

要使用它们,需要简单地声明一个适当的CacheManager - 一个控制和管理Cache的实体。
我们以Spring Cache默认的缓存实现Simple例子,简单探索下CacheManager的机制。
CacheManager非常简单:
- public interface CacheManager {
- @Nullable
- Cache getCache(String name);
- Collection
getCacheNames() ; - }
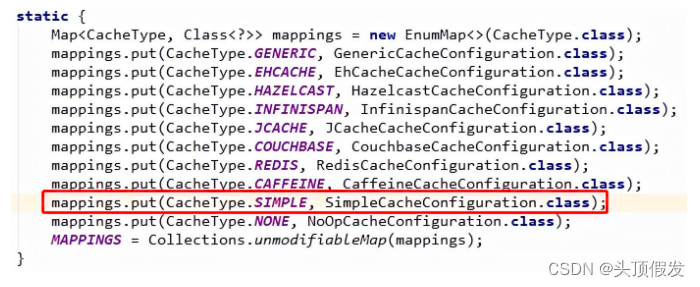
在CacheConfigurations配置类中,可以看到不同集成类型有不同的缓存配置类。
通过SpringBoot的自动装配机制,创建CacheManager的实现类ConcurrentMapCacheManager。

而ConcurrentMapCacheManager的getCache方法,会创建ConcurrentCacheMap。
 ConcurrentCacheMap实现了
org.springframework.cache.Cache接口。
从Spring Cache的Simple的实现,缓存配置需要实现两个接口:
- org.springframework.cache.CacheManager
- org.springframework.cache.Cache
3 入门例子
首先我们先创建一个工程spring-cache-demo。

caffeine和Redisson分别是本地内存和分布式缓存Redis框架中的佼佼者,我们分别演示如何集成它们。
3.1 集成caffeine
3.1.1 maven依赖
- <dependency>
- <groupId>org.springframework.boot</groupId>
- <artifactId>spring-boot-starter-cache</artifactId>
- </dependency>
- <dependency>
- <groupId>com.github.ben-manes.caffeine</groupId>
- <artifactId>caffeine</artifactId>
- <version>2.7.0</version>
- </dependency>
3.1.2 Caffeine缓存配置
我们先创建一个缓存配置类MyCacheConfig。
- @Configuration
- @EnableCaching
- public class MyCacheConfig {
- @Bean
- public Caffeine caffeineConfig() {
- return
- Caffeine.newBuilder()
- .maximumSize(10000).
- expireAfterWrite(60, TimeUnit.MINUTES);
- }
- @Bean
- public CacheManager cacheManager(Caffeine caffeine) {
- CaffeineCacheManager caffeineCacheManager = new CaffeineCacheManager();
- caffeineCacheManager.setCaffeine(caffeine);
- return caffeineCacheManager;
- }
- }
首先创建了一个Caffeine对象,该对象标识本地缓存的最大数量是10000条,每个缓存数据在写入60分钟后失效。
另外,MyCacheConfig类上我们添加了注解:@EnableCaching。
3.1.3 业务代码
根据缓存声明这一节,我们很容易写出如下代码。
- @Cacheable(value = "user_cache", unless = "#result == null")
- public User getUserById(Long id) {
- return userMapper.getUserById(id);
- }
- @CachePut(value = "user_cache", key = "#user.id", unless = "#result == null")
- public User updateUser(User user) {
- userMapper.updateUser(user);
- return user;
- }
- @CacheEvict(value = "user_cache", key = "#id")
- public void deleteUserById(Long id) {
- userMapper.deleteUserById(id);
- }
这段代码与硬编码里的代码片段明显精简很多。
当我们在Controller层调用 getUserById方法时,调试的时候,配置mybatis日志级别为DEBUG,方便监控方法是否会缓存。
第一次调用会查询数据库,打印相关日志:
- Preparing: select * FROM user t where t.id = ?
- Parameters: 1(Long)
- Total: 1
第二次调用查询方法的时候,数据库SQL日志就没有出现了, 也就说明缓存生效了。
3.2 集成Redisson
3.2.1 maven依赖
- <dependency>
- <groupId>org.Redisson</groupId>
- <artifactId>Redisson</artifactId>
- <version>3.12.0</version>
- </dependency>
3.2.2 Redisson缓存配置
- @Bean(destroyMethod = "shutdown")
- public RedissonClient Redisson() {
- Config config = new Config();
- config.useSingleServer()
- .setAddress("redis://127.0.0.1:6201").setPassword("ts112GpO_ay");
- return Redisson.create(config);
- }
- @Bean
- CacheManager cacheManager(RedissonClient RedissonClient) {
- Map<String, CacheConfig> config = new HashMap<String, CacheConfig>();
- // create "user_cache" spring cache with ttl = 24 minutes and maxIdleTime = 12 minutes
- config.put("user_cache",
- new CacheConfig(
- 24 * 60 * 1000,
- 12 * 60 * 1000));
- return new RedissonSpringCacheManager(RedissonClient, config);
- }
可以看到,从Caffeine切换到Redisson,只需要修改缓存配置类,定义CacheManager 对象即可。而业务代码并不需要改动。
Controller层调用 getUserById方法,用户ID为1的时候,可以从Redis Desktop Manager里看到: 用户信息已被缓存,user_cache缓存存储是Hash数据结构。

因为Redisson默认的编解码是FstCodec, 可以看到key的名称是: \xF6\x01。
在缓存配置代码里,可以修改编解码器。
- public RedissonClient Redisson() {
- Config config = new Config();
- config.useSingleServer()
- .setAddress("redis://127.0.0.1:6201").setPassword("ts112GpO_ay");
- config.setCodec(new JsonJacksonCodec());
- return Redisson.create(config);
- }
再次调用 getUserById方法 ,控制台就变成:

可以观察到:缓存key已经变成了:["java.lang.Long",1],改变序列化后key和value已发生了变化。
3.3 从列表缓存再次理解缓存抽象
列表缓存在业务中经常会遇到。通常有两种实现形式:
- 整体列表缓存;
- 按照每个条目缓存,通过redis,memcached的聚合查询方法批量获取列表,若缓存没有命中,则从数据库重新加载,并放入缓存里。
那么Spring cache整合Redisson如何缓存列表数据呢?
- @Cacheable(value = "user_cache")
- public List
getUserList(List<Long> idList) { - return userMapper.getUserByIds(idList);
- }
执行getUserList方法,参数id列表为:[1,3] 。

执行完成之后,控制台里可以看到:列表整体直接被缓存起来,用户列表缓存和用户条目缓存并没有共享,他们是平行的关系。
这种情况下,缓存的颗粒度控制也没有那么细致。
类似这样的思考,很多开发者也向Spring Framework研发团队提过。


官方的回答也很明确:对于缓存抽象来讲,它并不关心方法返回的数据类型,假如是集合,那么也就意味着需要把集合数据在缓存中保存起来。
还有一位开发者,定义了一个@CollectionCacheable注解,并做出了原型,扩展了Spring Cache的列表缓存功能。
- @Cacheable("myCache")
- public String findById(String id) {
- //access DB backend return item
- }
- @CollectionCacheable("myCache")
- public Map<String, String> findByIds(Collection<String> ids) {
- //access DB backend,return map of id to item
- }
官方也未采纳,因为缓存抽象并不想引入太多的复杂性。
写到这里,相信大家对缓存抽象有了更进一步的理解。当我们想实现更复杂的缓存功能时,需要对Spring Cache做一定程度的扩展。
4 自定义二级缓存
4.1 应用场景
笔者曾经在原来的项目,高并发场景下多次使用多级缓存。多级缓存是一个非常有趣的功能点,值得我们去扩展。
多级缓存有如下优势:
- 离用户越近,速度越快;
- 减少分布式缓存查询频率,降低序列化和反序列化的CPU消耗;
- 大幅度减少网络IO以及带宽消耗。
进程内缓存做为一级缓存,分布式缓存做为二级缓存,首先从一级缓存中查询,若能查询到数据则直接返回,否则从二级缓存中查询,若二级缓存中可以查询到数据,则回填到一级缓存中,并返回数据。若二级缓存也查询不到,则从数据源中查询,将结果分别回填到一级缓存,二级缓存中。

Spring Cache并没有二级缓存的实现,我们可以实现一个简易的二级缓存DEMO,加深对技术的理解。
4.2 设计思路
我们设计了四个类,用了大概两个小时开发完成
- MultiLevelCacheManager:多级缓存管理器;
- MultiLevelChannel:封装Caffeine和RedissonClient;
- MultiLevelCache:实现org.springframework.cache.Cache接口;
- MultiLevelCacheConfig:配置缓存过期时间等;
MultiLevelCacheManager是最核心的类,需要实现getCache和getCacheNames两个接口。

创建多级缓存,第一级缓存是:Caffeine , 第二级缓存是:Redisson。

二级缓存,为了快速完成DEMO,我们使用Redisson对Spring Cache的扩展类RedissonCache 。它的底层是RMap,底层存储是Hash。

我们重点看下缓存的「查询」和「存储」的方法:
- @Override
- public ValueWrapper get(Object key) {
- Object result = getRawResult(key);
- return toValueWrapper(result);
- }
- public Object getRawResult(Object key) {
- logger.info("从一级缓存查询key:" + key);
- Object result = localCache.getIfPresent(key);
- if (result != null) {
- return result;
- }
- logger.info("从二级缓存查询key:" + key);
- result = RedissonCache.getNativeCache().get(key);
- if (result != null) {
- localCache.put(key, result);
- }
- return result;
- }
「查询」数据的流程:
- 先从本地缓存中查询数据,若能查询到,直接返回;
- 本地缓存查询不到数据,查询分布式缓存,若可以查询出来,回填到本地缓存,并返回;
- 若分布式缓存查询不到数据,则默认会执行被注解的方法。
下面来看下「存储」的代码:
- public void put(Object key, Object value) {
- logger.info("写入一级缓存 key:" + key);
- localCache.put(key, value);
- logger.info("写入二级缓存 key:" + key);
- RedissonCache.put(key, value);
- }
最后配置缓存管理器,原有的业务代码不变。

执行下getUserById方法,查询用户编号为1的用户信息。
- - 从一级缓存查询key:1
- - 从二级缓存查询key:1
- - ==> Preparing: select * FROM user t where t.id = ?
- - ==> Parameters: 1(Long)
- - <== Total: 1
- - 写入一级缓存 key:1
- - 写入二级缓存 key:1
第二次执行相同的动作,从日志可用看到从优先会从本地内存中查询出结果。
- 从一级缓存查询key:1等待30s , 再执行一次,因为本地缓存会失效,所以执行的时候会查询二级缓存
- - 从一级缓存查询key:1
- - 从二级缓存查询key:1
一个简易的二级缓存就组装完了。
5 什么场景选择Spring Cache
在做技术选型的时候,需要针对场景选择不同的技术。
笔者认为Spring Cache的功能很强大,设计也非常优雅。特别适合缓存控制没有那么细致的场景。比如门户首页,偏静态展示页面,榜单等等。这些场景的特点是对数据实时性没有那么严格的要求,只需要将数据源缓存下来,过期之后自动刷新即可。 这些场景下,Spring Cache就是神器,能大幅度提升研发效率。
但在缓存颗粒度的控制上,还是需要做功能扩展,重点实现如下三点:
- 多级缓存;
- 列表缓存;
- 缓存变更监听器;
笔者也在思考这几点的过程,研读了 j2cache , jetcache相关源码,受益匪浅。后续的文章会重点分享下笔者的心得。
-
相关阅读:
服务器数据恢复—raid5上层NTFS分区误删除/格式化的数据恢复案例
MyBatisPlus分页实现
2023 (ICPC) Jiangxi Provincial Contest -- Official Contest
flask---》response
u-boot中的&&
【计算机网络系列】物理层②:信道复用技术(频分复用、时分复用、波分复用及码分复用)
linux驱动 平台设备驱动模型
点餐系统数据库设计--SQL Server
实战一个 Jenkins 构建 CI/CD流水线 的简单配置过程哈
【计网实验报告】Cisco局域网模拟组建、简单网络测试
- 原文地址:https://blog.csdn.net/lt_xiaodou/article/details/126544837
