-
SpringSecurity学习笔记【授权部分待更新】
初识Spring Security
认证和授权的基本概念
认证:你是谁?
授权:你能干什么?
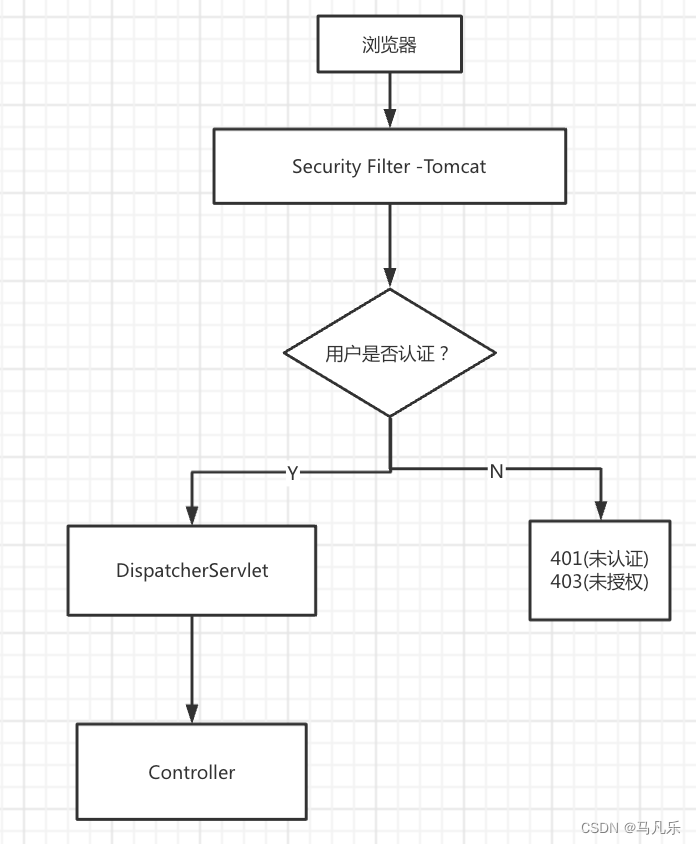
Spring Security默认配置
protected void configure(HttpSecurity http) throws Exception { logger.debug("Using default configure(HttpSecurity). If subclassed this will potentially override subclass configure(HttpSecurity)."); http .authorizeRequests() .anyRequest().authenticated() .and() .formLogin().and() .httpBasic();//采用Http Basic的方式认证,但是没有指定哪些请求需要认证,因此可以直接访问 }- 1
- 2
- 3
- 4
- 5
- 6
- 7
- 8
- 9
- 10
重写
protected void configure(HttpSecurity http)方法后,如果没有配置.formLogin()登录页将显示不出来.@EnableWebSecurity public class SecurityConfig extends WebSecurityConfigurerAdapter { @Override protected void configure(HttpSecurity http) throws Exception { http //默认登录页配置 .formLogin(Customizer.withDefaults()); } }- 1
- 2
- 3
- 4
- 5
- 6
- 7
- 8
- 9
- 10
过滤器和过滤器链


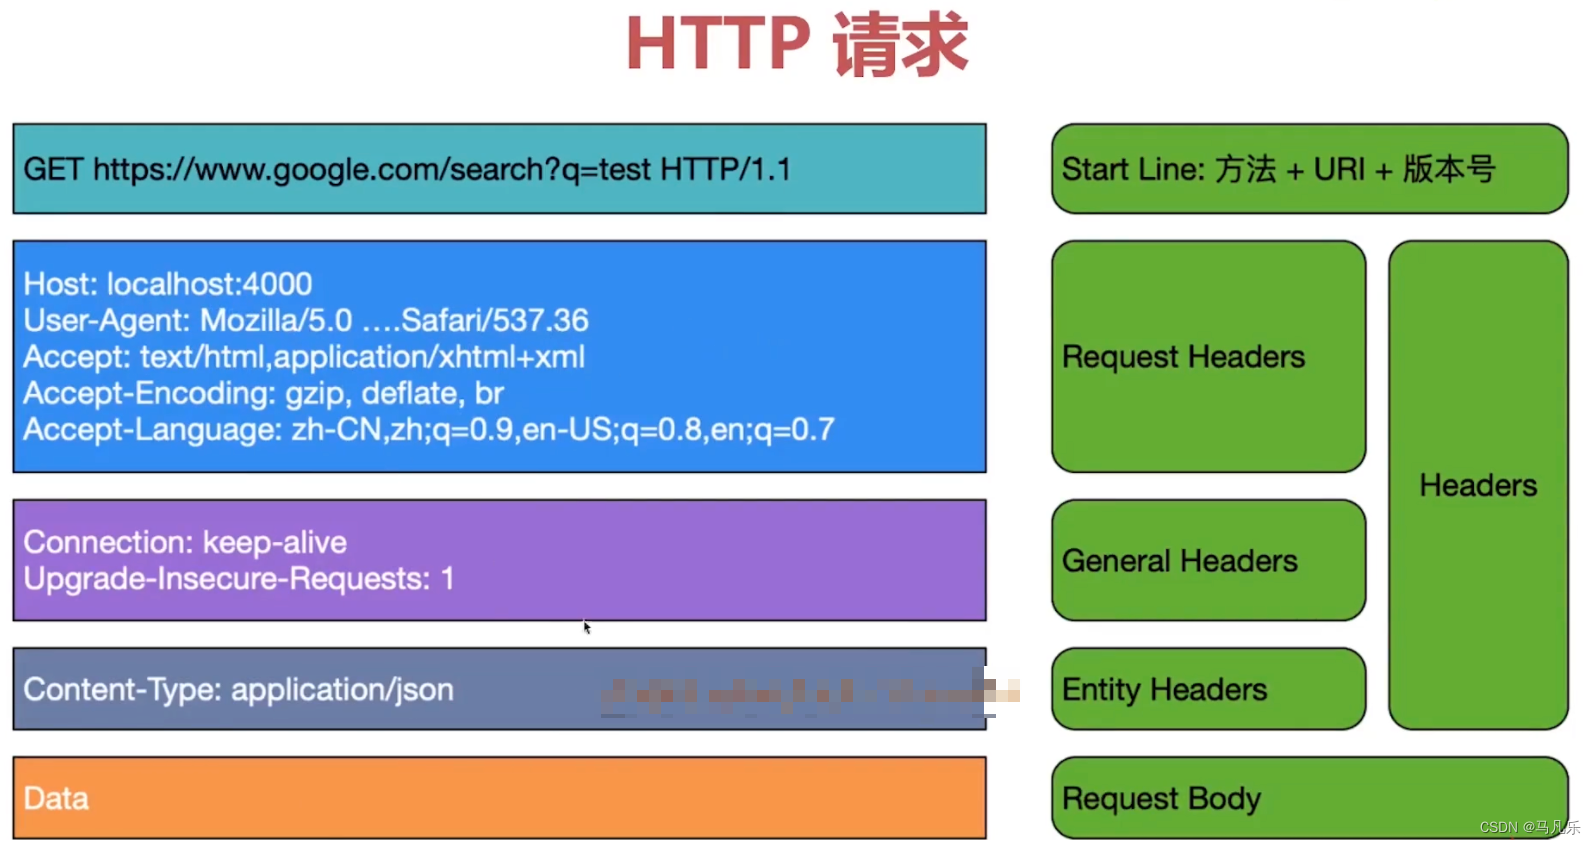
http请求的结构
http basic 认证
使用idea自带的
HTTP Client发送请求GET http://localhost:8080/api/hello Authorization: Basic user {{password}} Content-Type: application/json Accept: application/json #请求头和请求体要间隔至少一行,注释不算一行 { "gender": "男", "id": "1" }- 1
- 2
- 3
- 4
- 5
- 6
- 7
- 8
- 9
- 10
- 11
hello fucking world- 1

在HTTP中,
Basic Authorization基本认证是一种用来允许Web浏览器或其他客户端程序在请求时提供用户名和口令形式的身份凭证的一种登录验证方式。在发送之前是以用户名追加一个冒号然后串接上口令,并将得出的结果字符串再用Base64算法编码。例如,提供的用户名是
Aladdin、口令是open sesame,则拼接后的结果就是Aladdin:open sesame,然后再将其用Base64编码,得到QWxhZGRpbjpvcGVuIHNlc2FtZQ==。最终将Base64编码的字符串发送出去,由接收者解码得到一个由冒号分隔的用户名和口令的字符串。-
使用vscode中的rest client 或 idea中的http client则
不需要base64编码,IDE会自动处理。 -
若使用Post man 或Api post 等其他接口测试工具则
需要手动base64编码。- 未手动编码

服务端报错:
org.springframework.security.authentication.BadCredentialsException: Failed to decode basic authentication token- 手动编码

http响应的结构

开启security的debug模式
@Configuration @EnableWebSecurity(debug = true) public class SecurityConfig extends WebSecurityConfigurerAdapter { ... }- 1
- 2
- 3
- 4
- 5
************************************************************ // 请求方法 Request received for GET '/api/hello': org.apache.catalina.connector.RequestFacade@463246df // 请求头 servletPath:/api/hello pathInfo:null headers: authorization: Basic bWF5YW86NjY2 content-type: application/json accept: application/json content-length: 34 host: localhost:8080 connection: Keep-Alive user-agent: Apache-HttpClient/4.5.13 (Java/17.0.3) accept-encoding: gzip,deflate //该请求经过的过滤器链 Security filter chain: [ WebAsyncManagerIntegrationFilter SecurityContextPersistenceFilter HeaderWriterFilter LogoutFilter UsernamePasswordAuthenticationFilter BasicAuthenticationFilter RequestCacheAwareFilter SecurityContextHolderAwareRequestFilter AnonymousAuthenticationFilter SessionManagementFilter ExceptionTranslationFilter FilterSecurityInterceptor ] ************************************************************ 2022-08-11 17:19:41.074 INFO 31482 --- [nio-8080-exec-1] Spring Security Debugger : ************************************************************ New HTTP session created: 1F9DEB296860D99506A54723B7342075 Call stack: .... ************************************************************- 1
- 2
- 3
- 4
- 5
- 6
- 7
- 8
- 9
- 10
- 11
- 12
- 13
- 14
- 15
- 16
- 17
- 18
- 19
- 20
- 21
- 22
- 23
- 24
- 25
- 26
- 27
- 28
- 29
- 30
- 31
- 32
- 33
- 34
- 35
- 36
- 37
- 38
- 39
- 40
- 41
- 42
- 43
- 44
- 45
- 46
- 47
- 48
- 49
- 50
WebSecurity
让请求不经过过滤器链,一般用于
处理静态资源。@Override public void configure(WebSecurity web) throws Exception { web.ignoring().antMatchers("/public/**") // 静态资源,比如 css,js 无需登录鉴权 .requestMatchers(PathRequest.toStaticResources().atCommonLocations()); }- 1
- 2
- 3
- 4
- 5
- 6
************************************************************ Request received for GET '/public': org.apache.catalina.connector.RequestFacade@384c18c9 servletPath:/public pathInfo:null headers: host: localhost:8080 user-agent: curl/7.79.1 accept: */* Security filter chain: [] empty (bypassed by security='none') ************************************************************- 1
- 2
- 3
- 4
- 5
- 6
- 7
- 8
- 9
- 10
- 11
- 12
- 13
- 14
- 15
- 16
- 17
- 18
定制登录页
引入依赖
<dependency> <groupId>org.springframework.bootgroupId> <artifactId>spring-boot-starter-thymeleafartifactId> dependency> <dependency> <groupId>org.webjarsgroupId> <artifactId>bootstrapartifactId> <version>5.1.3version> dependency> <dependency> <groupId>org.webjarsgroupId> <artifactId>webjars-locator-coreartifactId> dependency>- 1
- 2
- 3
- 4
- 5
- 6
- 7
- 8
- 9
- 10
- 11
- 12
- 13
- 14
- 15
设置登录页
@Override protected void configure(HttpSecurity http) throws Exception { http .csrf().disable() .httpBasic(Customizer.withDefaults()) .formLogin() //设置登录页,如果没有认证就访问受保护的资源则都会跳转到这里。 .loginPage("/login") //提交表单的url .loginProcessingUrl("/doLogin") .and() .authorizeRequests() .antMatchers("/api/**").authenticated() .anyRequest().authenticated(); }- 1
- 2
- 3
- 4
- 5
- 6
- 7
- 8
- 9
- 10
- 11
- 12
- 13
- 14
- 15
添加WebMvc配置
@Configuration public class WebMvcConfig implements WebMvcConfigurer { //把webjar的静态资源加到映射中 @Override public void addResourceHandlers(ResourceHandlerRegistry registry) { registry.addResourceHandler("/webjars/**") .addResourceLocations("/webjars/") .resourceChain(false);//是否缓存资源解析的结果 //优先级设置最高 //registry.setOrder(1); } //将路径和url进行映射 @Override public void addViewControllers(ViewControllerRegistry registry) { registry.addViewController("/login").setViewName("login");//直接写模板的名字不需要后缀 //registry.setOrder(1); } }- 1
- 2
- 3
- 4
- 5
- 6
- 7
- 8
- 9
- 10
- 11
- 12
- 13
- 14
- 15
- 16
- 17
- 18
- 19
- 20
如果浏览器说:
重定向次数过多原因是:我们设置了
.anyRequest().authenticated();,它的意思是任何请求都需要进行登录认证,当访问/login时,由于/login也是请求,它会跳转到登录页进行认证,而/login是登录页的url,所以会再次访问/login,所以就造成了无限循环进行重定向。重定向次数过多也有其他情况,本质上都是访问login.html,然后又让login.html进行认证,结果就是陷入访问死循环
解决方案:
方式一:
@Override protected void configure(HttpSecurity http) throws Exception { http .csrf().disable() .httpBasic(Customizer.withDefaults()) .formLogin() //设置登录页,如果没有认证就访问受保护的资源则都会跳转到这里。 .loginPage("/login") //提交表单的url .loginProcessingUrl("/doLogin") .and() .authorizeRequests() .antMatchers("/api/**").authenticated() //让/login不需要认证 .antMatchers("/login").permitAll() .anyRequest().authenticated(); }- 1
- 2
- 3
- 4
- 5
- 6
- 7
- 8
- 9
- 10
- 11
- 12
- 13
- 14
- 15
- 16
- 17
方式二:
@Override public void configure(WebSecurity web) throws Exception { web.ignoring().antMatchers("/public/**","/login","/error"); }- 1
- 2
- 3
- 4
方式三(推荐,上面两种时不时出点问题):
@Override protected void configure(HttpSecurity http) throws Exception { http .csrf().disable() .httpBasic(Customizer.withDefaults()) .formLogin() //设置登录页,如果没有认证就访问受保护的资源则都会跳转到这里。 .loginPage("/login").permitAll() //提交表单的url .loginProcessingUrl("/doLogin") .and() .authorizeRequests() .antMatchers("/api/**").authenticated() .anyRequest().authenticated(); }- 1
- 2
- 3
- 4
- 5
- 6
- 7
- 8
- 9
- 10
- 11
- 12
- 13
- 14
- 15
Remember-me功能
为解决session过期后用户的直接访问问题
Spring Security提供开箱即用的配置rememberMe
原理:使用Cookie存储用户名,过期时间以及一个Hash
Hash:md5(用户名+过期时间+密码+salt) //如果改过密码或用户名则失效
定制登录/退出登录的处理
@Override protected void configure(HttpSecurity http) throws Exception { http .formLogin() .successHandler((req, resp, auth) -> { resp.setStatus(HttpStatus.OK.value()); resp.getWriter().println(new ObjectMapper().writeValueAsString(auth)); log.debug("登录成功"); }) .failureHandler((req, resp, e) -> { resp.setStatus(HttpStatus.UNAUTHORIZED.value()); //resp.setContentType(MediaType.APPLICATION_JSON_VALUE); resp.setContentType("application/json;charset=utf-8"); //val:lombok提供的,根据等号右边来自动判断左边的类型,相当于Map- 1
- 2
- 3
- 4
- 5
- 6
- 7
- 8
- 9
- 10
- 11
- 12
- 13
- 14
- 15
- 16
- 17
- 18
- 19
- 20
- 21
- 22
- 23
- 24
- 25
- 26
- 27
- 28
- 29
- 30
- 31
- 32
- 33
- 34
自定义filter
如果你既想保留json形式登录又想保留表单登录,则
需要关闭csrf。因为对于json形式不需要csrf token,但对于表单登录则需要csrf token。csrf对于http api请求不需要token。如果中途总出现
loginPage()和loginProcessingUrl()莫名其妙的问题,看一下是否关闭了csrf!!因为你在测试的时候是没有
csrf token的,Spring Security就不让你访问。http.csrf().disable()- 1
or
指定哪些请求不需要token
http.csrf().ignoringAntMatchers("/doLogin","/jsonLogin")- 1
密码的进化和验证
密码编码器
- 多种编码器的共存
DelegatingPasswordEncoder允许以不同的格式验证密码,提供升级的可能性
@Bean PasswordEncoder passwordEncoder(){ //默认编码算法的Id, 新的密码编码都会使用这个id对应的编码器 String idForDefault = "bcrypt"; // 要支持的多种编码器 Map<String,PasswordEncoder> encoders = new HashMap<>(){{ put(idForDefault, new BCryptPasswordEncoder()); put("SHA-1",new MessageDigestPasswordEncoder("SHA-1")); }}; return new DelegatingPasswordEncoder(idForDefault, encoders); }- 1
- 2
- 3
- 4
- 5
- 6
- 7
- 8
- 9
- 10
- 11
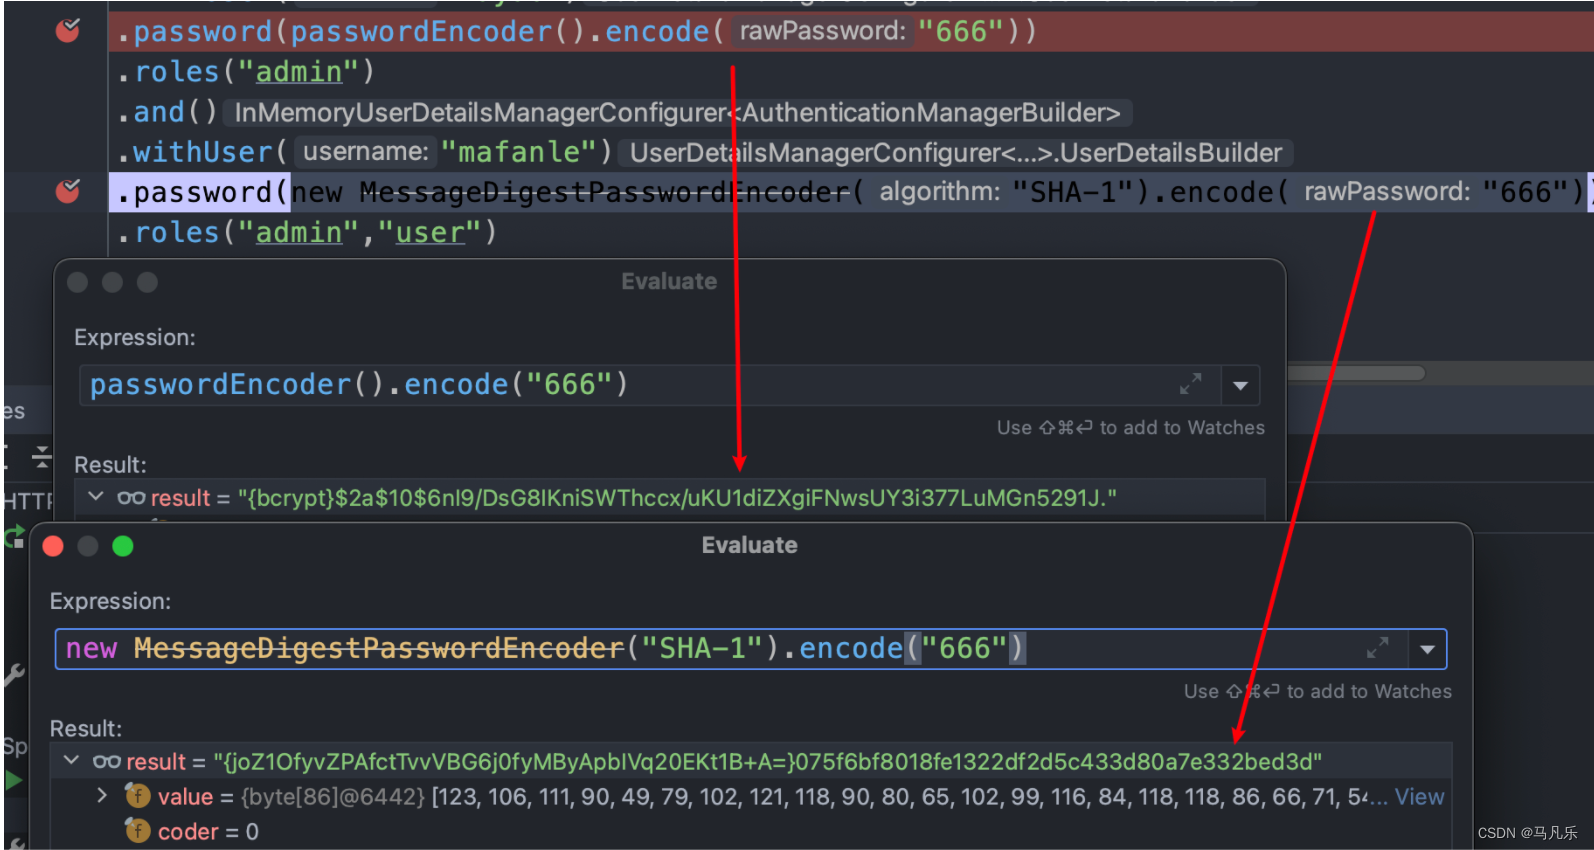
如果报错
There-is-no-PasswordEncoder-mapped-for-the-id....,参考在
DelegatingPasswordEncoder源码中给出了不同加密的样例,都是{id}encodedPassword的格式:// {bcrypt}:BCrypt强哈希方法 {bcrypt}$2a$10$dXJ3SW6G7P50lGmMkkmwe.20cQQubK3.HZWzG3YB1tlRy.fqvM/BG // {noop}:无加密 {noop}password // {PBKDF2}:PBKDF2加密 {pbkdf2}5d923b44a6d129f3ddf3e3c8d29412723dcbde72445e8ef6bf3b508fbf17fa4ed4d6b99ca763d8dc // {scrypt}:scrypt加密 {scrypt}:$e0801$8bWJaSu2IKSn9Z9kM+TPXfOc/9bdYSrN1oD9qfVThWEwdRTnO7re7Ei+fUZRJ68k9lTyuTeUp4of4g24hHnazw==$OAOec05+bXxvuu/1qZ6NUR+xQYvYv7BeL1QxwRpY5Pc= // {sha256}:sha256加密 {sha256}97cde38028ad898ebc02e690819fa220e88c62e0699403e94fff291cfffaf8410849f27605abcbc0- 1
- 2
- 3
- 4
- 5
- 6
- 7
- 8
- 9
- 10
解决方式:
对于
SHA-XX算法好像都没有id前缀,故手动添加。@Override protected void configure(AuthenticationManagerBuilder auth) throws Exception { auth.inMemoryAuthentication() .withUser("fanle") .password(passwordEncoder().encode("666")) .roles("admin") .and() .withUser("mafanle") //手动添加id前缀 .password("{SHA-256}"+new MessageDigestPasswordEncoder("SHA-256").encode("666")) .roles("admin","user") ; }- 1
- 2
- 3
- 4
- 5
- 6
- 7
- 8
- 9
- 10
- 11
- 12
- 13
- 14
密码匹配:
encoder.matches(CharSequence,String)密码升级:
实现UserDetailsPasswordService中的updatePassword。Spring Boot响应中未显示验证错误消息
只返回
400{ "timestamp": "2022-8-03T09:13:52.729+00:00", "status": 400, "error": "Bad Request", "path": "/departments" }- 1
- 2
- 3
- 4
- 5
- 6
原因:
Spring Boot限制错误响应中包含的信息,以降低将有关应用程序的敏感信息泄漏给客户端的风险。
通过在
application.properties或application.yml中设置一些属性,可以在响应中显式启用其他信息。server: error: include-binding-errors: always include-message: always- 1
- 2
- 3
- 4
验证注解和自定义验证注解
- JSR(Java Specification Requests) 380验证框架
<dependency> <groupId>org.springframework.bootgroupId> <artifactId>spring-boot-starter-validationartifactId> dependency>- 1
- 2
- 3
- 4
- 5
自定义注解对某个属性的验证
**以密码为例:**密码的验证比较复杂,使用
Passay框架进行验证。封装验证逻辑在注解中,有效的剥离验证逻辑和业务逻辑。
对于2个以上属性的复合验证,可以写一个应用于类的注解。
<dependency> <groupId>org.passaygroupId> <artifactId>passayartifactId> <version>1.6.0version> dependency>- 1
- 2
- 3
- 4
- 5
- 自定义注解
@Target({ElementType.FIELD,ElementType.TYPE,ElementType.ANNOTATION_TYPE}) @Retention(RetentionPolicy.RUNTIME) @Documented //指定此注解的实现 @Constraint(validatedBy = MyPasswordValidator.class) public @interface ValidPassword { // 当验证不通过时的提示信息 String message() default "invalid password"; // 约束注解在验证时所属的组别 Class<?> [] groups() default {}; // 负载 Class<? extends Payload>[] payload() default { }; }- 1
- 2
- 3
- 4
- 5
- 6
- 7
- 8
- 9
- 10
- 11
- 12
- 13
- 14
- 15
- 16
- 验证器
//验证注解,验证对象 public class MyPasswordValidator implements ConstraintValidator<ValidPassword,String> { @Override public boolean isValid(String password, ConstraintValidatorContext constraintValidatorContext) { PasswordValidator validator = new PasswordValidator(Arrays.asList( //长度8~20 new LengthRule(8, 20), //至少一个大写字母 new CharacterRule(EnglishCharacterData.UpperCase, 1), //至少一个小写字母 new CharacterRule(EnglishCharacterData.LowerCase, 1), //至少一个特殊字符 new CharacterRule(EnglishCharacterData.Special, 1), //不能有连续5个重复字母 new IllegalSequenceRule(EnglishSequenceData.Alphabetical, 5, false), //不能有连续5个重复数字 new IllegalSequenceRule(EnglishSequenceData.Numerical, 5, false), //不允许有键盘上的连续五个字符,如:qwert new IllegalSequenceRule(EnglishSequenceData.USQwerty, 5, false), //不允许有空格 new WhitespaceRule() )); RuleResult result = validator.validate(new PasswordData(password)); return result.isValid(); } @Override public void initialize(ValidPassword constraintAnnotation) { } }- 1
- 2
- 3
- 4
- 5
- 6
- 7
- 8
- 9
- 10
- 11
- 12
- 13
- 14
- 15
- 16
- 17
- 18
- 19
- 20
- 21
- 22
- 23
- 24
- 25
- 26
- 27
- 28
- 29
- 30
- 31
- 32
- 33
- 使用
@ValidPassword private String password; @ValidPassword private String matchingPassword;- 1
- 2
- 3
- 4
- 5
自定义注解对两个属性的组合验证
- 自定义注解
@Target({ElementType.FIELD,ElementType.TYPE,ElementType.ANNOTATION_TYPE}) @Retention(RetentionPolicy.RUNTIME) @Documented //指定此注解的实现 @Constraint(validatedBy = PasswordMatchValidator.class) public @interface ValidPasswordMatch { // 当验证不通过时的提示信息 String message() default "password not match"; // 约束注解在验证时所属的组别 Class<?> [] groups() default {}; // 负载 Class<? extends Payload>[] payload() default { }; }- 1
- 2
- 3
- 4
- 5
- 6
- 7
- 8
- 9
- 10
- 11
- 12
- 13
- 14
- 15
- 验证器
public class PasswordMatchValidator implements ConstraintValidator<ValidPasswordMatch, UserDTO> { @Override public void initialize(ValidPasswordMatch constraintAnnotation) { ConstraintValidator.super.initialize(constraintAnnotation); } @Override public boolean isValid(UserDTO userDTO, ConstraintValidatorContext context) { return userDTO.getPassword().equals(userDTO.getMatchingPassword()); } }- 1
- 2
- 3
- 4
- 5
- 6
- 7
- 8
- 9
- 10
- 11
- 12
- 13
- 使用
@Data @ValidPasswordMatch //放在类上 public class UserDTO implements Serializable { @NotEmpty @Size(min = 4,max = 8,message = "用户名长度必须在4~8个字符之间") private String username; //@NotEmpty //@Size(min = 8,max = 20,message = "密码长度必须在8~20个字符之间") @ValidPassword private String password; //@NotEmpty //@Size(min = 8,max = 20,message = "密码长度必须在8~20个字符之间") @ValidPassword private String matchingPassword; @Email private String email; @NotEmpty @Size(min = 2,max = 4,message = "名称长度必须在2~4个字符之间") private String name; }- 1
- 2
- 3
- 4
- 5
- 6
- 7
- 8
- 9
- 10
- 11
- 12
- 13
- 14
- 15
- 16
- 17
- 18
- 19
- 20
- 21
- 22
- 23
- 24
- 25
深入Spring Security认证
核心组件
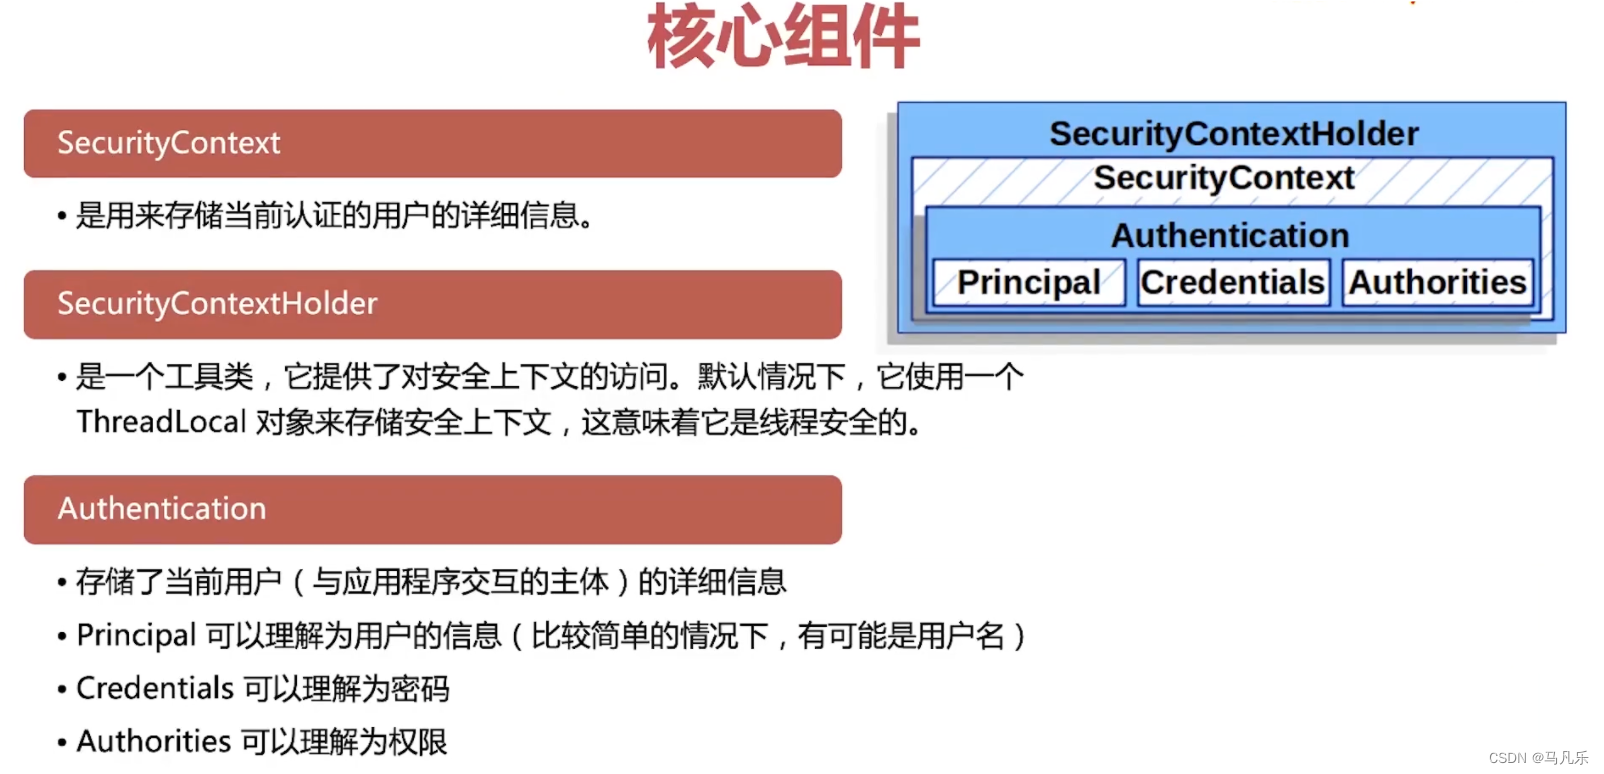
SecurityContextHolder工具类是一个线程安全的,为了应对服务器一对多的高并发情况。Authentication是Spring认证体系的核心元素,Spring Security内建了很多具体的派生类,比如最常见的用于用户名/密码登录场景的UsernamePasswordAuthenticationToken
UserDetails和UserDetailsService
通常的场景下用户是具备一系列属性约束的,这就是
UserDetails。从数据存储中根据用户名找到用户,是由
UserDetailsService定义的。这两个对象不负责认证工作,只是提供数据。所以一般我们都通过拓展它们来实现自定义的数据库结构。
根据数据库的表登录
最基础的表只需要两个:用户表和角色表最简单的定义可以直接设置查询语句。auth.jdbcAuthentication() .dataSource(dataSource) .usersByUsernameQuery("select username,password,enabled from users where username=?") .authoritiesByUsernameQuery("select username,authority from authorties where username=?") ;- 1
- 2
- 3
- 4
- 5
JPA方式
引入
jpa:<dependency> <groupId>org.springframework.bootgroupId> <artifactId>spring-boot-starter-data-jpaartifactId> dependency>- 1
- 2
- 3
- 4
配置
yml:spring: jpa: hibernate: ddl-auto: create-drop show-sql: true database: mysql- 1
- 2
- 3
- 4
- 5
- 6
ddl-auto几种属性:- create: 每次运行程序时,都会重新创建表,故而数据会丢失。
- create-drop: 每次运行程序时会先创建表结构,然后待程序结束时清空表。
- upadte: 每次运行程序,没有表时会创建表,如果对象发生改变会更新表结构,原有数据不会清空,只会更新。
- validate:运行程序会校验数据与数据库的字段类型是否相同,字段不同会报错。
- user实体类
实现UserDetails接口:
@Data @Entity @Table(name = "mooc_users") public class User implements UserDetails, Serializable { @Id//标识主键 @GeneratedValue(strategy = GenerationType.IDENTITY)//自增 private Long id; @Column(length = 50, unique = true, nullable = false) private String username; @Column(name = "password_hash", length = 80, nullable = false) private String password; @Column(length = 11, unique = true, nullable = false) private String mobile; @Column(length = 255, unique = true, nullable = false) private String email; @Column(length = 50) private String name; //如果类型是boolean则创建的方法是isEnabled //如果类型是Boolean,则创建的方法是getEnabled @Column(nullable = false) private boolean enabled; @Column(name = "account_non_expired", nullable = false) private boolean accountNonExpired; @Column(name = "account_non_locked", nullable = false) private boolean accountNonLocked; @Column(name = "credentials_non_expired", nullable = false) private boolean credentialsNonExpired; //建立表关联 @ManyToMany @Fetch(FetchMode.JOIN) @JoinTable(name = "mooc_users_roles", //user表 joinColumns = {@JoinColumn(name = "user_id",referencedColumnName = "id")}, //role表 inverseJoinColumns = {@JoinColumn(name = "role_id",referencedColumnName = "id")} ) private Set<Role> authorities; /*@Override public Collection getAuthorities() { return null; }*/ //可以直接删掉,因为lombok生成好了 /*@Override public boolean isAccountNonExpired() { return true; } @Override public boolean isAccountNonLocked() { return true; } @Override public boolean isCredentialsNonExpired() { return true; } @Override public boolean isEnabled() { return false; }*/ }- 1
- 2
- 3
- 4
- 5
- 6
- 7
- 8
- 9
- 10
- 11
- 12
- 13
- 14
- 15
- 16
- 17
- 18
- 19
- 20
- 21
- 22
- 23
- 24
- 25
- 26
- 27
- 28
- 29
- 30
- 31
- 32
- 33
- 34
- 35
- 36
- 37
- 38
- 39
- 40
- 41
- 42
- 43
- 44
- 45
- 46
- 47
- 48
- 49
- 50
- 51
- 52
- 53
- 54
- 55
- 56
- 57
- 58
- 59
- 60
- 61
- 62
- 63
- 64
- 65
- 66
- 67
- 68
- 69
- Role实体类实现
GrantedAuthority接口:
@Data @Entity @Table(name = "mooc_roles") @NoArgsConstructor @AllArgsConstructor public class Role implements GrantedAuthority , Serializable { @Id @GeneratedValue(strategy = GenerationType.IDENTITY) private Long id; @Column(name = "role_name",unique = true,nullable = false,length = 50) private String authority; /*@Override public String getAuthority() { return null; }*/ }- 1
- 2
- 3
- 4
- 5
- 6
- 7
- 8
- 9
- 10
- 11
- 12
- 13
- 14
- 15
- 16
- 17
- 18
- 19
- 实现
UserDetailsService接口:
@Service @RequiredArgsConstructor public class UserDetailsServiceImpl implements UserDetailsService { //@Autowired private final UserRepo userRepo; @Override public UserDetails loadUserByUsername(String username) throws UsernameNotFoundException { //如果不为空则从optional中拿出User,如果为空则抛出异常 return userRepo.findUserByUsername(username) .orElseThrow(()->new UsernameNotFoundException("用户名或者密码错误")); } }- 1
- 2
- 3
- 4
- 5
- 6
- 7
- 8
- 9
- 10
- 11
- 12
- 13
- 14
- 15
- 配置
SecurityConfig
@Autowired private UserDetailsService userDetailsService; @Override protected void configure(AuthenticationManagerBuilder auth) throws Exception { auth.userDetailsService(userDetailsService) .passwordEncoder(passwordEncoder()); }- 1
- 2
- 3
- 4
- 5
- 6
- 7
- 8
- 实现
UserDetailsPasswordService接口进行密码升级:
@Service @RequiredArgsConstructor public class UserDetailsPasswordImpl implements UserDetailsPasswordService { private final UserRepo userRepo; //密码升级 @Override public UserDetails updatePassword(UserDetails userDetails, String newPassword) { return userRepo.findUserByUsername(userDetails.getUsername()) .map(user -> { User user1 = user.withPassword(newPassword); User user2 = userRepo.save(user1); return (UserDetails)user2; }) .orElse(userDetails); } }- 1
- 2
- 3
- 4
- 5
- 6
- 7
- 8
- 9
- 10
- 11
- 12
- 13
- 14
- 15
- 16
- 17
- 18
- 19
- 20
使用场景:
当想让所有用户使用新的密码编码器时。
@Bean PasswordEncoder passwordEncoder(){ //默认编码算法的Id, 新的密码编码都会使用这个id对应的编码器 String idForDefault = "bcrypt"; // 要支持的多种编码器 Map<String,PasswordEncoder> encoders = new HashMap<>(){{ put(idForDefault, new BCryptPasswordEncoder()); put("SHA-1",new MessageDigestPasswordEncoder("SHA-1")); }}; return new DelegatingPasswordEncoder(idForDefault, encoders); }- 1
- 2
- 3
- 4
- 5
- 6
- 7
- 8
- 9
- 10
- 11
如果有是
SHA-1编码的用户登录进来,登录后自动让它的密码变成bcrypt编码,并且用户感知不到。Mybatis方式
- 创建
user实体类和role实体类:
@Data public class User implements UserDetails { private Integer id; private String username; private String password; private boolean enabled; @TableField(exist = false) private List<Role> roles; @Override public Collection<? extends GrantedAuthority> getAuthorities() { List<GrantedAuthority> authorities = new ArrayList<>(); for (Role role : roles) { if (role.getName().startsWith("ROLE_")){ authorities.add(new SimpleGrantedAuthority("ROLE_"+role.getName())); }else{ authorities.add(new SimpleGrantedAuthority(role.getName())); } } return authorities; } @Override public boolean isAccountNonExpired() { return true; } @Override public boolean isAccountNonLocked() { return true; } @Override public boolean isCredentialsNonExpired() { return true; } //@Override //public boolean isEnabled() { // return false; //} }- 1
- 2
- 3
- 4
- 5
- 6
- 7
- 8
- 9
- 10
- 11
- 12
- 13
- 14
- 15
- 16
- 17
- 18
- 19
- 20
- 21
- 22
- 23
- 24
- 25
- 26
- 27
- 28
- 29
- 30
- 31
- 32
- 33
- 34
- 35
- 36
- 37
- 38
- 39
- 40
- 41
- 42
- 43
- 44
- 45
- 46
- 47
public Collection getAuthorities()在jpa里省略了这个方法是因为他在authorities属性上建立了表关联,而我们使用mybatis没有这样的注解,故需要手动实现。@Data public class Role{ private Integer id; private String name; }- 1
- 2
- 3
- 4
- 5
- 6
- 7
- 8
- 创建mapper文件,使得根据用户名查找用户的时候,这个用户的角色也查询出来了。
@Mapper public interface UserMapper extends BaseMapper<User> { Optional<User> loadUserByUsername(String username); }- 1
- 2
- 3
- 4
- 5
- 6
<mapper namespace="com.fanle.mapper.UserMapper"> <resultMap id="baseMap" type="user"> <id property="id" column="id"/> <result property="username" column="username"/> <result property="password" column="password"/> <result property="enabled" column="enabled"/> resultMap> <resultMap id="userWithRoles" type="user" extends="baseMap"> <collection property="roles" javaType="list" ofType="role"> <id property="id" column="rid"/> <result property="name" column="rname"/> collection> resultMap> <select id="loadUserByUsername" resultMap="userWithRoles" parameterType="string"> SELECT u.*, r.id as rid, r.`name` as rname FROM `user` u LEFT JOIN user_role ur ON ur.uid = u.id LEFT JOIN role r ON ur.rid = r.id where u.username = #{username} select> mapper>- 1
- 2
- 3
- 4
- 5
- 6
- 7
- 8
- 9
- 10
- 11
- 12
- 13
- 14
- 15
- 16
- 17
- 18
- 19
- 20
- 21
- 22
- 23
- 24
- 25
- 实现
UserDetailsService接口
@Service public class UserServiceImpl implements UserDetailsService { @Autowired private UserMapper userMapper; @Override public UserDetails loadUserByUsername(String username) throws UsernameNotFoundException { Optional<User> user = userMapper.loadUserByUsername(username); return user.orElseThrow(() -> new UsernameNotFoundException("用户名或密码错误")); } }- 1
- 2
- 3
- 4
- 5
- 6
- 7
- 8
- 9
- 10
- 11
- 12
- 13
- 配置SecurityConfig
@Configuration public class SecurityConfig extends WebSecurityConfigurerAdapter { @Autowired private UserDetailsService userDetailsService; @Override protected void configure(AuthenticationManagerBuilder auth) throws Exception { auth.userDetailsService(userDetailsService); } @Bean PasswordEncoder passwordEncoder(){ return new BCryptPasswordEncoder(); } }- 1
- 2
- 3
- 4
- 5
- 6
- 7
- 8
- 9
- 10
- 11
- 12
- 13
- 14
- 15
- 16
环境和环境变量
至少会有2个以上的环境:比如
开发环境和生产(线上)环境Spring中的环境配置
application-{profile}.ymlapplication.yml
server: port: ${SERVER_PORT:8080} error: include-binding-errors: always include-message: always spring: profiles: active: dev- 1
- 2
- 3
- 4
- 5
- 6
- 7
- 8
- 9
application-dev.yml
logging: level: org.springframework.security: debug com.fanle: debug spring: datasource: type: com.alibaba.druid.pool.DruidDataSource url: jdbc:mysql://localhost:3306/test?useUnicode=true&characterEncoding=utf-8&serverTimezone=Asia/Shanghai driver-class-name: com.mysql.cj.jdbc.Driver username: root password: mayao666 #mybatis-plus: # mapper-locations: classpath:mappers/*.xml # type-aliases-package: com.fanle.entity # configuration: # log-impl: org.apache.ibatis.logging.stdout.StdOutImpl # map-underscore-to-camel-case: true jpa: hibernate: ddl-auto: create-drop show-sql: true database: mysql- 1
- 2
- 3
- 4
- 5
- 6
- 7
- 8
- 9
- 10
- 11
- 12
- 13
- 14
- 15
- 16
- 17
- 18
- 19
- 20
- 21
- 22
- 23
2022-08-16 10:03:17.171 INFO 75975 --- [ main] com.fanle.SecurityOauth2Application : The following 1 profile is active: "dev"- 1
使用系统环境变量:
${DB_SCHEMA:test},如果没有DB_SCHEMA这个系统环境变量,则默认赋值为test。server: port: ${SERVER_PORT:8080}- 1
- 2
@Profile("dev") public class SecurityConfig extends WebSecurityConfigurerAdapter {...}- 1
- 2
表示只有在
dev环境下才会加载这个配置类。自动化测试
Web的集成测试可以使用
@SpringBootTest注解,使用MockMvc执行请求以及对响应做判断。import org.junit.jupiter.api.BeforeEach; import org.junit.jupiter.api.Test; import org.springframework.beans.factory.annotation.Autowired; import org.springframework.boot.test.context.SpringBootTest; import org.springframework.test.web.servlet.MockMvc; import org.springframework.test.web.servlet.setup.MockMvcBuilders; import org.springframework.web.context.WebApplicationContext; import static org.springframework.test.web.servlet.request.MockMvcRequestBuilders.*; import static org.springframework.test.web.servlet.result.MockMvcResultMatchers.*; /** * @author FanLe * @date 2022/8/16 10:21 */ @SpringBootTest public class SecuredRestAPIIntTests { @Autowired private WebApplicationContext context; private MockMvc mockMvc; @BeforeEach public void setup(){ mockMvc = MockMvcBuilders .webAppContextSetup(context) .build(); } @Test public void test() throws Exception { mockMvc.perform( get("/api/hello") ) .andExpect(status().isOk()); } }- 1
- 2
- 3
- 4
- 5
- 6
- 7
- 8
- 9
- 10
- 11
- 12
- 13
- 14
- 15
- 16
- 17
- 18
- 19
- 20
- 21
- 22
- 23
- 24
- 25
- 26
- 27
- 28
- 29
- 30
- 31
- 32
- 33
- 34
- 35
- 36
- 37
- 38
- 39
启动
test方法后显示成功,为什么都没有认证就可以成功呢?因为spring默认认为你是测试接口的,如果需要认证,可以在构建MockMvc时决定是否应用Spring Security。
import static org.springframework.security.test.web.servlet.setup.SecurityMockMvcConfigurers.springSecurity; @BeforeEach public void setup(){ mockMvc = MockMvcBuilders .webAppContextSetup(context) .apply(springSecurity()) .build(); }- 1
- 2
- 3
- 4
- 5
- 6
- 7
- 8
- 9
结果:
java.lang.AssertionError: Status expected:<200> but was:<401> Expected :200 Actual :401- 1
- 2
- 3
通过
@WithMockUser模拟一个授权用户的访问@Test @WithMockUser //假设当前用户已经认证过了.这个注解的角色默认就是user public void test() throws Exception { mockMvc.perform( get("/api/hello") ) .andExpect(status().isOk()); }- 1
- 2
- 3
- 4
- 5
- 6
- 7
- 8
会话管理
会话并发管理就是指在当前系统中,
同一个用户可以同时创建多少个会话。如果一台设备对应一个会话,那么也可以简单理解为同一个用户可以同时在多少台设备上进行登录。默认情况下,同一用户在多少台设备上登录并没有限制,不过开发者可以在Spring Security中对此进行配置。
开启会话管理
protected void configure(HttpSecurity http) throws Exception { http .httpBasic()//开启basic方式认证 .and() .authorizeRequests() .anyRequest().authenticated() .and() .csrf().disable() .formLogin() .and() .sessionManagement() //开启会话管理 .maximumSessions(1) //设置会话并发数为1 ; }- 1
- 2
- 3
- 4
- 5
- 6
- 7
- 8
- 9
- 10
- 11
- 12
- 13
- 14
- 15
@Bean HttpSessionEventPublisher httpSessionEventPublisher(){ return new HttpSessionEventPublisher(); }- 1
- 2
- 3
- 4
-
sessionManagement()用来开启会话管理;maximumSessions(n)设置会话并发数。 -
HttpSessionEventPublisher提供一一个HttpSessionEventPublisher实例。Spring Security中通过一个Map集合来集护当前的Http Session记录,进而实现会话的并发管理。当用户登录成功时,就向集合中添加一条
Http Session记录;当会话销毁时,就从集合中移除-条Httpsession记录。
HtpSesionEvenPublisher实现了Fttp SessionListener接口,可以监听到HttpSession的创建和销毁事件,并将HttpSession的创建/销毁事件发布出去,这样,当有HttpSession销毀时,Spring Security就可以感知到该事件了。
会话被挤下线的处理方案
-
传统web开发
protected void configure(HttpSecurity http) throws Exception { http .httpBasic()//开启basic方式认证 .and() .authorizeRequests() .anyRequest().authenticated() .and() .csrf().disable() .formLogin() .and() .sessionManagement() //开启会话管理 .maximumSessions(1) //设置会话并发数为1 .expiredUrl("/login") //会话过期处理 ; }- 1
- 2
- 3
- 4
- 5
- 6
- 7
- 8
- 9
- 10
- 11
- 12
- 13
- 14
- 15
- 16
-
前后端分离开发处理
protected void configure(HttpSecurity http) throws Exception { http .httpBasic()//开启basic方式认证 .and() .authorizeRequests() .anyRequest().authenticated() .and() .csrf().disable() .formLogin() .and() .sessionManagement() //开启会话管理 .maximumSessions(1) //设置会话并发数为1 //会话过期处理 .expiredSessionStrategy(new SessionInformationExpiredStrategy() { @Override public void onExpiredSessionDetected(SessionInformationExpiredEvent event) throws IOException, ServletException { HttpServletResponse resp = event.getResponse(); resp.setContentType("application/json;charset=utf-8"); HashMap<String, Object> map = new HashMap<>(); map.put("status",200); map.put("msg","当前会话已失效,请重新登录~"); resp.getWriter().write(new ObjectMapper().writeValueAsString(map)); resp.flushBuffer(); } }) ; }- 1
- 2
- 3
- 4
- 5
- 6
- 7
- 8
- 9
- 10
- 11
- 12
- 13
- 14
- 15
- 16
- 17
- 18
- 19
- 20
- 21
- 22
- 23
- 24
- 25
- 26
- 27
- 28
禁止再次登录
默认的效果是一种被“挤下线”的效果,后面登录的用户会把前面登录的用户“挤下线”。还有一种是
禁止后来者登录,即一旦当前用户登录成功,后来者无法再次使用相同的用户登
录,直到当前用户主动注销登录,配置如下:protected void configure(HttpSecurity http) throws Exception { http .httpBasic()//开启basic方式认证 .and() .authorizeRequests() .anyRequest().authenticated() .and() .csrf().disable() .formLogin() .and() .sessionManagement() //开启会话管理 .maximumSessions(1) //设置会话并发数为1 .maxSessionsPreventsLogin(true)//登录之后禁止再次登录 .and() .logout() //主动注销 ; }- 1
- 2
- 3
- 4
- 5
- 6
- 7
- 8
- 9
- 10
- 11
- 12
- 13
- 14
- 15
- 16
- 17
- 18
CSRF
传统web开发使用CSRF
只需要在Spring Security的配置类中加
http.csrf();- 1
前后端分离使用CSRF
前后端分离开发时,只需要将生成
csrf放入到Cookie中,并在请求时获取Cookie中令牌信息进行提交即可。验证时不是只要是携带
Cookie就让通过,而是要把Cookie放在指定的位置,并且有一个Key才行。比如:放在header中,key是csrfToken,value是Cookie中的值。
-
修改CSRF存入Cookie
protected void configure(HttpSecurity http) throws Exception { http.httpBasic() .and() .authorizeRequests() .anyRequest().authenticated() .and() .formLogin() .and() .csrf() //1.将令牌保存到Cookie中 //2.允许Cookie被前端获取 .csrfTokenRepository(CookieCsrfTokenRepository.withHttpOnlyFalse()); }- 1
- 2
- 3
- 4
- 5
- 6
- 7
- 8
- 9
- 10
- 11
- 12
- 13
-
访问登录页面查看Cookie

-
发送请求携带令牌
-
从请求参数中获取
/jsonLogin?_csrf=3780e518-c5ad-4d8b-baf0-62a0330f6161必须以
_csrf为key! -
从请求头中获取

必须以X-XSRF-TOKEN为key!
-
构建基于JWT的认证
认证流程

JWT
JWT是Json Web Token的缩写,基于RFC 7519标准定义。- 可以安全传输的小巧和自包含的
JSON对象 - 可以使用
数字签名,所以是可信任的和安全的 - 可以使用
HMAC算法进行加密或者RSA的公钥私钥来进行签名
JWT的工作流程

JWT的结构

JWT的配置和类库的使用
引入依赖
<dependency> <groupId>io.jsonwebtokengroupId> <artifactId>jjwt-apiartifactId> <version>0.11.1version> dependency> <dependency> <groupId>io.jsonwebtokengroupId> <artifactId>jjwt-implartifactId> <version>0.11.1version> dependency> <dependency> <groupId>io.jsonwebtokengroupId> <artifactId>jjwt-jacksonartifactId> <version>0.11.1version> dependency>- 1
- 2
- 3
- 4
- 5
- 6
- 7
- 8
- 9
- 10
- 11
- 12
- 13
- 14
- 15
- 16
- 17

创建和解析JWT
@Component public class JwtUtils { //用于签名 private static final Key key = Keys.secretKeyFor(SignatureAlgorithm.HS512); //创建JWT public String createJwtToken(UserDetails userDetails) { Map<String, Object> map = Map.of( "sub", userDetails.getUsername(), "authorities", userDetails.getAuthorities() .stream() .map(authority -> authority.getAuthority()) .collect(Collectors.toList()) ); return createJwtToken(map); } //创建JWT private static String createJwtToken(Map<String, Object> map) { long now = System.currentTimeMillis(); return Jwts.builder() .setId("fanle") .setClaims(map) .setIssuedAt(new Date(now)) .setExpiration(new Date(now + 60_000)) //60s过期 .signWith(key, SignatureAlgorithm.HS512) .compact(); } //解析JWT public Claims getJwtBody(String token) { return Jwts.parserBuilder() .setSigningKey(key) .build() .parseClaimsJws(token) .getBody(); } //判断token是否过期 public boolean isExpired(String token) { //当前时间是否在过期时间之前 return getJwtBody(token).getExpiration().before(new Date()); } //刷新过期时间并返回一个新的token public String refreshTokenExpiration(String token) { Claims claims = getJwtBody(token); //在过期时间基础上延长一分钟 long before = claims.getExpiration().getTime(); claims.setExpiration(new Date(before +60_000)); return createJwtToken(claims); } }- 1
- 2
- 3
- 4
- 5
- 6
- 7
- 8
- 9
- 10
- 11
- 12
- 13
- 14
- 15
- 16
- 17
- 18
- 19
- 20
- 21
- 22
- 23
- 24
- 25
- 26
- 27
- 28
- 29
- 30
- 31
- 32
- 33
- 34
- 35
- 36
- 37
- 38
- 39
- 40
- 41
- 42
- 43
- 44
- 45
- 46
- 47
- 48
- 49
- 50
- 51
- 52
- 53
访问令牌和刷新令牌

-
编写yml文件
mooc: jwt: access-token-expire-time: 300000 refresh-token-expire-time: 2592000000- 1
- 2
- 3
- 4
-
编写JwtProperties类获取文件属性
@Data @Configuration @ConfigurationProperties(prefix = "mooc") public class JwtProperties { private Jwt jwt = new Jwt(); @Data public static class Jwt{ //Access Token 过期时间 yml文件中:mooc.jwt.access-token-expire-time=xxx private Long accessTokenExpireTime = 60_000L; //Refresh Token 过期时间 private Long refreshTokenExpireTime = 30 * 24 * 3600 * 1000L; } }- 1
- 2
- 3
- 4
- 5
- 6
- 7
- 8
- 9
- 10
- 11
- 12
- 13
- 14
- 15
-
修改JWT工具类
@Component public class JwtUtils { //用于签名的访问令牌秘钥 private static final Key accessKey = Keys.secretKeyFor(SignatureAlgorithm.HS512); //用于签名的刷新令牌秘钥 private static final Key refreshKey = Keys.secretKeyFor(SignatureAlgorithm.HS512); @Autowired private JwtProperties jwtProperties; //创建访问令牌 public String createAccessToken(UserDetails userDetails) { Map<String, Object> map = Map.of( "sub", userDetails.getUsername(), "authorities", userDetails.getAuthorities() .stream() .map(authority -> authority.getAuthority()) .collect(Collectors.toList()) ); return createJwtToken(map, accessKey, jwtProperties.getJwt().getAccessTokenExpireTime()); } //创建刷新令牌 public String createRefreshToken(UserDetails userDetails) { Map<String, Object> map = Map.of( "sub", userDetails.getUsername(), "authorities", userDetails.getAuthorities() .stream() .map(authority -> authority.getAuthority()) .collect(Collectors.toList()) ); return createJwtToken(map, refreshKey, jwtProperties.getJwt().getRefreshTokenExpireTime()); } //创建JWT private static String createJwtToken(Map<String, Object> map, Key key, long expire) { long now = System.currentTimeMillis(); return Jwts.builder() .setId("fanle") .setClaims(map) .setIssuedAt(new Date(now)) .setExpiration(new Date(now + expire)) .signWith(key, SignatureAlgorithm.HS512) .compact(); } //解析JWT public Claims getJwtBody(String token) { return Jwts.parserBuilder() .setSigningKey(accessKey) .build() .parseClaimsJws(token) .getBody(); } }- 1
- 2
- 3
- 4
- 5
- 6
- 7
- 8
- 9
- 10
- 11
- 12
- 13
- 14
- 15
- 16
- 17
- 18
- 19
- 20
- 21
- 22
- 23
- 24
- 25
- 26
- 27
- 28
- 29
- 30
- 31
- 32
- 33
- 34
- 35
- 36
- 37
- 38
- 39
- 40
- 41
- 42
- 43
- 44
- 45
- 46
- 47
- 48
- 49
- 50
- 51
- 52
- 53
- 54
- 55
- 56
- 57
- 58
实现JwtFilter

验证认证令牌
- 给JwtProperties.jwt添加两个属性
@Data @Configuration @ConfigurationProperties(prefix = "mooc") public class JwtProperties { private Jwt jwt = new Jwt(); @Data public static class Jwt{ //Access Token 过期时间 yml文件中:mooc.jwt.access-token-expire-time=xxx private Long accessTokenExpireTime = 60_000L; //Refresh Token 过期时间 private Long refreshTokenExpireTime = 30 * 24 * 3600 * 1000L; //请求头 private String header = "Authorization"; private String prefix = "Bearer "; } }- 1
- 2
- 3
- 4
- 5
- 6
- 7
- 8
- 9
- 10
- 11
- 12
- 13
- 14
- 15
- 16
- 17
- 18
- 实现JwtFilter类
@Component public class JwtFilter extends OncePerRequestFilter { @Autowired private JwtProperties jwtProperties; @Autowired private JwtUtils jwtUtils; @Override protected void doFilterInternal(HttpServletRequest req, HttpServletResponse resp, FilterChain filterChain) throws ServletException, IOException { //Authorization: Bearer xxxxx if (hasJwtToken(req)) { //合法请求,验证token JwtProperties.Jwt jwt = jwtProperties.getJwt(); String jwtToken = req.getHeader(jwt.getHeader()).substring(jwt.getPrefix().length()); Optional<Claims> jwtBody = Optional.ofNullable(jwtUtils.getJwtBody(jwtToken)); jwtBody.filter(claims -> claims.get("authorities") != null); jwtBody.ifPresentOrElse(claims -> { //jwtBody有值的处理方式 List<String> authorities = (List<String>) claims.get("authorities"); List<GrantedAuthority> list = authorities .stream() .map(SimpleGrantedAuthority::new) .collect(Collectors.toList()); //创建认证对象并保存在Security上下文中 Authentication auth = new UsernamePasswordAuthenticationToken(claims.getSubject(), null, list); SecurityContextHolder.getContext().setAuthentication(auth); }, () -> { //jwtBody没值的处理方式 SecurityContextHolder.clearContext(); }); } filterChain.doFilter(req, resp); } /** * 检查JWT token是否在HTTP报头中 * * @param req * @return */ private boolean hasJwtToken(HttpServletRequest req) { String header = req.getHeader(jwtProperties.getJwt().getHeader()); return header != null && header.startsWith(jwtProperties.getJwt().getPrefix()); } }- 1
- 2
- 3
- 4
- 5
- 6
- 7
- 8
- 9
- 10
- 11
- 12
- 13
- 14
- 15
- 16
- 17
- 18
- 19
- 20
- 21
- 22
- 23
- 24
- 25
- 26
- 27
- 28
- 29
- 30
- 31
- 32
- 33
- 34
- 35
- 36
- 37
- 38
- 39
- 40
- 41
- 42
- 43
- 44
- 45
- 46
- 47
- 48
- 49
- 50
- 注册到Spring Security
//添加jwt过滤器 http.addFilterBefore(jwtFilter, UsernamePasswordAuthenticationFilter.class);- 1
- 2
生成认证令牌及实现登录接口
-
创建辅助使用的实体类Auth和LoginDTO
@Data @NoArgsConstructor @AllArgsConstructor public class Auth implements Serializable { private String accessToken; private String refreshToken; }- 1
- 2
- 3
- 4
- 5
- 6
- 7
- 8
@Data @NoArgsConstructor @AllArgsConstructor public class LoginDTO implements Serializable { @NotEmpty private String username; @NotEmpty private String password; }- 1
- 2
- 3
- 4
- 5
- 6
- 7
- 8
- 9
- 10
- 11
-
创建UserService
@Service public class UserService { @Autowired private UserRepo userRepo; @Autowired private JwtUtils jwtUtils; @Autowired private PasswordEncoder passwordEncoder; public Auth login(String username,String password) throws AuthenticationException { return userRepo.findOptionalUserByUsername(username) //根据用户名查找用户 .filter(user -> passwordEncoder.matches(password,user.getPassword())) //校验密码 .map(user -> new Auth( jwtUtils.createAccessToken(user), jwtUtils.createRefreshToken(user) )) .orElseThrow(() -> new BadCredentialsException("用户名或密码错误")); //如果没值则抛出异常 } }- 1
- 2
- 3
- 4
- 5
- 6
- 7
- 8
- 9
- 10
- 11
- 12
- 13
- 14
- 15
- 16
- 17
- 18
- 19
- 20
- 21
- 22
-
创建controller并暴露接口
@PostMapping("/token") public Auth login(@RequestBody @Valid LoginDTO loginDTO){ return userService.login(loginDTO.getUsername(), loginDTO.getPassword()); }- 1
- 2
- 3
- 4
根据刷新令牌获取新的认证令牌
-
更新JWT工具类
@Component public class JwtUtils { //用于签名的访问令牌秘钥 private static final Key accessKey = Keys.secretKeyFor(SignatureAlgorithm.HS512); //用于签名的刷新令牌秘钥 private static final Key refreshKey = Keys.secretKeyFor(SignatureAlgorithm.HS512); @Autowired private JwtProperties jwtProperties; //创建访问令牌 public String createAccessToken(UserDetails userDetails) { Map<String, Object> map = Map.of( "sub", userDetails.getUsername(), "authorities", userDetails.getAuthorities() .stream() .map(authority -> authority.getAuthority()) .collect(Collectors.toList()) ); return createJwtToken(map, accessKey, jwtProperties.getJwt().getAccessTokenExpireTime()); } //创建刷新令牌 public String createRefreshToken(UserDetails userDetails) { Map<String, Object> map = Map.of( "sub", userDetails.getUsername(), "authorities", userDetails.getAuthorities() .stream() .map(authority -> authority.getAuthority()) .collect(Collectors.toList()) ); return createJwtToken(map, refreshKey, jwtProperties.getJwt().getRefreshTokenExpireTime()); } //利用刷新令牌创建新的访问令牌 public String creatAccessTokenByRefreshToken(String refreshToken){ Claims claims = getJwtBodyByRefreshToken(refreshToken); return createJwtToken(claims,accessKey,jwtProperties.getJwt().getAccessTokenExpireTime()); } //创建JWT private static String createJwtToken(Map<String, Object> map, Key key, long expire) { long now = System.currentTimeMillis(); return Jwts.builder() .setId("fanle") .setClaims(map) .setIssuedAt(new Date(now)) .setExpiration(new Date(now + expire)) .signWith(key, SignatureAlgorithm.HS512) .compact(); } //用访问令牌解析JWT public Claims getJwtBodyByAccessToken(String token) { return getJwtBody(token,accessKey); } //用刷新令牌解析JWT public Claims getJwtBodyByRefreshToken(String token) { return getJwtBody(token,refreshKey); } //根据令牌解析JWT public Claims getJwtBody(String token,Key key){ return Jwts.parserBuilder() .setSigningKey(key) .build() .parseClaimsJws(token) .getBody(); } //验证访问令牌 public boolean validateAccessToken(String token) { return validateToken(token,accessKey); } //验证刷新令牌 public boolean validateRefreshToken(String token) { return validateToken(token,refreshKey); } //验证令牌 public boolean validateToken(String token,Key key){ try { Jwts.parserBuilder().setSigningKey(key).build().parse(token); return true; } catch (ExpiredJwtException e) { //过期不算非法 return false; } catch (MalformedJwtException e) { throw new RuntimeException("token格式不对"); } catch (SignatureException e) { throw new RuntimeException("签名错误"); } catch (IllegalArgumentException e) { throw new RuntimeException("参数异常"); } } }- 1
- 2
- 3
- 4
- 5
- 6
- 7
- 8
- 9
- 10
- 11
- 12
- 13
- 14
- 15
- 16
- 17
- 18
- 19
- 20
- 21
- 22
- 23
- 24
- 25
- 26
- 27
- 28
- 29
- 30
- 31
- 32
- 33
- 34
- 35
- 36
- 37
- 38
- 39
- 40
- 41
- 42
- 43
- 44
- 45
- 46
- 47
- 48
- 49
- 50
- 51
- 52
- 53
- 54
- 55
- 56
- 57
- 58
- 59
- 60
- 61
- 62
- 63
- 64
- 65
- 66
- 67
- 68
- 69
- 70
- 71
- 72
- 73
- 74
- 75
- 76
- 77
- 78
- 79
- 80
- 81
- 82
- 83
- 84
- 85
- 86
- 87
- 88
- 89
- 90
- 91
- 92
- 93
- 94
- 95
- 96
- 97
- 98
- 99
-
创建接口
@PostMapping("/token/refresh") public Auth refreshToken(@RequestHeader("Authorization") String authorization, @RequestParam String refreshToken){ String accessToken = authorization.substring("Bearer ".length()); if (jwtUtils.validateAccessToken(accessToken) && jwtUtils.validateRefreshToken(refreshToken)){ //如果访问令牌和刷新令牌都合法,则签发新的token return new Auth(jwtUtils.creatAccessTokenByRefreshToken(refreshToken), refreshToken); } throw new AccessDeniedException("访问被拒绝"); }- 1
- 2
- 3
- 4
- 5
- 6
- 7
- 8
- 9
- 10
- 11
实现注册接口
-
实现service层方法
@Autowired private PasswordEncoder passwordEncoder; @Transactional public User register(User user){ //密码加密 user.setPassword(passwordEncoder.encode(user.getPassword())); //给个默认角色 user.setAuthorities(Set.of(Role.builder().authority("ROLE_USER").build())); return userRepo.save(user); }- 1
- 2
- 3
- 4
- 5
- 6
- 7
- 8
- 9
- 10
- 11
- 12
-
写controller层接口
@PostMapping("/register") public void register(@Valid @RequestBody UserDTO userDTO) { //检查username,email,mobile都是唯一的,所以要查询数据库确保唯一 if (userService.isUsernameExisted(userDTO.getUsername())){ throw new DuplicateUserException("用户名重复注册~"); } if (userService.isEmailExisted(userDTO.getEmail())){ throw new DuplicateUserException("邮箱重复注册~"); } if (userService.isMobileExisted(userDTO.getMobile())){ throw new DuplicateUserException("手机号重复注册~"); } //将UserDTO转为成User保存,给一个默认角色(ROLE_USER) userService.register(User.builder() .username(userDTO.getUsername()) .name(userDTO.getName()) .password(userDTO.getPassword()) .email(userDTO.getEmail()) .mobile(userDTO.getMobile()) .build()); }- 1
- 2
- 3
- 4
- 5
- 6
- 7
- 8
- 9
- 10
- 11
- 12
- 13
- 14
- 15
- 16
- 17
- 18
- 19
- 20
- 21
授权
权限管理策略
Spring Security中提供的权限管理策略主要有两种类型:
-
基于过滤器的权限管理(FilterSecurityInterceptor)主要拦截HTTP请求,拦截下来之后根据HTTP请求地址进行权限校验。
-
基于AOP的权限管理(MethodSecurityInterceptor)处理方法级别的权限问题。当需要调用某个方法时,通过AOP将其拦截下来,然后判断用户是否具备相关权限。
mvcMatcher、antMatcher、regexMatcher
-
antMatcher
映射不关心使用哪个HttpMethod的AntPathRequestMatcher实例List 。
参数:antPatterns – 用于创建AntPathRequestMatcher的 ant 模式
回报:创建RequestMatcher后链接的对象 -
mvcMatcher
映射一个不关心使用哪个HttpMethod的MvcRequestMatcher 。此匹配器将使用 Spring MVC 用于匹配的相同规则。例如,路径“/path”的映射通常会匹配“/path”、“/path/”、“/path.html”等。
如果 Spring MVC 不会处理当前请求,则将使用该模式作为 ant 模式的合理默认值。
参数:mvcPatterns – 要匹配的模式。匹配规则由 Spring MVC 定义
回报:创建RequestMatcher后链接的对象。 -
regexMatcher
创建一个未指定HttpMethod的RegexRequestMatcher实例List 。
参数:regexPatterns – 创建RegexRequestMatcher的正则表达式
回报:创建RequestMatcher后链接的对象
基于URL权限管理
-
配置类
@Override protected void configure(AuthenticationManagerBuilder auth) throws Exception { auth.inMemoryAuthentication() .withUser("root") .password("{noop}666") .roles("ADMIN","USER") .and() .withUser("user") .password("{noop}666") .authorities("READ_INFO"); } @Override protected void configure(HttpSecurity http) throws Exception { http.httpBasic() .and() .authorizeRequests() //具有admin角色 .mvcMatchers("/admin").hasRole("ADMIN") //具有user角色 .mvcMatchers("/user").hasRole("USER") //具有READ_INFO权限 .mvcMatchers("/info").hasAuthority("READ_INFO") .anyRequest().authenticated() .and() .formLogin() .and() .csrf() .disable() ; }- 1
- 2
- 3
- 4
- 5
- 6
- 7
- 8
- 9
- 10
- 11
- 12
- 13
- 14
- 15
- 16
- 17
- 18
- 19
- 20
- 21
- 22
- 23
- 24
- 25
- 26
- 27
- 28
- 29
- 30
- 31
-
请求资源路径
@RestController public class HelloController { @GetMapping("/admin") public String admin(){ return "admin ok"; } @GetMapping("/user") public String user(){ return "user ok"; } @GetMapping("/info") public String getInfo(){ return "info ok"; } }- 1
- 2
- 3
- 4
- 5
- 6
- 7
- 8
- 9
- 10
- 11
- 12
- 13
- 14
- 15
- 16
- 17
- 18
基于方法的权限管理
基于方法的权限管理主要是通过AOP来实现的,Spring Security中通过MethodSecurityInterceptor来提供相关的实现。
不同在于
FilterSecurityInterceptor只是在请求之前进行前置处理,MethodSecurityInterceptor除了前置处理之外还可以进行后置处理。
前置处理就是在请求之前判断是否具备相应的权限,后置处理则是对方法的执行结果进行二次过滤。-
开启方法安全注解
@EnableGlobalMethodSecurity(prePostEnabled = true,securedEnabled = true,jsr250Enabled = true) public class MethodSecurityConfig { }- 1
- 2
- 3
- prePostEnabled:开启Spring Security提供的四个权限注解,
@PostAuthorize、@PostFilter,@PreAuthorize以及@PreFilter。 - securedEnabled:开启Spring Security提供的
@Secured注解支持,该注解不支持权限表达式。 - jsr250Enabled:开启JSR-250提供的注解,主要是
@DenyAll、@PermitAll、@RolesAll同
样这此注解也不支持权限表达式
# 以上注解含义如下: - @PostAuthorize:在目标方法执行之后进行权限校验。 - @PostFiter: 在目标方法执行之后对方法的返回结果进行过滤 - @PreAuthorize: 在目标方法执行之前进行权限校验。 - @PreFiter: 在日标方法执行之前对方法参数进行过滤。 - @secured: 访问目标方法必须具各相应的角色。 - @DenyAll:拒绝所有访问。 - @PermitAll:允许所有访问。 - @RolesAllowed: 访问目标方法必须具备相应的角色。- 1
- 2
- 3
- 4
- 5
- 6
- 7
- 8
- 9
这些基于方法的权限管理相关的注解,一般来说只要设置
prePostEnabled=true就够用了。 -
给接口做限制
表达式 描述 hasRole([role]) 当前用户是否拥有指定 角色。hasAnyRole([role1,role2]) 多个 角色是一个以逗号进行分隔的字符串。如果当前用户拥有指定角色中的任意一个则返回true。hasAuthority([auth]) 当前用户是否拥有指定 权限。hasAnyAuthority([auth1,auth2]) 多个 权限是一个以逗号进行分隔的字符串。如果当前用户拥有指定权限中的任意一个则返回true。Principle 代表当前用户的principle对象 authentication 直接从SecurityContext获取的当前Authentication对象 permitAll 总是返回true,表示允许所有的 denyAll 总是返回false,表示拒绝所有的 isAnonymous() 当前用户是否是一个匿名用户 isRememberMe() 表示当前用户是否是通过Remember-Me自动登录的 isAuthenticated() 表示当前用户是否已经登录认证成功了。 isFullyAuthenticated() 如果当前用户既不是一个匿名用户,同时又不是通过Remember-Me自动登录的,则返回true。 @RestController @RequestMapping("/hello") public class AuthorizeMethodController { //具有ADMIN角色 或 具有READ_INFO权限 或 认证的用户的名字是user @PreAuthorize("hasRole('ADMIN') or hasAuthority('READ_INFO') or authentication.name=='user'") @GetMapping public String hello() { return "hello"; } //认证的用户的名字与形参一致 @PreAuthorize("authentication.name==#name") @GetMapping("/name") public String hello(String name) { return "hello:" + name; } //filterObject数组中的对象 //filterObject.id 对象的id属性 @PreFilter(value = "filterObject.id%2!=0",filterTarget = "users") @PostMapping("/users") //filterTarget 必须是 数组 集合类型 public void addUsers(@RequestBody List<User> users) { System.out.println("users = " + users); } @PostAuthorize("returnObject.id==1") @GetMapping("/userId") public User getUserById(Integer id) { return new User(id, "blr"); } //对方法的返回值进行过滤 @PostFilter("filterObject.id%2==0") @GetMapping("/lists") public List<User> getAll() { List<User> users = new ArrayList<>(); for (int i = 0; i < 10; i++) { users.add(new User(i, "blr:" + i)); } return users; } @Secured({"ROLE_USER"}) //只能判断角色 @GetMapping("/secured") public User getUserByUsername() { return new User(99, "secured"); } @Secured({"ROLE_ADMIN","ROLE_USER"}) //具有其中一个即可 @GetMapping("/username") public User getUserByUsername2(String username) { return new User(99, username); } @PermitAll @GetMapping("/permitAll") public String permitAll() { return "PermitAll"; } @DenyAll @GetMapping("/denyAll") public String denyAll() { return "DenyAll"; } @RolesAllowed({"ROLE_ADMIN","ROLE_USER"}) //具有其中一个角色即可 @GetMapping("/rolesAllowed") public String rolesAllowed() { return "RolesAllowed"; } }- 1
- 2
- 3
- 4
- 5
- 6
- 7
- 8
- 9
- 10
- 11
- 12
- 13
- 14
- 15
- 16
- 17
- 18
- 19
- 20
- 21
- 22
- 23
- 24
- 25
- 26
- 27
- 28
- 29
- 30
- 31
- 32
- 33
- 34
- 35
- 36
- 37
- 38
- 39
- 40
- 41
- 42
- 43
- 44
- 45
- 46
- 47
- 48
- 49
- 50
- 51
- 52
- 53
- 54
- 55
- 56
- 57
- 58
- 59
- 60
- 61
- 62
- 63
- 64
- 65
- 66
- 67
- 68
- 69
- 70
- 71
- 72
- 73
原理分析

ConfigAttribute在 Spring Security 中,用户请求一个资源(通常是一个接口或者一个 Java 方法)需要的角色会被封装成一个 ConfigAttribute 对象,在 ConfigAttribute 中只有一个 getAttribute方法,该方法返回一个 String 字符串,就是角色的名称。一般来说,角色名称都带有一个ROLE_前缀,投票器 AccessDecisionVoter 所做的事情,其实就是比较用户所具各的角色和请求某个资源所需的 ConfigAtuibute 之间的关系。AccesDecisionVoter 和 AccessDecisionManager都有众多的实现类,在AccessDecisionManager 中会换个遍历 AccessDecisionVoter,进而决定是否允许用户访问,因而 AaccesDecisionVoter 和 AccessDecisionManager 两者的关系类似于 AuthenticationProvider 和 ProviderManager 的关系。
动态权限管理
-
相关阅读:
深入React源码揭开渲染更新流程的面纱
Java桥接模式
京东商品分类API接口-(cat_get-获得jd商品分类API接口),京东分类API接口
Python中异常处理4-4
mongodb 在windows下 安装及使用
后缀是SS的文件怎么打开
阿里云服务器(Ubuntu)配置calibre-web图书管理服务
AIGC绘画设计——midjourney有哪些好用的关键词?
Redis教程(二十二):Redis的过期删除和缓存淘汰策略
LATEX
- 原文地址:https://blog.csdn.net/qq_43960768/article/details/126487889
