-
Linux系统下邮件服务器的搭建(Postfix+Dovecot+SSL)
系统环境为 centos7.2 x64 mini
1.首先安装编译环境包
yum install nginx vim gcc gcc-c++ openssl openssl-devel db4-devel ntpdate mysql mysql-devel mysql-server bzip2 php-mysql cyrus-sasl-md5 perl-GD perl-DBD-MySQL perl-GD perl-CPAN perl-CGI perl-CGI-Session cyrus-sasl-lib cyrus-sasl-plain cyrus-sasl cyrus-sasl-devel libtool-ltdl-devel telnet mail libicu-devel -y2.开始编译安装postfix
a.创建相关用户
- yum remove postfix -y
- userdel postfix
- groupdel postdrop
- groupadd -g 2525 postfix
- useradd -g postfix -u 2525 -s /sbin/nologin -M postfix
- groupadd -g 2526 postdrop
- useradd -g postdrop -u 2526 -s /sbin/nologin -M postdrop
b.编译安装
- cd /usr/local/src/
- wget https://mirror.nju.edu.cn/macports/distfiles/postfix/postfix-3.3.1.tar.gz
- tar -zxvf postfix-3.3.1.tar.gz
- cd postfix-3.3.1
- make makefiles 'CCARGS=-DHAS_MYSQL -I/usr/include/mysql -DUSE_SASL_AUTH -DUSE_CYRUS_SASL -I/usr/include/sasl -DUSE_TLS ' 'AUXLIBS=-L/usr/lib64/mysql -lmysqlclient -lz -lrt -lm -L/usr/lib64/sasl2 -lsasl2 -lssl -lcrypto'
- make && make install
在make install环节的时候会有个交互式的界面,可以自定义一些目录,根据自己的需求填写,本人这里只更改了第二项临时文件目录,其他的都选择了默认目录:
c. 更改授权
- chown -R postfix:postdrop /var/spool/postfix
- chown -R postfix:postdrop /var/lib/postfix/
- chown root /var/spool/postfix
- chown -R root /var/spool/postfix/pid
3. 配置 postfix
- vi /etc/postfix/main.cf
- myhostname = mail.bt.dvcloud.xin
- mydomain = mail.bt.dvcloud.xin
- myorigin = $mydomain
- inet_interfaces = all
- # 推荐ipv4,如果支持ipv6,则可以为all
- inet_protocols = ipv4
- mydestination = $myhostname, localhost.$mydomain, localhost, $mydomain
- #mynetworks = 127.0.0.0/8, 10.0.0.0/24
- home_mailbox = Maildir/
- smtpd_banner = $myhostname ESMTP
- # 添加到最后
- # 规定邮件最大尺寸为10M
- message_size_limit = 10485760
- # 规定收件箱最大容量为1G
- mailbox_size_limit = 1073741824
- # SMTP认证
- smtpd_sasl_type = dovecot
- smtpd_sasl_path = private/auth
- smtpd_sasl_auth_enable = yes
- smtpd_sasl_security_options = noanonymous
- smtpd_sasl_local_domain = $myhostname
- smtpd_recipient_restrictions = permit_mynetworks,permit_auth_destination,permit_sasl_authenticated,reject
然后需要在/etc/init.d/目录下提供一个脚本来管理postfix的启动与停止
- vim /etc/init.d/postfix
- #!/bin/bash
- #
- # postfix Postfix Mail Transfer Agent
- #
- # chkconfig: 2345 80 30
- # description: Postfix is a Mail Transport Agent, which is the program \
- # that moves mail from one machine to another.
- # processname: master
- # pidfile: /var/spool/postfix/pid/master.pid
- # config: /etc/postfix/main.cf
- # config: /etc/postfix/master.cf
- # Source function library.
- . /etc/rc.d/init.d/functions
- # Source networking configuration.
- . /etc/sysconfig/network
- # Check that networking is up.
- [ $NETWORKING = "no" ] && exit 3
- [ -x /usr/sbin/postfix ] || exit 4
- [ -d /etc/postfix ] || exit 5
- [ -d /var/spool/postfix ] || exit 6
- RETVAL=0
- prog="postfix"
- start() {
- # Start daemons.
- echo -n $"Starting postfix: "
- /usr/bin/newaliases >/dev/null 2>&1
- /usr/sbin/postfix start 2>/dev/null 1>&2 && success || failure $"$prog start"
- RETVAL=$?
- [ $RETVAL -eq 0 ] && touch /var/lock/subsys/postfix
- echo
- return $RETVAL
- }
- stop() {
- # Stop daemons.
- echo -n $"Shutting down postfix: "
- /usr/sbin/postfix stop 2>/dev/null 1>&2 && success || failure $"$prog stop"
- RETVAL=$?
- [ $RETVAL -eq 0 ] && rm -f /var/lock/subsys/postfix
- echo
- return $RETVAL
- }
- reload() {
- echo -n $"Reloading postfix: "
- /usr/sbin/postfix reload 2>/dev/null 1>&2 && success || failure $"$prog reload"
- RETVAL=$?
- echo
- return $RETVAL
- }
- abort() {
- /usr/sbin/postfix abort 2>/dev/null 1>&2 && success || failure $"$prog abort"
- return $?
- }
- flush() {
- /usr/sbin/postfix flush 2>/dev/null 1>&2 && success || failure $"$prog flush"
- return $?
- }
- check() {
- /usr/sbin/postfix check 2>/dev/null 1>&2 && success || failure $"$prog check"
- return $?
- }
- restart() {
- stop
- start
- }
- # See how we were called.
- case "$1" in
- start)
- start
- ;;
- stop)
- stop
- ;;
- restart)
- stop
- start
- ;;
- reload)
- reload
- ;;
- abort)
- abort
- ;;
- flush)
- flush
- ;;
- check)
- check
- ;;
- status)
- status master
- ;;
- condrestart)
- [ -f /var/lock/subsys/postfix ] && restart || :
- ;;
- *)
- echo $"Usage: $0 {start|stop|restart|reload|abort|flush|check|status|condrestart}"
- exit 1
- esac
- exit $?
设置该脚本权限
- chmod +x /etc/init.d/postfix
- chkconfig --add postfix
- chkconfig postfix on
- chown postfix.postfix -R /var/lib/postfix/
- chown postfix.postfix /var/spool/ -R
4.安装Dovecot
yum -y install dovecot配置Dovecot
- vi /etc/dovecot/dovecot.conf
- # 如果不使用IPv6,请修改为*
- listen = *
- vi /etc/dovecot/conf.d/10-auth.conf
- disable_plaintext_auth = no
- auth_mechanisms = plain login
- vi /etc/dovecot/conf.d/10-mail.conf
- mail_location = maildir:~/Maildir
- vi /etc/dovecot/conf.d/10-master.conf
- # Postfix smtp验证
- unix_listener /var/spool/postfix/private/auth {
- mode = 0666
- user = postfix
- group = postfix
- }
然后启动服务
- /etc/init.d/postfix start
- systemctl start dovecot
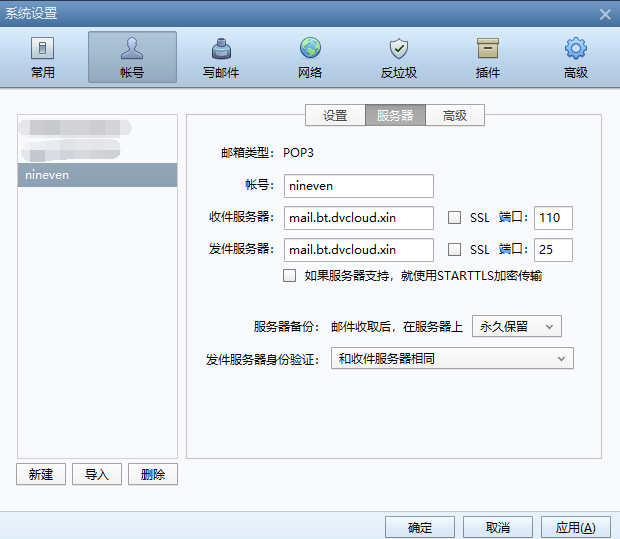
测试:就可以使用Foxmail等第三方软件来收发邮件了。
系统用户就是邮件的用户,例如root,就是一个邮箱用户,邮箱是root@domain.com,密码就是root的密码,所以需要创建用户,只要使用
useradd创建用户,再使用passwd设置密码。好了,假如我们创建一个admin的用户:
- # 创建用户
- useradd nineven
- #设置密码,会要求输入两次密码
- passwd nineven
第二章,配置SSL
1.创建自定义的ssl证书
- cd /etc/pki/tls/certs
- make server.key
- umask 77 && /usr/bin/openssl genrsa -aes128 2048 > server.key
- openssl rsa -in server.key -out server.key
- make server.csr
- umask 77 && /usr/bin/openssl req -utf8 -new -key server.key -out server.csr
- chmod 400 server.*
2.配置
- vi /etc/postfix/main.cf
- # 添加到最后
- smtpd_use_tls = yes
- smtpd_tls_cert_file = /etc/pki/tls/certs/server.crt
- smtpd_tls_key_file = /etc/pki/tls/certs/server.key
- smtp_tls_session_cache_database = btree:${data_directory}/smtp_scache
- smtpd_tls_session_cache_database = btree:${data_directory}/smtpd_scache
- smtpd_tls_loglevel = 0
- smtpd_tls_auth_only = yes
- vi /etc/postfix/master.cf
- smtps inet n - n - - smtpd
- -o smtpd_tls_wrappermode=yes
- vi /etc/dovecot/conf.d/10-ssl.conf
- ssl = yes
- # 指定证书
- ssl_cert =ssl_key =
然后重新启动服务
- /etc/init.d/postfix restart
- systemctl restart dovecot


-
相关阅读:
NVM 安装及注意事项
JavaWeb初学
3天带你走向实战,阿里顶配版Spring全家桶面试进阶笔记有多强?
自定义Key类型的字典无法序列化的N种解决方案
【leetcode学习计划】算法入门(1 / 14)
elasticsearch 深度分页查询 Search_after(图文教程)
SpringBoot整合mybatis-plus 实现增删改查和分页查询
应用平台 - OPPO敏感权限
【Linux|树莓派】分文件编程以及静态库动态库
海屯心理平台搭建系统模式
- 原文地址:https://blog.csdn.net/ly1358152944/article/details/126436384
