-
HCIP实验(09)

1.配置公有IP地址和环回
[r2]int lo0
[r2-LoopBack0]ip add 2.2.2.2 24
[r2-LoopBack0]int g0/0/1
[r2-GigabitEthernet0/0/1]ip add 23.1.1.1 24
[r3]int lo0
[r3-LoopBack0]ip add 3.3.3.3 24
[r3]int g0/0/0
[r3-GigabitEthernet0/0/0]ip add 23.1.1.2 24
[r3]int g0/0/1
[r3-GigabitEthernet0/0/1]ip add 34.1.1.1 24
[r4]int lo0
[r4-LoopBack0]ip add 4.4.4.4 24
[r4]int g0/0/0
[r4-GigabitEthernet0/0/0]ip add 34.1.1.2 24
[r4]int g4/0/0
[r4-GigabitEthernet4/0/0]ip add 47.1.1.1 24
[r7]int g0/0/1
[r7-GigabitEthernet0/0/1]ip add 47.1.1.2 24(测试)


2.对公网进行OSPF宣告
[r2]ospf 1 router-id 2.2.2.2
[r2-ospf-1]area 0
[r2-ospf-1-area-0.0.0.0]network 23.1.1.1 0.0.0.0
[r2-ospf-1-area-0.0.0.0]network 2.2.2.2 0.0.0.0
[r3]ospf 1 router-id 3.3.3.3
[r3-ospf-1]area 0
[r3-ospf-1-area-0.0.0.0]network 3.3.3.3 0.0.0.0
[r3-ospf-1-area-0.0.0.0]network 23.1.1.2 0.0.0.0
[r3-ospf-1-area-0.0.0.0]network 34.1.1.1 0.0.0.0
[r4]ospf 1 router-id 4.4.4.4
[r4-ospf-1]area 0
[r4-ospf-1-area-0.0.0.0]net
[r4-ospf-1-area-0.0.0.0]network 34.1.1.2 0.0.0.0
[r4-ospf-1-area-0.0.0.0]network 4.4.4.4 0.0.0.0
[r4-ospf-1-area-0.0.0.0]network 47.1.1.1 0.0.0.0(沉默R4和R7的接口并且加上认证)
[r4-ospf-1]silent-interface GigabitEthernet 4/0/0
[r4]int g4/0/0
[r4-GigabitEthernet4/0/0]ospf authentication-mode md5 1 cipher 123456(查看)

(为R7配置缺省路由)
[r7]ip route-static 0.0.0.0 0 47.1.1.1(测试)

3.在公网开启MPLS协议
[r2]mpls lsr-id 2.2.2.2
[r2]mpls
Info: Mpls starting, please wait... OK!
[r2-mpls]mpls ldp
[r2-mpls-ldp]q
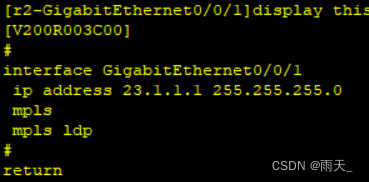
[r2]int g0/0/1
[r2-GigabitEthernet0/0/1]mpls
[r2-GigabitEthernet0/0/1]mpls ldp
[r3]mpls lsr-id 3.3.3.3
[r3]mpls
Info: Mpls starting, please wait... OK!
[r3-mpls]mpls ldp
[r3-mpls-ldp]q
[r3]int g0/0/0
[r3-GigabitEthernet0/0/0]mpls
[r3-GigabitEthernet0/0/0]mpls ldp
[r3]int g0/0/1
[r3-GigabitEthernet0/0/1]mpls
[r3-GigabitEthernet0/0/1]mpls ldp
[r4]mpls lsr-id 4.4.4.4
[r4]mpls
Info: Mpls starting, please wait... OK!
[r4-mpls]mpls ldp
[r4-mpls-ldp]q
[r4]int g0/0/0
[r4-GigabitEthernet0/0/0]mpls
[r4-GigabitEthernet0/0/0]mpls ldp(查看)

4.创建VPN空间
[r2]ip vpn-instance b1
[r2-vpn-instance-b1]route-distinguisher 1:1
[r2-vpn-instance-b1-af-ipv4]vpn-target 1:1
[r2]ip vpn-instance a1
[r2-vpn-instance-a1]route-distinguisher 2:2
[r2-vpn-instance-a1-af-ipv4]vpn-target 2:2
[r4]ip vpn-instance b2
[r4-vpn-instance-b2]route-distinguisher 1:1
[r4-vpn-instance-b2-af-ipv4]vpn-target 1:1
[r4]ip vpn-instance a2
[r4-vpn-instance-a2]route-distinguisher 2:2
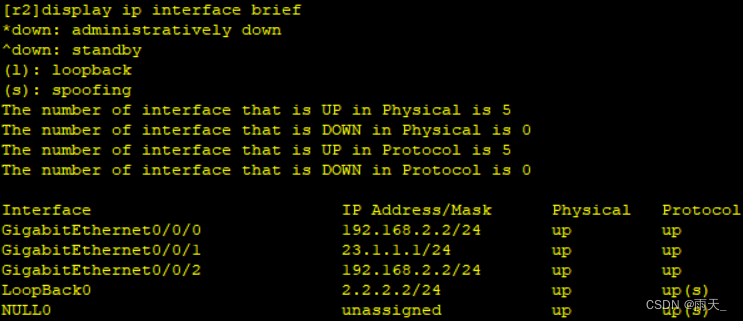
[r4-vpn-instance-a2-af-ipv4]vpn-target 2:2(查看)


(在VPN空间中放入接口)
[r2]int g0/0/0
[r2-GigabitEthernet0/0/0]ip binding vpn-instance b1
[r2-GigabitEthernet0/0/0]ip add 192.168.2.2 24
[r2]int g0/0/2
[r2-GigabitEthernet0/0/2]ip binding vpn-instance a1
[r2-GigabitEthernet0/0/2]ip add 192.168.2.2 24
[r4]int g0/0/1
[r4-GigabitEthernet0/0/1]ip binding vpn-instance b2
[r4-GigabitEthernet0/0/1]ip add 192.168.3.1 24
[r4]int g0/0/2
[r4-GigabitEthernet0/0/2]ip binding vpn-instance a2
[r4-GigabitEthernet0/0/2]ip add 192.168.3.1 24(查看)


5.创建BGP邻居
[r2]bgp 1
[r2-bgp]router-id 2.2.2.2
[r2-bgp]peer 4.4.4.4 as-number 1
[r2-bgp]peer 4.4.4.4 connect-interface LoopBack 0
(创建传递VPN路由的关系)
[r2-bgp]ipv4-family vpnv4
[r2-bgp-af-vpnv4]peer 4.4.4.4 enable[r4]bgp 1
[r4-bgp]router-id 4.4.4.4
[r4-bgp]peer 2.2.2.2 as-number 1
[r4-bgp]peer 2.2.2.2 connect-interface LoopBack 0
(创建传递VPN路由的关系)
[r4-bgp]ipv4-family vpnv4
[r4-bgp-af-vpnv4]peer 2.2.2.2 enable(查看)

6.配置客户端,传递私网路由
[r6]int lo0
[r6-LoopBack0]ip add 192.168.1.1 24
[r6]int g0/0/0
[r6-GigabitEthernet0/0/0]ip add 192.168.2.1 24
[r7]int lo0
[r7-LoopBack0]ip add 192.168.4.2 24
[r7]int g0/0/0
[r7-GigabitEthernet0/0/0]ip add 192.168.3.2 24(测试)

7.开启RIP和OSPF协议
[r6]rip 1
[r6-rip-1]ver 2
[r6-rip-1]network 192.168.1.0
[r6-rip-1]network 192.168.2.0
(绑定VPN空间)
[r2]rip 1 vpn-instance a1
[r2-rip-1]ver 2
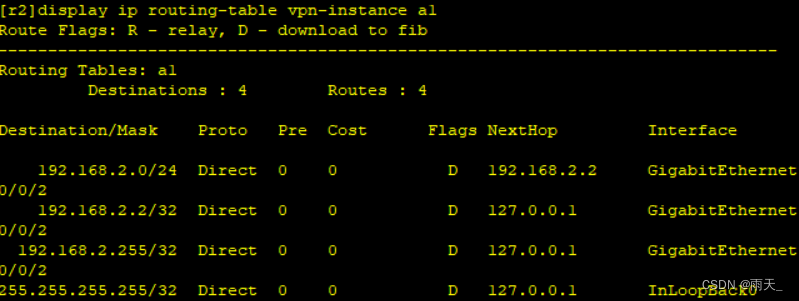
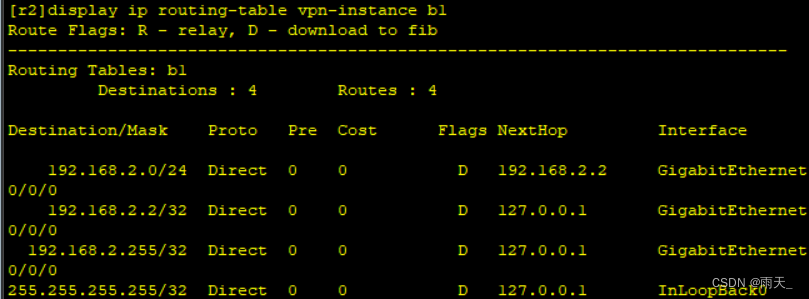
[r2-rip-1]network 192.168.2.0(查看路由表)

[r7]ospf 1 router-id 7.7.7.7
[r7-ospf-1]area 0
[r7-ospf-1-area-0.0.0.0]network 192.168.4.2 0.0.0.0
[r7-ospf-1-area-0.0.0.0]network 192.168.3.2 0.0.0.0(查看路由表)

8.进行重发布
[r2]rip 1 vpn-instance a1
[r2-rip-1]import-route bgp
[r2]bgp 1
[r2-bgp]ipv4-family vpn-instance a1
[r2-bgp-a1]import-route rip 1
[r4]ospf 2 vpn-instance a2
[r4-ospf-2]import-route bgp
[r4]bgp 1
[r4-bgp]ipv4-family vpn-instance a2
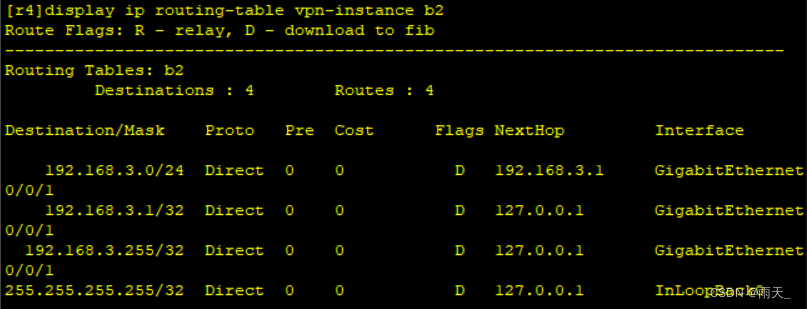
[r4-bgp-a2]import-route ospf 2(查看)


(测试)


9.配置静态路由和B1、B2的IP地址和环回
[r1]int lo0
[r1-LoopBack0]ip add 192.168.1.1 24
[r1]int g0/0/0
[r1-GigabitEthernet0/0/0]ip add 192.168.2.1 24
[r1]ip route-static 192.168.3.0 24 192.168.2.2
[r1]ip route-static 192.168.4.0 24 192.168.2.2
[r2]ip route-static vpn-instance b1 192.168.1.0 24 192.168.2.1
[r5]int lo0
[r5-LoopBack0]ip add 192.168.4.1 24
[r5]int g0/0/0
[r5-GigabitEthernet0/0/0]ip add 192.168.3.2 24
[r5]ip route-static 192.168.1.0 24 192.168.3.1
[r5]ip route-static 192.168.2.0 24 192.168.3.1(查看)

(测试)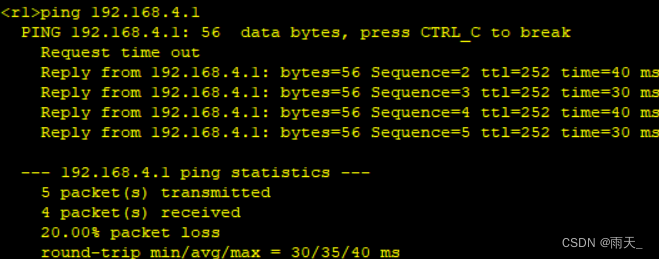
10.重发布静态路由
[r4]ip route-static vpn-instance b2 192.168.4.0 24 192.168.3.2
(查看)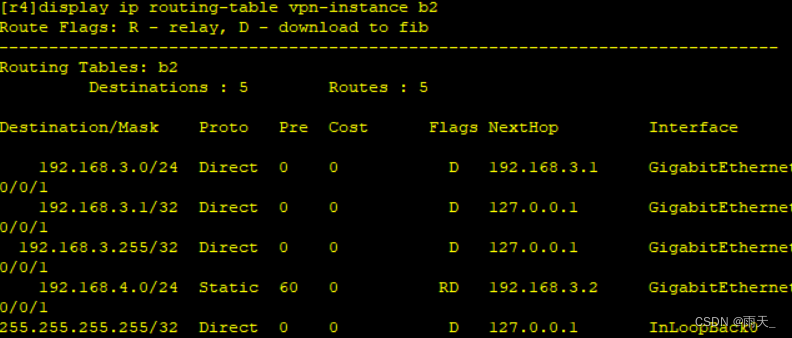
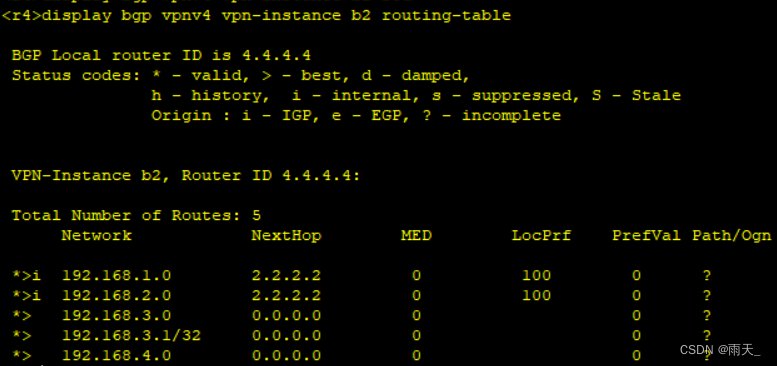
[r4]bgp 1
[r4-bgp]ipv4-family vpn-instance b2
[r4-bgp-b2]import-route direct
[r4-bgp-b2]import-route static
[r4]bgp 1
[r4-bgp]ipv4-family vpn-instance b2
[r4-bgp-b2]import-route direct
[r4-bgp-b2]import-route static
(查看)

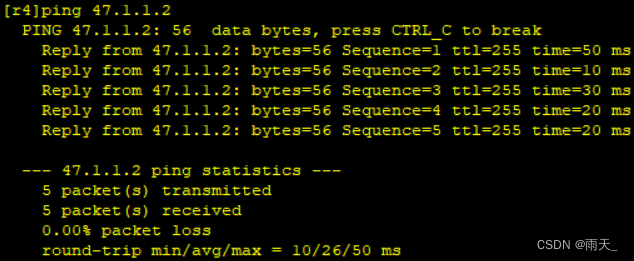
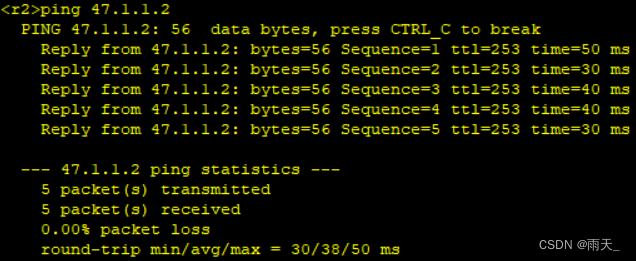
11.测试


-
相关阅读:
景联文科技:2023人工智能数据标注行业现状分析?
Flask后端开发(二) - 功能实现和项目总结
成都优优聚公司是靠谱的吗?
有哪些比较好的录制游戏视频软件,游戏录屏软件哪个好用
性能测试:springboot-2.x vs actix-web-4.x benchmark
Qt文件读写的天花板QFile和IODevice搭配第一集
Lua 环境搭建
【DevOps】Rundeck以及Jenkins
全网首讲最详细AMR系统介绍(1):Abstract Meaning Representation(AMR) 的基础表示逻辑;附英文版原 pdf 资料
abp(net core)+easyui+efcore实现仓储管理系统——供应商管理升级之上(六十三)
- 原文地址:https://blog.csdn.net/weixin_62443409/article/details/126192787