• Nginx优化与防盗链


    Nginx优化与防盗链

    一、隐藏版本号

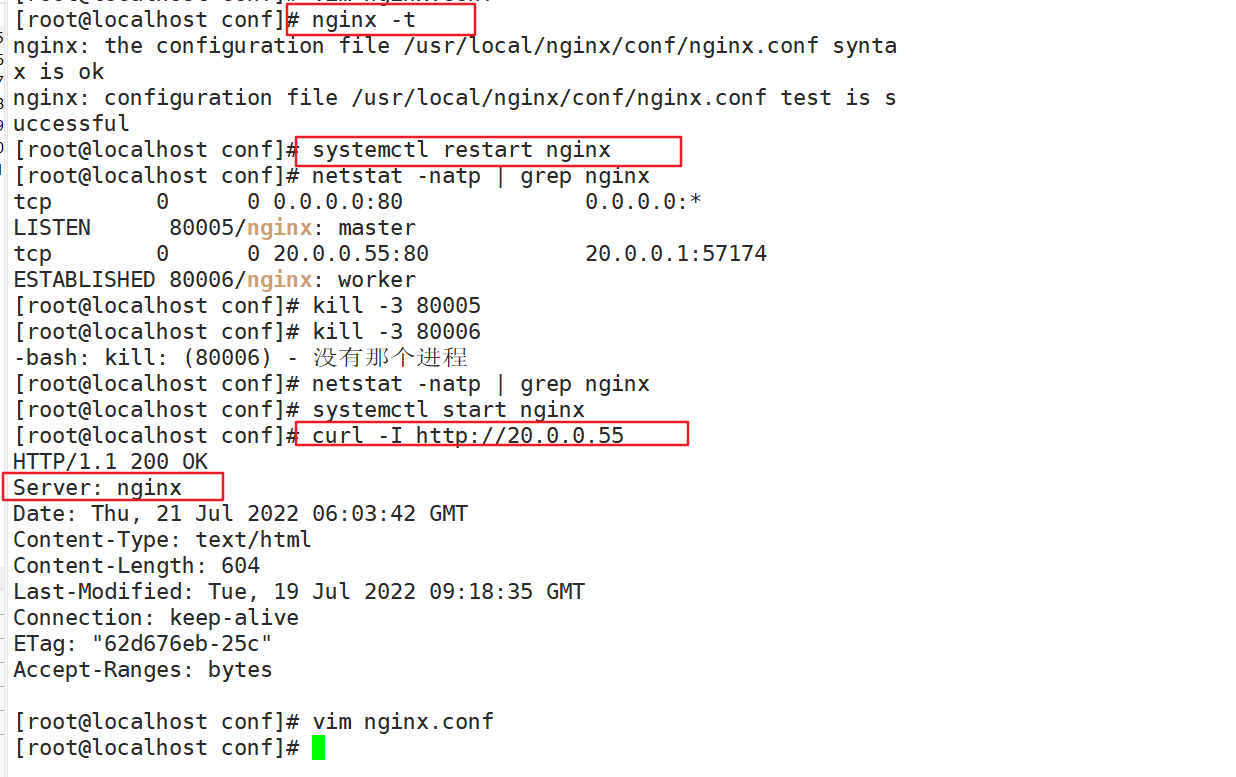
    可以使用Fiddler工具抓取数据包,查看Nginx版本,也可以在CentOS中使用命令curl -I http://20.0.0.55 显示响应报文首部信息。

    curl -I http://20.0.0.55 
    
    • 1
    方法一:修改配置文件方式
    vim /usr/local/nginx/conf/nginx.conf
    http {
        include       mime.types;
        default_type  application/octet-stream;
        server_tokens off;     #添加关闭版本号
    }
    systemctl restart nginx
    curl -I http://20.0.0.55
    
    • 1
    • 2
    • 3
    • 4
    • 5
    • 6
    • 7
    • 8

    image-20220721140434910

    image-20220721140512674

    方法二:
    [root@localhost objs]# vim /opt/nginx-1.12.2/src/core/nginx.h
    #define NGINX_VERSION      "1.30.23"                     #修改版本号
    #define NGINX_VER          "apache/" NGINX_VERSION       #修改服务器类型
    ---》wq
    [root@localhost opt]# cd nginx-1.12.2/
    [root@localhost nginx-1.12.2]# ./configure --prefix=/usr/local/nginx --user=nginx --group=nginx --with-http_stub_status_module
    [root@localhost nginx-1.12.2]# make           编译
    [root@localhost objs]# cp /opt/nginx-1.12.2/objs/nginx /usr/local/nginx/sbin/nginx
    [root@localhost objs]# systemctl start nginx
    [root@localhost objs]# curl -I http://20.0.0.55
    
    
    • 1
    • 2
    • 3
    • 4
    • 5
    • 6
    • 7
    • 8
    • 9
    • 10
    • 11

    image-20220721142708732

    image-20220721153304032

    二、修改用户和组
    vim /usr/local/nginx/conf/nginx.conf
    user root root;                 #取消注释,修改用户为root,组为root
    
    systemctl restart nginx
    
    ps aux | grep nginx
    主进程由root创建,子进程由nginx创建
    
    
    • 1
    • 2
    • 3
    • 4
    • 5
    • 6
    • 7
    • 8

    image-20220721154257370

    image-20220721154446483

    三、缓存时间
    vim /usr/local/nginx/conf/nginx.conf
    http {
    ......
      server {
      ...... 
        location / {
          root html;
          index index.html index.htm;
        }
        
        location ~ \.(gif|jpg|jpeg|png|bmp|ico)$ {    #加入新的 location,以图片作为缓存对象
          root html;
          expires 1d;                 #指定缓存时间,1天
        }
    ......
      }
    }
    
    systemctl restart nginx
    
    
    • 1
    • 2
    • 3
    • 4
    • 5
    • 6
    • 7
    • 8
    • 9
    • 10
    • 11
    • 12
    • 13
    • 14
    • 15
    • 16
    • 17
    • 18
    • 19
    • 20

    image-20220721155122691

    image-20220721155752671

    image-20220721160352806

    image-20220721161016477

    四、日志切割
    vim /opt/fenge.sh
    #!/bin/bash
    #  filename: fenge.sh
    day=$(date -d "-1 day" "+%Y%m%d")                 #显示前一天的时间
    logs_path="/var/log/nginx"                        #定义一个新的日志存放目录
    pid_path="/usr/local/nginx/logs/nginx.pid"        #定义变量pid_path将nginx进程id
    
    [ -d $logs_path ] || mkdir -p $logs_path        #创建日志文件目录
    
    #移动并重命名日志文件
    mv /usr/local/nginx/logs/access.log ${logs_path}/huigenb.com-access.log-{$day}
    
    #重建日志文件
    kill -USR1 $(cat $pid_path)
    #删除30天前的日志文件                   
    find $logs_path -mtime +30 -exec rm -rf {} \;
    #find $logs_path -mtime +30 |xargs rm -rf
    ---->wq
    chmod +x /opt/fenge.sh
    /opt/fenge.sh
    ls /var/log/nginx
    ls /usr/local/nginx/logs/access.log
    
    
    • 1
    • 2
    • 3
    • 4
    • 5
    • 6
    • 7
    • 8
    • 9
    • 10
    • 11
    • 12
    • 13
    • 14
    • 15
    • 16
    • 17
    • 18
    • 19
    • 20
    • 21
    • 22
    • 23

    image-20220721163430769

    image-20220721163647374

    image-20220721164015500

    crontab -e
    0 1 * * * /opt/fenge.sh   #设置周期性计划
    
    • 1
    • 2
    五、连接超时

    HTTP有个KeepAlive,告诉web服务器在处理完一个请求后保持这个TCP连接的打开状态。若接收到来自客户端的其他请求,服务端会利用这个未被关闭的连接,而不需要再建立一个连接。

    KeepAlive在一段时间内保持打开状态,它们会在这段时间占用资源,占用过多就会影响性能。

    vim /usr/local/nginx/conf/nginx.conf
    http {
    ...... 
        keepalive_timeout 65 180;               #三次握手的超过时间
        client_header_timeout 80;               #等待客户端发送请求头的超时时间会发送408 错误
        client_body_timeout 80;                 #设置客户端发送请求体的超时时间
    ...... 
    }
    
    systemctl restart nginx
    
    • 1
    • 2
    • 3
    • 4
    • 5
    • 6
    • 7
    • 8
    • 9
    • 10

    image-20220721165540449

    keepalive_timeout

    指定KeepAlive的超时时间(timeout)。指定每个TCP连接最多可以保持多长时间,服务器将会在这个时间后关闭连接。 Nginx的默认值是65秒,有些浏览器最多只保持 60 秒,所以可以设定为 60 秒。若将它设置为0,就禁止了keepalive 连接。

    第二个参数(可选的)指定了在响应头Keep-Alive:timeout=time中的time值。这个头能够让一些浏览器主动关闭连接,这样服务器就不必去关闭连接了。没有这个参数,Nginx 不会发送 Keep-Alive 响应头。

    client_header_timeout

    客户端向服务端发送一个完整的 request header 的超时时间。如果客户端在指定时间内没有发送一个完整的 request header,Nginx 返回 HTTP 408(Request Timed Out)。

    client_body_timeout

    指定客户端与服务端建立连接后发送 request body 的超时时间。如果客户端在指定时间内没有发送任何内容,Nginx 返回 HTTP 408(Request Timed Out)。

    六、更改进程数

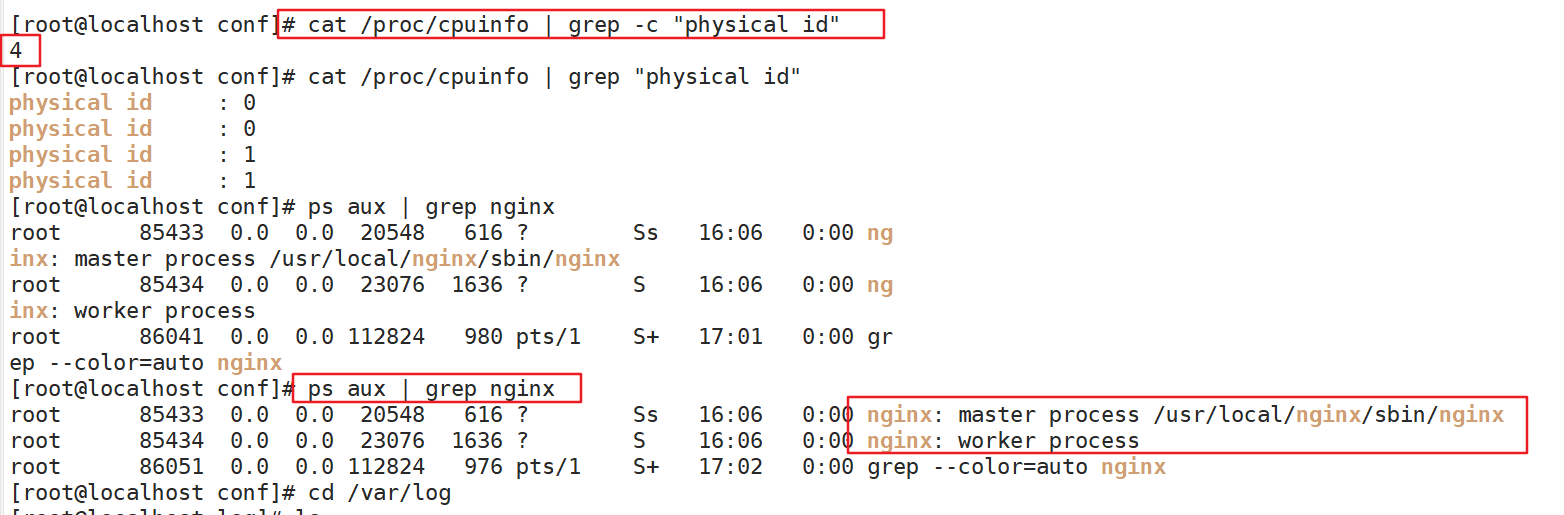
    在高并发场景,需要启动更多的Nginx进程以保证快速响应,以处理用户的请求,避免造成阻塞

    cat /proc/cpuinfo | grep -c "physical id"      #查看cpu核数
    ps aux | grep nginx                            #查看nginx主进程中包含几个子进程
    vim /usr/local/nginx/conf/nginx.conf
    worker_processes  2;                           #修改为核数相同或者2倍
    worker_cpu_affinity 01 10;                     #设置每个进程由不同cpu处理,进程数配2 4 6 8分别为0001 0010 0100 1000 
    
    systemctl restart nginx
    
    
    • 1
    • 2
    • 3
    • 4
    • 5
    • 6
    • 7
    • 8

    image-20220721171403772

    image-20220721172744450

    image-20220721172642364

    2核cpu,开启两个进程
    worker_processes     2;
    worker_cpu_affinity 01 10;
    
    • 1
    • 2

    解释:01表示启用第一个CPU内核,10表示启用第二个CPU内核
    worker_cpu_affinity 01 10;表示开启两个进程,第一个进程对应着第一个CPU内核,第二个进程对应着第二个CPU内核。

    2核cpu,开启4个进程
    worker_processes     4;
    worker_cpu_affinity 01 10 01 10;
    
    • 1
    • 2

    解释:开启了四个进程,它们分别对应着开启2个CPU内核

    4核cpu,开启4个进程
    worker_processes     4;
    worker_cpu_affinity 0001 0010 0100 1000;
    
    • 1
    • 2

    解释:0001表示启用第一个CPU内核,0010表示启用第二个CPU内核,依此类推

    4核cpu,开启2个进程
    worker_processes     2;
    worker_cpu_affinity 0101 1010;
    
    • 1
    • 2

    解释:0101表示开启第一个和第三个内核,1010表示开启第二个和第四个内核;2个进程对应着四个内核;worker_cpu_affinity配置是写在/etc/nginx/nginx.conf里面的;2核是 01,四核是0001,8核是00000001,有多少个核,就有几位数,1表示该内核开启,0表示该内核关闭

    8核cpu,开启8个进程
    worker_processes     8;
    worker_cpu_affinity 00000001 00000010 00000100 00001000 00010000 00100000 01000000 10000000;
    
    • 1
    • 2

    解释:0001表示启用第一个CPU内核,0010表示启用第二个CPU内核,依此类推;worker_processes最多开启8个,8个以上性能提升不会再提升了,而且稳定性变得更低,所以8个进程够用了。

    七、配置网页压缩

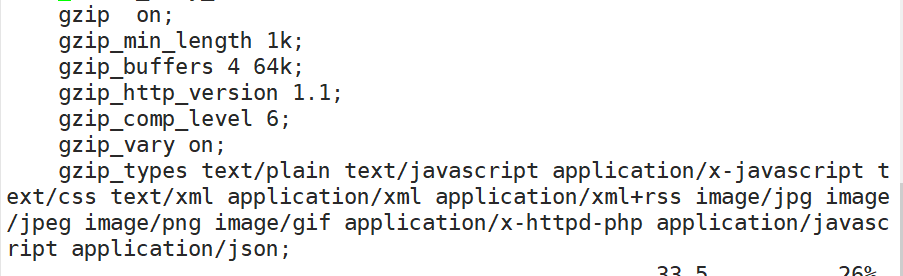
    Nginx的ngx_http_gzip_module压缩模块提供对文件内容压缩的功能。

    允许Nginx服务器将输出内容在发送客户端之前进行压缩,以节约网站带宽,提升用户的访问体验,默认已经安装可在配置文件中加入相应的压缩功能参数对压缩性能进行优化。

    vim /usr/local/nginx/conf/nginx.conf
    http {
    ...... 
    gzip on;       #取消注释,开启gzip压缩功能
       gzip_min_length 1k;        #最小压缩文件大小
       gzip_buffers 4 64k;        #压缩缓冲区,大小为4个64k缓冲区
       gzip_http_version 1.1;     #压缩版本(默认1.1,前端如果是squid2.5请使用1.0)
       gzip_comp_level 6;         #压缩比率
       gzip_vary on;     #支持前端缓存服务器存储压缩页面
       gzip_types text/plain text/javascript application/x-javascript text/css text/xml application/xml application/xml+rss image/jpg image/jpeg image/png image/gif application/x-httpd-php application/javascript application/json;  #压缩类型,表示哪些网页文档启用压缩功能
    ...... 
    }
    
    
    • 1
    • 2
    • 3
    • 4
    • 5
    • 6
    • 7
    • 8
    • 9
    • 10
    • 11
    • 12
    • 13

    image-20220722140941457

    cd /usr/local/nginx/html
    先将图片(R-C.jpg)文件传到/usr/local/nginx/html目录下
    vim index.html
    ...... 
           #网页中插入图片


    systemctl restart nginx
    
    
    • 1
    • 2
    • 3
    • 4
    • 5
    • 6
    • 7
    • 8
    • 9
    • 10

    image-20220722141606804

    在Linux系统中,打开火狐浏览器,按F12,然后F5

    选择 网络------>选择HTML、WS、其他

    访问http://20.0.0.55 ,双击200响应消息查看响应头中包含Content-Enconding:gzip

    image-20220722142144270

    image-20220722142227052

    八、配置防盗链

    image-20220722142603138

    vim /usr/local/nginx/conf/nginx.conf
    http {
    ......
      server {
      ......
       location ~* \.(gif|jpg|swf)$ {
               valid_referers none blocks *.dajb.com dajb.com;
               if ( $invalid_referer) {
                  rewrite ^/ http://www.dajb.com/error.png;
            }
            }
    
      ......
      }
    }
    
    
    • 1
    • 2
    • 3
    • 4
    • 5
    • 6
    • 7
    • 8
    • 9
    • 10
    • 11
    • 12
    • 13
    • 14
    • 15
    • 16

    image-20220722155539941

    ​ ~* .(jpg|gif|jepg|bmp|ico)$ :这段正则表达式表示匹配不区分大小写,以.jpg 或.gif 或.swf
    结尾的文件;
    ​ valid_referers :设置信任的网站,可以正常使用图片;
    ​ 后面的网址或者域名 :referer 中包含相关字符串的网址;
    ​ if语句:如果链接的来源域名不在valid_referers所列出的列表中,$invalid_referer为1,则执行后面的操作,即进行重写或返回403 页面。

    Web源主机(20.0.0.55)
    cd /usr/local/nginx/html
    将R-C.jpg、error.png文件传到/usr/local/nginx/html目录下
    vim index.html
    ...... 


    echo "20.0.0.55 www.dajb.com" >> /etc/hosts 
    echo "20.0.0.58 www.daolian.com" >> /etc/hosts
    
    • 1
    • 2
    • 3
    • 4
    • 5
    • 6
    • 7
    • 8
    • 9
    • 10

    image-20220722144541490

    image-20220722144612096

    image-20220722144734849

    盗链网站主机(20.0.0.58)
    yum install -y httpd
    vim /var/www/html/index.html


    ---->wq
    echo "20.0.0.55 www.dajb.com" >> /etc/hosts 
    echo "20.0.0.58 www.daolian.com" >> /etc/hosts
    
    • 1
    • 2
    • 3
    • 4
    • 5
    • 6
    • 7
    • 8
    • 9
    • 10

    image-20220722150012795

    盗图网站主机(20.0.0.58)上进行浏览器验证

    image-20220722155903416

    image-20220722160121445

    九、fpm参数优化
    cd /usr/local/php/etc/
    cp php-fpm.conf.default php-fpm.conf
    vim php-fpm.conf
    pid = run/php-fpm.pid
     
    vim /usr/local/php/etc/php-fpm.d/www.conf
    #96行
    pm = dynamic    #fpm进程启动方式,动态的
    #107行
    pm.max_children=20  #fpm进程启动的最大进程数
    #112行
    pm.start_servers = 5  #动态方式下启动时默认开启的进程数,在最小和最大之间
    #117行
    pm.min_spare_servers = 2  #动态方式下最小空闲进程数
    #122行
    pm.max_spare_servers = 8  #动态方式下最大空闲进程数
     
    #启动php-fpm,不可用于重启
    /usr/local/php/sbin/php-fpm  -c /usr/local/php/lib/php.ini
    #执行第一个命令后,就可以使用下面这条命令查看pid号重启php-fpm
    kill -USR2 `cat /usr/local/php/var/run/php-fpm.pid`
    netstat -anpt | grep 9000
    
    
    • 1
    • 2
    • 3
    • 4
    • 5
    • 6
    • 7
    • 8
    • 9
    • 10
    • 11
    • 12
    • 13
    • 14
    • 15
    • 16
    • 17
    • 18
    • 19
    • 20
    • 21
    • 22
    • 23
    十、文件句柄

    linux/Unix上,一切皆文件,每一次用户发起请求就会生成一个文件句柄,文件句柄可以理解为就是一个索引,所以文件句柄就会随着请求量的增多,而进程调用的频率增加,文件句柄的产生就越多,系统对文件句柄默认的限制是1024个,对Nginx来说非常小了,需要改大一点

    (1)设置方式

    系统全局性修改
    用户局部性修改
    进程局部性修改

    (2)系统全局性修改和用户局部性修改
    vim /etc/security/limits.conf
    
    • 1

    在End of file前面添加4个参数

    image-20220723143500439

    soft:软控制,到达设定值后,操作系统不会采取措施,只是发提醒
    hard:硬控制,到达设定值后,操作系统会采取机制对当前进程进行限制,这个时候请求就会受到影响
    root:这里代表root用户(系统全局性修改)
    *:代表全局,即所有用户都受此限制(用户局部性修改)
    nofile:指限制的是文件数的配置项。后面的数字即设定的值,一般设置10000左右
    尤其在企业新装的系统,这个地方应该根据实际情况进行设置,可以设置全局的,也可以设置用户级别的

    (3)进程局部性修改
    vim /usr/local/nginx/conf/nginx.conf
    
    • 1

    每个进程的最大文件打开数,所以最好与ulimit -n的值保持一致。

    worker_rlimit_nofile 35535; #进程限制
    
    • 1
    十一、事件处理模型优化

    nginx的连接处理机制在于不同的操作系统会采用不同的I/O模型,Linux下,nginx使用epoll的I/O多路复用模型,在freebsd使用kqueue的IO多路复用模型,在solaris使用/dev/pool方式的IO多路复用模型,在windows使用的icop等等。要根据系统类型不同选择不同的事务处理模型,我们使用的是Centos,因此将nginx的事件处理模型调整为epoll模型。

    events {
        worker_connections  10240;    //设置连接数
        use epoll;
    }
    
    
    • 1
    • 2
    • 3
    • 4
    • 5
    十二、高效传输模式
    vim /usr/local/nginx/conf/nginx.conf
    sendfile on; # 开启高效文件传输模式。
    tcp_nopush on; #需要在sendfile开启模式才有效,防止网路阻塞,积极的减少网络报文段的数量。将响应头和正文的开始部分一起发送,而不一个接一个的发送。
    
    
    • 1
    • 2
    • 3
    • 4

    image-20220723145150981

    十三、proxy超时设置
    proxy_connect_timeout 90;
    proxy_send_timeout  90;
    proxy_read_timeout  4k;
    proxy_buffers 4 32k;
    proxy_busy_buffers_size 64k
    
    
    • 1
    • 2
    • 3
    • 4
    • 5
    • 6
    nginx通用配置优化
    #将nginx进程设置为普通用户,为了安全考虑
    user nginx; 
    
    #当前启动的worker进程,官方建议是与系统核心数一致
    worker_processes 2;
    #方式一,就是自动分配绑定
    worker_cpu_affinity auto;
    
    #日志配置成warn
    error_log /var/log/nginx/error.log warn; 
    pid /var/run/nginx.pid;
    
    #针对 nginx 句柄的文件限制
    worker_rlimit_nofile 35535;
    #事件模型
    events {
        #使用epoll内核模型
        use epoll;
        #每一个进程可以处理多少个连接,如果是多核可以将连接数调高 worker_processes * 1024
        worker_connections 10240;
    }
    
    http {
        include       /etc/nginx/mime.types;
        default_type  application/octet-stream;
    
        charset utf-8;  #设置字符集
    
        #设置日志输出格式,根据自己的情况设置
        log_format  main  '$http_user_agent' '$remote_addr - $remote_user [$time_local] "$request" '
                          '$status $body_bytes_sent "$http_referer" '
                          '"$http_user_agent" "$http_x_forwarded_for" '
                          '"$args" "$request_uri"';
    
        access_log  /var/log/nginx/access.log  main;
    
        sendfile        on;   #对静态资源的处理比较有效
        #tcp_nopush     on;   #如果做静态资源服务器可以打开
    
        keepalive_timeout  65; 
    
        ########
        #Gzip module
        gzip  on;    #文件压缩默认可以打开
    
        include /etc/nginx/conf.d/*.conf;
    }
    
    
    • 1
    • 2
    • 3
    • 4
    • 5
    • 6
    • 7
    • 8
    • 9
    • 10
    • 11
    • 12
    • 13
    • 14
    • 15
    • 16
    • 17
    • 18
    • 19
    • 20
    • 21
    • 22
    • 23
    • 24
    • 25
    • 26
    • 27
    • 28
    • 29
    • 30
    • 31
    • 32
    • 33
    • 34
    • 35
    • 36
    • 37
    • 38
    • 39
    • 40
    • 41
    • 42
    • 43
    • 44
    • 45
    • 46
    • 47
    • 48

    mote_addr - r e m o t e u s e r [ remote_user [ remoteuser[time_local] “KaTeX parse error: Double superscript at position 34: … '̲status b o d y b y t e s s e n t " body_bytes_sent " bodybytessent"http_referer” ’
    '“ h t t p u s e r a g e n t " " http_user_agent" " httpuseragent""http_x_forwarded_for” ’
    ‘“ a r g s " " args" " args""request_uri”’;

    access_log  /var/log/nginx/access.log  main;
    
    sendfile        on;   #对静态资源的处理比较有效
    #tcp_nopush     on;   #如果做静态资源服务器可以打开
    
    keepalive_timeout  65; 
    
    ########
    #Gzip module
    gzip  on;    #文件压缩默认可以打开
    
    include /etc/nginx/conf.d/*.conf;
    
    • 1
    • 2
    • 3
    • 4
    • 5
    • 6
    • 7
    • 8
    • 9
    • 10
    • 11
    • 12

    }


    • 1
  • 相关阅读:
    Linux系列之压缩命令
    React基础教程(07):条件渲染
    电子词典项目
    基于springboot农机电招平台设计与实现的源码+文档
    PY32F003F18之DMA串口
    中期国际2.19黄金市场分析:美国通胀数据火热,黄金面临高利率削弱的挑战
    golang 结构体标签 -- struct tag (八)
    vue 关闭当前tab页,并更新父组件数据
    PCIe寄存器之二
    【Pytorch Lighting】第 6 章:深度生成模型
  • 原文地址:https://blog.csdn.net/m0_68295979/article/details/125959147